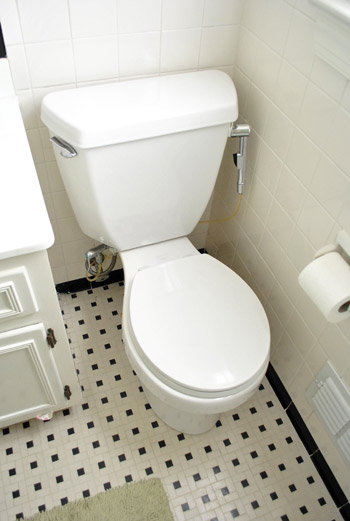
The toilet in our hall bathroom has rocked a little bit from the day we moved in (the inspector even noted it on our little home inspection form). Some people can fix this with plastic shims or tightening bolts, but we quickly diagnosed the issue as a rusted bolt under the toilet flange. That’s a fix that requires removing the entire toilet and replacing the bolt, so it took us a while to get to this to-do task. But here’s how I finally decided to seize the day toilet and show this rocking throne who was boss!
The process is similar to our toilet installation tutorial, but that project didn’t involve removing an old toilet first. So today you’ll get to see the fun part of removing an old, somewhat grody wax ring (along with some uncomfortable close-ups of the Petersiks’ potty). Sounds like fun, right? Don’t say I didn’t warn you. Let’s start with turning off the water.
Materials For Fixing A Rocking Toilet
Removing and reinstalling a toilet involves pretty basic hand tools (no power tools!) that most homeowners will already have around their house. The only thing you’ll probably need to buy at the store is a new wax ring kit, which is
- Flathead screwdriver
- Wrench
- Hacksaw
- Small putty knife
- Bowl, sponge, and/or paper towels
- New wax ring kit*
- White silicone caulk
*We always recommend buying 2 just in case… and make sure it’s the KIT that comes with bolts!
Step 1: Turn Off Water & Drain The Tank
Start by turning your water supply line valve clockwise to turn off the water. Try to do this by hand to avoid breaking the valve. If it’s stuck, try spraying WD-40 or even olive oil to lube the connection (don’t remove the screw!)
With the water off, flush the toilet to get as much water out of the tank and bowl as possible. Then use towels or a sponge to sop up the extra water by hand. And no, I won’t show you a picture of my hand in the toilet bowl.
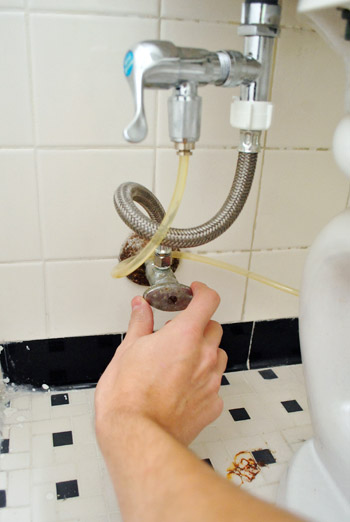
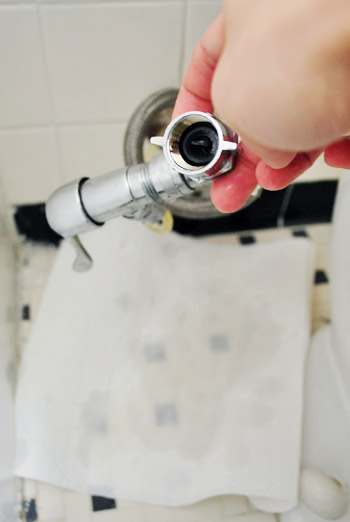
Step 2: Detach The Supply Line
Once things were pretty dry, I unscrewed the supply line from the bottom of the toilet tank. We’ve got a diaper sprayer attached so ours looks a bit crazier than your average toilet, but the idea is basically the same.
There was a bit of water leftover in the supply line, so I had some paper towels on hand to soak it up.
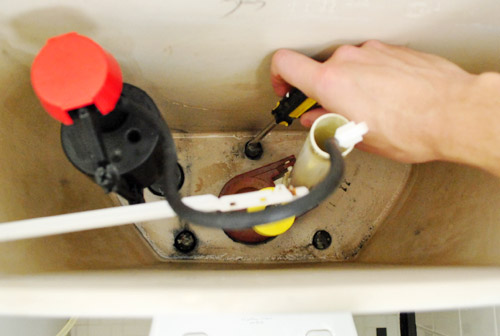
Step 3: Unscrew & Remove The Toilet Tank
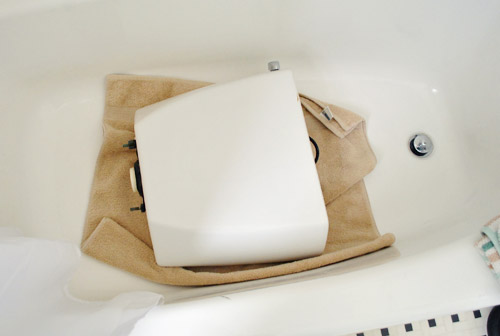
Next up was removing the tank, which is bolted to the bowl in three spots. I was pretty much able to do it with a screwdriver all from the top, but I did have to unscrew the nut from the bottom side at one point.
Once it was unscrewed, I lifted it up carefully and set it down somewhere soft and out of the way. In this instance, that meant an old towel in the bathtub. Oh yeah – we’re a classy operation ’round here.
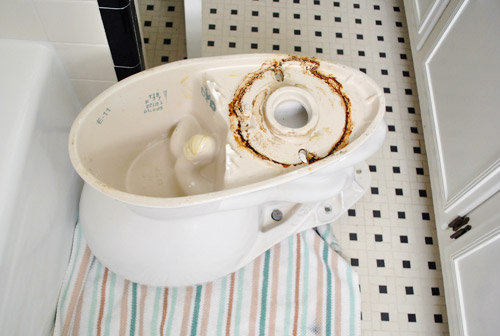
Speaking of classy: here’s our topless toilet.
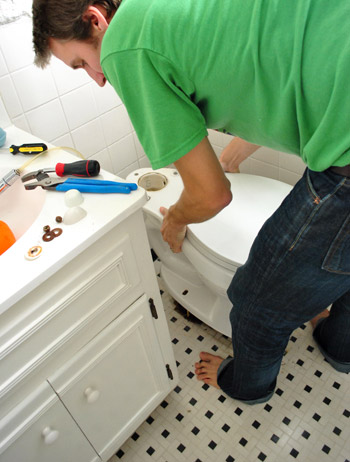
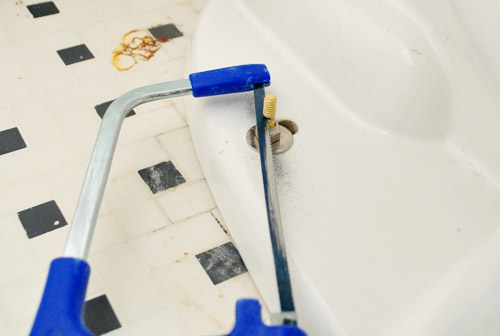
Step 4: Remove The Toilet Bowl
To remove the bowl, I used my wrench to unscrew the bolts on either side – this particular guy was the culprit for the rocking situation that got us into this whole mess:
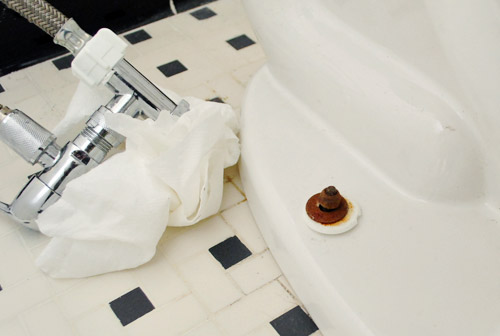
With both bolts unscrewed, I used a gentle rocking motion to detach the toilet from the floor. It’s stuck to the floor in place by a wax ring (just wait for that beautiful picture – it’s coming up!). But once you’ve got it unstuck, the bowl comes up pretty easily.
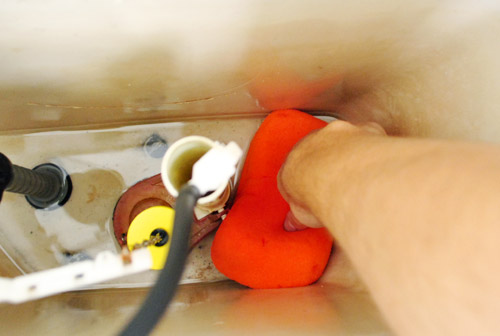
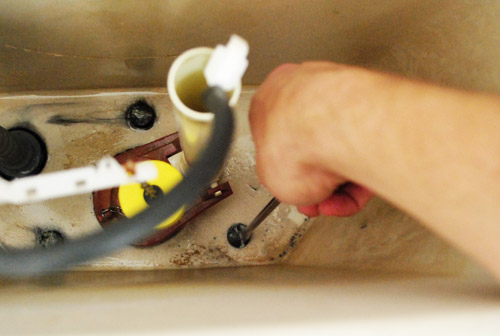
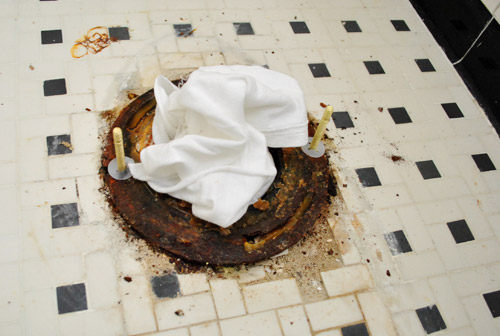
Step 5: Plug The Sewage Hole
And here’s that beautiful picture I teased. If you’re eating breakfast, you might want to stop scrolling. You can see I plugged the hole with an old rag to minimize the odors creeping back up and assaulting my nostrils. You just have to be careful not to put it in so deep that it gets lost into the sewer system. You might anger the Ninja Turtles living down there.
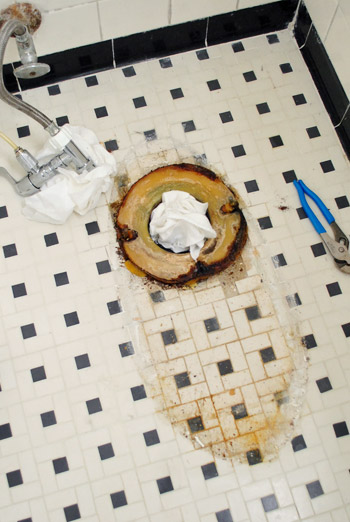
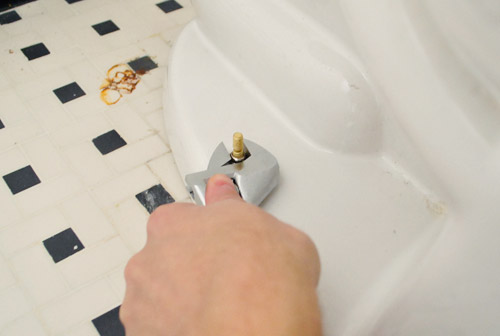
Step 6: Scrape Away The Old Wax Ring
Since the old wax ring had to come up to make room for the new one, I got to scraping it with a plastic putty knife. This is probably the grossest picture of the post, so please accept my apologies. But rest assured that it’s just wax and rust – nothing more.

Oh, and I made sure to remove the old rubber reinforcement ring too. This comes in some wax rings, so it shouldn’t be left in place (our new wax ring had one in it).
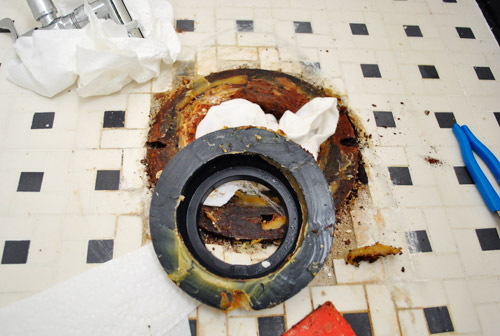
I also had to clean a little bit of the wax off of the base of the bowl too so it was all pretty looking. Well, pretty is probably a stretch.
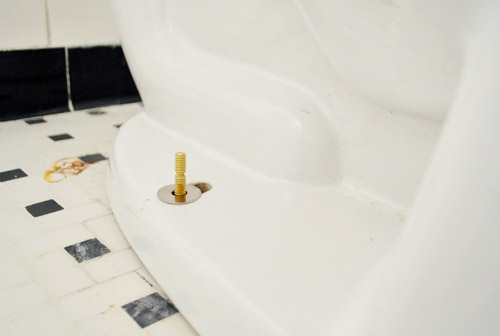
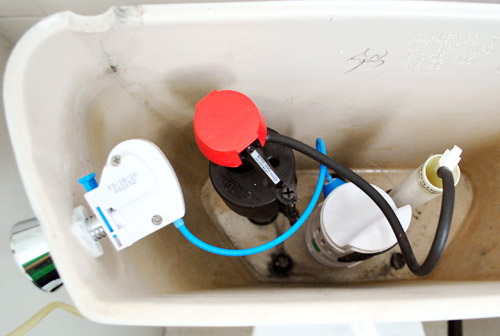
Step 7: Put The New Bolts & Wax Ring In Place
Here’s the new wax ring kit. It came with new bolts and everything for a whopping $7 at Home Depot.
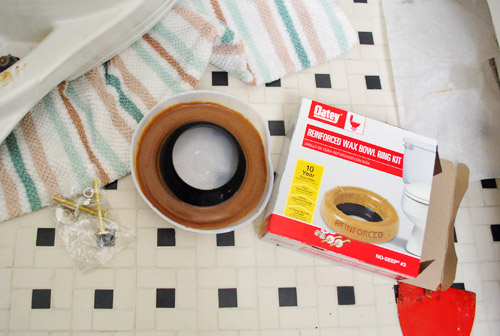
The new ring gets stuck to the bowl, not the floor. I just pushed it slightly down over the opening at the bottom of the bowl. Be sure to have an inquisitive chihuahua double-check your work.
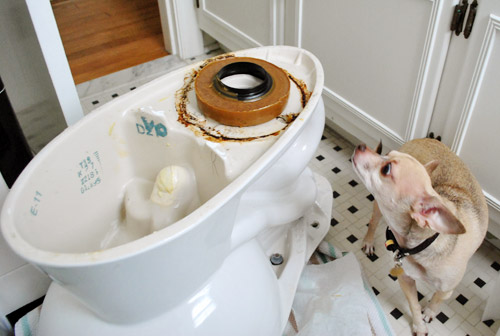
Oh, and of course the new bolts had to go into place around the flange (that’s the steel piece attached to the floor – ours is very rusty). And remember to pull up the rag right before you put your toilet back into place (so as not to meet the wrath of Ninja Turtles living in our sewers).
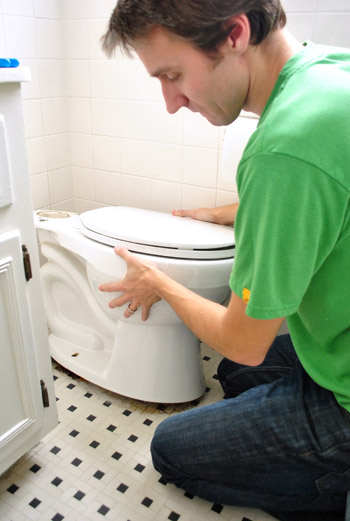
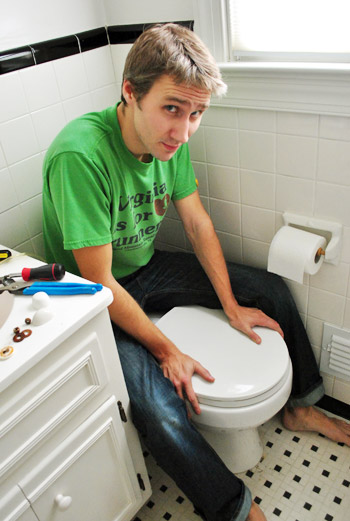
Step 8: Set The Toilet Bowl Back In Place
Then came the tricky part – which I’ve been known to mess up in the past – putting the toilet bowl back into place. It’s tough only because:
- They’re a bit heavy and
- You have to line it up perfectly over the bolts
But if worse comes to worst, you just pull it back up and try again (though if you’ve squished your wax ring too much you may need to put a new one on). That’s why I always buy two wax rings just in case. Better to spend an extra $6 to save a trip to the store (or risk a leaky toilet). Plus you can always return it the next time you’re at the store if you don’t end up needing it. Oh and this step can be helpful with two people (Sherry did once she was done taking this picture!)
Once we had the toilet placed and straight, well, I sat on it. This little bit of pressure squishes the wax ring into place to ensure that we were getting a good seal. I wish I could say this is the first post that featured a picture of me on the john, but alas…
Step 9: Tighten The Bolts
Once it felt pretty set, I went to work bolting it into place. You can see how the new bolts stick up nicely through the holes in the bottom of the toilet bowl. Note: that is not a hairball on the floor, it’s a weird rust stain that has been there since we moved in. So we plead the fifth.
I hand-tightened the nuts most of the way, but used a wrench to finish things off. The thing about a toilet is you don’t want to over-tighten because it can easily crack the ceramic. So just be sure to do this slowly and go back and forth tightening each side a few spins for an even installation. You can also break out a level if you really want to make sure.
Step 10: Cut Off Excess Bolt Length
Your bolt will likely be a bit too long for those little plastic covers to fit over them, so use a hacksaw to saw off any extra length.
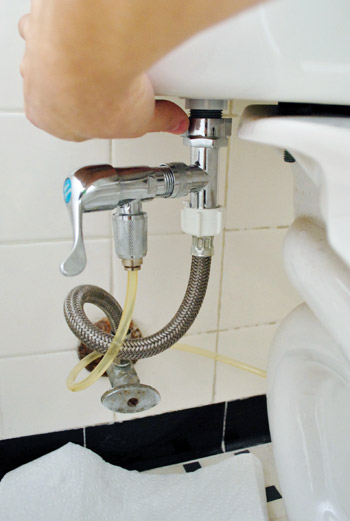
Step 11: Reattach Your Toilet Tank
Bowl securely in place? Check. Not rocking anymore? Check. Now it was time for some tank action. I put the tank back into place on top of the toilet and screwed it in. Again, not too tightly because I didn’t want it cracking. But enough so that it felt secure and I didn’t think it would leak.
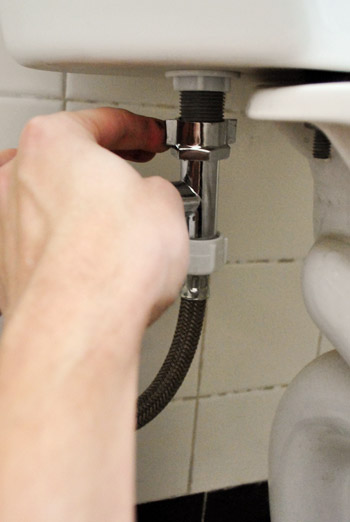
Step 12: Reconnect Your Water Line & Check For Leaks
And last but not least, I reconnected the water supply line so we could refill the tank and bowl. Be sure to check for leaks around the base of the bowl, the bottom of the tank, and where the water line is connected.
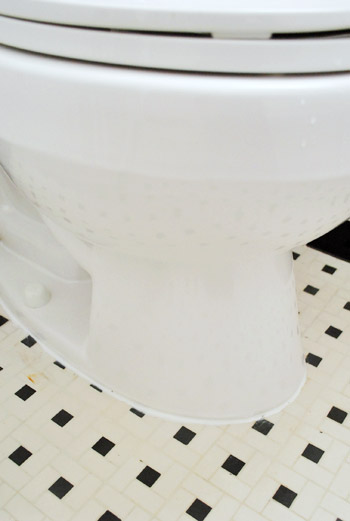
Step 13: Caulk Around the Base Of the Bowl
All of that checked out okay, so I ran a line of caulk around the base of the toilet. I only did it around the front 75% of the bowl so that if a leak were to happen in the future, it could escape out the back and alert us to the issue (that’s a little plumber’s trick we learned a few years back for ya).
BONUS: Add A Dual-Flush Converter Kit
This is usually where a toilet replacement adventure would come to an exciting conclusion, but we used this as an opportunity to install a dual-flush converter kit to this toilet.
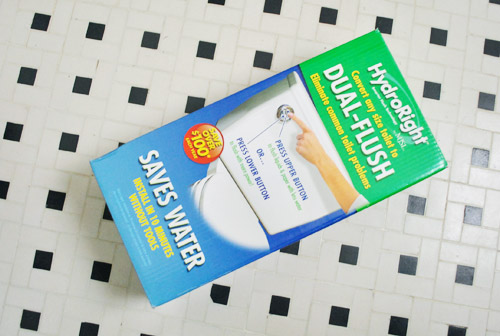
We did this in our last house so you can read our more in-depth dual flush toilet conversion tutorial. But basically, this $25 converter kit lets you take a normal toilet and give it two flushing options: a lighter flush for, um, lighter “activities” and a fuller one for the, you know, other stuff. Hooray for saving water (and money) and pretending your toilet is from the future.
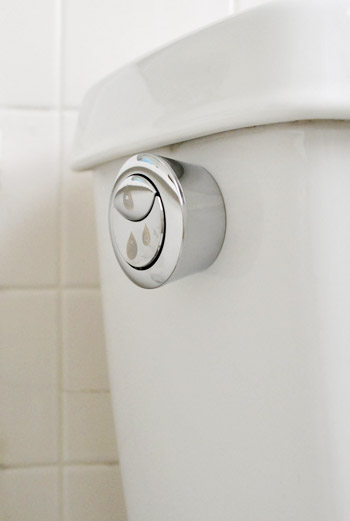
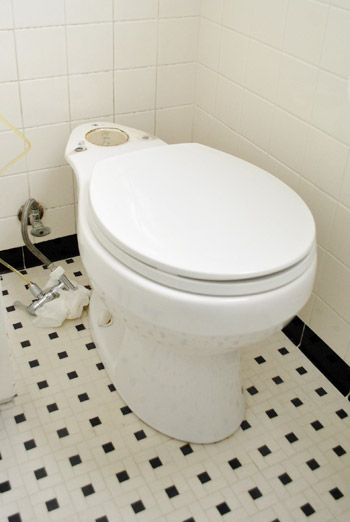
The installation was a cinch compared to the whole wax ring replacement stuff. Here’s a shot of the finished product.
And for the grand finale – and “after” shot of our now fixed, now dual-flushing toilet. Sure, it looks pretty much the same. But just try sitting on it. It’s soooooo much better. No more seasick-esque motion. No more shouting a warning to guests who head down the hall to use the facilities.
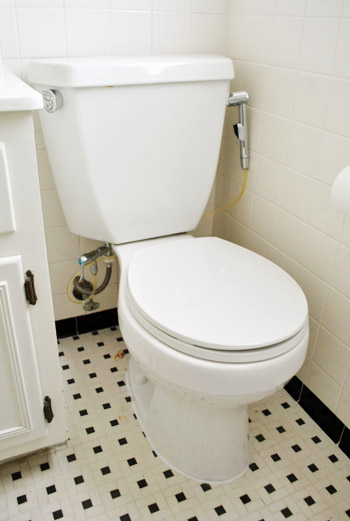
And admit it, that diaper sprayer on the right is hardcore. Like our toilet is wearing a little holster or something…
Psst- Now that I’ve assaulted your eyes with toilet pictures, check this out (it’s much cleaner and sweeter).

Anne says
This may sound odd, but have you tried using Coke (the soda) on the rust stain? I haven’t tried it on a floor, but I have soaked things in it before to get off rust and corrosion. Just a thought. You could also ask at the tile store.
YoungHouseLove says
Oh yes that’s my brother (the doctor of chemistry)’s tip! Will have to try it!
xo,
s
Maya says
Have you tried citric acid? I don’t know how hard it is to find in the US (it’s common here in Israel where people use it to get calcification of electric tea kettles and such) and I’ve used it to get up some rust stains that I thought were permanent. Just get the stain damp, sprinkle on the citric acid, let it sit, scrub it off. I don’t know how “green” it is, but it IS technically edible (I’ve heard unsweetened koolaid is high in citric acid) so it can’t be too bad!
YoungHouseLove says
Good to know!
xo,
s
suzi says
You can use the lemonade flavor of kool-aid for the citric acid.
YoungHouseLove says
Nice!
xo,
s
Ye Jin says
We have the exact same floors in our 1948 home. I found a thing on pinterest where you squeeze a lemon, allow it to sit with salt for 2 hours, and scrub with the lemon. It totally worked – I guess it is an acid thing b/c Vitamin C is ascorbic acid. Citric acid – you can find in the canning section in a small baking powder like container. But try the lemon – I swear it worked! And I tried everything! Good luck :)
Maya says
Ye Jin, it’s funny you suggest that, because in Israel citric acid is actually known as “lemon salt” (melach limon)!
Maya says
Btw “barkeepers friend” is basically just citric acid, and citric acid truly is a super versatile cleaning product… I use it on my counters (don’t know what they are, but they’re something like Corian) whenever they get stained, and it’s amazing on porcelain fixtures too. It’s also great for playing pranks on fellow cast members on the final night of a show when they’re supposed to salt their food onstage (shhh) /DoneLobbyingForMyFavoriteCleaningProductNow/ :)
Liz F says
Citric acid or just lemon juice straight from the lemon! That stuff is amazing :D
Jennifer Hayes says
You ban buy citric acid at Williams Sonoma!
Debbra says
Try Whink rust remover, works great, no scrubbing!
Angela R. says
Have you tried Whink? It’s a rust remover. I’ve used that on old cast iron bathtubs that have had rust issues.
Thanks for doing this post- our toilet has been rockin’ for the last 7 years I think. I’ll have to show this to my dear hubby! Actually, I might even just have to do it myself some day and see if he notices!!
YoungHouseLove says
Love all the tips guys, thanks!
xo,
s
Amy @ this DIY life says
Looks like a fun time ;) As for the rust stain, Mr. Clean magic eraser? Baking soda paste? Toothpaste? Potato dipped in baking soda (takes it off cast iron pans)? Just a few ideas.
YoungHouseLove says
All great ideas that I haven’t tried! Haha. Will keep you posted!
xo,
s
Kristen @ Popcorn on the Stove says
I must be twelve because bathroom humor cracks me up. I’m still giggling about “topless toilet”. Haha.
When Joe and I were on our honeymoon in the UK, it felt like everywhere had those dual flusher buttons. I’m a fan of them (well, after I got used to them, of course).
Rhune says
If you’re twelve, then I’m eleven. Because I actually visualized Beavis & Butthead having a field day with this toilet post.
By visualized, I mean vocalized. /shame
Kristen H says
Must be toilet week – My sister’s was leaking, so I put all new guts and a supply line in it on Sunday. I’m intrigued by the dual flushy thing though. Might have to head back to Home Depot.
Oh, and get on that dishwasher install will ya? :D My new one arrived yesterday, and I’ve decided to tackle it myself. Got it for a STEAL. Originally $800 bucks, I got it for $368 plus tax and free delivery! yay me! :) I have a builders grade one in my kitchen now – only a couple of years old. But it is so loud, you can’t hear anything on the whole first floor when it is running (open floor plan)> This new one is 12 dB quieter and Energy Start compliant, so here’s hoping! :)
YoungHouseLove says
It’s on the list next! Can’t wait to get it done!
xo,
s
Jill Stigs says
I know you guys are “anti-chemical” but I swear by using a product called Whink. It comes in a oval shaped brown bottle and if it’s not at the grocery store, check a hardware store. Works miracles. Really.
I am going to do the caulk thing….will make mine look way better. thanks!
Jill Stigs says
http://www.whink.com/index.cfm?fuseaction=cEcommerce.Product&ProductID=4328&CategoryID=1535
YoungHouseLove says
Thanks for the tip Jill!
xo,
s
Dee in BC says
will a cleaner like CLR do the trick for the rust? Just be careful not to let it seep into the grout as I think it could damage or visibly lighten it. We had a few spots on the ceramic tile of our last hpuse where nothibg seemed to make them come clean ( Actually I think it could be that someting had damaged the surface & thisis why it wouldn;t clean up) I used an appliace touch up paint that matched the white tile quite well. At least the spots were then less visable. I did need to retouch every year or 2 but we couldn’t afford to tear up the tile and this was better than having a floor that looked like it had dirt spots on it.
YoungHouseLove says
Thanks for the tips everyone! Love it!
xo,
s
lindsay says
Eee! So stoked to see you guys on Friday night! Is there a way to buy advanced tickets???
YoungHouseLove says
Friday night? We’re in Portland on Wednesday the 22nd. Is that what you’re talking about? So sorry, we’re confused! Haha.
xo,
s
Valerie says
If you want to remove the rust stain get some Bar Keeper’s Friend (I use the powder) and it will be gone in 2.5 seconds…
http://barkeepersfriend.com/
I had some rust stains when I moved into my apartment that were unsightly and this was the only stuff that got rid of it…
YoungHouseLove says
Thanks for the tip!
xo,
s
Connie says
Here’s another vote for Barkeeper’s friend. It’s inexpensive and no fumes, etc.
I bought it when I had a porcelain sink, but also use it on my current stainless steel sink. It temporarily makes the stainless steel sink look a little “dryed out” for lack of a better term, so I spray furniture polish all over the sink and wipe it out and it looks like new!
Sarah R. says
I can’t believe I lived so many years without knowing about BKF. Best stuff ever!
Katie says
Another vote for Bar Keepers! I often leave bobby pins on the tile on the side of the tub and they rust so quickly. This removes the stain in an instant. With other cleaners the stains hardly budge.
heather says
Another vote for Bar Keepers! It keeps my porcelain sink all pretty and my pots and pans and any other tough thing I need to get clean without much scrubbing or effort and no fumes. Loovee the stuff. It was a requirement from my Dad when he bought me some AllClad haha.
Elise says
I was just going to suggest BKF. It really is amazing stuff and no fumes or anything. I used it on horrible rust stains in a place we rented a few years back and was amazed at how easily it cleaned everything.
Sara Philly says
I LOVE that dual flush kit! I didn’t even know they existed. Definitely have a weekend project now. Thank you!
Angela M says
We have lived with a wobbly toilet for 2 years… but we live on a slab thats not level in that particular spot. The people that lived there before apparently tried re-caulking the front end over and over and it looked gross. We cleaned that mess up! But we’ve tried shoving wood paint stirrers under the front but that doesnt help. I think we’re just stuck with our wobbly john! Glad you got yours fixed! If you have any suggestions for me, they’d be appreciated :)
YoungHouseLove says
Aw man, they actually sell plastic little toilet shims that might help! Or just embrace the imperfection of a rocking toilet! Haha.
xo,
s
Laura says
Seriously, Captain Safety???? Barefoot and holding a toilet? I’m waiting for the post where you go to the ER with a severed toe or two. :)
YoungHouseLove says
The way the toilet goes down with two people doesn’t really give anyone the opportunity to get a toe under there (the way that you straddle it with your legs on either side would make it really hard to curve your legs back under and get toes under it)! Sorry if it looks crazy but it’s very slow movements with two people holding just the base up, so nothing toe-related really happens unless you’re not being careful. Haha. And you know Captain Careful…
xo,
s
Corien says
oooo, you are a TRUE HERO, John.
bridget b. says
what was the difficulty level of sawing of the long part off the toilet screw so the plastic caps could fit over them? i have this issue with my toilet and for some reason i’m kind of wary of trying it. our screw is pretty rusty, so i’m wondering if that would make the job harder…
thanks!
YoungHouseLove says
Difficulty level 1: if you can slice fruit you can do it. Just get a cheap and simple hack saw (they’re usually just a few bucks) and go back and forth. Will probably take you 50 times back and forth, but they should pop right off eventually (whether they’re rusty or not). Hope it helps!
xo,
s
Justin says
We just made the switch to cloth diapers (thanks to your posts on the topic), and also got the diaper sprayer for the toilet. FYI – They changed the plastic tube to a chrome one now, so it looks a little nicer. Installing it was pretty easy! We love it, and the cloth diapers, not to mention the massive amount of money we are already saving.
Have you tried CLR for the rust spot? Or steel wool? Or a combination of both?
YoungHouseLove says
Ooh that chrome tube does sound nice! And we haven’t tried CLR or steel wool, but we’ll have to give it a go!
xo,
s
Priscila P. L. says
Steel wool and your favorite cleaning product will definitely work. I’ve already used this trick to make plated taps look like new. Hope it helps.
Mary says
I’m glad you explained the diaper rinse thingy. From the very first photo, I was thinking….what the heck is that?? Great idea! I used cloth diapers too for my (now adult) babies.
Merideth says
Do you ever caulk the other 25% around the toilet? Or do you leave it that way forever?
By the way, I love these in depth how-to posts…thank you so much!
YoungHouseLove says
We’ve heard you should always keep the back part open so at any point if it starts leaking it won’t be all sealed up under the toilet rotting the floor and you’ll see it come out the back and be alerted of the problem!
xo,
s
Merideth says
Nice – I’ll be checking my toilets when I get home!
Emily says
I don’t know, Mike Holmes (Holmes on Homes) told me (via the TV) never to caulk a toilet. I pretty much think he is god, but perhaps the 75% thing gets you around that.
YoungHouseLove says
Yes, I believe the trick is just to leave some of it open to see if there’s water leaking out (local plumber friends have taught us that, at least).
xo,
s
Allyn says
John on the john. Ha.
Sitting on a wobbly toilet can very effectively scare the living daylights out of my if I’m not prepared. Not sure exactly what it is that I think will happen (death! dismemberment! being soaked in noxious substances!), but it always makes my heart skip a beat.
I love the dualflush idea. We might need to look into that!
Krystle @ ColorTansformedFamily says
Thanks for the post. Hopefully we can use this when we get around to our bathroom redo. I think I’ll leave that job to the hubs though. Just the pictures were starting to make me a little queasy. I am use your photo shoot guys appreciate the fix.
Lauren says
Long time lurker, first time poster! I swear by Bon Ami (basically same thing as Barkeepers Friend but in a cuter container). It’s super cheap and gets the rust off of EVERYTHING. I use it on my stainless steel pans and ceramic sink – its never scratched a thing. Happy de-rusting!
YoungHouseLove says
Thanks Lauren!
xo,
s
Rachel Tatem says
My husband and I just did that less then a month ago. The wax takes forever to get off your hands!
Jess @ Little House. Big Heart. says
Thanks for the tutorial! Kev and I are starting to plan our DIY bathroom reno, so this will definitely come in handy!
Vidya @ Whats Ur Home Story says
The rocking toilet! LOL! I’m big fan of the dual flush too. We have these at the office and they are good. By the way, we just installed floating shelves in our family room. Going back and reviewing your post about filling up the kitchen shelves so that I can spruce up mine too.
http://whatsurhomestory.com/wp-admin/admin.php?page=stats
YoungHouseLove says
Aw man, looks like the link is messed up. Would love to see it though!
xo,
s
Vidya @ Whats Ur Home Story says
Oops….
http://whatsurhomestory.com/im-floating/
YoungHouseLove says
So pretty! I love it! What an awesome hanging job too! They’re all so straight and even!
xo,
s
Vidya @ Whats Ur Home Story says
Thanks Sherry. Can’t take credit for the hanging. We got it done professionally. Long story…..
Anne says
Try Magic Erasers, but don’t ever get the off brand! (They disintegrate faster). It’s the only thing I know of that has successfully worked for us for removing little rust stains like that, soap scum in the bathtub/shower, AND that little red stuff that collects in the shower because of hard water! Good luck!
YoungHouseLove says
Thanks again for all the tips everyone!
xo,
s
ESBlondie says
Only YHL can make toilets fun! Thanks for another great detailed post :)
Rachel G. says
Such a timely post as we have a toilet in our guest bathroom that also “rocks” out. It drives me nuts (and has since we moved in two years ago). I always thought it was because the floor in the bathroom was uneven, which doesn’t make a lot of sense since we live in a brand new house, but I guess it is possible. So is that a major indicator of a bum wax seal? If that’s the case, it will definitely go on my daddy-do list for the next time my dad is in town (my hubby=not so handy).
YoungHouseLove says
Oh yes, if it rocks, the wax ring probably isn’t perfectly sealed anymore and it could just be loose bolts – both of which can be remedied with a new wax ring kit (it comes with all those parts new). Good luck!
xo,
s
Ellen says
We installed that same diaper sprayer a few days ago! I heard about it here first!
YoungHouseLove says
Wahoo! Hope you love it as much as we love ours!
xo,
s
Brandi @ His Shabby Her Chic says
We’ve been doing some work to our bathroom lately too. We actually added a toilet to a bathroom that didn’t have one. Weird right?? Who takes a toilet out of a bathroom??
http://hisshabbyherchic.com/2012/02/16/master-bathroom-almost-reveal/
YoungHouseLove says
So pretty! And so funny it wasn’t there before!
xo,
s
Julie M. says
We are getting ready to replace a cracked toilet. One tip I have is to use newspaper to plug the hole. That way if you push it down to far or forget to remove it, it will just break up and flush down.
YoungHouseLove says
Ooh that’s a good one!
xo,
s
Kala M. says
I love the Ninja Turtles references. My husband was and still is a big Ninja Turtles fan. For Christmas one year my mom bought him a Ninja Turtle Snuggie. It even has a hood with the eyes on it so he looks like a giant Turtle. LOL.
YoungHouseLove says
We like to say that we have Ninja Turtle Feet when we inexplicably find ourselves wearing socks around the house and then throwing on flip flops to go outside to grab something. It’s a very strange look indeed.
xo,
s
Amanda says
Thanks for the info on the 2 flush converter. We might install that in our house.
Also, Barkeepers Friend will get rid of that rust stain and is not as caustic smelling as CLR. I like the gel version (most grocery stores have the powder, Bed Bath and Beyond has the gel also).
YoungHouseLove says
Thanks for the tip Amanda! You guys are so great about sharing info!
xo,
s
SherriEakin says
Yay for Ninja Turtle references! Great tutorial, thanks!
Shannon @ Bungalow960 says
The ninja turtles comment just killed me. They are my favorite! I also don’t feel so afraid of replacing the toilet in our main bath anymore, so horray for that.
Marlayna says
Hi Guys!
Thanks for the low-down on that gross toilet seal! :) Such good tips…and now I’m not going to be afraid of fixing an old clunker. :) This post was coincidentally perfectly timed for an article I read yesterday. It was a super easy how-to on Alicia Silverstone’s blog about saving water by installing a 1/2 gallon jug into your toilet tank for a lower flow! Cheap and easy and impactful! To me = fun :) haha http://www.thekindlife.com/post/kind-classics-eco-bathrooms
YoungHouseLove says
Oh yeah that’s a great tip!
xo,
s
Lindsey says
Can I just offer a word of advice on this? If you do add something to your toilet tank for lower flow, make sure the water doesn’t flow up and over the overflow tube thing! We decided to add a few bricks to our toilet tank to reduce the flow, but it actually made the water level rise and keep running 24/7 and we ended up with a $150 water bill (it’s usually $50). It was totally our fault because we just didn’t know enough about how toilets work, and we have a super crappy toilet. Anyway, hopefully this will help someone lower their water use instead of actually wasting a TON of water…
Kristy says
Love the diaper sprayer too! Our daughter is just a month older than Clara and is potty training. I think it is because she sees what happens with the diaper sprayer!
Jessica @ The Desert Abode says
We just installed a dual-flush kit(looks like the same one you purchased) after reading your post of yore. It’s such an easy and inexpensive way to go green. I’m kind of surprised that more people don’t make the switch!
YoungHouseLove says
Wahoo! Enjoy it! We were sad to leave ours at the last house so we’re glad we have it back up and running here!
xo,
s
Emily says
I’m not gonna lie, maybe I pee more than others, or maybe I use to much TP, but whenever I travel abroad I never use the smaller flush, because it just doesn’t seem to get everything down. I like the idea, but in practice, it hasn’t worked for me.
Jennifer says
Bar Keepers Friend will take that rust away! Give it a try – amazing stuff.
Ashley@AttemptsAtDomestication says
I’ve never heard of the dual flush converter, but it sounds pretty nifty! I’m going to have to run that by Hubby!
karen serna says
i also recommend bar keeper’s friend! love that stuff!
Ericka says
I had a giggle from the Ninja Turtles reference:)
Maureen @ This (Kinda) Old House says
I want one of those dual flushers. Very cool. Our bathroom adventures will be continuing tonight when we caulk/putty all these lovely boards in our bathroom:
http://thiskindaoldhouse.com/2012/02/boarded-up/
Jenny says
My husband told me that caulking around the bottom of the toilet might not be a good idea for the reason that if water starts to leak under the toilet you actually won’t have any way to know that its leaking and the water, if enough will have to go somewhere. Could get inbetween cracks of tile under toilet and rot the wood under the toilet. You should double check on caulking around bottom rim of toilet.
Jenny says
Oh… I just saw that you only caulked around the front of bottom toilet rim…
Maddie says
Love it! I clicked on to your last dual flush post a few months ago, and was inspired to update our toilet in the townhome we had just moved in to. John made it look so easy, and I really thought it would only take 10 minuets…
We have a bathroom counter over half of the tank, so we had to remove the entire toilet tank first, then turns out older toilets (ours was 15 yrs old) that still have ballcocks need a converter kit (made by the same dual flush people). We picked one up (trip #2 to the hardware store), then the overflow valve broke – we didn’t even touch it, it just leaned over and cracked in half, so back to the hardware store we went. . . Long story short, it took about four hours and three trips to Menards, but I never would’ve attempted it without your first post.
Thanks for inspiring me to do something I never would have considered in the past! After a few months, I love the dual flush and we save so much water, so the crazy installation was totally worth it.
YoungHouseLove says
Aw man, so sorry about the broken valve! Old toilets are so quirky! But so glad you got it done and have been saving water ever since!
xo,
s
Emily says
The flush more/less buttons are mainstream in new toilets in Ireland. One of the few things they’re very forward on over here!
Margie M says
We just replaced a whole master bathromm, carpets and flooring clear down the hall and into the office and guest bath because of that cute little nut that attaches the water line to the toilet tank cracked and started leaking in the middle of the night. Not great to jump out of bed and step in 2″ of running toilet water. All this damage took place in about 3 hours. We have checked all water lines and made sure we no longer have any plastic nuts anywhere. Many $$$$$$ later.
Shaye says
I just saw a tip on Pinterest about using a pumice stick from the hardware store to get rid of rust stains in sinks and tubs. I don’t see why it wouldn’t work on tile. Best part? No chemicals!
LMN says
When my boyfriend and I moved into a new apartment last summer, we found ugly rust stains on our marble sink top and shower shelf. Magic Eraser was no match for these stains, but what did work was creating a poultice and leaving it on the stone for 24 hours (my fervent Googling brought me here: http://www.housekeepingchannel.com/a_121-Removing_Stains_From_Stone_Tile_and_Concrete). I mixed diatomaceous earth and Iron Out with a little water, and despite my serious skepticism, it took the rust stains out with no scrubbing whatsoever.
YoungHouseLove says
Great tip LMN! Thanks for sharing!
xo,
s
Eleanor@SavingOurWay says
Love the barefoot work! Totally cracked me up!