When we spotted these odd little metal cups for $1.50 a pop at Goodwill (which you may have noticed in our recent Halloween post) we decided to take them home for a speedy little spray paint makeover. We fell in love with the little cut-out shape and since we already had yellow and white spray paint around (thanks to this project and this project) we got right to work.
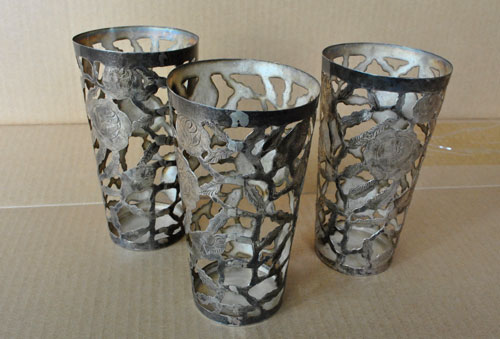
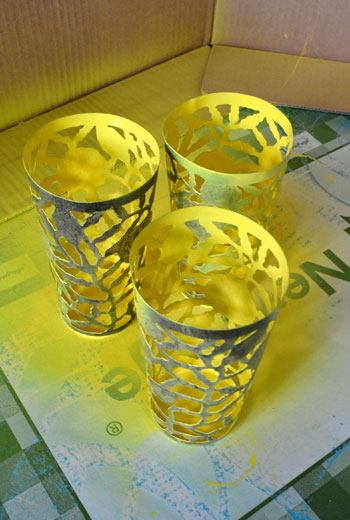
Our concept was to make the inside of each cup yellow and the outside of each one white, just for a little two-tone fun. So we thought up a few ways that might work when it came to accomplishing that effect. First we debated spraying the whole thing white and then covering the outside with painter’s tape and then spraying in the inside yellow. But we reasoned that it would be harder to spray the inside of the cups (and the painter’s tape might peel off the new-ish paint) so we decided to start by spraying the inside of each cup with yellow paint, which of course got on the outside a bit as well:
Then instead of messing with painter’s tape we decided to try rolling up a piece of white paper and slipping it into each cup (to hopefully shield the yellow spray painted interior from the coat of white spray paint that we then applied to the outside).
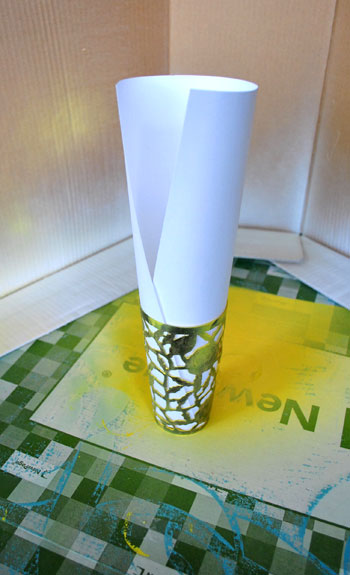
Here’s what it looked like after that coat of white was added:
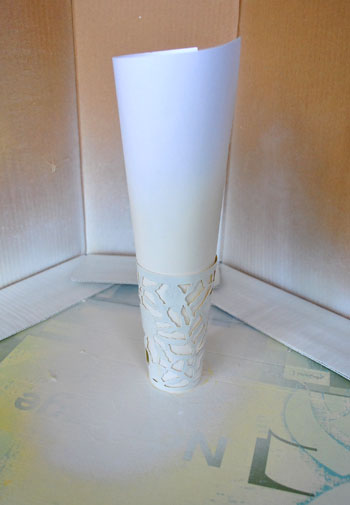
We had no idea if it would actually work, so when we removed the rolled up piece of paper from each cup after the paint dried, we were pleasantly surprised to see that we were left with a nearly perfect result:
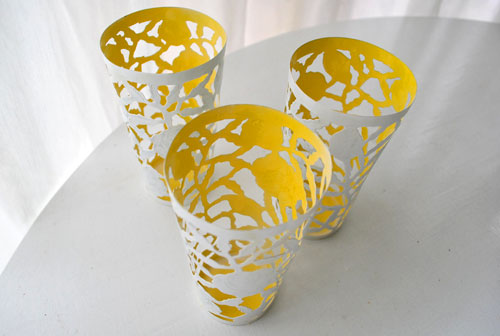
And it honestly only took about three minutes to complete the entire project (not counting the five hour drying period that we allowed for after spraying the yellow and before slipping in the white sheets of paper in and spraying the outside white).

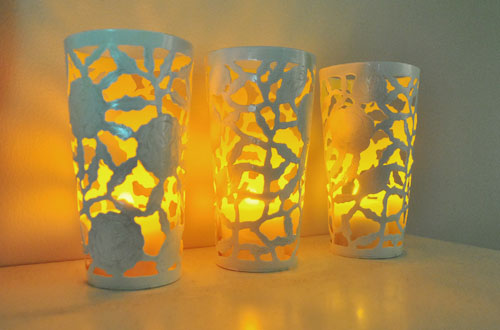
We love the idea of using them for flameless candles so the yellow interiors are illuminated without the risk of setting our whole house on fire. You know, because that would be bad.
What about you guys? Are you spray painting anything in a two tone finish? Are you morally opposed to faux candles because you think they’re tacky (you know those small battery operated fake-os)? I must admit I resisted them for a while but for things like this they’re tres handy.

kristi bishop says
Hi Sherry,
okay are you sitting down??? this is not something i spray painted but i DID find it at goodwill…are you ready? A Jonathan Adler lantern vase!!! with the stamp on the bottom and all. as soon as i got home i looked it up it is selling for $98. I swiped that puppy up for a mere .99 yes 99 cents!!! i knew you would appreciate my find.
i love the painted cups btw. have a good one!
YoungHouseLove says
Uh.Mazing.
Congrats on your big score!
xo,
s
Carmel @ our fifth house says
I was just at Goodwill today; and found 2 ceramic birds that made me think of you and 1 ceramic owl that me think of Katie :) I didn’t buy them but I did buy an awesome side table (totally the hubs style) for $6.50! No spray paint needed, but I do love how your 2-toned look came out!
Carmen says
I love these! What a unique idea. I much prefer real candles but honestly you can’t beat the battery operated candles. They are much easier and definitely safer. We’ll use the tealights for all our jack-o-lanterns this year again. I wouldn’t mind also having the pillar LED lights, that way I could “light” them on my mantel without fear of burning my house down.
christie says
Awesome! I love how they came out. You have such a great eye. I would have never thought to do that, but I really love the two toned paint and how the yellow reflects the candlelight!
Rebecca Foxworth says
I looked it up. And I found out that, “6,780 homes were destroyed by fire in a four year period” in the United States. Um…yeah…I like the fake candles. Plus, they don’t burn children, either. I’m a “flameless” fan.
Rebecca Foxworth says
Oh, and when I read the title, I thought you were about to make some great Breast Cancer Awareness Month post. Ha!
Kari says
LOVE LOVE LOVE THEM!!! What a unique accessory…I think my Goodwill needs an overhaul!!! LOL! :D I love the two tone, looks fabulous!!
JC ~ Palm Springs UK says
Wow, that is so cool. I love how you did that…I think I might shamelessly steal that idea and apply it to something in my house. Exciting! Love your blog x
Kim says
ok really! How on earth do you come up with these ideas. I would have never thought of a project like this if I saw these in the Goodwill store.
Adam R says
The two color finish turned out wonderful, what a great idea!
kelly says
Love, love, LOVE IT!!! :)
antonia says
Great idea! They look awesome! Almost like those cut-out paper decorations.
Cindy says
I love this color combination! I’ve been trying to decide what color to paint the walls in my dark kitchen, and was thinking “butter and cream” and now that I see the colors together, I can’t wait to get started painting!
susan says
Very, very clever. Where did I put my spray pain? Susan
Kristin says
Beautiful!
I’ve got one question regarding spray painting: Did you paint the bottom of the cups as well and, if yes, how?
YoungHouseLove says
Hey Kristin,
We left the bottoms unpainted (shhhh, don’t tell) but had we wanted to paint them we probably would’ve start there first and just stood the cups upside down, given a light coat to the bottoms only and let it dry before proceeding with the rest of the project.
-John
leanne says
Hey guys! This is a GREAT idea. I love that you used two colors, instead of one. I’ll have to try it myself next time. One question…I guess it’s okay not to use primer on metal? I’ve always used it when making over anything brass, but I’d love to skip that step if it’s not necessary. thanks for another inspiring project!
YoungHouseLove says
Leanne,
Just make sure whatever spray paint you’re using says it works on metal. If it does, then you should be fine without primer (as long as it’s not super rusted)!
-John
Julie says
Love them. They look great!
Rachel @ The Avid Appetite says
These are so adorable! And the best part is that you can always redo them if the mood strikes, though I do love the bright and cheerful color combo that you chose! Love it! Spray paint envy continues…
Jennifer says
Great project. I gotta tell ya…I Love the flameless candles Ours have timers so they come on at the same time every evening and I dont have to remember to turn them off, as they automatically go off 6 hrs later. They are a little more, but the peace of mind is worth it.
Cher says
This is so relevent to me. I am going to attempt to paint two large brass planters from India that my neighbor gave me (freebie :)). Someone told me to use a self-etching primer (?? – hopefully I can get it at home depot) so the paint will stick to the metal and not peel. Have you all used this before?
YoungHouseLove says
Our experience with metal is that it takes paint really really well, so we have never needed to use primer (even on hot metal fireplace doors). It couldn’t hurt though. Hope it helps!
xo,
s
Tiff Morrison says
LOVE this
katie kindness says
i think the people who donated the metal cups would like them back:) Love the look!
Etcetorize says
Love, love, love this project. I know what I’ll be on t he lookout the next time I’m in the 2nd hand shop!
Dayna Coronado says
So Awesome. I cannot say enough what wonderful ideas you all have! I have a question- if I am spray painting a round mirror that is gold now, white (Like those fab animals you love), how do I tape it exactly? Thanks so much!
YoungHouseLove says
Hey Dayna,
We would try to tape off the edge with painters tape as well as possible and then spray. Once everything’s dry, remove the tape and carefully use a straight razor to scrape any paint off the surface of the mirror. You could also try to cut a piece of cardboard in the round shape and just put that down over the mirror before you spray to protect it and hug the round edges. Good luck!
xo,
s
MB says
Those are fantastic! I’ve been reading your blog for some time now and really enjoy it! Thanks for all the inspiration and have a happy weekend.
Monique says
What brand paint did you use? Was it low VOC or low odor? Thanks!
YoungHouseLove says
Hey Monique,
We always have an eye out for low or no VOC spray paint, but alas, we haven’t found any yet (although we’re sure people will hop on that bandwagon soon). Instead we just spray everything outside while wearing masks and let it thoroughly dry (and offgas) before bringing it in. We haven’t had any odor issues at all from that method. Hope it helps!
xo,
s
Jenn L @ peas and crayons says
OMG so funny – I’ve been spray painting fun finds all week. So much, in fact, that my pointer finger has a giant spray-paint-can-tip sized blister on it (owwww!) No pain no gain! Haha
I love the two tone finish! Homegoods had some similar vases/candle holders last week that I was drooling over.
Crazy awesome vase
Holly says
Love them! I am going to have to keep my eyes open for something similar.
I did steal some of your other Goodwill/spray painting ideas. I bought some cheap candle sticks that were tarnished brass and spray painted 2 bright orange and 1 teal. I also bought a ceramic bird and spray painted it orange. All of them turned out great and were lovely additions to our living room! $4 for the items, like $6 for the paint and I was set!
Natalee says
OH my goodness! These are so thrifty. I love them!
Cordia says
Uggh! Beautiful! You guys are killing me with your creativity! Lol!
Indira says
Hi Sherry,
Just wondering where you store all the cardboard boxes you use for these paint projects. You seem to spray paint a lot and from those images i often see new boxes not old ones that are being used.
So are there any tips for us to use store such boxes so that it would’nt occupy too much space. We often tend to throw those boxes, thinking that would occupy more space.
YoungHouseLove says
We keep them in the garage. Just a few broken down boxes and a few that have yet to be broken down end up in the recycling pile so I keep them around instead of bringing them to the curb!
xo,
s
Nicole says
The “before” picture looks like those cups may be real silver… I scout goodwill for real silver items that may be just VERY tarnished, and I spend lots of time polishing them to some of their former glory. I’m kind of a “purist” when it comes to the materials in decorative items. :)
Renae says
I love the fake candles for opaque candle holders… but if its clear I think the fake candles look tacky.
Clara in Paradise says
I made some glass lanterns out of old wire hangers and glass jars. They are on the dining table in our terrace, it is a breezy spot, and we usually eat with the ceiling fan on, so regular candles are not very useful.
On top of that we have a pyro-curious 5 year old, and we’d like our home not to burn down (or our kid to get hurt). This is why we use fake tealights instead. they flicker, and in you can’t see they are fake through the frosted glass.
Another advantage to this is that do not produce heat, always a plus in the tropics.
Monica says
More from the “purists” camp, I suppose…just thought I’d share, those are definitely solid silver sleeves for mexican tequila glasses (I have a couple that I brought back from a trip to Mexico nearly 20 years ago). And while not very useful for sipping tequila without the inner glass, still not so sure about spray painting the silver. Oh well, to each his own.
YoungHouseLove says
Hey Monica,
We figured for $1.50 a pop we couldn’t go wrong- but we know not everyone would be so paint happy! It’s a sickness.
xo,
s
Sarah@StyleandCentsability says
Seriously Cool!! I love the way the yellow really shines with the lit candles.
And you spray painted something white that wasn’t a critter-ha!
http://styleandcentsability.wordpress.com/
Holyoke Home says
They look GREAT! I’m no purist, but don’t show this post to anyone who likes antique silver! These were really collectible when they had their glass insides!
Good for you for reusing them!
Nicole says
Those are vintage Cordial/Sherry Glasses! Too bad they are missing the glass inserts…
YoungHouseLove says
Love that they’re sherry glasses- they were totally calling my name!
xo,
s
Christine says
They look AMAZING!!! I definitely would have gone for the obvious black and silver – your ability to visualize things like this is what sets you apart. :)
As for flameless candles, I too resisted, until a) I discovered a pack of vanilla-scented pillars at Costco and decided they’d be nice in my big front window, without setting my curtains on fire; and b) I livened up my upstairs landing with a big lovely decorative sconce that called for 6 tealights, but, um, our cape has VERY low ceilings upstairs, and the sconce was not only too close to the ceiling but also too close to the smoke detector. D’oh! We only light ’em when we’ve got company who are going to be tossing their coats in the upstairs bedroom, but it’s definitely great to have them for that. We’ll probably also use fake candles for our jack o’lanterns this year.
Monica says
Whoa, those look so amazing! And what a great idea with the two-toned colours. I’m definitely going to do this soon!
Kristina says
I discovered the fake tealight candles when I learned that real candles weren’t allowed at our wedding venue. Now I’m totally hooked (as long as the candle holders aren’t completely transparent)!!
Tracy says
Such a simple idea, and yet you guys are genius for thinking of it! I seriously love it. Now I need to find me some good cups…
Candi says
I love it! What a great idea!!!
Leah says
You totally inspired me! Thank you!
http://californiacallahans.blogspot.com/2010/10/remember-when-i-said-i-was-going-to.html
Bea says
excellento!