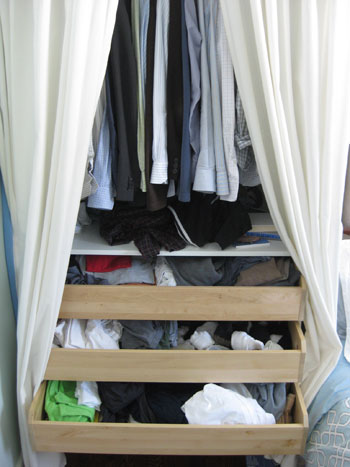
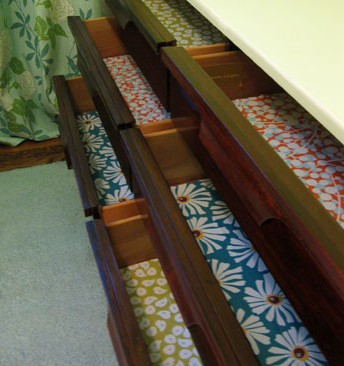
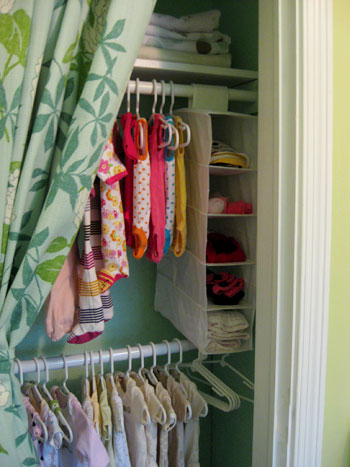
Archive for March, 2010
Nursery Progress: Makin’ A Mobile
Remember how we mentioned in our Charlotte window shopping post that we found inspiration for our nursery mobile at a charming little shop called Lucy & Co? Well, after talking to the incredibly inspiring designer of the yellow butterfly mobiles we learned that all it took to whip them up was some floral wire, some yellow fabric butterflies, and some glue. Sounds doable, right? But instead of butterflies we decided to brainstorm a few other “things” that could appear to be swarming around in a ball above our baby girl’s head. John kept harping on bees because they were on our homemade wedding invitations…

… but I thought that might be a bit terrifying. Bees in the nursery? Yikes. We finally settled on small yellow and pink blooms after we slipped through Micheal’s to check out what they had on hand. We were crazy about the small feathery little florets that we could pop right off of the stems and we loved the idea of adding some yellow and pink to our soft green and aqua palette. Plus they were buy one get one free, so for $8 we picked up two giant bunches of faux hydrangea blooms (one bunch in yellow and one bunch in pink).

We also picked up some silver floral wire to the tune of a few bucks. Then we parked our butts on the couch in front of the TV and watched The Celebrity Apprentice while we messed around with the floral wire and tried to create three orbs that we could cover with a swarm of hydrangea blossoms. This step of the process was sheer trial and error. We started by making a few loops of wire to establish the size of the sphere and then gradually took it from a 2-D circle into a 3-D ball-shaped mass of wire while Burger watched with suspicious half-closed eyes (see his legs below).

In the end our little orbs turned out feathery and haphazard and semi-ethereal. We could definitely work with them and we were sure to make one big beach-ball sized one along with one that was about the size of a cantaloupe and one that was somewhere in between. And as you can see from the image below, we left a few wires feathering out from the sphere for a light and airy look (once we glued the flowers on). Note: we later removed the little wire handle that we created on the top of the orb (stay tuned for more hanging details).

After we made all three wire spheres we got to work popping off the blooms from each individual stem on our faux hydrangea bouquet (by this time we were watching The Amazing Race- this is one of those takes-a-while-but-you-can-do-it-kind-of-on-auto-pilot projects).

Each individual flower came off with a bit of a hollow nub in the back, which used to slide over the stem to keep it in place.

So in order to attach our flowers to the wire, John geniusly suggested that we use an Exacto knife to cut each of the nubs vertically up the center about a centimeter, which created a forked pincher that we could dab with some glue and slip over the wire to adhere them to our spheres. And it worked! The pincher held it in place long enough for the glue to dry and really secure it for the long haul. So the forked flower nub + a dab of glue was all it took to secure each of our blossoms, which we clustered around each sphere randomly for a charming unplanned and not too overly balanced look. Oh and we used Aleene’s Original Tacky Glue (which we already had laying around) as our glue of choice since it’s non-toxic and water-based (both good selling points for anything that will live in a nursery).

Then we dug three small white ceiling hooks out of our screws/nails/etc drawer (they can be found at any hardware store or even at Target if you don’t have them on hand) and John drilled three tiny pilot holes into the ceiling. It was helpful to whip out the drill just to get things started since it’s hard to have great leverage when you’re trying to screw something into the ceiling. Oh and as for placement we just suspended each orb with regular old white sewing thread and John moved them around until we decided on the best three spots for our hooks. Again, we went the trial and error route.

And here they are all hung up on those white hooks with nothing more than white thread keeping them suspended. We love that the thread is so hard to see that they almost appear to float in the room. We definitely wanted them to look light and airy (and we love that we had the thread on hand so it was f-r-e-e). As for how we staggered them, again we just experimented with different lengths of string and kept stepping back to see what looked best. In the end we loved that none of our orbs were exactly the same size and that they were all hung at slightly different heights- just to keep things interesting.

Here’s more of a detail shot for you. See how invisible the string is? And how those little offshoots of wire ended up looking really whimsical and sweet once we added some blooms? Plus we love the fun shadows that they cast on the wall. Who knows, maybe the beanette will stare at those more than the actual mobiles.

And we mentioned that we removed those large wire “handles” that we initially made in favor of just pinching the wire in a spot on the orb (just a bit) to create a much smaller and less obvious place to loop the white thread around. Thankfully, it worked like a charm.

And although you’re probably assuming that we hung them over the crib, we actually opted to place them over the changing pad above our newly refinished dresser since that wall was looking a little bare (and we already had a great mirror on the wall above the crib to bounce around a lot of light from the window across the room and serve as a fun and colorful shape for Baby P to gaze at). Of course our new trio of homemade mobiles might look a bit high and a smidge off-center but we have other plans for that wall as a whole so you’ll have to stay tuned for those details…

And speaking of our changing table pad, we wanted to share how easily we secured it to the dresser using the screw & snap system that came with it. See the screw that I’m holding in the photo below? It has a large and super firm snap on the back of it, so you just have to secure it to the back of the dresser in line with wherever you want your pad to be placed…

… and screw it firmly into place…

And then you can snap your changing pad so that it’s fixed for the long haul (there was one snap-screw that we attached for each end of the pad so it’s wiggle proof and extra secure).

And you may have noticed our little blue fan. We have heard time and time again that good air circulation (ie: a fan in the nursery) can cut down on SIDS and make for a comfortable and happy baby- so we invested in a cute (and finger-tip-safe) Deco Breeze fan for the other side of the dresser that we can easily aim right at the nearby crib to cool down the beanette. We love how it looks with everything from the aqua ceiling and chandelier to our printed curtains (and you get a little sneak peek of another nursery furnishing that we’ll elaborate more on later in the background below).

So that’s how we made a fun little three-sphered mobile to hang above the changing table pad that we secured with some simple hardware. Oh and if you’re wondering where we got the changing pad cover, it’s actually from the same place where we got our organic aqua crib sheets (the changing pad cover is also organic, and we thought the price was pretty darn good). What about you guys? Have you ever made a mobile? Any tips or project ideas to share with the group? Any other changing-table-safety methods that you’ve implemented? Do tell.
Psst- Wanna see our nursery progress from the very beginning? Here’s our painting post, our big shopping spree, our crib hunting rundown, our curtain-making tutorial, our fun little chair search, our mirror-painting extravaganza, our DIY faux sheepskin project, our big dresser makeover (and subsequent drawer lining project), our closet makeover, and our homemade crib skirt undertaking. Good times.
Fab Freebie: Canvas The Area
***This giveaway is no longer accepting entries***
Are you looking to kick off your art collection? Do you want to add a bit of gallery-eque feel to that blank wall? Or do you just love winning something pretty? Well this week’s prize from Rachel Halsey Photography is right up you’re alley then.
Rachel’s a portrait-photographer-for-hire from Greenville, SC who’s making the move into selling her vintage-inspired images. So now her sometimes-sweet, sometimes-industrial work is available on canvas in two styles: gallery wraps (where the canvas is wrapped around 1.5″ piece of wood) or float wraps (which are similar, but give the added dimension of “floating” off the wall a bit). Either way you look at it, it’s a sophisticated twist on your traditional framed art wall or leaning mantlescape (bonus: each canvas is ready to hang, so there’s no need to hunt down a frame).
Here’s the breakdown about how you can snag one for yourself (oh and stay tuned for a YHL discount on Thursday):
- PRIZE: Any image in Rachel Halsey’s shop, in either a 11 x 14 gallery wrap or a 16 x 20 float wrap
- TO ENTER: Comment on this post with the words “CANVAS ME” and…
- BONUS QUESTION: … since this week is about giving your art a gallery feel, we’d love to hear if you have a favorite art gallery or museum of another variety. Are you a MoMA guy or gal? Or maybe you’d rather find yourself in your city’s science or history museums?
- GIVEAWAY CLOSES: Wednesday, March 31th at 8pm EST
- NUMBER OF WINNERS: One
- PRIZE SHIPS: To all Americans and Canadians alike
- USUAL STUFF: One entry per e-mail address is permitted. The winner will be selected using random.org and announced on Thursday. Good luck!
Find more freebie info on our Giveaway FAQs page. Pics courtesy of Rachel Halsey Photography.
Budget Blooms: My Birthday Bounty
As most of you know, every month we like to enjoy one inexpensive (and even free) bouquet to keep things feeling fresh around here (the idea actually stemmed from a super sweet Christmas present from the hubs a while back). But somehow I actually ended up with two months of blooms overlapping here at Casa Petersik this month. Remember when I shared February’s $5 blooms? Well those suckers are still alive. Well into March. All of them. Gotta love carnations. And I’m not doing anything special (just changing the water every week or so and reclipping the stems at an angle every two weeks or so). Crazy, huh?
But that didn’t stop my favorite/only hubby from walking in the door after work on my birthday last Friday with a big smile and this pretty surprise birthday bouquet full of lilies, alstroemeria, and a few sprigs of plum colored heather in honor of March (and me I guess).

I’m not used to having a big professional arrangement around the house (especially since we usually clip things from our yard or spend, at most, $5 at the grocery store for our monthly bouquets) so maybe that’s why it feels so special. Seriously I’m still permasmiling a week later. But perhaps I should elaborate in John’s defense. It’s not that he never comes home with flowers, it’s just that he does it just rarely enough to totally catch me off guard and make me giddy. As an example, he had a bouquet delivered when we moved into our house so I would answer the door and see something pretty to bring inside in hopes of making this old ranch feel more like home. And he usually heeds my I’m-a-cheapo-so-just-buy-me-a-single-white-rose advice since I don’t want him to break the bank every month on giant special occasion bouquets.
Possibly the cutest thing is that John excitedly explained that he specifically directed the guy at the flower shop when it came to my bouquet (saying things like “she likes similar tones that are sort of layered so nothing is too high contrast” and “nope, not too much filler” and “yeah, I think she likes lilies” and “no tulips because they remind her of a certain annoying ex”). In short: the whole thing was adorable and I was a very happy birthday girl indeed.

I also love that John picked them up over lunch, which meant that when he brought them back to the office everyone was curious about the giant bounty of blooms so he started telling people that he won a pageant over lunch. He cracks me up. And he even sat them in a cup of water on his desk until it was time to bring them home to me, just to keep them happy. I’m telling you, he’s the man.

So although this month’s bouquet is less of the free-or-five-dollar-variety, it’s truly special to me and I just wanted to share the birthday eye candy. And did I mention I also awoke to find this cute homemade birthday banner (complete with little love notes on each letter/number) hanging in the doorway between the kitchen and the den?

I love birthdays. But enough about my big turning-two-eight adventures. Have you guys ever been surprised with flowers? And what do you like when it comes to big pro bouquets? It was so interesting to hear John directing the guy at the flower shop because he was better at articulating my preferences than I could ever be. Does anyone know you better than you know yourself in the flower department? What would you say if you were asked to describe the perfect bouquet for you?
Wanna see our first grocery store bouquet from last January? Itching to check out February, March, April, May, June, July, August, and September too? How about this year’s January and February bouquets? Just follow the links for some pretty sweet cheap-o (and even free) bouquets.


