Archive for October, 2009
Fun Friday Departure: Costume Chitchat
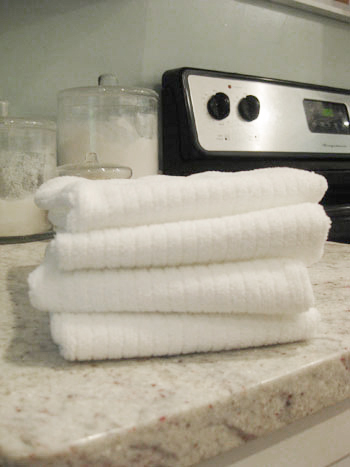
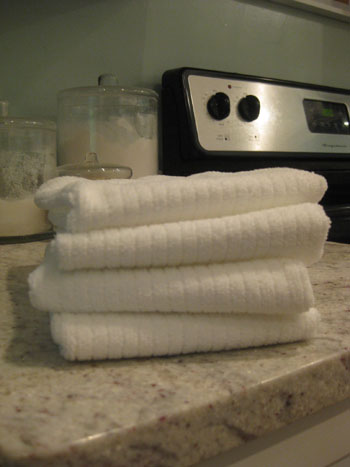
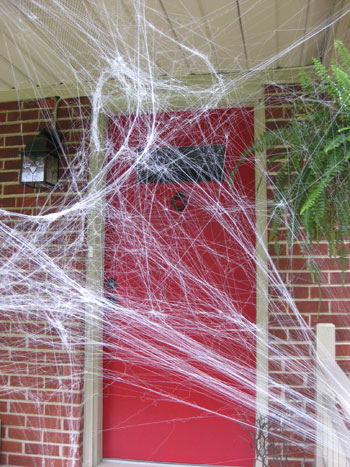
With Halloween finally upon us we’re wondering if you guys plan to host parties, attend them, attend them in costume or just answer the door and shove fistfulls of Butterfingers at the three-foot-tall ghosts and goblins ringing your bell. Something about Halloween is especially intriguing to us this year. Maybe because it’s sort of a before and after fest when it comes to your house (our porch and our living room had a little spooky makeover) and even when it comes to yourself (if you’re dressing up there’s a definite transformation that takes place). So tell us all about who or what you’ll be for the night (any Jon & Kate Plus 8s? Or how about those cute kids from the movie Juno?) along with what kind of parties you’re hosting or attending, and most of all, what your kiddos (four-legged or two) are dressing up as. There have been many (many) requests for photos of Burger in his costume so without further ado we present to you… Hamburger the hot dog:

We picked up this little ditty to the tune of $9.99 at Target. And two out of three Petersiks were super excited about the purchase.

If Burger had his way he’d wear it like this…

So tell us all about your big Halloween plans and don’t forget to drop in on Burger’s blog to see what he really thinks about wearing mustard and relish on his back. Viva Halloween!
Our Home Made Canadian House & Home!
We’re super excited to share that our humble abode made Canadian House & Home’s amazing website! They approached us a while back to see if they could feature our before and after pics in an online gallery (alongside some pretty amazing designers and fellow bloggers like Grace Bonney of Design Sponge and Courtney Barnes of Style Court). Of course we jumped at the chance. Ok maybe we screamed and convulsed at the chance. And imagine our surprise when a photo of our living room actually made their home page (!) last week (by the way, thanks for all the facebook and twitter messages directing us there so we could see it for ourselves- we gaped at the screen for at least ten solid minutes).

For those of you not privy to the insanely amazing eye candy that is House & Home, allow us to share some of their gorgeous inspiration images…
Love the soft blue pattern on the back wall. Love the oversized baskets. Love the chandelier. Love.

So simple and so soothing. Couldn’t you hunker down with a good book all day in this little corner?

Bold stripes + white furniture + basic bedding + poppy pillow = the perfect balance of classic and crisp.

Orange you glad I included this picture. Har-har. But seriously. Aren’t you? I’m smitten with the matching tangerine lamp shades and those bold curtains on that gorgeous wall of windows.

Um yeah, so they’ve got it going on. And the cool thing is that not only do they offer glossy subscriptions beyond the borders of Canada, they also offer an online subscription which is about half the price and still chock full of all the same delicious and delectable design. And of course trolling their galleries is f-r-e-e so don’t hesitate to drop in and see what all the fuss is about. There’s a reason more and more of our American readers are emailing us to tell us about their love affair with Canadian House & Home (in fact they came up more than once in the comment section of this old post about favorite mags) and we’re beyond honored to be included on their stunning site among some pretty fantastic design greats! We’re blushing. Happy Friday to all!
I Touch My Surface Freebie Winner!
Before we dive into the results from this week’s giveaway from DuPont, we wanted to follow-up with the photos of our new nephew Emanuel that we promised last Thursday (while at least keeping with this week’s prize theme). Here’s the little ladykiller now at one week old (p.s. he’s loving his new nursery):

Doesn’t that just make you wish there was an app for taking great photos? ‘Til then, I guess Emanuel will just have to settle for having a professional photographer as a father (gotta love that soft focus). But at least there are apps to help with the little things in life like picking out the perfect countertop surface, thanks to DuPont’s mySurface (free in the iTunes App Store). If any of you have tried it out, we know they’d be curious to hear your feedback.

And in case you haven’t tried it out, one of you is about to have no good excuse not to thanks to the free 8GB iPod Touch they’re about to win. As usual, we huddled with random.org and picked a winner: Hillary R. We’re not sure if you’ll find that application that calculates dimensions of a room from a picture, but if you stumble upon any other must-have apps let us know. Congrats!
The good news for everyone else is that next week’s giveaway is perfect for those who wanted an app to help with dinner. Plus it’s available to all of our international readers. Oh happy day.
Get more info on our freebies at our Giveaway FAQs page.
In Your Face, Clog
Please excuse me if this post comes off as hyper or deranged or a little bit of both, but yesterday at exactly 5:41pm I told that drain who was boss and cleared the clog. Victory is mine! And yes I did have my hands up in the hallelujah pose for at least five minutes while I stared at the euphorically-empty-tub before breaking into a full body happy dance (think Elaine from Seinfeld). The funny thing is that I did it all by myself while John was on his way home from work (gotta love girl power) and without spending a dime or using a drop or Drain-o, Liquid Plumr, or anything else that could put hair on my chest (or singe any off of John’s). Woo to the hoo.

But before we get to the drain-clearing miracle that occurred less than 24 hours ago, we have to say THANK YOU to all of the amazing guys and gals who weighed in with tons of helpful suggestions on yesterday morning’s post about our clogged drain (all 175 of you!). If anyone reading this is having a drainage issue, definitely read through all of the amazingly helpful and diverse comments (at the end of this post) for more ideas than you’ll know what to do with! We even had some plumbers (and wives/daughters of plumbers) weigh in with direct advice from the experts themselves and for that we’re eternally grateful.
For anyone dealing with a backed up sink, let’s take a look back at the initial things we did to try to solve the clog that wouldn’t quit (seriously, not an inch of water would drain in a 24 hour period):
- Fishing around with our fingers (gross, we know) dislodged a decent-sized hairball (or what John affectionately called a Sherr-ball) but didn’t open the floodgates.
- Plunging released a few more items we’d rather not have seen again, but still no change in water level.
- Even our 25 foot-long drain snake (i.e. auger) was a waste of time (though we had low expectations for it anyways).
- So then we broke out the boiling water trick that had saved our kitchen sink last year. After five attempts we had only succeeded in adding more water to our tub.
- That’s when we turned to a natural remedy: a half-cup of baking soda followed by a cup of white vinegar. We did that, watched our little drain volcano fizz, let it sit for five minutes, then flushed it with a gallon of boiling water. Still no luck. Even our second attempt provided no relief, just more science project flashbacks.
- I also tried this $3 As Seen On TV quality Zip-It tool referred to us by a friend on Facebook. It didn’t yield anywhere close to the über disgusting results shown in this video about it, which we were half grateful for and half frustrated by.
So after sharing those attempts in our last post where we begged for help, many readers piped up with these additional ideas (and this is just a sampling so be sure to check out all of their comments for even more):
- Pour a bottle of Dawn dish detergent down the drain and let it sit to break up grease
- Use a wire hanger to fish around for the clog
- Shoot CLR Plumber right into the drain (it’s a can of pressurized air or gas that can blast out the clog)
- Try Drain-o, Thrift, Liquid Plumr, Paqua, or Instant Power Hair Relief products with varying levels of chemicals to dissolve it
- Dump Nair into the drain to eat up the hairball
- Pour a two-liter bottle of Coke down the drain so it erodes the clog
- Try the Kleer Drain from Home Depot to blast out the blockage
- Use a drain balloon along with a garden hose to get things moving again
- Remove the trap in the basement/crawl space to get rid of the clog & snake the drain from that angle
- Check the vent pipe on the roof to be sure it’s not clogged with debris (air flow helps water flow)
- Ensure that the stopper valve didn’t fall closed deep inside the pipe, thereby blocking the water from draining
- Remove the overflow cover (on the side of the tub under the faucet) and pull out the spring and clean it of any hair/junk
Obligatory warning: of course we’re not plumbers so we can’t vouch for all of the suggested remedies above, and you should always take the types of pipes that you have- and their conditions- into consideration when trying to clear them (we have galvanized metal ones but have heard that some of the harsher solvents and chemicals can melt newer PVC pipes and even rust metal ones, so we wouldn’t go crazy with ten of these remedies at once for example). And maybe try starting off with the milder options like the wire hanger, Dawn detergent, pressurized treatments, etc before breaking out the super crazy acid-based solutions).
Second obligatory warning: if you have tried one of the more chemical fixes above (like Drain-O, Nair, Liquid Plumbr, etc, and eventually do end up calling in a plumber, PLEASE tell the plumber which chemicals you’ve already tried to help them avoid nasty chemical burns!
But back to business. Let’s get to the exact method that did the job (paired with some pretty insane determination):
Step 1: Talk some smack to the drain, just so it knows you’re not messing around this time. I think I said something to the effect of “Ok, enough of the namby pamby stuff, I’m serious. Dead serious.”
Step 2: If there’s any standing water in the tub (which was always the case with ours since it wasn’t draining at all) use a bucket and a large sponge to empty the tub as much as possible (I dumped the water into the nearby toilet and it periodically flushed itself- fun).
Step 3: Use a screwdriver to remove the overflow cover on the side of the tub under the faucet and pull out the metal coil to inspect it for any hair or junk (if you don’t have an overflow valve skip to step 5).

Step 4: If the coil is completely clean (like ours- not one single hair to be found) do not be deterred. Shove a wet washcloth into the opening under the faucet where the overflow cover had been to keep any pressure that you’re about to apply to the drain from escaping.
Step 5: Plunge the drain like it’s your job. Every ten times in a row or so the washcloth would come loose and need to be shoved tightly back into the hole to keep the air from escaping with every plunge (a tight seal is everything). If you have a spare person around they can help by holding the washcloth in place to keep the seal nice and tight, although I’m thrilled to say that I didn’t even need John (but would’ve appreciated the eye candy).

Step 6: After about three or four ten-second attempts (a total of about forty plunges) if nothing is happening don’t give up. I almost did, but the idea of another shower spent standing in five inches of stagnant water was enough to spur me on. “No. More. Wrinkly. Feet.” I chanted (screamed?) as I plunged.
Step 7: Cue the beautiful music. No it won’t be Beyoncé’s Put A Ring On It, it’ll be the glorious sound of the drain gurgling and furiously draining right before your very eyes. At least that’s what happened in my case. And I may or may not have gotten misty-eyed at the sight of the swirling water.
Step 7: Screw the overflow cover back into place and call your husband/friend/parole officer to brag about your newfound plumbing skills. In my case I called John to gloat. I also debated greeting him at the door bent over with my butt crack out (we’re married, it’s ok) but decided against it.
Step 8. As a precautionary method, to clear things out even further, pour half a cup of baking soda and a cup of white vinegar down the drain (we actually used 50% rice wine vinegar and 50% apple cider vinegar because we had it on hand and it worked like a charm). Let it sit for five minutes and then flush everything down with a gallon of boiling hot water. This time everything should be whisked right down the drain like a flume ride at an amusement park. It might be the best moment of your life.

And that’s all it took. Zero dollars, zero chemicals, and zero manpower (lady power all the way). So that’s the story of me + 1 plunger +1 dishcloth + sheer desperation. Take that clog. Who’s your daddy? And it sure beat paying a pro to come work some magic in five minutes and bill me $80-$150 for his time. Which is not to say that we don’t highly encourage hiring a professional if you just can’t crack something on your own. For example, if this had been a clog in the main line or if exterior tree roots or pipe corrosion had been involved we definitely would have been happy to pay someone to swoop in and save the day.

And now I’ll enthusiastically end this drain discussion with even more bullets, in the form of what precautions we’ll be taking to make sure this never ever happens again (many of which were suggested by our lovely readers):
- We’ll be snagging a better drain trap with mesh that blocks a heckova lot more hair than our current metal plug (seen above)
- I’ll be brushing my hair before each shower so more comes out before I step into the tub
- We’ll be using our little baking soda and vinegar science project as maintenance every month from here on out
What about you guys? Any stories of home improvement triumph following a few frustrating attempts at something? Sometimes it takes a challenge to truly make you feel victorious!
Tackling The Basement: Chapter Two
Ok, we’re back on speaking terms with the basement. After it gave us quite a hard time when we began our Dryloking-interrupted-by-oh-no-is-that-mildew adventure (read all about that right here), we’re feeling victorious after conquering the first step towards turning our cinder block insect shelter into clean and functional storage space.

If you recall, we had already faced the grueling disappointment of mildew spots making their way through our first coat of white latex-based Drylok (which is like painting with Elmer’s glue, btw)…

So with our second round of bleach-treatment having tamed the mildew a bit more, we crossed our fingers as we broke out the powerhouse oil-based Drylok (as recommended by the experts at True Value for being even more protective and durable).Talk about stinky. Sheesh. Thank goodness for our professional grade gas masks (we’ve read about people passing out without them when it comes to the oil-based formula). When it came to the consistency, it was like we had traded Elmer’s glue for natural peanut butter (you know, the kind that you have to stir to mix the oil in?). But we furiously trudged ahead as quickly as possible while October graced us with a convenient little “heat wave” last week (Drylok has to be applied at 50+ degrees so last week’s highs in the 70′s were a blessing to our otherwise unheated basement).
After two 5-hour days and eight additional gallons of Drylok (yes, eight!) we finally finished slathering a second coat on the walls and floor plus two complete coats on the ceiling. And with that we officially sealed our beige box of a basement (yup, that’s 13 gallons all together, totaling 325 beans- thank goodness for our True Value gift card!). And a few hundred bucks is still a small price to pay for a weatherproofed basement that can now serve as usable storage forevermore (in fact after the first coat we had about a week of rain and nary a drop of moisture seeped through, so the second coat convinced us even further that our basement was completely waterproofed for the long haul). And despite the premixed tan Drylok color being a little fleshy for our tastes (they offer it in white, tan, gray and blue- we went with tan to make it feel a bit less stark down there), it actually looks pretty good- especially compared to the raw cinder block “before.”

But the best part by far is no mildew (!!!) – even now, a week and at least two rainstorms later. Zero. Zilch. Nada. I guess the guys at True Value were right… that oil-based stuff is way better than the latex version.*


So with our Drylok finally packed away, this weekend we took care of the last bit of painting prep: the floor. See, we opted to use tan Drylok everywhere instead of painting with tan latex paint over white Drylok because painted Drylok can’t be re-Dryloked, which is recommended every 15+ years or so. But we wanted to bring some color to the floors to break up the big beige box of a basement (all of our moisture problems stemmed from the porous cinder block walls, not the concrete floor, so we’re confident in painting over it without worry that we’ll need to re-Drylok the floor in a decade or two).
And in the spirit of being cheap using what we have, we broke out some leftover chocolate brown porch and floor paint from our sunroom floor-painting project (Valspar’s Oil-Based Porch & Floor Paint in “Brownstone” in case you’re wondering), slapped on one thick coat, and called it a day. We love that the dark color will hide dirt and outdoor footprints (since it’s a separate entry basement that’s always a plus because we’ll always be trudging in from outside) and we also appreciate that the rich tone works with the rest of our home’s mocha flooring to make it feel like a part of our casa, even if it is a bit disconnected.


But of course this is all still just the beginning of the big basement overhaul. Once that floor paint has a few days to dry, we’ll be back in there planning how to minimize eyesores like the big water heater in the middle of the room, brainstorming some storage solutions, tidying up a few more areas – including the access to our crawl space – and hopefully finishing this basement makeover before the whole lack-of-heating-down-there thing really makes this project uncomfortable.
Oh and while we’re on the subject, tell us what you guys use your basements for. Are they storage only? Completely abandoned? Livable square footage with extra bedrooms and bathrooms? Man caves? Rooms where monsters live like in Home Alone? Spill it.
*I also mentioned our basement project to my very-expert-in-construction friend last weekend (at his wedding – I know, great “you just got married, but let’s talk about Drylok” conversation skills on my part). First question he asked was “you used oil-based, right?” I quickly responded “of course,” too embarrassed to admit our first coat mistake. Lesson learned.


