You guys all know that we’ve slowly been making over John’s sister Emily’s nursery on a major budget and the good news is that we’re back with yet another update. We already shared how we painted some modern vertical stripes, added large mirrors to open things up, whipped up a super easy no-sew bed skirt, made some free art and even hung some hooks to add function and fun. But what about the lighting sitch in there?
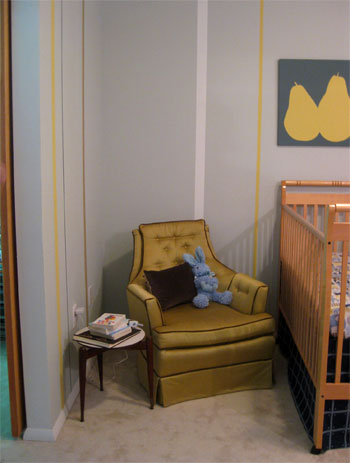
Other than a clean-lined overhead fixture, there was nary a light source to be found. So we decided that we needed to bring in at least a couple more to keep things feeling bright and functional (Emily mentioned that the ability to illuminate one corner while the overhead light is off is a nice perk in a nursery). But after some discussion about purchasing a sleek floor lamp or a small clean-lined table lamp for the corner with Emily’s plush reading/nursing chair (a $40 thrift store score from years past), we realized a better use of the space would be to hang a swing arm lamp from the wall- thereby freeing up valuable floor and side table space for a less cramped result. Here’s that corner before the big swing arm score…
… and here it is about twenty minutes later (after John worked his swing-arm-mounting magic while we supervised/complemented his manliness):
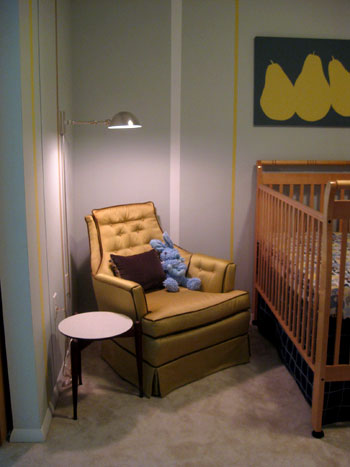
And in good budget news, we snagged it for just $39 (on sale from $159 at The Decorating Outlet here in Richmond). Oh happy day. It instantly feels airier than a floor lamp or a table lamp would (since it appears to float serenely above the chair). And it’s also super functional thanks to the dimming option that’s built right in (there’s a soft setting and a brighter one, which always comes in handy depending on if the baby’s in rest-mode or wide-awake-and-ready-to-go mode).
We were sure to hang it so it wouldn’t get in the way when someone sat down or stood up, and also used the metal cord covers to neatly run the cord down the wall for a clean and polished look (which is also more child-friendly than a dangling one).
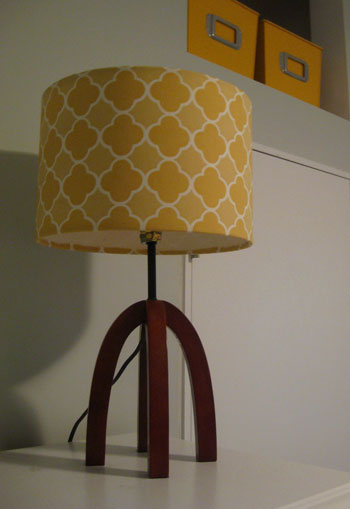
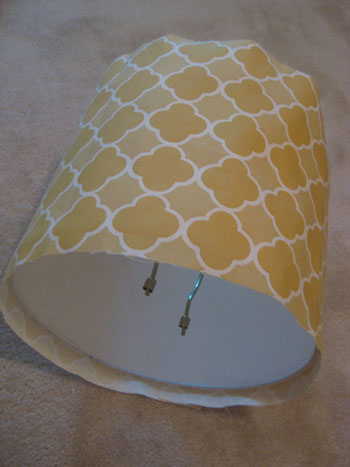
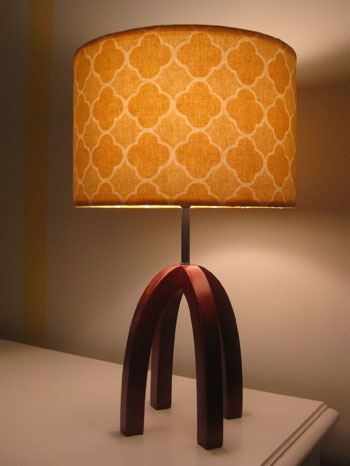
So with one corner of the room’s lighting problemo solved, we moved on to the light that we’d be placing on top of the small armoire on the opposite side of the room. But we didn’t just want to just purchase a table lamp to plop down on the freshly painted armoire (which Emily purchased for her daughter’s old room years ago). Instead, we opted to repurpose an existing lamp that Emily already had and we seized the opportunity to give the basic white fabric shade a whole new look with some fun yellow fabric that we picked up for less than eight dollars. Here’s the illuminating finished product:
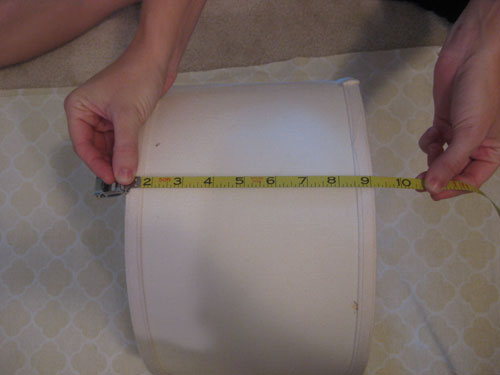
And the good news is that anyone can freshen up a lamp shade with some fresh fabric and a glue gun (note: this project works best with fabric shades and not paper shades, which can overheat and melt the glue). You also may want to use high-temp glue sticks with your glue gun for even more no-melt security (although we used regular glue sticks without incident). Completing our custom shade from start to finish only took about a half hour. First we grabbed a half of a yard of graphic yellow fabric from our favorite local fabric store (William’s & Sherrill) which we knew would be enough to easily cover the lamp’s existing white shade. Oh and we went with moderately thin yellow fabric so the lamp would still cast a lot of light into the space (dark thick fabric wouldn’t allow for nearly as much of a glow). Then we laid out the fabric and measured the circumference of the shade and the height of the shade (and added two inches to each before cutting our swatch of fabric to that size).
Since our fabric has a pattern on it, we were careful to follow the lines of the pattern while we cut (so we weren’t left with a crooked-looking swatch to cover the lamp). After trimming it down to two inches longer and wider than the circumference and width of the shade, we had one long panel of fabric that could be wrapped around the shade with a bit leftover on all ends (which we would use to secure things in place).
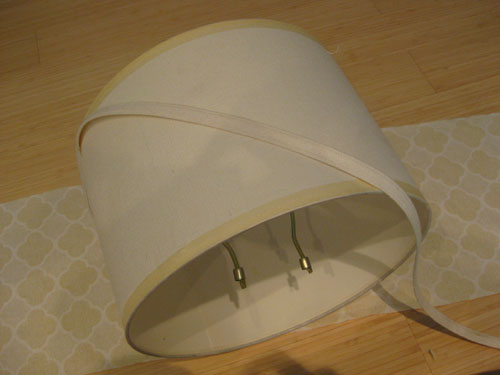
Oh and our shade had a bit of banding around the top and the bottom that was just glued on, so we carefully pried both strips off to create a perfectly flat shade to serve as the foundation for our new fabric.
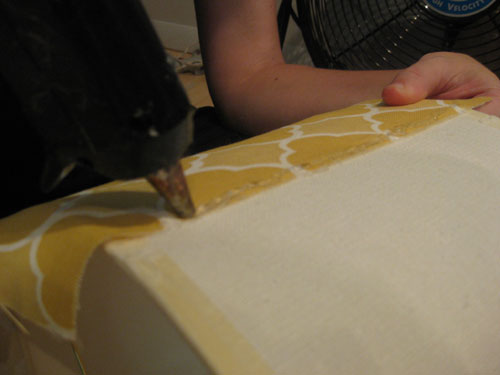
Then we used one of Emily’s had-them-forever glue guns to carefully adhere one end of the fabric in place on the shade. We learned pretty quickly that we had to work fast (nothing stuck to the line of glue if it had too much time to dry, so we just peeled off our first too-slow attempt and picked up the pace for a much better result).
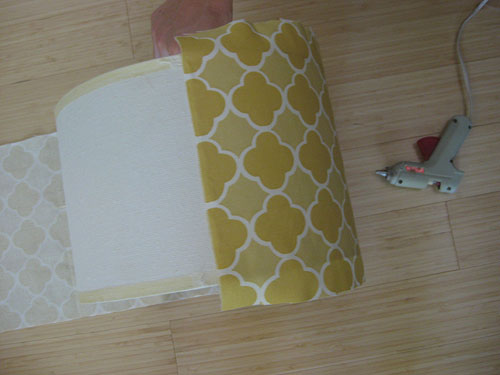
Next we made a nice finished looking edge on the other side of the fabric by folding about a half inch of it over itself and gluing the hem in place (not shown). Next we applied another bead of glue on top of the other side of the fabric…
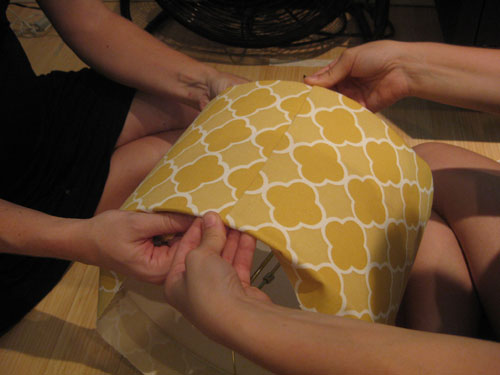
…so we could tightly wrap the entire panel of fabric around the shade and stick one end on top of the other to create a nice clean-looking seam. Tight is the key word so be sure to have someone hold the shade while you pull the fabric around and secure it for a sleek and professional look (baggy just won’t look nearly as good as fitted fabric).
Of course your pattern might not match up perfectly when you glue the ends together to create the seam, but ensuring that everything is straight and even on the rest of the shade (top to bottom, so nothing looks like it’s slowly slipping up or down) makes for a nice polished look. And of course after you’re done you can simply turn the seam to face the wall so the perfect looking front of the shade is on display.
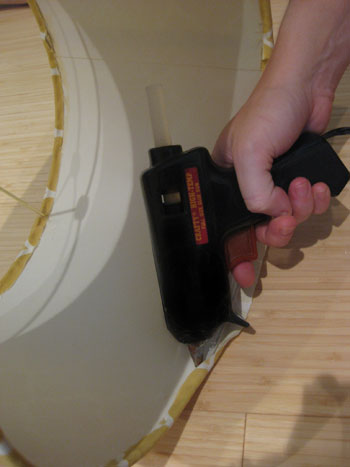
You can see from the photo above that after we attached the fabric panel securely around the lamp shade at the seam, we still had extra fabric around the top and the bottom of the shade. We trimmed a bit of the excess off and then got to work using our trusty glue gun to adhere the sliver of fabric that we had leftover around the inside rim along the top and bottom of the shade for a nice finished look. It was easy to run the glue gun against the inside lip of the shade and glue down three to four inch sections at a time (anything much longer was hard to get to before the glue dried).
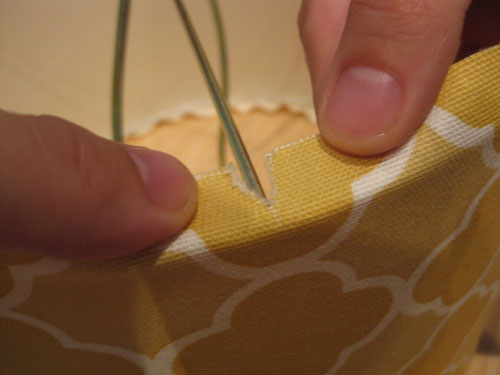
We also realized that to get a nice tight edge we needed to carefully snip the fabric around the metal rods that hold the shade to the light bulb, so we made some tiny snips and just glued them on either side to hold the flaps in place around the rods for a seamless look (see photo above for one a finished one).
So that’s it. All you need is a half yard of fabric, a scissors, a glue gun, a tape measure, and a helping hand (this project is definitely easier with two people). And for less than eight dollars you can totally spruce up an old table lamp (or even a floor lamp or a giant ceiling pendant!).
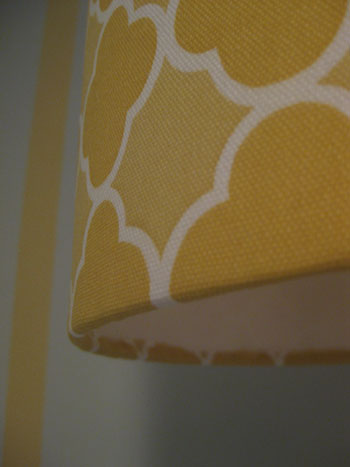
Here’s a delectable detail shot. We got so lucky with our fun fabric find!
And here’s our baby all lit up and glowing. And speaking of babies, isn’t Emily’s little guy going to be one lucky man? With this fun little lamp shade to gaze at we think he’s destined for greatness.
So that’s how, for just $47, we installed a swing arm lamp and made a custom lamp shade to cast more than enough light around the room. Next on the agenda are just a few finishing touches and stimulating accessories, which is pretty good news considering the baby’s October due date is just around the corner.
What do you guys think? Anyone out there who might take on the lamp shade recovering project? Any swing arm seekers who might add one to free up some table or floor space in their home? Anyone else doing a fun nursery or kids room project? Any newly pregnant ladies out there? So many of our friends and family members are telling us they have a bun in the oven that we wonder if there’s something in the water…
Psst- Lighting projects should always be handled with caution. Remember to leave a lamp’s original fabric shade in place and in good condition to ensure that your exterior layer of fabric is an ample distance away from the bulb so it’s not a fire hazard. Oh and using CFL bulbs (which are much cooler to the touch) will further reduce the risk of anything overheating. And of course remember to turn off the power to the entire house if you’re hardwiring a fixture like a swing arm lamp. Safety first!

Kate says
I LOVE that second lamp! The pattern on that fabric is great.
rachael sudlow says
Dang, I was hoping for a source on the lamp base! that’s the coolest part!
YoungHouseLove says
Rachael- The lamp is a vintage thrift store find that Emily had rewired a while back (older lamps are much safer with newer wiring, and it’s not even a very expensive thing to get done at a local lighting store). Hope it helps!
Carol- We don’t know the brand or style of the fabric, but would recommend checking out any higher-end fabric stores in your area (which still don’t break the bank when you need such a small piece). Happy hunting…
Carol from Indian Springs says
Love that fabric on the shade! Do you happen to know the brand/style of the fabric? It would go great as a pillow on my downstairs sofa for a punch of color.
steph anne says
I am in love with that lamp! I can’t wait to do this when doing our bedroom lamps. I probably should look for some cute fabric on Etsy.
angela ferraro-fanning says
I LOVE the new lampshade! Just this past weekend I was wondering about how to re-cover a shade. Thanks for the step-by-step how-to guide!
Samantha says
Your updates are awesome, but the best part about this post to me was more places to shop in Richmond that I’d never heard of! I already gave Diversity Thrift a whirl and fell in love, now I need to try two more places! I apparently just need to branch away from Henrico and hit more in Chesterfield :)
I thought about covering a lampshade in my craft room. I ended up putting it on the backburner when I decided my Christmas Story Trophy Leg Lamp was a better fit for my space ;)
Krysta says
completely unrelated…I tried the Sherwin Williams brush you reccomended for cutting in and I L*O*V*E it!!!
Leah says
Too freaking cute! I love the lampshade! What a great idea and cute fabric!
Erin N. says
Oh, awesome! That lampshade-cover tutorial is going to come in so handy! I have a great lamp set, but the shades are getting to be a little grimy. I can’t wait to find an awesome fabric to cover them!
Heather says
I saw a great lamp this weekend for super cheap and wondered how hard it would be to recover – thanks for the how-to! It looks fabulous!! (wish I had bought the lamp!!)
ghazal says
the walls look amazing! awesome job :)
Brenna says
Great timing! I am about to cover the lamp shades in my bedroom and was wondering how to do it! Thanks for the inspiration, as always.
Nick says
We’ve got a little one on the way, due Oct. 3rd
While the nursery is not ready yet, most of the items are here waiting to be set up. We’re currently putting new wood floors in throughout, so we can’t do too much to the room until they are done.
We have painted, horizontal stripes inspired by your bathroom redo. Here’s a sample pic, sorry about the quality, it’s an iphone pic:
http://farm4.static.flickr.com/3439/3806793046_cb5dd5d288.jpg
YoungHouseLove says
Hey Nick,
Oh my goodness those stripes are adorable! Thanks so much for sharing them. That room is going to be so sweet when it’s done and we’d love the after pics if you ever get around to sending them our way.
Everyone be sure to click that link and check out the beginning of Nick’s awesome nursery project! So glad our bathroom striping project came in handy!
xo,
s
Sarah says
Wow that lamp looks so great! I want it! What I love about this nursery is that it doesn’t scream “nursery,” and if you take a lot of the individual pieces out, you see that they can be used for a very long time! Great job, youngsters!
Teri says
LOVE the made over lamp. I just redid some furniture in my 2-year-olds room and his lamp shade is white…I think a little makeover is due on that little thing to tie in more of the colors I am using. Thanks for the great idea!
Chloe says
Samantha is right on! I love that you guys are in Richmond because I get to see where you score all the fun local stuff! We’re in the middle of working on a couple bedrooms ourselves and I’m really excited about this new rug and lighting source!
Kristi says
Very cute lamp. I have a question though. Are you worried about the shade getting too hot and melting the glue? That’s always a concern of mine because I once had a plastic lamp shade that got so hot, it started to melt and smoke. Scary!
YoungHouseLove says
Kristi- Since the original lamp shade was fabric (and when we removed the edging detail we noticed that it had been glued on) we weren’t scared to glue other fabric onto the shade because the original shade had edging glued on and didn’t smoke or overheat after years of use. Perhaps it’s best to do this project with a fabric shade and not a plastic one since they might tend to overheat and melt the glue. Thanks for the warning! We’ll edit our tutorial to specify that this project works best on fabric shades.
Carla- Good suggestion! Since Emily’s home is a new construction all the overhead lights have dimmers on them, we just forgot to mention it!
Carla says
Have you guys thought of installing a dimmer for the overhead light? We found this to be very useful when we had our little one. Especially great for night time feedings when you want it as dark as possible without actually tripping over anything.
By the way, I totally love the new lamp shade. Must try that at home!
heather s. says
I love the new lights but my eyes kept going to that dated 70’s chair. The shape is great but the fabric is awful. Please tell me you are recovering it!
YoungHouseLove says
Ouch Heather! Emily loves that vintage thrift store find of a chair- and we intentionally worked yellow into the stripes and the bedding to incorporate it instead of breaking the budget to recover it (since it’s still in perfect condition). We think it’s a great find (for just $40) and we personally love it with the gray-blue, white and chocolate tones in the room (it even has chocolate piping that further ties it into our color scheme). Of course decorating is subjective so we don’t expect everyone to love everything, but we hope that explains why we chose to keep the chair as-is.
xo,
s
Thao says
wow, what a great lighting solution! the nursery looks great.
D Young says
Piggybacking on Kristi’s remark, I think you may have problem with glue gun adhesive and more cone shaped shades. The top of the shade does warm up.
YoungHouseLove says
Hey D Young,
Hmm, have you tried the glue gun project with a cone shaped lamp and failed? We’ve heard of many DIY shade projects that involve recovering fabric lamps with a glue gun or even adding ribbon trim to all sorts of fabric shades without incident. In fact here’s an eHow tutorial using a similar glue gun method: http://www.ehow.com/how_4930188_cover-self-adhesive-lamp-shades.html
Perhaps someone who has recovered a cone-shaped lamp can come forward and offer any issue (or non-issue) they have had?! Also from our experience, once the glue from a glue gun dries it is extremely rubbery and wouldn’t re-melt very easily at all (especially since it has a fabric shade between the glue and the light bulb- which is still around 6″ away from the shade). Hope it helps!
xo,
s
Randifity says
I love the lampshade rework. I’d suggest using a high temp glue and glue gun to adhere the fabric so it doesn’t loosen from the heat from the bulb.
It gives me some ideas for the nursery I am working on! :) Thanks for the inspiration!
YoungHouseLove says
Great suggestion! We’ll note that high-temp glue will provide even more security (although we used regular glue with no incident) so people can decide whichever way they would like to go. Hope it helps!
xo,
s
kajr says
I’d love suggestions from the youngsters/peanut gallery on how to recover an old lamp shade of ours. We first tried to find a replacement shade, but it’s a very particular size that we couldn’t replicate, so we decided to recover it. The original fabric was dark, coarse, and torn in several places, so we tore it off the frame. We’ve tried gluing some interfacing around the frame, but no luck so far. Any suggestions?? TIA – we love this lamp!
Danielle says
WOW! Great deal on the lamp and the shade is just darling. Reusing all these items is a fab idea! Vintage always makes a statement.
I have a friend that is having a baby and she has a very low budget. There is already a twin bed in the room that she is using as a nursery. Do you have any suggestions for bedding ideas? She doesn’t want to match up the fabric with the crib or make it too babyish. I thought about a solid fabric or stripes. How could she tie this in? We haven’t started the nursery yet, so it’s wide open for ideas and we do not know the sex of the baby. Thanks in advance!
Danielle
Cathryn says
I’m just an auntie, not a parent, but the silver mounted lamp seems rather bright for the baby’s eye position in any nighttime feeding scenario. My nephews would squirm and fuss. Maybe it is the just photo’s contrast? Love your tips and love to learn new things…keep them coming!
YoungHouseLove says
Cathryn- Good eye! We took the photos with the lamp on the brightest setting, but as we mentioned in the post it actually has a dimmer setting which is a lot softer and perfect for when the baby’s in rest mode. Hope it helps!
Danielle- We agree that coordinating the twin bed without making it matchy-matchy is the way to go. I would either find crib bedding or twin bedding that you love and use that as a jumping off point, for example if you find an awesome twin duvet that’s striped, you can pick out one of those colors for the crib bedding so they look great together without looking like a matched set. You would definitely want the crib bedding to be more playful and whimsical than the adult bedding, so perhaps finding something fun for the crib and then plucking out a color for the solid twin duvet is the way to go. Hope it helps!
xo,
s
Marianne says
Hi there ! I love this project. This baby is already very lucky to have such a beautiful room waiting for him.
I think the nursing area looks great, although, aren’t you afraid that the light will be a bit hard/strong for the baby’s eyes as he will probably look up when in his mother’s arms ? Keep showing us the progress in the room !! Marianne from France
YoungHouseLove says
Hey Marianne- Good eye! We took the photos with the lamp on the brightest setting, but as we mentioned in the post it actually has a dimmer setting which is a lot softer and perfect for when the baby’s in rest mode. Hope it helps!
xo,
s
Jessica Sykes says
I love the lamp! I have an existing lamp shade, but it has crinkly fabric on it – do you think I could strip that fabric off and add fabric on top of it? It seems silly to buy a new lampshade when I have one that works, but isn’t all that pretty. Great post!
YoungHouseLove says
Hey Jessica,
I think if you use high-temp glue you could probably strip the old fabric off and recover it. We usually recommend that people keep the original fabric in tact so there’s not a fire-hazard issue though, so perhaps you could bring your lamp shade (and the new fabric you’ve chosen) to a local lighting store and ask the professionals there for a moment of their time to get their take on the idea. Hope it helps!
xo,
s
heather says
I NEED that wall-mounted lamp! I am working on my nursery now (due in 3 weeks) and that is exactly what I need. Do you think I could call the store and have them ship me one? Do you think there were more? Thanks!
YoungHouseLove says
Heather- I would definitely call the store (you can google them online for their number) and see if they can ship you one. There were a few more there about a week ago. Hope it helps!
Meredith- The overhead light actually has a dimmer already (lucky Emily with her new construction!) so we love that it’ll come in handy for those late night feedings. And we’re so glad to hear that your mom found her way to our site! Sweet.
xoxo,
s
Kate says
I love that lamp – I am definitely going to have to try this at my own home! I think the lamp shade can be the hardest thing to get right and your options are endless if you make your own. Thanks for the inspiration and how to!
Meredith says
Does the room have overhead lighting? If so, I would highly, highly, HIGHLY recommend installing a dimmer switch. We did this, and I can already tell how helpful it will be to be able to have some light when we’re going in the room for a midnight feeding, but also to not have to turn on the lights full blast, or fumble around for a lamp switch.
If we have any leftover fabric from the pieces we picked up over the weekend, I just might have to try the lamp re-cover.
PS- My mom found your website when she was searching for easy crib bedskirts online, and since she’s doing all the linens for our nursery, has become seriously addicted!
Meredith says
Nevermind about the overhead dimmer…I didn’t read all the comments before posting! But the rest of my comment stands :)
Amanda V says
Sherry,
Another suggestion to keep the fabric from coming unglued is to switch out the bulb to an energy saving kind. They are much cooler than the regular cheapo ones! Our newly covered lamp has not had any trouble since we’ve switched out the bulb!
YoungHouseLove says
Hey Amanda V,
Awesome point! We use CFLs throughout our house and agree that they’re much cooler burning bulbs… so anyone with a regular glue gun might just want to use a CFL which has little chance of melting anything! Yessss. And Mother Nature will thank us too!
xo,
s
angela miller says
Totally off topic but I searched your website and could not find anything on: cord management. We actually have the white parsons style desk from west elm that you have and all the cords hanging from our computer look so bad. Do you have any product(s) you recommend to hide the cords?
Thank you!
-grace
YoungHouseLove says
Hey Grace,
Room & Board sells these awesome cord management things that can run down the back of the legs of your white parson’s desk (which we also have as well) so that’s one option. But instead of using those systems, we actually just slid a small leather ottoman from Target under the left side of our desk with a printer on it (the chair tucks under the right side) and all the cords go down to the outlets behind the ottoman/printer so no one sees the mess. You can check out some photos for a visual here in this old office-related post. Hope it helps!
xo,
s
Alyssa says
Hey guys!
I’ve done a slightly cone shaped lampshade recover using fabric glue (Fabri-Tac, I think…) with fairly good success. It doesn’t dry as quickly as hot glue, so it gives you more leeway to position the fabric exactly where you want it. I also left the raw edges on the inside of the shade and trimmed them with an X-acto knife once the glue was set. It gave a really neat edge without all the bulk of folding the fabric over…
Happy covering!!!
Alyssa
PS-Your blog is great!!!! I am so excited there are others out there that believe Target and IKEA are as awesome as I do…
Amber says
Love, love, love both the swing arm and the lamp!!!
heather s. says
Sorry…I hope I didn’t offend you with my chair comment! You’re right – decorating is subjective and not everyone will love everything but the room just seems so modern and fresh with the exception of the chair. :)
Can’t wait to see the whole room vs. bits and pieces!
YoungHouseLove says
No worries Heather! We can’t wait to reveal the whole room so you can see how everything works together. There’s also an older armoire on the opposite side of the room to cut all those modern lines for a warmer and more mixed-and-matched effect. Hope it helps!
xo,
s
stephanie says
Love it!
The fabric find is awesome and I love that vintage chair!
Although I havent tried it, I have seen the idea of using liquid starch undiluted to stick the fabric on lampshades (even walls) and the best thing is when you want to redo it again you should be able to just peel it off!
I haven’t tried it yet but I will let you know how it turns out!!
The nursery looks amazing!
Great job as always!
Amara says
Love the room so far! So true. Decorating is subjective. I saw the chair and immediately thought, “cool retro chair.”
Go figure:)
marianne says
Thanks for your response about the light ! Looks fantastic ! Isn’t this great to be getting this nursery ready for your nephew ? This lucky baby will have great bedtime stories in that chair !!!
Amanda says
The fabric that the lampshade is covered with is made by Braemore, it is called Emillio: lemondrop . It also comes in a nice green, red, black, and sand. I just covered a pillow and a bench seat with the lemon drop color, and made another pillow out of the green color. I just love the pattern! Thanks for the how-to on covering the lampshade!
YoungHouseLove says
Hey Amanda,
Thanks so much for that fabric info! Hope it helps people track it down more easily.
xo,
s
D Young says
Yes, I did have a problem with a come shaped lampshade in the past coming unglued. It sounds like you and your readers worked around it. Thanks for the tips.
Averill says
I LOVE that quatrefoil fabric you used on the lamp — it looks fabulous! Also, where did you get that chair?
YoungHouseLove says
The chair was actually a thrift store find that Emily snatched up for just forty bucks at a local shop called Love Of Jesus Thrift (we practically live there). Hope it helps!
xo,
s
Natasha says
Great tutorial! I’m in the process of redoing a lamp, but reusing the original shade is not an option (damaged beyond repair). Any idea where I could find an inexpensive “blank” shade to start over with? I need something pretty large–the original had a 15-inch diameter.
YoungHouseLove says
Try Target, Home Depot, Lowe’s or TJ Maxx. Hope it helps!
xo,
s
Dana Miller says
LUH-UV the retro, cutsie lamp. I’m also excited about the organizational fabric bins set into (what looks like) a niche in the wall. Staying tuned…
Kylee says
Love the lamp, love the fabric, but I was little bummed that the fabric doesn’t match up. On a perfectly straight drum shaped shade, I think it would just take a few extra minutes of planning to line up the print.
Tannis says
Hi!
Awesome job. Quick question/observation as a mom who recently did a nursery project. When mom is sitting in the chair nursing baby, won’t the light bulb from the wall mounted light shine right into baby’s eyes?
Just a thought/observation.
Thanks!
Tannis
YoungHouseLove says
Hey Tannis,
Fear not! We took the photos with the lamp on the brightest setting, but as we mentioned in the post it actually has a dimmer setting which is a lot softer and perfect for when the baby’s in rest mode. Hope it helps!
xo,
s
Danielle Murphy says
I love-love-love the nursery. I am surrounded by women having babies and everything is so ‘themey’. It’s either winnie the pooh, day at the circus, sports arena, thomas the train, etc. I love that you guys have done something creative, modern, yet still childish and adorable.
Emily Moser-Wright says
Hey Sherry,
I just noticed all the comments about the swing arm lamp being bright. I wanted to remind everyone that beyond the dimmer, the lamp arm moves as does the head so you can turn it away from baby’s eyes. Lots of options to adjust the light and where it is in terms of my little guy’s eyes. Hope that clears things up even more!
Love you,
Prego Emily
heather says
Thanks for your help. I got the last swing arm lamp at the store. They don’t normally ship, but thankfully they bent the rules. Thanks so much for the suggestion…I can’t wait to get it hung in the nursery.
Thanks, again!
YoungHouseLove says
So glad they bent the rules for ya. Good luck with your new swing arm lamp!
xo,
s
Blayne says
LOVE the re-covered lamp shade. Can’t wait for you to do our nursery! Hopefully we will know whether it is a boy nursery or a girl nursery within a month or two.
YoungHouseLove says
That’s so exciting! Can’t wait!
xo,
s