Okay, let’s get some open shelves up in this mother.
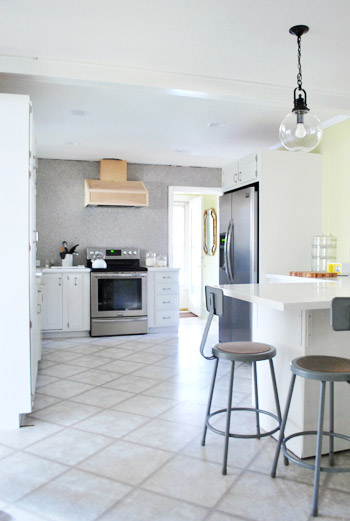
With the hood cover now built, we could finally put the shelves in around it. We were originally going to build true floating shelves (maybe even breaking out Ana White’s instructions) but after looking at some of our inspiration pics again, we decided to open ourselves to the idea of using brackets instead. Note: For anyone wondering how the whole dust/grease situation is with open shelves, check out this post (we’re crazy so we did our research). Apparently the consensus is that if you have a great range hood (check!) and put dishes you use often up there (soon-to-be-checked!) it’s all good. Rarely used items stored inside of cabinets get dusty too, so the key seems to be to have a good hood and to rotate things and use them a lot when they’re out in the open. We’ll definitely tell you how it goes for us.
Besides just liking the look of them, brackets would also make us less concerned about things ripping out of our wall o’ tile (and you already know that stresses us out). Plus, we had heard that Home Depot had some pretty good and affordable options for brackets. Here are the ones I found – actually this is the photo I texted to Sherry to ask which one she liked best since she was at home with Clara and the photoshoot crew.
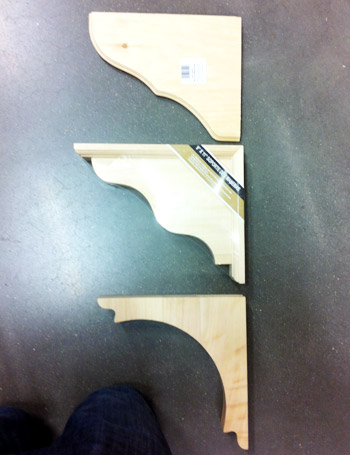
We both agreed the last one was BY FAR our favorite, so I picked up 12 of ’em along with some 12″ framing lumber to act as our shelves. A few of you had said this 12″ framing lumber + brackets system worked well in your kitchens (and we had good luck with them making our office desk) so why not, right?

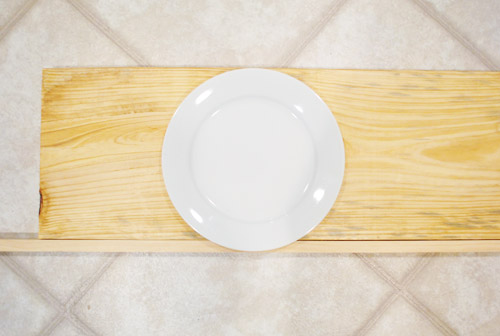
Well, one “why not” would be that they’re not wide enough for our plates. We have 12″ dinner plates and since 12″ in lumber terms is really closer to 11.25″, we realized we’d have some plate overhang-age. Which is never a good look:

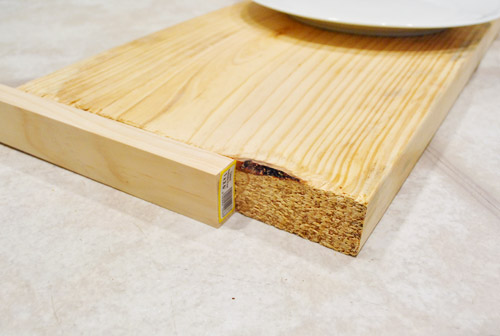
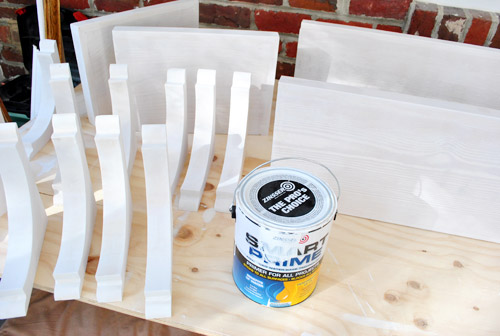
After briefly contemplating getting smaller plates, we devised this solution instead: adding some 1 x 2″ trim around the end (just like we did to finish the top of our homemade console table in the living room).
Not only would it solve our shelf depth issue, but it’d also mean I could cover up the rough end of each board with a nice smooth piece of wood. A win-win, dontcha think?
With all of our materials purchased our total came to about $116 (for brackets) + $15 (for the shelf boards) + $10 (for the smaller boards to frame out the larger shelves) = $141. Which isn’t exactly cheap, but we knew we’d essentially get four shelves worth of storage (two big and two smaller ones) which is about the equivalent of three upper cabinets (which usually go for around $300+ total). And thanks to saving money with things like reusing our original cabinets, building our fridge cabinet, our self-installed wall of tile, and our craigslist range hood we were ok with a semi-splurge in the shelving category (plus we already have the paint and primer we’ll be using).
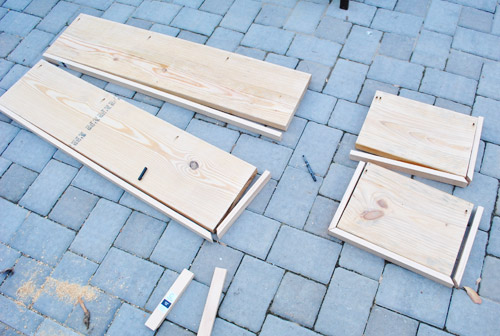
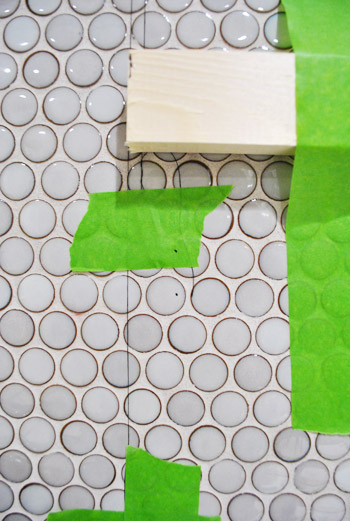
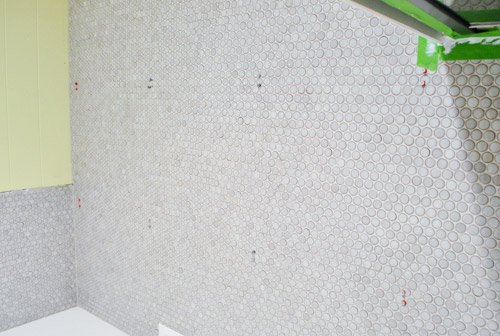
Next we began marking and measuring everything. We used the same weighted-thread-hanging-from-marks-on-ceiling method for indicating where my studs were (which we used here to hang our range hood). Ends up they’re pretty awesomely placed to get even looking brackets – except for the two on the end of the long side (that stud is being used by the hood, remember?). But we figured we’d just use heavy duty anchors on the other two (sunk into tile we knew they’d be nice and strong).

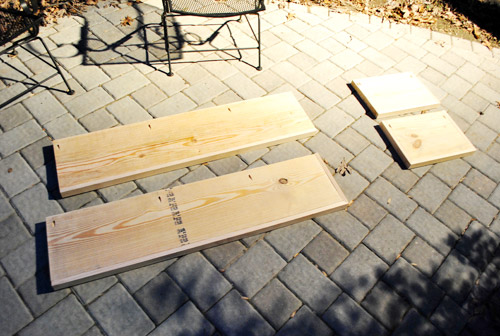
We also used this moment to measure and cut our shelves too. I know it may look short on that one end, but remember we’re gonna trim it with a 1 x 2″ board, so that’s intentional. Oh and see those subtle gray lines in the photo above and below? Those are our hanging pieces of thread to mark the studs. Just didn’t want anyone to wonder if we drew on the tile or anything.

We decided to just trim the exposed sides so each shelf had a slightly different configuration. The long shelf on top would have the wall and hood on both ends, so it only needed trim on the front. But the short shelf on the bottom would be exposed everywhere but the back side (the one on the top right would run into the hood and the one on the bottom left would run into the wall). I know it might seem strange not to just trim them all out in the same way, but we knew from building our console table that once it was all put together and painted it would look great this way. And of course we cut the framing lumber to different sizes to account for the trim, so they’ll all be the same finished length and depth.
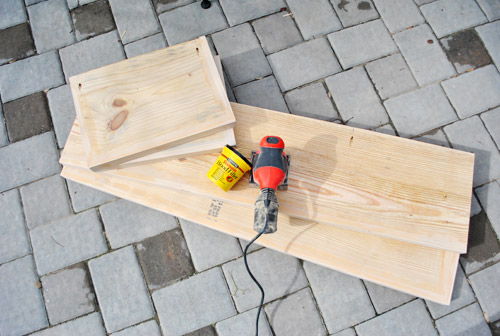
We attached the trim with some wood glue and finish nails. You’ll notice we also have some pre-drilled pocket holes on the top. I was thinking it might be nice to screw the shelves directly into the wall (in addition to screwing them to the brackets).
That night I also broke out the wood filler to make the thin seam between the trim and 12″ board completely disappear. It was a small detail, but we thought once primed and painted it would really help make it feel like one solid board. See how even in the photo below (without primer and paint) you can’t tell that some are trimmed out on one side while others are trimmed out on two? We’re actually glad our plates didn’t fit on the boards alone since the trimmed out result is so much more finished looking.
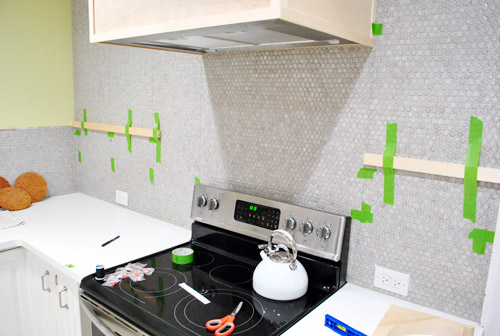
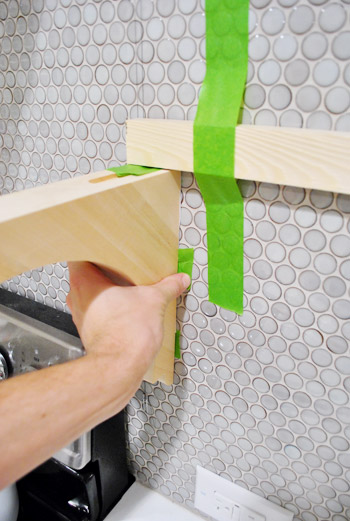
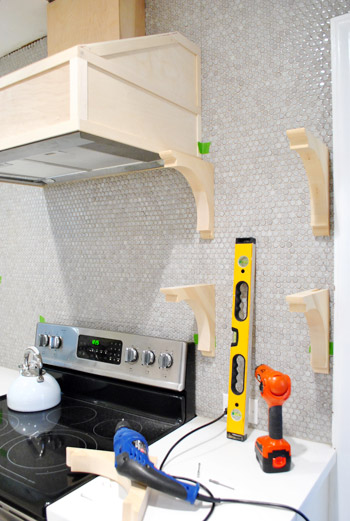
While all that was happening, we also started getting ready to attach the brackets to the wall. We leveled and taped up some 1 x 2″ scraps to act as our placeholder shelves so that we’d know exactly where the top of the bracket needed to sit.
The brackets came with two metal hooks on the back, so I used my favorite paper template method to help figure out where I needed to drill corresponding holes on the wall. The strip of paper is taped to the bracket on the top and bottom, but the tape on the sides is facing out to stick to the wall. And the two holes are punctured right where the notches are.
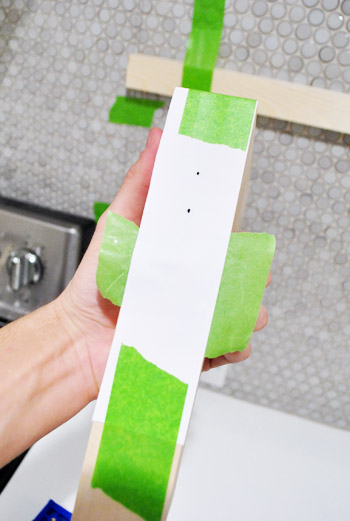
Then I put it in place on the wall, pressed the side pieces of tape against the tile, and carefully peeled the bracket away…
…leaving my paper template in place so that I could mark through the holes.
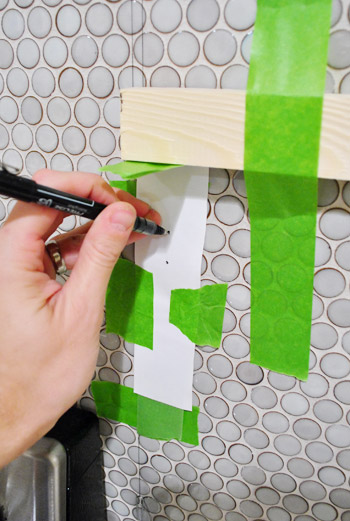
See? Easy right? Now just pretend it wasn’t super tedious to do it 11 more times.
And since I still cringe at the sight of our tile getting drilled into (especially 24 times!) I couldn’t bear to photograph it again, let alone share it here. But here’s some of the final product – a dozen pairs of screws waiting for brackets to be hung on them. That my friends, as subtle as it may look, is the look of progress.
Here’s a sense of how everything will hang. We did a test run of hanging one side to make sure the screws weren’t in or out too far, and to make sure they felt secure. They did! Phew. True to form, Sherry can’t wait to load them up with dishes and plates galore.
But as excited as we were to just get the darn stuff hung, we knew it would behoove us to do all of our priming/painting beforehand – (that way we wouldn’t have to worry about taping off the wall or getting paint on our grout). So this is where our shelf-hanging tale ends for now. Waiiiiiting for our primer to dry so we can apply two coats of paint (the same color that we used for our cabinets) and then hang it all up once it’s nice and cured. Oh yes, and we’re priming and painting the hood too, so that should look nice and crisp the next time you see it.
Once dried, it should be pretty quick to get everything hung so we should should have “after” pics for you by Wednesday, barring any unforeseen craziness (who are we kidding, it’s week two of three for our in-home book shoots and we live in Crazyville, but it would take a pack of wild boars running through the house for us to slow down on our shelves). What did you guys do this weekend? Any lumber stuff? Priming? Drilling through tile? Prepping 35 more secret projects to shoot for your book while your daughter ran amok and your chihuahua ate various crumbs leftover from the past week of visitors?

Lindsey @ arkadian belle woods says
I am so excited! I love that you chose this option versus cabinets! This is going to be amazing!
Amanda @ Our Humble A{Bowe}d says
Wahoo! Almost to shelving! And, I think using the brackets made your job much easier. I’m so excited to see them hanging. :)
Over the weekend, we cleaned and organized and I sanded our walls to prep for paint!
Melanie @ Mailbox Journey says
Those shelves are going to look gorgeous!
Rebecca @ the lil house that could says
Ahh! The suspense!! :)
Kristen @ Popcorn on the Stove says
Yay Brackets! I love the ones you chose (but I also like option #2 a whole bunch).
This is so exciting to watch the shelves go up! If I were you, I would’ve been freaked out about drilling into tile, too.
Heather says
They look lovely! In case anyone is nearer an Ikea we used the Ikea plain wooden shelves, cut them to length and used their wooden brackets as well. The shelves are wide enough for dishes and storage and once painted look great in our crooked, 1920’s farmhouse kitchen.
adriane Wacker says
You guys move so fast…it looks really great!
Katy says
I did not do anything as cool or intensive as deciding on new shelving but I did decorate my canvas tree for Valentine’s day! http://thefirstapartment.blogspot.com/2012/01/canvas-art-recycling-trees.html Yay! 9 days till I have to take it down!
~Katy
YoungHouseLove says
Aw, cute! Enjoy it while it lasts!
xo,
s
Janelle D says
Looking good, guys! I’m backing you up the bracket choice, the bottom ones are so pretty.
Katy says
Oops, wrong link http://thefirstapartment.blogspot.com/2012/02/canvas-art-tree-valentines-decor.html
Sorry!
YoungHouseLove says
LOVE the hearts!
xo,
s
Alison says
I would hate to have to keep all of that clean, it looks like a kitchen that would not really be cooked in.
YoungHouseLove says
Check out this post (we’re crazy so we did our research). Apparently the consensus is that if you have a great industrial strength range hood (check!) and put dishes you use often up there (soon-to-be-checked!) it’s all good! Rarely used items in cabinets get dusty too, so the key seems to be to have a good hood and to rotate things and use them a lot when they’re out in the open! We currently store lots of bowls and stacks of dishes out on the counter just so they’re close at hand and it’s not an issue, but of course we’ll keep you posted!
xo,
s
Alison says
Good Luck with it. I hope it works for you.
YoungHouseLove says
Thanks!
xo,
s
Marianne says
We have open shelving above our sink and I love it. Our stuff does get dusty but that is because it is not stuff that we use on a regular basis- I think like Sherry says, if you use it often it’s a non-issue kinda like a pot rack. I collect colourful and unique dishes from second hand stores and use our open shelving to display these. Because we don’t use them I just rinse them off every once in awhile and throw them back up there. Makes our kitchen look so nice and provides a light, airy touch above the sink in the absence of a window.
Tia says
I think this works because they don’t have cats! I swear cat hair is in every nook and cranny of our house 5 minutes after we vacuum and dust! There is no way we’d put our plates on open shelving like that (I suggested it and my husband said no way very quickly). However, if we didn’t have cats, I think this would totally work. I love the way it looks.
Sara says
You guys are awesomesauce! I just love reading about your kitchen.
Mallory @ R. Simple Life says
I’m so excited to see the finished product. Hopefully it will help me convince my husband that open shelves are COOL.
We built ourselves a 5×6 foot bookshelf this weekend. I’m officially in love with a piece of furniture.
Em says
It seems like those shelves are hung pretty close together. Like you wouldn’t be able to stack much on them because the bracket for the shelf above it is so close.
YoungHouseLove says
Must just be the perspective in this post! Each bracket is about 15″ apart, so there’s plenty of room for a giant stack of dinner plates, bowls, cups, etc. We also have around 15″ between each shelf so the brackets won’t touch each shelf or anything. We’ll share the pics of everything loaded up as soon as we get there!
xo,
s
Holly@Loveoflifeblog says
I can’t wait to see how they turn out! We also have bought those brackets for a diy mini mantel in our apartment. They are amazing!
Emily says
I totally guessed the bracket that you went with. It looks fab!
John@Our Home From Scratch says
trimming out a 2x… clever! Best part about a chihuahua (or in our case a schnauzer) is you have less crumbs to sweep up! Brooms not required.
YoungHouseLove says
Amen! Burger is THE BEST dustbuster!
xo,
s
Debbie~refreshrestyle says
Oh, this is going to be so pretty! Love the brackets! Love everything, can’t wait to meet y’all at HAVEN!
Debbie
Ashley @ sunnysideshlee.com says
It’s starting to look great guys! Can’t wait to see the finished product!
Christine says
Wow, it looks so bright and glowy in there! Love bracket #3, too, and think you guys are so brave to drill into the tile! I would be quaking in my boots to do that!
Brittnee says
Go guys go! The shelving looks great already! I’m taking a little inspiration from this shelf adventure too. I plan on putting some in my office as a (light) bookshelf. I can’t wait to see your finished product and show my husband so he knows what to do! He can learn from John’s handy work. Your kitchen is becoming very envy-inducing!
Krystle @ ColorTansformedFamily says
This past weekend we cleaned our house from top to bottom. It hasn’t been this clean since we had a baby three months ago. A clean house makes me so happy. I can only imagine how excited y’all will be to get your house back in order after the photo crew leaves.
YoungHouseLove says
Man, that must feel amazing! Our house is a WRECK! Hahah.
xo,
s
Regan @ RenovatingRothenbergers says
The shelves are going to be sooooo nice!! :)
YoungHouseLove says
Aw thanks Regan! We’re so excited! Is it Wednesday yet?
xo,
s
Melanie says
Those are indeed the best brackets, and I’m not at all biased by the fact that I used the same ones in my laundry room. ;p
YoungHouseLove says
Haha- I love it!
xo,
s
Kate says
It’s going to look great!! We added open shelving to our kitchen and used the same exact brackets. We even added them under our cabinets to give them a little more visual heft. You can see pictures about halfway down this page: http://house185.wordpress.com/house-tour/
Can’t wait to see them up on Wednesday. After looking at an empty wall for so long, I think the shelves will make a huge difference!
YoungHouseLove says
Love it! Your entire home makeover is amazing and so inspiring Kate!
xo
s
Kate says
Oh wow. Thank you so much Sherry! That means so much coming from you!
Ashley@AttemptsAtDomestication says
I will be sitting here staring at the computer anxiously awaiting these shelves to be done! I’m so excited to see them! I think this is the part of the kitchen I’ve been the most anxious to see, aside from the painted cabinets. We just Super Bowl partied it up this weekend and my husband made a fast food lasagna… http://www.attemptsatdomestication.com/fast-food-lasagna/
YoungHouseLove says
Mmmmmmmm, lasagna.
xo,
s
Lori says
Looking good, guys! Your bracket choice is also my favorite and I love that great tip for measuring the location of where to drill.
I didn’t do anything big this weekend – just created a cute little pillow for my son (which he loves!).
http://familylovehome.blogspot.com/2012/02/t-shirt-to-pillow.html
YoungHouseLove says
That’s so sweet!
xo,
s
Kate says
I can’t wait to see the shelves!
I had a fairly exciting lumber adventure this weekend: after some procratination, yesterday my husband and I went and got all of the wood needed to build a farmhouse bed from Ana White! (Well, a modification of one anyway, I’m going with plywood instead of board panels since I want it more modern, and a higher footboard and headboard.) I hate to shell out as much money as we did (about $180 and I haven’t gotten paint yet, eep!), but I’m hoping that it turns out well and that it’s worth the investment. I also now have plywood to build a sofa table I’ve been wanting as well as some currently unclaimed pieces, so that softens the blow a bit. All I got done yesterday was a little bit of the footboard, but I’m hoping to have it all complete (less painting) by the end of next weekend. I really hope it turns out well!
YoungHouseLove says
Ooh that’s so exciting! I’m sure it’ll be amazing!
xo,
s
MidloMel says
Great choice. Floating shelves make me nervous…like they don’t look sturdy enough. The bracket shelves in your inspiration picture are gorgeous. I can’t wait to see the final results!
Ellen says
We made major progress on the nursery! The baseboards have now been primed and the quarter round trim is in place. While I don’t have pics of that, I do have pics of everything else that’s been done so far!
http://www.kellyandellen.org/house/2012/02/nursery-updates/
Oh, and I also got two coats of green paint on the Craigslist dresser, thanks to my mom who held the baby…
YoungHouseLove says
Aw, moms are so good at holding babies! Congrats on all your progress!
xo,
s
carley says
I am amazed at the change in your kitchen. It doesn’t even look like the same house. You guys are amazing! I also love that you don’t break the bank to make your changes! The penny tile looks mote amazing in every photo!
YoungHouseLove says
Aw thanks so much Carley!
xo,
s
SherriEakin says
ARRRRGHHHH!!! SUCH A CLIFHANGER! Can’t wait to see them mounted on the wall. They look amazing so far! :)
Tania G says
Love it! We are redoing our kitchen and adding shelves as well…we keep going back and forth on if we should use brackets or not. Tough decision!!!!
Sarah says
What a tease! Something tells me that even if a pack of wild boars came through your house, you would still get the shelves done, because you live in crazyville…and a pack of boars is a normal occurrence in crazyville.
YoungHouseLove says
Hahah, this is true. We’d just ask them if they’d like something to eat or drink and go back to our project.
xo,
s
Robin @ Our Semi Organic Life says
Did you spray prime the brackets or use a brush? Angled brush or foam or what?
I’m also pro open shelving because I don’t know about you but we mostly eat vegetarian so the dirtiness of the grease alone wouldn’t be a worry in our house. I don’t think at least.
YoungHouseLove says
We used our usual small angled brush + small foam roller method. Hope it helps!
xo,
s
Amy says
We grouted the new glass tile/stone back splash in the kitchen. My husband INSISTED on waiting 30 minutes to follow with the wet sponge (according to the package of grout), so now he gets to meticulously finish cleaning the grout off the tiles, not me.
Any tips on getting dried grout off tile carefully but quickly once it’s dried?
YoungHouseLove says
Oh yes, we have a post about that which we owe you. We ended up using grout haze remover and then sealed ours. Hope it helps!
xo,
s
Amy says
Oh good. I’ll send the hubs to the store for some of that. We planned on sealing it anyways and have some on hand already.
YoungHouseLove says
Good luck!
xo,
s
Crystal @ 29 Rue House says
I love how you used the trim boards to make the 2×12 boards work for you and the brackets seem like a perfect fit for your kitchen.
We wall-mounted the big tv in our living room AND hid all the cords in the wall!! And I finally settled on a color scheme for our bedroom AND made my first mood board for it. (Should have post up about these couple of things in the next couple of days.) Plus my husband took both kids grocery shopping so that I could some good, uninterrupted house cleaning in!
YoungHouseLove says
Wahoo! You’ve been busy! Congrats!
xo,
s
Katie says
I flinch every time you drill into your tile wall and it’s not my wall. LOL. I like the trim along the edges. I think that will make everything look very finished and clean.
Good luck with the crazy. Bless you for all your hard work!
Nicole says
Looks great!
Karen F says
Wow, it’s all coming together! The shelves are going to look amazing, and I can’t wait to see how you “style” them (something I am horrible at, even though I’m pretty creative/artistic – I guess I’m more 2D than 3D!)
This weekend I had a house full of 5 year olds for my daughter’s birthday party. I made a pinata and also balloon garlands with your tutorials (as well as the Martha Stewart tissue paper poms) and the house looked SO pretty and festive! Thank you so much for all the party decor inspiration :)
YoungHouseLove says
Aw that sounds like so much fun! Congrats!
xo,
s
Jenn says
I just finished my new coffee table. I make my own stain with vinegar and steel wool and this time I think I left the wool in too long because the wood is a bit red/orange. I think I’ll eventually re-stain it but was wondering if anyone has a stain recommendation that is more grayish brown??
Thanks. And the shelves look AMAZING!
YoungHouseLove says
Anyone have any tips or ideas for Jenn?
xo
s
Lizzy says
Love the brackets you chose! I started on the bracket hunt this weekend as well but we still have a few more weeks to go before we are ready to hang OUR open shelving.
Two questions:
1.) What size screws did you use to attach the brackets to the wall? My biggest concern with open shelves is not having them secure/strong enough to hold the weight of our dishes!
2.) Did you drill pilot holes into the tile for the screws that will go directly through your shelf and into the wall or will you do that once your shelves are up?
YoungHouseLove says
1. The brackets came provided with screws and anchors meant to hold the weight of open shelving! That certainly was helpful. Maybe they were 2″ long?
2. Spoiler alert: We’ll be getting into this in the next post, but we decided the brackets were plenty sturdy without adding more holes to our tile so we’re 99% sure we’re going to end up filling in those pocket holes with putty and just touching them up with paint. We’re waiting to hang the shelves to be sure (since we can still pop the brackets off and add pilot holes if we think we need them). Will keep you posted!
xo,
s
lisa says
lloks great so far!
question though, can’t tell from the picture, but right under the words “See? Easy right? Now just pretend it wasn’t super tedious to do it 11 more times” is the tile cracked near the wood, or is there a marker line on the tiles? it looks cracked from the pic, but i could be wrong.
YoungHouseLove says
Oh that’s just black string hanging all over the place (and stuck in our tape)! We used that to mark our studs from the ceiling down!
xo,
s
Lara says
My brother & sister-in-law have two chihuahuas,& their floors are always spotless:)
P.S. Prayin’ for ya’ this week there in Crazytown:)
Jen @ The Decor Scene says
Love the brackets!!! Awesome choice! Can’t wait to see all of it up and painted. So exciting! YAY!!! :)
Reuben says
Those brackets and shelves are going to look great once they’re finally up on the wall. Adding edge trim to the shelves was a great idea, too.
Christa Mae says
John,
I’m so glad you clarified about your thread markers for your studs. I saw them in the range hood post, and I honestly thought you drew on the tile and about had a heart attack! I figured it out once you explained it in that post, but the clarification’s good…you know, so nobody else almost has a heart attack. :)
Those shelves are gonna look mighty classy up there. I definitely agree with your choice of brackets – and I think that brackets in general just give the whole open shelving concept a more ornate and cozy feel. Can’t wait to see the finished product!
Wendy says
Can’t wait to see these up! Makes me want to rip down the cabinets beside my sink and replace with shelving..it would really open up my kitchen…hmmmm…
gemma@thesweetestdigs says
Can’t wait to see how they turn out!!
Kristen says
I noticed in the inspiration photo from You paid more than me that the lower shelves have a piece of 1×2 running between the brackets (presumably for stability and/or more visual weight?). Are you expecting to need anything like this on the longer shelves to prevent sagging? How long *are* the longer shelves?
YoungHouseLove says
Our longer shelves are only going to be around 50″ long, which should be plenty sturdy with four brackets under them to support ’em. We used framing lumber for our desktop and it’s super heavy duty stuff (it’s literally what they use to frame out a house before drywalling). We don’t anticipate any sagging thanks to the brackets – even after years and years of heavy use, and of course we’ll keep you posted!
xo,
s