We could not be more thrilled to introduce Ana from Ana-White.com who’s swinging by with an amazing build-it-yourself project for anyone who’s ever wanted to DIY floating shelves. For those who don’t already know about Knock-Off Wood, it’s a site full of amazing designer-lookalike furniture plans that will save you hundreds- even thousands- if you’re willing to break a sweat and put in a little elbow grease to whip things up on your own.
And you know we love that Ana proves that woodworking isn’t only about guys in overalls. Ladies can totally make the sawdust fly just as well. So without further ado, let’s get down to business with the first project that Ana is exclusively bringing to all of our lovely readers. And don’t worry, she promises it’s a super easy and affordable undertaking, which is why we thought it would be right up your alley. Let the fun begin…
Sidenote: If you’re looking for additional shelving projects and ideas, this post is one big roundup of easy shelving ideas.
YHL: Hey Ana, so happy to have you dropping in to share a project with us. What are we building today?
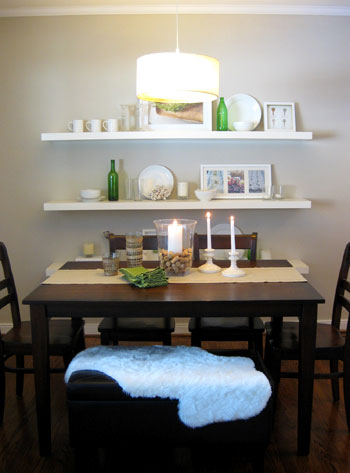
Ana: Youngsters, I want to hack your entire house. Everything. From Burger’s closet to the bean’s crib. If I could, I would write a blog called Young House Love HACKED. So the stalking starts today with my favorite feature in your home, those floating shelves in your dining area.
YHL: Sounds like fun. What level of difficulty would you say this project is?
Ana: Beginner. You, yes YOU, can do this project! No, not the Youngsters, they already have shelves. YOU at home.
YHL: And how much money should someone expect to spend to build all three 72″ long shelves?
Ana: For three 6′ long shelves, it will cost about $50-$60, less if you have some basic supplies like paint, screws, sandpaper and wood filler. In fact, the lumber is only going to run you about $30 (which means you’ll save around $60 as opposed to buying them). Bonus: You’ll have enough leftover scraps to make three 24″ shelves for free!
YHL: And about how long should this project take?
Ana: It will take a couple of hours to construct all three shelves, and then you’ll need to paint ’em. If you start in the morning, you can have these hung by night. I did!
YHL: Nice. What would our shopping list look like?
Ana: Here’s all you’d need to get ‘er done:
- 1 sheet of 1/4 plywood, sanded on one side or lauan ($15)
- 10 1×2 pine boards ($1 Each)
- 1″ brad nails (think the little tack nails that you use to put the back on an IKEA bookcase)
- 2″ screws
- 3″ screws (for mounting to the wall, you will only need about 10 of these)
- wood filler
- sand paper
- paint (I used high gloss white)
YHL: And what tools would we need?
Ana: Nothing too complicated. Here’s the list:
- measuring tape
- drill with countersink and drill bits
- saw (or get the hardware store to cut your boards for you)
- hammer
- sander
- paint brushes
- stud finder
- level
YHL: Sounds simple enough. What would our cut list look like?
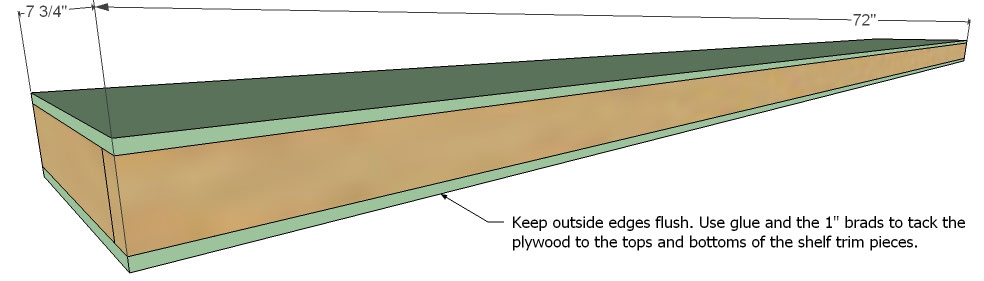
Ana: When you buy your plywood, have Blue or Orange cut it into strips that are 7 3/4″ wide, and 8′ long. I will refer to these as “plywood strips.” By having the store cut your plywood into strips, you can haul it in just about any car and it will be easier to work with to create the exact cut list below when you get home. And you may even be able to get the store to make the exact cuts in the list below, which will save you from any at-home sawing! Here’s that exact cut list for ya:
6 – Plywood strips @ 72″ (tops and bottoms of shelves)
3 – 1×2 @ 72″ (fronts of shelves)
6 – 1×2 @ 69″ (shelf frame)
12 – 1×2 @ 7″ (ends of shelf frame and shelf)
21 – 1×2 @ 5 1/2″ (shelf frame studs)
YHL: Ok, we’re ready. Hit us with your plans.
Ana: Alright. Let’s get down to business.
1. General Instructions. Work on a clean level surface. Have your plywood cut into 7 3/4″ strips by the hardware store. Then make all of your cuts as directed in the cut list. Always use glue and countersink your screws. Keep outside edges flush unless otherwise directed. Use proper safety precautions and equipment. Click plan to enlarge.

2. Frame. Set aside the frame, now let’s drill the sleeve. Predrill with a countersink bit pilot holes for your screws in the frame sides. Then use glue and the 2″ screws to fasten the frame supports to the frame sides. Keep edges flush. Click plan to enlarge.

3. Shelf Trim. Build the trim for the shelf by screwing the trim ends to the trim face. Click plan to enlarge.
4. Shelf Surfaces. Just like you would add a back to an IKEA bookcase, tack the plywood to the tops and bottoms of the shelf. Keep your outside edges flush. The better job you do, the less sanding later!
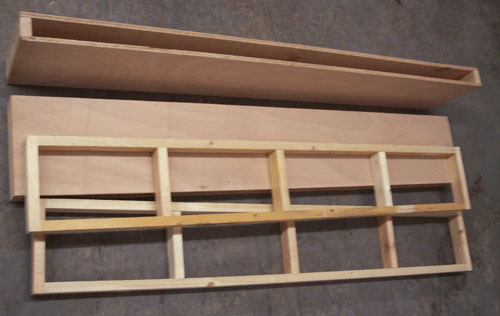
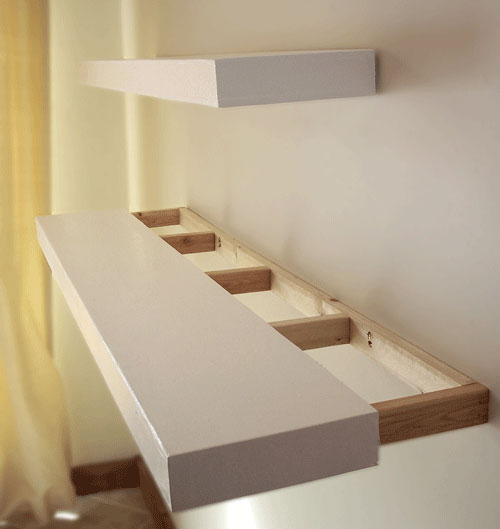
5. Test Fit. Your DIY floating shelves should look like the above photo (except I made two that are 48″ long, and you’ll probably be making three that are 72″). Dryfit your frames with the sleeves to ensure the frame fits into the sleeve. You may need to sand the frame in areas to get a better fit. You do want the sleeve to fit tightly on the frame to keep it in place.
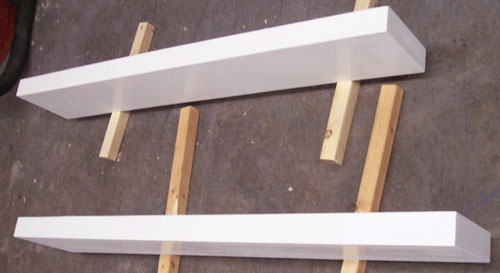
6. Wood Filler. Fill all holes on the sides and face with wood filler. Fill any and every hole if you want that shiny finish! Overfill your holes and let dry.

7. Sand. Sand extremely well, making all edges flush and even. If you need to, add more wood filler, let dry and sand again. The better you do at sanding, the shinier & smoother your finish will be.
8. Painting. Vacuum your shelves with a soft bristled brush. If you are using paint with primer, you can skip the primer. Otherwise, apply a coat of primer first. Let dry, and begin adding coats of high gloss white paint. I used three coats.
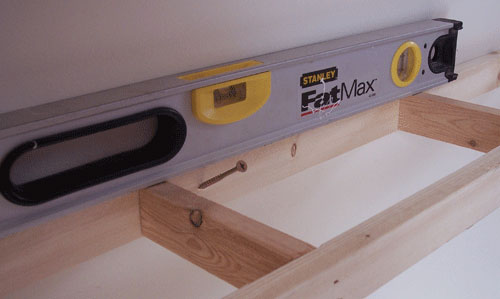
9. Hanging On The Wall. Locate the studs in your wall and mark where your shelf will be placed. If you cannot locate a stud, then you will need to use drywall anchors to hang your shelves. Then fasten with 3″ screws as shown above into the stud or anchor in the wall. Screw in a downward direction, as shown above. This will not just give you room for your drill, but it will also create a hook, or a stronger joint. Use at least 6 screws, in at least 3 different locations or studs. Use a level as shown below to keep things looking straight.
10. Shelf Sleeve. Slide the shelf sleeve over the frame, as shown below. The sleeve will fit snugly. If it’s too snug, you can sand down the frame a little – just a bit will make a big difference. You want the sleeve to fit tightly, as we will not be screwing the sleeve to the frame.
*And now for the Ana-White.com disclaimer: This plan has not been tested for weight or safety. Build at your own risk. Ana-White.com (or Young House Love) are in no way responsible for any loss, damages or injury resulting from this post.
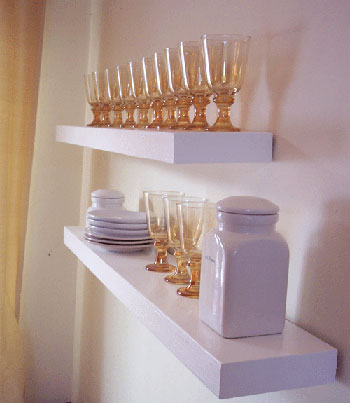
Onward to the after picture. Check out Ana’s amazing shelves. We can’t believe that she actually whipped up a pair for herself (she wanted to be sure that the plans that she provided were as accurate and detailed as possible). And we also can’t believe how great they look in her home.
So a big thank you to the amazing Ana for whipping up such a fantastic make-it-yourself shelf tutorial. What do you guys think? Will any of you be creating some sleek DIY floating shelves anytime soon? Let’s shower Ana with praise for stopping in. And of course, we’d love to see photos from anyone and everyone who decides to take these babies on. Happy building to one and all!
Update – Wanna know where we got something in our house or what paint colors we used? Just click on this button:


Ashley @ The Design Thief says
Knock off Wood is awesome! I want to be Ana when I grow up. This is such a good idea, I’ve been wanting some of these white, floating shelves ever since I saw them in your dining area :)
Rebekah says
Awesome new feature! Love it!
However… I would rather buy Ikea than make. It is cheap enough on it’s own. I think my time to make this exceeds the $60 cost savings. Let’s move on to making Pottery Barn things! :)
Emily @ Our Waldo Bungie says
Excellent! I’ve always wanted something like your shelves but alas, do not live near an IKEA so I couldn’t buy them…but now I think I am going to commission my husband to make these this weekend!!!!
Cindy @ The Flipping Couple says
Oh you guys, AWESOME new feature. Totally diggin’ the exclusive how-to. And now I want those shelves. Desperately want the shelves. Here’s to weekend projects!
Jessica @ How Sweet says
Love the how-to! We have some floating shelves in our family room, but they are so unsturdy! These look much better!
Cindy says
I am already a HUGE fan of Ana and Knock-Off Wood. She works so hard and is very giving to all of us who she doesn’t even know. And – duh! – her furniture plans are spectacular!
I haven’t built anything yet, but I have a long list. I need to get started… STAT!
xo
Liz says
I LOOOVE ME SOME KNOCK OFF WOOD PROJECTS. Our friends just made this …
http://knockoffwood.blogspot.com/2010/01/plan-how-to-modify-queen-sized-stratton.html
…and it came out awesome! It also save them hundreds of dollars!
Jennifer says
JACKPOT! Two of my favorite BLOGs in ONE place! Ana is amazing! (Of course, you guys are too!!!)
I know the Big white Box store has these for 20-30 bucks a pop, but you get a GREAT sense of satisfation and pride when you do them yourself. And these are SOLID WOOD!!
Thanks again, to all of you!
kathy says
Isn’t it cheaper and a whole lot EASIER to purchase floating shelves directly from IKEA? Like Ana’s concept. How about knocking off Design Within Reach?!? The Cellula crystal chandelier is a start.
YoungHouseLove says
Hey Kathy,
We’re all about offering up another option. Now people can choose to grab the Ikea shelves OR make them on their own. To some people, saving the $60 is well worth it. To others, it’s not and they’d rather just buy them (we’re definitely enthusiastic about buying things at Ikea at Casa Petersik, so we totally understand that rationale). And to yet another group of people, having solid homemade shelves is totally worth the time and satisfaction upon completion. Plus we can’t forget that many many YHL and Knock-Off Wood readers don’t live anywhere near an Ikea, and we wanted to start by sharing a project that was so simple and affordable that anyone could do it. Hope it helps!
xo,
s
p.s. With Ana’s tutorial you can also customize the length of the shelves that you build to fit any space (Ikea only sells them in two set lengths) and you can paint/stain them any color you’d like since they’re real wood and not laminate. Gotta love even more options!
Stephanie says
Right! Geesh…My closest Ikea is 4.5 hours away in Chicago. If I would have them shipped that would cost the 30 bucks anyway. Plus, you get the satisfaction that you built them. I made my own roman shade for my kitchen window. Yeah, I could have just bought one, but I beam with pride when I look at it. Ana is so very talented!!
Kyley says
I’ve been wanting a big one of these shelves but in a stained dark walnut.
Its kinda hard to tell in the photo of the unfinished shelf, but I’m guessing it probably wouldn’t look as good just stained? Because you could see the seams – and it wouldn’t just look like a solid piece of wood. Am I wrong?
YoungHouseLove says
Hey Kyley,
Good question! Plywood can actually look great when it’s stained, you’d just want to keep everything flush so there’s not much wood filler to interrupt the wood-grain effect. Oh and a deep walnut or espresso color is really pretty forgiving anyway, so the final effect should still be handsome, solid and well made. You can always do a test by bringing home a bit of wood and applying the stain before building anything- just to be sure you like the color and the overall effect. Hope it helps!
xo,
s
Jennifer says
I’m moving into my first house in a month and I was really wanting Knock Off Wood to have a tutorial on these shelves! Perfect timing! I have a few from ikea already and while it may be simpler to just go buy them, I really wanted a better “real wood” version instead of the laminate cheap-o ikea version. I still love the ikea ones (I do have 3), but I love this tutorial!
Leigh says
I love Ana! Her plans are awesome! Thank you to you guys and to Ana for giving us a way to make the floating shelves. I live no where near an Ikea, I’ve never even been inside one and I’m always up for saving money to put towards other things. This is fantastic!!! Thanks again!!!
Shelley @ Green Eggs & Hamlet says
This is awesome! I love Ana’s site and glad to see a little match made in heaven between KOW and YHL. Thank you, Ana! This makes me want to buy some tools, learn how to use them, and start building away.
Jessica says
Oh how I love ANA!!!!! I have been wanting these for a perfect spot in my bathroom. I know a bathroom, but if I can figure out how to change the size….oh they will be just beautiful. I am so excited!
katie says
woohoo, collaboration between my two favorite home blogs, knock off wood and young house love! this is exciting. =)
Jess says
I HEART this post!!!! I am totally game for Young House Love Hacked – all your furniture is so cute – and you usually stick to reasonable prices, but how fun would it be to build it!!!! Loved the interview from both YHL and Ana!
Babs says
I love this!! Perfect timing. We’ve recently shoved an extra bed into our office and I’ve been wanting to put up shelving to help with the space issue. I can’t wait to build these!
Loren says
I’m so excited about this KoW post, it’s like a crossover from the comics. This would be a Wonderwoman (that’s Ana) and the Fantastic Four crossover(that’s Sherry, John, Burger, and Bean)
Someone asked the question ‘Why not just buy these at Ikea?’ Well for me the 8 hours it took Ana to build this I could just barely make the drive to an from the nearest Ikea. So if you add in the gas money it would save me closer to 90$.
Also I think it’s fun to build things :) I think it’s great Ana can provide simple plans for projects like this.
Chelsea says
Thank you so much Ana and YHL! I’ve been wanting some large floating shelves like yours forever, but don’t live anywhere near an Ikea! Now we can whip some up ourselves for 30$ because we already have the other supplies. Thank you!
Macy Dawn says
I have added to my shopping list- I have been wanting to figure out how to make my own floating shelves for awhile now. Thanks!
Also, I spotted you too on my DIY Ideas Newsletter emailed to me this morning. Fun, fun, fun! Congrats!
YoungHouseLove says
Thanks for the heads up Macy! That news is a total surprise to us. Off to check it out…
xo,
s
Nichole@40daysof says
Great project! I have bought those shelves at Ikea before, but I can totally see the value in making them in wood. They would last longer and probably look better. Thanks for the intro. to a new blog!
http://40daysof.wordpress.com/2010/04/14/transforming-into-a-runner/
Amanda says
I love it! I love how these shelves look and how sturdy they are. I had my cabinet guy build a couple for my kitchen in lieu of cabinets on one spot. I may have to build these for my craft room!
Elizabeth says
Okay! Seriously! I have been trying desperately to talk my husband into floating shelves for a very long time. But since we live in South Africa- and the aesthetic is oh-so different- we can’t find the darn things anywhere! And of course no IKEA to fall back on. :)
These plans might just be just the answer! Thanks! xxoo
Sara says
For whatever reason, the white lack floating shelves (43 inches) are not available at ANY of the ikeas on the east coast, and you can’t order them online. So this post is very timely! Thanks!
Caitlin @That House on the Corner says
Oh Ana, the things you make us do. Here I go again dreaming up ideas… Ana is like crack for DIYers, you just keep winding us up and we go back for more!
Thanks for posting!
Caitlin @ That House on the Corner
travis says
We love Ana and her website! Thanks for the tutorial!
By the way, one of the most frustrating things about store bought floating shelves is the mounting hardware provided. They tend to be very unforgiving and inflexible. I just put up some small store-bought ones and they were clearly not meant to hold much or very heavy objects. Her plans are meant to be sturdy and can easily be adapted to fit any situation. Way to go Ana!
Happy building everyone!
Juliet Robinson says
Thanks for this post! I’ve been considering trying a KoW project but was a little intimidated… this one seems like the perfect first-project to try.
Another Ana fan here. I’ve been inspired to enroll in a beginning woodworking class at the local community college because of her!
kate says
I actually have a few of these Ikea Lack shelves waiting to be hung in my dining room, but I haven’t yet because I’m stumped on the height.
Yours look fantastic in your dining room. Do you have any tips on how high to hang them?
YoungHouseLove says
Hey Kate,
Good question. Our shelves are hung 17″ apart, and the bottom one is 23″ from the floor. We just held things up (while one person stepped back to see what looked best) and decided that with our standard height (8 ft) ceilings that specific arrangement fit the bill. Hope it helps!
xo,
s
Michaela @ The Gardener's Eden says
Ana and her blog are both amazing. I love her projects for indoors and out! She is singlehandedly bringing true democracy to the world of furniture design!
xo Ana ! Michaela
Ana White says
So the hardest part about build these sleeves . . . was the hanging! Finding studs, and then, drilling a hole in my pretty walls. You have to do that regardless of if you built or bought. But I find myself staring at them, and the shelves have become my favorite feature in our home.
When I knock-off designs from IKEA, I find you can save about 50%. But for many of us do not live near an IKEA (that’s me up here in Alaska), already have paint and screws (which is the bulk of the cost), or want a custom color or configuration, DIY makes sense.
John and Sherry, thanks for having me- and letting me hack your beautiful home. I find myself at your site all the time, and I’m starting to believe that moose antlers and beachy colors could go together! You are causing me to loose my design mind!
YoungHouseLove says
No thank YOU Ana for all your inspiration and expertise! You truly are a woodworking genius and we love sharing your shelf knowledge with the world! Here’s hoping we can team up again sometime. It’s too much fun not to!
xo,
s
marissa says
Very fun! I’m excited because I actually knew what a countersink was. I just learned about it this weekend!
Sarah Sarniak says
Wow, I love this and it looks so simple to do. Thank you!
crissie says
Looks like I found my weekend project. cool
Carol from JunkMail Greetings says
I am SOOOOOOO happy to see Ana on here! I read her blog every day and will soon be building a *sweet* kitchen island. What a fantastically awesomewonderful move to have her on here. From what I’ve read, Ana really is an incredible person doing incredible things. :)
Carol
Barb says
Thank you YHL for introducing me to Ana’s blog. I can’t wait to read through and find even more ideas for the new house I’m moving into in just 2 months!
misty says
I love Knock off Wood! I am going to give the plans for the mini picnic table to my Father in law to make! He is much more handy than I not to mention retired and likes to build things for our son. Ana is the best. Keep up the good work!
Ana White says
About sturdiness, of course this shelf has limitations too, but the longer the shelf, the more studs you can attach to, the sturdier – so go for the full 8′! And also, if you love a chunkier floating shelf, you can use a 1×3 board or a 1×4 board instead of the 1x2s. This will make the shelf even more sturdy. I used this design for my kitchen island with a 1×4, and it holds a granite counter top up!
YoungHouseLove says
Thanks for the tip Ana! You’re the best.
xo,
s
Yolanda says
Another HUGE Knock Off Wood Fan who is ecstatic to see plans for the floating shelves. I love IKEA and own several LACK shelves, but I have long felt hampered by their color palette. With a lot of prep and the right primer, sure the LACK shelves can be painted. I think it would be much easier to do this with a wood surface, than the foils and laminates used for LACK. But when it comes to taking them down and moving them around, I’d put my money on wood and screws over LACKS’s compressed wood composite.
Kate @ Domesticating Kate says
Thanks so much for these plans!! I’ve been looking everywhere for instructions on how to build something like these, but I’ve never found directions on how to build nice long ones like yours (and unfortunately, I live nowhere near an Ikea).
Ana, you truly are amazing and inspirational to women! Keep up the fantastic work, and maybe tackle that gorgeous West Elm daybed the youngsters have in their sunroom for your next installment of Young House Love HACKED. ;)
jenelle says
Great plans. You could modify these by added some crown molding around the edges and even some corbels on the bottom for a more Pottery Barn look.
YoungHouseLove says
So true Jenelle. Great idea!
xo,
s
Anna See says
What fun! 2 of my faves working together!
These look sturdier than the Lack shelves. Thoughts?
YoungHouseLove says
Yup, Ana’s versions are definitely sturdier and more high end looking since they’re made from actual wood and not laminate!
xo,
s
Susan says
Thanks for hosting Ana! She is one of my favorite bloggers. I might just add YHL to my regular reading list, too. It’s a testament to your talent that I love everything I read here even though you have very different style than me.
cheryl says
Thank you for featuring Ana on your blog today! I discovered Knock-Off Wood through YHL awhile back, so it’s nice that you’re spotlighting her again so that others who missed her the first time around are introduced to her and her fabulous work!
Okay says
This will be my weekend project. Thanks to Ana and YHL.
Allison says
This is awesome!! I looked online for a good floating shelf tutorial awhile back and I like this design so better than anything I found (we even gave up on building floating shelves because those designs just didn’t seem sturdy enough). Now, I’m going to revisit the idea! I know you have a disclaimer on the weight capacity of the shelves, but if you could ball-park-it (with no committment to accuracy, of course) how many lbs. would you guess one shelf could support? Thanks & love the new segment!
YoungHouseLove says
Hey Allison,
Here’s hoping Ana will drop in to answer your question soon! Stay tuned…
xo,
s
erin pearce says
Thanks for this tutorial Ana and YHL! we have some ikea lack shelves but my hubby always gets frusturated that they don’t work with the studs at every 16″, and the fact that they don’t seem to hold a lot of weight.
i’ll definitely be bookmarking this and will go this route when we plan on putting in more shelves, i love the fact that we can customize these now that we know the process!
yes, more YHL HACKED please!
Kate says
I was just thinking the other day about wanting to hack these shelves! I can’t wait to try it out!
Reagan says
These are exactly what I have been looking for! And please, I beg you, tell me where you got your dining room light–I’ve been hunting for one like that and can’t find one ANYWHERE (for under a grand at least!.
YoungHouseLove says
Hey Reagan,
It was actually a super cheap CB2 find. Here’s a link to something extremely similar that they sell now: http://www.cb2.com/family.aspx?c=120&f=4773
Hope it helps!
xo,
s
Jessaca says
I was just thinking about doing floating shelves! This is great. YHL, what do you think of doing a combination of a low buffet with a floating shelf or two above? I know I don’t want a buffet with a hutch and I don’t think floating shelves on their own will suit because I would like to store some things out of site. Thoughts? You guys are the best!
YoungHouseLove says
You could definitely do two floating shelves above a buffet for a ton of concealed storage. We didn’t have a lot of wall space to spare (between where the table and the walls was) so slimmer shelves were our choice… but we love the added function of a buffet! If you have the room, definitely go for it!
xo,
s