Alternate punny post title: The Updated Light Fixture Blues. That’s right, we’ve got the blues, but we’re far from sad about our “new” light fixture in the office. We just opted for indigo blue spray paint and added a giant drum shade to our old brass friend. Hence the blues joke. But you’ll get a closer look in a minute. Patience, grasshopper.
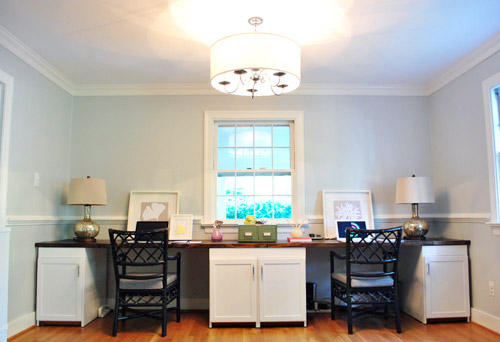
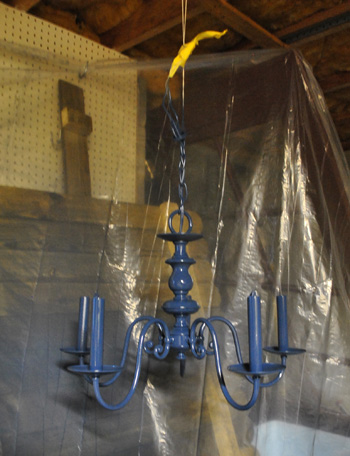
As a refresher, here’s what was there before (remember to ignore the lack of height due to the too-small frames leaning against the wall instead of proper hanging art and those we-probably-won’t-keep-them lamps on either side of our new desk). Our office was originally our house’s formal dining room, hence the whole formal dining room fixture feel.
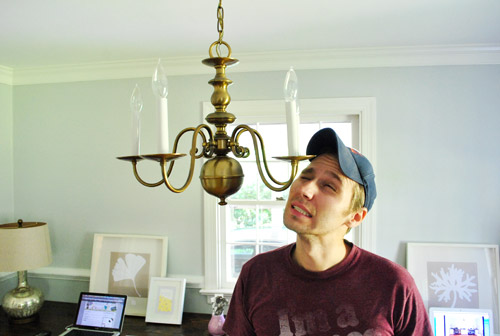
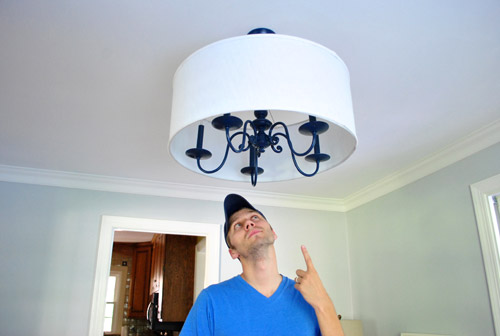
Speaking of its “feel.” Over the last nine months I’ve felt it a lot… with my head.
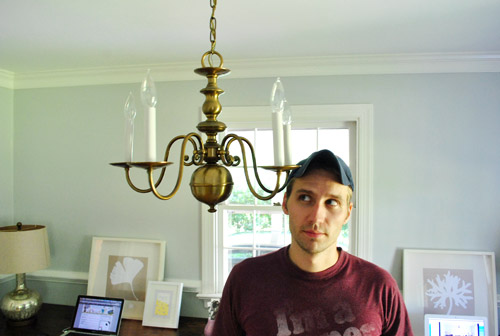
Though a more proper re-enactment of my many run-ins with the fixture would look something more like this. Just imagine a speech bubble with some expletives in it.
So even though the chandelier and I weren’t on speaking terms, after a brainstorming phone call with Katie B, Sherry convinced me that we should do our darndest to work with what we have. Again. See, we already spray painted a brass chandelier like this in our last dining room, so this time we wanted to do a bit more than just add a fresh coat of paint. So we decided to attempt to “modernize” it a bit by tweaking the silhouette, adding a big white drum shade around it, and bringing in some sophisticated-yet-kinda-unexpected color.
Luckily we had no trouble finding a jumbo shade at our first shopping stop, which is a local favorite of ours (The Decorating Outlet which we’ve probably mentioned ten million times – it’s also where we found Clara’s capiz chandelier and the shade for the pendant we made in our last office/guest room). The best part was that it was miraculously large enough (it had to be at least 24″ wide and it was exactly that).
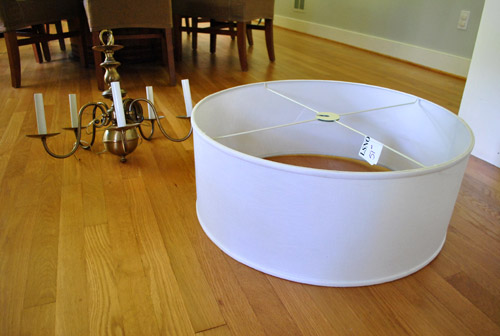
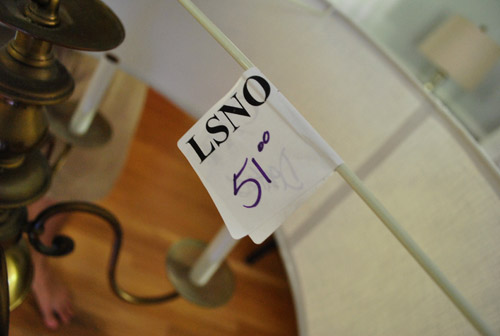
It was marked as $51, but after my better half sweetly pointed out a couple of subtle dents to the salesperson she was willing to sell it for $39. Score. I’ll point out the dents in a later picture – they’re not bad at all. But you know Sherry loves a deal. So even though $51 was a lot less than most 24″ drum shades like this $199 version that’s only 20″ wide (yes, ours is a full two feet wide), it never hurts to ask. And $39 was the magic number.
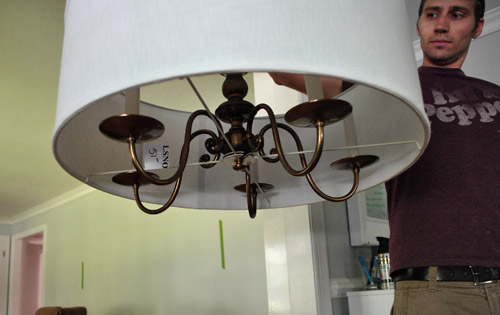
We also decided to eliminate the large ball on the bottom of the chandler since we felt like it would look funny sticking out of the drum shade (“like butt cheeks hanging out of a short skirt” as the wife so eloquently stated). Fortunately it just took a few twists of the bottom finial and the whole thing screwed right off (even the long rod that kept the ball part attached). We couldn’t believe it was hollow because we assumed it would be full of wiring or something.
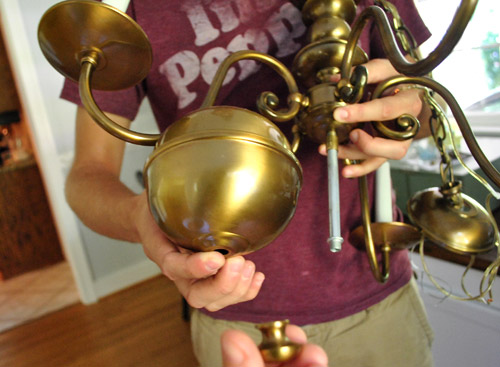
Here it is minus the ball (aka: with less junk in the trunk). We just reattached the finial to the shorter middle rod (since the extension rod that held the ball up screwed right off) and it was good to go.
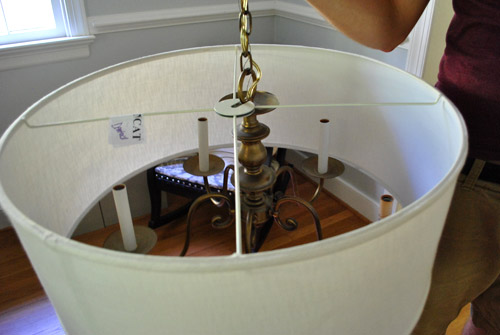
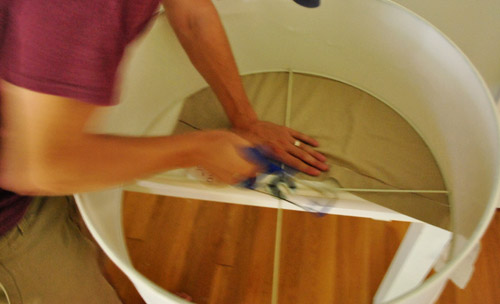
The next step was figuring out how to attach the drum shade, since it wasn’t exactly made for our old brass chandelier. The obvious choice was the bottom, since there was a nice little nub for the shade’s ring to slide on to (and the finial could be screwed back in to hold it up). It almost worked, but we didn’t like the idea of the shade’s straight & narrow crossbars being so in your face. They kinda messed with the original curves of the chandelier – ya know? So I gave it one of these faces and we moved on to the next idea:
The obvious alternative was to hang the shade from the top (so the cross bars would be in the background instead of the foreground). The only problem was that the shade’s top-attachment-thingie was too narrow to slide onto the top of the chandelier. Harumph.
So we decided to improvise. The existing piece of notched metal had to go. Sherry was able to pry off half of it without a problem – just a little flick of the screw driver while steadying the “legs” so it didn’t tweak the shade.
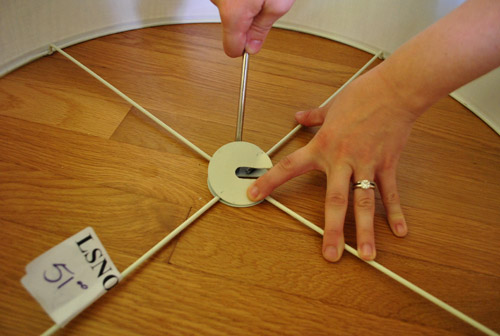
But the other half was more stubborn. We tried lots of tools, but it was requiring so much force that we started to get nervous about damaging the shape of the whole shade. (PS: You can see a couple of the small dents in the upper right of this picture – which are nearly impossible to detect from the outside of the shade).
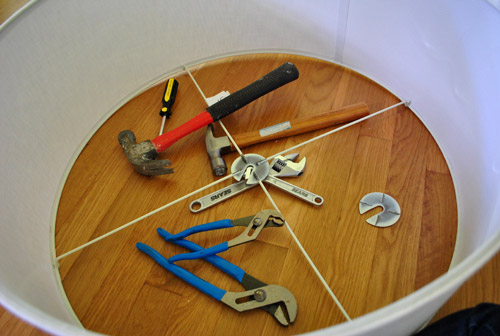
So we did what any demo-happy people would do. We broke out the hacksaw. Sherry was kind enough to photograph me looking like a sawing superhero, but it was actually she who did most of the sawing. Three out of four “legs” actually. She’s my hacksaw heroine.
Removing the rest of that ring thing was just half of the battle. Okay, maybe a third of the battle. Because these four rods floating in mid-air certainly weren’t going to solve our problem. They needed to be stabilized by something, and that something needed to somehow fit onto our chandelier.
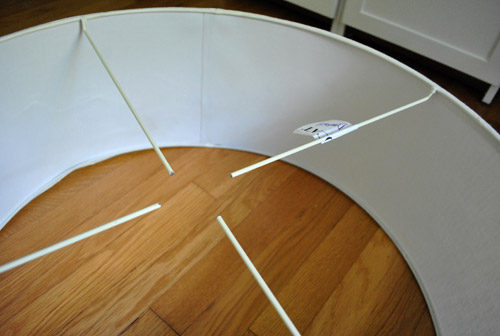
Luckily we found some spare 3″ binder rings in our office-supply drawer that were big enough to fit over the top of the chandelier. After a couple of attempts at super-gluing one to the four rods (and having the ring break off within seconds of trying to pick up the shade) I decided to try wiring it two of them together, thereby sandwiching the shade’s four rods. I just used some craft wire that we had around (pretty thin gauge stuff so it was easy to bend). The method was far from complicated. I just (messily) tied some wire round and round – sort of making a figure eight shape to secure things. I wouldn’t earn any merit badges for my wire knots, but they did the trick (and won’t be seen in the final assembly anyway, so… yay).
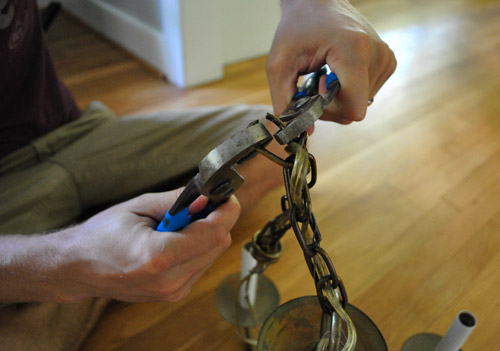
I can’t believe I haven’t mentioned one of the most important steps in our chandelier project: painting it raising it so I don’t hit my head anymore. This involved shortening the chain that it hung from and snipping the wiring to match the new height. Once we determined how many chain links we wanted to keep (by Sherry holding it up as I walked under it, a very scientific process) we just pried off the extraneous rings with two channel lock pliers. It was nice and easy – and a big step toward me (and my delicate man face) enjoying our final product.
Painting it was a pretty important step too. At first we thought about something smoky like an un-shiny charcoal grey (not quite black, but close – sort of like a matte gunmetal color). But we thought it might be fun to take a little subtle risk with a rich deep color. And while in the spray paint aisle evaluating our options (yellow, green, teal, and even orange – all of which we might bring in a few other ways with things like upholstery and art), a can of indigo blue spray (in a satin finish) caught our eyes. Perhaps a nice nod to the backs of the built-ins in the adjoined dining room?
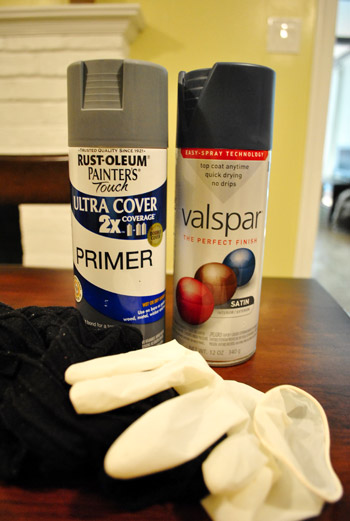
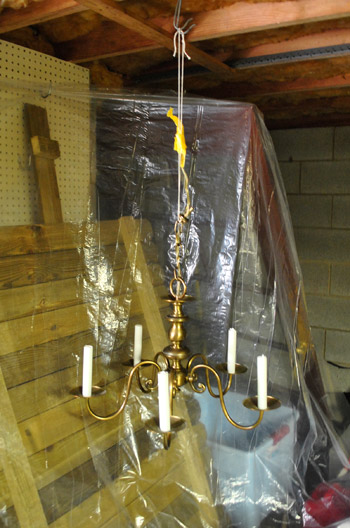
So Sherry gathered her supplies: spray primer, our freshly purchased indigo spray paint, rubber gloves, and some sexy black socks (you know, so she can impress all the neighbors with these legs). Because she needed to spray it while hanging (for the most easy-access) we decided to use the basement (with the door open and an equally-as-sexy-as-the-socks gas mask) where we could hang it from the ceiling and surround it with a drop cloth.
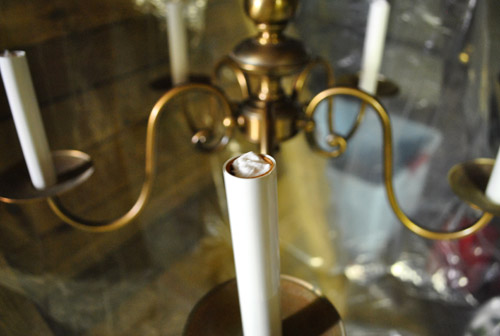
We were also sure to stuff some paper towels in the sockets to keep paint out of the interior part where the bulbs screw in (no sense in gumming up the works).
Sherry first did a coat of spray primer, which was a pretty cool color in itself. For a second we debated just leaving it…
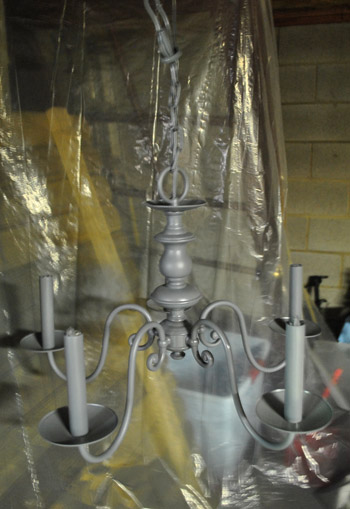
…but after going for the indigo we were immediately happy with the choice. It makes the whole thing look classic, but updated at the same time – at least in our humble what-the-heck-do-we-know opinion.
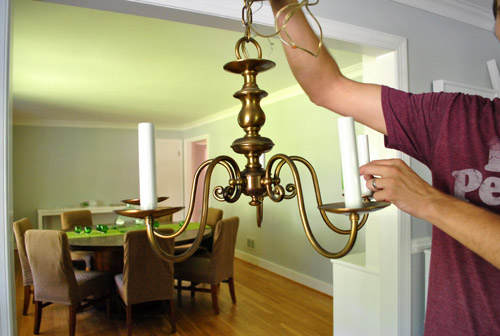
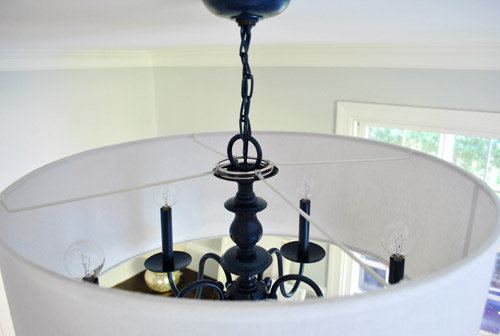
I don’t have many (okay, any) pictures of the process of re-installing it because it took all four of our hands (Clara’s hands were busy napping and Burger’s paws were probably partaking in a sleep-sesh too). But after sliding the shade down the chain so the rings rested on the top of the chandelier’s fluted center part (there’s a detailed pic of this coming up) Sherry held the whole thing up while I re-wired it to the ceiling in the same manner in which I had taken it down. That’s the extent of my electrician knowledge – just carefully redo what you undo. And I turn off the power to the entire house just in case things aren’t perfectly marked in the fuse box (they don’t call me John “Paranoid” Petersik for nothing).
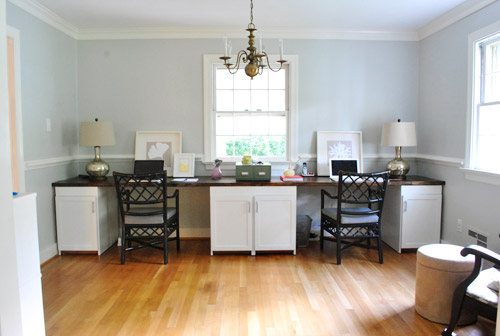
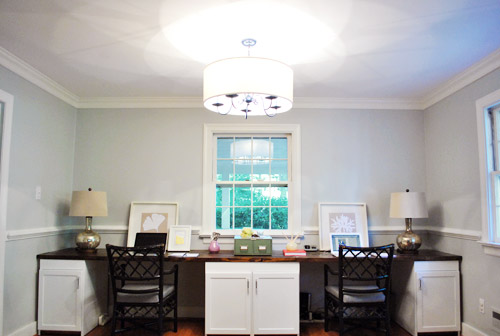
And voila. The rich blue color is sort of hard to see in pictures but it’s nice and clear in person.
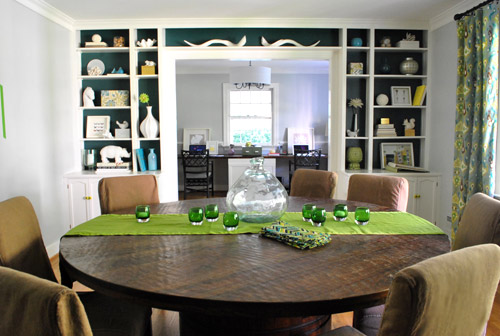
We love that it’s clean and understated from afar because we someday plan to drop a huge chandelier over the huge dining table (and didn’t want the office fixture to compete).
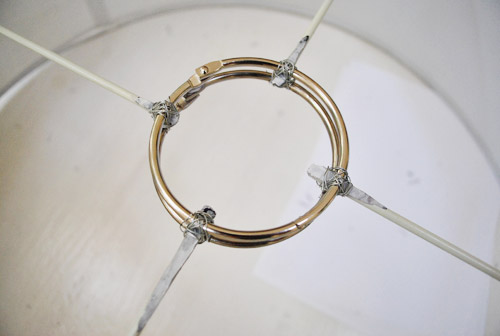
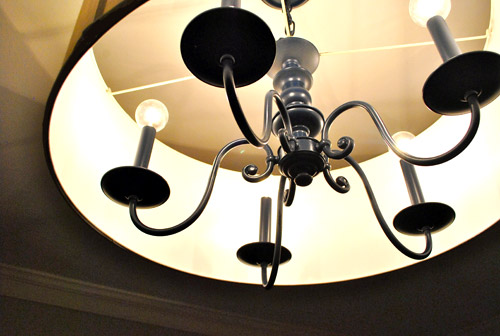
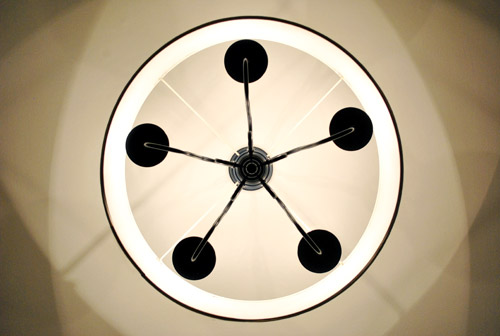
Here’s a shot from the top so you can see how the binder rings rest on top of the chandelier’s middle flute thing. Since the rings are smaller than the disk that they’re sitting on, they’re completely invisible from below. So only the flies on the ceiling get to enjoy this vantage point.
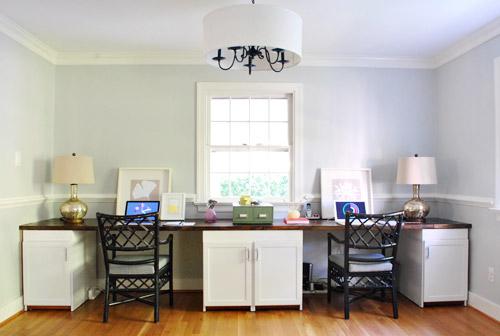
And of course, one of my favorite features of the new fixture is that I can walk right under it. Oh the simple pleasures in life. For you detail oriented folks, the bottom of the chandelier is 78″ from the floor.
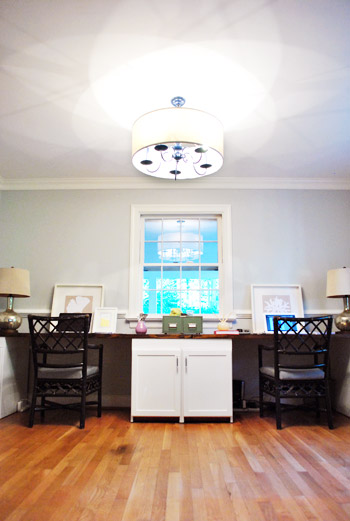
As much as we love the light off, it really comes alive when it’s on. The room feels light and bright and the shade diffuses the light much more evenly, meaning the chandelier no longer casts creepy five-legged shadows of itself on every wall.
And we think the kaleidoscope pattern that it makes on the ceiling is pretty nifty.
It’s also a really stellar size in person. The giant 13 foot desk could easily dwarf something smaller, but the light colored shade and clean lines keep it from feeling too heavy so it’s nice and airy – even with the deep blue tone on those ol’ brass legs.
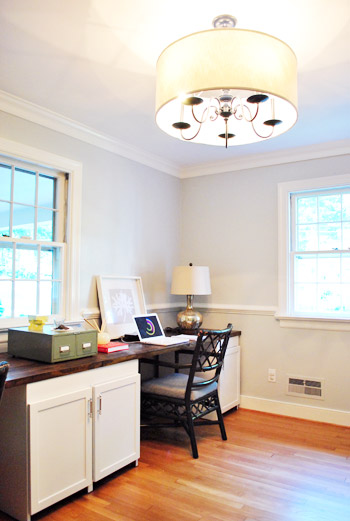
And oh yeah, we swapped out the traditional “flame” light bulbs for more modern globe-style bulbs (from Lowe’s). It’s a small detail, but we think it makes a big difference in crisping things up (we first fell in love with round bulbs around four years back when we used them on a similar dining chandelier in our first house that we spray painted white). We looked for CFL versions, but no dice- although we hear most things are going LED now, so here’s hoping they make little round chandelier ones soon.
In summary, we love it. Here’s the view from the floor (where Clara and Burger actually spend a fair amount of time). And speaking of the bean, she’s learning so many new words these days. It charmed us to no end when she woke up from her nap after we hung the “new” fixture and pointed right up at it and said “oooooh, light.”
Even though the update wasn’t totally free, it certainly beats the price of paying for a whole new fixture. Especially anything that’s two feet wide. Here’s the breakdown:
- Chandelier: $0 (already owned, but we’ve seen them for under $10 at yard sales and thrift stores)
- Drum Shade: $39 (from The Decorating Outlet, negotiated down from the already discounted price of $51)
- Binder rings & wire: $0 (already owned, maybe $4 if you had to buy them?)
- Tinted spray primer: $0 (already owned, but it’s around $7.50 from Lowe’s if you need some)
- Indigo spray paint: $3 (from Lowe’s)
- New globe light bulbs: $9 (from Lowe’s)
- TOTAL: $51
Not bad considering a nearly identical version (minus the deep blue color) was recently sold by Pottery Barn for $299 (looks like it’s currently out of stock).
I’m sure we’re not the only ones who’ve updated a chandelier or other light fixture, so we’d love to hear your experiences and even see pictures if you’ve got a place to link to them (like Flickr or your blog). Has anyone else gone for a non-traditional-but-surprisingly classic color? Or found another way to make an old fixture feel fresher? Who else hit their head on a light at least five times a week for thirty six weeks straight? Why the heck did we wait so long on this update anyway?

Sarah CC says
I love it! Never again will I throw away an ugly brass chandelier! But I must say that I cringed when I saw the photo of Sherry trying to remove the notched metal ‘thingy’ with a screwdiver on the wood floor – if that had been me, I’d of had a new gouge on the floor to show off!
Kelly @ Corner of Main says
Looks awesome! I love the color. I recently painted the old gold light fixtures in our bathroom with (your favorite Sherry) Oil Rubbed Bronze spray paint. They look fabulous; who needs new fixtures when you can just spray!
Amber says
Looks Great!
toni from says
I love the new chandelier. It looks fantastic and what a great price. John, I have thought this for awhile but you look like James Franco. Has anyone ever told you that before? Look at the picture on this post, I believe it is the second one down where you are making the “I hit my head on the light face” and you’ll see what I’m talking about.
YoungHouseLove says
I see it all the time! When John smiles I melt. Same thing with James Franco. Haha.
xo,
s
Nicole Turnbull says
just painted a similar looking chandelier over the weekend, but in a metallic purple. Now i will be on the hunt for the little round bulbs, so sweet!
YoungHouseLove says
Ooh purple sounds fun!
xo,
s
Lindsay says
Love it! I really want to add a shade like that to my ceiling fan…we are renting so it would be better to do that than change it out. Great idea!!
SushiMama says
Me likey! And, I love the above suggestion about painting the chairs the same color, but totally get that you want to wait and see what fabric you end up with. Nicely done!
Julia @ Chris loves Julia says
I am not sure which I love more–the new, updated fixture, or that navy-colored spray paint. Yowza!!!! I think it’s the combo.
Stephanie M. says
LOVE! LOVE! LOVE!!
Laura@JourneyChic says
Love, love love!! The risk you took with the blue paint was well worth it – the dowdy piece now loos so fresh and modern. Like something you’d find in a hip boutique! Awesome!
Manda says
Love the change and I can totally see that blue spray paint getting a lot of use on other projects!
Shanna says
You guys are complete geniuses! Why go out and buy something brand new when you can transform what you have. LOVE it!!
Jen says
Fabulous. I saw this a few days ago – if you want to add more bling (I mean dimension), this could be the way!
http://littlegreennotebook.blogspot.com/2011/09/lining-lampshades-with-metallic-paper.html
I am in the middle of my office reno also. Thanks for the inspiration. I was ready to buy laminate counter tops, but I am going the same route you went as soon as I have the time and can figure out a 25″ depth.
YoungHouseLove says
Isn’t that an amazing project? Love that blog!
xo,
s
Elisa @ What the Vita says
The perfect solution and the blue is a great color choice! Wish I could see it a little better. I guess you will just have to host a in-person party for all of your readers once your house’s done ;-)
We had a light update recently, too! We updated a old ceiling light I got from CL for the little baby that’s coming soon – see it here http://whatthevita.wordpress.com/2011/09/07/is-it-a-bird-is-it-a-plane-no-its-a-white-ceiling-light/
YoungHouseLove says
So cute! I love it. And the “baby goes here” label. Haha.
xo,
s
annabelvita says
Have you seen this giant eraser? It made me think of that thing you have for Clara’s head in the bathroom – https://pinterest.com/pin/194988023/
I had this crazy idea on the way to work today of painting a tree above either side of your desk. Something like this http://www.ohdeedoh.com/ohdeedoh/levis-farm-fresh-room-nursery-tour-155756 – totally wacky and random and probably too much to compete with the dining room built-ins. But just ignore that one, I don’t even need a response.
Anyway. My poor tall (6ft8) boyfriend can empathise with John. His poor head has a permanent lump on it from ducking through tiny english doors. (My mum’s house is 17th century and full of beams so that’s the worst).
YoungHouseLove says
Haha, I actually like the idea of adding some interest with paint to the walls- we ordered that fun feather stencil so here’s hoping it doesn’t kill us!
xo,
s
Maren says
I love that the total cost equalled what the shade originally cost!
YoungHouseLove says
Oh my gosh- didn’t even think about that. Might have to add that point because it’s kind of hilarious!
xo,
s
LMN says
love love LOVE the blue. even without the shade. i totally have to do the ugly ole thing in my kitchen now. but with a nice sparky red :-)
Shannon says
We had a formal dining room that we turned into a playroom. My husband and I both smacked our heads on it often. We finally decided to “fix it” when we were selling the house by using wire to shorten the chain. It didn’t look good, but at least potential buyers didn’t smack their head on it.
I love the chandelier. Going to show the hubby tonight! I’m thinking a drum shade would be perfect for our current dining room!
rachael says
Looks great! Our daughter has one in her room, now I’m thinking of how to convince my hubby to help me with this :) Also, do I see a new console table by the front door, or is that the old desk and is it there to stay?
YoungHouseLove says
That’s the old desk. Probably won’t stay though- just shoved there for now.
xo,
s
Megan says
I have to say – I was kind of skeptical after the first photo. I didn’t really dig the chandelier arms hanging out from under the shade. But by the end I was all over it…maybe it was my emotional investment after reading the rest of the post? Who knows? I think the huge drum also does a nice job of hiding a fixture that would otherwise look kind of awkward hung that close to the ceiling.
Jessica @ Quirky Bookworm says
Way to go Mr J Paranoid Petersik and wife, looks awesome! :) I’m really anti overhead lighting (gives me head-aches) but your description of the shade’s softness makes me wonder if I just need to talk everyone I know into putting shades on their chandeliers!
Sarah says
I love it! You’re right, a fixture like that would be no less than $200. Katie B. is a thrifty lady – glad you took her advice and reused the old light. It’s fun to keep updating pieces like that, it gives them a new life. I have these lamps that were the bf’s grandmothers. First, I got new shades for them…I was OK with how they looked for about a year, then I decided to ORB them…and they looked even better. Then I bought newer shades on Tuesday, from Tar-jay…(similar to the ones in your bedroom, they were the burlap drum shades) and they gave the lamps a totally new life once again. I goofy-grin every time it gets dark and we have to turn the lights on…it’s the simple things haha!
Lindsay B. says
Did you debate whether to paint the white “candlestick” part of the fixture or not? I’m not sure if I would have or not – I like the idea of them being white, but the blue is such a fun update! Love it and wish I could do this to my ugly brass apartment chandelier!
YoungHouseLove says
We just wanted everything under the shade to be blue so it wouldn’t look busy or stemmy- its nice because it ties it all together. But it’s definitely one of those personal preference things!
xo,
s
Reenie says
I never thought of painting the “candlestick” part either…but wish I would have painted mine. I certainly will on the next chandy that I plan to hang in my home (it’s waiting on me to paint it). =)
Meredith says
That is so clever. And it looks fabulous! Great job.
Donna says
Great job, guys! I love that you are always repainting or repurposing! Anyone can go out and just buy new stuff, but you guys manage to have a beautiful home, are creative, and save a bunch of money in the process! It’s just one of the things that sets u guys apart from similar blogs! Love it!
Rachel says
Looove the drum shade!
Check out our chandelier! http://eatingcrowpie.blogspot.com/2011/07/i-held-this-over-my-head-for-20-minutes.html
YoungHouseLove says
So sweet!
xo,
s
Melissa says
That turned out great. What a fun idea! I have been thinking of trying the lampshade trick on an ugly fan we have in our family room?
YoungHouseLove says
Do it! We added a large drum shade to a fan in our old den. Loved it!
xo,
s
Tracy says
Great update!!! I am dying to paint one of my brassy chandys… you’ve inspired me.
PS – I love that John has his official YHL work shirt on in these pics. I love me some Dr. Pepper, too. ; )
YoungHouseLove says
Haha, seriously. It’s the shirt for getting things done.
xo,
s
Amanda says
The first pic looks almost black, so my first thought was “there goes Sherry with the ORB again!” So glad you went with the indigo, it’s a very unique and pretty color. It kind of ties in the blue tint from the built-ins. Love it!
Bridget says
I was just on Betthany Frankels website (loooove her!) and she wrote about how she feeds her baby organic natural foods… it was a really interesting post I thought you guys might enjoy. What are Clara’s fav foods? How do you keep it healthy & organic with her?
YoungHouseLove says
Love me some Bethenny! Thanks for the tip. As for us, we just do organic: milk, yogurt, veggie omelettes, sweet potatoes, hummus and flatbread, veggies, fruit, beef & chicken/turkey, fish, etc. Anything organic and healthy that we can hunt down/think of. The girl even likes kale!
xo,
s
Dana says
Love it! You always impress :)
Andy B says
What a cool idea! I have been wanting to change and modernize the light fixture in the dining area of our kitchen and have been at a loss for what to put in. . . well, besides the $1.5k light fixture from Italy that I fell in love with. No way that’s going to happen. I may have to consider this.
Nicole says
The office is really taking shape – I love the new light fixture. I bet that blue looks fantastic in real life – especially the shot from the dining room area into the office. How exciting.
stephanie says
I have said it before and i’ll say it again….you guys are AMAZING! This is turning into my favorite office EVER!
Jenny @ Words On Wendhurst says
Love it. And I’m totally waiting for Bob to chime in and yell at you for making some random part of this process “so difficult!” :-P His comments always make me laugh. Also, I vote for using the curtain fabric on the chairs and painting them a coordinating green! You wouldn’t see them from the dining room, but it would pull both rooms together. :)
Chelsea J says
I tried to do this and gave up on finding the right size shade — those big ones are pricey!! Good work!
Marlena says
Wow – that looks great! I also loved the matte gray look. Very cool.
Holly@loveoflifeblog says
Wow! Well done painting the fixture that beautiful color before framing it with the Drum shade! I feel like I could easily see this in a magazine. It’s a great way to mostly use what you have instead of paying an ungodly amount for something just as pretty!
Katie says
I can’t believe this is the post this morning because I just completed the same project last night for our dining room! I had to do a little “how-to” video for a school project and I thought, “Do what you know!” I didn’t go crazy and do a fun color, but I ORBed it. Then squealed for 25 minutes about how shiny it came out. So easy and such a fun fix!
http://www.theredlens.com/2011/09/how-to-upgrade-an-ugly-brass-chandelier/
YoungHouseLove says
Love it! What a fun school project!
xo,
s
Lindsay @ A Walk in the Closet says
Wow! What an impressive before and after, all for $51. Thanks for sharing your DIY. Makes me feel like there is a chance for all those poor light fixtures at our local Goodwill. :)
Sophia says
Love it! I have to say I’ve been following your blog for about a month or so now and I’m getting more and more punctual at running to my computer to see your morning post. I’m really loving the process your office space is taking. I cross my fingers everyday that it’s another part of the office unfolding. Can’t wait to see what’s next! Thanks for all the inspiration!
Brittany says
I love it!! You’re whole office is lovely and the light fixture made a HUGE difference!
We must be on the same wave length b/c I just made over a couple $5 lamps that I found at the thrift store with indigo spray paint. I did it a couple weeks ago but haven’t had a chance to blog about it yet. Great minds….:)!
Annette says
I recently built my own lampshade. It was easier than I thought.
At first I wanted this: http://a6.sphotos.ak.fbcdn.net/hphotos-ak-ash4/190179_10150169631944257_581529256_8107650_359103_n.jpg
But when I saw the price tag, I decided against it: 70 EUR (ca. $95) for the shade and a smashing 200 EUR (ca. $270) for the base, that’s made from some kind of special material.
So, inspired by your blog, I decided to DIY. I went and looked for a cheap lamp with an ugly shade. The plan was to ditch the shade, spray paint the base green and just buy the afore mentioned 70 EUR shade.
I did find a nice base with working light fixtures on ebay to pick up close by. And when I got the base, I realized I liked the shade of the wood as it is and decided against painting it. I might change my mind at some point, but for now, I’m really happy with it.
But as life goes, by the time I found a suitable base, the shades had all sold out.
That’s when I realized there were Lampshade DIY-Kits that I could use my own fabric with. So that’s what I did. It was actually easier than I thought it would be. And that’s what it looks like now: http://bimk.wordpress.com/2011/09/14/1075/
Cost breakdown:
10 EUR for the base
33 EUR incl. shipping for the DIY-Kit
30 EUR for the fabric (with enough left to make at least another one (which we’re thinking about right now) – maybe hang it on the ceiling?
That’s a total of 73 EUR instead of 270 EUR. I like!
YoungHouseLove says
Gorgeous!!! I love it so much. And the cost breakdown is awesome!
xo,
s
Kara says
Love it! I think I know what we’re doing with our dining room light fixture now. :)
Rachel Tatem says
What a great yet simple redo!
Christin says
Love it!! So creative! : )
Leah says
soooooo FAB!!! Love it, guys! Great job!
Life Begins at Thirty Right says
It looks great! I did one very similar a while back but didn’t do the drum shade but now that ive seen it …. :-)
http://lifebeginsatthirtyright.blogspot.com/2010/08/dressing-room-lamp-re-vamp.html?m=1
There are the pics of my makeover!
YoungHouseLove says
Haha, love it!
xo,
s
Micha says
Fabulicious! I’m loving it!
– Micha
aka “She who added shades to a bunch of ceiling fan fixtures”
Jenna says
This is too funny. Once I read the post about the built in’s and saw that chandelier, I immediately thought that you guys should just get a round drum for it. I then today read the headline of this post and was very shocked. Well, I was at first sad I didnt’ submit my idea as a comment but I guess in the end it didn’t matter. However, I never thought about spray painting it blue but it is a nice subtle contrast to the room.