The ceiling hole is patched (see more on how I get that done here, complete with a ridiculous video of the process) – although admittedly the paint is probably still drying. But we’re ready to call this turkey done. For now.
This is one of those makeovers that wasn’t a total gut job, but was a series of smaller tweaks that added up to something pretty darn noticeable. In fact going into this we thought this just might be a “for now” fix that we’ll eventually redo completely (all that beige tile was hard to get behind) but now that we’ve made these upgrades we’re surprised how much we like the room – especially since we plan to redo the floor someday down the line with some hex tile, as seen in this mood board (more on that here).

So other than a flooring update down the line, we might just leave the beige wall tile as-is (or eventually have it professionally reglazed to be white for a few hundred bucks, like we did to the tub in our first house). Which definitely wasn’t something we thought might be our solution going into things (we really thought we would have to demo out all of the tile in this bathroom to really make it feel fresh and updated). So that’s a nice surprise, even to people like us who have been DIYing for a long time – you never know when something “for now” will charm you into sticking with it for a while longer! And as much as we love a sledgehammer, you know we also love using what we have…
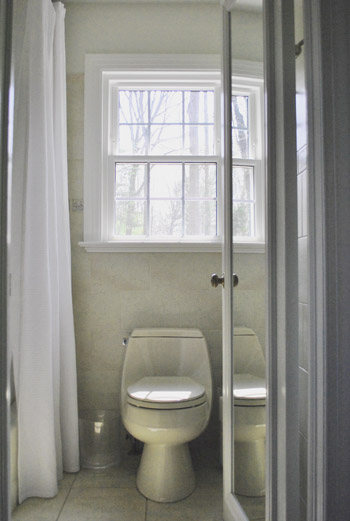
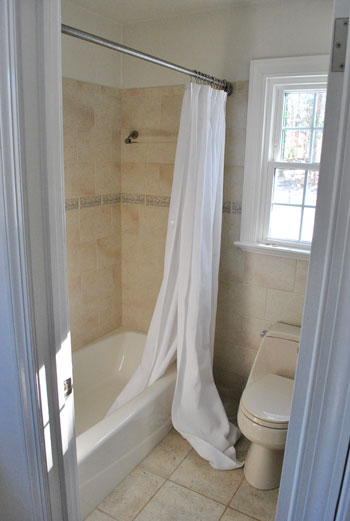
But enough chitchat. Let’s get to the before and after pics and the big ol’ budget breakdown. First the pics. Here’s the room before we did anything other than hang an extra long shower curtain at ceiling height (that’s one of our favorite small-bathroom tips – if you can’t trick the eye into making the room feel wider, you can at least make it feel taller and loftier by raising the curtain).
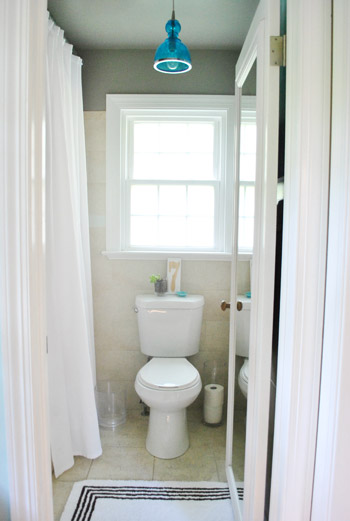
And here’s the room now, after some planning, some painting, some light-swapping, some art hanging, some trim-painting, a toilet-update, some window frosting, some shampoo wrangling, some door trimming, some border tile demo, some border retiling, and some light-moving.
Here’s another before pic from another angle.
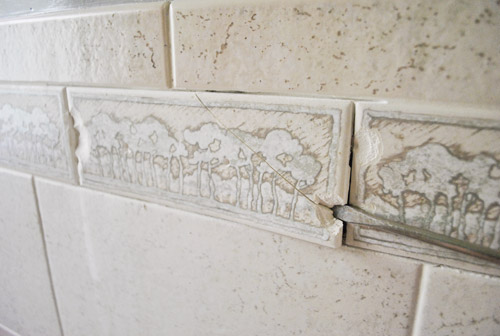
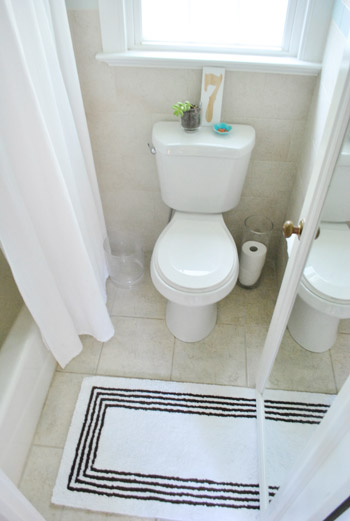
And the updated after pic from that same angle. See how painting the walls darker, painting the trim bright white, swapping the repetitive tree border tiles with clear glass ones, and switching out the old squat almond toilet for a tall white one made it feel a lot less like a beige box?
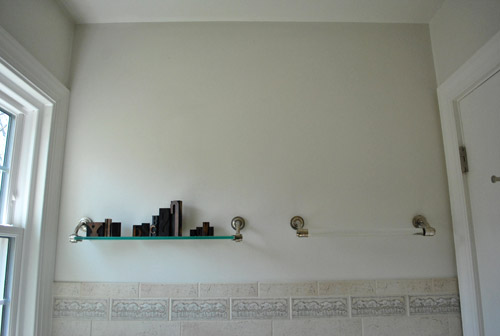
Here’s another before pic of the shelf and towel bar that we inherited (you almost felt like you might scrape your body on them whenever you walked in since it was such a tight space):
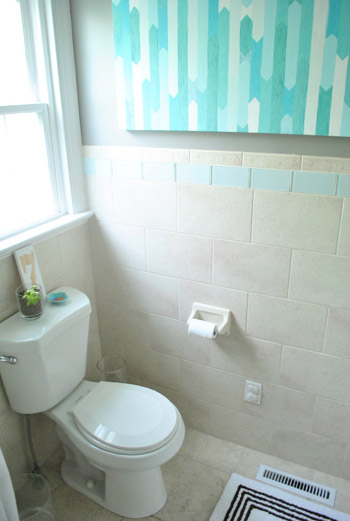
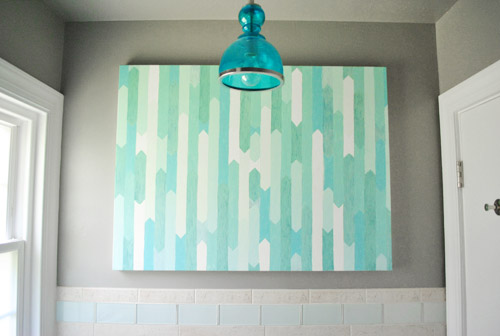
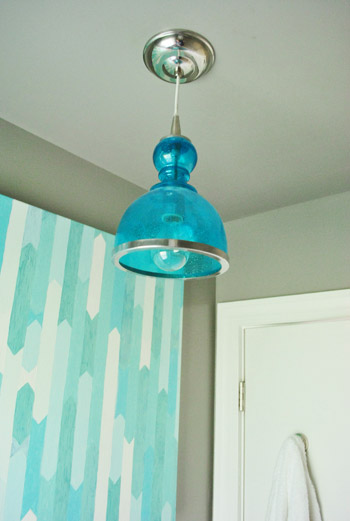
And here’s that wall now that we hung some DIY artwork I already had around and added a pretty blue pendant that we recently centered on the window and door:
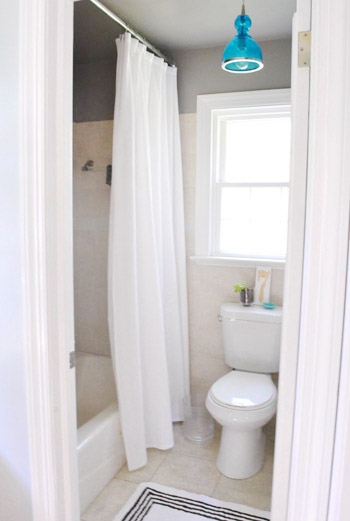
Here’s an old pic of the room from the hall before we even raised the shower curtain (it was taken on move in day)!
And here’s a shot from that angle now. It’s definitely not an entirely new room, but a few small upgrades added up to a nice little facelift that makes it feel a lot fresher, cleaner, newer, and less beige-on-beige. See how breaking things up with more white and dark gray paint along with some pops of cool blue make the tile feel a lot less pinky-beige than it did before we added those cool-toned accents and pops of white to temper things?
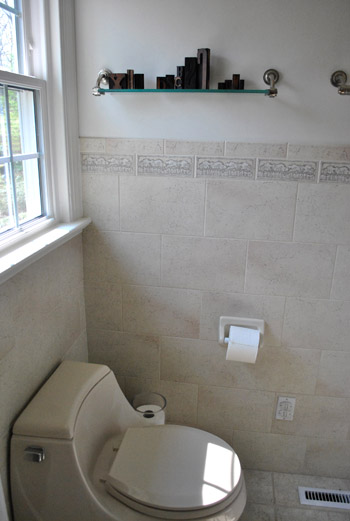
And since I can’t stop at just a few before and after pics, here are two more fun little detail shots. You know, for posterity.

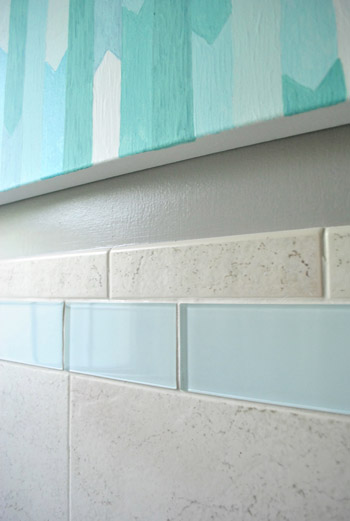
I think our favorite upgrade in here is the hardest to catch on film (in person it’s definitely what “shifted” this room from feeling old to feeling crisp and new), which is the little border tile switch-out.
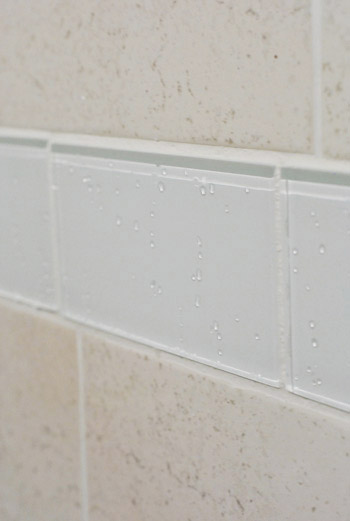
The new “snow white” clear glass tiles make such a difference (they’re not blue at all, they just reflect the accent color in these pics for some reason, so they look blue-green here).
My favorite thing about them is how they make little droplets of water that fall on them in the shower glitter like tiny glass beads.
Here’s a shot that shows how tiny the room really is. Somehow shooting the floor seems to capture it best as the tiny space that it is. Yup, it’s literally four tiles deep and around three and a half tiles wide. Teensy. But cute.
So now our bathroom to-do list looks like this:
paint the walls so they have some contrastreplace the boob lightpaint the cream trim whitehang some bathroom-friendly artcraigslist the toilet and replace it with a classic white onedo something to add privacy to the windownix the ugly and cluttered showerhead caddyremove the door so we can shave the bottom to allow for a rug/bathmat (and add a door stopper so it doesn’t squash the art)replace the border tile around the roommove the blue pendant light to hang centered in front of the window- finally get a bath mat <– since this one is borrowed from the guest bath, we still have to get on that
- replace the floor tile & possibly reglaze the wall tile, just to completely freshen this old beige box (phase 2)
And our budget breakdown looks like this:
- painting the walls a moody gray color (Benjamin Moore’s Rockport Gray in Natura, we only needed a quart): $16
- upgrading an old boob light for a blue glass pendant from a local outlet (for around $100 less than one by Ballard): $80
- hanging a painting I made about a year ago and painting the trim white (with trim paint we already had): $0
- selling our old beige Kohler toilet on craigslist (for $60) and buying a taller white Glacier Bay one for $88: $28
- frosting the window for privacy (without blocking too much light): $0 (we had frosting film leftover from another project, but it’s usually around $20 for a giant tube of it at Home Depot)
- adding shower caddies for shampoo/soap/conditioner storage: $22
- trimming down the door so we could actually use a bath mat (the door was so tight to the floor it didn’t open all the way since it got caught on an air vent in the floor): $0
- redoing the new border tile (more on that here and here): $84
- moving the light so it’s centered on the window and door instead of oddly close to the shower curtain: $0
- TOTAL SPENT: $230
You can spend $230 on a toilet or a bathroom light alone, so that total makes us pretty darn happy. Even though it’s tiny, we crammed in lots of updates and it was nice to take things one week at a time and just do as much as we could handle as we inched along. I’m telling you, the “no rush” approach really does cut down on the stress-factor of a bathroom redo (especially when you’re not demo-ing your only full bathroom down to the studs so you don’t have anywhere to shower like we did at our first house). What about you guys? Have you bought any new toilets? Updated any border tile? Painted the walls? Hosted any bath mat fashion shows? I can’t wait to get my bath mat fashion show on when it comes to finally picking one for this room (so I can finally return the one above to the guest bathroom where it rightfully belongs).
Psst- To follow this bathroom sprucing project from the start, check out this planning post, this painting post, this light-swapping post, this art and trim-painting post, this toilet-updating post, this window frosting and shampoo wrangling post, this door trimming post, this border tile demo post, this border retiling post, and this post about moving the light.

Sarah says
I absolutely love how it turned out!!!! The fixture is just awesome. Great job guys!
YoungHouseLove says
Aw, thanks Sarah!
xo,
s
SW says
People actually buy used toilets on Craigslist? That is really, really gross. All the bleach in the world doesn’t make that any less gross. But fortunate for you, I guess.
YoungHouseLove says
Apparently our old toilet was a $1200 Kohler one! So someone was glad to pick it up for $60! You’d be amazed what people will buy on craigslist!
xo,
s
Koliti says
Oh, who peed on that “lovely” poster’s tidy bowl man?
Sherry & John, I thank you for inviting me into your love-filled, creative, happy home every week :)
YoungHouseLove says
Aw thanks Koliti!
xo,
s
Kaitlin says
Crazy timing! We just posted this morning about starting our guest bathroom makeover. http://www.condo-nest.com/2012/07/be-our-guest-bathroom.html. Yours is such an inspiring budget makeover to comapre to- thanks!
YoungHouseLove says
Good luck with everything Kaitlin! I bet it’ll turn out awesome!
xo,
s
karen says
I think the tiles really make it. You guys are awesome, but you already know that! :)
YoungHouseLove says
Aw thanks Karen!
xo,
s
Jenn Leigh says
I’m in a bit of a roofing dilemma and thought this may be the fastest way to get your expert opinion. We are needing to pick out a shingle color stat and I was hoping the two of you could weigh in – it would be so very much appreciated!
Here is the link to our shingle color post.
http://www.homestylereport.com/2012/07/picking-shingle-color.html
Sorry again for the impromptu way of reaching out to you!
YoungHouseLove says
I like Harvard Slate!
xo,
s
Sarah K says
What a change a few hundred dollars make! This is so great to see. Thanks for teaching me how to update things without breaking the bank!
Katie says
Love the light the most! This is a great example of how working with what you have with just a few tweaks can make such a difference!
YoungHouseLove says
Aw thanks Katie!
xo,
s
Courtney says
We just moved into a house built in 1965. All of the bathrooms have the original tile which we love but one bathroom had been “updated” in the 80’s with oak cabinetry and brass candle sconces on the wall. We repainted and, because tile covers 3/4 of the wall, we were able to do 2 coats with a sample can from Bejamin Moore that we got for free with a coupon! I also followed your lead, and sprayed the mirror and the sconces with a crisp white spray paint. They look pretty good!. The only splurge was new vanity. Thanks for the inspiration!
YoungHouseLove says
Wahoo! Sounds awesome. Congrats Courtney!
xo,
s
{plum} says
your tiny loo looks perfectly refreshed!
two finishing touches, a lucite toilet paper holder and maybe a new outlet cover? anthro has some nice ones or maybe your next DIY?
keep the hits comin’!
~d.
YoungHouseLove says
Aw thanks! Yes, there are definitely lots of tweaks to tackle! We’ll keep you posted for sure!
xo,
s
Amy @Five Kinds of Happy says
It’s amazing what a little facelift can do! We’ve just done similar in our bathroom – it’s old but we’ve gone with the vintage style and a few pops of colour and I love it!
xAmy
Five Kinds of Happy
susan says
I’ll swap your boring beige for our 1948 Mamie Eisenhower PINK tile with burgundy trim-on ALL the walls, thankyouverymuch, along with a white tub and white sink.
Go figure.
Yes, we officially have the world’s UGLIEST bathroom!
Since we are moving in the fall, it’s all good; however, if we were staying,it’d be demo derby at Mark and Susan’s :)
YoungHouseLove says
Ooh deno derby sounds fun! But so does moving! Haha. Maybe the next house will have the best bathroom ever! Here’s hoping…
xo,
s
Catherine says
I love that you show the sort of update that I might actually be able to do (a gut job just isn’t always in the budget) and I can’t believe what a difference the ceiling height shower curtain makes. Definitely one to store in the ol’ memory banks for the future. Great job!
YoungHouseLove says
Thanks Catherine!
xo,
s
HelloDoorSeven says
Was it really so inexpensive? Incredible!!!
I love how it looks now! Please, come to my house and help me figure things out!!! Haha! I love your style guys… the soft tints with a splash of color! Amazing!
YoungHouseLove says
Aw thanks!
xo,
s
Chrissy says
It’s wonderful to see how you changed the whole feel of the room with small tweaks!
In Germany bathrooms usually have either a (passive or active) vent or a window, so that the moisture gets out and you don’t get mold. And I don’t know a single household with a ceiling fan in any room.^^ I just wonder if due to the “lighter” American building technique you needn’t air out through the window? I wouldn’t want the moisture of two people having a daily shower in my flat, because it would rather “settle in” than air out if that makes sense. I am always amazed when you guys just saw through the ceiling or wall where I’d expect solid bricks (every wall) or at least several layers (ceiling towards the attic, which can carry a man’s weight even if it’s just crawlspace). Makes for cool DIY-possibilities though!
Enjoy your work : )
YoungHouseLove says
The funny thing about bathrooms with air vents here are that sometimes they’re so necessary (we had one in our first house and definitely needed it) and other times you think you’ll need one, but you don’t! We were planning to add one here after we moved in, but then after a year and a half of living here and showering regularly, that room seems to have much better ventilation than our last one, so we don’t have a moisture issue in there. We just recommend living with a space for a while and seeing how it works, since sometimes what works in one house doesn’t work in another!
xo,
s
Anne says
I love the makeover! I do have a really nosy question though, because I don’t have a solution for it myself. – May I ask where you keep your toilet brush? I couldn’t spot it in any picture!
I hate that with the “fancy” decorative ones changing is expensive or impossible if you don’t buy new, but I do want to change them regularly, so I buy the cheap eyesore versions…
Love,
Anne
YoungHouseLove says
We have one in the house (in one of those little containers that it sits in) in the hall bathroom (since it tucks behind that toilet more and can’t be seen because of the layout in there). I just move it from room to room when I clean the toilets and then back it goes into hiding! Haha.
xo,
s
Eva says
Hextiles on the floor will totally make the room! I am all for small tiles on small floors! I hate it when people use big tiles on very small spaces so every other tile seems to have a cut.
Lindsey says
Love the mood board!!! We’re building a new house and I’ve been looking for some inspiration for our master bath. I especially love the color scheme…maybe I missed it (I know one is Rockport Gray and one looks white), but what are those 4 beautiful colors on your board?
YoungHouseLove says
Thanks Lindsey! I just pulled colors from the art/light, so those blues aren’t paint colors (although Benjamin Moore’s Quiet Moments is similar to those tones). And our favorite white is Decorators White by BM. It’s clean and bright without being too stark/blue/cold.
xo,
s
Naomi says
You inspire me. Now I want to go hammer some nails in my walls and finally hang all that art and those coat hooks (I need place to put my bags and coat by the door!) that’s been sitting in bags and boxes for, oh, going on 2 years…
YoungHouseLove says
Haha- you can do it! I’m cheering you on!
xo,
s
Amy @ a new old house says
Looks GREAT! I love seeing how little tweaks along the way made such a big difference (shows the importance of taking before photos to reflect back on too!)
Paige says
Looking good so far. Love the light fixture!
Also, will you replace the door knob on the door too? I see you are going with a more modern look and the knob appears to be brass? Just curious.
And I love your blog, keeps me motivated :)
YoungHouseLove says
Oh yes, that baby has GOT TO GO!
xo
s
Tracey says
You know I love you guys, right? It’s with that love that I humbly suggest getting a new toilet paper holder. I think a chrome or brushed nickel (my preference, but chrome would match your light fixture) one would kick the space up a notch too. Having said that, I realize you might end up jacking up your tile to install it, so if you don’t do it I totally understand. I’ll just stop reading your blog and lose all faith in you guys. LOL. No, not really… (I still secretly dream of you house crashing me and our daughters playing together and us being bff’s like you and the Bowers, cuz me and my hubby are all diy too and we’re the same age and you really need a new toilet paper holder! We could even come down there and install it for you! LOVE YOU!!!!)
YoungHouseLove says
Aw thanks Tracey! That’s totally one of those tweaks we’d love to make as we go! We think we can use a dremel to get it out just like the border tile and replace it! Things like that and the brass doorknob are definitely on our tweak list! In the meantime it’s the same color as the wall tile and the tub, so it sort of blends in – at least that’s what we’re telling ourselves until we have the energy to get on that, haha.
xo,
s
Melissa @ HOUSEography says
I think it looks fantastic – especially considering the budget. I agree the tile is livable even if you wouldn’t have picked it. The green glass really dresses it up. Can’t wait to see what you do with the sink area.
Brett says
Question: I notice that the shower surround tile doesn’t go all the way up to the ceiling. I have an old 1980 house and am retiling a tub surround. Is it pretty common these days to go all the way up to the ceiling w/ the tile? Or stick to that 5 foot mark?
Or do I need to just sack up and decide? ;-)
YoungHouseLove says
Yes, I would go all the way up! It’s a more modern choice (one we made in our first house’s bathroom when we gutted it). Makes the room feel taller!
xo,
s
Starr @ The Kiefer Cottage says
I think the bathroom looks great. You luckily had a good start even if it was bland.
We just recently replaced a toilet upstairs–which was nice since the old one was from 1958 (stamped in the lid) and the wooden seat gave me splinters. Our downstairs bath, however, is very similar to the one in your old house and should be gutted. So tiny I’m not even sure we’ll be able to find a toilet that fits (the front can’t be more than 25 inches from the wall). Maybe one day!
Brett says
Thanks for the reply! You know, I thought I noticed that subway tile all the way to the top on that renovation you’re referencing. I also need to go and see how you fixed that rotted floor issue.
Love your style, by the way! Great ideas seem to flow on out.
YoungHouseLove says
Thanks Brett! Good luck with everything!
xo,
s
Valerie says
I love the bathroom rug, can you tell me where it’s from?
YoungHouseLove says
Thanks! It’s from Target (stolen from our guest bathroom, so it’ll go back in there once we find the right rug for this room).
xo,
s
Meg says
Looks great!!
Would you mind sharing what template you guys use for mood boards? Or if you want to keep it a secret to you have any others online you would rec?
Thank you.
Meg
YoungHouseLove says
We just use photoshop, so it’s not a template. I cut things out so the background is gone, and just add numbers and I’m good to go!
xo,
s
Marissa C says
Ha! I’m about to paint our hall bath Rockport Gray (matched to Behr Ultra)…the accents are yellow. Cant wait to see how it looks. Behr’s “Jackal” is almost identical, but the Rockport Gray is just slightly different.
YoungHouseLove says
Good luck- I bet it’ll be so pretty! It’s our favorite paint color in the whole house!
xo,
s
Amy Knisely says
Reading this post helped alleviate a LOT of anxiety. We’re in the middle of emergency surgery on our only bathroom (the shower started flooding buckets into our basement a few days ago – finally the plumber is coming this morning to fix it and install brand new faucets since ours are ancient and one of the causes of the problem). We have some cracked tiles in the shower surround that need to be replaced so it’s emergency retile the bath weekend at our house. Wish us luck! (Luckily, we’re no strangers to tile so it shouldn’t be too bad)
YoungHouseLove says
Lots of luck!!
xo,
s
how2home says
huuray for a completed bathroom! It looks pretty awesome. I love the fact that you guys did the project at such a cost effective price, its perfect for young couple like us to follow these guidelines. Thanks for sharing this with us guys :) fabulous work u guys did!
YoungHouseLove says
Aw thanks!
xo
s
Rachel @ The House of Burks says
Looks great! We are going to be renovating our bathroom soon, so this is very inspiring. I went ahead and got a new shower curtain and bath mat, and it’s amazing the difference such simple and inexpensive things can make!
quirkstreet says
Wow, great job. Such a fantastic example of how you can use color to ‘fix’ things like beige tile; and how those little ‘tweaks’ can make such a massive difference.
I recently did a temporary makeover of our upstairs bathroom. Because I knew it was temporary, I decided to be really playful and a little over-the-top and went for a steam-punk-industrial inspired look.
I used salvaged carerra marble tile on the floor, upcycled the existing vanity, and lighting, and made some shelving and a towel rail. We did put in a new lo-flow toilet, which was the most expensive part, but we figured that was something we would keep, and to re-tile the floor properly you really have to take the toilet out anyway.
Here is what it looked like before:
http://quirkstreet.wordpress.com/2012/04/09/in-the-pink/
You can check out the final thing here: http://quirkstreet.wordpress.com/2012/05/26/hot-and-steamy/
Right now I am planning an overhaul of our master bathroom, so I have been watching yours with interest. Ours will have to be more major, alas, as we have major leak issues in the shower which will mean pulling everything out and replacing it. Ugh.
Thank you so much for your inspiring blog!
YoungHouseLove says
Wow- that’s awesome! Thanks for sharing the link!
xo,
s
JoAnn in NJ says
Hi John and Sherry,
First of all, Sherry I am sorry for the loss of your Aunt Kay Kay. It sounded like you had a very special relationship with her.
I have a question and the posts you’ve done about the metal/mesh thingie in the ceiling definitely helped me a lot, but my house is plaster and the walls are textured. Do you have any advice/insight for me?
Love your blogs and love hearing about the fam!
Thanks!
YoungHouseLove says
So sorry, we don’t have experience with textured walls. But we hear you can buy texturing products (so you probably patch the hole the same way and then texture over it to help it blend. Good luck!
xo,
s
Felicity @ ourlittlebeehive says
I’m super impressed with how the bathroom turned out. I think the tile was the biggest improvement. I love how just “swapping out” the accent tile freshened up the whole room. I think I would have been going at the beige tiles with a sledge hammer!
Crystal @ 29 Rue House says
Did you see the Bathroom of the Month in the latest House Beautiful magazine? It was at the back of the mag and reminded me of your bathroom (minus the turquoise). I loved how they described the board and batten as getting wrapped up in a towel in an otherwise open, not-private setting.
YoungHouseLove says
Sounds awesome! I’ll have to check it out!
xo,
s