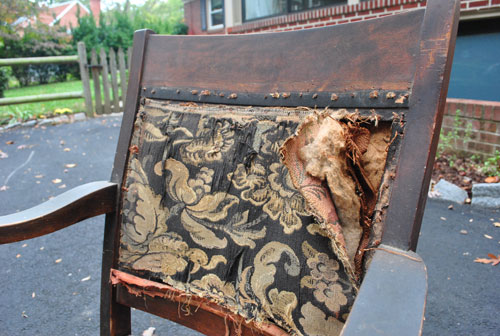
That’s right. I broke out the word dastardly. And I know we should be hard at work on our office cabinets, but that’s a big job (aka: a weekend job – maybe even a two-weekend job) and I have been giving this rocker the stink eye since November (yes, even before we moved). For anyone who can’t even remember that far back (me), here’s a recap: I originally picked it up off of Craigslist for $25 because I really liked the simple lines of it. Then it sat untouched for over nine months until this weekend.

Why? Well, no sooner had I gotten it home than I realized I had no earthly idea how to reupholster it. At all. I mean I knew how to do the bottom (I’ve redone seats before) but the hole at the top completely confounded me because it had to look finished on both sides. Le yikes.
But I posted this call for help a while back and a bunch of you guys were awesome! I definitely learned that there were probably about ten ways to skin that cat (gross expression, sorry – but it was comforting to hear that even some very experienced folks described many different ways I could “go”). So it gave me the confidence to tackle it right away put it off for nine months and begrudgingly give it the old college try over the last few days.
I will disclaimer this entire process much like when aliens took over my body and I made a quilt for Clara, which is to say: I went rogue. I took in all the advice from you guys along with some google tips and some suggestions from a reupholstering-fiend friend of mine… and just played it by ear and did what seemed to work as I went along. So with that out of the way, allow me to share the madness that is Me vs. Rocker. Which is not to be confused with Man vs. Wild (Bear Grylls I’m not).
Oh and because this process was so involved, it actually took me a few days of work. Which meant it was a multi-phase thing involving lots o’ pics. So I broke it right down the middle for ya (since 40 pics in one long rambling post = madness that even we can’t endorse). So here’s the first half. And the second half is in the hopper for tomorrow (still have to snap some after pics for ya, but it’s almost all set).
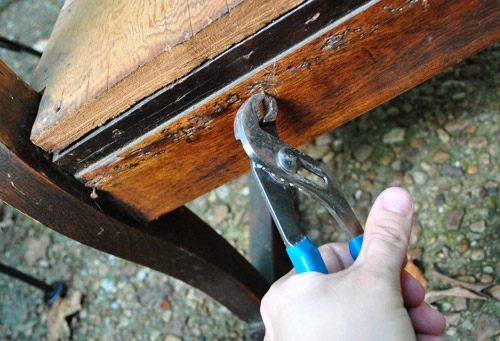
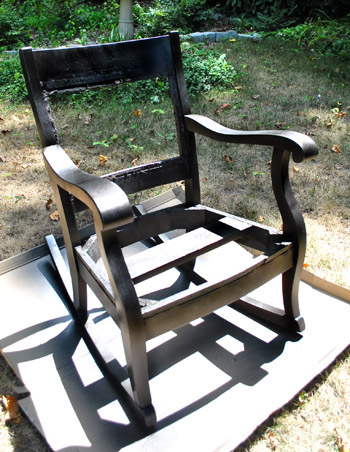
Anyway, here’s how it all went down: First I gave my rocker the stink eye one last time. You know for old time’s sake. Then I got to work pulling staples and nails out of the frame along with the ratty old upholstery to see what I was dealing with.
Oh and my tip would be to use a small channel lock pliers to pull things out. It was much easier than the back of a hammer or a needle-nosed pliers for me (although I still had to pull like crazy, this gripped better so I didn’t go flying backwards after tool slippage).
After about an hour I had a nice little pile going on. But I was only about 30% done.
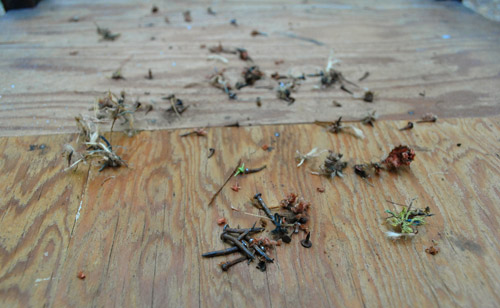
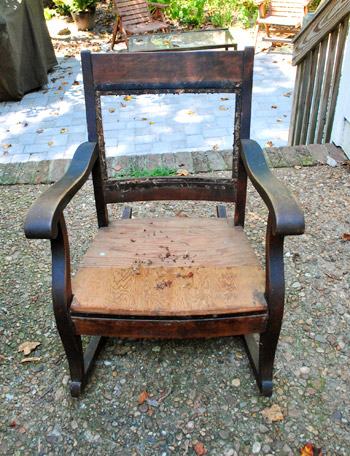
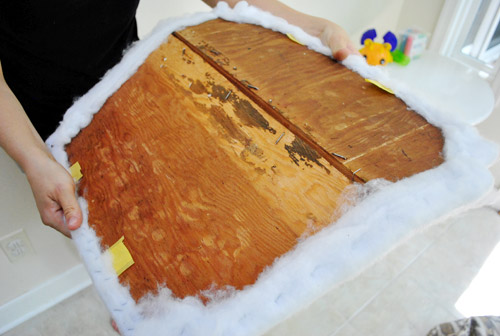
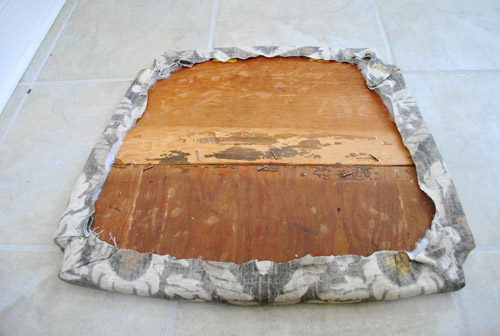
So I kept pulling old nails and tacks for a few more hours, and then removed the two wood seat slats and was left with this:

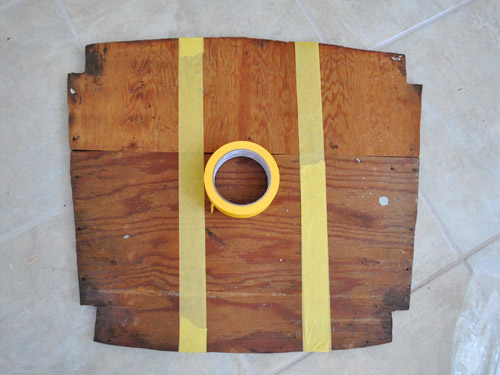
It was a pretty ugly sight for three-ish hours of work. And I knew I had some serious wood puttying and sanding to do when it came to the frame (to get it ready for some rich dark stain). But I was tired. So I decided to move onto a less strenuous step that I figured I couldn’t mess up. Upholstering the weird little two-pieces-of-wood seat. First I decided to tape them together so I could upholster it as all one thing (as opposed to two with a weird little seam). I just used some delicate surface painting tape because it didn’t need to be super heavy duty stuff (like sticky duct tape) because I knew once the batting and fabric were in place they’d hold it together for the long haul.
Then it was time for a bunch of layers of extra-loft batting. I used “Soft N Crafty” from JoAnn, which I purchased back in November when I thought I was going to tackle my chair (kind of embarrassing that I then just packed it up and moved it and it continued to sit around untouched for 8+ months, but whatever). I knew I could have used a big piece of foam for the seat, but I actually prefer wood seated rockers like this (John’s mom has the most comfortable one ever) so I decided I didn’t want too much cushion goin’ on. But I also knew that staple gunning one layer of extra loft batting around the back wasn’t going to do much…
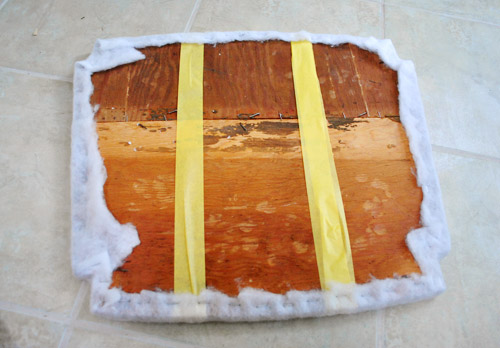
… so I applied a second layer…
… and then a third, fourth, and fifth. By the end it was plush without being super sink-in squishy, which I liked. Nice and firm with a bit of softness.
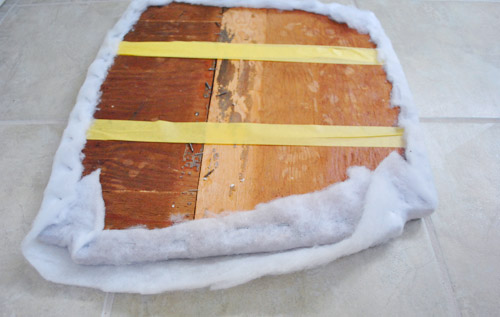
Here’s the point where I wanted to throw everything out the window. Yup, after five layers of batting applied staple by staple, I realized that the seat needed to be able to bend to fit past the arms and legs and actually lay flat on the base.

So I nearly broke down with visions of having to restaple five layers o’ batting after separating the two pieces of wood so they could hinge forward for just a second to be slid into place. Thankfully my sweet husband (who I always describe as the brains of this operation) pointed out that I didn’t have to unstaple anything and could just turn the seat over and cut the yellow tape that was running across the back and the batting should be flexible enough to fold forward (it wasn’t like I was trying to stretch it backwards or anything).
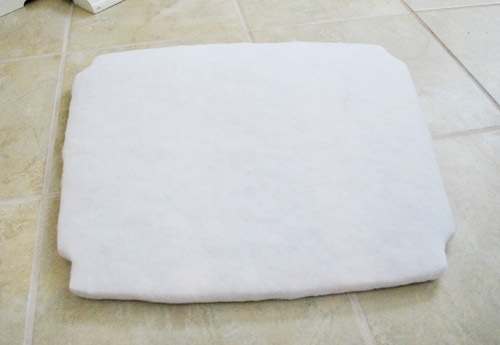
Worked like a charm. And apparently I was so excited I took this completely crooked picture in celebration:
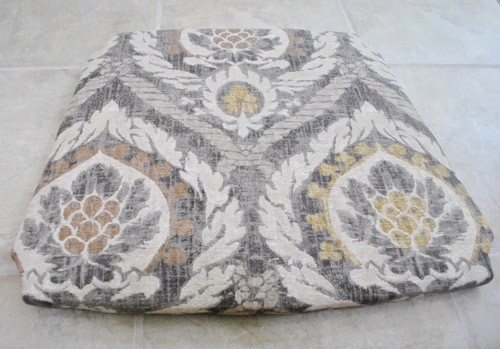
Then it was time to reupholster my seat. I was super excited about the “Kravet Design” remnant fabric that I found on clearance at JoAnn for… wait for it… $2 a yard (I got two yards for $4). At the time that I grabbed it I had no idea what I’d use it for, but after woefully glancing up at my biggest failure (Mr Rocker, sitting untouched in the sunroom for nearly a year) I realized that the fabric would look really pretty on it (with some rich dark stain to set it off). The pattern of my fabric meant that I would have to take the time to center it before stapling anything, so here I am roughly folding it around the seat to try to find a center line and see how it might look in place:

Then I flipped everything over and just shot one staple into the top middle and one staple into the bottom middle (while pulling things tight). This way I could flip it back over and ensure that I was indeed still centered (and if I wasn’t I just had two staples to pop out with a flat head screwdriver.
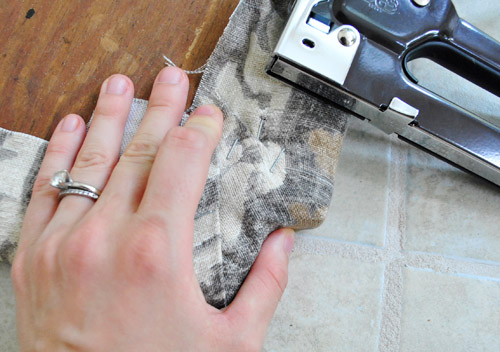
Happily, I was right on track, so I pulled things tight and shot another staple through the middle of each side of the seat, just so it was being held firmly at the noon, three o’ clock, six o’ clock, and nine o’ clock positions. Then I kept the fabric firmly pulled and continued to staple all around the rest of the perimeter. When it came to the carved-out corners, I just folded the fabric like I was wrapping a present – again being sure to pull things taut and use a few staples to hold my folds in place (so it would look nice and smooth from the front).
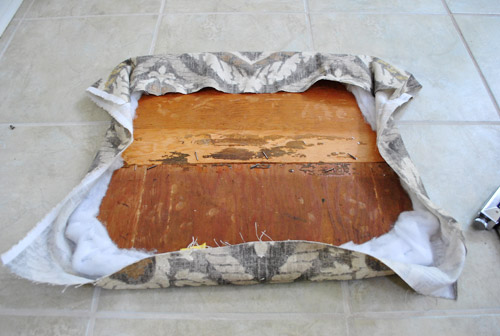
Here’s what it looked like from the back when I was all done with my staple job:
And here’s what it looked like from the front. Purty, right?
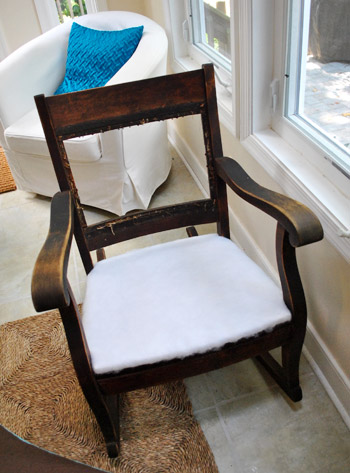
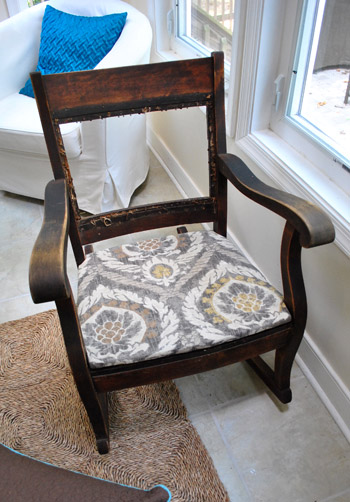
Then I shoved it back into the seat to make sure the batting and fabric still allowed the seat to hinge forward a little bit to squeeze in. Whew, it still worked. And in the distance I heard angels singing.
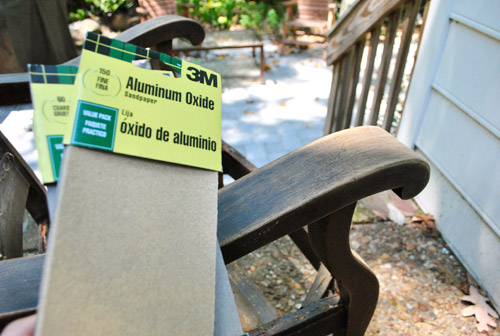
Then it was time for the strenuous frame-readying step. I used wood putty to fill some of the holes that might be visible (like the ones under the seat along the front of the chair’s framing) and sanded everything to rough it up and ready it for some rich dark stain. Since I had some liquid deglosser on hand I gently swiped that over the entire chair after some rigorous sanding (I used low grit paper followed by higher grit paper to smooth everything out).
This is when I was forced to face the music: stain, even dark stain, wouldn’t make this chair look as flawless and something opaque like a rich deep coat of paint. Because even after all that putty, sanding, and deglossing, it was looking so inconsistent in certain areas that I knew it wouldn’t soak up stain evenly. Boo. And although some folks wouldn’t dream of painting wood, we’re definitely ok with it (especially since this is just a $25 cragislist find and not a family heirloom). So I threw my rich dark stain idea out the window and ran to the arms of an old friend. You guessed it: ORB.
I’m telling you, my name is Sherry and I’m addicted to oil-rubbed bronze spray paint. But thanks to having a nice built-in primer and applying three very thin and even coats, it actually took on the look of a rich dark wood (and had more dimension than plain old chocolate paint thanks to the subtle metallic quality of the finish). Here’s a picture that I snapped after two coats (you can see that it’s not completely seamless and even yet- but the third coat did the trick).
Oh and you can find more general spray painting tips here (lightly misting it while keeping your arm moving all the time is key).
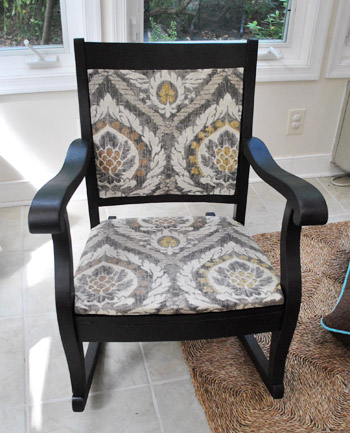
And because I hate to end on that poorly shot, blown out, two-coats-out-of-three spray painting pic, I thought I’d fast forward a little to give you a glance at Part Two of The Glee Project The Rocker Project. Here she is (not completely finished, but getting there). I’ll be back with more details of that whole shebang (and some final after shots) for ya tomorrow.
Update: A sweet commenter (thanks Laura!) just told us that our chair fabric was actually on the cover of the Ballard Designs catalog, so we hopped over there and learned they actually sell a chair that’s upholstered in exactly the same fabric for $600-800 (depending on the finish of the chair) and the fabric is being sold on its own for $32 a yard!
What about you guys. Do you have any projects that you’ve put off for an epically long time? Is there something that intimidates you, like two-sided upholstery does to me? Are you completely unsurprised that I basically try to solve every problem in my life with ORB? Can you believe that darn seat wouldn’t fit on the chair after five layers of batting-stapling? At that point I truly wanted to set the entire thing on fire.
Reference: https://www.productexpert.com/best-ergonomic-office-chairs/.

LARY says
Looks great! Great job $herdog! I thought this project was worthy of calling you by your favorite nickname :)
YoungHouseLove says
Aw thanks Lary. You know the way to my heart.
xo,
s
Jaime says
Amazing how it turned out. Very impressive.
Heather Andrews says
That is going to look so nice!!!!
My Mom redid a rocking chair for my baby & me. It was my great grandmother’s. It’s very similar in structure to your chair, as in the back has fabric on both sides. I picked the fabric, and she used danish oil on the wood. Here’s a pic:
http://www.flickr.com/photos/22614082@N06/6076576281/
That’s a crappy phone pic, but I LOVE it. The yellow isn’t as dark in person, and the purple is brighter. It’s very comfy. It’s pretty low to the ground, is yours? I’m so glad to have this. It’s especially weird to think that my great grandmother rocked my grandmother to sleep in that thing! I can’t wait to see the final product with your chair!
YoungHouseLove says
Gorgeous! What an awesome job! As for ours, it’s pretty average in height I think (I’m also really short so it might be low to the ground and I can’t tell-haha).
xo,
s
Julie says
Dastardly: mean, treacherous, or cowardly. Wow, what did that old rocking chair ever do to deserve such language. :) It is beautiful, BTW.
Julie
ilikebeerandbabies.com
YoungHouseLove says
It’s evil! Haha. Every time I thought I had it figured out it threw me curveballs like the seat that had to hinge and the wood that couldn’t be stained! Wait until part two- there are more of those coming. Haha.
xo,
s
Maggie Rose says
Yay, I’m glad you’re tackling this project! I just moved (earlier this month) ALSO with two reupholstery projects in tow (matching chairs). Although I stripped them to paint before we moved (new apartment doesn’t have a good place to spraypaint) so we had to drag the nasty stained cushions separately. Thinking I might have to tackle them today… but mine require sewing in piping trim and that part makes me nervous!
orange says
I was much easier than the back of a hammer or a needle-nosed pliers for me.
The “I” should have been an “it” right?
YoungHouseLove says
Yes! Thanks! Off to fix it!
xo,
s
Suzanne Supplee says
Pretty, pretty, pretty!
Amy says
I do have a project that I’ve put off for too long & it just so happens to relate to your project! I bought a vanity stool months ago that needs to be painted & the seat to be re-upholstered. Your post has just given me the answers I’ve been looking for! I had no idea what to use for the seat padding, all the foam pads I found were either too small or WAY too big & expensive. So I think I’ll go your route – layers of batting! Thanks for the tip & the inspiration!
joyjoy says
Oo, that “not completely finished” shot looks great already! All your ORBing has got me itching to go out and buy some myself. I really like the finished looks of everything you’ve ORBed. The only thing holding me back is the fact that I have nothing that needs painting at the moment. Darn details.
Kate says
I totally called the ORB paint from the very start of the post. ;-) It looks great! This is going to give me more confidence to pick up the gorgeous chairs that need a little love from thrift stores, dumpsters, etc!
Keri says
Absolutely gorgeous! I want one!
Erin says
This could not have come at a better time! I have a similar chair that I’m getting ready to reupholster, and also have NO IDEA how to go about the double sided chair back. Can’t wait for tomorrow!
Karen @sugarspicelivin says
This post couldn’t have come at a better time. Years ago I found a similar chair on the side of the road and stained it really dark. Now it needs an update. After sanding, priming and 2-coats of white paint- I am realizing it needs more. I was thinking the next step would be spray paint. Do you think a high gloss white spray paint would be ok??
YoungHouseLove says
Oh yeah- that could be pretty pretty! We love painted furniture, but it’s one of those to-each-his-own things!
xo,
s
Katie says
I think I have the non-rocking brother of your chair. I bought it for $5 at a moving sale near Maymont several months ago and have been wondering how to fix the old guy up. Thanks for the post. Can’t wait to see how you do the back of the chair. Mine has some old, ripped leather on the back that needs to be replaced.
Ashley says
What an inspiring post! I love the fabric and the final photo. Can’t wait to read part two!
Kim Schoenherr says
I’m just gonna throw it out there that I’m going to take credit for this chair getting done since I asked about it last week :P
haha I love it though!
YoungHouseLove says
Haha- it’s all you Kim!
xo,
s
Alecia says
It looks great! Oh, the things ORB can do…
Speaking of ORB, I also did a makeover to our faded black storm door a few weeks ago. Taped things off and sprayed and it looks like new! And yes, I can’t get over the subtle metallic sheen when the light shines on it. Yippee for ORB!
Leah says
So impressed. Somethings are worth waiting for (read: putting off).
Sara says
Absolutely LOVE that fabric!
Ladizzle says
Seriously….same issue with a Rocker…its sitting very sad and very naked…burning sounds great but so does the ORB! If only I knew what I was doing and could pick fabric! I better get working on it BEFORE it gets super cold….or burning might sound better then fixing! YOURS looks awesome you make it looks SO easy! Great work that is an addiction that pays!
Emily says
Wow it looks amazing!! The fabric is beautiful!
Joy says
I love the chair! We had a rocker that we bought at our church rummage sale, stashed, moved to our new house, stashed again and ended up deciding we had no idea how to begin redoing it, so we put it back in the church rummage sale the next year!
I do have an epically-long put-off project (I blame it on nesting during pregnancy) that did eventually get finished (thanks to lots of help from my Dad). It’s a pair of kitchen stools! The whole story is on my blog, of course!
Kahli says
Oh wow it looks fabulous! Glad to see you are upholstering chairs. Now you can start on an armchair lol. That fabric is lovely. My Joann’s doesn’t have anything remotely close to that! *sad face*
Ashley Taylor says
Oh! I picked up some fabric at u-fab for $6ish a yard and just saw it upholstered on a chair at Pier 1 for $399!
YoungHouseLove says
That’s awesome! What a score! We love u-fab.
xo,
s
cindy says
Love it!!! I am such a procrastinator…I am finally completing my DIY list…etching jars & magnets…now I am starting a canvas painting and a photo collage wall.
Nikki says
Thanks so much for telling us what’s to come for future posts…it helps with my YHL addiction to have something to look forward to :) You guys are awesome!
Colleen P. says
I love the chair, especially the way you put the fabric on. Most people would have centered with the teardrop shape because that’s sort of a traditional look, but the rope motif is centered, and to my eye it makes it look much more modern and updated, really just more interesting. I can hardly wait to see the finished product, it’s going to be a truly one-of-a-kind piece that people will be constantly trying to talk you out of! LOL!
Rose says
You did an awesome job! I’m surprised by how well the ORB did on the wood surface. It looks really inviting. We recently re-did a chair that had been upholstered in the 50s with VINYL. Ew. I love transformations!
Kelly says
The chair looks great! My husband and I are super procrastinators. We’ve been working on redoing the lower level of our tri-level this summer, and it’s going on the 6th week or so, because we just can’t find the motivation to move onto the next step! My parents are coming over tonight to finish more with us though – they’ve been getting us through much quicker!
What brand is the yellow painter’s tape you used? I’ve never seen it before.
YoungHouseLove says
That’s by FrogTape (their normal stuff is green, but their delicate surface stuff is yellow). Hope it helps!
xo,
s
Ruth says
Yeah projects that hang around a long time… we got ’em. I got a set of dining room chairs from CL that match the chairs my grandma had when I was little. Pretty easy to stain & reupholster but we only managed one before the winter rains started, so we put them in the back room until summer rolled around. Well… summer rolled around and then passed and now we are headed for the rainy season again so it looks like those chairs have another 6 months to wait.
Cynda says
I adore that fabric!
When I bought my house, all the baseboards and doors had been primed, not painted, and there was no quarter round. I JUST finished painting it all white and installed quarter round- 14 months later!
Carla says
Looks great … you did a great job. But part of me always feels sad for these lovely old pieces of furniture. The natural patina on the original stain was really nice, and the lines are unique and interesting. Have you tried to research the chair and learn something about it’s history? Clearly it’s an antique, so I’d be curious to know if it was made in New England or possibly Europe. Did you ask the person you bought the chair from where they got it from? I bought a maple bookcase that really pained me to paint, but I reluctantly gave in so that it would work nicely in my home, and now I love it even more. :o)
YoungHouseLove says
I wish I had asked the person I bought it from (was busy trying to keep Clara out of trouble while John loaded it in). I did try to do some googling to figure it out though (and wondered if we might learn something by posting about it back in November and today) but nada! Usually things like the veneer dresser that we refinished and the kids chairs that we got for Clara have some sort of maker stamp or sticker on them for us to research, but there’s not a clue on this rocker. My best guess is actually that someones family member made it (it’s a little imperfect in lots of places, so it doesn’t seem mass produced to me). Makes me wonder why someone cragslisted if it’s a family creation – but maybe reupholstering it scared her as much as it did me. Haha.
xo,
s
Melina says
The chair looks amazing!! I’m so inspired, I might tackle the old ratty captain’s chest I bought at a flea market over a decade ago and now sits lonely in my garage buried under paint cans and gardening equipment.
Lindsey says
I have a chair that I snatched for free that has been sitting unfinished for close to 2 1/2 years. It has an upholstered seat and the back and sides where all cane but it was ripped and in very poor shape. I ripped the cane out and have come to a halt, trying to figure out how to upholster the back that wasn’t upholstered in the first place. Here’s hoping your part two will answer that question and give me motivation to finish it.
Also so glad you showed a pic of the ORB painted chair, I have wondered what an entire piece of furniture would look like painted ORB and I love it!
Heather W says
Love this post. I printed it out to have in my folder of potential project how-tos! I have some dining room chairs I want to paint/ORB and reupholster. Thank You! Can’t wait to see tomorrow’s post!
I listened to part of your radio interview this morning. I had to stop it to leave for work so, I missed any info you gave about your book. Can you please share that on here please and thank you.
YoungHouseLove says
So sorry! The interview was an hour long so writing out the transcript (even the part about the book) would probably be 100 paragraphs! I’m planning a post about the whole process of writing our book and our proposal and all that though, so maybe that will help? Or you can try to catch the rest of the interview another time?
xo,
s
tjack432 says
This chair is so cool looking. When I first saw the fabric I was like “ewwww” but against the painted wood it looks great!
Question:
Do you y’all know how to get rid of the “straight out of the box” smell from Ikea furniture? We just bought a bunch of furniture from Ikea and it is still stinking up our very very tiny house (like 4 days later). Now we just keep the windows open and turn the fans on. That is kind of doing the trick, slowly but surely.
YoungHouseLove says
Our trick is weird, so get ready: we assemble it and bring it outside on a hot day. The sun speeds up offgassing so things heat up and all the fumes are left outside after a day or two in the sun. Just make sure there’s no rain in the forecast!
xo,
s
Stephanie Handy says
First the office plans and now THIS! You guys seriously need to stop reading my mind! I literally JUST finished doing similar work on a pair of bamboo chairs for our front porch (including plans for staining before making do with paint, although I opted for a nice expresso brown).
My furniture was stolen from the previous home owners, however, who are currently living across the street while they finish building their new home!
http://www.thehandylife.net/2011/08/prodigal-chairs/
YoungHouseLove says
What an awesome project! Love it!
xo,
s
Carney says
Hi Young Family,
My sister sent me your blog this summer and i now look at it almost every day. I grew up with a DIY Mama and try to do projects when i can but i need a little help on this one!
I am redoing a mid century modern Lane coffee table which i picked up from the flea market in Raleigh, NC for $20!! It is in good condition but i think it needs a little love (a few water stains). I want it to look fresh and original and i definitely don’t want to paint it. I wanted your advise on what to use: sandpaper, furniture cleaner etc? and then what you recommend for the finishing step: polish or stain etc? The link is an exact match to what mine looks like:
http://compare.ebay.com/like/140593974655?var=lv<yp=AllFixedPriceItemTypes&var=sbar&_lwgsi=y
YoungHouseLove says
Ooh, it’s gorgeous! I would just sand it down by hand and wipe it with some liquid deglosser and then wax it or use some sort of sealer/stain to keep the wood looking gorgeous! What a find!
xo,
s
OMG Ponies! says
Combo of Comments:
1. It’s kinda neat how in both lives the chair has had a similar flora/botanical inspired type of print for it’s fabric cover. Did the tattered remnants of fabric inspire you at all?
2. I’m looking forward to hearing how couponing is going…whenever you have an update.
3. Your Momformation blog post about Photo albums vs. Photo Books was super great. I am not a scrapbook/photo album assembling type person. But for my someday future kids I was planning to force myself to do something I dislike (handling physical copies photographs responsibly) because I know I’d be happy with the end result. Your solution is now my solution. I love to take pictures, both sets of future-grandparents love to look at pictures, so your little tip/experience and being able to view your end product has totally de-stressed me.
hi5s
YoungHouseLove says
Haha, thanks! As for couponing, I’m still doing the same things I posted about back in the day. I have sort of plateaued, probably because we buy a lot of produce and organic stuff, so it’s not all on sale by the manufacturer and the store for super savings, but I do save around 40-50 bucks a trip so I’m happy! As for the old fabric, isn’t that funny how it’s sort of related to the new fabric. I like to think I recovered him in fabric that’s a few generations younger, but still from the same family. Haha.
xo,
s
Dawn says
LOVE the chair! And I am righ there with you on lagging in doing projects. I bought an end table almost a YEAR ago and STILL haven’t started it. When we moved my man was like “are you going to go ahead and throw that thing away now?” I said “NO…it is moving with us and I WILL finish it!”…lol. He just shrugged his shoulders and put it on the truck.
I also have two sets of dressers that desperately need to be done. My daughter’s (hers are the lovely “french provincial” looking things that you can find anywhere), and my son’s. One day I will get the time to do them…one day!
emma says
Love how the rocker turned out! You always do great at taking a fabric and making a piece that really highlights it.
I also just finished listening to your interview Sherry, that John posted the other day. It was really interesting to get more insight into day-to-day happenings, esp about the book. I’m sure you’ll be covering that more when the publishing comes closer but thanks for sharing for now!
YoungHouseLove says
Aw you’re welcome Emma. Thanks for listening to that long thing! Haha.
xo,
s
susan says
Rockin……………….chair. Great job. susan
Beckers says
I recovered a wing back chair 4 years ago and learned so much by doing it. I have another (the other in the pair) that I haven’t gotten around to doing, and it’s been 4 years! I love your rocking chair. The way you put the fabric on the top makes it look like owl eyes. Haha.
Erica in SF says
Don’t know if you’re going into this tomorrow…but if you are opting to use the “Safecoat acry-lacq” stuff you guys have used in the past, I wanted to let you know I got some slightly less shiny “Safecoat HardSeal Clear Gloss”. Its about $40 for 1 gallon, but can be used on all kinds of surfaces you don’t want off-gassing. I have used it over ORB spraypaint (I can understand your fix!) and it deepens the color only slightly. hope this is helpful!
YoungHouseLove says
Thanks so much for the tip! We haven’t Safecoated it yet, but it’s nice to hear that you’ve tried the Hardseal with good results!
xo,
s
Mary says
WOW! Love it love it love it. I also use spray paint to solve all my problems (well, not all of them…can’t spray the kids with it when they are acting up–too toxic!) Don’t forget the Scotch Guard.
Maryeliz says
Beautiful. Just beautiful.
Katie Lee says
Oh my gosh, I must do this! I love these types of projects that don’t involve any sort of saw. I am totally inspired. I love it!
Polina says
Awesome job! Love the glipse at an end result!
Bridget Davis says
So, I’ve never left a comment before, but I just have to say that I absolutely LOVE your rocking chair!! What a great find for only $25 and $4 fabric. I love, love, love it! I would love to rocking my “baby” in a rocking chair just. like. that. And because I need to use the word one more time; I love the chair. :)
MaryJ says
Looks great!! The deep color of (your beloved) ORB works beautifully, I think definitely gives you the same effect as the dark stain you were hoping for. I clicked the link to the BD site and I saw a comment on there that someone was pleased with this chair, which they bought for their office. Wow. Can you imagine spending $600-800 on any chair, much less for your office?? Well, I know you can’t, because you guys always find such fitting and creative solutions without spending excessively.