We got this rocking chair for $25 thanks to craigslist, because we loved the simple shape and the low back and the rich chunky wood. Plus I’ve been dying to add a rocker to the new house’s living area (since I feed Clara all the time while hanging out in the public part of the house, as opposed to retreating to the nursery or the bedroom). Plus she loves rocking at John’s mom’s house, so we thought it would contribute to good quality time with the bean. But this rocker is obviously lacking a bit in the seat and back cushion area. No worries, we just figured we’ll reupholster it.

Until we realized that we had no earthly idea how to attack the double sided back cushion. As for the seat, we’re planning to remove the boards that make up the bottom, add a foam cushion, staple batting around the back to hold it down/smooth it out, and reupholster that the same way we’d do any removable chair seat (and then screw it back in from the bottom). But the back has us stumped with a capital um.
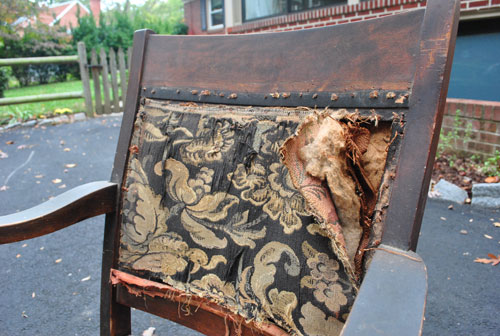
If you remove the fabric you can see right through the chair. In other words there are two upholstered panels on each side that were probably stapled and then trim was used to cover the staples, but we’re not sure if we should add some structure so it’s not just fabric that supports a person’s weight against the back. That seems like it could sag over time, right? Any ideas? We’ve seen that seat-belt looking stuff that you can weave to create support and we’re wondering if we need to do something like that for the back (so people can lean on the chair without feeling like they’re falling into a hole) and then somehow attach two more fabric panels on either side of it (you know, for a seat-belt sandwich?). Can you tell we have no idea what we’re doing?
Somebody help us!

Kelly says
What about adding wooden spindles(though elegant and characteristic of the piece) to provide support in the hole, and then add a pillow on the chair for comfort? Are you planning to sand the chair down and re-finish it?
YoungHouseLove says
Oh yeah, we’ll definitely sand it down and refinish the wood.
xo,
s
Emily says
You could use two thin pieces of wood and put batting/fabric on one side of each piece, then sandwich the backs together. You’re on your own for how to attach both of them without hardware showing, though. No idea.
Beth@Just{Heart}It says
Is there no way you can just wrap a piece of fabric around a thin piece of plywood or particleboard and then somehow fit and screw that in there? I have a dining room chair like that where there’s an upholstered piece in the back that is just slipped into the hole and then screwed in from the bottom bar so you don’t see the screws. I don’t think I would go for the seatbelt mesh in between two pieces of material – that might look a little mish-mash.
Maya says
Hmm… I’ve never tackled something as confusing as that chair back, but in general I figure that the way something was upholstered originally is good enough… it looks like the original back lasted a long time! After all, the wood on top will keep people from falling through, right?
When you do the seat, don’t forget to add a nice foam cushion. :) You only mention batting, so I just wanted to say that batting on plywood would be pretty uncomfortable.
Awesome find!! I can’t wait to see how it turns out!
heather says
If you were to drill holes in proper places, you could cane the back of it fairly easy.
Corrie M. says
Ooh…..good project! Great chair!
It actually looks like you have a little bit of wiggle room there (albeit just a smidge) so could you use your fancy jig tool (can’t remember what it’s called) to “dig” narrow grooves inside the wood that frames the back? Then you could just have a very thin piece of wood cut to size, cover it with batting and material, and then wedge it into the grooves?
let me know if you have no idea what I’m talking about- it all makes sense in my head!
Rachel says
Well, at least it has good bones! I’m as clueless as you guys on upholstery technique, but I’m sure you’ll figure out a good DIY solution. I can’t wait to see what fabric you choose!
And, can I just say…I am DYING to see your ideas for your dining room after the discussion on your floor plan post. I am totally digging the cozy, library-eque look too, and I’m trying to achieve a similar vibe in our dining room which is currently empty. I would love ideas for sources! I have found some upholstered chairs I like on Overstock, but that’s about it. I may have my husband build a farmhouse table, but I am so lost on what to do for dining room storage, which we desperately need. China cabinets seem too stuffy, hutches too country, etc. I like the Hemnes cabinet and Stornas buffet from Ikea but I’m not sure if they go with the look that I want.
Darbi@ A Pinch & A Dash says
I would click on a few of those blogs you have in your Link Love section! I’ve seen several people reupholstering chairs with backs just like yours. Seriously I saw like 5 yesterday and now can’t remember where they were. It doesn’t look too hard nor did it seem to require any sewing (which is always a plus). I’d just google it or check out some of your favorite blogs! Good luck!
Erika says
Perhaps you could call an upholstery expert in your area…they might be willing to charge just a small fee for their expertise, if you want to do the work yourself.
I would definitely get an “expert” opinion before tackling that!
Mercedes says
Great find! I’m on the search now for a nice piece to reupholster, but I plan on taking an upholstery class offered here in NOVA. You didn’t mention foaming, which is what an upholster would add to the bottom, then the batting and a dacron wrap (which required by VA law, makes objects flame resistant), then of course your fabric. The back you could either use a foam or a poly fill may be easier to manipulate. I’m assuming the webbing may work the same or in addition to the fill. I also work at a design center where we send out our clients work for reupholstery to local workrooms, so I’ve been able to gain a bit of insight into the process. I love the idea of taking a traditional piece and making it funky! Good luck to you.
-Mercedes
Val says
Sounds like you need webbing support bands. See a visual example here:
http://www.pieknits.com/blog/2008/05/chicks_with_staple_guns.html
Jen says
A while back, Thrifty Decor Chick reupholstered her dining room chairs and they had fabric on both sides of the chair back. Maybe check out how she did that for some guidance.
Hannah says
That upholstered back probably slides into some grooves on the sides, top, and bottom of the chair. You’d probably have to remove the horizontal bottom support, reupholster the back piece, and slide it back in. Then reattach the horizontal bottom support piece. I think that made sense :)
Jenn(ifer) says
serious envy, that is a beautiful chair.
You don’t need to support the back (because of the wood on the top and the bottom) as long as you use fabric that was meant for upholstering and accordingly durable…
Just staple is on and you can hide the harware with upholstery nails or cord or even selfmade binding out of the same material…
Can’t wait for the after pictures!
Amy @ Renovation Innovation says
You can use upholstery tack strips to attach the fabric to the wood either side without the staples showing.
diana says
I have a similar rocker that I redid. You don’t need to put anything except padding in between. Be sure to use upolstery fabric (closer weave and strong enough to pull tight when putting it on)and use a staple gun (staple about every inch or so. Then apply the trim with a glue gun
Darbi@ A Pinch & A Dash says
http://www.centsationalgirl.com/2009/04/diy-chair-recovered-cinderella-story/
I knew I could find it! LOL!
Steph @ BirdHouse Family says
Great find! I think you need something uniform on the back like a piece of very sturdy cardboard or a thin piece of pressboard or plastic. You could probably just staple it on. Kate at Centsational Girl used cardboard to switch a rattan back to a padded back for a couple of chair transformations, but she still had the rattan to give it structure:
http://www.centsationalgirl.com/2009/04/diy-chair-recovered-cinderella-story/
Trina says
This post really made me laugh! I have an old Victorian chair that’s been ‘a work in progress’ for months now. Song is GREAT!
Good luck!
Trina
Alexandra says
I’ no expert, but I did buy a $5 garage sale chair and successfully reupholstered it, so here goes
1. yes yes yes add something to hold your weight. I suggest a heavy weight fabric and just staple it to the inside frame. Be VERY generous with your staples
2. To get your upholstery fabric on I suggest you buy the tack strips. These are a cardboard strip that has tacs in a row to create a flawless look. This link will show you the tacs in action
http://tiffersupholstery.com/yahoo_site_admin/assets/images/CUT_006.25832204_std.jpg
The only trick will be to keep your fabric taught. I’m sure youtube will have videos to help.
Cait @ Hernando House says
Granted I have never done anything in this style, but it sounds like for the back you might want to do one panel and screw it in place from the other side (I’d probably do the front like that) and then use small finish nails through the edges of the back panel and cover them with trim of some sort (maybe nail head trim?) Good luck!
Alexandra says
alright, i had to type my response twice and I was less detailed the second time. My suggestions are for the back of your chair (just in case there was any confusion. Sorry about that!
Maura says
Have you been to U Fab on Cary and Robinson? They gave me GREAT advice last time I was there and they have great discounted designer fabrics!!!
YoungHouseLove says
Oh yeah- we love U-Fab!
xo,
s
Jen K says
Not to worry! There is a relatively eay way to do this. We did a similar project years back at my Mom’s house. The two pieces of wood that form the back of the chair, top and bottom will do a pretty good job of preventing the “sitter” from falling back. BUT, I suggest you make a “sling” with a heavy weight canvas to make the back a bit more substantial. SO what you would do is cut a piece of canvas about a half inch bigger than the whole in the back (remove all the fabric etc that’s there now). This will be stapled many time to the top and bottom of the wood making up the back of the chair. (Staple to the sides too if you can, I can’t tell from the photos if that would be possible.) So now you have a taught piece of canvas as your “back”. Upholster from there. You will want to make sure you have enough “fill” or padding to make the back full looking. Whatever you choose to use should be in one “sheet for the front side and another for the back side. This should be also stapled heavily to the frame so it doesn’t scootch down over time. Just Tack on your pretty fabric over that and add your trim to disquise staples. Ta da! You’re done. Can’t wait to see what fabrics you choose. Maybe even different fabric for the front and back? Have fun!
erika says
This chair looks to be really great. If you look at the arms of the chair, thats what appears to be holding the brunt of the weight on the back, I would just take a piece of plywood, or something that feels a bit solid, upholster it, front and back ( like the seat cushion) then use short screws -so you don’t go out the other side-to screw the cushion into the side of the opening-from the back side, then either decorative trim or buttons to cover the (say six) screw holes-Im sure you could come up with something like that. but really, I don’t think that panel will be holding that much weight… like you said you just dont want your back to sink into a hole.-looks like such a nice solid piece…can’t wait to see how it turns out.
Jamie says
Curbly.com has an upholstry expert. Mod home ec teacher. I’m sure she’d love to help, and you guys could probably partner-blog about it.
Kari says
Umm, no idea how to handle that (sorry!), but I love the chair!! Good eye, good find!
Betsy says
Yep, use the seat belt stuff. It will provide support and something to place a bit more padding on, but will also have some give that will make it comfortable to sit in, unlike plywood. Taking it apart will help you see how to put it back together. Also, check out some upholstery books from the library. And/or if possible maybe take a class. It’s a wonderful skill to have!
Justine Wicks says
I agree with Emily about sandwiching two pieces of thin plywood back to back; however, i would use a foam mattress pad instead of batting.(unless, of course, you have some incredibly soft, thick batting).I bought a twin mattress pad at Wal-Mart for about ten bucks last year. (I’d probably double or triple it for the seat, and just single for the back.) It looked as though there was some sort of lip around the center of the cut out. If that’s true, I would image liquid nails would work by applying it to both sides of the lip and sandwiching the board to that. Good luck:)
Jackie Hintz says
I am not certain about the back of the chair, but what about caning the seat for sure? My hubby knows how to do that. That would be strong and thin.
Kate in the Shade says
I have no advice (sorry) but just wanted to say that I love the rocker! Love it.
Mel says
You are already on the right path with the backing.
Weave ulphostery webbing, stapling to the sides and top/bottom to secure. Use batting cut to size on each side, then add your fabric. Staple the fabric all around the openings, finish off with gimp to hide the staples.
It may seem wimpy, but it won’t be. It will give a little when you sit in it and be incredibly comfy.
Nice find.
Sarah says
I was so surprised to see this post because I’ve been trying to tackle a similar project for the past few weeks.
After three weeks of investigating upholstery resources, I’ve found two great ones:
1. diyupholsterysupplies.com – they have how-to videos, a space where you can submit your questions (and the owner actually gets back to you will advice and a general game plan), and all the supplies you’ll need.
2. The book Simply Upholstery – I checked out 10 books from the library and this one had the best how-to advice and clearest step-by-step details.
Good luck!
carolinaheartstrings says
Lovely find. It will be beautiful when you have finished it. How about on the top back putting in a piece of wood that you would then cover on the back in the same manner that it is now and on the front of it where you are actually sitting you put in some cushioning of some sort and cover that over with fabric in the same manner as you have done on the back. The wood wood would not be seen that supports that cushion part because you are just basically going to go back to what is there now just added padding for the front. Does that make any sense?
Stephanie says
Um…I have nothing really to contribute except a compliment: you all are so brave! That project would sit in my basement for years. I know you’ll figure it out. But, I do like Beth’s suggestion.
It is a very pretty rocker. I love it. Can’t wait to see it finished!
Amy L. says
I’m kind of with Kelly (first comment) on this one, if there’s no simple solution for a cushioned back. I think this would look nice with a wood back, although perhaps not spindles but something like a curvy slat back that could echo the curves of the arms? I’m thinking of something like the back of this chair (these are my dining room chairs, and they are surprisingly comfortable).
http://www.stoneycreekfurniture.com/Img/Products/Better_Homes_and_Gardens/Color/838637-B3.jpg
Then maybe toss a pillow on it? I don’t know, I guess for your purposes I can see why you’d prefer to keep the back cushioned, but I’m imagining it would be easier to figure out how to attach a wood back. Good luck!
Linda says
I almost think this was originally a cane back chair. Can you see the holes where the cane was? It’s a bit tough to see in the photo. If that’s true that may explain how they were able to support their fabric. Again, if that’s the case you could look into “learning” that craft or having it done. If that’s not the case, you could weave the upholstery jute tape (seatbelt stuff) and staple it to the openings on both the front and back and then secure your fabric/batting over that. It would mean quite a few staples or tacks that way. Or you could build the pockets of woven jute, batting and fabric and then tack them to each side. between which you could use what they often used in older furniture…cardboard. Can’t wait to see how it looks when done!
Pammy says
I picked up an upholstered rocking chair very similar to this recently. But like you guys, i have no idea how to reupholster it either! I will be following this post to see what people suggest…
hi-d says
Love that chair! I have recovered cushions before, but haven’t done anything with a back like this. The other day, I saw a post on a bunch of before and after chair upholster projects…you should check out this link. http://www.designspongeonline.com/2010/11/before-after-chairs-from-spruce-mod-green-pod.html They might be able to give you some tips.
Can’t wait to see the end results!
hi-d
Leanne {The Energetic Mommy} says
Wow! I have no ideas for you, but know it will be amazing when you figure it out!
caree says
maybe this will help:
http://www.poetichome.com/2008/03/17/industry-secrets-diy-antique-chair-reupholster-tutorial/
the comments at the bottom have more tips also
Rachel says
I agree with Maya. I think putting it back together similar to the way you found it should be fine.
Unless you’re really set on changing things.
Sorry, I’m no help!
Kim @ EF eDesigns says
Oh boy…I can’t help just yet, but I’ll be checking back for your upholstery experts’ input! I’m tiptoeing around doing a wingback chair myself. http://efedesigns.com/blog/?p=1581
Robin says
I cannot begin to tell you how many times I have learned to do something — or gotten some really good ideas how — by going to YouTube and inputting a few words. Like in this case I would type in “reupholstery” (or “upholstery”) and “chair.”
My guess is that if you got some upholstery webbing and attached it to the empty square space on the chair back, and then built up the front and the back side with padding, that would make a secure backing for the chair.
meg says
you will probably want to remove that plywood seat and replace it with the ‘seat belt looking stuff’… plywood seats are easy to upholster but are terrible to sit on for a long period of time without SUBSTANTIAL padding. since this is supposed to be a super comfy rocker for you and babies… i would suggest upholstering it in such away that it gives your back some support. :)
Annie says
Yeppers! Use that jute webbing to weave the back and then add your new fabric right over the top, hot glue the trim and enjoy! That’s how I did mine!
Suzanne says
I would do the back exactly as they did, and staple and glue the heck out of it…then cover with trim as you said. A nice solid upholstery fabric should do just fine. Can’t wait to see finished product!
Rachel @ The Avid Appetite says
Can’t wait to see how you tackle it! I would love to do something like this.
MS says
I believe I’ve seen this done on a TV show before. So not super helpful, but if I remember correctly, the fabric was stapled directly to the surface of the hole/frame and then the staples were covered with piping or trim of some kind that was hot glued on. If you folded the cut side under and stapled through the (then) two layers of fabric, I imagine it would be very sturdy depending on the fabric choice. And you could still stuff the space between the front and back parts with padding of some kind.
Kathleen says
Check out my tutorial, it’s a different kind of chair, but the back is similar. Check out the 4th pic down and see what is included in between the front and back fabric. Just some thin foam, cardboard and a thicker piece of foam and then some batting.
http://btweenblueandyellow.blogspot.com/2010/09/first-upholstry-projecttutorial.html
Hope this helps :)
~Kathleen