Ok I’m back with part two of the madness that is Me vs. Rocker. But remember my disclaimer from yesterday’s post that this entire process was much like when aliens took over my body and I made a quilt for Clara, which is to say: I went rogue. I took in all the advice from you guys along with some google tips and some suggestions from a reupholstering-fiend friend of mine… and just played it by ear and did what seemed to work as I went along. I mean, it’s not a family heirloom, it’s a $25 craigslist find. But enough chatter, heeeeere we go.
Although there was a sneak peek pic of the almost-finished product at the end of the last post, we were actually here when it came to the play-by-play:
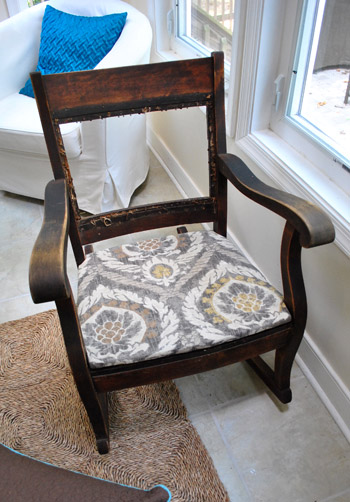
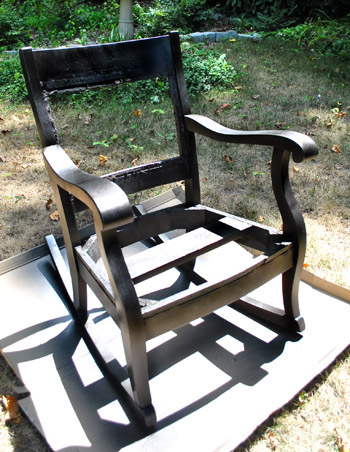
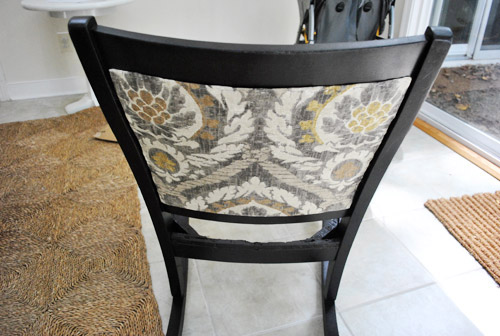
No wait, we had finished that seat and were here after redoing the frame:
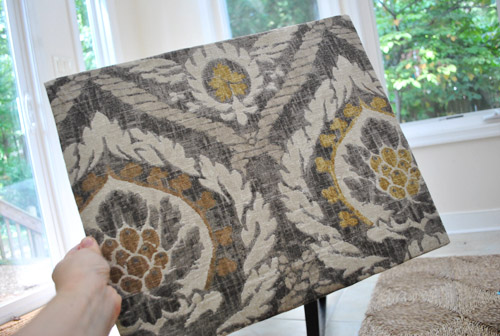
Finishing the seat upholstery and the frame meant I could no longer avoid the most intimidating part of this project: that opening at the top part of the chair that would have to look finished from both sides. And yes, I was skeered. But after reading through a ton of recommendations on this original how-do-I-do-it post from nine months ago (and chatting to a reupholstering-fiend friend of mine) I opted to use one of the more surprising yet most commonly recommended methods: heavy duty cardboard. Doesn’t that sound like a terrible idea? I know, it sounds completely wrong. Like bad dollhouse furniture that would be uncomfortable and make weird cardboard sounds when you lean back on it. But I guess a lot of upholstery experts use it and my friend had gorgeously redone an entire dining set with double-sided upholstery just like my rocker using that method. So I went for it. And in the words of Madonna: I’m not sorry (it’s huuuuman naaaature). It actually worked out awesomely. Let’s get into it, shall we?
First I used four pieces of cardstock to make a template for the opening (to see just how wide and long it needed to be to cover some of the gross hole-riddled parts of the frame that the original upholstery had once obscured):
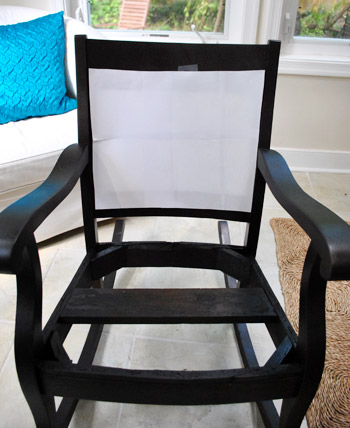
Then I placed that template on the back side of the chair to be sure another upholstered panel of that exact size would work nicely in the back (and cover all the rough areas of the frame that aren’t meant to be seen back there). It worked in the back too, so I laid my handy little cardstock template down on some heavy duty cardboard (leftover from our Ikea file cabinet packaging) and traced the shape of the template onto the cardboard.
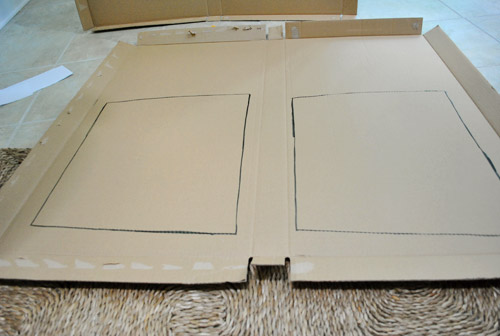
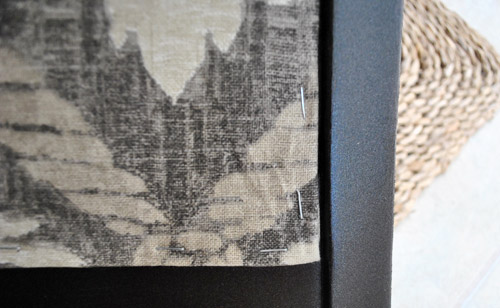
Next I cut each cardboard panel out and used more extra-loft batting and fabric, which I secured from behind to upholster it just like I did to the seat in the first part of this tutorial. Oh and you’ll notice I did my best to center the fabric again and pull it nice and taut around the back perimeter. This time I just used one layer of batting underneath it (instead of five like the seat) since people don’t sit on the chair back (they just lean on it). I don’t mind all wood rockers like this, so I wasn’t looking for a ton of top-of-your-back plushness anyway. I just wanted the batting and fabric to give the heavy duty cardboard even more strength and durability. It was actually surprisingly legit looking when I was done. And since I worried that staples would poke through the front of my fabric from behind as I secured the batting and fabric, I used duct tape to hold it in place from behind instead – just until I could staple through everything to attach the panel to the chair (which I knew would hold a lot more firmly over time than tape). I don’t think anyone would have guessed it was cardboard and duct tape under there from the front. And the great thing about it was that it wasn’t completely unbendable…
… but once it was stapled (with my regular old staple gun) to the chair about a quarter of an inch from the edge (through the panel and into the frame) it was completely unbendable and appropriately strong.
I don’t think a kid could stab an umbrella through it actually. It’s that strong. See, it gets really nice and rigid once the outside is reinforced with all of those staples around the chair’s wooden frame. And it was nice that it wasn’t completely rigid (aka: unbendable) before the stapling step because if I used anything more unbendy (like a piece of metal flashing) I worried it would have been really hard to attach. Why? Well, whatever I chose for the panel had to have some flex so it could follow the slight curve of the frame without buckling or folding. In short: cardboard sounds crazy, but the thick stuff that’s reinforced with batting and fabric = smooth and completely professional looking. I don’t think anyone could thump their hand against it (hard, it can take it) and guess that it was cardboard. And it’s completely comfortable to lean on, rock in, etc.
But just stapling the panel around the exterior left me with this dilemma: ugly little visible staples around the perimeter. At first I thought I’d find some sort of trim or burlap ribbon to glue over it (they sell upholstery glue meant for adding trim like that) but the more I looked at options, the more I didn’t like the idea of adding more contrasting fabric or trim. Nothing seemed to go with my base fabric, and I didn’t want it to look cheap or peel off due to constant use (we work our furniture hard in this house).
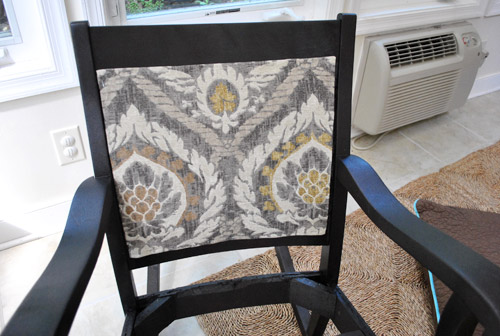
So I did what any novice chair upholstering gal would do, and completely ignored the problem for the time being. Instead I just moved on to making the second panel for the back (again using the one layer of batting + one layer of taut fabric method to cover the panel – secured from the back with duct tape and then stapled to the chair frame to hold everything in place for the long haul).
Here’s a better shot where you can see how the frame curves a bit, so creating a panel that’s not too rigid to follow that curve was key.
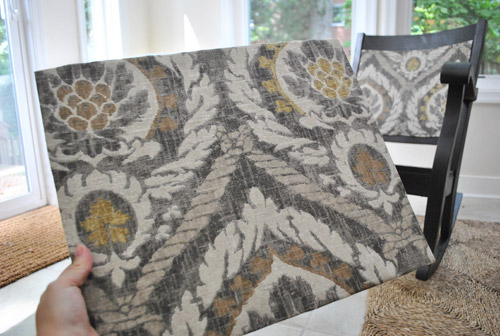
From afar she was looking miiightly fine (this is actually the sneak peek pic I included in yesterday’s post)…
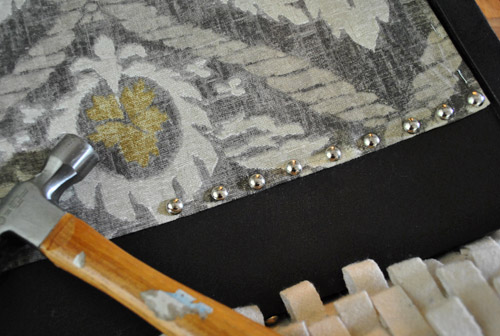
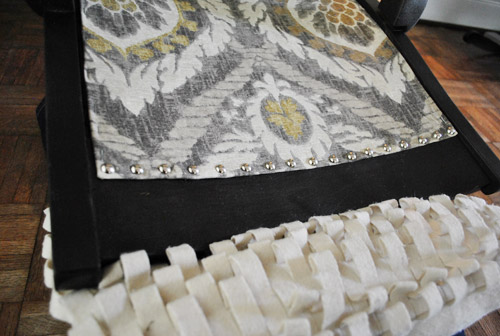
… but up close there was still the visible staple issue around the edge of each panel. So I decided after looking at all of my trimming options at JoAnn that maybe it was a job for nail heads (sold in packs of 24 for $1.50 each). After all I love the gorgeous detailing they can add to things (our living room ottoman has them going on, and I am totally picking up what it’s putting down). So I very slowly pried out the staples as I added nail heads down the line instead (the staples could be easily popped out with a flat head screwdriver, and then I just used a small hammer to bang in my nail heads, which basically look like heavy duty thumb tacks).
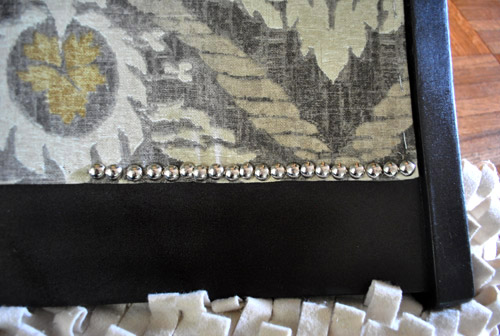
But after a whole bunch of chihuahua-scaring hammering, I stepped back and hated the lumpy bumpy result. They were just far too ganked up on each other and no matter how hard I tried to hammer them in straight, there was a slight wiggled effect and it just wasn’t working for me. I had looked for one of those long rows of nail heads that they sell pre-lined-up on a spool (which probably would have been a lot easier) but I couldn’t find them at JoAnn (hence purchasing individual nail heads instead). But it was definitely time to figure something else out. So I decided to try to space my nail heads a little further out (sort of the same distance as my staples) instead of trying to make a long dense line…
It was soooo much better. I could breathe again. If one was slightly higher or lower than another one it was a lot less obvious this way. And it felt more airy and not as on-top-of-itself crowded.
Oh and just to be clear, I would remove each staple with the flat head screwdriver as I went along and replace it with a nail head. So it wouldn’t be smart to remove all of your staples at once or nothing would hold your panel in place on the chair. Moving around the chair and popping one staple out and one nail head in did the trick. And using a small piece of paper or cardboard as a spacer between the nail heads can help you keep them nice and equidistant. Booyah, Dad. I just used equidistant on the ol’ blog (he’s a math teacher, so that should thrill him to no end).
Oh and see that ruffled cream thing at the bottom of the pic above and below? That’s just a pillow from the sofa because I was banging the chair pretty hard, so I didn’t want it rubbing against the floor with every hit. Poor pillow. I’m happy to say that he made it through. And here’s what I had going on after doing three out of four sides of the front panel:

Not bad, right? It was nice because it made the whole chair feel kind of special and expensive in a way that I feared glued cording or trim couldn’t. But I’m not gonna lie. This is the hardest step by far, physically. You get sweaty and gross from all that extra-hard hammering and it’s just downright tiring. It’s also super frustrating every once in a while when your nail head inexplicably bends as you hammer it in, which means it is rendered completely useless (and results in a bunch of annoying waste in the end). Just look at this pile of “brokens”:
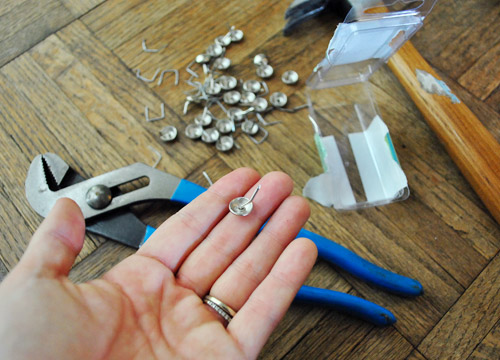
I even tried to straighten them with a pliers in the hopes of reusing them, but once they’re bent they’re just too compromised to go in straight and look right (and often just break entirely). Bummer.
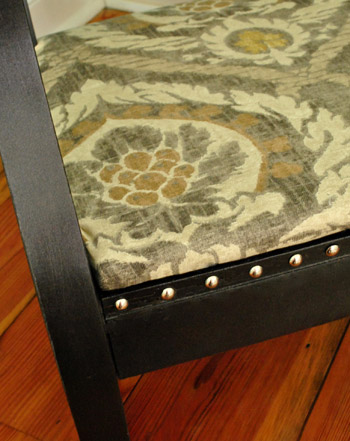
But in the end (after about an hour and a half spent studding the front panel) I loved the look so much that I even added studs along the wood trim part under the seat on the sides and front. Just to add some balance and bring some of that detailing to the bottom of the rocker along with the top panels. It’s hard to tell in the pics, but the studding on the upper panel of upholstery is nice and shiny, so adding some shine along the wooden bottom edge of the chair made it feel more not-top-heavy, so it’s more balanced looking in person.
Secret: I haven’t nail-headed the back panel yet, so I have a bit more hammering to do. Maybe next week when my arms recover. Hah. For now I’ll just keep my chair facing forward and nobody will be the wiser. Except for the fact that I just told everyone. Because I’m smooth like that.
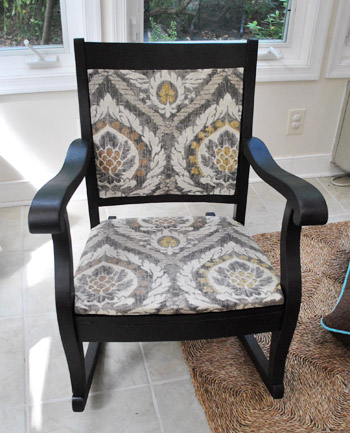
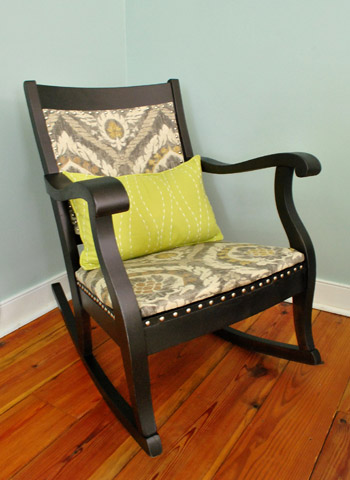
Either way, from the front and the side… I think I’m in love:
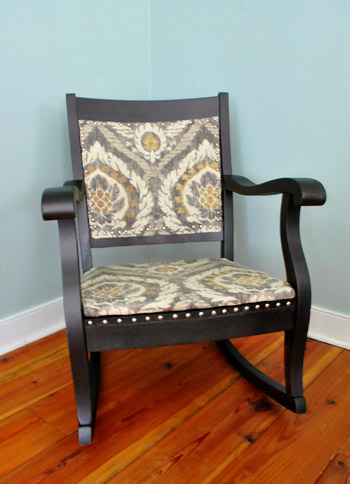

Isn’t she sexy? Wait, I mean he. The studs and the curves give me mixed signals. Speaking of the studs, for some reason the nail head row on the bottom (that wraps around the wood rail under the seat) reads as a little “medieval” in these pics, but I promise it’s not at all reminiscent of Knights Of The Round Table in person, I think the camera just caught them differently than they read in real life.
But back to those nail heads, my advice to you would be this: buy waaaaay more boxes of nail heads than you think you’ll need. They’re only $1.50 a box (at least at our JoAnn) and you can always use coupons on top of that. It’s just waaay more annoying to run out of them and have to treck back out to the store all sweaty and frustrated than to have extra boxes that you can return at the end if you don’t need them. To give you an idea of how many boxes I went through, I actually needed five of them (due to all the annoying bent ones that messed with my mojo). I probably could have done it in three if none of them inexplicably bent on me.
To celebrate fiiiinally finishing (well being 95% done, since I still have to stud the back panel) I decided to have a pillow fashion show. Because I’m weird like that. Here’s Mr Dapper himself, rocking (har-har) a random green HomeGoods pillow that I have in my embarrassingly extensive pillow collection:
And here he is with a little Anthropologie-ish spin thanks to a fun patterned yellow pillow going on (originally from Target, borrowed from the guest room):
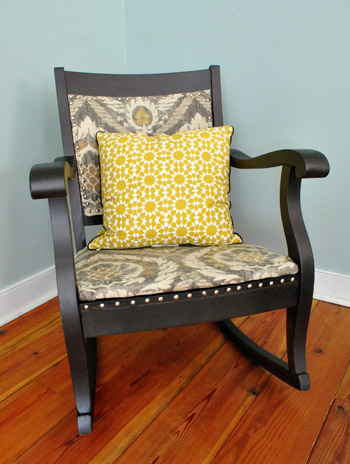
Today he’s “wearing” the little green pillow in the corner of our bedroom, but the patterned yellow one was fun for a hot minute too. We’re thinking our rocker might eventually end up in the office, which would be really nice since we spend lots of Clara-reading time in there (and decided our big green sofa doesn’t really work with the floor plan that we’re working towards). We’ll definitely share some pics when we pin down a permanent home for the guy.
And just for kicks, here’s a look back at our $25 craigslist rocker before I worked up the took-nine-months-to-cultivate energy to get ‘er done. Ah memories.

You’ve come a long way Rocky. Here’s the budget breakdown:
- Rocker (from craigslist): $25
- Extra-loft batting (from JoAnn): $6 (with 50% off coupon)
- Staple gun: $0 (already owned – but it’ll run you $19-ish bucks from Home Depot if you need one)
- Oil-rubbed bronze spray paint (from Home Depot): $7
- Heavy duty cardboard: $0 (leftover from our Ikea file cabinet packaging)
- Kravet fabric (found as a clearance remnant at JoAnn): $4 (for two yards)
- Nail heads (from JoAnn): $6 (they were $1.50 a box & I needed 5 boxes, but used 2 coupons)
- Total: $48
Possibly the most exciting thing? We just learned that Ballard Designs is selling the same exact Kravet fabric that we found as a clearance remnant at JoAnn for $4 (for two yards) for a whopping $32 a yard (which adds up to $64 for two)! So the fabric that we used on our project alone could have cost more than our entire $48 rocker makeover. Definitely makes the whole roller-coaster upholstery adventure feel like time and money well spent. Although I’m still mad that some of my nail heads bent so I had to buy a few extra packs. Oh well, there’s no crying in baseball upholstery.
So there you have it. A what-worked-for-me rundown with 44 photos between the this post and part one (hence the two part split). As for how it feels to rock in that guy, in a word: niiiiiice. It’s all very comfy and smooth (with nice rock-ability going on). And best of all, there’s not an inkling of “is this thing made of cardboard?”- for which I’m eternally grateful. Has anyone else out there tried the cardboard panel trick for chair backing (or some other upholstery task)? Is anyone bravely embarking on an even more involved chair makeover (the idea of a wingback makes me shake in my boots)? Good luck and godspeed!
Psst- We announced this weeks giveaway winners. Click here to see if you’re one of them.

Christa M says
Now I have Slick Rick’s Children Story stuck in my head
Christa M says
from this sentence “But enough chatter, heeeeere we go.”
Sherry you did an amazing job on that Rocker!
Makes me feel like I can tackle the dresser I want to redo! Thanks for the inspiration!
YoungHouseLove says
Hahaha- now it’s in my head too.
xo,
s
Jordan G @ The Happy Homebodies says
That chair turned out SO SO awesome. I think the nailheads totally make it, and I love how you added them to the wooden part in front. That detail makes it look extra expensive!
Rebekka says
i LOVE the addition of the nail heads, especially the ones around the seat! it makes him so much more unique!
Eve says
Isn’t s/he gorgeous? Great job with the nailhead trim. I like the spacing. I’ve been poring over reupholstery sites to re-do this chair on the right that we bought from CL. And I love the yellow pillow – not that you want to buy more fabric, but a little lumbar pillow in Dwell’s Bella Porte Citinre would look quite sassy.
YoungHouseLove says
Ooh that would be fun!
xo,
s
Ashley Reid says
Dang Sherry!! That chair looks absolutely designer. Good job!
Angie says
Beautiful job, Sherry! I am so impressed! What an improvement you’ve made to that old beastly chair… Congrats!
Iomay says
Dang! You two are hogging up all the talent. That must be why I’m not so crafty :) But my birthday IS in December if you’d like to send some my way! Thanks!
It looks amazing :)
Stephanie says
Looks awesome! In which room did you photograph the chair? The walls look blue.
YoungHouseLove says
That’s our bedroom. The greeny-blue-gray walls seem to change all the time depending on the time of day (I shot these pics yesterday afternoon)!
xo,
s
Diane says
Holy crap – that doesn’t even look like the original chair! What a cool transformation :) The nail heads really make it look rich and high end.
Julie (from Pocketful of Joules) says
Great job – I love, love, love the finished product! And I really like the way the two patterns look together with the yellow Target pillow (even if that was just for the sassy fashion show).
Laura says
It looks fantastic!
Melanie @ Mailbox Journey says
It really looks great. I had to laugh when you said about a kid stabbing an umbrella thru it. haha!
Laurie says
He rocks! Where can I get one? A perfect example of looking at used/battered furniture for the lines. Love the nail head finish. Love the fabric. Can’t believe how good the ORB looks on a rocking chair. I’m a satin nickel kind of girl, but lately you’ve been really swaying me in the ORB direction. At least I know if I decide to make the change, I can just go get the spray paint instead of buying all new hardware.
Anna Blount says
Looks great Sherry! Might just have to find the ambition to redo a glider rocker, bought at auction for $10 – fabric from the early 80s but one of my favorite spots to relax. Thanks
Jess @ Little House. Big Heart. says
I love it! Looks great!
Why doesn’t Craigslist in Dallas have great finds like this?
my honest answer says
Sherry it looks great! I must admit I didn’t really love the fabric… until I read it should have been $32. Isn’t that ridiculous? I should like it or not based on how it looks, not whether you got it for cheap. I guess that’s how stores play wierd mind games on us, and convince us to buy junk just because it was once expensive, and now it’s cheap. Yes, TJMaxx, I’m looking at you…
Seriously Sassy Mama says
Again, I love the fabric. The nail heads definitely complete the chair. I would never have thought about the double cardboard. That is genius!
Elisa says
Looks good! As a project in collage we had to make a chair completely out of corrugated cardboard. Once you start layering that shiz together it becomes quite strong.
YoungHouseLove says
Isn’t that so funny? I totally pictured someone leaning back on it and busting through!
xo,
s
Kristen @ Popcorn on the Stove says
We had that same project my first year in college – a 3D design class! How funny! It was supposed to be designed for a certain historical person (I chose Isadora Duncan).
EHS says
Must be lots of art school readers today. I didn’t have to make anything out of cardboard the first year, but I had lots of friends making some pretty cool cardboard chairs in their 3D classes. One class had to make a bridge out of cardboard that multiple people had to walk across. And the prof was a hefty man!
kathy says
YES! There are some amazing websites and images online of creative and quite usable cardboard furniture!
Caity says
I’ve said it before, and I’ll say it again: amazeballs. I totally want to find a sad rocking chair and make it happy now.
Sam Cross says
Me too!! this post was THAT inspiring!!
ashley says
Wow, that is incredibly beautiful. You two amaze me! This is helpful too, because I have some cane-backed chairs that have been destroyed by our sweet clawing cats, and fabric backs would be perfect! Good work, as always : )
Rebecca R says
I mean this in the nicest way possible….I hate y’all, LOL!! You are just TOO creative. Never in a million years would I be able to turn that hunk of junk into that beauty!! Keep the ideas coming!!
Kristen @ Popcorn on the Stove says
This absolutely amazing! It looks awesome. Can I just say that I saw two chairs on the street this morning that had some upholstering and I contemplated picking them up because this inspired me? I didn’t end up doing it (bed bug fear) but I may stop by our local thrift store and see if I can find anything nice!
KC says
This is unbelievable. I’m in love too. Now if I can only convince my husband to tear apart the cushioned seat and back on his beloved old, ugly rocker. Hmmm, maybe I’ll just surprise him…
Sarah C says
I’ve never used it but I’ve seen other bloggers use the nailhead trim on a roll, which might help with hammering and keeping it even. Something like this: http://www.diyupholsterysupply.com/french50.html
Chair looks great – love the fabric!
YoungHouseLove says
Yeah that definitely would have come in handy! I couldn’t find anything like that at JoAnn. But I actually love the spaced out look now- it seems a little airier and lighter.
xo,
s
heather s. says
You can buy nailhead trim on a roll from JoAnn – that’s where I got mine for around $15.
YoungHouseLove says
No way! Maybe it was just sold out at ours. Good to know for next time!
xo,
s
Jax says
What are your thoughts on revamping a family rocking chair? I have one that is totally 70s in my living room and want to fix it up and make it more contemporary. Would this ruin the fact it’s from a family member?
YoungHouseLove says
Hmm, I’m from the school of thought that it’s nice to love everything in your house, so if you don’t love it as it is, I think you could still protect the lines and feeling of the chair but freshen it up a bit. Especially if it’s not worth a bunch of money or anything. Lots of folks get hand me downs and revamp them after a few decades or so. Good luck!
xo,
s
Rachel Tatem says
That’s great! I love what you see when you find a great piece!
Kristie says
Nice job, Sher-dog! You may have mentioned it, but how long do you estimate this whole she-bang took you? (Not including the 9-month-work-up-the-courage waiting period).
YoungHouseLove says
Haha, not counting the nine month waiting period it probably took me about two hours a day for three consecutive days. So maybe six hours total from doing the seat, the frame, the back and front panels, and the studding?
xo,
s
bridget b. says
it looks nice, good job Sherry. i’m feeling inspired to upholster something now!
Amanda @ Our Humble A{Bowe}d says
Wow, totally great transformation! I wouldn’t have guessed to use cardboard for the back, but that’s cool that it worked. I really love the addition of the nail head trim. I was really hoping that would be the option you were going to use. Because it’s pretty and functional. Love the little row along the wood, too. Great work! Love the presto changeo!
Robin @ Our Semi Organic Life says
fashion show, fashion show, fashion show of pillows!
YoungHouseLove says
Haha- I was having a Kelly from The Office moment.
xo,
s
Courtney says
haha!! Oh, Kelly…she’s one of my favorites.
Rachei says
Wow! Awesome job! I love it so much that I want one:) I have been looking for the perfect chair to do myself but I still have found one. You have inspired me to look harder! You are so talented!
Jessie says
I love how unconventional your thinking is. It’s a gift, and I’m jealous of it! Love how the chair turned out. I love the embellishments on the seat. My vote goes for the little green pillow!
kory says
love it!!!!
AarthiD says
Oh my goodness, the chair looks amazing. It’s a complete transformation. I love the nail-studding; it adds a bit of sparkle to the chair, and I do love me some sparkle. :D
Hmm. I like the yellow pillow sometimes, but the green strikes me as a better fit. It’s the right size for the back-opening thingy.
Personally, I’ve always loved like the wicker-mesh bases for chairs ’cause of their flexibility. Kind of like the ergonomic Herman Miller computer chairs, haha.
heather s. says
Looks great! My only suggestion would be to never use a regular hammer on nailhead – you really should use a rubber mallet since hammers can break the nailheads and can also scuff up the surface.
I reupholstered a chair a couple of years ago – it also had cardboard wrapped in foam for the back cushion! I used nailhead trim rather than individual nailheads and love the result.
http://athomewithh.blogspot.com/2010/02/chair-makeover-story.html
YoungHouseLove says
Who knew? Haha. Thanks for the tip! I even have a rubber mallet I would have loved to break out. Next time for sure! And you did an amaaaazing job on that chair btw!
xo,
s
threadbndr says
Good catch, Heather. I was about to suggest a tack hammer, since I think Sherry may have had so many bent tacks because her hammer was too heavy. A nylon tip tack hammer would be even better.
Sherry, btw, the tack hammer we are talking about is available from the same website as the ‘french tack’ rolls mentioned above. I have a footstool that I need to have my son glue and clamp so that I can make a new needlepoint cover for it and will be using the french tacks (the roll) when I put it back together.
YoungHouseLove says
Thanks so much for the tips guys!!!
xo,
s
kathy says
WOW, Heather! Did you have experience upholstering before you did this chair? Just wondering–because I have a great Bergere chair that I took to an upholsterer who quoted about $1600, so I’ve hesitated. i doubt I could do it myself. Any suggestions…anyone? Thanks!
Kelsey says
Oh my gosh, goegreous! This makes me want to reupholster something…local rocking chairs WATCH OUT.
Wendy says
Impressive! I made a headboard inspired by you guys and I added nailhead trim. I used a kit for the trim, which was so much easier (it’s a long strip of nails attached to each other and you only nail in 1 out of every 5 nails). It’s a lot less hammering and it is perfectly spaced.
http://www.fabricfarms.com/UP141.html
YoungHouseLove says
That sounds like a great solution! Thanks for sharing!
xo,
s
Melody says
It looks so great! I love the nailheads!
I’m glad that you posted this when you did, because I’m about to reupholster a footstool that looks worse than your rocking chair did.
Lindsey says
Great job! It looks amazing! Now I want to reupholster something. Be proud!
Giulia says
Looks great! I did those nail heads on my chair a couple of years back and found it hard and frustrating. I really admire people that do that professionally – imagine those intricate headboards…wow! My chair still does not have the back done after 3 years…it faces one way only in our bedroom ;)
YoungHouseLove says
I know, right? Whoever does that for a living is amazing! I tip my hat to them.
xo,
s
Mona says
Rocky might also look good next to a cute little off-white Roundy (pillow).
YoungHouseLove says
Ooh yeah, he could rock that. Har-har.
xo,
s
Rachel @ The Avid Appetite says
This looks amazing Sherry! I adore that fabric too – it seems like it would match (or mix with) so many things! Beautiful.
Lindsey says
First of all, it turned out awesome!! Great work!
I’m a tad confused on how you attached the fabric to the cardboard though. I swear it said you stapled it, but wouldn’t a staple poke all the way through cardboard?? Or did you not attach the fabric to the cardboard first before attaching the cardboard to the chair?
YoungHouseLove says
Ack, I totally have to clarify that in the post, so I’ll go back in there and update it for ya. In the meantime, I actually wrapped the batting and fabric around the cardboard and secured it tautly in place with duct tape and then used the staples around the permeter of the panel (when attaching it to the frame of the chair) to hold the batting/fabric permanently tight and in place. Hope that makes sense!
xo,
s
Christa M says
Oh yes! Thanks for clarifying, I was confused as well!
erin says
Looks great! I was wondering how you find time to run out to all of these craft, fabric, and home stores in between caring for Clara, blogging, and your projects?
I can’t imagine it was very easy when you where exclusively breast feeding!
YoungHouseLove says
Haha, it definitely wasn’t easy and still is kind of a challenge most days. We basically do all of our projects and run errands on nights and weekends since one of us has a desk job during the day (writing posts, answering comments, editing photos, organizing giveaways) and the other person is on Clara duty (stay at home mom or dad = full time job). Except for an hour in the morning and in the afternoon when Clara naps (so we’re both free, which is usually when one of us will run out for supplies or start a project). Or we’ll both work on posts/pics/contest/comments while she sleeps and then all go out as a family in the evening or over the weekend. We always joke that we should take more advantage of the off-hours during the work day and go to the store then, but we can never seem to manage it until the blog slows down around dinnertime.
xo,
s
Sarah @ w30 says
This is actually really encouraging to read. I know it’s not like this at all, but it’s easy to imagine you have unlimited time to do projects since you get so much done. Instead, you have to do most of your projects on nights and weekends like everyone else … so, basically, what you’re saying is I have no excuse!
Melissa@Julia's Bookbag says
INCREDIBLE! Just when I thought I couldn’t get more impressed with what you guys can do! This is GORGEOUS and I can’t even think what this would cost at someplace like Anthropologie….
Elizabeth P. says
So inspiring! Awesome job!
Melanie @ Mailbox Journey says
Every time I come on here I have to stare at your new header for a couple seconds. It’s so eye catching, I love it.
Janae says
Its so funny, my sister gave me a yardsale chair when she moved out of state, and I’ve wanted to reupholster and paint it since I got it. Whomever owned it previously had a child that used (what I think could be) nail polish to “decorate” the wood, and it drives me nuts. Fortunately it’s living in my painting studio right now, so it’s not an eyesore… but your entire walk through here is inspiring, and I want to tackle this even more now. Thanks for all the step by step insight! :)
kathy says
wow, that rocker looks great! Kudos to you, Sherry, I would never be brave enough to try that!
Sarah @ Redhead in Ruffled Flats says
Looks amazing!!! I know how intimidating upholstering the back of chair like that can be. A couple years ago when I was in college, I found some great “big butt” old chairs as we like to call them (they were large) with a great caning detail along the back piece. I thought I would just paint them and recover the seat cushion, but when I got them home (they were like $6 for four at Goodwill), I noticed that a couple of the chairs had a rip in the caning. I have no idea how to fix that, so I gave up after holding on to them for a couple years and gave them to my mom to figure out. Hopefully she has better luck!