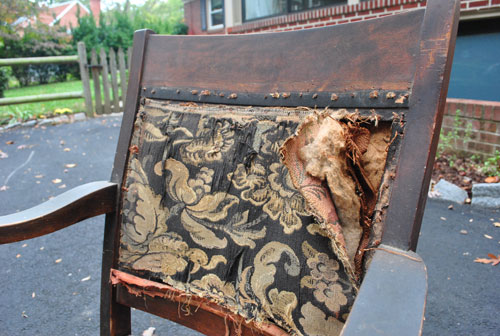
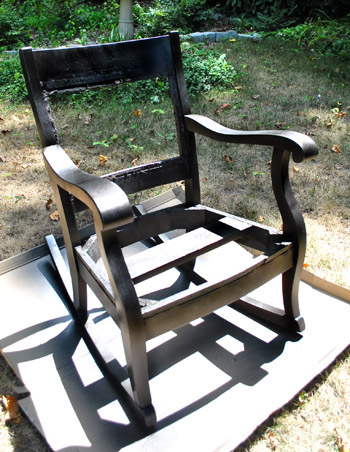
That’s right. I broke out the word dastardly. And I know we should be hard at work on our office cabinets, but that’s a big job (aka: a weekend job – maybe even a two-weekend job) and I have been giving this rocker the stink eye since November (yes, even before we moved). For anyone who can’t even remember that far back (me), here’s a recap: I originally picked it up off of Craigslist for $25 because I really liked the simple lines of it. Then it sat untouched for over nine months until this weekend.

Why? Well, no sooner had I gotten it home than I realized I had no earthly idea how to reupholster it. At all. I mean I knew how to do the bottom (I’ve redone seats before) but the hole at the top completely confounded me because it had to look finished on both sides. Le yikes.
But I posted this call for help a while back and a bunch of you guys were awesome! I definitely learned that there were probably about ten ways to skin that cat (gross expression, sorry – but it was comforting to hear that even some very experienced folks described many different ways I could “go”). So it gave me the confidence to tackle it right away put it off for nine months and begrudgingly give it the old college try over the last few days.
I will disclaimer this entire process much like when aliens took over my body and I made a quilt for Clara, which is to say: I went rogue. I took in all the advice from you guys along with some google tips and some suggestions from a reupholstering-fiend friend of mine… and just played it by ear and did what seemed to work as I went along. So with that out of the way, allow me to share the madness that is Me vs. Rocker. Which is not to be confused with Man vs. Wild (Bear Grylls I’m not).
Oh and because this process was so involved, it actually took me a few days of work. Which meant it was a multi-phase thing involving lots o’ pics. So I broke it right down the middle for ya (since 40 pics in one long rambling post = madness that even we can’t endorse). So here’s the first half. And the second half is in the hopper for tomorrow (still have to snap some after pics for ya, but it’s almost all set).
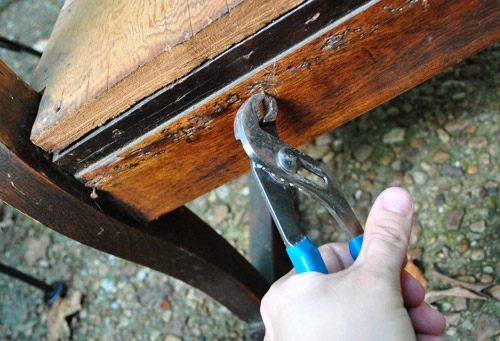
Anyway, here’s how it all went down: First I gave my rocker the stink eye one last time. You know for old time’s sake. Then I got to work pulling staples and nails out of the frame along with the ratty old upholstery to see what I was dealing with.
Oh and my tip would be to use a small channel lock pliers to pull things out. It was much easier than the back of a hammer or a needle-nosed pliers for me (although I still had to pull like crazy, this gripped better so I didn’t go flying backwards after tool slippage).
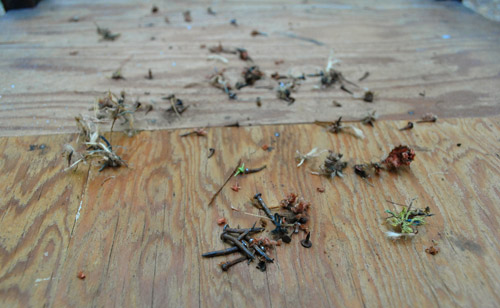
After about an hour I had a nice little pile going on. But I was only about 30% done.
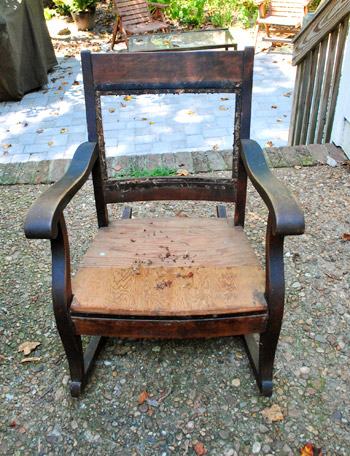
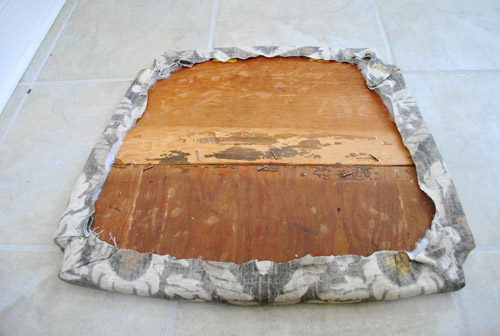
So I kept pulling old nails and tacks for a few more hours, and then removed the two wood seat slats and was left with this:

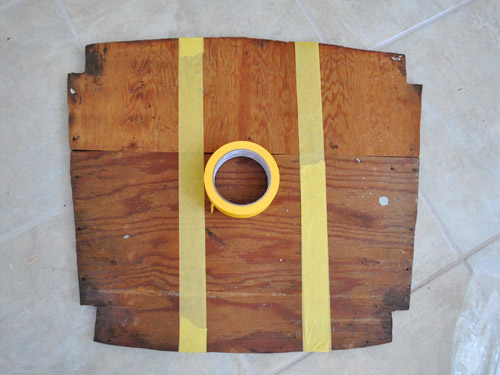
It was a pretty ugly sight for three-ish hours of work. And I knew I had some serious wood puttying and sanding to do when it came to the frame (to get it ready for some rich dark stain). But I was tired. So I decided to move onto a less strenuous step that I figured I couldn’t mess up. Upholstering the weird little two-pieces-of-wood seat. First I decided to tape them together so I could upholster it as all one thing (as opposed to two with a weird little seam). I just used some delicate surface painting tape because it didn’t need to be super heavy duty stuff (like sticky duct tape) because I knew once the batting and fabric were in place they’d hold it together for the long haul.
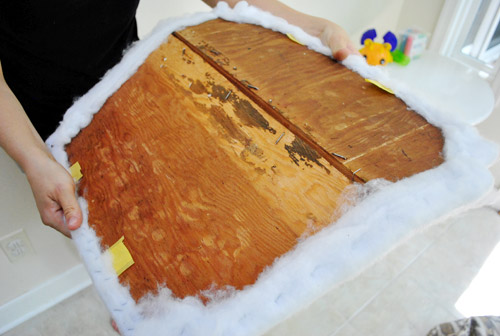
Then it was time for a bunch of layers of extra-loft batting. I used “Soft N Crafty” from JoAnn, which I purchased back in November when I thought I was going to tackle my chair (kind of embarrassing that I then just packed it up and moved it and it continued to sit around untouched for 8+ months, but whatever). I knew I could have used a big piece of foam for the seat, but I actually prefer wood seated rockers like this (John’s mom has the most comfortable one ever) so I decided I didn’t want too much cushion goin’ on. But I also knew that staple gunning one layer of extra loft batting around the back wasn’t going to do much…
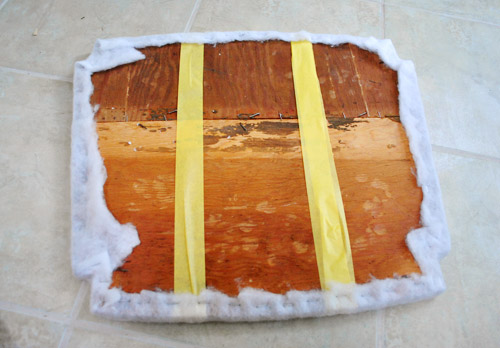
… so I applied a second layer…
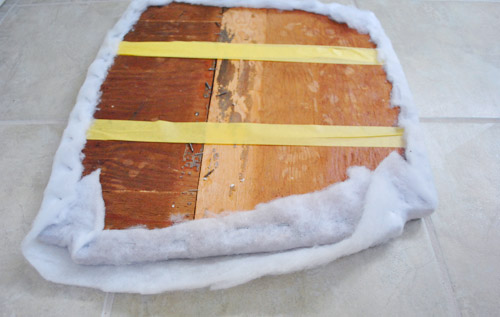
… and then a third, fourth, and fifth. By the end it was plush without being super sink-in squishy, which I liked. Nice and firm with a bit of softness.
Here’s the point where I wanted to throw everything out the window. Yup, after five layers of batting applied staple by staple, I realized that the seat needed to be able to bend to fit past the arms and legs and actually lay flat on the base.

So I nearly broke down with visions of having to restaple five layers o’ batting after separating the two pieces of wood so they could hinge forward for just a second to be slid into place. Thankfully my sweet husband (who I always describe as the brains of this operation) pointed out that I didn’t have to unstaple anything and could just turn the seat over and cut the yellow tape that was running across the back and the batting should be flexible enough to fold forward (it wasn’t like I was trying to stretch it backwards or anything).
Worked like a charm. And apparently I was so excited I took this completely crooked picture in celebration:
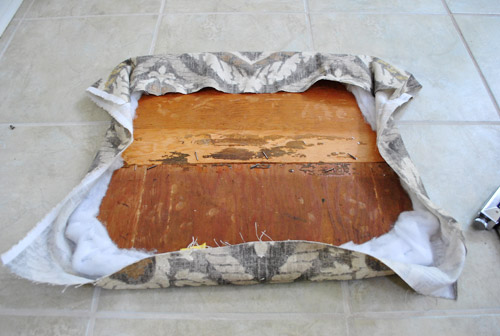
Then it was time to reupholster my seat. I was super excited about the “Kravet Design” remnant fabric that I found on clearance at JoAnn for… wait for it… $2 a yard (I got two yards for $4). At the time that I grabbed it I had no idea what I’d use it for, but after woefully glancing up at my biggest failure (Mr Rocker, sitting untouched in the sunroom for nearly a year) I realized that the fabric would look really pretty on it (with some rich dark stain to set it off). The pattern of my fabric meant that I would have to take the time to center it before stapling anything, so here I am roughly folding it around the seat to try to find a center line and see how it might look in place:

Then I flipped everything over and just shot one staple into the top middle and one staple into the bottom middle (while pulling things tight). This way I could flip it back over and ensure that I was indeed still centered (and if I wasn’t I just had two staples to pop out with a flat head screwdriver.
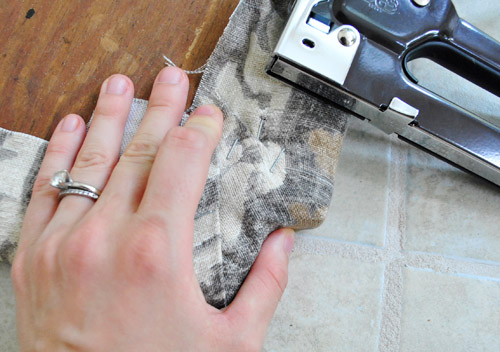
Happily, I was right on track, so I pulled things tight and shot another staple through the middle of each side of the seat, just so it was being held firmly at the noon, three o’ clock, six o’ clock, and nine o’ clock positions. Then I kept the fabric firmly pulled and continued to staple all around the rest of the perimeter. When it came to the carved-out corners, I just folded the fabric like I was wrapping a present – again being sure to pull things taut and use a few staples to hold my folds in place (so it would look nice and smooth from the front).
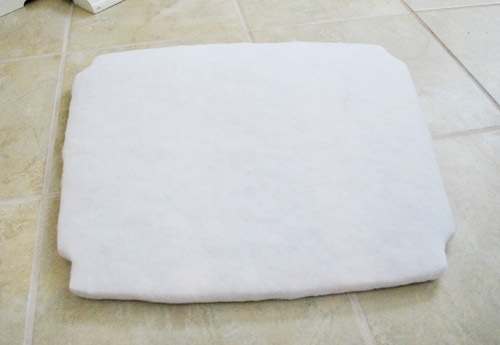
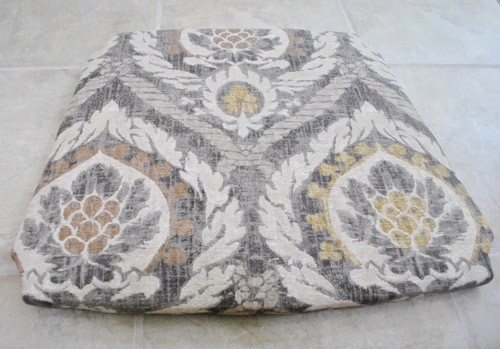
Here’s what it looked like from the back when I was all done with my staple job:
And here’s what it looked like from the front. Purty, right?
Then I shoved it back into the seat to make sure the batting and fabric still allowed the seat to hinge forward a little bit to squeeze in. Whew, it still worked. And in the distance I heard angels singing.
Then it was time for the strenuous frame-readying step. I used wood putty to fill some of the holes that might be visible (like the ones under the seat along the front of the chair’s framing) and sanded everything to rough it up and ready it for some rich dark stain. Since I had some liquid deglosser on hand I gently swiped that over the entire chair after some rigorous sanding (I used low grit paper followed by higher grit paper to smooth everything out).
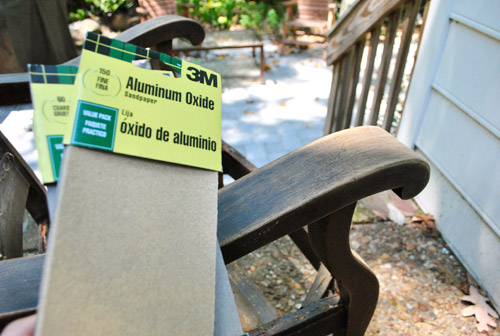
This is when I was forced to face the music: stain, even dark stain, wouldn’t make this chair look as flawless and something opaque like a rich deep coat of paint. Because even after all that putty, sanding, and deglossing, it was looking so inconsistent in certain areas that I knew it wouldn’t soak up stain evenly. Boo. And although some folks wouldn’t dream of painting wood, we’re definitely ok with it (especially since this is just a $25 cragislist find and not a family heirloom). So I threw my rich dark stain idea out the window and ran to the arms of an old friend. You guessed it: ORB.
I’m telling you, my name is Sherry and I’m addicted to oil-rubbed bronze spray paint. But thanks to having a nice built-in primer and applying three very thin and even coats, it actually took on the look of a rich dark wood (and had more dimension than plain old chocolate paint thanks to the subtle metallic quality of the finish). Here’s a picture that I snapped after two coats (you can see that it’s not completely seamless and even yet- but the third coat did the trick).
Oh and you can find more general spray painting tips here (lightly misting it while keeping your arm moving all the time is key).
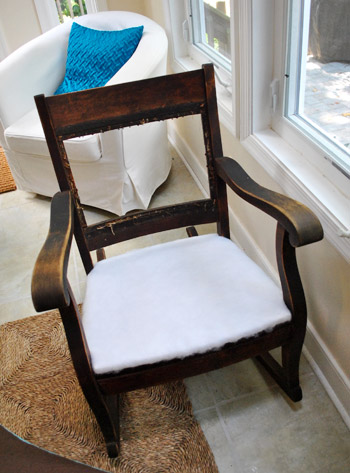
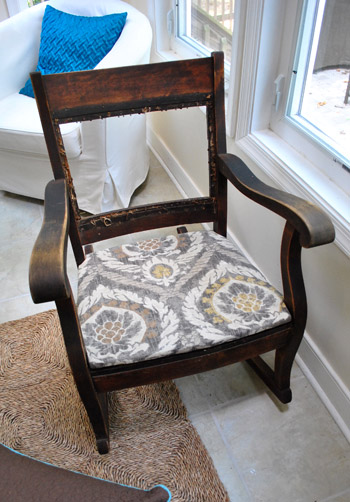
And because I hate to end on that poorly shot, blown out, two-coats-out-of-three spray painting pic, I thought I’d fast forward a little to give you a glance at Part Two of The Glee Project The Rocker Project. Here she is (not completely finished, but getting there). I’ll be back with more details of that whole shebang (and some final after shots) for ya tomorrow.
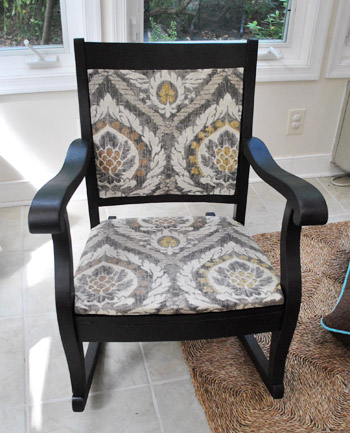
Update: A sweet commenter (thanks Laura!) just told us that our chair fabric was actually on the cover of the Ballard Designs catalog, so we hopped over there and learned they actually sell a chair that’s upholstered in exactly the same fabric for $600-800 (depending on the finish of the chair) and the fabric is being sold on its own for $32 a yard!
What about you guys. Do you have any projects that you’ve put off for an epically long time? Is there something that intimidates you, like two-sided upholstery does to me? Are you completely unsurprised that I basically try to solve every problem in my life with ORB? Can you believe that darn seat wouldn’t fit on the chair after five layers of batting-stapling? At that point I truly wanted to set the entire thing on fire.
Reference: https://www.productexpert.com/best-ergonomic-office-chairs/.

Sabrina says
Why can’t I find any of the used stuff you guys do? lol Everything I find is junk,junk. Love the finished project. Bought a can of ORB for my outdoor furniture and thought about you. I can not watch Bear anymore after what he did on that raft lol
Shari @ The Daily Dish says
The chair looks great!
Angie says
I love how the chair looks now! Although I must admit that I didn’t like the fabric so much on the first pic. But it looks perfect in combination with the new color of the chair.
My project I don’t really feel like tackling is our new second hand couch whose owner must have smoked a lot. That’s why I really need to do something about the smell. We got the couch about a month ago, and the odor is still there, although no longer as bad as it used to be.
I heard that putting baking soda on the cushions and then vacuuming it up is supposed to help. Guess I’ll just have to give it a try when I find some time and motivation… XD
James says
Thanks to this blog, your ORB addiction has spread to me, I’ve repainted all my cheap Ikea frames, and I’m in the process of redoing a retro lamp from my Aunt Hattie that’s from the 50’s.
Diana says
Beautiful job!! I have an old rocker that I bought about 30 years ago from a woman in her eighties ( the chair belonged to her father). My chair has a wooden back, straight arms, and a three inch deep removable cushion. I have yet to tackle that task, and have been covering the worn cushion with a throw blanket…so, your nine months doesn’t seem long at all:)…..
Gloria says
It looks awesome!!! I have TWO rocking chairs sitting in my possession for over a year now. I haven’t bought fabric for either, but maybe I just need to get it over with. This is good motivation!
Angie says
The chair looks beautiful, but I wrote to say I am so glad you are all safe and sound! We are in NY and felt it. Crazy, huh? Stay safe from the aftershocks!
YoungHouseLove says
Thanks! I felt a few yesterday and one in the middle of the night (although the one in the middle of the night might just have been a dream- I have earthquakes on the brain now!)
xo,
s
Lauren says
Not a dream! On the news this morning they said there was about a 3.0 aftershock in VA overnight.
YoungHouseLove says
I knew it! Ed the bed was a-shaking!
xo,
s
Stephanie Phillips says
Giggle. It was a-rocking…
YoungHouseLove says
Haha, for totally natural-disaster-related reasons!
xo,
s
Melissa says
Looks great!
I would be daunted by a chair but you make it look doable.
Now just to finish all the in projects that are already in progress!
heather says
I’m in the process of trying to find 3-4 complimentary chairs in need of re-caning for our dining room. I’m intimidated (I did it once, for about 15 minutes at an ag-fair and have loved it since), but I so want to do it. Reupholstering scares the bajesus out of me but I really should give it a go instead of being a scaredy pants. Yours came out beautiful and it didn’t look as scary as I thought.
My kids are probably going to think I’m the coolest mom ever with my mad crocheting, canning, soap making and caning (oh, they will be honed) skillz. *heavy sarcasm*. I should probably just go get a pair of tapered Mom pants at L.L. Bean right now and call it a day.
beth in dc says
We don’t know yet what your color plans are for the office, but I am imagining this chair in the living room, at home with the ORB sofa legs and the soft grey curtain patterns. .. but maybe it would be almost TOO much at home in there?
YoungHouseLove says
I actually have him sitting in the corner of the living room but it might be too much seating (since we have our huge sectional, the desk chair, and the two chairs at the white pedestal table near the window. And I figure since we read to Clara a lot in the office it might be a nice little addition!
xo,
s
Jen @ Always a Project says
This is a serendipitous time for a post like this—well, for me anyway! I just bought some fabric to reupholster a mid-century chair I’ve had for awhile, but I’m not really sure how I’m going to do it (never reupholstered, have no idea how to sew). Thanks for the inspiration. I’ll get that fabric on there somehow!
Hannah says
This looks great– and I have to say that I also finished listening to the radio show and loved it! So exciting to hear about the book! I will be pre-ordering it the second it’s available. Or camping out at bookstores the night before, iphone 5 style.
YoungHouseLove says
Oh Hannah you’re so sweet! Thanks so much!
xo,
s
Amy M says
Sherry, thanks so much for the inspiration! I bought a heirloom wooden rocker off of Craigslist a few months ago because I wanted something different for our nursery. All the gliders were just so expensive and didn’t have that passed-down-in-the-family vibe I was going for (even though it hadn’t been passed down in MY family). Every company wanted $300+ to reupholster it and I’ve been trying to work up the cojones to do it myself… now I know I can!
YoungHouseLove says
Good luck Amy! You can do it, girl!
xo,
s
Allison says
It looks awesome! If you put this chair in the corner of the office – do you have enough leftover fabric to cover the 2 desk chairs?
YoungHouseLove says
Ooh I think I do! But it might be too matchy if the rocker and the chairs have the same fabric. Hmm. We’ll have to see where we end up. I don’t even know what color the walls will be yet!
xo,
s
Page says
I truly enjoy reading about all of your projects! Love this chair!
Lauren says
Oh my goodness it’s beautiful!!! You guys are so inspiring.
As an aside because I know you share my love of Jeff Lewis, I think I spotted a smaller sized Karl in the living room he worked on in a recent episode (that horrible woman who is mean to Jenni). He had his little pale legs though, not the cool ORB ones. :)
YoungHouseLove says
No way!! I didn’t even notice that. But I think that lady who is mean to Jenni is such a jerk face!
xo,
s
Jen @ The Decor Scene says
Gorgeous! Love the paint & the fabric!!! Can’t wait to see if it winds up in the office or not. ;)
Kacie says
It looks beautiful!!
Tashia D says
The chair is so pretty now! I’m jealous of your fabulous craigslist find!!
Chari says
Hey! u guys are over on Amber Interior’s Blog today. She likes your paint chip art! it is pretty cool….
YoungHouseLove says
Wha? She’s too cool for us. That’s awesome.
xo,
s
Lisa P. says
Girlfriend, you’ve got mad skills. I’m jealous! LOVE this rocking chair.
Ashley @ Spite or Flight says
It looks amazing!! I can’t wait until Part Two to see how you tackled the top!!
Bree says
Wow, that chair is looking pretty hawt. I can’t wait for the next installment!
Andi says
LOVE!!!! This is absolutely gorgeous! You are inspiring me!!!!
Eilene says
You should feel really great about getting that chair done in less than a year. I found a really interesting chair at a yard sale years ago. Yes.. years. I had sanded it and now what? Nothing. My husband resently found a charming little chair on casters. Thought it would be perfect for a little girls room… but I have no idea how to reupolster and it’s really bumming me out. I hope that I can tackle it after reading about your posts. Fingers crossed!
Rachel says
Lookin good! Can’t wait to see more tomorrow!
Rachel H. says
LOVE. LOVE. LOVE.
katalina says
wow–I love that fabric and the new ORB chair.
I am thinking maybe you should be a spokes-model for ORB.
I think I am getting addicted to spray painting….I might get arrested for painting the old rusty round flat water meters in my yard.
question: I have those ugly fake gold knobs on all door with hinges—have you taken down all your door hinges and doorknobs in your house? It is probably not a good idea to spray the hinges while connected to the door?
thanks for your inspiration and laughs! Read your blog every day.
YoungHouseLove says
I definitely plan to spray them outside just for the fumes and to keep the house neat (that dust can go everywhere)! Hope it helps!
xo,
s
Rachel Tatem says
What a great job, simple steps that make it your own!
Kelli says
Wow the chair looks amazing! I have a rocking chair that I am planning on sanding and staining a dark color also.
On another note…I just reread your cloth diapering post and I was wondering how long it takes the all-in-ones to dry? I am debating between the all-in-ones and the inserts. I’ve heard that the all-in-ones take a really long time to dry. Have you had that experience? Thanks!
YoungHouseLove says
We have an awesome front loading energy efficient washer that spins them so fast they’re only a little damp when they come out, so they can air dry on a window ledge overnight or go for about 30 minutes in the dryer. Hope it helps!
xo,
s
Bridget says
I just dug a chair from the dumpster (literally) and I have no idea how to cover the double sided back… so it just sits in my room with an ugly grey stained seat. I’m also trying to create a new “look” for tiny bedroom…I tried a “shades of blue and green” look, but I”ve got too many different blues that aren’t contrasting enough and too many different patterns. I’m thinking of changing things to be black (or ORB) and white, with lime green accents….so that I can just change out the accent colors depending on my constantly changing tastes. I can’t seem to stick to a plan…Any advice?
YoungHouseLove says
I think you’re right about choosing something neutral for the chair, and then it’ll work in any room (and you can add a bright pillow or art or other accessories to amp things up). Good luck!
xo,
s
Lauren says
What a handsome chap! …But have you named him yet??
YoungHouseLove says
Hmm, Sir Winston? He seems kind of fancy.
xo,
s
Marie-Ange says
John, hurry!!! Get the girl in rehab (for this ORB addiction that is…). hahaha, what a non surprise!!!
Looks like a million bucks- definitely worth all the efforts!
M.C. Sommers says
This looks so amazing! I wish I had more courage when it comes to reupholstery!
Molly P-H says
Have you ever sent anything to Design*Sponge for their Before & After column? This is a definite contender!!! Molly P-H in Florida
YoungHouseLove says
Thanks Molly! We haven’t- but we love her blog and all of those awesome before and afters!
xo,
s
Donna says
It looks great. Are you ready to tackle another upholstery project now.
YoungHouseLove says
Honestly? Maybe in a month or two. Haha.
xo,
s
Rae Ann says
I did the exact same thing! I bought a pair of wing back chairs off Craig’s List and they moldered in all their strangely-flesh-colored glory for almost a full year. Now, I have started the reupholstering process… and stalled out in the middle. Blah! I have one chair done and one partially stripped. The good news is that they are turning out fabulously, but the progress is so SLOW!
Karen C. says
I love the effect of the ORB paint! I have been inspired to use it after reading how much you love it and bought some recently to revamp some picture frames. Can’t wait to start the project, hopefully this weekend!
Krystle @ ColorTransformedFamily says
I have a similar project that I have been putting off as well. I found an old dining room chair a couple years ago at a yard sale for $1. Couldn’t resist so I took it home but I have yet to reupholster it. Mainly b/c I am going to have to redo the front and back like yours. Thanks for the inspiration.
laura says
Well, your love of ORB finally convinced me to take the plunge. After giving our blingy brass doorknobs (a yucky 1980s modification to our 1918 house)the stink eye for months, I just ORB-ed them last weekend. A note about ORB for others thinking of trying it though — it is like paint, so if you ORB anything that might rub against something else ( for example,say, the faceplate of the latch hole and the latch part of the doorknob) it probably will scrape off, just like regular paint would. The doorknob part looks great though, and I am just trying to ignore the scrape-y latch parts for now. I’d recommend anyone thinking of ORB-ing to just consider if the parts are going to rub, and if so, whether it will bother you if some of the ORB scrapes off in those areas.
YoungHouseLove says
Great tip Laura!
xo,
s
Hilary says
I’m SO excited about this!! I have a rocker with a hole in the back that I’m about ready to start on and I was just thinking the other day “Darn, YHL hasn’t done their rocker yet.” Thanks for making my day!
Aimee says
Ooh, love it!
I have three (THREE!!) chairs I picked up on the cheap from a garage sale and a thrift store. In Georgia. From whence we moved TWO YEARS ago. I have fabric to recover them (which I’m no longer in love with, of course), and I’ve just never gotten around to it. I maintain that a big part of that is my desire to redo things in the winter, when it’s so rainy so constantly here in the PNW that I can’t get outside to paint furniture. Maybe this fall…
Emily B says
It looks great, guys! I just reupholstered SIX chairs last week! Talk about work. Were your hands as tired as mine were from pulling out staples -and- using the heavy duty stapler so much? You can check out my chairs at Chair Transformation Thanks!!
YoungHouseLove says
Oh yes- lots of hand cramping going on! Love the fabric you chose for your chairs!
xo,
s
Laura says
I have always wanted to do one of those headboard turned benches, so when I found a headboard at the curb marked FREE, it was mine. Well it has sat in the garage for 6 mos maybe more! DD is leaving for college this Sat, so I am hoping after all that excitement dies down I will have time to do that project, along with oh about 10 others! “) Lets Hope.
Jenny says
Splendid! Fabulous before & after. You’re inspiring me to do the same with my grandmother’s old chair that is sitting in my garage!
Anne G. says
Sherry, you’re amazing! The chair looks beautiful.
I have two chairs left over from a set of 4 that my grandmother used with a card table when she had friends over to play bridge. They’ve been sitting in my garage for almost 2 years! You have inspired me to reupholster them so they can be used and enjoyed in our home.
Mellissa says
Holy Wow! That chair looks amazing!!!
Kelly Carlson says
I found a danish, mid-century, walnut dining room set on Craigslist that I snatched up without thinking-for a steal of $250. Now that I have it back home, I’m not crazy about the reddish stain but not sure if it would be a crime/disaster to try to change it. Also, it comes with 6 chairs that are currently upholstered in marbled, avocado green vinyl that isn’t in great condition. I’d have recovered them ages ago if it was just the seats, but, you-guessed-it, the backs are also covered AND two-sided. Oh, and I should mention that sanding brings out the psycho in me, within 20-minutes I want to throw/break things…
WHAT TO DO? Should I orb the whole set?! Will tomorrow’s post inspire me to conquer this dining room beast?!
YoungHouseLove says
Ooh that’s a toughie! I would wait for tomorrow’s post to see about the backs. And as for ORBing them, I would actually try to stain them if they’re in good condition (our frame literally had cracks and holes that we had to fill, so if yours are in good shape you can sand and stain them a rich wood tone!
xo,
s
Meredith says
I love the way the rocker turned out! One of my favorite things is finding unloved furniture and bringing it back to life again! I’ll definitely have to check out the post where readers gave suggestions about upholstery because I have a chair that I found on Craigslist also that has been sitting in my living room for months because I am scared to try upholstery! I am about to break down and see how much it will cost for a professional to fix it, but it wouldn’t hurt to try first! Oh, and how exciting is it to find fabric for so cheap?! I found a great fabric store just outside of Atlanta that sells amazing fabric for $2.99 or $3.99 a yard – I hit it up every time I am in town!
Nevin says
It looks fabulous! I have tackled this week a project that has been sitting in my garage since January, I think. :/ I found an adorable china cabinet at Class and Trash that needed much TLC and I couldn’t pass it up. I too was going to paint it, yet I have a hard time painting something that has such beautiful wood and character. So yesterday I began stripping it and just finished here at lunchtime. whew! Now on the sanding and prepping for stain. I hope the stain looks even! Soooo… long story short, I know exactly how you feel about those “things” that just stare at you for a long time. I don’t even know where I am going to out it when I am done!!! yikes!
YoungHouseLove says
Sounds so lovely! Good luck! And feel free to share pics (here via a link to Flickr or directly uploaded over on our Facebook page)!
xo,
s