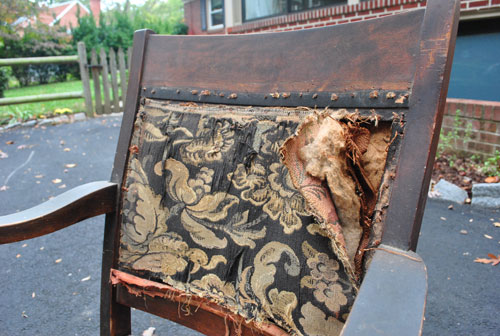
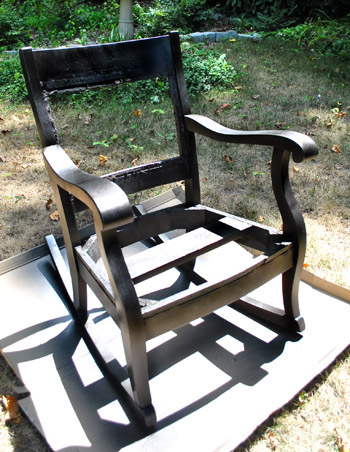
That’s right. I broke out the word dastardly. And I know we should be hard at work on our office cabinets, but that’s a big job (aka: a weekend job – maybe even a two-weekend job) and I have been giving this rocker the stink eye since November (yes, even before we moved). For anyone who can’t even remember that far back (me), here’s a recap: I originally picked it up off of Craigslist for $25 because I really liked the simple lines of it. Then it sat untouched for over nine months until this weekend.

Why? Well, no sooner had I gotten it home than I realized I had no earthly idea how to reupholster it. At all. I mean I knew how to do the bottom (I’ve redone seats before) but the hole at the top completely confounded me because it had to look finished on both sides. Le yikes.
But I posted this call for help a while back and a bunch of you guys were awesome! I definitely learned that there were probably about ten ways to skin that cat (gross expression, sorry – but it was comforting to hear that even some very experienced folks described many different ways I could “go”). So it gave me the confidence to tackle it right away put it off for nine months and begrudgingly give it the old college try over the last few days.
I will disclaimer this entire process much like when aliens took over my body and I made a quilt for Clara, which is to say: I went rogue. I took in all the advice from you guys along with some google tips and some suggestions from a reupholstering-fiend friend of mine… and just played it by ear and did what seemed to work as I went along. So with that out of the way, allow me to share the madness that is Me vs. Rocker. Which is not to be confused with Man vs. Wild (Bear Grylls I’m not).
Oh and because this process was so involved, it actually took me a few days of work. Which meant it was a multi-phase thing involving lots o’ pics. So I broke it right down the middle for ya (since 40 pics in one long rambling post = madness that even we can’t endorse). So here’s the first half. And the second half is in the hopper for tomorrow (still have to snap some after pics for ya, but it’s almost all set).
Anyway, here’s how it all went down: First I gave my rocker the stink eye one last time. You know for old time’s sake. Then I got to work pulling staples and nails out of the frame along with the ratty old upholstery to see what I was dealing with.
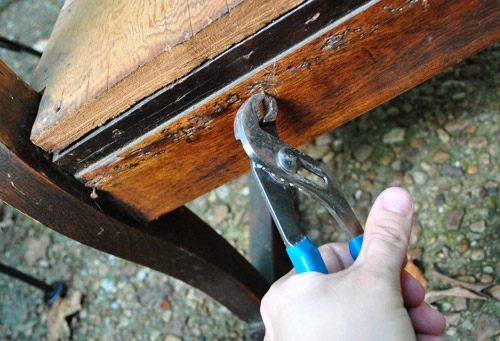
Oh and my tip would be to use a small channel lock pliers to pull things out. It was much easier than the back of a hammer or a needle-nosed pliers for me (although I still had to pull like crazy, this gripped better so I didn’t go flying backwards after tool slippage).
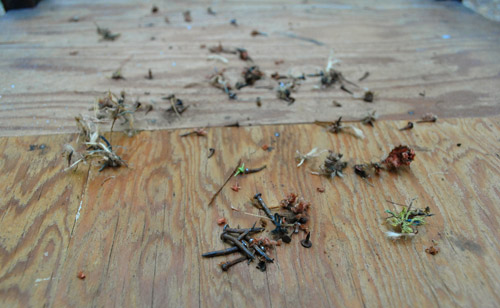
After about an hour I had a nice little pile going on. But I was only about 30% done.
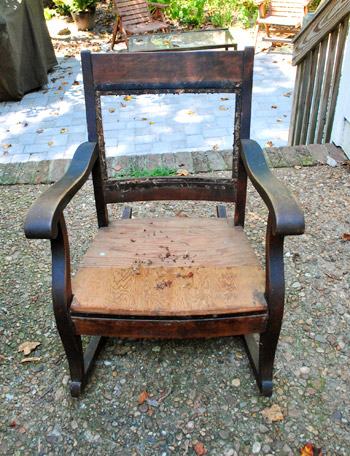
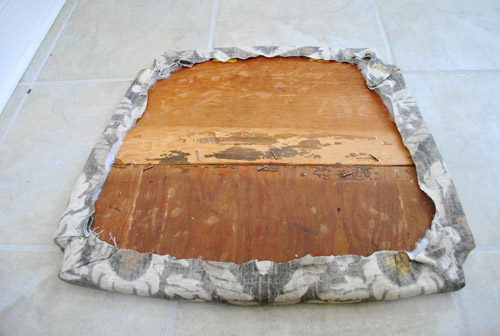
So I kept pulling old nails and tacks for a few more hours, and then removed the two wood seat slats and was left with this:

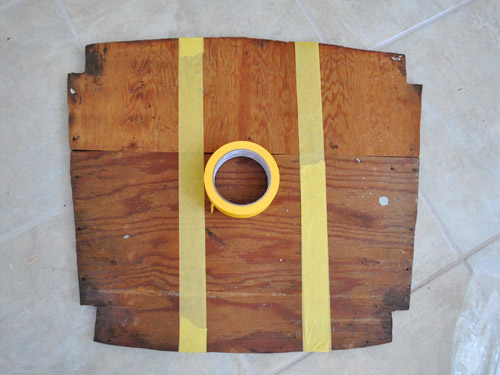
It was a pretty ugly sight for three-ish hours of work. And I knew I had some serious wood puttying and sanding to do when it came to the frame (to get it ready for some rich dark stain). But I was tired. So I decided to move onto a less strenuous step that I figured I couldn’t mess up. Upholstering the weird little two-pieces-of-wood seat. First I decided to tape them together so I could upholster it as all one thing (as opposed to two with a weird little seam). I just used some delicate surface painting tape because it didn’t need to be super heavy duty stuff (like sticky duct tape) because I knew once the batting and fabric were in place they’d hold it together for the long haul.
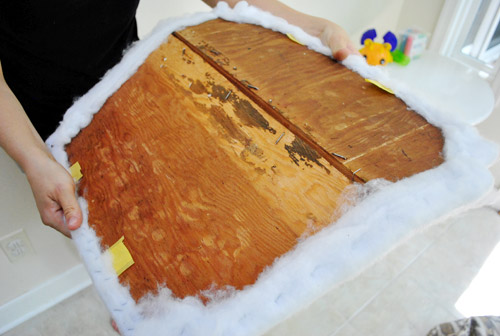
Then it was time for a bunch of layers of extra-loft batting. I used “Soft N Crafty” from JoAnn, which I purchased back in November when I thought I was going to tackle my chair (kind of embarrassing that I then just packed it up and moved it and it continued to sit around untouched for 8+ months, but whatever). I knew I could have used a big piece of foam for the seat, but I actually prefer wood seated rockers like this (John’s mom has the most comfortable one ever) so I decided I didn’t want too much cushion goin’ on. But I also knew that staple gunning one layer of extra loft batting around the back wasn’t going to do much…
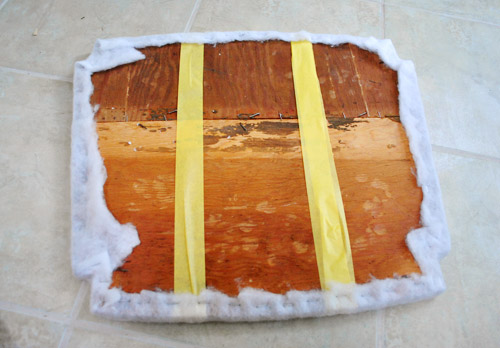
… so I applied a second layer…
… and then a third, fourth, and fifth. By the end it was plush without being super sink-in squishy, which I liked. Nice and firm with a bit of softness.
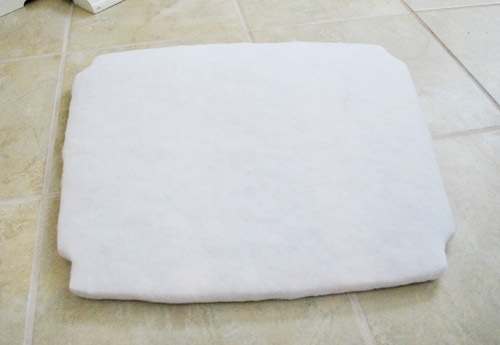
Here’s the point where I wanted to throw everything out the window. Yup, after five layers of batting applied staple by staple, I realized that the seat needed to be able to bend to fit past the arms and legs and actually lay flat on the base.

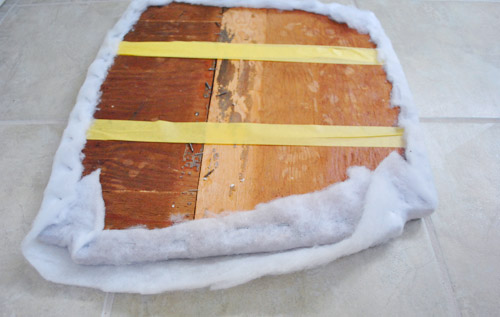
So I nearly broke down with visions of having to restaple five layers o’ batting after separating the two pieces of wood so they could hinge forward for just a second to be slid into place. Thankfully my sweet husband (who I always describe as the brains of this operation) pointed out that I didn’t have to unstaple anything and could just turn the seat over and cut the yellow tape that was running across the back and the batting should be flexible enough to fold forward (it wasn’t like I was trying to stretch it backwards or anything).
Worked like a charm. And apparently I was so excited I took this completely crooked picture in celebration:
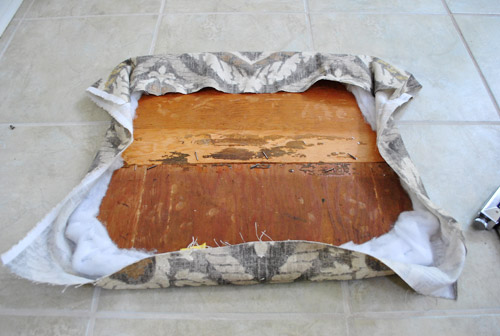
Then it was time to reupholster my seat. I was super excited about the “Kravet Design” remnant fabric that I found on clearance at JoAnn for… wait for it… $2 a yard (I got two yards for $4). At the time that I grabbed it I had no idea what I’d use it for, but after woefully glancing up at my biggest failure (Mr Rocker, sitting untouched in the sunroom for nearly a year) I realized that the fabric would look really pretty on it (with some rich dark stain to set it off). The pattern of my fabric meant that I would have to take the time to center it before stapling anything, so here I am roughly folding it around the seat to try to find a center line and see how it might look in place:

Then I flipped everything over and just shot one staple into the top middle and one staple into the bottom middle (while pulling things tight). This way I could flip it back over and ensure that I was indeed still centered (and if I wasn’t I just had two staples to pop out with a flat head screwdriver.
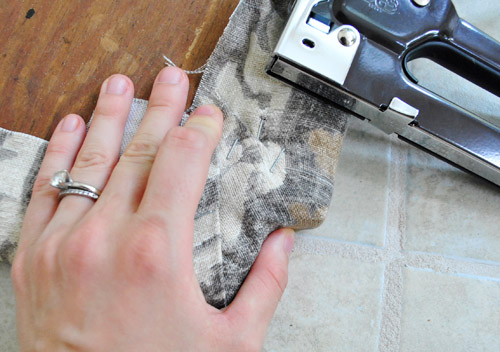
Happily, I was right on track, so I pulled things tight and shot another staple through the middle of each side of the seat, just so it was being held firmly at the noon, three o’ clock, six o’ clock, and nine o’ clock positions. Then I kept the fabric firmly pulled and continued to staple all around the rest of the perimeter. When it came to the carved-out corners, I just folded the fabric like I was wrapping a present – again being sure to pull things taut and use a few staples to hold my folds in place (so it would look nice and smooth from the front).
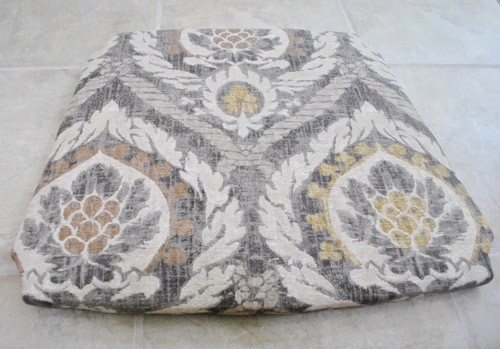
Here’s what it looked like from the back when I was all done with my staple job:
And here’s what it looked like from the front. Purty, right?
Then I shoved it back into the seat to make sure the batting and fabric still allowed the seat to hinge forward a little bit to squeeze in. Whew, it still worked. And in the distance I heard angels singing.
Then it was time for the strenuous frame-readying step. I used wood putty to fill some of the holes that might be visible (like the ones under the seat along the front of the chair’s framing) and sanded everything to rough it up and ready it for some rich dark stain. Since I had some liquid deglosser on hand I gently swiped that over the entire chair after some rigorous sanding (I used low grit paper followed by higher grit paper to smooth everything out).
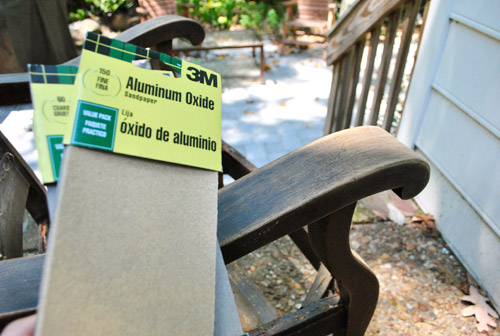
This is when I was forced to face the music: stain, even dark stain, wouldn’t make this chair look as flawless and something opaque like a rich deep coat of paint. Because even after all that putty, sanding, and deglossing, it was looking so inconsistent in certain areas that I knew it wouldn’t soak up stain evenly. Boo. And although some folks wouldn’t dream of painting wood, we’re definitely ok with it (especially since this is just a $25 cragislist find and not a family heirloom). So I threw my rich dark stain idea out the window and ran to the arms of an old friend. You guessed it: ORB.
I’m telling you, my name is Sherry and I’m addicted to oil-rubbed bronze spray paint. But thanks to having a nice built-in primer and applying three very thin and even coats, it actually took on the look of a rich dark wood (and had more dimension than plain old chocolate paint thanks to the subtle metallic quality of the finish). Here’s a picture that I snapped after two coats (you can see that it’s not completely seamless and even yet- but the third coat did the trick).
Oh and you can find more general spray painting tips here (lightly misting it while keeping your arm moving all the time is key).
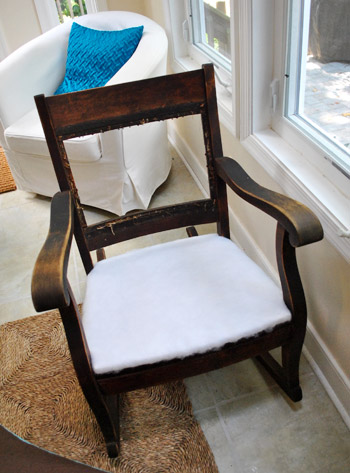
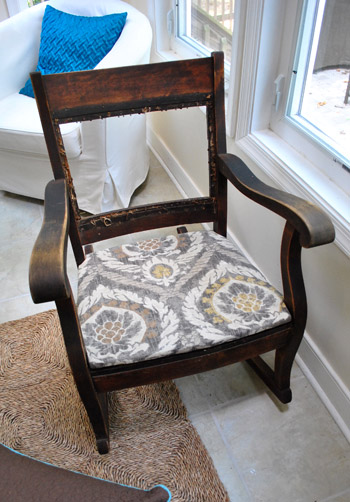
And because I hate to end on that poorly shot, blown out, two-coats-out-of-three spray painting pic, I thought I’d fast forward a little to give you a glance at Part Two of The Glee Project The Rocker Project. Here she is (not completely finished, but getting there). I’ll be back with more details of that whole shebang (and some final after shots) for ya tomorrow.
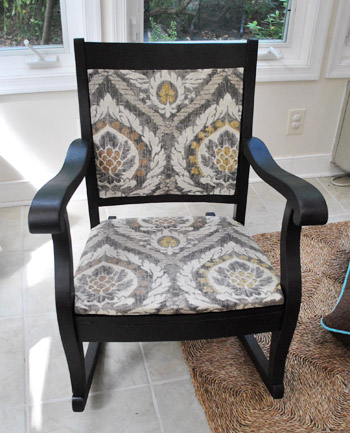
Update: A sweet commenter (thanks Laura!) just told us that our chair fabric was actually on the cover of the Ballard Designs catalog, so we hopped over there and learned they actually sell a chair that’s upholstered in exactly the same fabric for $600-800 (depending on the finish of the chair) and the fabric is being sold on its own for $32 a yard!
What about you guys. Do you have any projects that you’ve put off for an epically long time? Is there something that intimidates you, like two-sided upholstery does to me? Are you completely unsurprised that I basically try to solve every problem in my life with ORB? Can you believe that darn seat wouldn’t fit on the chair after five layers of batting-stapling? At that point I truly wanted to set the entire thing on fire.
Reference: https://www.productexpert.com/best-ergonomic-office-chairs/.

Katie Rose says
I have about 4 projects that have been waiting in the wings, half finished, that I either don’t have the skills & know-how or the energy to finish.
One is this wreath: <>. I actually have the wreath base completed (wrapped in fabric) and all the circles cut out, but I didn’t feel the way the instructions say to complete it was secure enough…I am just kinda waiting until I have an epiphany as to a better way to do it to finally finish it up. :/ I started it in February so we’re currently at 6 months. No epiphany.
I also have about 10 wine bottles saved for what I was hoping to turn into hurricanes. However, like you guys, I have tried many unsuccessful ways of cleanly cutting the bottles. I want it to work so badly but nothing seems to work. Sigh.
Katie Rose says
Wreath Link: http://pinterest.com/pin/10640620/
YoungHouseLove says
Ooh pretty! Good luck!
xo,
s
Amber says
I think it looks great Sherry! I think it is wonderful that you took a sad piece of furniture and turned it into something new.
carolinaheartstrings says
That looks so fantastic. I am impressed!!! Great fabric pick.
Hannah says
I love the ORB (in fact many things in my apartment I painted ORB). But I’m kinda surprised you didn’t paint it white or go bolder with the fabric. I do have to agree with the posters who think it would look good in the soon to be new office!
Ps. Thanks for including the finished photo. I was so afraid that I would be living in suspense until the post tomorrow to see how it turned out! Haha
YoungHouseLove says
I think since we don’t know what room it’ll live in (although I’m leaning towards the office) I figured going with neutral fabric/paint meant I could add a pop of color with a pillow or with other stuff in the room (I didn’t want the chair itself to be too bold to not slip in somewhere, ya know?).
xo,
s
McKenzie says
Um Love this! You have such a great eye for fabric, love what you chose :) Looks amazing!!
Ashley @ Any Lovely Thing says
Wow, your chair is looking great! I’m in luff with the subtle bluesy, grey, and yellow tones in the fabric. Looking forward to the finished product.
I had a dream about Jake Gyllenhaal last night and didn’t remember until your mention of Man vs. Wild, so thank you for triggering that ;)
~Ashley
anylovelything.blogspot.com
YoungHouseLove says
Mmm, Jake is one of my favorites. Haha.
xo,
s
Kristen @ Popcorn on the Stove says
LOVE the chair – LOVE the pattern … I pretty much love everything. We have my mom’s old vanity (that she used when she was growing up) and thought I could sand off all the paint she had added to it and stain it a nice color. There’s too much paint on it (probably lead based) so we maybe got 10% done. When the weather cools down we’ll probably try again.
Danielle says
I found an old dresser on craigslist that was painted a terrible blue color. I was just planning on stripping the paint and painting it a different color. I used a paint stripper to remove the old paint. It wasnt mineral spirits, but this orange paste-like stuff. You smear it on, let it sit, then scrape it off with the paint. It worked really well and didnt have a harsh smell(smelled like oranges). We foound it at Home Depot. Once all the paint was off, we could tell that the wood was gorgeous, so I sanded it and gave it a nice dark stain.
Good luck!
Hillary says
Impressive! I probably would have just broken down, cried, and called it a day. True perseverance right here.
Carissa says
Wow!!! It looks fantastic! I was at the thrift store a while ago and fell in love with an AMAZING chair – but it had double sided upholstery and I was way too intimidated to buy it. I can’t wait for tomorrow’s post, it will open up a whole new world of chair options ;)
(Is it wrong that the Aladdin theme song popped into my head as I typed “a whole new world”?)
YoungHouseLove says
Haha, I am known to sing that song often around here. Usually while dancing with a baby or chihuahua.
xo,
s
Lauren says
This made me laugh…because only this morning I was dancing with my puppy singing “If I Only Had A Brain” from The Wizard of Oz.
The rocker looks great! I am pretty sure if I tried to reupholster something I would staple my finger.
And the word Dastardly? Awesome. I am adding to my list of favorite words. I actually just did a post on the rest of them here.
http://filingjointly.blogspot.com/2011/08/five-things-friday-words-about-words.html
YoungHouseLove says
Love it! Hoodwink and vestibule are totally on my list too! Weirdest word in the English language: curb. Say it a few times. Totally sounds fake.
xo,
s
Rachel says
Looks fantastic and makes me want to do a chair makeover!
Rachel @ the Avid Appetite says
Wow, you did an amazing job! I adore that fabric. I wish I was nearly as adventurous when it comes to tackling home projects :)
Gina @ Running to the Kitchen says
I’m not gonna lie, looking at the gutted chair picture I was thinking “how the heck are they going to make that thing look good?” but, somehow you did it! It looks awesome! Love the pattern you chose too.
Jules says
Ooh, gorgeous! But scrolling up and down for before and after pics was too hard. LOL
YoungHouseLove says
I’ll definitely have a side by side before and after in the final post (that bottom pic is actually not the full after, I still had a few more steps!
xo,
s
Kimberly says
Okay Sherry, you’ve convinced me with the ORB. I’m spray painting an old white and ugly brass day bed with it, and it looks amazing so far. I can see why you are addicted. It doesn’t look like a spray paint job at all.
kathy says
I just bought my first can of ORB spray paint last weekend to use on some outlet covers that I had bought previously but now can’t return. It’s the beginning of my downward spiral…
and I loove the way the rocker looks!
Erin says
Love!
Sarah says
Wow – it looks beautiful.
Have some time this morning so, I’m just listening to the radio show…it sounds fantastic!
YoungHouseLove says
Thanks so much for listening to that long thing! Haha. You guys are so sweet.
xo,
s
Annette says
Aaaah, the magic of spray paint. Unluckily, I don’t have access to a garden, just a balcony. So spray painting bigger stuff is not exactly easy, not to say impossible, as inside is not an option.
I really like the ORB on the chair
Laura says
I had just looked at his post and then sat down to flip through the Ballard Designs catalog that came in the mail. They have a chair on the front cover with the same fabric!
YoungHouseLove says
NO WAY!!!! That’s so awesome. Off to check it out!
xo,
s
Plein Jane says
I got this today, too! I literally said, “Holy crap!” Not only does it have the same fabric, but the cover shows the process of reupholstering the chair!
YoungHouseLove says
Isn’t that so crazy?! What are the odds!
xo,
s
Ashley says
I’ve had a desk chair from the thrift store that I’ve been putting off recovering the seat for over a year! I finally ordered and received some fabric this week and I’m going to finally tackle it! Woo hoo!
bfish says
WOW!! The chair came out so great — definitely one of your best projects ever. I concur 100% with your painting it, and the fabric is lovely. You have certainly elevated your $25 find.
I’ve bought old wood furniture thinking there was something pretty to work with under multiple dark layers of stain and shellac only to be sorely disappointed. Sorry about the wood-painting doubters, but there’s no question here that you made the best of what you had.
Lisa @ Life in Green says
Chair looks so good! And yes I have projects I put off. I still have yet to finish the pathways between my raised bed kitchen garden project.
And I hate to admit it but we still haven’t hooked up the sewer to a recent half bath renovation. So its a purty bathroom which no one can use. It’s been a couple months & it requires going into the hot, hot attic…so maybe when it cools down we can get our butts done with it!
Kristal says
Great job! Not surprised you used ORB at all!
js says
One project? No. So many. I had bought the comfiest (yes, that IS a word) oversized, overstuffed couch and chair when I moved out on my own the first time. Cat claws shredded the upholstery on the corners of both, and, well, lets just say upset tummies stained the fabric. I refuse to give them up, and they are too big for any cover you can buy. So I have to either make my own cover or reuphoster them. So far they have been in the basement for 4 years, but this post give me hope!
Erin G. says
Ok I’ve never recovered a dang thing, but everytime I read about I’m always left with the same question, so I’m finally just going to ask it. After you recovered the seat, how did you get it to say in place? Did you just lay the recovered seat down and didn’t staple, nail, or secure it in any other way? That step is always left out and I’m always left wondering…
YoungHouseLove says
There are usually screws that go up from the underside of the chair into just the base of the seat cushion to hold them together (not deep enough to poke you if you sit). Hope it helps!
xo,
s
kristen says
(not deep enough to poke you if you sit)
that’s what she said
YoungHouseLove says
Bwahahah. I’m falling into that trap left and right today!
xo,
s
Seriously Sassy Mama says
I love the fabric! ORB is like a super hero.
kaylan says
It looks amazing! I cannot wait to see the finished project tomorrow!
I’m all about painting furniture if it suits your needs. My favorite project right now (and one that needs to stop because I’m running our of room) is finding old chairs at yard sales and painting them a bright, fun color. Wood is beautiful, but sometimes it just can’t be saved.
Jenni says
Well done, Sherry! That chair looks stellar, and the fabric is fantastic. It is totally inspiring! (I also have had a couch that has needed fixing for over two years now…whoops!) Maybe if you hadn’t waited until after the move, perhaps you wouldn’t have been as addicted to ORB as you are now, and then it might not have turned out quite as awesome? (Okay, that’s a stretch-especially as it would have turned out great either way! ;) Stoked for part 2 (tomorrow? which is ironically the same day that the next Glee Project episode comes out on Hulu…Not that I’m shamefully addicted or anything.)
YoungHouseLove says
You know what Jenni, I agree with you! I bet I would have painted it white before the move, and I’m loving the richer higher-contrast look of darker wood and ORB (mixed in with lighter accessories like ceramic animals and light pillows/art for balance). You’re totally right that it’s probably a good thing it took me this long!
xo,
s
ashley says
ORB is the new white. Somebody put it on a t-shirt.
Erin @ His and Hers says
We currently own 3 chairs that are half reupholstered and shoved in a room with a bunch of other junk. (I’m not sure why I continue to buy chairs that I have NO idea how to redo.) Good for you for finally tackling it–love that you got the fabric for such a good deal!! :)
Elizabeth says
Amazing transformation! I love it! Can’t wait for part 2!
Sara says
the more I read about ORB and see what can be done with ORB you convinced me, I picked up 2 cans last week to spray my table and chairs on the patio. Can’t wait!
Victoria says
I have a project that has been sitting for er, um, ah, yeah, a lot longer than 8 months. Re-doing four dining room chairs with the same problem that your seat back has…only it’s the seat itself that is a big hole. The original solution was strips of burlap nailed into the frame. I guess I’m afraid that I won’t be able to pull it tight enough.
Beautiful job, Sherry, it looks so nice. I admire your stick-to-it-iveness!
julie says
lovely! I feel your pain..have taken apart 2 chairs and am now trying to put them back together…took me 2 friggin’ days to get the staples out of just one chair! OY! Hoping I can put it all back together again!
J says
Is it weird that your chair is going to completely match the hardware – like the door handles? That seems awfully matchy-matchy to me!
YoungHouseLove says
Nah, we’re thinking it’ll go in the office, which actually doesn’t have any doorknobs (or doors, hah)! In our first house all the curtain rods were orb (and probably will be at this house) but a touch of it in each room is cool- sort of like a touch of black or white in every room. Hope it helps!
xo,
s
Melissa S says
wow…i love it! the fabric and the ORB ;-)
nicole says
Sherry thank you so much for posting this! I am in the same situation right now… I found this amazing chair at a local thrift for $10.00 but I have just been staring at it due to fear of the double sided back cushion. I now feel some motivation to give it a go for myself and hope to come out with the same great end result :) Only difference is I have piping all around my cushions and that is something I have yet to attempt… Any tips for piping? I love you guys and have been keeping up with your blog for the last 2 years. I just decided to start my own and would love to meet you both sometime! I live not to far away down by va beach, so if you ever come through please contact me! Have a super day and can’t wait to see the rest tomorrow!!
YoungHouseLove says
Piping scares the bejesus out of me. Anyone have any piping tips? Maybe try looking on youtube for piping upholstery videos? They can really help!
xo,
s
Christina M says
I am truly impressed. It looks beautiful. You give me hope that I can actually tackle such a project. Now I feel like I don’t have to pass up those great Goodwill finds out of fear of not knowing what to do.
laura says
Love it!! You have inspired me to give old, beat up chairs a chance!
Luisa says
Love the fabric choice – well done. But as a purist, I have learned to never mess with the original stain of a piece (and boy do they harp on that on Antiques Roadshow). I think part of the charm of the rocker was the imperfections and arm rests that showed years of use. I have discovered a great product called “Restoer-A-Finish” (I can’t remember who makes it but it brings out the original color of the stain without canceling it out). Between that and using very fine steel wool to get the grime off, you can really do wonders. Sorry to be a Debbie Downer!
YoungHouseLove says
No worries Luisa! We know there are definitely wood purists out there! It’s definitely one of those whatever-floats-your-boat type of things. Thanks for the tip about Restoer-A-Finsh- we’ll have to check it out!
xo,
s
Carolyn says
I have so many projects I’ve been meaning to do for months now …. mostly they consist of painting old furniture (which I’ve never done, so am a little nervous I’ll a) do it right and b) pick the right color. But I told myself I can’t start another painting job before I finish painting the trim — at least in the living room. Can’t wait til fall when I actually am home on the weekends again so I can tackle some things on my to-do list!
Love the rocker! I like the lighter fabric with the darker wood. Nice balance.
Jill says
Looks ORBtastic, Sherry!!! I have a daunting upholstry task I’ve been putting off for probably 5 years now. The chair has been in the garage under some rugs and surrounded by other boxes from my grandmother’s house. It is the coolest chair. Wish I had a pic to show you. I bought some avocadoey-apple green microsuede fabric from my old job (I used to work for a business that designed interiors of model homes and this fabric was leftover from a job) to upholster it in and was going to most likely stain the wood parts espresso. WELP, turns out that fabric matched some oops wall color I bought for my bedroom 3 years ago and that fabric made for FABULOUS black out curtains!!! So anyways, chair still sits in the garage and now I don’t have any discount fabric to cover it in. Sigh. I surely wish I had a pic to show you. Maybe someday!?
YoungHouseLove says
Someday indeed! You never know… you might get the energy up in a few more months. Haha. I totally understand how it can take a while!
xo,
s
Jill says
At this point, I’m afraid to see what condition it is in. Hopefully there isn’t a rat’s nest in the seat or a bug’s nest living in there now! Eeeks!!!
I am redesigning my bedroom from ideas I found on pinterest, so hopefully this chair will be inspired by something I find on there and can live out a blissful life in that room (until I change it again…)!
Patti says
Oh What a timely post! I’m re-covering my kitchen chairs this weekend and have never done anything upholstery-related before. I love when that happens ;) Lovin’ the rocker YHLovers!
liz says
Wow, gorgeous! I’ve remained intimidated by upholstery a bit too long, I think. It sounds like there are some great resources available online to make it a little less daunting. Do you have any favorites?
YoungHouseLove says
I actually like youtube.com. They have lots of videos, and seeing things in motion seems to help me!
xo,
s
Anna S. says
Beautiful! (And I spent the weekend ORBing all of our patio furniture and it looks AWESOME! It makes me so happy to go outside now – even in the super Texas heat!)
Rachel says
Question: how did you do the top piece of upholstery so it doesn’t have a stapled look from the back? Can you do a bit about the top piece of the chair, where your back hits? I’m curious!
YoungHouseLove says
We’re planning to cover all of that in part two of the upholstery tutorial tomorrow! It’s just a big long schpiel with lots of pics, so we had to break it up. Haha.
xo,
s
HIlary says
Love it! I vote for making it an addition to the office as well.
YoungHouseLove says
Thanks Hilary! I definitely can’t wait to bring it in there and play around with it!
xo,
s
Caitlin says
that’s what she said
YoungHouseLove says
Oh man, I walked right into that one. Haha.
xo,
s
Cindy says
This is going to be so pretty! I love wood rockers.
One of my many half-done projects is an IKEA kitchen island that is sanded and primed but still needs to be sanded again and painted. It got waaaay too hot in Kansas City to be trying to successfully paint in my un-climate-controlled garage.
Now I’m nervous because I’ve recently read that if you let primer sit for too long before painting that it can cause adhesion problems. Any wisdom out there on this topic?
Also, you totally had a “that’s what she said” sentence in this post, but I’ll just let you guess what it is since this is a family show… xo
YoungHouseLove says
Haha- how could I have missed that? Someone called me on the sentence with firm in it, so maybe that’s what you’re referring to? Haha. As for the island, I would just try to sand and paint it as soon as possible and hope for the best. I’m sure a little gentle sanding will rough it up and it’ll be nice and ready for paint! Good luck!
xo,
s
Cindy says
Will do! Thanks! Weeks of temperatures hovering around 100 degrees has been very de-motivating for this full-time job mama.
If you must… it was the part about flying backwards after tool slippage. Sorry in advance to your moms… ;) xo
YoungHouseLove says
Ah yes, tool slippage. I should have known. Haha.
xo,
s
Sheryl J says
I’m a little surprised that you didn’t paint the frame white, but then totally got it when you painted it ORB. I’m loving the look so far!
YoungHouseLove says
Haha, someone mentioned that it might have been a good thing that it took me so long to get to this project because I might have painted the rocker white a while back instead of my new ORB obsession- and I totally agree! White is still my color of choice for ceramic animals though! Haha.
xo,
s
Emily says
You seem to have transitioned from a white spray paint addiction to an ORB one. Maybe you’re saving the white for animal friends. I had not really used spray paint until recently. I was scared and would brush or roll instead, but thanks to all your wonderful tips I was able to spray paint successfully. Not a big project, but frames for a gallery wall.
YoungHouseLove says
Haha, it’s true! I do love my white ceramic animals. I think in general we’re digging more contrast in this house (lights & darks as opposed to lots of tone on tone airy accents). It’s so funny to compare our first house’s rooms to our current home!
xo,
s
bex says
SO stoked that you guys took on this project at this moment!! I’ve got a chair that I got for FIVE bucks at a firesale of a garage sale (EVERYTHING MUST GO!) that’s amazingly beautiful (hubby disagrees), but has this weird cane/straw mat of a seat area. I had no idea how to tackle that puppy (and would seriously love some one-on-one time with you to give me ideas-slash-walk me through it – HA!), but this post definitely gives me courage to go for it! Oh, and for the record, it’s been sitting in my kitchen (ugly and unloved) for almost 4 months. And I don’t even have the excuses of moving and a baby’s first birthday party to use…