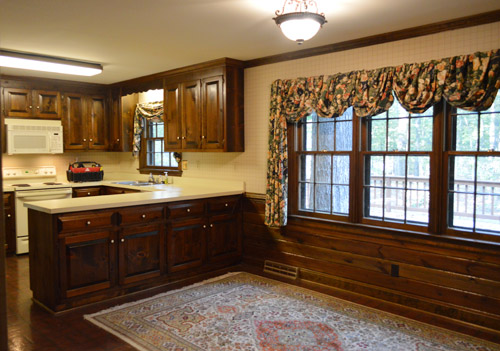
The stain on our kitchen cabinets was too orange and dated-looking. We loved the wood grain, but just wanted a darker, more contemporary color. We just didn’t love the idea of sanding or stripping off the old finish. Luckily, we found a product that would let us skip that messy and tiring step while still giving us the end results we wanted.
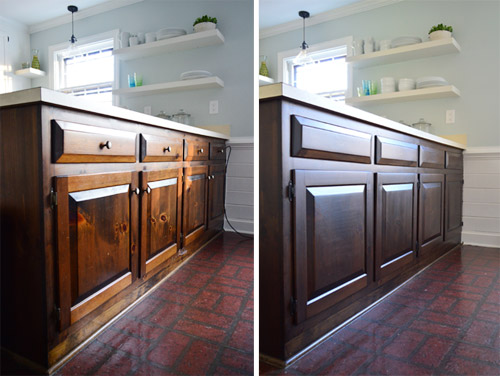
You can see our results above, and read below for how we got there!
What Stain Product Did You Use?
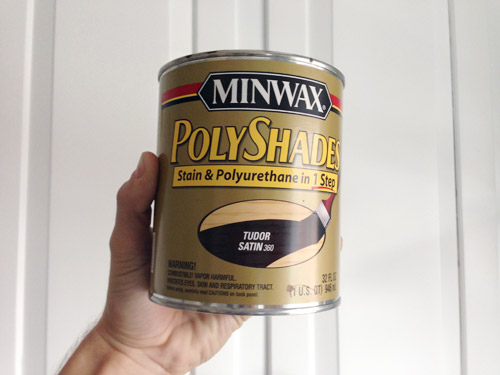
We used Minwax Polyshades for this project, which is similar to a gel stain. Unlike traditional wood stains, which have to soak into the wood to work, a PolyShades coat or gel stain product sits on top of the existing stain, much like a paint application would. Like paint, you need to take a bit more care when applying PolyShades to avoid drips or brushstrokes – but we’ll cover that in more detail below (even on video)!
These products come in lots of colors, but we chose one called Tudor in a satin finish. We had previously used a darker PolyShades color on our bathroom vanity (Espresso) but wanted something slightly lighter in the kitchen. Keep in mind that your final color will be impacted by the color you are staining over, so you may want to test a few colors in an inconspicuous spot (like the back of a door) before starting. And you should always go darker – so from light to medium, or medium to dark.
These products are also oil-based, which means you can skip the usual last step of sealing the stained surface with a coat of polyurethane sealer (like you have to do with water-based stains).
Can You Stain Your Cabinets Darker Without Sanding?
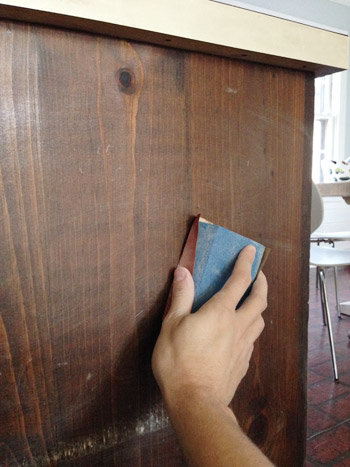
While yes, you can avoid completely sanding and stripping an old stain finish off of your kitchen cabinets, you will need to do some light sanding as part of this project. So be wary of any tutorials that suggest otherwise. But don’t fret – this is the type of sanding you can easily do by hand with a simple sanding block or sheet of sandpaper. Lightly roughing up the surface will help your new stain adhere for longer-lasting results.
What Materials Do You Need?
The best part of this project is probably what you DON’T need. You don’t need any polyurethane sealers or varnish. You also don’t need any chemical strippers, power sanders, or other heavy-duty products to get your already stained cabinets down to their raw wood. Still, you will want to have these supplies on hand:
- Minwax PolyShades or similar gel stain product (we only needed 1 quart for two coats)
- 2 or 3 stain-grade paint brushes (small enough to fit in mouth of stain can)
- 220-grit sandpaper or sanding block
- Extra fine steel wool (#000 grade)
- Screwdriver or drill
- Dropcloth or old cardboard
- Nitrile gloves (optional)
- Wood filler & putty knife (optional)
- Painter stands (optional)
- Degreaser or liquid deglosser (optional)
You will also need a space – like a garage or maybe a basement – to lay out your cabinet doors while staining and drying.
How Long Does It Take To Stain Your Cabinets Darker?
The process is very straightforward as DIY projects go (if you can paint a room, you can do this) but it does take a bit of time, mainly due to the drying process. Ours took about five days total, but yours may vary depending on the size of your kitchen or the amount of cabinetry you’re staining (we were only doing our lowers).
- Prep day
- First staining day
- Second staining day
- Drying & curing
- Reassembly
Step 1: Remove Cabinet Doors & Hardware
Before beginning, you’ll want use your screwdriver to remove your door, drawers, and any hardware (knobs, pulls, hinges, etc) so you’ll have unobstructed surfaces to apply stain too. You also want to spread out your doors and drawers apart from the cabinet frames so that those two surfaces don’t accidentally come in contact during the process (which could make things stick together).
We propped all of our doors up on old paint sample cans, but you could also use a set of painter tripods if you’re fancier than us.
Step 2: Patch Any Hardware Holes
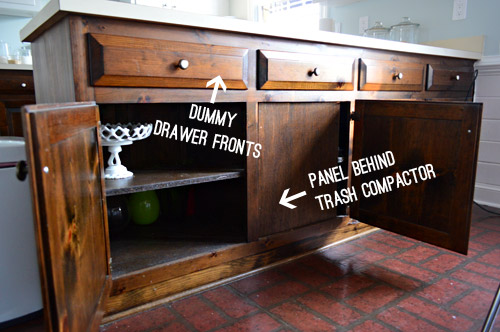
If you are changing any hardware (like using a different pull size or hinge style) you’ll want to fill any useless hardware holes now. We chose to eliminate all of the knobs on the backside of our kitchen peninsula for a cleaner look. The drawers were just dummies anyways (they pulled out on the other side) and doors were just secondary/less used access points to the front cabinets.
So Sherry wood puttied the holes, let them dry, sanded, and repeated. We always like two coats of wood putty on big holes like this to account for any shrinking or dips. In retrospect, we should’ve used a darker wood filler that was closer to the original cabinet color.
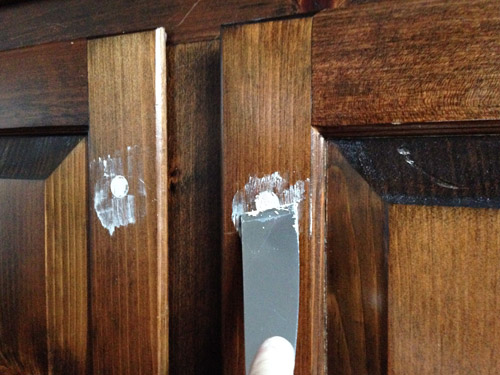
This lighter wood filler is what we had on hand and we made it work by dabbing a little more stain on the puttied parts with each coat of PolyShades.
Step 3: Give Your Cabinets A Light Sand
To prepare for staining, you’ll want to sand everything – drawer, doors, and frames – lightly with a high grit sanding block. Again, you’re not trying to remove the old stain. You just want to rough up the surface slightly so that the new stain can adhere.
After sanding, be sure to wipe everything down with a damp rag or paper towel to remove any sanding dust or dirt. Also, if you have any spots that are coated with grease or grime, you may need to use a spray degreaser to make sure the surface is fully clean. We wiped everything down with a liquid deglosser just to be safe before beginning.
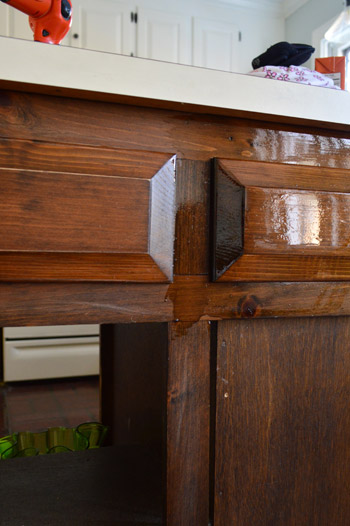
Step 4: Apply Your First Coat of Stain
PolyShades is best applied with a paintbrush and you’ll want to systematically do your frames, drawer fronts, and both sides of any cabinet doors. We actually chose to not stain the backs of our cabinet doors (shhh!) but if you do, be sure to not flip them over until your stain is fully dry.
Also, don’t be alarmed if your first coat doesn’t look much darker going on. It will dry darker and you can always do additional coats until it’s dark enough for you. We ultimately did two coats.
Note: These are dummy drawer fronts that are screwed in place, which is why we didn’t remove them.
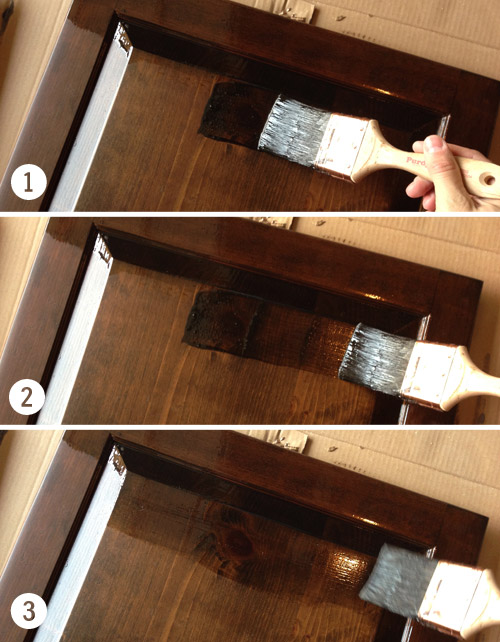
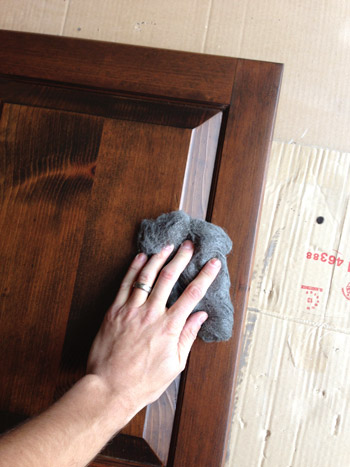
Tip: Applying PolyShades For A Smooth Finish
We had learned from our first project using PolyShades that applying it is pretty straightforward, but it can be a little challenging to keep it from looking drippy or streaky. We came up with a simple method of dragging the brush along everything after it’s applied to smooth it out. I filmed this quick video of myself putting one coat on a door so you could see it in action:
Note: You can also view this video on YouTube
In case you can’t watch the video, here’s the gist:
- The stain goes on pretty thick, which is exciting if you’re going for a darker color. Resist the urge to leave it thick because that excess stain will create drips.
- Don’t worry too much about brush marks at first. Focus first on covering the area that you’re working on.
- Once you’ve got the whole area covered, go back over the whole surface with long, even strokes. This will thin everything out and make your brush lines more even.
Although do as I show in the video (not in the pics below – oops) and brush in the direction of the wood grain. This will help any lingering brush lines blend with the wood grain better.
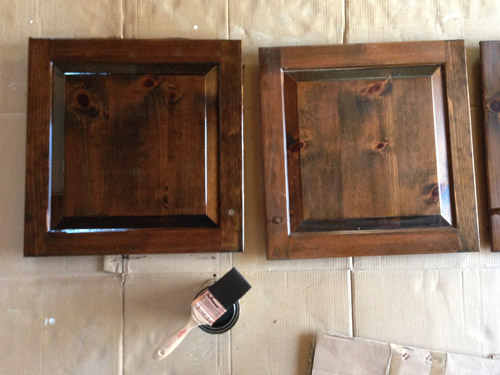
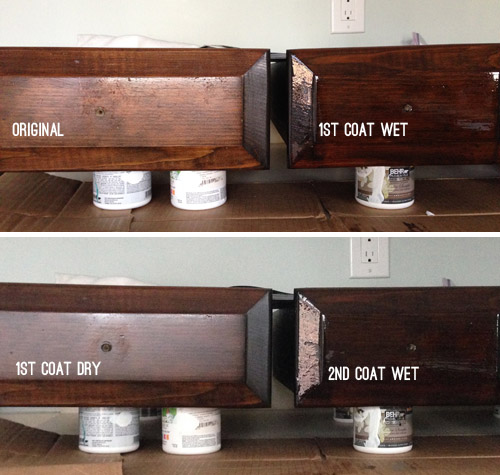
Step 5: Let Dry, Buff, & Recoat
After our first coat fully dried (we gave it 24 hours) it was substantially darker than it looked when wet – phew! If you’re happy with the color, you can be done here. We wanted our slightly darker so we chose to apply a second coat of PolyShades.
Before beginning the second coat, we followed the manufacturer’s instructions and buffed the first coat with some very fine steel wood (000 grade). This doesn’t visibly damage the finish, it just roughs it up enough for the second coat to hold nice and firmly.
You can see below how these coats “build” and gradually get darker. Also, you can tell how the “wet look” wasn’t a good predictor of how it’d dry.
Step 6: Let Second Coat Dry
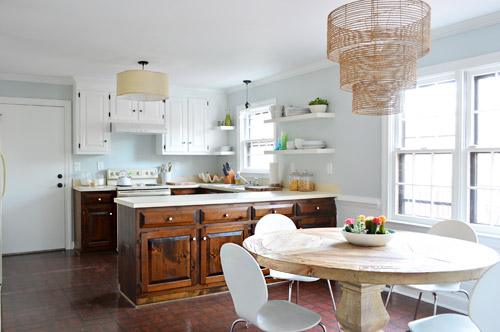
The next day, as our second coat was almost fully dry, we could finally see the results of our efforts (thanks to not staining the backs of the cabinet doors!). You can see in the side-by-side below that we definitely achieved the darker and more contemporary, less orange and dated look we were hoping for. And we loved that you could still the wood grain coming through!
Again, this is the part with a traditional stain you would need to seal your wood cabinets with varnish or polyurethane. But since PolyShades is an oil-based stain and poly in one, you can skip it!
Step 7: Reassemble Your Kitchen
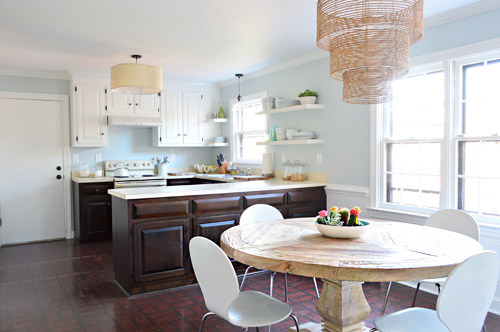
With everything done, you can reattach your drawers, doors, and hardware. If you’re installing new hardware, we’ve got a fully tutorial on how to easily (and quickly!) make new holes for cabinet knobs and pulls. For us, we just used the existing holes and added darker knobs that almost disappeared against the dark stain. So here’s our final look!
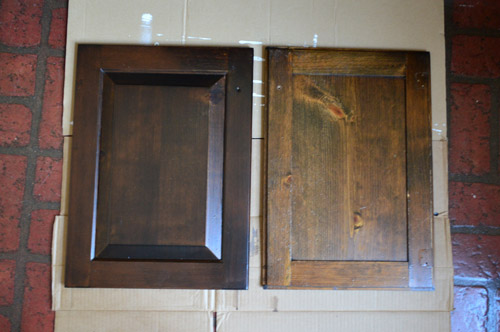
As a reminder, this is where we were last week with those redder and more knotty lowers. Although, this is after we had painted the upper cabinets white.
And it’s a far cry from where we started when we bought the house!
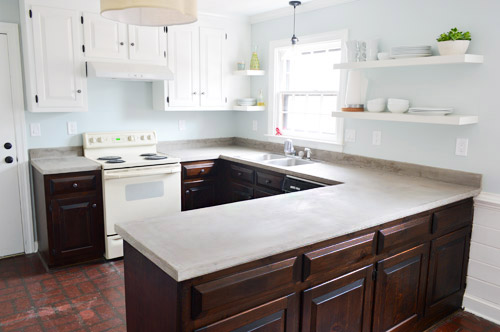
UPDATE: Since originally completing this project in 2014 we soon updated the laminate countertops by applying a faux concrete finish to them using Ardex.
And two years later, we fully remodeled this kitchen with a completely new layout. But the old cabinets held up great for two years while we waited to begin the remodel. You can read all about that in these posts:
- Choosing A New Layout
- Gutting & Rebuilding
- The Big Reveal <– You can find all of the sources for the room right here!
- A Video Tour Of How We Organized Our Cabinets & Drawers
*This post contains affiliate links*
PS: Wanna know where we got something in our house or what paint colors we used? Just click on this button:


Alina says
It is INSANE how much love you guys put into this kitchen for so little (comparative) money. Fantastic work!
YoungHouseLove says
Aw thanks so much Alina!
xo
s
nicole says
Peel and Stick!!!!!!!!!
Jennifer says
Love the kitchen! Question though….did you test to see if the cabinets were finished with a poly? What if they were a shellac finish? Would the polyshades still work? I was contemplating doing this to a mid century modern piece i found but did a test and it’s not a poly! I didn’t know if I should risk it….
YoungHouseLove says
I would just sand and test the PolyShades on a small area just to see how it goes! I think it’s meant to work on sealed things as long as they’re roughly sanded (it sits on top instead of penetrating, if that makes sense). Good luck!
xo,
s
Hannah K. says
Hey guys, you look pretty nice all dressed up in Tuxedos :-)
Had one quick thought, did you consider or have you considered doing something Clara related or just fun in the fake cabinet space on the panel behind the trash compactor? It looks like it could be a real fun spot for a hidden chalk board, picture spot, or so many other fun ideas. :-) just a little somethin’ somerhin’ to think about. Love the tux look though.
YoungHouseLove says
A few others recommended that! Could be so much fun!
xo
s
Jackie says
Not sure if they actually make these – but what if you covered the face of the fridge in magnetic black and white photos of your family? As in, covered it completely – cutting the sheets around the handle to make it flush.
You’d be able to keep using them long after a future kitchen reno too.
Again, no idea if this is feasible but if it is I think it would be a really unique, show stopper.
YoungHouseLove says
That could be really fun!
xo
s
Alisha says
You should totally look into “Luxury Vinyl Tile”. It’s cheap for now, but looks good and if you do the groutable vinyl tile, I don’t think you’ll be let down. We did that in our kitchen this summer to cover up a similarly dark and ugly floor and we can’t believe how easy the groutable tile is and how much bigger out kitchen looks with light flooring. Just my .02. :)
YoungHouseLove says
Thanks for the tip, Alisha!
xo
s
Jackie says
For the black and white photo fridge cover I mentioned above, You could get 2 or 3 large magnets (car magnets) printed http://www.uprinting.com/car-magnets-printing.html and then use 4×6 ones and the Instagram ones to fill in the gaps.
With effort you could probably get a away with doing this for under $100 and you’d end up with having a use for them down the road no matter what.
YoungHouseLove says
Such a fun idea!
xo
s
Amanda N says
It’s lookin’ good! Watching you guys tackle this phase 1 kitchen update is really pushing me to tackle a few projects in my own kitchen: tile backsplash, paint island cabinets dark (I’ve been crushing on tuxedo kitchens for a while now), refinish the counters (can’t wait to see what you do here), and now I’m thinking of replacing my microwave with a range hood. Thanks for the continued inspiration and great tips!
YoungHouseLove says
Good luck Amanda!
xo
s
Madeline says
I used black appliance spray paint on my off-white $50 Craigslist refrigerator to match our apartment’s black stove, and had excellent luck (2 years going strong!). I do recommend buying a lot more than you think you need, though. I ended up burning through six cans before I was satisfied, but I think it was worth my own personal hole in the ozone, and it made our 20 year-old fridge look brand new and modern.
YoungHouseLove says
So good to know! Thanks for the tip Madeline!
xo
s
Lauren says
Have you considered doing something fun on the panel covering the trash compactor? Since it’s hidden, could it be turned into a secret chalkboard for Clara to play with?!?
YoungHouseLove says
Other folks have mentioned that too! Love that idea!
xo
s
amy says
here is a blog post about painting a floor similar to yours.
http://designertrapped.com/2013/11/how-to-paint-your-linoleum-floors-yes.html
YoungHouseLove says
Ahhhh! That was so fun to read! I can’t believe it only took her two hours and looks that amazing!
xo
s
Amber says
I LOVE the new look!
I have a good friend that used chalkboard pain on her fridge while waiting to get a new one and she loved it so much she put off buying a new one until the oldie completely quit! So it might be worth a try :)
And I’m not sure if this is feasible or not but could the floors be stained instead of painted? I know they have concrete stain so would something like that work in the meantime without having too many issues with scratching?
Love following y’all!!!
YoungHouseLove says
Thanks Amber! Someone else said that about a chalkboard fridge (ended up loving it so much they didn’t ever want to get rid of it). As for the stain idea, since our floors are vinyl (not real brick/stone) I don’t think they’d take stain very well, but it would be an awesome idea if they were porous like concrete/brick!
xo
s
helen says
Definitely go the peel and stick tiles for the floor. Won’t it be worth the effort for years of durable flooring? It looks amazing, the new floor will really clinch this makeover.
Stephanie says
I love the darker stain! What a difference! And great call on removing the knobs! I wouldn’t have thought of that. So clever!
Smo says
Wow, that looks really great. It’s amazing what a difference that has made to the entire space.
How did the first weekend of the new year treat us? Not that well – didn’t get into the pruning and mulching we were hoping to because it was – I kid you not – 44 degrees at our house! That’s centigrade. So around 111(?)F, which meant it was impossible to go outside or really do anything at all. Even very early in the morning and in the evening it was over 30c (this is in Australia). I’ve been watching the crazy weather reports from over there – are you guys freezing where you are???
YoungHouseLove says
Yes, it’s freezing here! Mother Nature is messing with all of us!
xo
s
Kris says
I saw a Buzzfeed that used contact paper and removable wallpaper on appliances for a face lift that can be reversed. Might work since you’re thinking of resale?
YoungHouseLove says
A few others have recommended that! Such a cool idea!
xo
s
Heather says
Guys, just came across this literally a minute after I read your post. http://designertrapped.com/2013/11/how-to-paint-your-linoleum-floors-yes.html She’s had them for a few months and they still look the same. It seems like they should be sealed or something though. . . like they did here: http://lindsayandandrew.blogspot.com/2012/10/painting-linoleum-floor.html I say paint if you have some extra supplies around, what’s the worst that could happen? Anyways, it’d be nice to know from a reliable source (that’s you!) if it works :)
YoungHouseLove says
Thanks so much for sharing that link! Her post (and outcome!) is super inspiring! Looks great, and I’m so glad they’re holding up well!
xo
s
Karin says
Love the cabinets! Have you considered groutable peel and stick tiles for the kitchen floor? They are the best of both worlds: inexpensive, easy to put down, they look great and are very easy to clean. I put mine in our foyer, because I already had two layers of ugly vinyl down and short of jack hammering up the floors they weren’t going anywhere. Lowes has nice options. Good luck!
YoungHouseLove says
Thanks for the tip Karin!
xo
s
Stacy says
I’m not able to read all the other comments so don’t know if anyone else mentioned this, but if you do peel and stick tiles over your existing flooring, it really shouldn’t be that much more demo work. If you pull up the bottom layer of vinyl, the peel and stick should come up relatively easily right on top of the old vinyl…you shouldn’t have to remove them separately. Plus, the idea of a baby crawling around on painted floors is kind of gross, IMO.
YoungHouseLove says
That’s my argument too Stacy! Haha!
xo
s
Elena says
Hey Guys!
Nice post! My husband, Rick and I, are avid DIYers. I’m a lucky girl that he’s construction saavy (afterall he was a contractor for a while). We too started the new year sick (flu), but we’re kicking it in the but and getting our 2014 vision board ready with our Kitchen renovation top of the list. :)
We love getting ideas from you guys and are thinking we might start blogging our projects too.
Happy 2014!!
Elena says
sorry for the typos!
YoungHouseLove says
Aw, so sorry you guys started the year off sick, but so excited about your kitchen reno list! All the best with everything!
xo
s
sarah m. dorsey says
WOW! Such a difference! Love how bright and open it feels!
Rosie S says
Looks great….the cabinets really turned out better than I imagined they would…I have done a similar project with less than stellar results, I don’t have the touch you guys do! Really Great job! My 2 cents for the fridge, get a new one and start enjoying it, old one stays put in garage or basement (?)….we LOVED having an extra one and sorely miss that in our new house……once you have the extra one, it is hard to go back, great for ‘stocking up’ storage, and parties. And the grouted vinyl tile looks awesome, it IS hard to believe it is not the real thing. As far as projects…at -24 here at night, and a HIGH of -13 yesterday, we have been cleaning and purging the basement and closets…next..PAINT! ALL inside stuff! LOL
YoungHouseLove says
Oh man, it’s freezing there! Stay warm, and thanks for the tips!
xo
s
Sandra T says
Hey S and J! Happy 2014! Gotta ask: are you guys seriously thinking of painting your appliances and linoleum floor or are you just messing with us? Just imagining what it would take to do it and having to live with it if it looks bad is enough to give me the shivers!
YoungHouseLove says
Not kidding! Actually if you read the comments dozens of folks who have done it have chimed in to say it has been awesome and durable (which was not what we were expecting – we thought we’d hear horror stories!). They sell appliance spray paint specifically for that purpose (it’s high heat and everything) so it’s a great way to make almond (or harvest gold!) appliances look white if you’d rather have them in that color :)
xo
s
Kaye says
Sherry,
Do the dark hinges against white cabinets bother you guys? I have the same thing going on in my kitchen and it has started to bother me a bit… like it’s too busy or something. I’ve been itching to replace it with white hinges but I’m waiting it out to make sure it’s not just a phase I’m going through. BTW, I’m so excited to see how the entire kitchen turns out! love you blog!
YoungHouseLove says
We actually really like it (we did blendy hinges in our last kitchen though, so maybe we just wanted a change?).
xo
s
Sarah @ An Inviting Home says
I must say that you guys are totally transforming this space with such inexpensive and easy to do changes. What an inspiring resource for so many home owners. Thanks for all that you do!
~Sarah
YoungHouseLove says
Thanks so much Sarah!
xo
s
Molly S. says
This is looking amazing- I can’t believe what a huge different that stain made. I can’t wait to see how you tackle the counter-tops and floors next!
Where did you get your adorable white tea kettle? It’s so cute!
YoungHouseLove says
Thanks Molly! That was a HomeGoods find a few years back. It’s by Kitchenaid if that helps.
xo
s
judianni says
I’m amazed at the wonderful difference the darker stain made!! Your kitchen is beautiful! What fun it is to watch y’all make such a transformation in your houses. Blessings for the new year, and especially your soon to be new little addition.
YoungHouseLove says
Thanks so much Judianni!
xo
s
Gwen says
Wow! Huge improvement! Great job, guys.
Tasha @ Designer Trapped in a Lawyer's Body says
Your kitchen is looking AMAZING! My husband is so opposed to painting our cabinets, but he may go for staining them, so I can’t wait to show him this post! I think you should go for painting the floor. I painted the floors in our laundry room with porch paint almost 4 months ago and they are holding up beautifully–not a scratch or mark on them. Obviously, your kitchen will get more use than our laundry room (though we have twin toddlers and do use the room A LOT), but I am pleasantly surprised by the durability. Here is my post about it if you are interested! http://designertrapped.com/2013/11/how-to-paint-your-linoleum-floors-yes.html
YoungHouseLove says
Thanks so much Tasha! Other folks linked to your post and it’s so inspiring! I’m blown away by how good those look!
xo
s
Mandi says
Wow! Looks amazing. I’m currently working on repainting yellowed super glossy trim. I’m planning on using your technique of sanding to get the shine off and then a liquid deglosser. Just wondering, what grade of sand paper did you use during this project? Would you suggest that for most glossy surfaces?
YoungHouseLove says
The best for super shiny glossy trim would be 100 grit followed by 200 grit to smooth things out!
xo
s
lola says
Wow your lower cabinets look like dark chocolate bars, really like that. Strawberry pink kitchen counters would be so adorable to match, but probably not everyone’s taste :)
YoungHouseLove says
That sounds adorable to me! Neopolitan kitchen!
xo
s
Joanne says
Are you going to put in a gas cook top when you swap out the oven? I must say, I love cooking with gas in my last three rentals and will never go back!
YoungHouseLove says
I think John (zee chef of zee family) would love that, so hopefully it’s not too much trouble (we have gas heat, so hopefully adding a hookup for the stove won’t be too crazy expensive).
xo
s
Malissa says
We are about to start on a kitchen makeover and are trying to decide between all white cabinets and a two-tone effect. Would you recommend the poly shades as a forever finish if someone was planning not to replace cabinets or would you go for traditional sanding/staining/poly?
YoungHouseLove says
We have had luck with it so far upstairs in our bathroom nook (it gets wet, toothpaste splashes, etc), so that’s what made us go for it down here. I can report back as to how it wears over time, but so far we’re happy with it for the long haul (we are planning to reuse these cabinets in the garage as part of a workshop so we hope it lasts forever!).
xo
s
Bailey says
Gorgeous, gorgeous update. I’ve been imaging in my head how this would look with those dark cabinets, and it’s just as beautiful and classy as I’d imagined. Beautiful job!
Bailey
Christine says
I’m glad I’m not the only one that had issues with the streaky PolyShades. This post makes me feel much less inadequate than I previously had!
I used it on some natural colored tables I was trying to color match to some very dark furniture based on one of your previous posts where you used it. The whole time I was doing it I felt like I must have been doing something wrong because of all the brush strokes it left! I used the same technique as you to try to minimize the brush strokes and was pleasantly surprised with how much it settled and darkened after the first coat was dry. After the second coat it was almost a perfect color match, and MUCH smoother looking!
As you said…it drips easily, and because of the streaky-ness I laid on a too thick coat in a couple places, but it was my first experiment with the stuff, and in the end, it turned out pretty darn good, all things considered. It’s definitely a much better option than doing the full gamut of prep, etc. for a regular staining process, so thanks for the idea :o)
YoungHouseLove says
So glad!
xo
s
Shani says
Loving the kitchen! Have you considered stainless steel contact paper for appliances?
YoungHouseLove says
Love that idea!
xo
s
Sarah says
what color did you paint those walls?
YoungHouseLove says
They’re Nelson Blue by Benjamin Moore.
xo
s
Chelley @ A is for Adelaide says
What an amazing transformation!
Julie says
Brightly spray-painted appliances would be awesome. Could be a beautiful shade of blue to go with the coastal vibe going on in this room, and would suggest a vintage feel. I’ll be fascinated to see what you ultimately come up with.
YoungHouseLove says
Ooh that’s fun! I actually love that idea. The paint would have to be made for appliances (high heat for the stove) so we’ll have to see what they have!
xo
s
Margaux says
I love coming to visit YHL and I always drool over your re-dos… I just realized Phase 1 projects (with permission) could be good rental makeovers too. I am longing for a place of our own and for now I have to deal with our rental home, but a little paint – some stain, it could be livable! AND I am sure the owner wouldn’t mind the mini upgrades.
YoungHouseLove says
Aw thanks Margaux!
xo
s
Julie says
Here I am again. Just took a quick look through the spray paint options. I have no idea if engine enamel spray paints are appropriate for appliances, but they are designed to withstand temperatures up to 500 degrees. If they are, then your color options are as limited as the colors on the mass-produced cars. Aga stoves have insanely beautiful colors that could serve as inspiration. Oh, to own an Aga!
YoungHouseLove says
AHHH! I love that idea!!
xo
s
Andrea Schmidt says
I JUST bought Polyshades in a the same color before I saw your post. I did a “test” on my bathroom cabinet and wondered what to do if you do get a “drip” that dries…Do you just sand it and do your 2nd coat? I like the product so far, thankfully we don’t have to sand down to the wood!! Also, do you think a foam brush would work, I’m having issues with cleaning my brush. UGH.
YoungHouseLove says
Yes, I think you could hopefully sand it out and the next coat would cover that? We used a short handled angled real brush since it seemed to recommend that on the can over a foam one, but maybe but a cheaper one just for this project and bag it overnight (between coats) so you don’t have to worry about cleaning?
xo
s
Amber says
I really enjoy your phased approach. I think it’s inspiring to see what paint, stain and elbow grease can do. Alot of people live in spaces they don’t really love because they are waiting till they have enough money for a full remodel. I like that you guys turn your home into something beautiful during the in between time. Will you all provide a breakdown of costs for your kitchen so far?
YoungHouseLove says
Aw thanks Amber! We’re hoping to do a full budget breakdown when we’re finished with Phase 1 (we have all the receipts/costs in a pile but just like to tally them up once at the end). Can’t wait to share- soon hopefully!
xo
s
Allison Heichelbech says
I’m curious where you got your kitchen table??? I’ve been looking for something VERY similar! Nice job on cabinets. Pretty!
Thank you!
YoungHouseLove says
Thanks Allison! It’s a Restoration Hardware table but we got it at a local outlet (called The Decorating Outlet) for about 75% off!
xo
s
Bethany @ Dwellings by DeVore says
What an amazing difference already! I love following along on all your makeovers!
Stacey says
I did the chalk board fridge a few months ago… NO REGRETS everyone that comes in loves it. I can’t believe what a conversation piece it has become and now the first place nieces and nephews and kids friends go to leave their mark! Fun to update seasonally also. I used tips from several sites and had a great outcome. If you’ve never used magnetic primer see if u can have them shake it up for you at the paint counter if u plan on using right after u buy its a pain to stir but it is possible. Also I have watched your cabinets and read every detail as we are trying to make decisions on color and stain vs paint. We have used rustoleum cabinet transformation products on dressers and are leaning that way. Interested to know if y’all have ever tried that product??
YoungHouseLove says
We’ve never tried it but hear good things!
xo
s
Shelley says
I was going to try and find feather finish here, till I read this blog, where they used it in the kitchen with disastrous results. http://412love.wordpress.com/tag/ardex-feather-finish/
YoungHouseLove says
Oh no!
xo
s
Cami says
Hey y’all!
I tried so hard to read through all the comments but didn’t quite make it – apologies if I’m asking a question that has already been answered.
I LOVE this color and plan to try it on our newly-madeover (wow, too many words there) guest bathroom. I will probably also use it on our kitchen cabinets (new house, yay!!) but would like to try it in a smaller space first, just in case I don’t love it.
Any advice on what liquid deglosser to use?? Is that a have-to-buy-the-best product, or will anything do? I’m also curious about what kind of brush to use for the application of this stain. I have a feeling the quality/material of the brush could be why some people are left unhappy with their results…
Love everything you do. <3
YoungHouseLove says
We use one by Next from Home Depot, but I hear they don’t sell it anymore, so I’m sure whatever they sell will work (just wipe everything down and ventilate the room if it’s stinky since Next is more eco than some other kinds). As for the brush, we just used 2″ angled brushes from Home Depot (the short handled kind with blue rubber handles) which worked out well. Good luck!
xo
s
Lindsay says
I just did my first staining project using PolyShades, after reading your post. I stained a play table for my daughter, that my husband made. It was unfinished wood before, and I applied two coats of PolyShades. The color / stain looks amazing, but I expected the finish to be glossy, is that not the case? Since this will be used for craft projects / eating, should I do a coat of something else that would seal it better? I expected the “poly” part of the PolyShades to do that. Thanks!
YoungHouseLove says
Hmm, if it’s for eating I’d use a food safe sealer like Safecoat Acrylacq (it’s non-toxic and you can order it online). I think the Polyshades comes in two finishes (satin and gloss) so maybe you went for the less shiny one?
xo
s
Carrie says
I love the look that you got with this stain! A really rich brown color, but the grain isn’t totally covered, which I really like. I have a question about the cabinet sides though: on our kitchen cabinets the exposed sides aren’t real wood but some sort of fake veneer. I used gel stain for a similar condition in our bathroom and it worked, but I wasn’t sure about regular stain. Any idea if it would adhere to non-wood in the same way as the cabinet fronts?
YoungHouseLove says
Some other folks asked about that and we’ve never tackled it so we’re not sure. Maybe test a tiny spot? Or find thin real wood veneer to put on the sides so it’ll take stain better?
xo
s