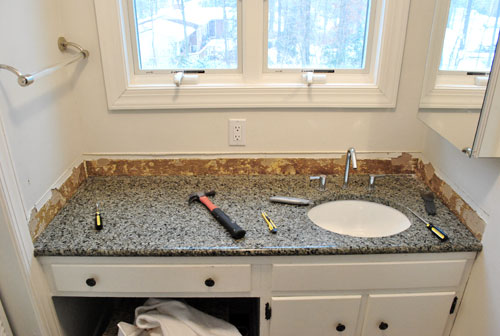
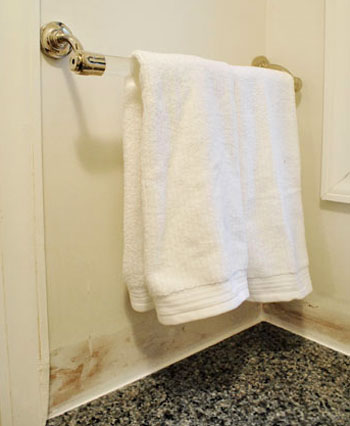
You might notice a theme when it comes to posts like this and this and this and this. Making this house feel like ours seems to be just as much about stripping things down and removing stuff as it is about adding new furnishings and wall colors. Just like the old matted carpets in the sunroom and the bathroom of our old house had to go (along with the crocheted duck curtains, the wallpaper, some small doorways, a few bi-fold doors, and the linen closet door) we’re all about working with what we have. Which could mean altering things a little bit to help them fit more within our aesthetic instead of just junking them and starting from scratch. Which is why the granite backsplash around the bathroom sink (which happens to live in a nook on one wall of our bedroom) had to go.
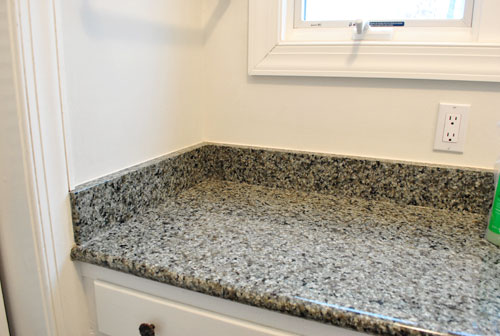
Wait, before you get all nervous, let me explain. We thought the backsplash made the sink scream “Look! I’m a sink! In the middle of the main bedroom!” And removing it might make it whisper “Hey. I’m a sink. But I look more like a piece of furniture because I’m slick like that.” We don’t actually mind the location of the sink, we just want to make it fit in more with the rest of the room instead of sticking out like a sore thumb. So this little project is step one of that process.
Thanks to some waterproofed caulk around the edge and some semi-gloss paint on the walls of that alcove, we won’t have any issues with splashing or water damage (our last house didn’t have a backsplash in either bathroom and the caulk and semi-gloss paint approach worked like a charm. I would even venture to say that the caulk & semi-gloss paint method took a licking and kept on ticking. Yes I just pulled out that hokey little rhyme. You’re welcome.
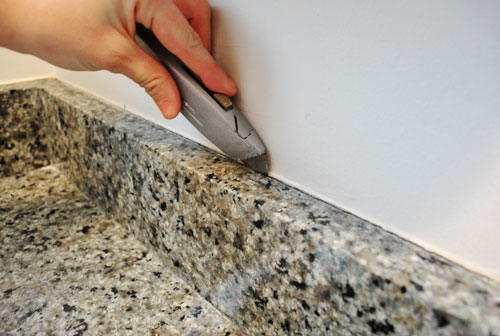
So here’s how it all went down. First I scored the clear silicone caulk by running a box cutter along the top of the backsplash:
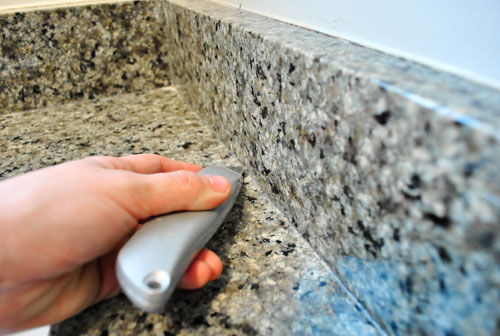
Then I scored the caulk between the counter and the backsplash using the same method:
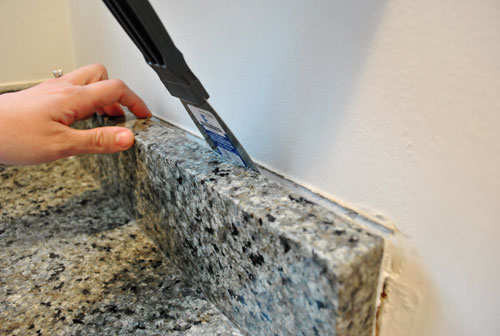
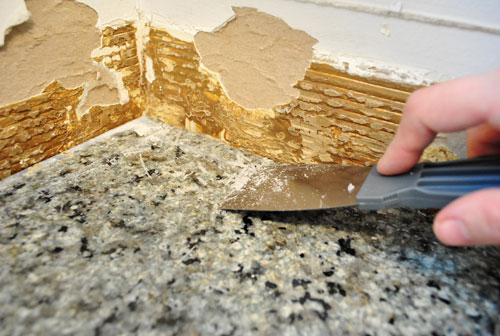
Next I used a thin metal spackle knife to get in there behind the backsplash and the wall and pry it away slowly:
I was able to teeter (yes, that’s a technical term) each of the three backsplash pieces back and forth away from the wall and back again until they completely broke free of the wall and could be lifted out. Those suckers were heavy but I got ‘er done. In fact I’m pretty psyched that I was also able to do this whole project on my own while John was on Clara duty (she says with pride, while simultaneously patting herself on the back and brushing her shoulders off).
Wait. Did I mention I started it without talking to John first? I just wanted to see if removal was even possible and once I got into it there was no turning back. Or telling John what I was doing since the sink looked like this. I would have been in so much trouble (cue all the kids in class saying “ooooh” when the principal gets on the loud speaker and calls someone down to her office by name).
I wasn’t totally going rogue though. I knew he’d go for the backsplashless concept since we had chosen it for both of our previous bathroom overhauls in the old house. So I just crossed my fingers that I could strip things down and make them look a bit more presentable before he and Clara came in to see what I was up to. So here I am furiously scraping the silicone caulk off the surface of the granite counter with the same spackle knife I used to remove the backsplash pieces (it worked really well without scratching the granite at all):
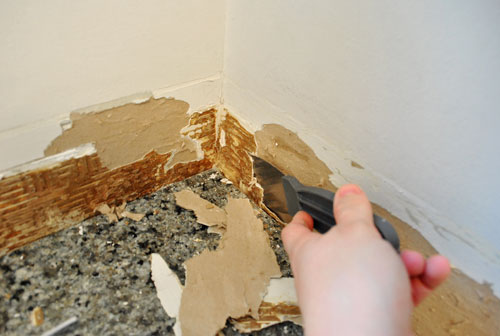
And here I am using the same trusty spackle knife to get in under all that nasty glue and flake it off to reveal a slightly roughed up (but much less gnarly and bumpy looking) piece of drywall:
Here’s what it looked like when John came in to see what all the noise was about. Thank goodness it was a lot less grody looking once all that glue was scraped off. And he was, dare I say it, pleased (!) with the surprise project that I sprung on him. Whew.
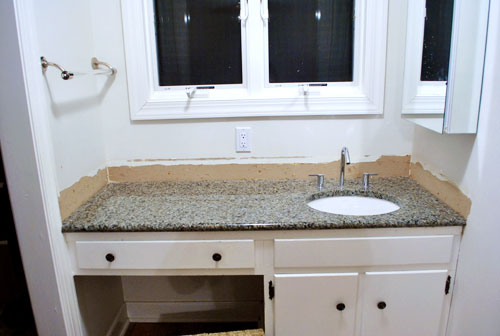
Then it was time to skim coat all the roughed up drywall so it would again look seamless like the rest of the wall. Some people would choose to mud the wall when skim coating, but I actually used some of the same lightweight Dap spackle that I mentioned in this post, which I was able to sand down to a totally smooth and even surface that looked seamless with the rest of the drywall (but remember, don’t sand until the spackle is totally dry). Then I used some white waterproof paintable caulk (I like the Dap door and window stuff) around the perimeter of the counter to fill and seal any tiny hairline cracks between the granite and the wall so no water could collect or drip back behind the counter or vanity.
Here’s what she looks like now from afar (ignore the baskets and all the junk that we have yet to organize):
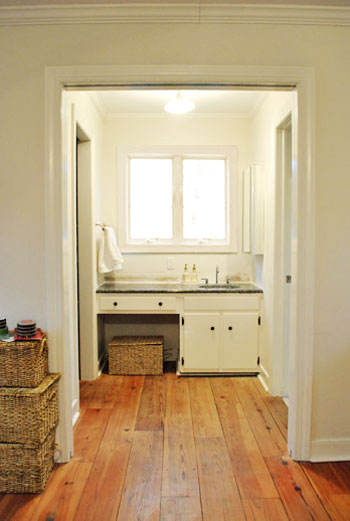
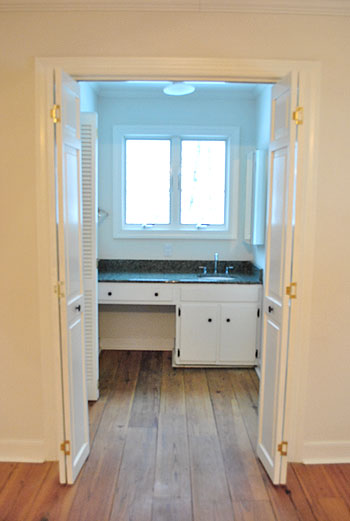
It’s not too bad when you compare her to her glory days (this next photo was taken when we first moved in, before removing the bi-fold doors and of course that backsplash).
My apologies about the bad blue light, I’m still learning how to tell the Nikon who’s boss.
Anyway, I know the after pic above this one still might not look like much, but we’re psyched. We can picture how great some wipe-able semi-gloss paint will look on the walls of that little nook, and we have some other big plans for that area (to make it look even less bathroom-sink-ish). Oh and as for where those three slabs of granite that I removed will go, we’re sending them off to the Habitat For Humanity ReStore since someone else might be able to use ’em. You know in case they buy a house from someone who went crazy and stripped out their backsplash while the hubby was watching the baby and they’d now like to add it back in. Haha.

gemma@thesweetestdigs says
Looks really great already! It makes the whole area seem much brighter and more appealing. Nice work!
Christina @ Centsible Savings says
Love it! I don’t understand WHY people think you need a 3 inch backsplash of granite, laminate whatever – it is ugly! We have a laminate backsplash like that in our kitchen and it has seen it’s last days!! :)
No $ to replace the laminate but hoping to paint it and seal it. The install a tile backsplash on the WHOLE wall. :)
Any tips on painting laminate? products to use, should we do the sponge paint effect made to look like granite?
YoungHouseLove says
Hey Christina,
We haven’t seen laminate painting done with much success, but recently someone mentioned that they’re selling painting kits for it (by Rustoleum maybe?) so perhaps checking your home improvement store for those might help? Good luck!
xo,
s
jbhat says
Ha ha, you just wanted an excuse to use some more of that spackle that you love.
I think that this was a marvelous improvement. I don’t know if I would have ever really seen it myself, if it were in my house. I guess a granite slab seems so permanent in my mind. But you just whisked it right off. And now it really does have the effect you were going for. I’m super impressed.
jbhat
Charity says
I am AMAZED at what a difference that made. And now I’m inspired to take a closer look at my bathroom and find what little things can make a big change like that!
Navy Bean says
I can’t believe what a difference that made! You and John have such great vision for the house. Following you guys is such a treat!
jbhat says
And now I am wondering if you guys can post or respond with how you are prioritizing this stuff. For instance, my husband would maybe be glad that I had done the backsplash removal during his baby watch, but what if there was something more pressing I could have been working on? How are you guys managing the decision-making together? Totally curious.
jbhat
YoungHouseLove says
Hey jbhat,
You can read a bit about our prioritization process here in this long list post. Basically we just do things that we’re in the mood to tackle (depending on if we have the materials on hand) and pop around the house depending on what we feel like doing. But of course if something is pressing due to safety or functionality it gets bumped to the top of our to-do list.
xo,
s
Jordan says
Wow, Huge difference! It looks so much better and does look like a nice piece of furniture now instead of a bulky bathroom sink. I am loving that you guys moved so I can follow all your new changes. Thanks for the entertainment! :)
Betsy says
Wow! It’s amazing how such a small thing can make such a big difference. I love it.
Jo says
I, too, am really impressed that you could see what a difference this little detail would make. Astounding! Really great.
Lindsey says
Wow! I can’t believe how much better that looks already! Seriously, how do you come up with these things?? Brilliant!
Tracy says
It looks like you had a pretty easy time scraping, but I thought I’d offer a tip for removing old adhesive (like liquid nails) from walls that is so easy. There is actually adhesive remover in the same aisle at Lowes as the glues/caulk/paint and it’s specifically designed to remove liquid nails (or stuff like it). You just brush it on, stick plastic wrap to it, wait 30 minutes and it literally wipes off like butter. We used to have old fake vinyl-y tile sheet glued to the wall of our kitchen, and I spent days trying to scrape the rock hard glue off of the walls that it left behind, bit by bit. Finally I got desperate and found the liquid nails remover. I cried when I able to wipe it off so easily after all the previous scraping attempts, but it was great because the wall was perfectly smooth, with no trace of the glue left.
YoungHouseLove says
Good to know! Thanks for sharing that alternative Tracy!
xo,
s
Caroline says
I love the bathroom minus the backsplash! But I have to say, the video of Clara was my favorite part of this post. She is always so smiley and happy (which equals ADORABLE!).
Kristi says
Hey Sherry,
Looks much better. I never would have thought just by removing the back splash piece, the bathroom doesn’t jump out at you as much.
When I was looking at your space it made me think of my master bath. It’s at the top of the stairs and it says “hello, I’m a bathroom” right at the top of the stairs. And the door used to open INTO the bathroom. It was awkward to say the least! We ended up putting in a pocket door. It’s fabulous.
I was thinking a pocket door would be great for your master bath. One thing at a time I’m sure, but something to consider if you haven’t already! -Kristi
Jamie B says
Looks great! So much cleaner and less “clunky” in that little nook.
PS…that’s totally the same granite we picked when we gutted/redid our kitchen.
Addie says
Wow! Ok, Sherry, how many hours of work was that for you? You make it sound like a one hour project while John was playing with Clara. Was it really that quick?! You’re incredible!
YoungHouseLove says
Hey Addie,
Aw thanks! I probably had the backsplash out within 10-15 minutes and it only took about an hour of active working time to get ‘er done (not counting breaks for drying time when it came to spackling). The spackling and sanding step definitely took the longest, but everything was pretty straightforward.
xo,
s
Sara says
Hey Sherry-
I am so impressed by your girl power! I am the DIYer in my home and I love doing things around the house without the the husband.
I think your transformation looks spectacular, but now you’ve got me thinking…I’ve got the same 3-4 inch lip of granit backsplash in my kitchen. I have been wanting to put in a tile backsplash from the lip up to the bottoms of the cabinets and I hadn’t thought about removing that granite lip. Would it look weird to have 3-4 inches of granite and then tile?
YoungHouseLove says
Hey Sara,
We think it looks more streamlined and current to add backsplash tile from top of the counter (as opposed to keeping the lip of granite and adding it above it) but it certainly won’t look weird if you do it the other way. It’s really all about preference!
xo,
s
Kelly says
I initially thought I would never have bothered removing the back splash, but the results are oddly drastic. Crazy, thanks for sharing!
Hilary @ My So-Called Home says
It is amazing what a difference something so small can make! Do you plan to put in double sinks at some point?
YoungHouseLove says
Hey Hilary,
We don’t mind brushing our teeth in tandem for now, so we don’t have any plans to add another sink but it’s nice to know we have the space for one if the need arises.
xo,
s
Gigi says
That is genius! I will admit I was skeptical but it does look so much better.
You might want to hang on to the backsplash, we used a piece of a similar width to create a shelf on top of a half-wall that we are stuck with and the top of which my husband would otherwise use to create coffee mug circle art*. It can also make a windowsill somewhere.
*unintentionally
KNatGU says
I can see it now if you rework the bottom cabinets. Maybe a series of drawers on the left side and it may end up looking more like a dresser then a bathroom vanity. Too bad you can’t think of someway to rework the granite in your own home
Melisa says
Have you thought about possibly putting french doors up between the sink nook and your bedroom? We have them in our master and it looks so pretty and inviting! :)
YoungHouseLove says
Hey Melisa,
We did talk about doing that someday down the line! We love open living though, so we have a feeling we’d leave them open all the time and just like them for the architecture they add (even when thrown open).
xo,
s
Kathy says
I WISH I could do this in my kitchen!!! I have that same type of backsplash!
But alas…our walls are VERY heavily textured! No easy drywall repairs for us due to this problem! :(
Amanda@Longroadset says
I don’t understand. I don’t personally get the aesthetics behind it, but kudos.
Abby @ a delightful design says
brilliant move! Great work!!
abby
Linda says
I would have never thought about doing a project like that’, but you’re right, it makes the sink so much better like it’s a piece of furniture. Great job!
emily @ the happy home says
i absolutely LOVE it without the backsplash!
Nicole says
Looks phenomenal!! I’m so jealous of that space! I would turn the open cubby space into a vanity with seating and a cute mirror for doing makeup and hair. You could have lots of gorgeous bottles and brushes laying out (and store everything else in the drawer).
jodi says
it looks so much better already! and i am in LOVE with your floors. wowza.
Becka says
Just a FYI. I went to Home Depot on my lunch break and saw they put the Freshair NO-VOC paint 75% off. $10 a gallon.
I don’t know if that applies to all Home Depots or only mine. Just something to check into.
YoungHouseLove says
Sweet deal! Thanks for the heads up!
xo,
s
Nik says
Oooohhh. I love it already. Don’t know if it fits in your color-scheme, but I can totally see the base cabinet in a creamy, buttery yellow with a slightly darker yellow on the doors. I am drooling over all of the charming things your new old-house will become.
LindseyR says
great job brave woman! Looks awesome!
KarenC says
I can’t believe how much better that looks It never would have occured to me that such a small change could make such a big difference.
I’m always impressed with the things y’all think of. ;)
carolinaheartstrings says
The backsplash did have to go. Who knew. You are slick like that. It looks like like a “laundry room” to me now and more like a little “nook”. Cannot wait to see how it keeps progressing.
Snickrsnack Katie says
I am thinking one of those fancy bowl sinks – like maybe a glass one or stainless steel, or something, would look nifty there. Then, from a distance, it won’t LOOK like a sink – but just a bowl. And they have those sinks that have the little faucets that the water just sort of pours out like a waterfall, and not a big rounded faucet like you have there currently that just screams “I AM A FAUCET!” I wouldn’t have thought this was a big deal until you showed me the after-shot, but I can totally understand why you did this. The backsplash just screamed “sink”. Of course it is, but in a bedroom it seems odd. Or like you are in a hotel that has the sink out in the main living area. Now it just looks like a pretty vanity area that just happens to have a sink. Once you make that sink even more discreet, I think it will really be amazing!
Lizzy B says
You go Girl, excellent DIY house building and repairing you have going on! I just love all you have accomplished with this house!
Mindy says
Looks awesome. I don’t consider myself to be a girly girl–I like to jump in and just do things–but I kind of am when it comes to home projects! I am psyched to be learning these kinds of things from your blog, just to know just in case. :) Did you grow up with a handyman dad? Cause I didn’t, as much as I love my dad… we always called people in to do this or that. My husband is very do-it-yourself, so I’m re-learning that it’s okay to touch your own place! ha!
YoungHouseLove says
Hey Mindy,
I don’t think my dad has ever picked up a hammer. No offense dad! But I did have a very hands-on mom (she stained and refinished furniture, and general contracted a lot of work done on her house). But I wasn’t handy at all until right before we started this blog (actually I probably shouldn’t have called myself “handy” even after starting this blog for the first year or so- John and I had no idea what we were doing- still don’t sometimes). So there’s hope for anyone!
xo,
s
Sarah K says
I took the granite backsplashes out of our kitchen and used them as an edging in the yard between lawn and flower beds. Funny how both my kitchen and your bath look better without those 4″ backsplashes..
bridget b. says
lol at “brushing her shoulders off”. i love all the little pop culture references that make it into you guys’ posts. i’m about the same age as y’all, so i get an especially good laugh out of the ’90s references.
the sink area looks great. i never would have guessed that removing the backsplash would make such difference.
Melissa @ Sassy Mommy says
The bathroom in my office has the exact same look. Granite counters and backsplash with undermount sink. Everytime I have gone in there today I keep thinking… hmmm… wonder what this would look like if Sherry came in here and took this off. Random but true… Obviously I am not in the mood to work today :)
Kristen says
Paging through an old Elle Decor and came across a Kohl’s advert that had white ceramic animals in it. Is it bad that Sherry is the first person that came to my mind?
Holly says
OMG!!! I just told my husband I wanted to do this same thing to our vanity! I didn’t know where to start, but you have paved the way for me now! Thank you for documenting it! haha
Julie at www.downtimeweblog.com says
Great idea! I never really thought about taking the backsplash off and how much nicer it could make a bathroom look. But it certainly does make the bathroom cabinet/sink feel much more like a piece of furniture. Thanks for the idea!
Erica says
Wow, who knew that little backsplash would make such an imapct! What an awesome idea and looks so much better already!
Snickrsnack Katie says
So I am thinking that sink would look cool with a faucet like this.
http://www.sinksgallery.com/products/bf-n390-01-orb-64rs_original.jpg
With a sink like this:
http://www.sinksgallery.com/products/xfueragreenonyxb1170_original.jpg
Granted, the faucet would have to be a little bit taller to clear the sink, but that is the idea I have. A fancy sink like that would look like a beautiful decorative bowl. The ones I linked to are pricey, but I am sure you could find similar ones elsewhere for a steal.
Anyway, that is just my two cents. Not that it means much because I am by no means a decorator like you are. I just have fallen in love with that bathroom-niche in your bedroom and think you could do so much with it! Have fun with it!
Erin L says
I just had to admit that I was very skeptical when I started reading this post, but now I’m happy to say ‘you’re right!’ It totally looks sooo much better without the backsplash. The before and afters seal the deal. Good job, Sherry! (Oh and you are so brave too to do it without really consulting the hubby first! haha!)
Erika says
I love you guys! It’s always nice to read through your posts! Good luck on the rest of the house, it’s coming out so beautiful!
Shannon says
The after looks awesome! It totally looks more like a piece of furniture and less like a vanity. You can hardly notice that there is even a sink there now – awesome job :) I am looking forward to seeing the progress and evolution of your new home!
gk says
ooh, count me in as one of the people now craving take it away in cville!
also, like the backsplash removal. i wouldn’t have thought it would make such a difference, but it really does.
Christa M says
Just noticed the seam in the molding above the doorway, do you guys as DIYers find it distracting when you’re lying in bed? I would probably be fixated on it until the day it was tackled.
YoungHouseLove says
Yes! We can’t wait to caulk that!
xo,
s
Nina says
It looks great! But I’m really commenting to say I love the floors in there. But I’m really, really commenting to ask how you split up baby duty. I’m so curious, do you have like a chart to keep track or is it more on a per project basis?
YoungHouseLove says
Hey Nina,
There’s nothing organized about baby duty around here! We knew when Clara came home that instead of one of us being a full time stay at home parent while the other one is a full time blogger we’d have to just switch off, so we operate at about 50% efficiency when it comes to YHL since someone is always playing with Clara (or feeding her or changing her, etc). I usually work for an hour or two while John watches Clara and then we switch. We also try to tackle projects together at night when she’s sleeping (in the case of this project, John was feeding Clara a snack and something possessed me to go crazy on the backsplash). We love that we both get to spend time with her at home, but it’s definitely a bit of a juggling act when John wants to start a project but I have a post to write- so we just do our best and try not to feel too frustrated if we don’t get things done as quickly as we’d like!
xo,
s