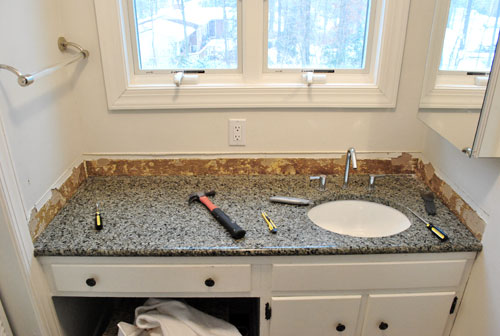
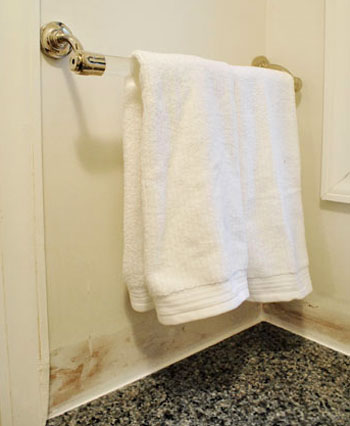
You might notice a theme when it comes to posts like this and this and this and this. Making this house feel like ours seems to be just as much about stripping things down and removing stuff as it is about adding new furnishings and wall colors. Just like the old matted carpets in the sunroom and the bathroom of our old house had to go (along with the crocheted duck curtains, the wallpaper, some small doorways, a few bi-fold doors, and the linen closet door) we’re all about working with what we have. Which could mean altering things a little bit to help them fit more within our aesthetic instead of just junking them and starting from scratch. Which is why the granite backsplash around the bathroom sink (which happens to live in a nook on one wall of our bedroom) had to go.
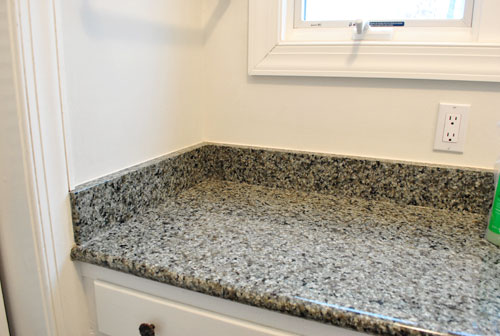
Wait, before you get all nervous, let me explain. We thought the backsplash made the sink scream “Look! I’m a sink! In the middle of the main bedroom!” And removing it might make it whisper “Hey. I’m a sink. But I look more like a piece of furniture because I’m slick like that.” We don’t actually mind the location of the sink, we just want to make it fit in more with the rest of the room instead of sticking out like a sore thumb. So this little project is step one of that process.
Thanks to some waterproofed caulk around the edge and some semi-gloss paint on the walls of that alcove, we won’t have any issues with splashing or water damage (our last house didn’t have a backsplash in either bathroom and the caulk and semi-gloss paint approach worked like a charm. I would even venture to say that the caulk & semi-gloss paint method took a licking and kept on ticking. Yes I just pulled out that hokey little rhyme. You’re welcome.
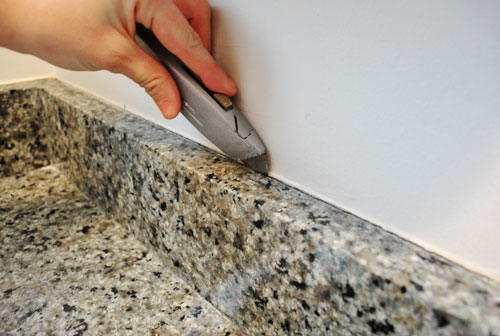
So here’s how it all went down. First I scored the clear silicone caulk by running a box cutter along the top of the backsplash:
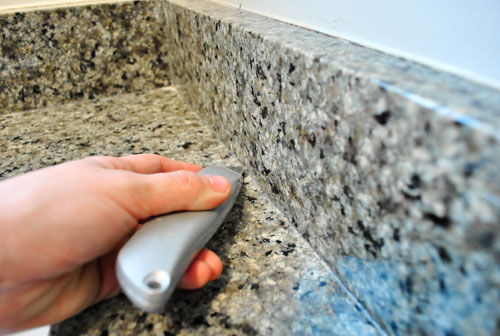
Then I scored the caulk between the counter and the backsplash using the same method:
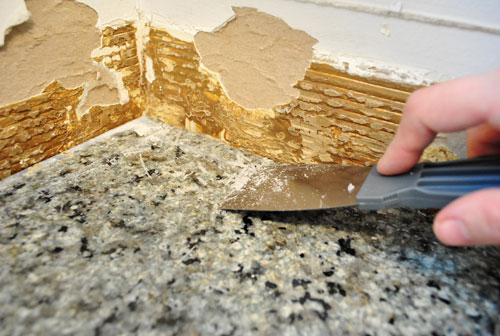
Next I used a thin metal spackle knife to get in there behind the backsplash and the wall and pry it away slowly:
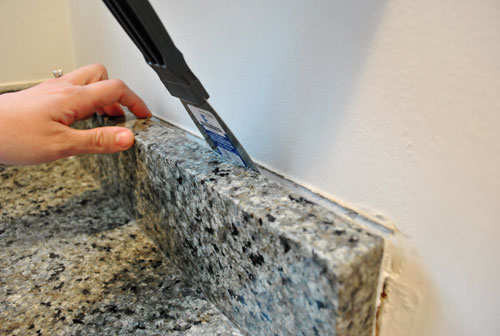
I was able to teeter (yes, that’s a technical term) each of the three backsplash pieces back and forth away from the wall and back again until they completely broke free of the wall and could be lifted out. Those suckers were heavy but I got ‘er done. In fact I’m pretty psyched that I was also able to do this whole project on my own while John was on Clara duty (she says with pride, while simultaneously patting herself on the back and brushing her shoulders off).
Wait. Did I mention I started it without talking to John first? I just wanted to see if removal was even possible and once I got into it there was no turning back. Or telling John what I was doing since the sink looked like this. I would have been in so much trouble (cue all the kids in class saying “ooooh” when the principal gets on the loud speaker and calls someone down to her office by name).
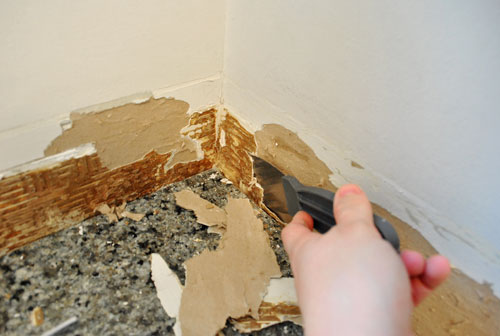
I wasn’t totally going rogue though. I knew he’d go for the backsplashless concept since we had chosen it for both of our previous bathroom overhauls in the old house. So I just crossed my fingers that I could strip things down and make them look a bit more presentable before he and Clara came in to see what I was up to. So here I am furiously scraping the silicone caulk off the surface of the granite counter with the same spackle knife I used to remove the backsplash pieces (it worked really well without scratching the granite at all):
And here I am using the same trusty spackle knife to get in under all that nasty glue and flake it off to reveal a slightly roughed up (but much less gnarly and bumpy looking) piece of drywall:
Here’s what it looked like when John came in to see what all the noise was about. Thank goodness it was a lot less grody looking once all that glue was scraped off. And he was, dare I say it, pleased (!) with the surprise project that I sprung on him. Whew.
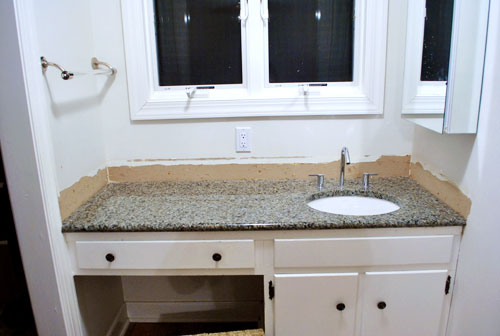
Then it was time to skim coat all the roughed up drywall so it would again look seamless like the rest of the wall. Some people would choose to mud the wall when skim coating, but I actually used some of the same lightweight Dap spackle that I mentioned in this post, which I was able to sand down to a totally smooth and even surface that looked seamless with the rest of the drywall (but remember, don’t sand until the spackle is totally dry). Then I used some white waterproof paintable caulk (I like the Dap door and window stuff) around the perimeter of the counter to fill and seal any tiny hairline cracks between the granite and the wall so no water could collect or drip back behind the counter or vanity.
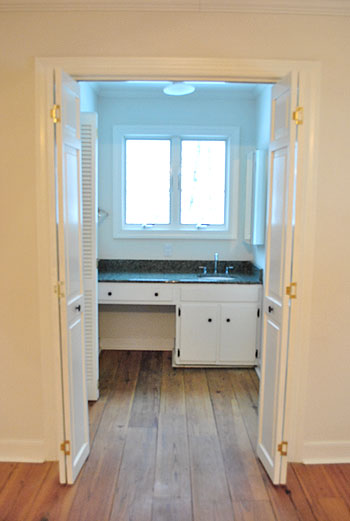
Here’s what she looks like now from afar (ignore the baskets and all the junk that we have yet to organize):
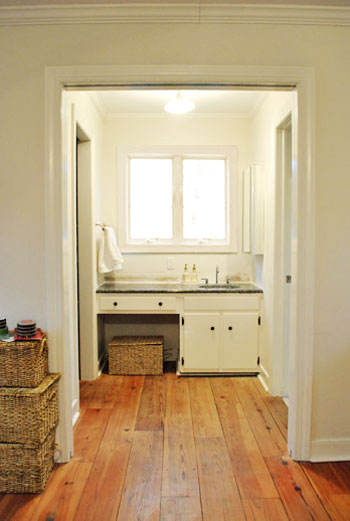
It’s not too bad when you compare her to her glory days (this next photo was taken when we first moved in, before removing the bi-fold doors and of course that backsplash).
My apologies about the bad blue light, I’m still learning how to tell the Nikon who’s boss.
Anyway, I know the after pic above this one still might not look like much, but we’re psyched. We can picture how great some wipe-able semi-gloss paint will look on the walls of that little nook, and we have some other big plans for that area (to make it look even less bathroom-sink-ish). Oh and as for where those three slabs of granite that I removed will go, we’re sending them off to the Habitat For Humanity ReStore since someone else might be able to use ’em. You know in case they buy a house from someone who went crazy and stripped out their backsplash while the hubby was watching the baby and they’d now like to add it back in. Haha.

Michelle says
That looks WAY better! What a difference a little time and elbow grease can make!
Melody says
Great decision! I never would have thought to do that, but it looks so much better!
Jenn the Pen says
Ok. I admit – I panicked when you said you were taking out the backsplash, but seeing the after picture, I see you were oh so right in doing it!
Michelle @Dream Home DIY says
Okay, I have to say it. I am insanley jealous of your GORGEOUS hardwood floors. We just purchased a house over the summer not far from where you guys are in Richmond. Isn’t Virgina just a beautiful state? Im originally form the west coast, but wouldn’t trade it out here for anything.
Loree / danger garden says
Never in a million years would I have thought to do that but it makes such a huge difference! Before it looked like a sink in a hotel but now you’re right…more like a piece of furniture.
Holli says
Oh my goodness! I can’t believe how much of a difference something that tiny made on the look of the sink! I’m amazed! How do you see these things so well?! I never would have thought to do that lol! LOVE IT!
Lindsay L. says
Woah so much better! Sometimes you really do just have to leave your doubts behind and go for it! And I looooove the floors in there.
Marie says
I really like the change! You might want to test granite in your house for radon, which countertops have been known to emit. You can get a home test kit from a hardware store.
YoungHouseLove says
Hey Marie,
Thanks for the suggestion! We actually had our house tested before moving in. Thankfully the new radon level after mitigation is extremely low. Whew. Read more about that here.
xo,
s
thecounselormom.com says
Wow, it looks so much better!! It’s very clean and crisp looking! I will have to use this technique when I remove my old office cabinets our previous owners put in. THanks!
Paige says
I gotta tell ya, I was a little nervous reading this post. Great job and good call! Looks great! I could totally see a small chair or bench with a vintage mirror on the other side of that sink! It is so exciting to see your transformations so far! ~Paige
MaryBe says
It looks so much better!
Sammy says
Wow! Looks so much better.
Maybe a stool (between the basket and the counter seems just the perfect amount of space so you won’t break your neck when it’s not in use) and a nice table mirror would make it look even more… meant to be there? Oh, and will you paint this nook too when you tackle the bedroom?
I really hope I don’t annoy you with my curiosity!
YoungHouseLove says
Hey Sammy,
A stool is also a great idea! We’ll have to see what we find. We’re definitely considering painting the nook the same color as the bedroom so it feels nice and cohesive (although we’ll use semi-gloss paint in there just to keep it more wipe-able).
xo,
s
Cassie says
Ok, this kind of post is exactly why I love this blog. I would have never in a million years figured out that a few inches of back splash would weigh down a space so much. It’s amazing, Sherry, how you are able to notice these tiny little things that make such a big difference! I learn SO MUCH on YHL.
Monica says
I never would have thought to remove the backsplash but it does look so much better! Can’t wait to see what other tricks you have up your sleeve for this area.
Jill Stigs says
Looks fantastic. I am all about the “slab” look, I totally cringe when I see granite go up the wall (especially all the way to the cabinets bottoms ick).
OOOOOOOOOO…..those floors, sigh.
Nadia says
What a great idea!! It looks awesome. You guys aren’t by any chance planning sliding doors (barn doors like the ones you showed at John’s sister’s house) anywhere are you??? We are in the market for one and are BLOWN AWAY by how pricey it is!! I was quoted $650 for what literally looks like three pieces of metal, some wheels and a few screws!! I’d looooove to see how you guys would diy a solution!
YoungHouseLove says
Hey Nadia,
We need the wall space on both sides of the opening for dressers, so we won’t have clearance for an open barn door. So sorry you’ve found them to be so expensive. Does anyone have a DIY link or suggestions for a less pricey option for Nadia?
xo,
s
Kristen says
It looks awesome! At first, I was thinking why would you want to get rid of something like that, but then when you did the before and after pictures, the difference is HUGE! I love it!
Jen @ The Decor Scene says
Love it. Looking better already.
So will the bedroom and the bathroom area be painted the same color so it doesn’t feel like two separate rooms? This way the open living idea will be seamless? Can’t wait to see what else you have in store for this room/rooms. ;)
YoungHouseLove says
Hey Jen,
Yup, we’re thinking it’ll be the same color as the rest of the room so it fits right in (but we’ll do the nook in semi-gloss so it’s wipe-able since it’s near the sink).
xo,
s
Sherry says
Great idea! It really does make all the difference in the world.
I remember in your house tour you guys were trying to figure out how it feel more integrated since it’s visible from the bed. Would you guys ever consider putting tile up that back wall, around the windows and to the ceiling? It might look cool to wake up and see some gorgeous light-bouncing glass tile, or even stone (check out Island Stone tile, I think you guys would love it!). Just an idea :) Can’t wait to see what you guys come up with!
YoungHouseLove says
Hey Sherry,
Gleaming tile would definitely look nice, but it might make that nook look more bathroomy and less like furniture in an alcove of the bedroom. For now we’re going to try painting the walls the same color as the rest of the room (to further integrate that area) but we’ll definitely add some decorative touches when it comes to the light fixture, those windows, some accessories, etc- so it’s a pretty little spot to wake up and stare at.
xo,
s
Lisa says
Oh I LOVE this. I’ve been secretly trying to pry the (laminate) backsplash off our kitchen counters to see how much of a mess it might make before I suggest it to my husband. Maybe our ugly laminate countertops will look better without it… until we scrape up enough cash to replace them all with nice granite counters.
Now I can show your before/after to hubby!! :-)
Michelle says
As I was reading through and your description of hoping it would have a “shh.. im a sink but I look like furniture” effect seemed like you would putting too much oomph in the effect that teeny backsplash would have. Holy crap! The before/ after is EXACTLY as you described. Nicely done! How in the world did you know that it would have that big an effect?
YoungHouseLove says
Hey Michelle,
I just stared the sink down for a while and tried to picture it without a backsplash (John and I are both really visual people, so we stare at things instead of using reasoning or math or anything more scientific than a good long glare). Then I looked around for some pieces of furniture like desks and dressing tables with granite tops without backsplashes to help visualize it more. Just to make sure it looked ok. I found a bunch on google, liked what I saw, and went for it. It also helps that our last two bathrooms in the old house were backsplashless, so I knew we liked that look.
xo,
s
Jen says
Looks great! You are brave-most people don’t have the nerve…
I vote to remove the medicine cabinet too.
YoungHouseLove says
Oh yeah- that sucker’s a gonner! We’re working on a more functional solution today! Details soon…
xo,
s
Melissa says
so pretty! Wow… I’m in love with your floors! absolutely gorgeous!!
suki says
amazing what a little thing might change in the look. :) the sink doesn’t scream at you anymore. love it! now if only i could figure out what to do with my 1950s bathroom. :p
Kristin says
Hey guys, nice work it definitely makes the whole space look lighter and cleaner! One question though, was the door trim to the left of the sink cut out during the original installation of the granite back splash? It kind of looks like it was, and I was just wondering how you repaired the door trim after removing the granite back splash. I have a similar problem and cannot figure out how to fix it…
YoungHouseLove says
Hey Kristin,
I just filled that with heavy duty Dap spackle and shaped it to look as much like trim as possible. It’s pretty seamless looking now- and will it’ll look even better when we paint (we’ll share more pics when we do). Some people might try to cut a piece of molding to fit, but it was such a small thing that filling it was the easiest solution for me.
xo,
s
Val says
Genius! It is the little things that make all the difference. I never understand why people (HGTV addict here) want double sinks. I only have one bathroom, and I have never felt the need for simultaneous tooth-brushing.
Amanda says
As for your mirror situation, what I would do is buy a mirror on a hinge so you can move the mirror when you want to use it, and tuck it against the wall when you aren’t. And you can use just a regular mirror so you don’t have a “box” on your wall (as you do now with the medicine cabinet!)
YoungHouseLove says
Hey Amanda,
We’re actually working on a solution to the mirror problem today. More details soon!
xo,
s
Nichole@40daysof says
This is something I never would have though to do! I am looking forward to the reveal.
http://40daysof.wordpress.com/2011/01/07/kitchen-faves/
Jennifer says
Thank you so much for this! Our master bath is fairly trashed (the previous occupant very much had a “make do” attitude to things, and was nearly blind to boot) and right now has a weird piece of unfinished wooden molding between the backsplash and the counter, with a crooked cutout to fit around the sink (presumably to cover some sort of gap that developed as it settled — these people were bizarrely anti-caulk), and it just makes me want to cry every time I go in there. I’m now inspired to pull the backsplash and molding off this weekend and see just how bad things look. Best case, it’s actually a minor and caulkable gap, and I can do what you did, worst case…I put it all back and I’ve lost a few hours of time but gained knowledge, right? (And then I start reworking the grocery budget so we can save more quickly for the bigger reno the room needs!)
Lindsay says
I’ve actually been DYING to do this exact thing to our kitchen, which came with decent (not what I would have picked, but looks ok) granite countertops and back splash. I’d love to replace the granite back splash with tile. I’m just far too nervous to pry those suckers off. I’d be seriously worried that they were covering a not smooth/unfinished edge of the counter where it meets the wall (since they’re pretty thick). Do you think that really ever happens or am I just paranoid? Oh well. You’re definitely tempting me! Yours looks great! :)
YoungHouseLove says
Hey Lindsay,
The wild card is how far away the gap between the granite and the wall are, but in our case it was super snug. I think in general the granite guys are experts when it comes to getting a nice straight cut and a tight fit, so maybe try prying something off just a little to have a peek?
xo,
s
Kari says
Haha! This reminds me of the time when I went to dig out a piece of stone in the yard, in preparation for planting. I started around 11 am ;I pulled out a good sized piece of granite fieldstone, I wondered if there was more (our house was built in 1929 and the house two doors down had excavated a whole terrace and a fountain base in their yard), so I started using a long stick to poke down–when I hit anything around 6-12 inches deep, I dug. By the time my husband got home late in the afternoon, I had dug up an area around 10 by 20 or so feet and had dug out several dozen field stones (we think there were a couple of paths). The stones have been used as edging in for all the beds. There is still a largish area which I know has more stone (probably an old terrace given the location) but I promised not to start on it until we were ready to deal with the results (and now I am thinking spring may be the time).
I will never forget the look on my husband’s face when he saw the mess of a yard and the huge pile of field stones.
pam says
I really like how that is looking. Big difference! Okay for those of you who have a toilet in a room seperate from the sink – how do you get past the idea that you’re constantly opening a door with “dirty hands”? Yes, nurses think like that.
Christine says
I love your floors! The wide planks are fantastic!
Alexa says
Wow – looks great. Can’t wait to see what further improvements you make. You’ll inspire me to rip out the 5 inches of ugly tile *above* our bathroom backsplash – yuck!
I will recommend though that you hold onto the backsplash pieces just incase a future owner want so put it back. When we bought our house most of the bedroom closet doors were missing, along with a number of kitchen cabinet doors. Luckily for us all were stored in the garage loft and we were able to put back any we wanted. We were really happy to find them.
Mary says
Looks MUCH subtler. Also, I must tell you, I am in serious envy of your hardwood in your bedroom. I have nice hardwood throughout our upstairs, but not the wide plank like that. Be still my heart…
Shannon says
See, this is why I read your blog! I would have never thought to remove the backsplash, or that I would even like it but I LOVE IT! It does look more like a piece of furniture instead of a bathroom sink. Go you!
Tricia Jones says
wow, i can’t believe how such a small change completely makes the space look so different. great job sherry!!
Sarah @ The Strength of Faith says
Wow, that’s amazing. In the before picture my eyes go directly to the back splash, but in the after picture I have a much more open view of things. Nicely done Sherry!
Khirsten Thomas says
I am amazed at the difference. I wouldn’t have ever thought…
Marije says
You two have such a good eye for seeing how things would look better! I’m amazed…! I just read your blog and do the things you do, haha, I’d never be able to think of ideas like that.
Jackie says
Beautiful! I would have never thought of that! Thanks for the tip.
karen @ our slo house says
It cracks me up how you guys pop around the house from project to project, in no particular order. I never know what you’re going to do next (and I love it!)
btw, the {lack of} backsplash looks great.
Gina@ Temporary Neat says
I have to admit that I doubted that this would make a difference when I first started reading this post … but I am pleasantly surprised at the HUGE difference it makes! I should never second guess the Youngsters!! Great job Sherry!
Jamie says
great, now thanks to the title of this post, I have a craving for a certain cucumber-hummus sandwich that I would have to fly clear across the country to get my hands on. John knows what I’m talkin’ about.
YoungHouseLove says
Haha, you’re the second person to crave Take It Away in C-ville.
-John
Jason says
I would suggest using the backsplash pieces as windowsill/windowsill extensions. My uncle use to do that with Marble he got.
Kari says
Good for you! I have always lived by the “Better to ask for forgiveness (if you happen to mess up) than to ask for permission” and I have been known to do things while my husband was at work! Luckily for me, I haven’t run into any trouble…yet!
Jen says
Sherry,
I love how you managed to pull up the old back splash and “furiously” scrape the silicone caulk off without John finding you, all while taking pics for the blog! Way to go multitasking! It really does look totaly different, love it.
YoungHouseLove says
Haha, once that adrenaline gets pumping there’s no turning back!
xo,
s
kim says
getting rid of that black line around the room was definately the right move. the room doesn’t look cut in half anymore thus making it appear larger and taller. Also is it just the lighting or did you guy clean the floors with something, they look alot lighter. Also if you did clean the wood floors what do you use?
YoungHouseLove says
No floor cleaning has occurred, so I blame our photography skills (and probably a different time of day/amount of natural light difference too).
xo,
s
Elaine says
Hello Sherry! I am a new reader to your blog and LOVE IT! You and John both have such a great ‘voice’ (always find myself laughing out loud when reading your articles) and of course, fantabulous ideas and vision. I’m a graphic designer so get the whole ‘visualizing’ thing. Loves it. As a home decor enthusiast and visual person myself (as well as a ‘new’ mom to my 21 month old adorable son and (canine boxer cross) daughter Belle I love ALL aspects of your posts. Just wanted to say ‘hi’ (from Canada) to you both and dollop a big frothy, whipped helping of praise onto the top of your morning java (or tea)! Keep up the great work :) – Elaine
YoungHouseLove says
Aw thanks Elaine! You’re making me blush. So glad you found our blog!
xo,
s
Diana says
Looks good! I would have thought you guys would get all DIY on us and turn those back splashes into shelves or something. Hopefully someone will get a use out of them.