It may seem intimidating to install a stair runner yourself, but it’s so darn easy that we’ve done it twice! Thrice if you count demonstrating it on live TV (more on that later). Just follow the steps in our tutorial below, including our trick for making sure your rug is the perfect size for the project.
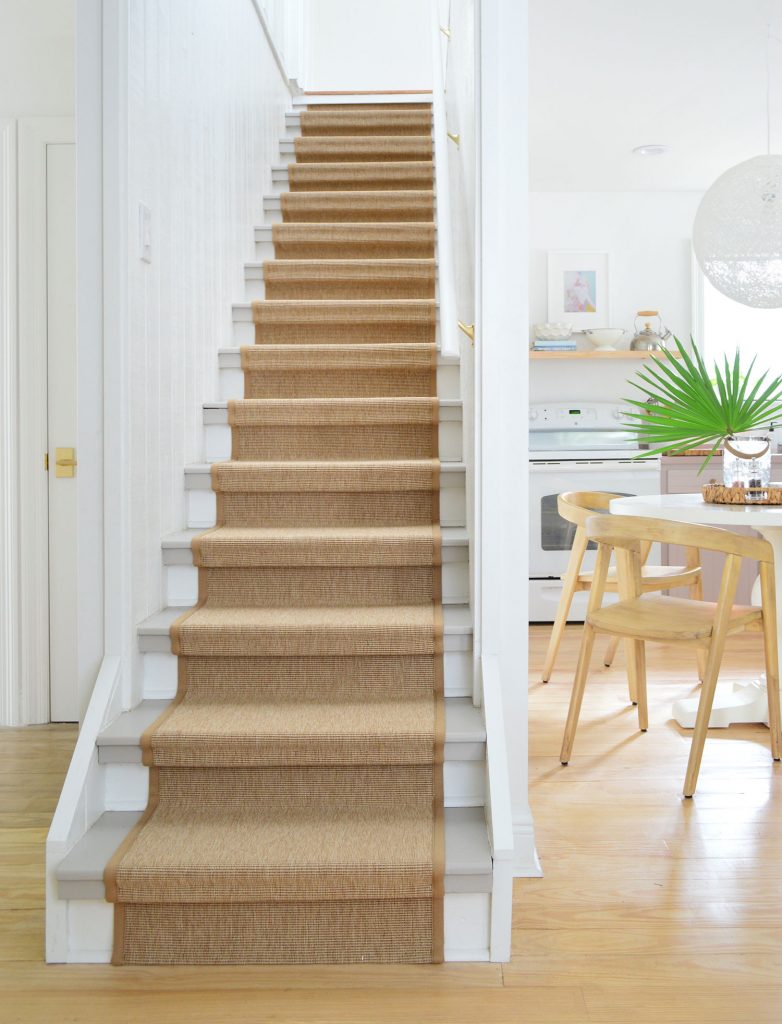
Adding a rug or runner to your stairs isn’t just a stylish decor choice that can add color, personality, or pattern. It’s also a safety feature! We find that adding a stair runner cuts down on slips, falls, and even makes it easier for our dog to traverse them. They also absorb sound, meaning your less likely to hear your kid clomping up and down the steps. So we highly recommend adding one if you’ve got young children, pets, or even just clumsy adults around.
DIY Stair Runner Before & Afters
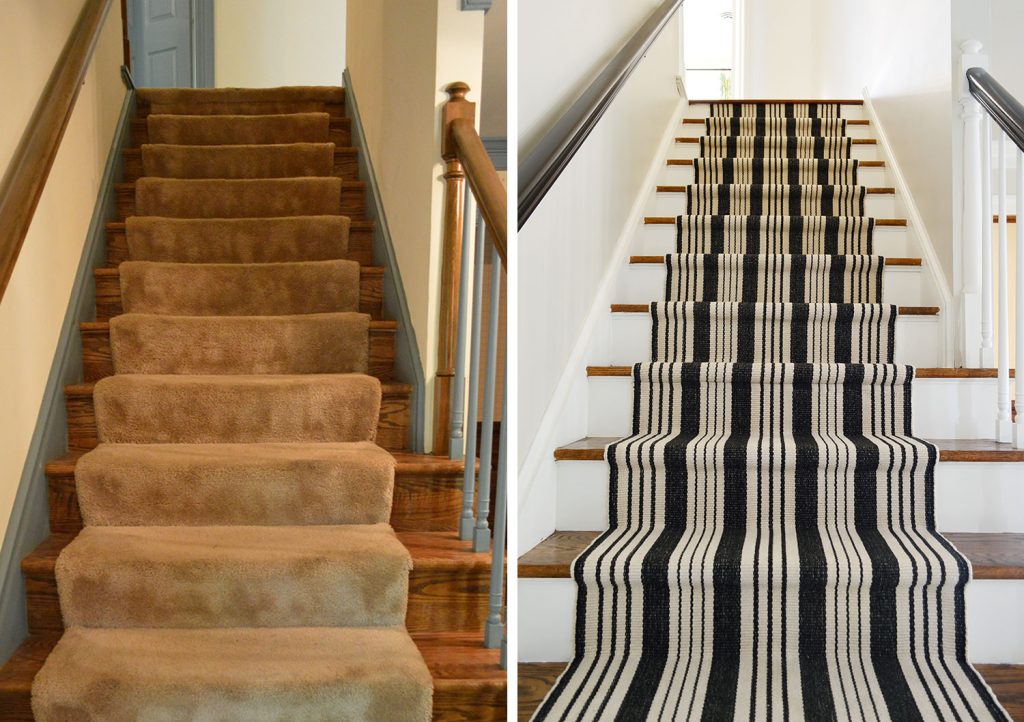
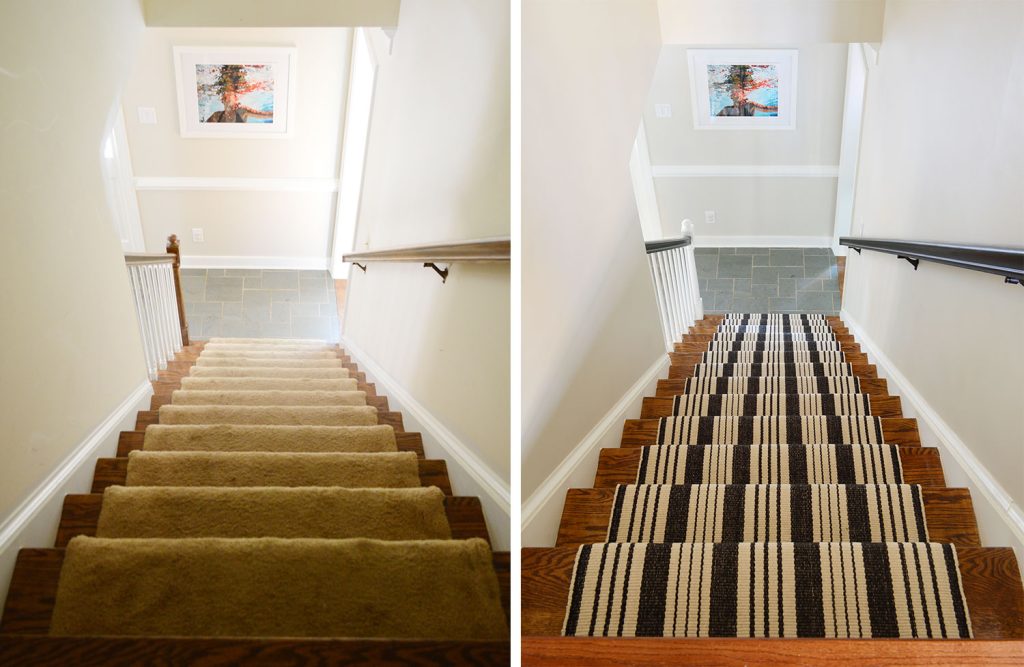
The first time we installed a stair runner, it was to replace a dingy carpet runner that came with the house. You can see in the photos below that we not only livened up the stairs with a bold striped rug, we also modernized the steps by painting the risers, trim, & balusters white and staining the wood handrails dark.
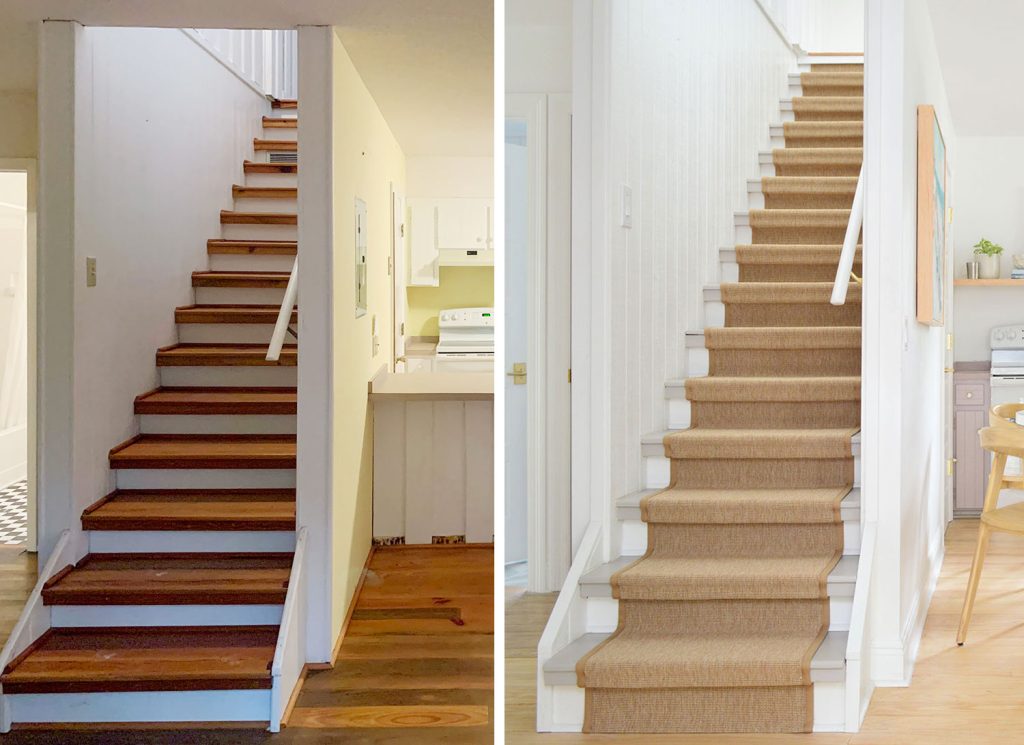
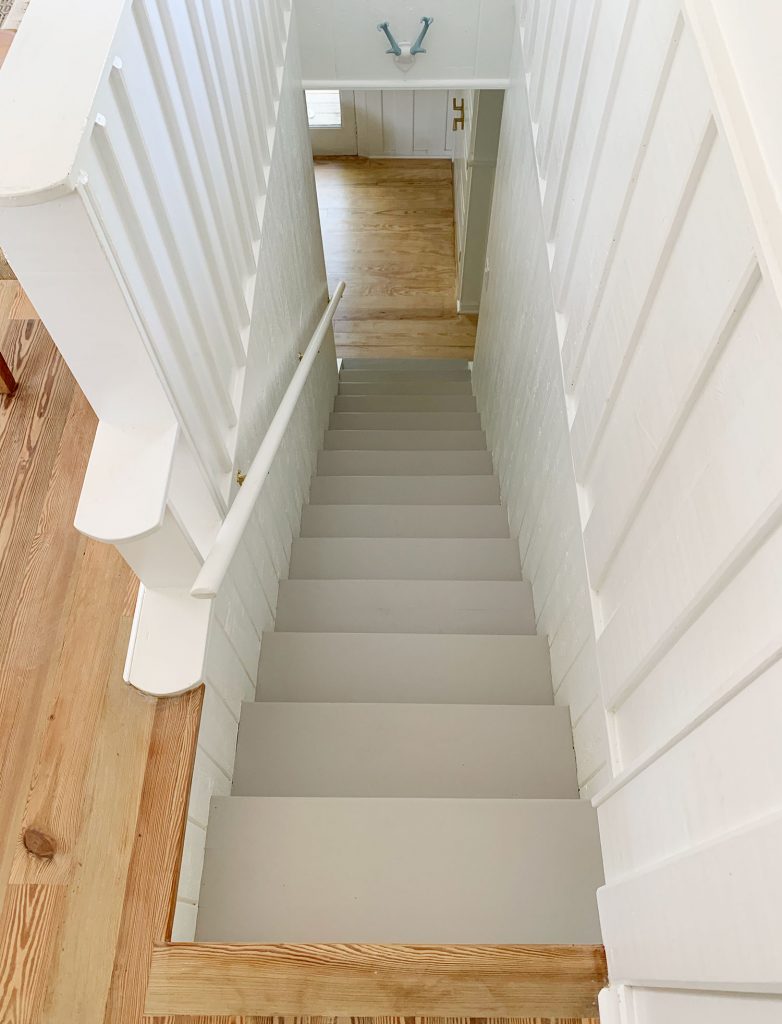
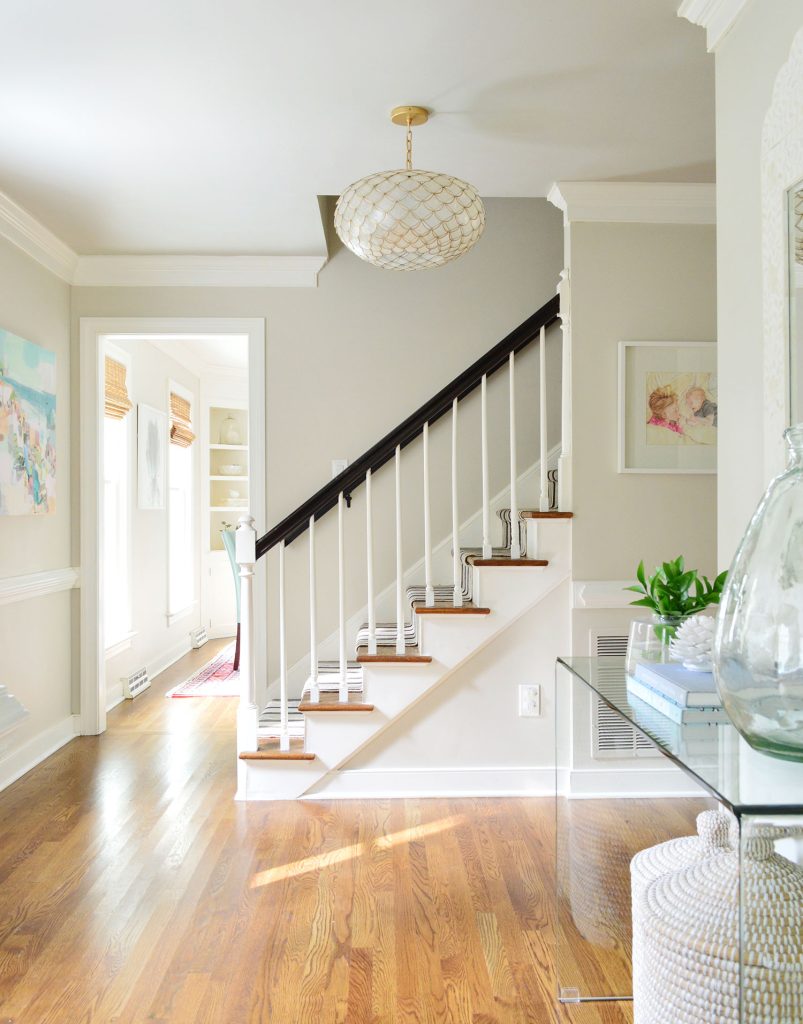
For our second install, here in our current home, we used a beachy sisal runner instead. We also painted the treads a wary gray to brighten them up.
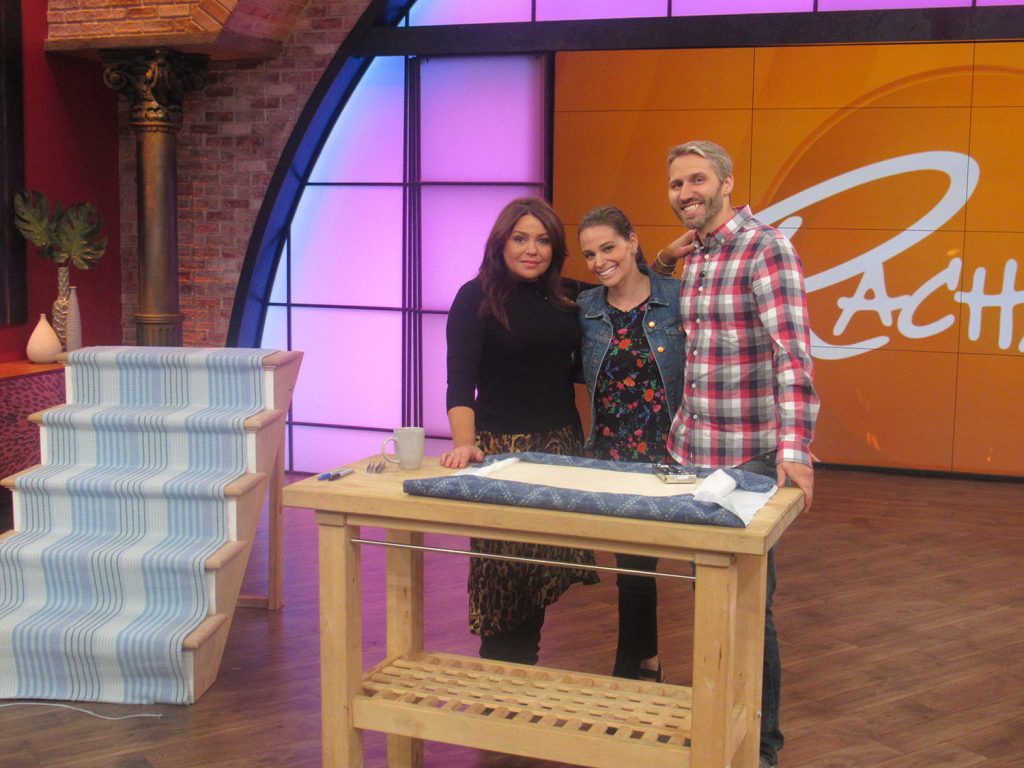
The “third” stair runner we added was for a DIY segment we taped for The Rachael Ray Show. We only shot about 3 staples on camera, but we prepped the small fake staircase backstage. It’s too bad we didn’t get to do a whole staircase. That runner is cute!
Overall, you have lots of ways you can customize this project to suit your style and your stairs. So let’s dive into the tutorial!
Tools, Materials, & Cost
Here are the supplies and tools you should have handy to install your own stair runner:
- Stair runner
- Rug pad
- Tape Measure
- String
- Painter’s Tape
- Electric staple gun & staples
- Sharpie
- Scissors
- Needlenose pliers
This doesn’t have to be an expensive project either. Our first runner installation cost less than $300! It mostly depends on the runner you choose and how much you need.
Steps To Install A Stair Runner
Our project in total took us about 20 hours, but that also included removing the old runner and painting the risers and railings. The actual stair runner install only took about 4 hours, although may depend on the length of your stairs. We’ll go into each step in more detail, but here’s an overview of the process:
- Remove your old runner (if needed)
- Measure
- Select a runner
- Paint or stain your stairs (optional)
- Mark your placement
- Cut the rug pad
- Prepare your staples
- Start at the top
- Connect two runners (if needed)
- Finish the bottom edge
Step 1: Remove your old runner
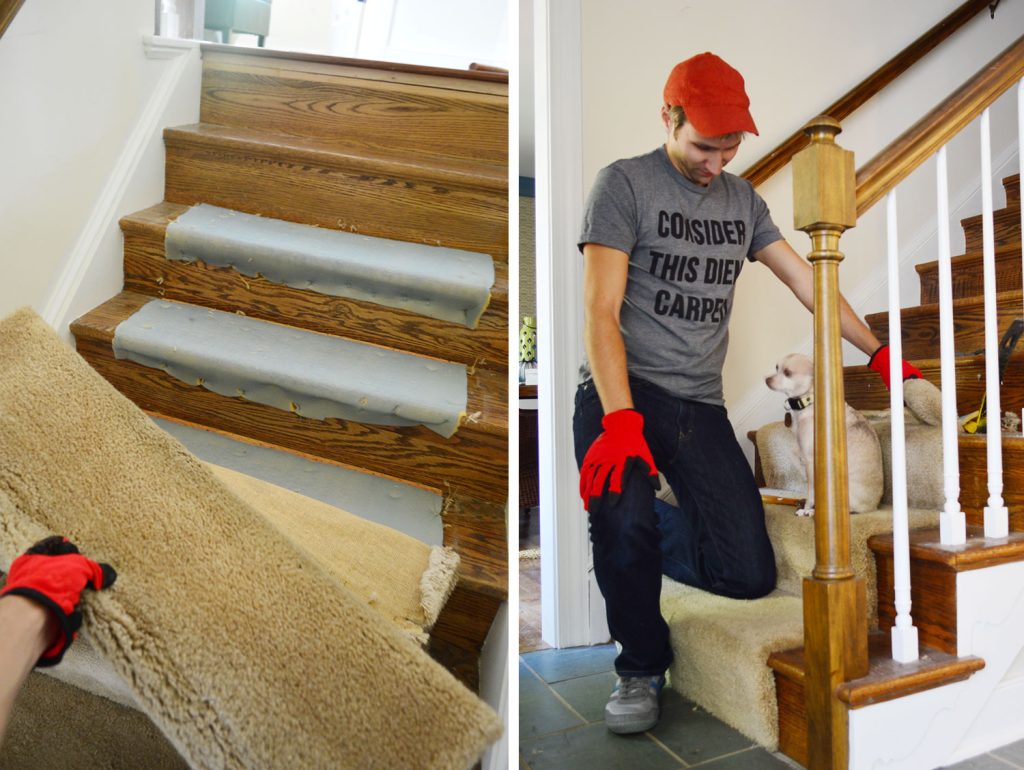
This step only applies if you have an existing rug, runner, or carpet on your stairs that needs to go. This process may take time – especially getting all of the old stapes up! We counted nearly 600 staples in our old carpet. We have a separate stair runner removal tutorial for this, including what tools you’ll want to help get that old carpeting off.
Step 2: Measure
Before buying your runner, you’ll need to measure how much you’ll need. As with any rug, the important measurements are length and width. Knowing this will also help you determine if you can purchase a stock size or need to order something custom.
Measuring runner length
We suggest using a string or flexible measuring tape to determine the length of one step. This means riser + tread, including around the front bullnose edge. Multiply this measurement by the number of steps you have, and then add 10-15% extra. Having too much material is easier to deal with than not having enough!
Measuring runner width
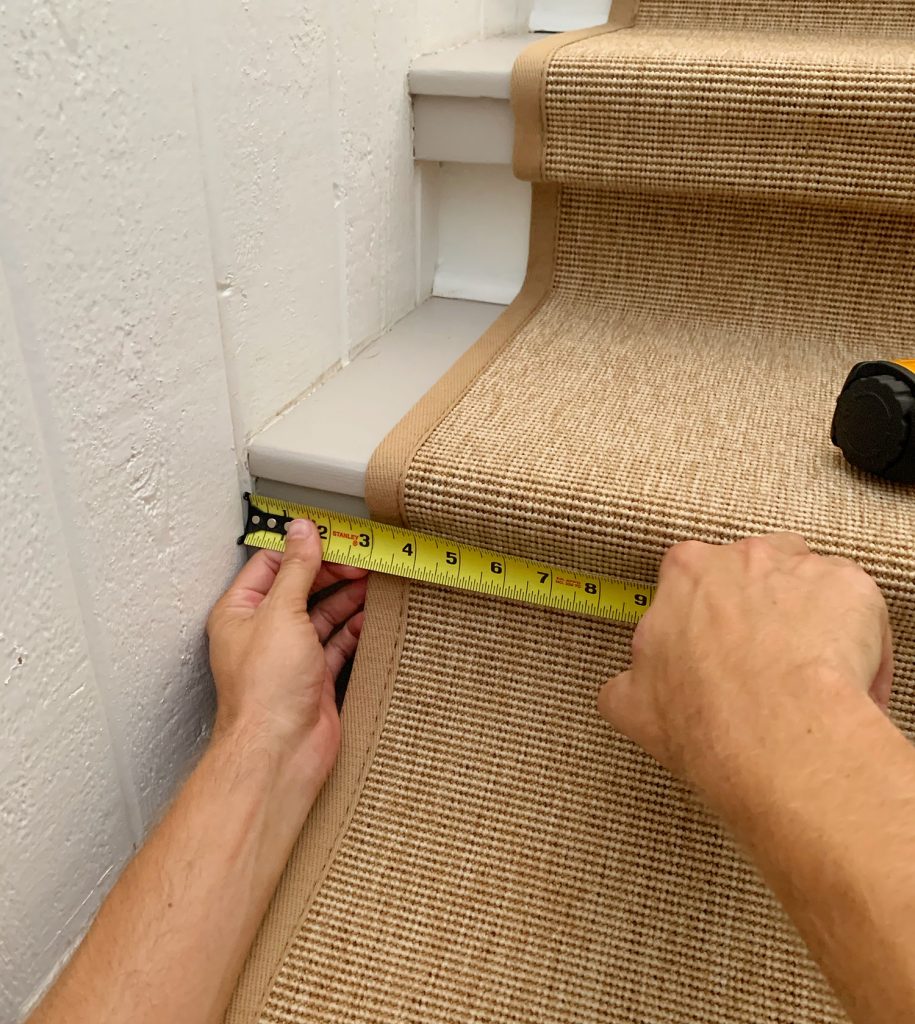
Most stair runners don’t go wall-to-wall. Instead, they leave about 2-3″ exposed on either side (see above). This number is personal preference, and it may be dictated by stock sizes. Measure the width of your narrowest stair, and subtract 4-6″ to get your runner width. Just be mindful that many staircases “flare” at the bottom, so make sure whatever width you choose will fit and look good from top to bottom.
Step 3: Select a runner
Virtually any carpet or rug can be turned into DIY stair runner. However, we suggest choosing something that will be durable and easy to clean, especially if your stairway gets lots of foot traffic. Indoor/outdoor rugs and natural fiber rugs like wool or cotton are great for these reasons. We also suggest something low pile, since they are easier to keep clean. We have used both stock and custom runners for our stairs.
Using a stock runner
For our striped runner, we used a rug from Annie Selke (formerly Dash & Albert) because they are known for their durability. They also have tons of patterns and colors, and most styles come in a variety of sizes. We used two 2.5′ x 8′ Birmingham runners, but they now also sell a 20-foot version and as a customizable size. After 7 years of use, we can vouch that it held up great (apart from some fading from sun) and felt quite soft underfoot!
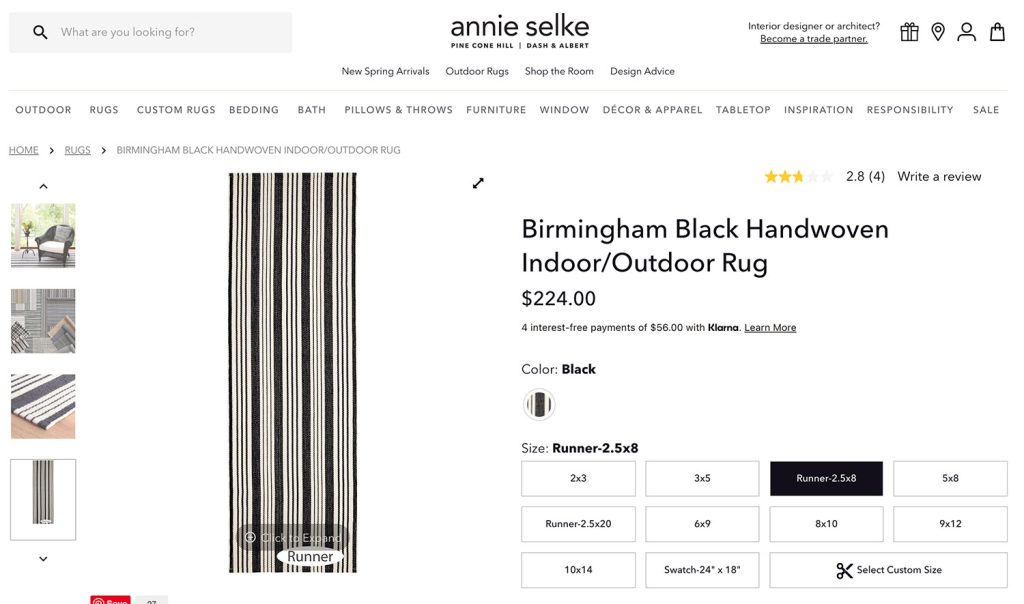
Stock runners are typically cheaper, but they may require more ingenuity to fit precisely to your space. Don’t worry – we’ll show you how!
Using a custom runner
For our sisal runner, we ordered a custom outdoor rug from Sisal Rugs. This gave us great control over the exact look – we picked the color, border material, border color, size, etc – and only cost us slightly about $100 more than 2 Annie Selke rugs would’ve at the time.

We have been equally happy with both types of rugs we’ve used – stock vs custom, cotton vs sisal, bold vs neutral – so you should feel good about choosing whatever is best for you.
Step 4: Paint or Stain Your Stairs
If your stair makeover plans include any painting, staining, or other potentially messy updates: do them now! You don’t want to have to worry about dripping a new rug later!
Before we added our striped runner, we stained the handrail a darker color and painted the balusters, trim, and risers white. These were somewhat time-consuming tasks, so they are great to tackle while you’re waiting for your rug order to arrive.
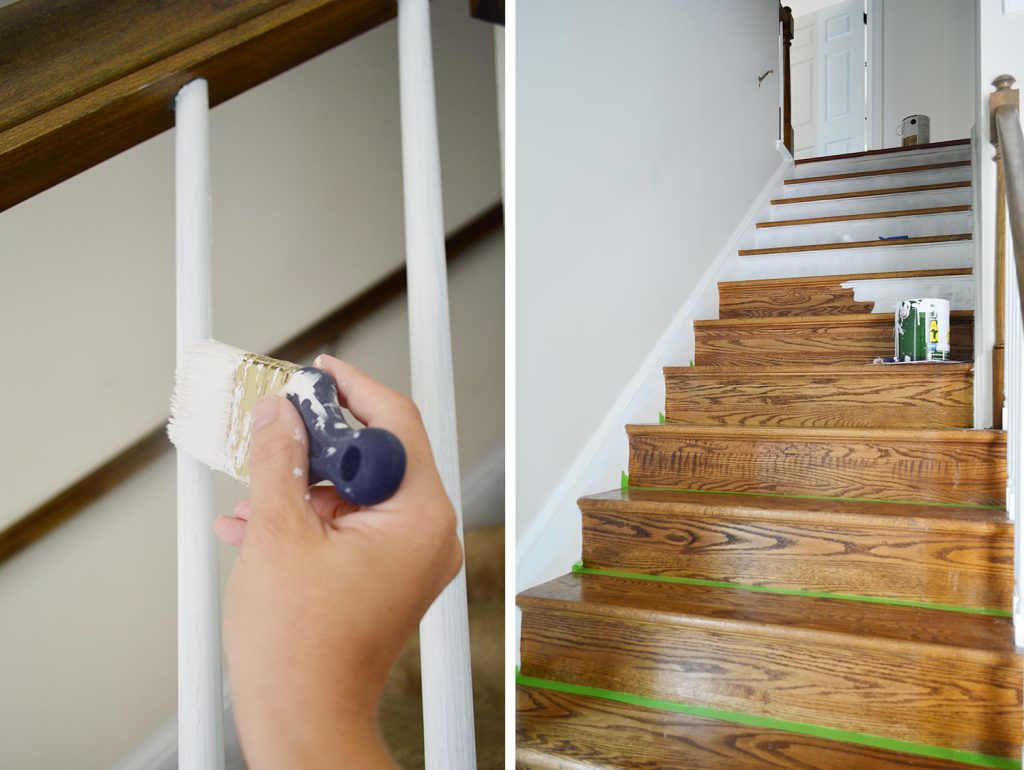
Before adding our sisal runner, we decided to paint the stair treads a warm gray to cover up some discoloration in the stain. We used this Porch & Floor Enamel in Requisite Gray by Sherwin-Williams. It didn’t require a primer and has held up great!
This also is a great time to do any other repairs to the stairs – like if you have a loose or squeaky tread, or need to fix any nearby molding.
Step 5: Mark Your Placement
Once you’re ready to install your runner, start by marking its placement on every step. This will help make sure it stays straight and doesn’t drift to the side as you install it. We used a measuring tape and painter’s tape to mark the edges along each tread, which you can see below.
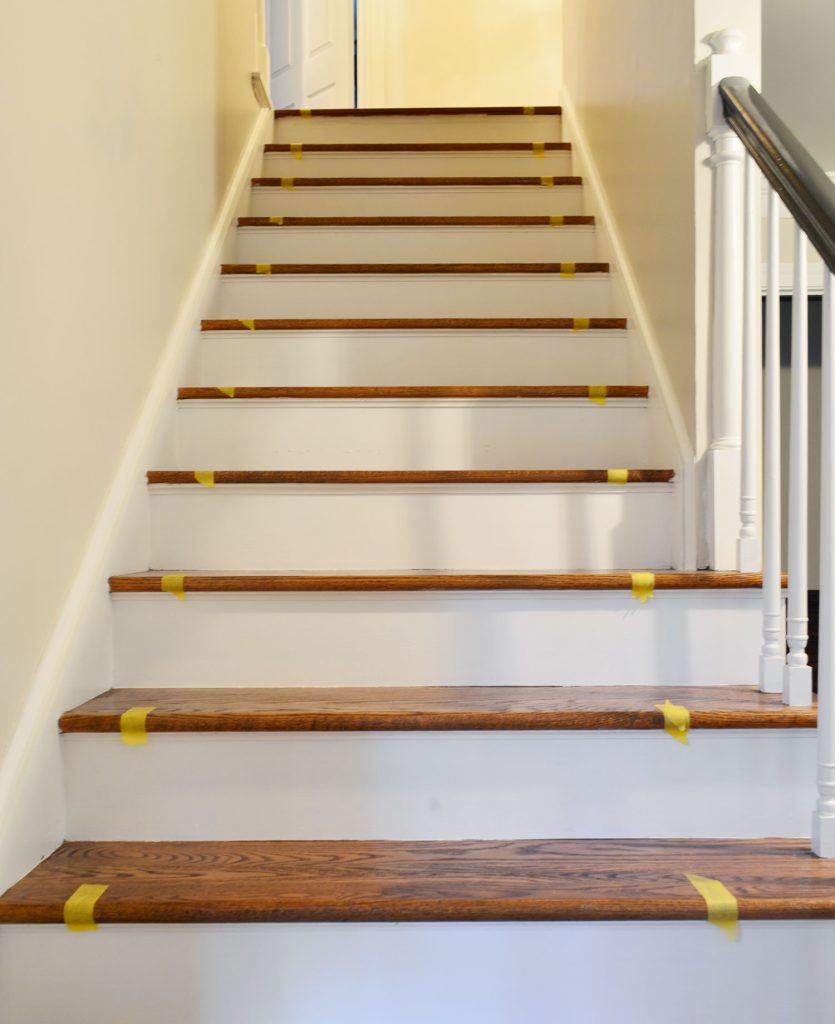
Alternatively, you can check your placement with a ruler or measuring tape as you go. We just found it faster to tape down guides at the start of the project.
Step 6: Cut The Rug Pad
You’ll want a rug pad under your runner to (1) provide more cushion and (2) keep the runner in place. If you don’t want extra cushion, you can use carpet tape instead. We have used both a felt rug pad and a rubber rug pad with equal success. Just make sure whichever you choose has a non-slip design. Both are sold in multiple sizes, including runner lengths, and don’t need to be very thick (we use 1/8″ depth).
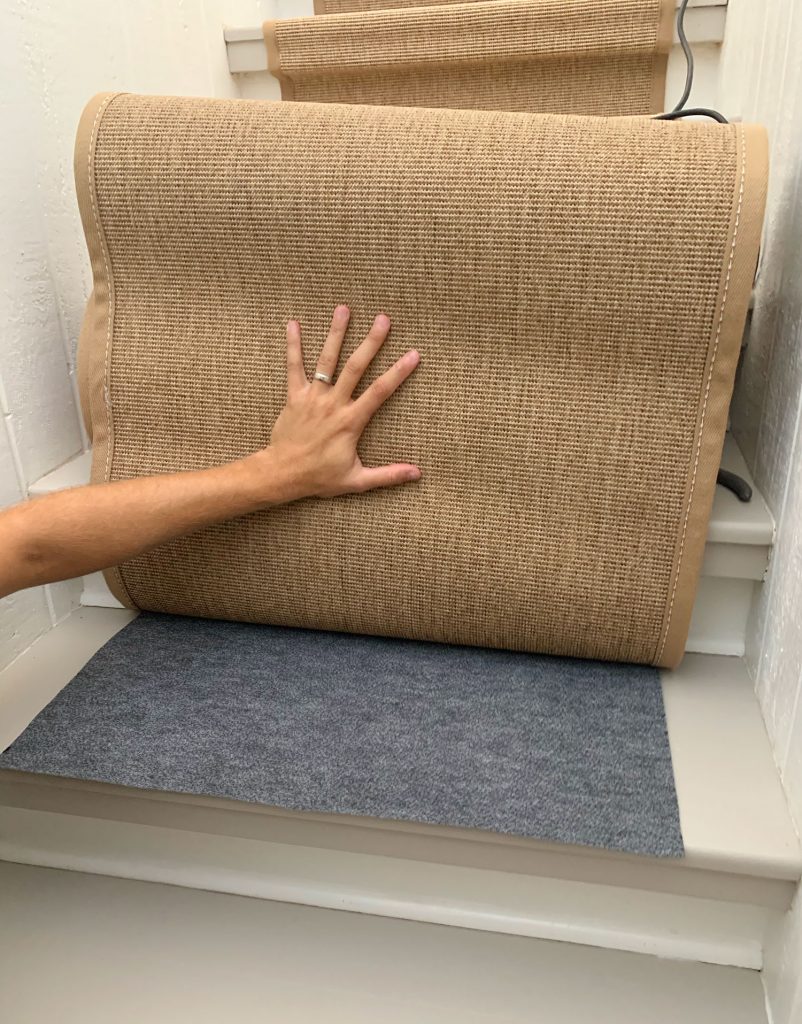
We prefer to use the rug pad ONLY on the tread surface (not the vertical riser). This saves money and also prevents unnecessary bulk against the riser. But it does require some time upfront to cut the rug pad into strips. Luckily they usually cut easily with household scissors. We leave it long enough to wrap around the front nose of the stair.
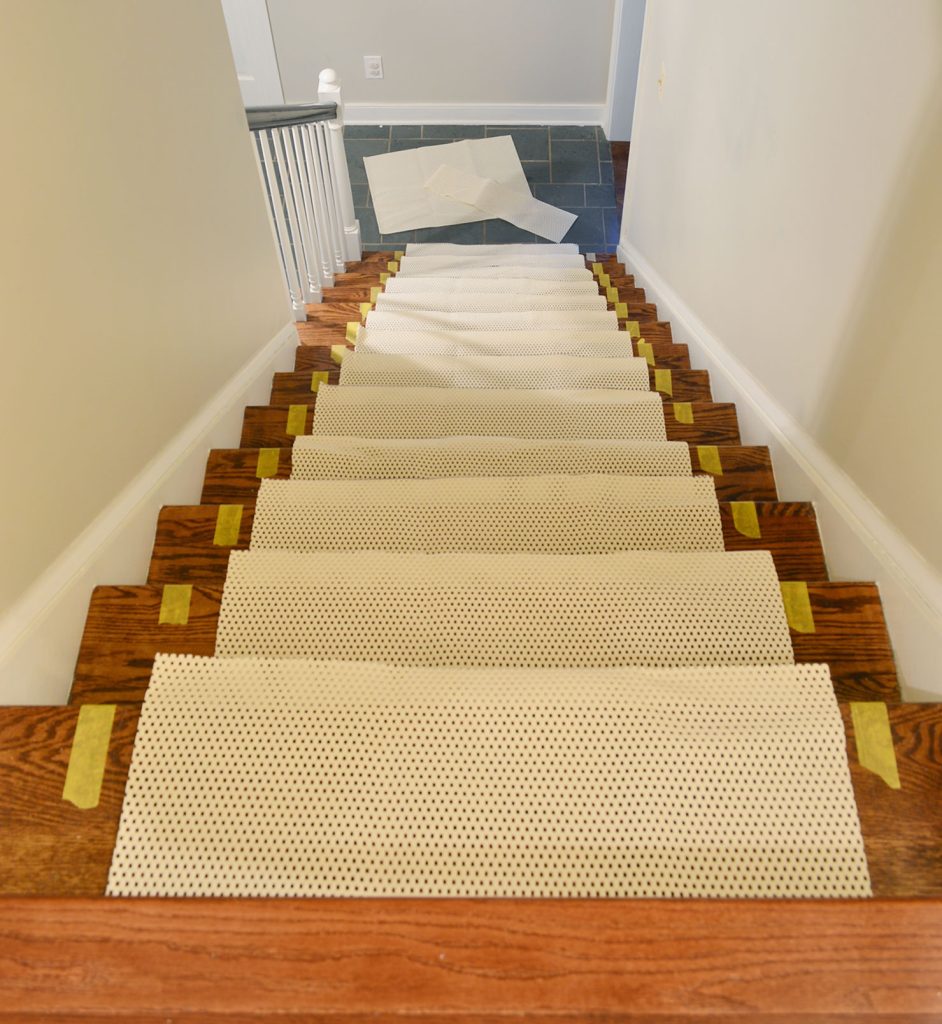
We leave enough overhang so the rug pad can wrap around the bullnose of each step, as you can tell above.
Step 7: Prepare Your Staples
Here comes the weird step, but we promise it’s worth it! After some trial and error, we found an electric staple gun designed for upholstery projects to be the most effective way to secure a stair runner. A hand-powered staple gun was too light-duty. We needed something with more oomph!
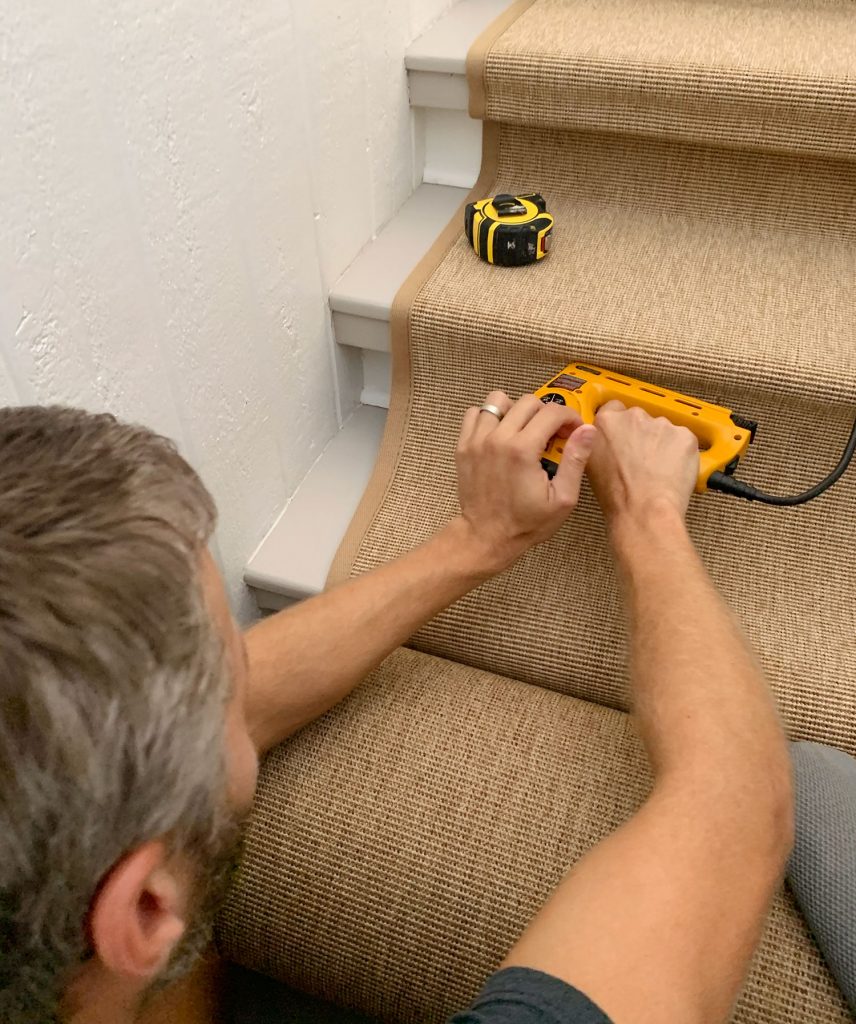
The drawback to this approach is that your staples may be visible UNLESS you take the time to color them first. I know it sounds weird, but trust us. It works!
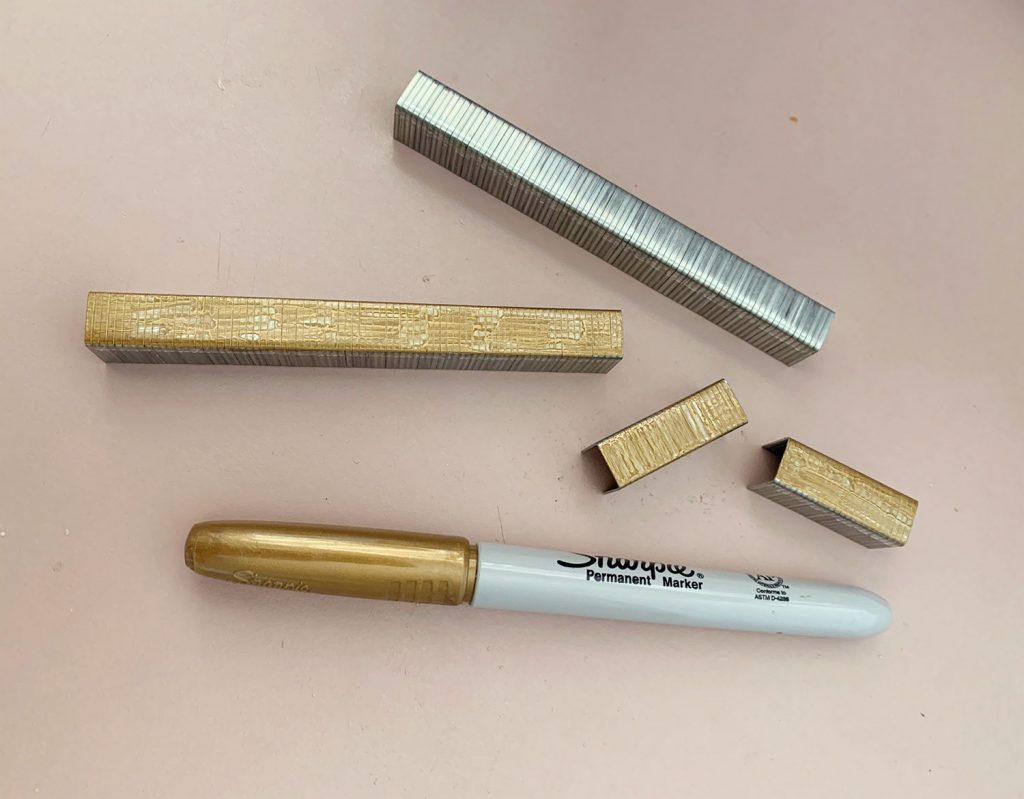
For our sisal runner, we used a gold Sharpie to roughly color a strip of staples before loading them into the stapler. For our black and white runner, we did the same thing with a black Sharpie.
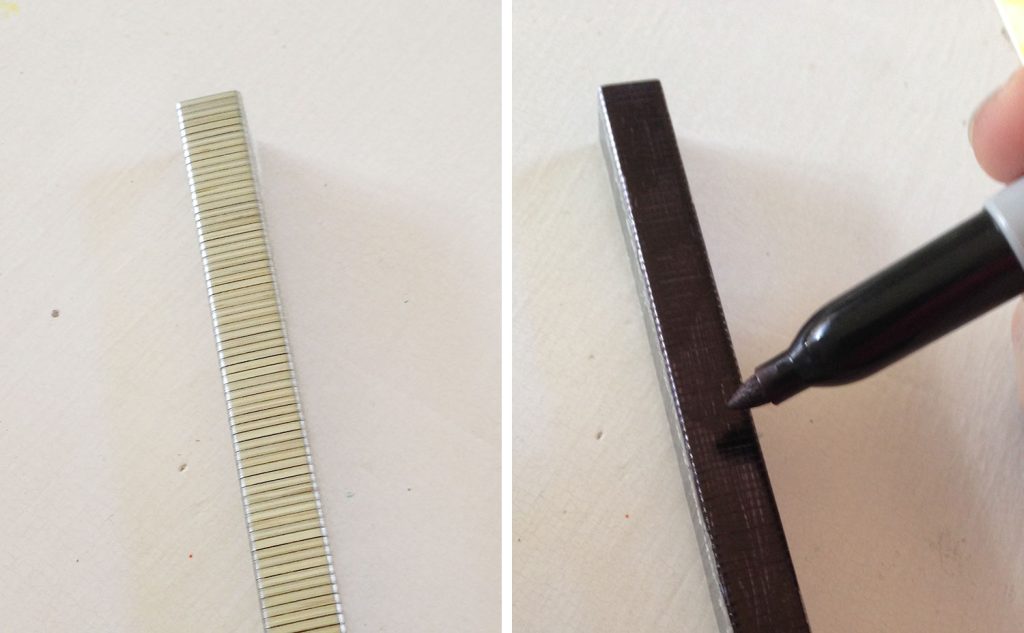
Matching the exact color of your rug is not important because the main benefit of this approach is that it removes the SHINE of the staples. The staples were mostly visible when they catch the light, so the Sharpie ink dulls them enough that they camouflage into the pattern of the rug.
Coloring one big strip of staples before you put them in the stapler is much faster than doing it individually after they’re stuck into your rug. But you can test it on a few stapled staples first if you want to determine what color offers the best disguise.
Step 8: Start At The Top
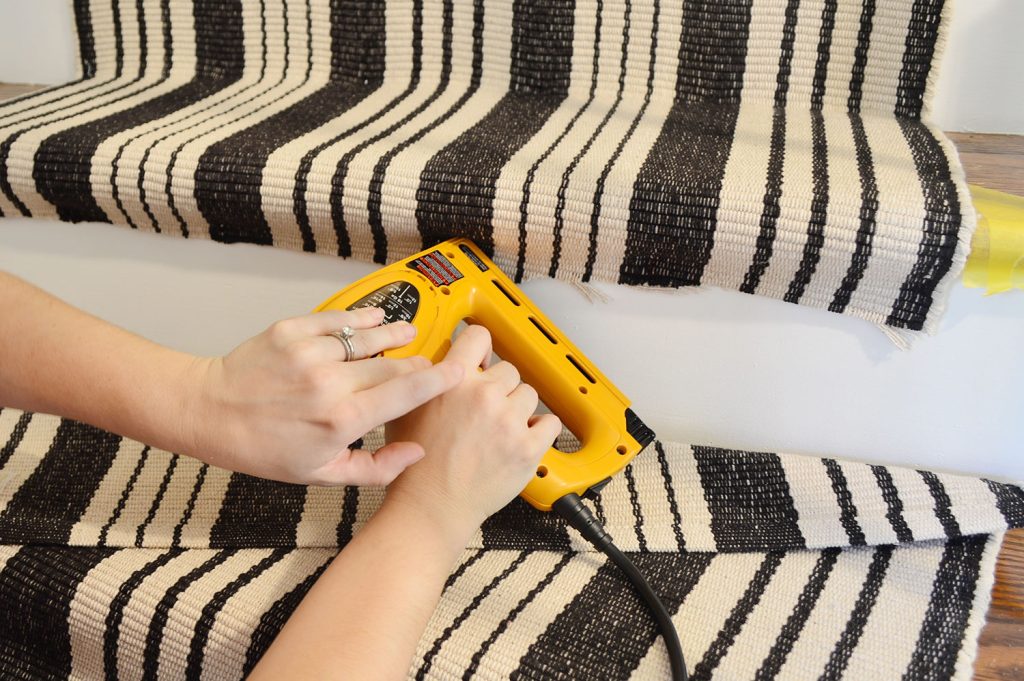
Begin stapling your runner under the lip at the top of your staircase. Take your time to position your runner precisely – keeping the top edge flush, and your edges aligned with your tape markings. Use the electric staple gun to secure it at each edge and about 4-5 places in the middle. Your rug’s pattern may determine where best to place your staples so they are as hidden as possible. You can also go back and add more staples later if it is sagging anywhere. The important part now is to just get it attached.
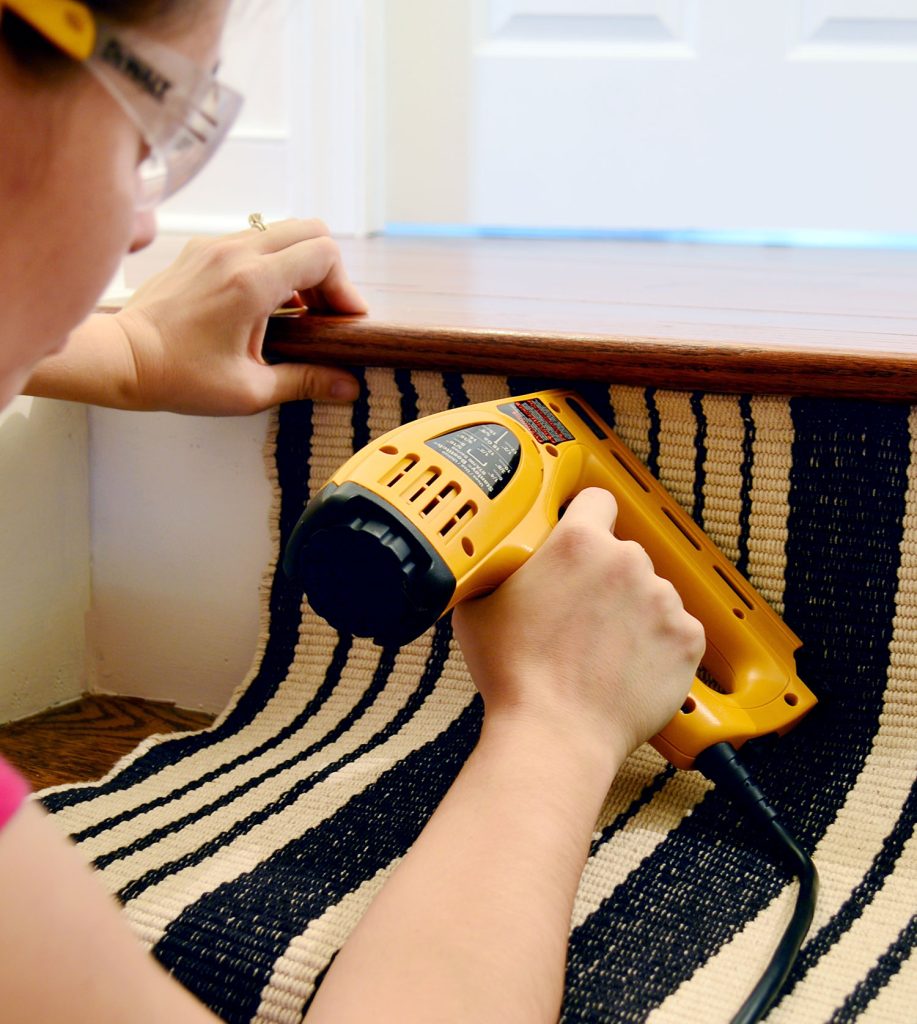
With the runner stapled along the top, pull it tight against the riser and staple along the bottom into the RISER, not the TREAD. At no point during this process will you need to nail into the treads. This way you don’t have to worry about bare feet ever feeling cold metal.
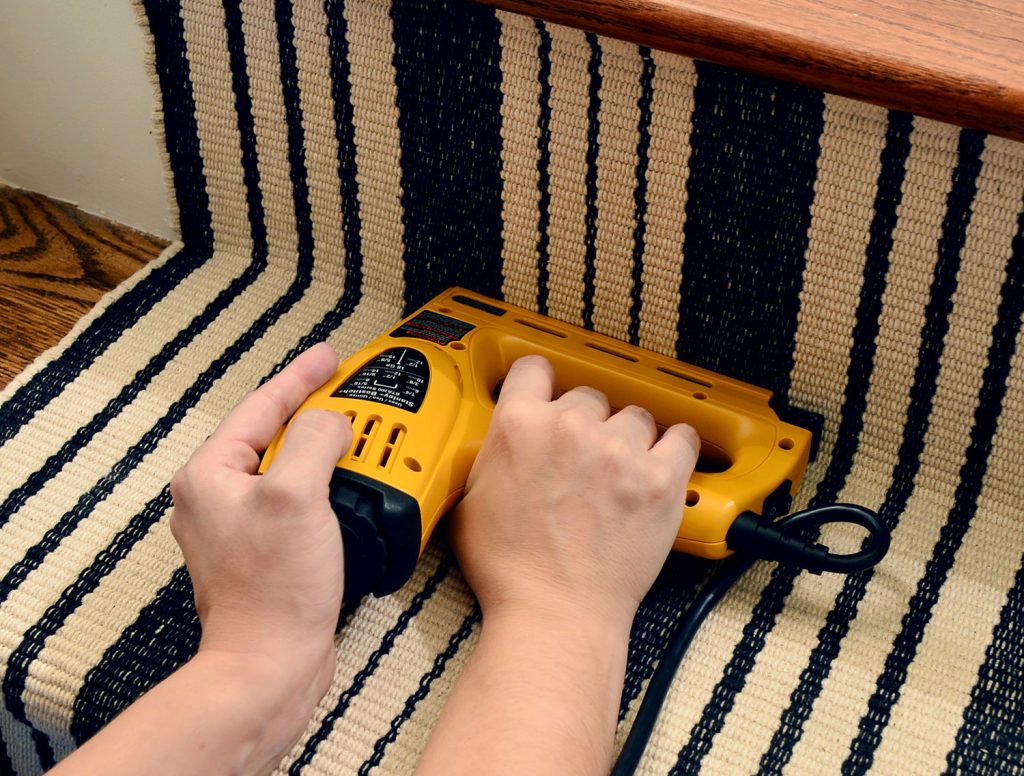
Next, pull the runner tight along the tread and repeat this process, starting with another row of staples under the lip of the next tread.
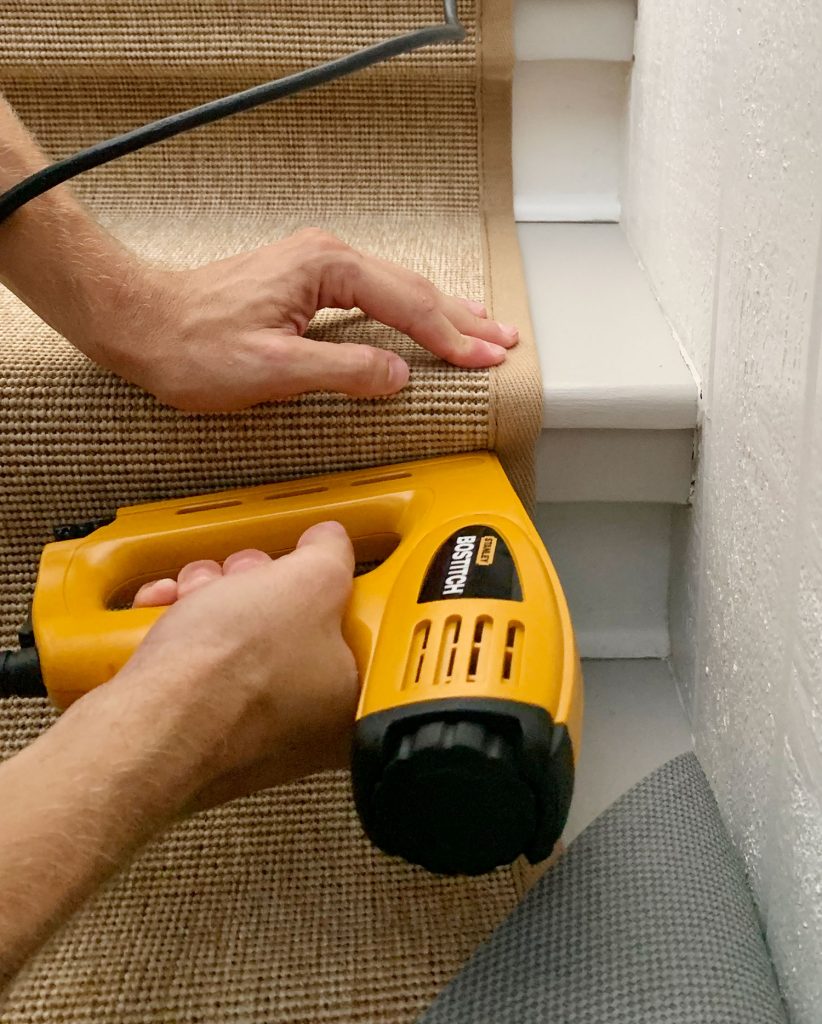
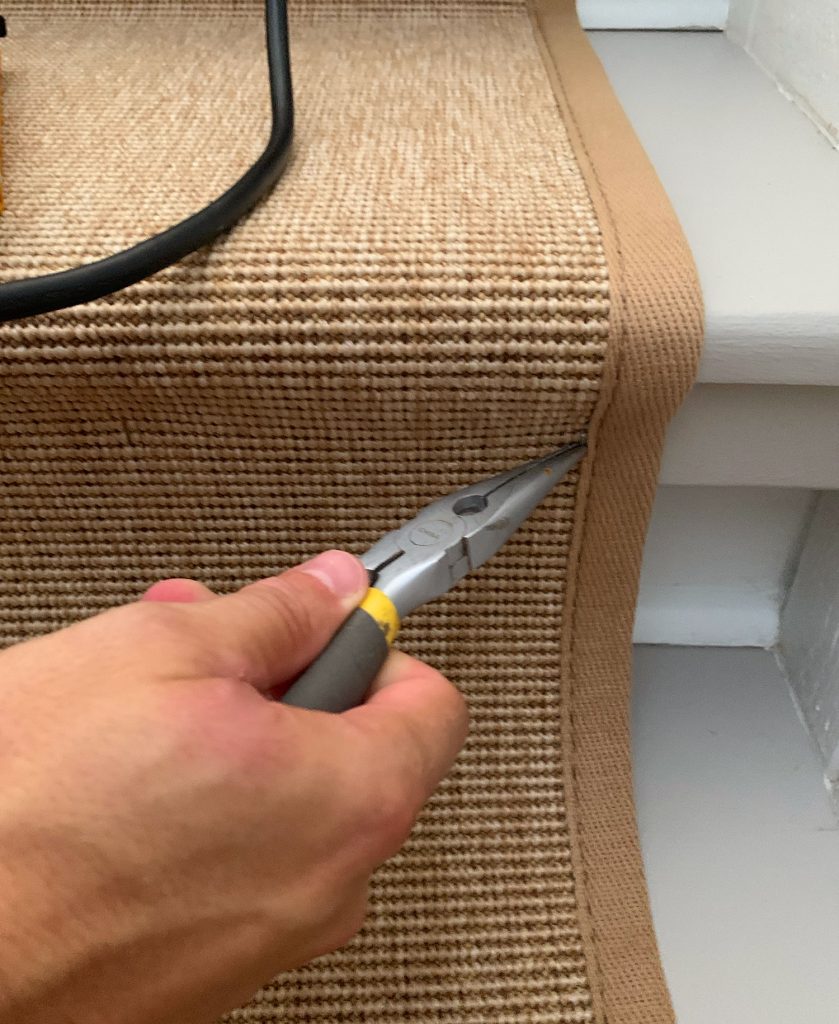
Use your judgment as to where & how many staples are needed to hold your runner tight to the stairs. With our sisal runner (above) we had two “lips” under each tread, so we had to do two rows of staples along the top of each step. Also, don’t fret if you need to remove a misfired staple now and again. Just keep some needlenose pliers handy.
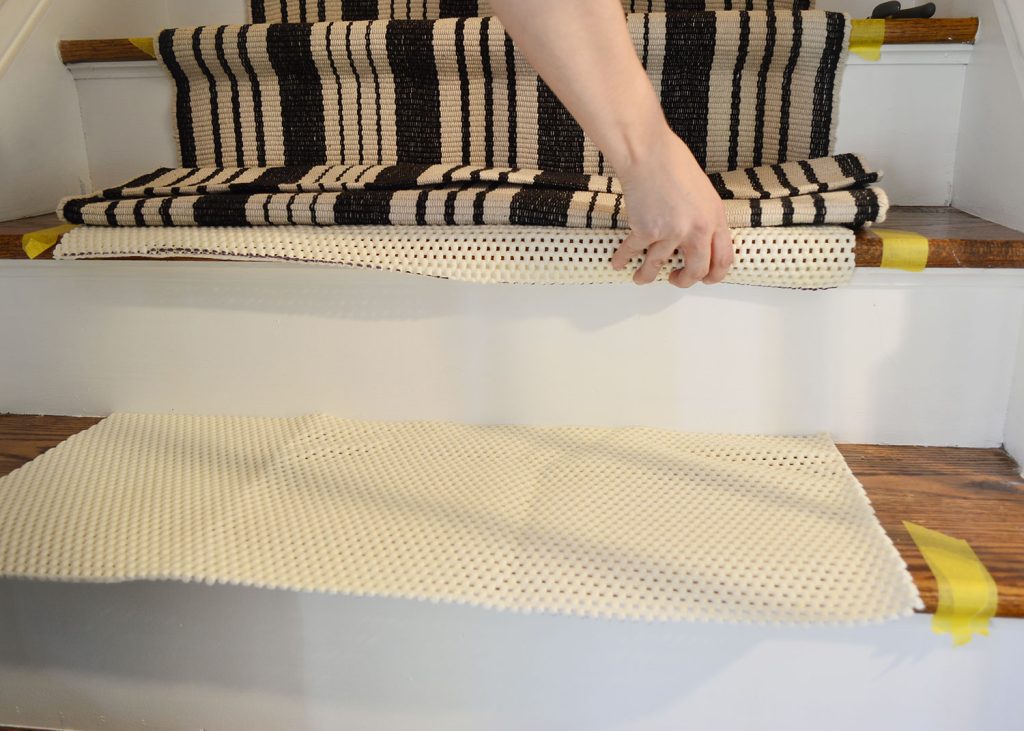
Continue this process, working down your stairs towards the bottom. Just remember to keep pulling your runner tight and make sure it’s not drifting to one side as you go. Oh, and don’t forget to put down your rug pad strips as you go.
Also, we find the electric staple gun works best when you apply pressure to the back of it as you fire. This helps the staples sink deeper into the swood.
Step 9: Connect Two Runners
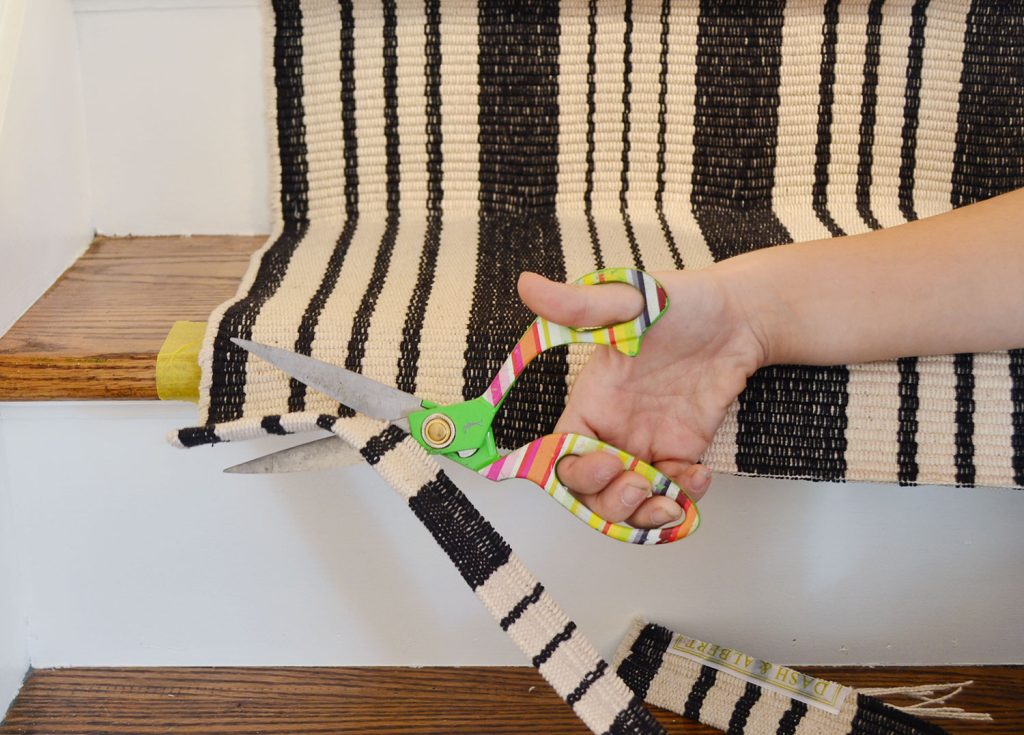
If one runner won’t reach the bottom of your stairs, it’s easy to seamlessly connect two separate runners. The best way to do this is to hide the transition under the lip of a tread. Use scissors to cut off any extra material from your first runner so that it terminates under the lip.
Staple that cut end right under the bullnose edge of the tread, just as you have been doing.
Then attach the second runner under the lip, just like you did with the first runner at the top of your stairs. From there, you can continue down your stairs with the second runner. Here is a finished picture of our stairs. Can you find the spot where one runner ends and the other begins?
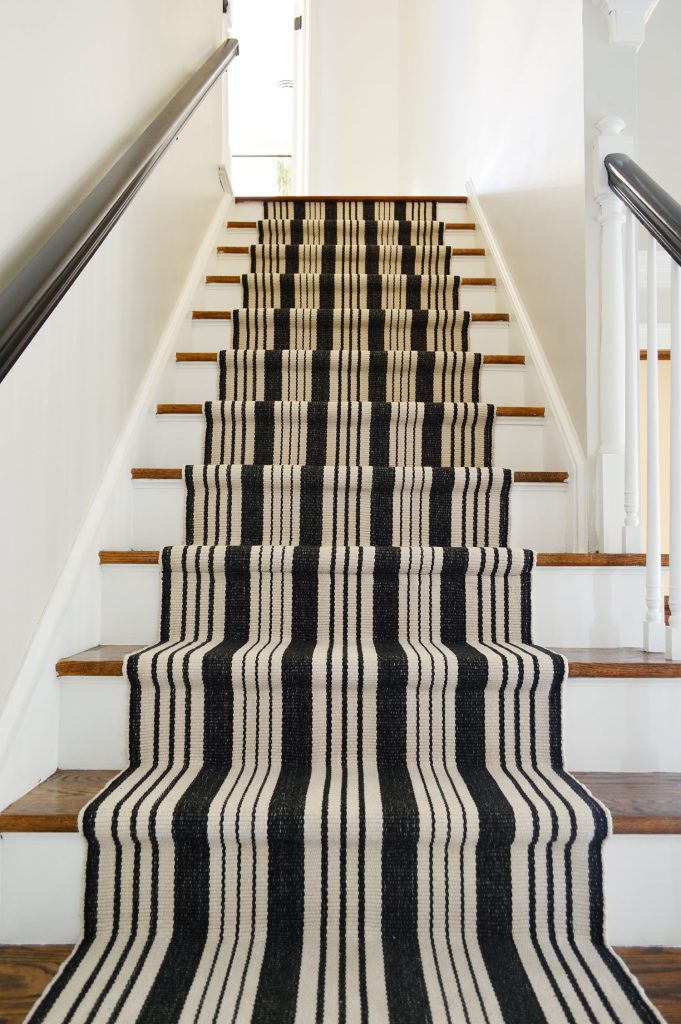
You can kinda see it there about 3 steps up. The transition is not 100% undetectable, but it’s so subtle you only really notice it if you’re looking for it.
Step 9: Finish The Bottom Edge
Once you get to the bottom, use scissors to cut off any excess material – leaving about an extra inch of material. Fold this extra bit back under the runner and staple it into the bottom of the rise. This fold gives a cleaner, even edge on the bottom (since some runners will fray slightly when cut).
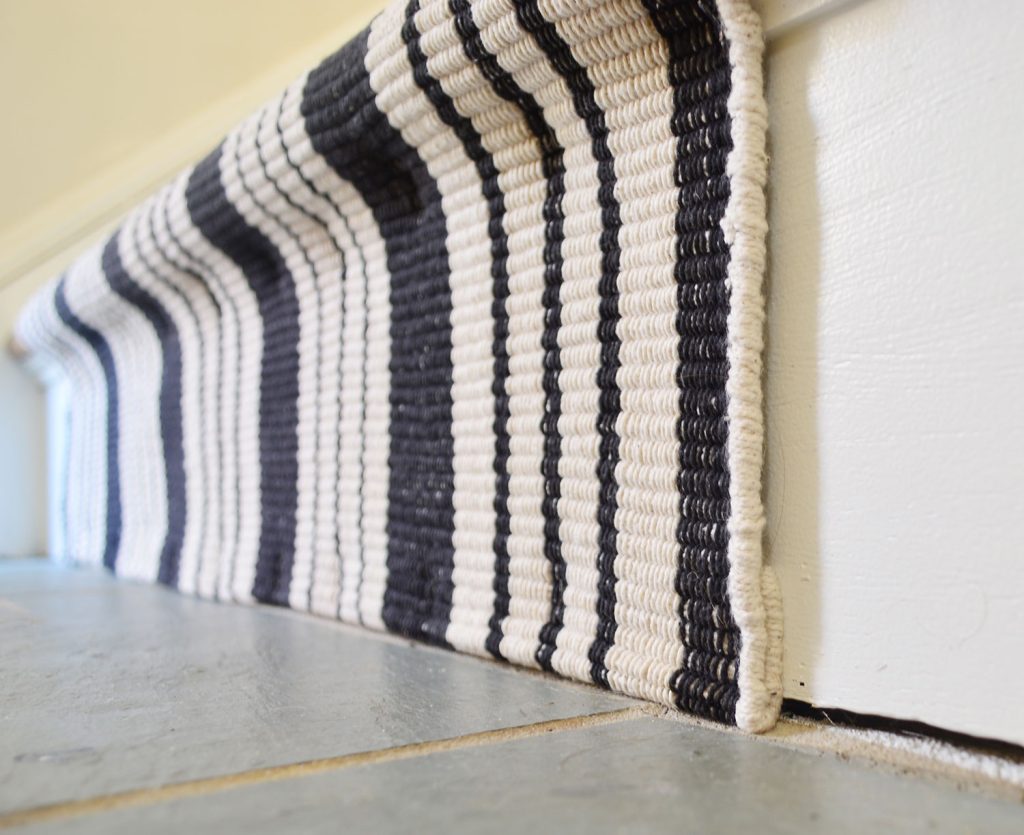
And just like that, you’ve finished your stair runner installation!
You can read more specifics about installing our sisal stair runner, and see more before & after pictures of that space.
Stair Runner FAQs
Here are answers to other questions we frequently get about installing a stair runner.
How well do stair runners hold up?
Our stair runners have held up very well, even with busy kids & pets in the house. Like any rug or carpet, they require regular vacuuming and the occasional stain removal. But as long as you choose a durable material like an indoor/outdoor polypropylene rug or a natural fiber rug, you should have little trouble. We lived with our striper runner for over 7 years before moving, and we only experienced light fading at the bottom (where it got lots of sunlight) and some small, but barely noticeable, fraying on the nose of a step or two.
Do stair runners damage the stairs?
When you install a stair runner, you will put small staple holes in your stair risers. A stair runner also may cause your paint or stain finish to fade unevenly, due to the steps being partially covered. However, both of these can be remedied with wood putty and a fresh coat of paint or stain.
What are the advantages of a stair runner?
In addition to improving the look of your stairs, you’re also making your steps safer and quieter when you install a stair runner. Rugs absorb sound and cut down on the noise of loud footsteps. They also are less slick than wood steps, which makes slips and falls less common.
How do stair runners stay in place?
Stair runners stay in place thanks to a combination of staples and rug pads. The staples hold the rug tight to each riser, helping it form to the shape of the staircase. Rug pads under the tread keep it from moving underfoot. Alternatively, you can use stair carpet rods to hold the rug tight to the riser.
What are alternatives to a stair runner?
In our historic beach home, we didn’t want to install a permanent stair runner. We used two alternate solutions to help our dog not slip on the stairs. On our front steps, we used non-slip sisal treads held in place with carpet tape. On our back stairs, we used clear non-slip treads for a nearly invisible look.
*This post contains affiliate links, so we may earn a small commission when you make a purchase through links on our site at no additional cost to you.

Sarah says
You guys always do an awesome job at turning a room around! This is an awesome transformation.
Marci says
Love the runner, it reminds me of ribbon candy! Great job!
Momcat says
Perfection! I love the look of it all, especially the dark handrail with white posts. So clean!
And I still love that Samantha French you’ve got there. ;)
Jenn says
We’ve been thinking about a similar project, so thanks, this is great! Just wondering what colour you painted the under side of the railing where it meets the stair posts. Is it white like the posts, or dark like the railing? Thanks!
YoungHouseLove says
The whole railing (even the underside) is stained and the posts are white.
xo
s
bella says
It looks great guys. Very straight forward and doable and yet it has great impact. Very classy. I might have to send this to my husband as a hint. =)
Gabrielle says
Can you tell me more about the stain? I am inspired. I love the look of the dark wood banister! We have mahogany wood work that is a reddish brown from 1929 and we want to darken it (base trim, crown molding, divided light windows, and door trim and doors are solid mahogany). We love bold colors like orange and red and how they pop against very dark trim (and a common look in old houses in the Pacific NW where we live). DO you think this stain would work? We still want some of the wood grain to show through though ideally. Is the stain you used no VOC?
YoungHouseLove says
Yes, I think it would be great! It wasn’t no-VOC so John applied it (and did that one railing outside to keep the smell in the house to a minimum) but it wasn’t too stinky (and was odorless when it dried). I would run fans and open windows as well as using a respirator or getting someone else to apply it if you’re pregnant. Also, I can only vouch for this finish (satin) and color (espresso), so a different color or finish (like semi-gloss) might be stinkier due to the pigments or added poly.
xo
s
Jill says
This looks SO GOOD! I have a short staircase (about 8 steps), up to my upper level, and at the top of the stairs it goes straight down a long hallway. Do you think a runner that is ONLY on the stairs would look good? Or should I continue a runner all the way down the hall?
YoungHouseLove says
Ooh that’s a good question. I bet people have done it gorgeously each way, so I’d check out pinterest or google images to see if there’s anything that catches your eye. I would say that continuing the runner down the hall could be awesome, but I could also see it being really pretty just on the steps.
xo
s
Laurie says
It looks fantastic you guys! Really good work. That project was very fiddly so it can be hard to keep your attention to the detail but the payoff is worth it!
I adore contrast almost too much. I have to force myself to blend a few elements so my favorite contrast areas pop out more.
I’m so impressed you can have dark and white striped rugs like that. I’m a barefoot household too with NO kids and I had a blue and white kitchen rug that always looked filthy. I guess I can’t blame anyone but me!
YoungHouseLove says
No way! It’s not you, I bet it’s the rug! We have just heard that D&A rugs hold up really well (even from people with young kids and dogs) but some other rugs like this might get dirty easier if they’re not as tight of a weave or as scrubbable/high quality. We’ll definitely keep you posted though – even though I hear good things I’m still nervous that this one could show dirt, so I’ll post an update with pics down the line either way!
xo
s
Anna in Ohio says
Wow…that last shot! Everything you’ve done has really helped to downplay that flooring! Before, it was the first thing I wanted to see go – and now, it kind of works! Amazeballs, guys!
Jess says
Are you happy with the final finish the Polyshades product gave you? I’ve been looking for something to cover all the orangey oak trim in our 1960’s ranch with painting white a last resort – I’d much rather stain dark. The Amazon reviews for this stuff are a real mixed bag, and I’m sure some of it is user error, the most common are that it drips nonstop and that it develops little bubbles that dry in the finish. Did you have either of those issues? I’m so glad I read this post, never knew this stuff existed until you posted!!
YoungHouseLove says
Weird! We didn’t have any bubbles or issues with drips (we’re “thin and even coats” freaks, so we try not to load up our brush with anything from paint to stain). It also could be the color/finish, but the satin Espresso was really easy to use according to John. I’m the weirdo who was jealous that he got to try a new product.
xo
s
Claire says
Wow, this is amazing! I love how sophisticated (but still fun and comfy!) your house looks. This is a silly question, but when you’re doing projects that involve tearing things up (like carpet), how do you get rid of the waste? Can you throw it in your normal trash can or do you have to find someone to haul it away?
YoungHouseLove says
We have heard that in different areas there are different options (sometimes trash will grab small sections of rug if they’re cut and rolled, sometimes there’s a recycling place to drop them off, sometimes they’ll take the whole pile on “big trash day”). We have been saving ours to see if we can freecycle it for someone who might want it (we hear gardeners sometimes like it as weed blocker or veterinary clinics use it somehow).
xo
s
Lindsay@Tell'er All About It says
Alright, kids. I don’t normally comment but this is my most favorite makeover you’ve done to the house yet!!! It’s so sophisticated and beautiful and light and classic and black and white and awesome all over!! Seriously, beautiful!!!!! Great work!!!!!!!
YoungHouseLove says
Aw thanks Lindsay! You’re so sweet!
xo
s
Amanda says
Couldn’t agree more!
Paula says
It looks fabulous! You guys make a great team!! I am in the process of priming some woodwork to paint. What kind of paint did you use to prime the stairs?
YoungHouseLove says
Our favorite is Smart Prime by Zinsser (the low-VOC primer from Kilz is good too though!).
xo
s
Koliti says
What a stately Black & White exclamation point!
And I quite enjoyed your very informative step-by-step tutorial even though my house is without stairs.
(Didja notice how SKEERED that blue trim looks in the last pic? I bet it wishes it could jump off the trim and run outa the house!?
YoungHouseLove says
Hahaha! In my dreams.
xo
s
Jennifer says
Looks AH-mazing! I was wondering if you were happy with the polyshades product you used? (Especially Sherry) I got the exact same thing to make a table top a couple of shades lighter – I was hoping it would go well so I could do my stair rail as well. But it is soooo stinky! I am also pregnant, so I wear a mask while putting it on but it also takes sooooo long to dry that it stinks for a long time! Hubby will come downstairs (where I am working, but in a back room) the next day and say it stinks. I’m worried that with the long dry time combined with the smell, it may not be the best idea. If you had a do-over, would you do the same thing again?
YoungHouseLove says
Hmm, John did that one big rail outside but I have a nose that can smell stuff a mile away and the one railing that he did in the house wasn’t bad at all. It did take longer to dry, but honestly didn’t even smell as much as our low-VOC primer. Were you using the satin finish? Maybe the semi-gloss is stinkier because it has more poly? Or perhaps certain colors are stinkier if the pigment is different? If I were you I wouldn’t apply it, and see if your husband or a friend relative would do it since you’re pregnant. Then just go for a walk or run errands for a few hours with fans going/windows open and I hope it won’t be fumey at all when you return.
xo
s
Jennifer says
I checked and I have the espresso satin too. Maybe because it’s in an enclosed room it just isn’t airing out? Hmmm – unfortunately my hubs is completely anti-DIY so I am on my own with any and all projects! That stair rail may just end up being white :)
Thanks for the reply – it is totally awesome that you answer so many comments! Makes me feel like we’re totally friends! (But I’m kinda creepy like that I guess)
YoungHouseLove says
Haha, we’re totally friends. Oh and John had the front door open too, so that helps.
xo
s
Donna says
Yowza, those are some sexy stairs! Hope you’re starting to feel better, Sherry.
YoungHouseLove says
Thanks Donna! I’m still sick, but I keep saying “next week will be the week” – gotta stay positive. Haha! Just very thankful to be carrying a healthy little bun.
xo
s
Steph says
Some of the dates are wrong, Sat the 9th and Sat the 10th?
YoungHouseLove says
Sorry Steph, fried brains over here! All fixed!
xo
s
Kimberley says
Thank you so much for breaking everything down. It is so helpful for someone like me, who has wanted stair runners in our split foyer home for many years, but have had absolutely no idea how to do it. Your staircase transformation is beautiful and so inspiring. I think I finally have a plan in place to update our tiny foyer. I’m so excited!
YoungHouseLove says
Good luck Kimberley!
xo
s
Molly says
Wow, that looks fantastic! Is there a significant chunk of runner left from the second pass? If so, it’d be cool to use it as a small doormat!
YoungHouseLove says
There’s a little left over! I wondered about a door mat but also had another somewhat unusual project I thought it could work for. Will keep you posted…
xo
s
SuperCutePetContest says
Wow! That looks amazing. Everything you do is pretty amazing though, so I’m not really surprised. You have made incredible progress with the whole house already!
Angel p says
So happy to see that you stained the railing a different color than the treads. I’ve been considering staining ours dark since they are really worn and I am not crazy about the orange-ish tone they are now but the thought of doing the treads too has kept me from changing anything. Yours looks awesome and I think I will go ahead and proceed with the staining of the rails and painting the spindles since you made it look easy enough.
YoungHouseLove says
Good luck Angel!
xo
s
Ely says
It looks great! Nice and clean and homey! Much brighter and fresher than the previous look and at a reasonable price too. Love it!
Evan says
Love it! So pretty!
Leslie says
It’s amazing how different the foyer wall and floor colors look now, with all the carpet and blue trim gone. Like a whole new house!
Julie says
What a dramatic improvement. I am totally loving watching this transformation process. And I want to offer support for you both as you have to live with that faux brick on your kitchen floor for a while longer :/ I’m wondering about your handrail, did it have much of a finish? Will lightly sanding be enough for the new stain/urethane to adhere? I’d like to try this with my handrail but thought it had to be totally stripped.
YoungHouseLove says
We thought that too! There are some newer products that seem to work miracles, and this said it only needed to be scuffed up a bit and not sanded down to the base tone, and it was really easy and came out great. Maybe because it’s a dark color so it can layer over the other stuff (I can’t imagine you could get away with so little sanding if you were trying to go lighter instead of darker).
xo
s
Stephanie says
Gorgeous! It’s really beautiful and looks like such a pro job.
sara says
This looks awesome! I have been wanting to rip the carpet off of our stairs and make ours look like that!! I love the minwax polyshades, I use on as much as I can since I am lazy and hate the prep work. Sorry if this is a repeat question but where is the runner from? Would love to price out the cost of that for our stairs, thanks so much! you guys rock!
YoungHouseLove says
If you click the link in the budget breakdown with the cost of the runners that post will tell you all about where we got them :)
xo
s
Kim says
LOVE how this turned out! We’re thinking of doing a similar runner technique to some unfinished stairs going to the basement. Any advice for working with unfinished stairs?
YoungHouseLove says
I would check out Jenny’s post that we linked to in this post!
xo
s
Amanda says
You guys are awesome! What a dramatic change! You mentioned that you’re a shoes-off kinda house. I’ve been thinking about switching to the same, but I also have a dog. Doesn’t it seem futile to be shoes-off if your dog is tracking in dirt from the outside?
Also, I’d love for you guys to write a post about tissue boxes. (Is that totally nerdy?) We have a lot of allergies in our house and tissue boxes (and most tissue box holders) are such an eyesore.
YoungHouseLove says
Haha, that’s a good one! Will have to see if there are cool ones out there!
xo
s
Lisa says
Love it, love it, love it! I can’t imagine the pressure of getting this one done in time for today’s post, but goodness it came out amazing. I’m a big fan of the dark/light contrast, it looks so sophisticated! If this were my place I’d wanna eat all my meals on the floor of that foyer just to bask in the beauty of this room, lol. :))
Kelli says
Gorgeous! Way to get it done!
Danielle Ferretti in Miami says
Petersicks…as usual, outdone yourselves !! :) ALMOST makes me want to run and do this to my stairs too… But, I have a landing and a 180 degree turn, not sure how I would pull off all that joining/matching of stripes/angles/turns. Scares me just to think about it !
Also – I would SO looking forward to seeing a BEFORE and AFTER picture of your whole space, just to help and slap me across the face with all the amazing changes you guys have made so far in your entryway.
You guys never cease to amaze me… xo <3
YoungHouseLove says
Aw thanks Danielle! We have to update the House Tour page soon with those!
xo
s
Lauren (in PA) says
So probably I would have stained the baulster dark, so it would ground the floating railing…but that is quibbling, and personal preference.
Because THIS LOOKS AMAZING! I love the entire entry!
Kaely says
Wow! I have never been a fan of stair runners, but that looks really nice. It has a wonderful nautical feeling to with the light and dark stripes.
Christina B. says
I can’t stop staring at the side-by-side before and after shots. I just want to sit on the bottom step and pet the runner.
YoungHouseLove says
Haha, come on over!
xo
s
Leigh says
Hey hey!
Congrats, the stairs look fantastic. I know they were a lot of work, but y’all really nailed it! ( Well i guess technically you really stapled it, but you get the point! haha)
We have Dash and Albert rugs all over our home and they hold up extremely well. We have a HUGE baby (150lbs English Mastiff named Big Steve) and even he can’t destroy them with muddy paws and slobber! Great choice. Cheers to your new stairs!
YoungHouseLove says
SO HAPPY TO HEAR THAT LEIGH! Wahoo!
xo
s
Kristy says
What is it about stripes that are so appealing? Love the runner, and I love that you stained the railing dark, in the picture going down the stairs, it really is so much more visually appealing that you painted the posts white. LOVE this.
Stacia Reagan says
Wow! That is an amazing difference! Makes me want to re-do my stairs . . . but first I am applying your paint color tips. With your tips I have spent the weekend painting the 1,200 sq. feet of my upstairs. The last colors I chose ended up looking flat and washed out with the bright white trim and doors. I have the new color’s up in 2 bedrooms, the bathroom, hallway, dining room and kitchen now. I knew they were the right one’s when I looked back down that hall at what I had already painted and said, ‘Wow! I love this color!’ to my hubby who was watching the football game.
Thanks for tip on the rebates for paint at Lowe’s. As soon as I finish the simple online rebate submission I am off to paint an accent wall in the dining room, the living room and one last bedroom. The cherry on top will be installing my new living room light from your Shades of Light collection. Gosh, I hope that doesn’t sound stalker-ish. :-) I just really love the collection you created and equally hate the old 70’s ceiling fan with wicker blades. Thanks again!
YoungHouseLove says
I love you Stacia! Send us pics! We’d love to see it. Sounds awesome!
xo
s
Gaidig says
As you may have guessed from my comment about my staple-pulling discovery on your other post, we spent Saturday pulling up carpet. It’s been something I’ve wanted to do for a while, but we’ve been waiting to be able to afford to have it professionally refinished. This week we were forced to do it when our carpet cleaning efforts went bad and the carpet stayed wet so long that it began to mildew. Despite it preempting all of my other plans, I am so happy we’ve done it!
YoungHouseLove says
Wahoo!
xo
s
emily @ cabin fervor says
Love it! This is one of my favorite updates you’ve done. We have a staircase with black treads, white risers and black railings/newel posts. I’m thinking at some point we might do a patterned runner, but we’re not there yet! (Bigger fish to fry and all.)
Among other things, we’re currently working on our master bathroom. 14 cases of subway tile are currently going up on the walls as I type this! (We DIY most things, but we hired a professional for this project because we’re on a super tight deadline to refinance and NOTHING in our 1800s house is remotely square.) I’m so excited about this tile… we’ve been doing so much structural/behind-the-scenes work that is essential but not that exciting in an aesthetic way. This will be a big boost to keep us motivated to keep going!
Allisen says
Stairs look wonderful!!!
What primer are you guys using now that you’re finding works against wood bleed but is still low voc?
YoungHouseLove says
We’ve had luck with Zinsser Smart Prime and the low-VOC Kilz stuff at Home Depot.
xo
s
Suzanne says
Love the bannister. I’m a big fan of painted risers/stained tread and carpet runner. Two thumbs up. What’s the ETA on a new entry way floor. I hate the faux slate vicariously for you.
YoungHouseLove says
We love the idea of working with what we have, but there are some damaged areas and some stains I just can’t seem to conquer, so perhaps when we redo the kitchen and add heated tile in there we can carry it over into the foyer and the half bathroom so there’s just hardwood and tile on the main level (right now there are three different flooring types that all meet at the corner of the kitchen/living room so it looks a little chaotic).
xo
s
Ashley@AttemptsAtDomestication says
I love that runner! It all looks so good! Makes me want to install one at our house….
Meghan says
Looks awesome!
Can you refresh my memory on your wall colour? Also, will that stain work on a bathroom vanity? and last – where did you get the star light fixture? LOVE it!
YoungHouseLove says
Yes, it should work for a vanity (we’ve heard from someone who used it on furniture) and the wall color is Edgecomb Gray by BM. The light is from a local outlet called The Decorating Outlet here in Richmond, but I have seen them on ebay and stuff too!
xo
s
Trista says
Looks fabulous! You make it look so easy…Lets hope that we can do this as beautifully as you.
Question, is that a Dash and Albert runner? We are thinking of one too and I am wondering how it is holding up on the stairs?
Thank you!
Trista
YoungHouseLove says
Yup, it’s D&A! We hear good things about them on stairs from people who have ’em!
xo
s
Mel says
My apologies if this has been mentioned already, but your dates are a bit wonky in this post.
Sunday = Nov 10th
Monday = Nov 11th
YoungHouseLove says
Thanks Mel! Sorry about that – our brains are fried. I think they’re all fixed if you refresh :)
xo
s
Megan says
Great Job! The more I look at it, the more I love it. Initially, I too, had the thought of a darker tread to match the railing… but I think the lighter oak is a great compliment. It looks effortless and not overdone. Reads more coastal cool beach house vs fancy foyer trying too hard! :-)
My fingers are crossed for you with the PolyShades. I wanted to save some time and use it on an accent chair and the guy at H.D. did everything but grab the can out of my hand. Along with application problems, durability seems to be an issue. Looks like you guys had no problems applying it, so I hope the same is true for it holding up!
YoungHouseLove says
Thanks so much Megan!
xo
s
Amy Bull says
I love your foyer so much. It’s such a great reflection of your style! Great job.
Laura @ Sneakers and Spatulas says
Love how it turned out! I’m going to check out the stain you used-we need to stain our stair railings as well and I wanted something darker!
I wanted to share our board and batten install with you, my husband and I had the confidence to take this on by following your tutorial and we are so happy with it.
http://www.sneakersandspatulas.com/2013/11/11/living-and-dining-room-before-and-after/
YoungHouseLove says
Amazing!
xo
s
stephanie says
Painting risers are next on my to do list, and I love the way yours turned out! When you applied the Rejuvenate restorer, did you just wipe on one coat by hand (ie, with a rag instead of with a floor mop, which seems like it would be pretty tough to do on a narrow stair …)? And did you use the same high gloss restorer you used on your downstairs floors? THANKS! :)
YoungHouseLove says
Yup, it was the same high gloss stuff! John used the mop cover they sold with it (the same one we used for our floors) but instead of putting it on a mop, John stuck his hand in it and just wiped it on that way.
xo
s