This art wall makes us so happy – and we didn’t overthink it (to the point of what-should-we-frame paralysis – which can happen if we’re not careful). Although we did talk about a few other options and eliminate them based on certain factors, such as:
- one giant piece of art on each side of the window = too symmetrical for our taste, and too repetitive with the big rectangular window in the middle (so it would look like three big boxes)
- open shelving = too much shelving since there are two walls of it thanks to the dining room built-ins (it would be shelving with more shelving beyond it)
- mirrors = too much, since we already have a large framed mirror hanging over the file cabinet on the opposite office wall
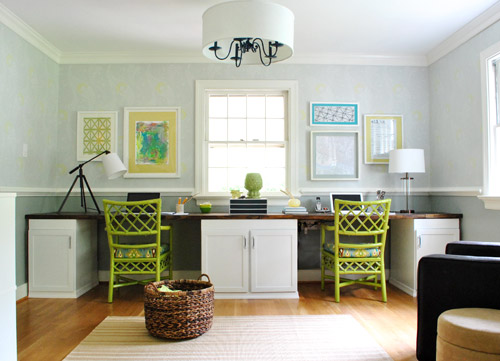
So we decided to use frames that we already had in a balanced-but-not-completely-symmetrical arrangement. And as is the usual agenda, we tried to go with things that have meaning, feel personal, and make us smile. Are they perfect? Nah. But perfect is overrated. They just make us happy like our chipper green office chairs. So in a way, the fact that it’s not perfect is kind of perfect for us.
We liked that we had a “John’s side” (the right) and a “Sherry’s side” (the left) so since John loves maps, typography/handwriting, travel, and high-contrast geometric shapes, he ended up with this little medley:
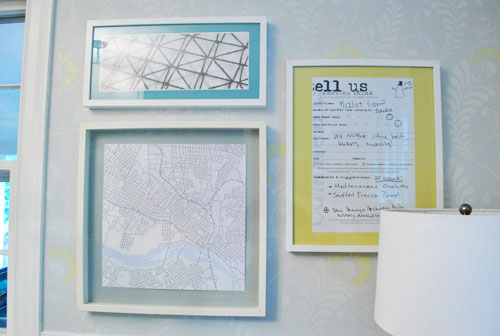
Not only does it represent a bunch of things he loves (type, maps, travel, geometric shapes, etc), it’s also personal because:
- the map is a typographic map of Richmond by a local artist (it’s actually made up entirely of words, more on that here) – I just painted the Ikea mat with the same gray paint that we used under the chair rail to help it pop
- the handwritten/typed item on the far right is a blown up copy of a tiny comment card from a meal that we shared in Alaska during our Honeymoon (we wrote things that we ate and what we saw on the comment card and kept it as a souvenir to remember that day)
On my side I knew I wanted Clara to paint me something (everything she makes is my favorite thing ever, what can I say?) and I liked the idea of framing a textile that I loved (some fabric leftover from Clara’s weekly project, which I also used a few years ago to reupholster a bench that now sits in her nursery).
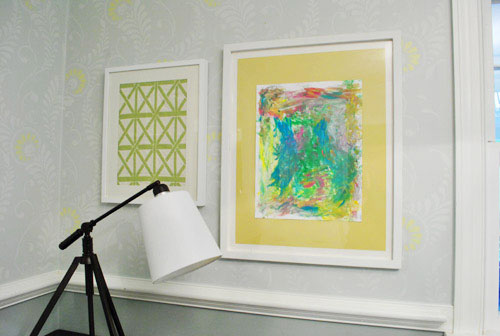
It doesn’t hurt that the lattice shape of the fabric ties in with the lattice detail on the chairs… and also seems to relate to the high-contrast geometric print on John’s side. Gotta love happy accidents like that. To us that just screams: meant to be.
As for how we approached the whole office art thing, here’s the order of this whole project (although we’ve done this multiple ways so there’s definitely not one “right” formula):
- Went through our existing frames to see what we had to possibly work with (and found the five that we used for a grand total of $0 spent)
- Laid the frames out on the floor in groups until we hit on a balanced but not symmetrical arrangement that we liked
- Hung the frames without anything in them, just to get a sense of how they’d look on the wall instead of the floor
- Began the art hunt (we figured we could trim/blow things up to work with the frames we had – although sometimes art comes before frames for us – it varies)
- Pulled our typographic Richmond map out of the playroom since we knew it was one of the things we wanted to hang (and painted the mat for that frame with leftover wall paint from under the chair rail)
- Went through our “memory box” full of movie stubs and love notes (it’s just a shoebox-sized container full of keepsakes), which is where we found the comment card from our honeymoon (which we blew up 420% at a copy shop to fit the frame)
- Dug up some sentimental fabric that I loved (which was also used here and here)
- Found a high-contrast print in my little file o’ art from years past that worked nicely on John’s side (it balanced out the handwritten comment card and the detailed type-map)
- Stripped Clara down to a diaper with some water-based Crayola paint and had her go to town on a large sheet of paper that would fit the frame I wanted to use with it
- Ran to Michael’s to grab some large colorful sheets of paper to create “mats” for some of the art (to better fill the frames and tie in some happy color since the office is our cheerful little bubble of unicorns, rainbows, and puppy dogs)
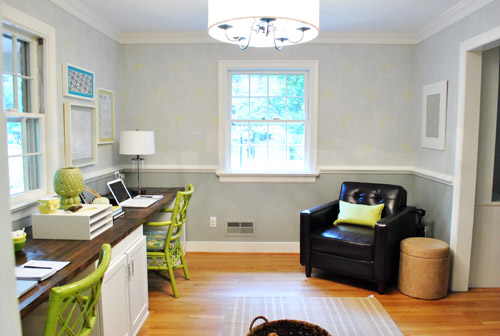
It definitely feels mixed & matched yet balanced enough for us – and it’s bold & happy without giving us a headache. We like that the color palette is diverse (Clara’s painting is full of color and there’s a black & white print, so it’s pretty varied). Even with all those colors/styles, the dominant tones (like teal and grellow) relate to the chairs and the dining room curtains – and the white frames help unify things. We definitely plan to play around with room accessories in other colors though (some pops of orange or coral on the desk might be fun) so we’ll have to see where things go…
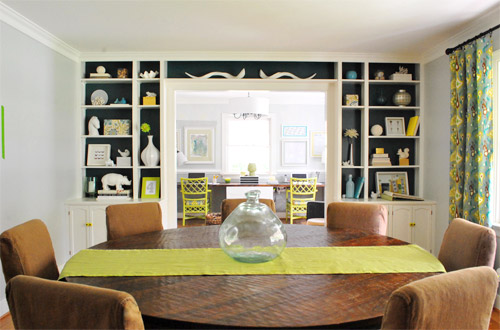
Oh and here’s the view from the dining room. I love that the office is so light-washed and the dining room built-ins are so dark. It really helps keep the spaces from blending into one big rectangle-fest. Oh and I’m on the hunt for a new runner that’s not so matchy (plum could be fun – or even textured burlap).
As for how much this entire update cost us, since we already owned all the frames we just spent around $9 at Michael’s on the large colored paper “mats” and $4 at the copy shop (FedEx Office) blowing things up. So that’s a total of 13 bucks for five pretty big pieces that we get to stare at whenever we’re not gazing at our laptop screens.
We still have other office things on the agenda, like: getting a permanent rug (most likely longer, not as wide, and darker), adding more permanent art to the other side of the room…
… hanging some window treatments (probably homemade roman shades), and adding a proper lamp and side table for the leather chair corner, etc. But for now we’re just grateful to have something on those have-been-blank-for-the-last-ten-months walls. Can’t believe we have stared at blank walls for almost a year. The shame! Especially since the frames were just sitting around in our playroom and it was only $13 to fill them with some happy-go-lucky stuff.
But enough about us. Have you guys ever blown things up at a copy shop like a comment card from a memorable meal? How about stripping down your toddler and “commissioning” some custom art? I thought I was going to be really Type A about colors and design but I just gave her every color of the rainbow and watched her go to town. My little artist…
Psst- Here’s another post about a ton of sentimental things we’ve framed around the house.

Briel K. says
Is that a new lamp on your side Sherry or did I just miss it in another post?
Love the art btw. I like how you guys always try to personalize things instead of buying something generic somewhere.
YoungHouseLove says
Those were mentioned here (both from Home Goods). Hope it helps!
xo,
s
Deanna says
Have you done homemade roman shades before? I need to make some for some odd shaped windows we have and am finding the project a little daunting (like your chair upholstery project…I’ve left it for over a year…) Any help or direction you have would be great.
YoungHouseLove says
Nope, just pinned some tutorials so I hope I can hack it! Will keep ya posted!
xo,
s
Keri says
Thank you a bazillion times for helping me figure out what to do with the space around the window over my sofa.
Amy says
I love the art! You guys always seem to find the perfect balance! I’m excited to see what you come up with for the window coverings (I vote for curtains on the window by the armchair! :-) Thanks for providing us with all the eye candy!!
Jess says
Yeah!! Looks great!!! Just enough class with the walls and desk, and all the bright accents add inspiration. This is a room I could easily work in all day! I can’t wait to see the window treatment and rug you guys choose to add. I think this room has a lot of really great character. Way to go!!
Sarah says
I love the Richmond map on John’s side of the desk! After looking at your website for over a year, I decided to try my hand at a DIY art project for my office. (I’m a grad student in British literature, but I didn’t have anything Brit-related to hang on my walls.) I found a tourist map from a family trip to London several years ago, trimmed off all the coupons, and put it in a simple Michael’s poster frame. My officemate (who studies Irish literature) liked the idea so much that she did the same thing with her Dublin tourist map! Thanks so much for the inspiration!
YoungHouseLove says
Love it!!!
xo,
s
Kait says
What I love most about this new art arrangement (other than, you know, everything) is the happy splash of colour from the teal and yellow mats. You mentioned you bought the paper to make the mats from Michaels – have you done a tutorial about creating mats before? I’d love to know how. Maybe it’s more obvious than I’m thinking but not-so-crafty folks like me could use a tutorial. Just a thought!
YoungHouseLove says
I just put the paper behind the print or image (so I don’t cut a hole or anything to make a real mat, it’s more like a frame of colored paper that hangs out from behind the image). I just use loops of tape at the corners to hold the image down in the center of the colored piece of paper. Hope it helps!
xo,
s
Kait says
I knew it would be more obvious than I was thinking, haha. Thanks Sherry! That’s really helpful!
Renee says
Love what you’ve done…I love the idea of enlarging a ticket stub, etc.
Tip for future “Clara” art that I learned in my art class….take some blue tape and tape all around the edges of the paper. When it’s dry, pull off the tape. It will give you a clean ‘gallery’ type edge to her artwork and make it pop even more.
YoungHouseLove says
So cool!
xo,
s
Renee says
I should clarify…you tape before you start to paint, in case that wasn’t clear…lol.
YoungHouseLove says
Gotcha! Love it.
xo,
s
Ana says
Where do you get all of these frames you have?! You always seem to have some extra ones laying around. Any advice on finding inexpensive frames so I can start a stockpile too!? :)
YoungHouseLove says
We had a bunch from when we moved (our first house was plastered with frames and we have yet to hang a lot of them back up in this house). As for where we get them, Ikea, Target (on clearance) and thrift stores/yard sales are our favorite spots. Hope it helps!
xo,
s
karen says
so awesome! you guys are gooood!
Melinda says
I love that you all chose multiple frames and that they’re hung asymmetrically. The colors and scale really work well together!
Firesparx says
We’re also going on 10 months of bare walls… We built a house and moved in last December. Since the walls are brand new, I haven’t had the heart to start punching holes in them! I’m also thoroughly sick of the “art” from our old place (nothing of value, mostly framed posters from our single days and *gasp* University days).
Meagan says
I could not for the life of me figure out how y’all were going to put art in that room because of the stencil…but you nailed it. Its perfect. I was convinced it would look so weird with the stencil…but it doesn’t. I think it helps that the stencil is subtle. But anyway…its perfect. Loving this room!
Marian H says
Love the picture arrangement and the fun green chairs. When my son was about 18 months old, I stripped him down to his diapers and had him “paint” a picture for his Dad for Fathers Day. Although it’s not up on the wall anymore, it is still a cherished piece of art.
Laurie says
I picked out a rug for your office…it’s at “Dash and Albert”….
http://www.dashandalbert.com/product/view/tortola-ticking-woven-cotton-rug–RDA029
You like????
YoungHouseLove says
Haha, we love all D&A rugs!
xo,
s
maribel says
I was “surfing the internet” (do people still say that) yesterday, and I came across ideas for little ones scribble pages. This mom matted the pages with shapes or animals, so you would have a scribble rhino. Not sure how she did it…I thought it was cool.
YoungHouseLove says
Love that idea! I actually pinned something like that recently. So much fun!
xo,
s
Heidi says
I love all of this. Love it. I want to go back through my own shoeboxes and find fun things right now! We don’t have enough non-photography art in our house and you’ve given me inspiration to adjust that. Also, I think a plum runner would rock. Yay for so much general enthusiasm!
Molly @thewaffler says
I love how there are 2 piece on one side and 3 on the other. See, I would have made it symmetrical, but I like this soooo much better.
Whitney Mayer says
Looks gerat I am sooo jealous!
Amanda K. says
I’m sure you’ve noticed this before; the two sculpture pieces in the dining room in the middle arch look like a mustache. And I don’t know if you know what these crazy kids are into these days, but mustaches are totally in. You guys are hipsters and you don’t even know it! …or maybe you do!
YoungHouseLove says
Haha- John loves that. He calls them Giant Mustache.
xo,
s
Meredith says
Wow. I just love this! Time to get creative with my own walls!
Gaidig says
I love the idea of blowing up something personal and framing it. I think I can even do it with our printer, since it has a the ability to scan.
The colors and arrangement really work well, and using the colorful mats makes it read nicely from far away. I also really like the way you arranged your frames to relate to the window. I remember seeing something about asymmetrical groupings being best in certain overall shapes, and one was with the largest mass in the middle and tapering away on either side. Your window is serving as that center anchor, which is cool.
In other randomness, I saw Candice Olson use your dining room curtain fabric on her show when I was watching reruns on the internet yesterday. There wasn’t quite enough available for her, and I kind of wondered if this was after you had done your curtains and there had been a run on the fabric. :)
YoungHouseLove says
Haha- that’s too funny! I love Candice!
xo,
s
DanielleR says
You and John are the only people I know who could make a toddlers finger painting look tasteful and classy lol. Great job as always :)
Mona Alicia says
I think it looks awesome, fun, and happy! I actually smiled to myself when I scrolled down to the first picture. You’re making me at least think about decorating my little home office a little more. Right now it’s functional but not much fun. Great job!
Kelly says
I absolutely LOVE everything about what that art does for the office and even for the dining room. love love love.
I can’t wait to see what art you put on that other wall… I would be afraid to put anything there in fear that it would look like to cluttered.
Nicole says
I think this might be a stilly/stupid question, but how does one go about painting paper or card stock with wall paint? I would imagine it would be too thick and goopy… am I crazy?
-Ultimate DIY noob
YoungHouseLove says
The mat that I painted was a thick cardboard type material so I just used a regular old paintbrush (for the walls) and wall paint (it’s latex based, so it’s not too thick) and applied it thinly – just like on the wall. No drips at all!
xo,
s
Ami @ parsnips and pears says
As always awesome art ideas :)
Crystal says
I love the art, especially all the color it adds. I think it looks fabulous. You guys never cease to amaze.
anne says
Would you consider a round… thing on the dining room table, instead of the oblong runner? Every time I see that table, I want there to be a round colorful mat of some kind. Smaller than the table but sizable. Maybe burlap with a plum edge?
YoungHouseLove says
Oh yeah, if it’s big enough that could be really cool actually!
xo,
s
Teresa says
I love it! And I love how you guys always use white frames. I have a ton of black in my house and it is suffucating me now that I have seen the “light” lol.
I love using things that have meaning as art…I used one of the extra personalized labels that we used for the wine bottles at our wedding, and a postcard from a NYC visit on New Year’s one year. Our wedding invite is up there too.
Nicole says
The room is really coming together. I adore all the color, shapes, patterns, etc. I recently pinned this diy jute webbing table runner which sounds like it might be up your alley (similar to the textured burlap idea).
http://www.taradennis.com.au/create/jutetablerunner/tabid/999/Default.aspx
I am also love with the the plum runner idea. It would be another beautiful, rich jewel tone brought into the dining room.
YoungHouseLove says
Love that! Thanks for the link!
xo,
s
Kahley @ Ambiance says
Looks gorgeous! I am loving the unbalanced balance of the artwork! Super inspiring, can’t wait until I can focus on my office!
Debra says
I was just thinking you guys need some roman shades and there you go, already a step ahead. I see them in a wide awning stripe for some reason, maybe charcoal? Your room looks really cheerful and so personal, I love it!
YoungHouseLove says
That could be really fun!
xo,
s
Maria says
I know it is ridiculous but for some reason I am intimidated by the whole copy shop art thing. I just kind of picture myself in a scene worthy of The Office where I end up with a 1,000 copies of the wrong side and it’s stapled to itself or something. I need to overcome this fear because your stuff comes out looking so great.
YoungHouseLove says
Haha- we usually just ask for help if we need it! They’re nice there!
xo,
s
Raina@ Mamacita Spins The Globe says
It looks great! I have also framed my kids’ artwork. It’s amazing how their little hands can create something that works so perfectly in our decor. It’s also amazing how something can go from being a “kid finger painting” to high quality artwork when put in a frame. Sadly I can’t frame all of their work, or I would need more walls.
Kirsten says
The art you picked is perfect!
Love the plum table runner idea, you could even use that as a jumping off point for roman shade fabric (not matchy but maybe a print with a similar shade?)
Angie K says
I just saw this on pinterest and knew you would go crazy for it! I bet it’s something you could diy!!
http://pinterest.com/pin/362860042/
YoungHouseLove says
Love it so much I pinned it!
xo,
s
Missy G. says
That pin goes to someone’s Etsy shop. I pinned the Louisiana one the other day. But to buy, I could never DIY someone like that. I just found this comment interesting after Sarah’s comment yesterday about the ethical dilemma of pinning Etsy products as DIY.
YoungHouseLove says
Exactly! I pin stuff to buy it! I have pinned earrings and other sentimental items like personalized art like this and John has bought them for me as a birthday or mother’s day surprise!
xo,
s
Jen @ This Hollywood Life says
I hear ya on finally making some changes in a room! I just got curtains up in our toddler’s “big boy room”, and you are inspiring me with the Pinterest Challenge to keep checking off things on the “To Do” list in there! :)
http://this-hollywood-life.blogspot.com/2011/10/pirates-room-for-me-or-rather-for-baby.html
Aska says
I love it. You guys give us so many creative ideas. It’s like having a free decorator- thanks again.
CarliJean says
I am loving the art, and the Snow City Cafe is DELICIOUS!! we are in the process of selling our house and moving back to Alaska (my hooooome sweeeet hoooooooome *god bless america tune*), and I can’t wait to eat there again! If you are ever up there again, you’re welcome to our home! :) Rusty says that Burger can come too. :)
Felicity @ Our Little Beehive says
I slapped together some artwork the other night for our nursery using elephant punch outs leftover from writing thank you notes the night before:
http://www.ourlittlebeehive.com/2011/10/ele-artwork.html
I haven’t blown anything up yet since it’s a tiny room and we need tiny art, but I have been using cards and notes that we get in the mail that “go” with our theme and colors. It’s really fun to just have a bunch of frames on hand to fill with whatever (mostly free) stuff we find around the house.
YoungHouseLove says
So cute!
xo,
s
LARY says
LOVE LOVE LOVE!
Patty says
I love it! Can you elaborate a bit on what you did to make your mats for your frame? I have a ton of Ikea frames and would love to paint the mats… but you said you painted one and just bought huge paper (and cut out the center sizing it to fit) for the other frames? Or did you actually by colored mats at Michaels? Thanks! Again, looks great!
YoungHouseLove says
The one we painted was a cardboard mat from Ikea that came with the frame (just painted it with thin even coats of wall paint). As for the colored paper from Michael’s, I just laid it down on the table cut to the size of the frame, taped the item that I wanted to showcase in the middle of it (with loops of scotch tape on each corner holding them down from behind) and put it into the frame!
xo,
s
Michelle says
I’m in the middle of my office makeover (latest post here http://michelleleeinteriors.blogspot.com/2011/10/gallery-wall-goodness.html) and filled frames in my gallery wall with all kinds of prints: I heart AR, our wedding vows, a silhouette of a deer mount (hubby’s a hunter and the office is taking a rustic modern look) and alphabet art! Love your map and Clara art!
YoungHouseLove says
Looks so great!
xo,
s
Melissa Evans says
Your home is just getting BETTER and BETTER!! Seriously! you guys should be SO house proud! AMAZING work! Your choice of art is spot on! :)
Leigh Anne says
Did you use the same Crayola Washable Paints for Clara’s art as you did for the pumpkin project, or was it a different kind of paint? I’d like to do some canvas painting, but I haven’t explored the paint situation…
YoungHouseLove says
Yes! Same exact ones!
xo,
s
Ashley says
Stuffed French Toast from Snow City Cafe= My favorite! Well done…what a great memory. :) (Love the shout out to AK!)
Michelle says
With the Ikea mat that you painted on John’s side, did it already have a pre-cut out space for the art, and did you just mount the art on top of it? I’ve been having so much trouble finding frame + mat combos at Ikea to fit my oddly shaped art, but mounting it over the cut-out could work…does that make sense? Ha!
Love how the office is coming together…such a cheerful place to work!
YoungHouseLove says
I mounted all of the art on top of the mats/paper, just centered it and held it down with tape at the corners (from behind so it’s hidden).
xo,
s
Meredith says
Wait, you painted a mat with regular ol’ wall paint? I did not know you could do that. How long did you let it dry before framing it? This information just might change my life. ;) Thank you for inspiring me every day!
Meredith says
haha, wall paint… I’m sure that’s a term ;)
YoungHouseLove says
Just a day or so! I did thin thin coats. Worked like a charm.
xo,
s
NYer says
I miss the vintage green file box that used to reside in the center of the desk. Does it have a new home or are you ebaying it, by any chance?
YoungHouseLove says
It’s in the playroom. Not sure where it’ll land but somewhere! It was a v-day gift for John so it’s for keeps (his mom worked at a library so it’s sentimental).
xo,
s
NYer says
it is extra-special! love that is was a valentines gift and love the personal art work. your office looks great!