The last four days have been nutzo in Patio Land for us (not to be confused with Temptation Island- remember that show?). The good news is that it’s nearly done. Like 90% done. But since I’m a bit low on energy at the moment (and we have to wait for better light to take more pictures), I’m gonna cover as much of our four-day patio-extravaganza as I can muster. The rest will come a bit later when we’re 100% finished (and have a chance to take about a million after shots from every angle).
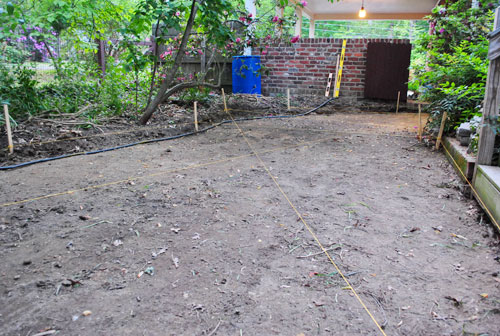
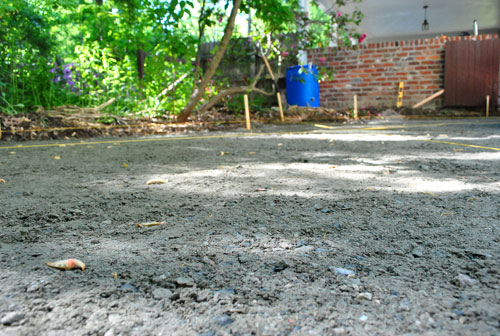
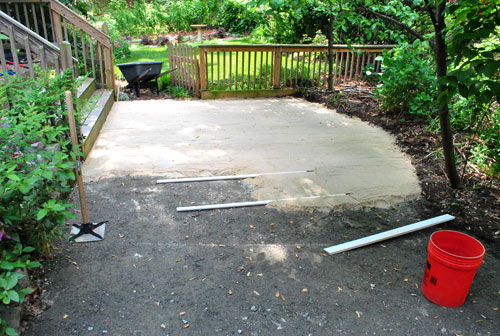
To recap: as of last Monday the area was all marked, leveled, and dug up.
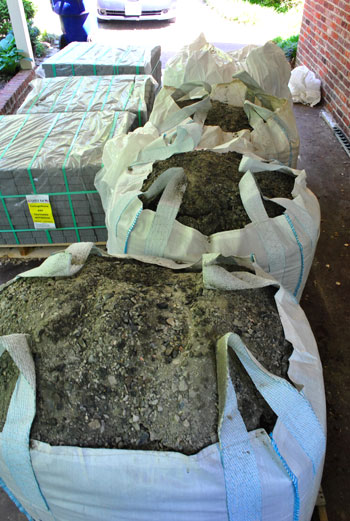
Then on Tuesday our nearly 10-ton delivery arrived via flatbed (300 square foot patios apparently weigh more than two elephants). As far as deliveries go, it wasn’t that eventful – except that the forklift (seen hooked to the back of the truck below) got a flat tire halfway through, so it delayed things a bit while the guy left to repair it.
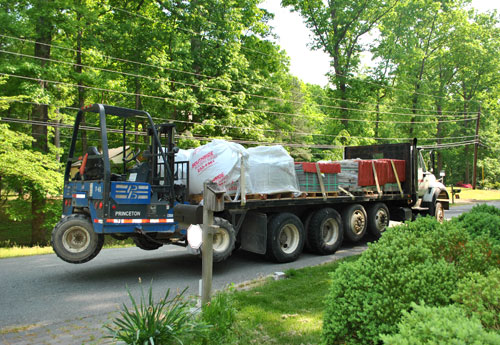
But eventually everything made it into our carport in one piece. If you’re keeping track, that’s three giant bags of fill gravel, one giant bag of sand, and three pallets full of cobblestone pavers (two of the rectangular variety and one of the square kind).
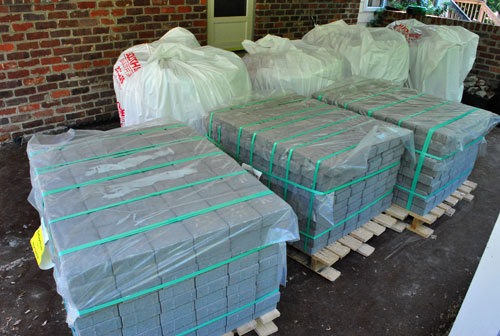
We picked a paver called CottageStone by a local company named Eagle Bay. Yup, it’s manufactured right here in Richmond and we discovered it just by asking for the most affordable paver cobblestones at a local stoneyard called Southside Builders Supply (it came out to be around $2 a square foot, which beat both Lowe’s and Home Depot prices by around 75 cents, which really adds up over 300 square feet). The color is a gray-ish tone that they call “Jefferson” (amongst other Virginia-tastic color names like “Blue Ridge,” “Chesapeake,” and even “Richmond”). It was pretty easy to make our color choice because we decided to do our best to roughly match the gray cobblestone pavers that are already in our driveway. So that’s how we picked our poison- er, pavers (read more about the cost of the whole project here). But enough about design decisions and money – let’s get back to the physical labor.
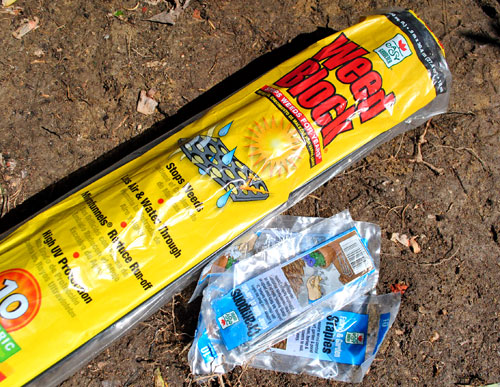
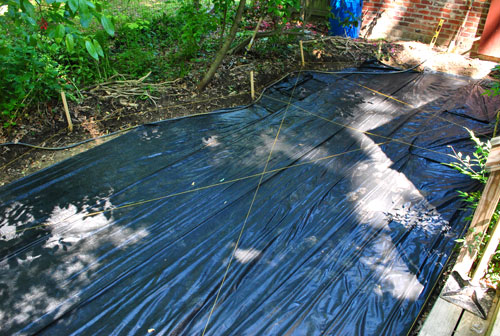
We took Wednesday off Project Patio because it rained, so Thursday was my next work day (while Sherry tended the blog, the baby, and brought me granola bars and water by the hour). As my trusty Lowe’s video and the saleswoman at the stone yard had directed me, the next step was to put down my weed blocker. I picked up this 300 square foot roll of Weed Block and ground staples to hold it down (weirdly called “Crampons”) from Home Depot.
Since we know from experience that weeds and grass love to sprout up between paver stones, we wanted to at least discourage their appearance (although we’re huge rebels… just kidding… we like to follow directions or we start to hyperventilate). Here’s the area all covered in the Weed Block sheets just as recommended. It was pretty easy to cut it to size with scissors and then just stab each row into place with my crampons, so this step only took me about forty five minutes.
Next up: gravel. And not just any gravel – THREE EFFING TONS of it.
Laying this gravel basically consumed my entire Thursday. My wheelbarrow wouldn’t fit through the gate separating the carport and the patio area, so I resorted to carrying the gravel bucket by bucket (thanks to a spare 5-gallon paint bucket that we had on hand) back and forth all day. It was exhausting and disappointing (only because I fully expected to look like Hercules when I was done, but still found myself staring at my usual spaghetti arms). But in the end I was glad that I went the bucket route instead of using the ol’ wheelbarrow, because it allowed me to keep my nylon strings in place, which were invaluable when it came to ensuring that everything was nice and level with a slight slope away from the house (which is really important for drainage reasons).
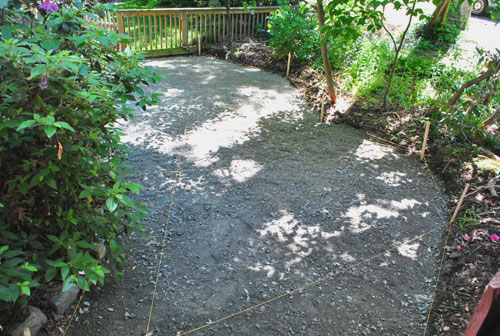
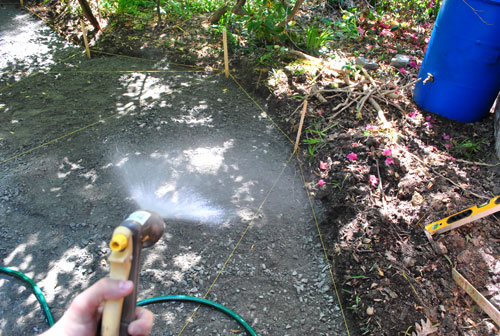
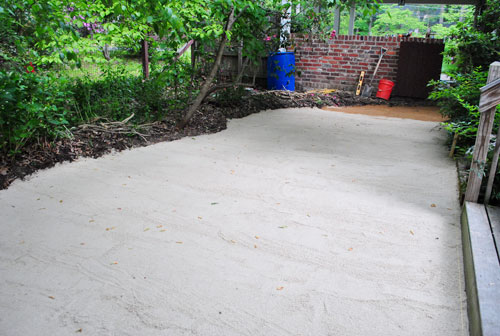
But my workout for the day wasn’t complete, because the gravel had to be tamped down. First I lightly misted the whole area, which started to turn the loose gravel into more of a cement-like consistency. I paid close attention to the Lowe’s video at this point in the process, which instructed me to make it moist enough to clump, but not to go overboard and get it too wet. So my advice would be not to go spray crazy and just look for that cement-like clumping action and then step. away. from. the. hose.
The tamping was a manual task again (sigh) because we opted to purchase a $30 hand tamper instead of going through the trouble / expense of renting a plate compactor (our car is small, we’re cheap, and I may have already mentioned that I wouldn’t mind bigger biceps). It wasn’t a particularly enjoyable task, but honestly at that point my arms were sorta operating on autopilot. And it was actually really gratifying. You can see how it turned my gravel pit into a flat, semi-solid, and ready-for-sand surface below. It almost looked like asphalt in the end. But sand would have to wait for Friday. Over seven hours of Project Patio was enough for me (and the sun was starting to set anyway).
After taking Clara’s 51-week photo on Friday morning, I threw my patio pants back on and got to laying down a 1″ layer of sand. I couldn’t have done this part without the brilliant tip from the Lowe’s video involving two pieces of 1″ PVC pipe. Praise google.
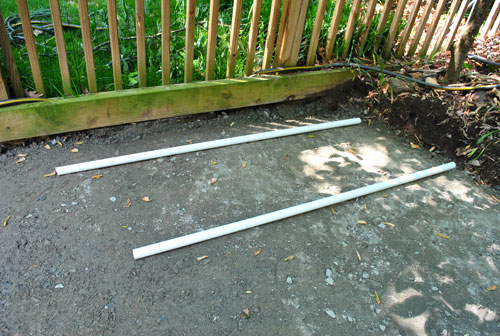
You basically lay them down side-by-side and then dump your sand over them.
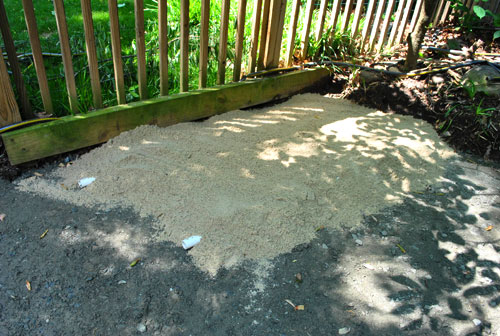
Then using a spare piece of 2 x 4 (or in my case, some extra trim molding) you scrape off the excess sand which leaves you with a flat, paver-ready surface of sand (which is exactly an inch deep thanks to the pipe “spacers”).
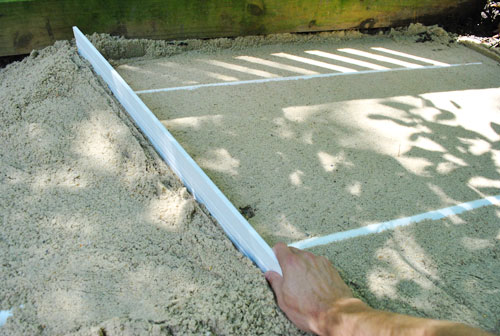
Then you carefully pull out the pipes and fill the empty “pipe lines” with a little bit of excess sand (by hand) for a totally flush look. Let’s just say it was a much faster process than the gravel was (since it only had to be an inch deep instead of three, which made it a lot faster to haul). Here it was half-complete:
I would’ve finished faster had I not run out of sand at the very end. But fortunately a quick trip to Lowe’s for a few extra bags did the trick (notice the color change at the far end of the area?).
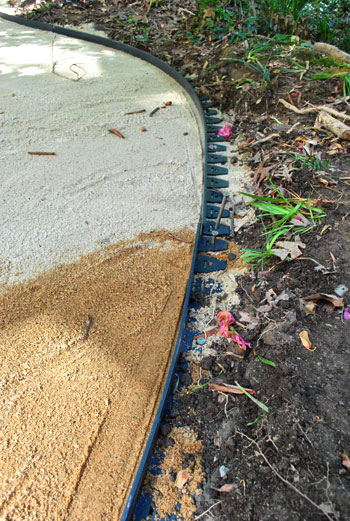
The last step before we could fiiiiiinally get to putting down stone was to install the plastic edging to hold all of our pavers in place (which will end up being virtually invisible once we backfill it with dirt/mulch on one side and pavers on the other). We had heard different theories about whether you should do this before or after you put your stone down (apparently it can work either way) but we thought it’d be easier to plan our curves with the flexible edging than with the heavy stones themselves. And we can tell you from experience that it was the right way to go for us – definitely consider adding the edging first if you’re doing any sort of curve and would appreciate a nice set guide to follow.
By this point it was about 4pm on Friday. I really wanted to call it a day, but Sherry and I were determined to get some of the pavers down so that we could at least start to see the patio come to life. So I charged forward and promised myself that I’d just put down the entrance area. A couple of hours later (yes, it was slow going at first), I had this:
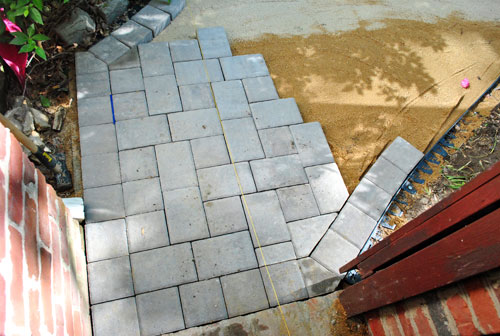
I’ll get into the ins and outs of cutting and laying the pattern in the next post, but below you can see things progressing slowly but surely. Sherry snapped this pic right after she put Clara down to sleep for the night (hooray for a 7:15 beanette bedtime, which gave us some daylight to work together on it- enabling us to move twice as fast during that narrow evening window). And thankfully we didn’t hear a peep from Clara (you know Sherry had the baby monitor outside on high, just in case). But Clara must have known we were busy making a patio for her birthday bash. Smart kid.
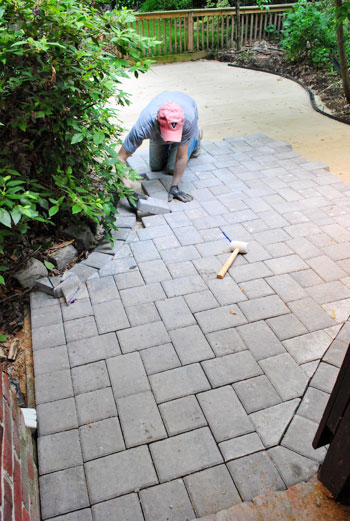
We both decided to put all the cuts on hold for the night so that we could focus on just filling the central patio area with as many whole pavers as our arms could carry (and avoid operating a wet saw in partial darkness as the sun began to set).
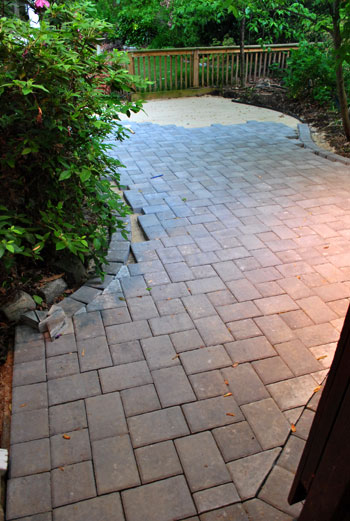
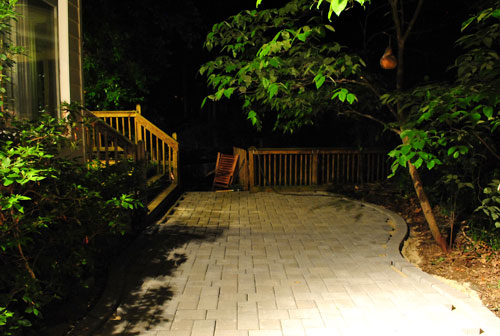
By some miracle, our energy held out ’til about 9:30, when we finally laid the last full paver at the far end of the patio. So you can sort of start to see how things are coming together, despite the darkness and all those missing stones around the borders that we still have to cut.
Our camera batteries only lasted long enough to attempt to snap a few totally normal pics of us “conquering” this task. So we just got a few blurry shots like this winner before the camera shut itself down:
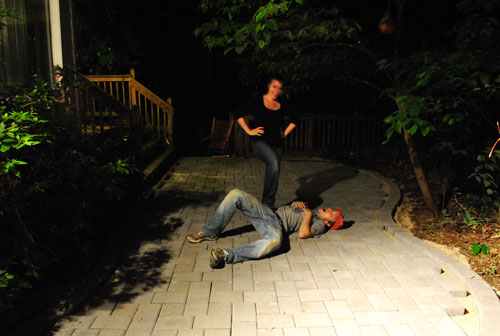
Notice how I chose the role of laying down and looking exhausted? I plead that so-tired-you-feel-drunk phenomenon that occurs after a loooong day (when everything makes you die laughing and you kind of lose your mind for a minute).
So now you know how the Petersiks spend a Friday night. Actually, we did cap it off with a Netflix movie (after a much-needed shower, of course). We saw Love & Other Drugs if you’re wondering. And we thought it was just as naked as the critics said, but not bad. Just don’t rent it with the extended family over the holidays or anything (awkward).

annabelvita says
Jeff the patio – love it! Can’t wait for the full reveal (and of course omg the party pics!)
annabelvita says
ps. I love those night time pics, it’s gonna be such a sweet secluded spot
YoungHouseLove says
Haha, that’s hilarious. Good ol’ Jefferson (aka: Jeff) might be the perfect name.
xo,
s
Krysta @ Domestic for Dummies says
John, that was totally worth all of your hard work. It looks amazing!
Necole says
Oh, if I only could get my husband to do something like this. Great looking patio.
Megan @ reFind says
My niece has the same birthday as Clara- and the entire fam spent the weekend helping my sister and bro in law with their deck and patio and landscaping. Tiring, but so rewarding! It better be sunny on Saturday in MN (for us) and VA (for you)to be able to enjoy all the work :)
YoungHouseLove says
I know, right? John looked at me before we snapped that last picture and said “I hope this doesn’t jinx next Saturday into being rainy.” But it rained last year on Clara’s birthday here, so I figure the odds of that happening again should be smaller – you know, just because this year should be nice if last year was crummy. Haha. Such a scientifically proven theory.
xo,
s
ellis says
Haha, Sherry. Yesterday I tried to explain to the bf that the reason the springs we were swimming in were cold but didn’t feel AS cold as a chlorinated pool of similar temperature was that “the chemicals weigh down the water, making the water more dense which your skin perceives as colder.” He looked at me like I was crazy until I admitted that it sounded like science, but was in no way based in science.
YoungHouseLove says
Haha. I have a cousin who is so good at lying with a straight face about such odd things that you believe him. I fall for it every time and then he cracks up and admits he made everything up.
xo,
s
Kristen @ Popcorn on the Stove says
Congratulations! The patio looks amazing! Can’t wait to see pictures of it in the daylight when it’s all finished. Even with the play-by-play, I still can’t believe you were able to do this yourself!
PS – John, are patio pants the same as painting pants?
YoungHouseLove says
Haha, yes they are. But they get slightly muddier during this process thanks to the wet saw.
xo,
s
Reenie says
OMG!! I was sooo going to ask the same question about his “patio pants” vs. his “painting pants”….ha!! I guess the “painting belt” can also be used as his “patio belt” too ;)
I can’t believe you had to carry the rocks by buckets!! OMG!! I bet you were pooped….and sore. It looks soooo good ~ and I can’t wait to see it all finished.
YoungHouseLove says
Haha, yes. Painting belt = patio belt. Can’t have any crack going on while laying pavers.
xo,
s
becca says
painting pants = thor britches?
YoungHouseLove says
Bwahahhaahaha. Yes. Most definitely.
xo,
s
Hanna says
You are officially upgraded from /hero to /superhero!
Wow that was a lot of work. But OMG… it looks fantastic!!! It doesn’t even have that awkwardly new look — it fits in so well with the landscaping that it looks like it has been there forever!
Kate says
That’s looking GREAT guys! I can’t believe how many pavers you got done Friday night, even if that didn’t include cutting!
blog is the new black says
Off to a great start! Lots of work… gonna be great!
Catherine says
Great job, you guys! My boyfriend and I are planning on renovating an old house once we have enough money for a downpayment and getting married in the backyard too! (We’re super cheap as well) I just stumbled across your blog and I love it! You’ve made so much progress on your new house, and I know we all really appreciate having these walkthroughs when we’re taking on a project. Hope cutting the border pavers goes quickly and you can enjoy Clara’s birthday on your new patio.
Jen @ The Decor Scene says
It looks awesome!!! Love the pattern you picked.
Alisa says
I’m sure my husband will pop over here shortly to thank you guys- now I want him to do this in our backyard ;) Those cobblestones look just like the stone streets we walked all over in Puerto Rico though, and he loves it there, so maybe I have a shot at getting him to agree… It looks beautiful and is DEFINITELY worth some sore arms :)
Cait @ Hernando House says
That looks great! Can’t wait to see it in the daylight!
Kate Battle says
WOW looks great! My husband and I spent our entire weekend working on our yard too…we are putting in a HUGE raised bed, square foot garden with cinder block….after two days of digging, carrying block, etc we are HURTING today!
Check it out on my blog…
http://retroranchrevamp.com/2011/05/08/aching-back-garden-attack/
YoungHouseLove says
Wow- that looks like a ton of work!
xo,
s
Kate Battle says
It was! (and we still have TONS more to do!) I bet you guys are all kinds of sore today too from all the tamping, spreading of sand/gravel, stone carrying and of course bending down….OUCH! Thank goodness for Advil!
brandt @ NewHouseOnTheBlog says
Having laid patio bricks, and having worked a bit of landscape, my hat goes off to you, fine sir. It’s a brutal task that’s totally worth it when you’re all done, but when it’s 3:00 PM and that sun is just ROASTING you, it feels like you are near death sometimes.
+1 man-card for you!
YoungHouseLove says
Thank you good sir. I accept that man card and will forever treasure it (along with my patio).
-John
Meghan, UK says
oh.wow. It looks lush. Well done you guys!
Emily says
It looks great! You guys just keep continuing to amaze me! I can’t wait to see the final product. :)
kelly says
Looks awesome! This reminds me so much of last summer when we put in our patio.. we did the exact same steps as you and our pavers were even the same color (although we also had “twinkie” sized stones). We loved the pvc pipe trick too :)
Robin @ our semi organic life says
Congratulations! It looks so good and so professional! Way to Go!
Adriane Wacker@FortheLoveofPainting says
Looks wonderful…I can’t wait to see the last pictures!
Veronica @ Sweet Pumpkin says
What a way to start my week, reading about other people’s hard-working friday. Truth be told I hate being a renter, this looks fabulous! Makes me wish I had a house to add a patio to :) Can’t believe Clara’s 51 week picture is up, that went by so fast!
Amy says
GREAT LOOKING PATIO!!
phenominal work, kudos to you petersik’s!
Erika says
Hey, I thought Sherry said she wanted to do at least some of tamping for a good arm work-out. Looks like you both lost out – John for the extra work and Sherry for minus the buff arms :)
Looks great, can’t wait to see the finished product.
YoungHouseLove says
I know right? Clara was the boss/supervisor on this one. So even if mommy wanted to help, Clara put the kibosh on that (until she was asleep). Haha.
xo,
s
Lindsey says
You guys are awesome!! Can’t wait to see the finished product, it already looks great!!
Ellen says
It looks fantastic!!
Kirsten says
Holy! That looks amazing! I’m beyond impressed. It must be so awesome to be able to see the transformation of that space. Totally epic. :-)
Marije says
I’m in A-W-E!
Jessica says
Looks AWESOME!!!! It will be wonderful to have for Clara’s party too! Great work guys!
Beth green says
Wow. I am zoo impressed. Thanks for keeping it real and always showing that it is hard work and dedication to save money and do it yourself. You guys are the best. My DS loves following burger!
Claire says
It looks AMAZING already, even though we haven’t seen the finished shots! Absolutely worth the hard work to have something so gorgeous for so cheap (relative to paying someone, of course)! Once again, your motivation and stamina astound me. :)
Amanda @ Our Humble A{Bowe}d says
Ok, it looks great, even in the dark. AND, I’m totally impressed that you worked until 9:30 when you wanted to quit 5 hours earlier! Seriously, that’s dedication! Really, you guys, great work!!! I’m sure the daytime pictures will look even better. Hope you had a great Mother’s Day, too.
Oh, and I agree about Love and Other Drugs. Not bad, but lots of nudity and language and totally awkward to watch with anyone but your spouse. Ha.
Stephanie Phillips says
I ditto Hanna- it looks like it was meant to be there! John, you’re a rock star. I am very, very impressed with this!
Brita says
This looks AMAZING! I’m consistently impressed by your ability to do things that I previously thought only “professionals” could do. Petersik for the win!
charlotte says
Great job guys!! I am so impressed that you did all this yourselves. We are trying to talk ourselves into re-doing our deck ourselves. Maybe I should show your blog to my husband for encouragement.
rachelg says
looks wonderful! my fiance and i have been furiously house hunting as our wedding is fast approaching (just over 2 months away) and we have no place to live. this post made me so excited to work hard and make our new house, wherever it ends up being, into our home!
Thomas says
Our son has the same birthday as Clara (another crazy story- my wife “UpNorthPreppy” commented on Clara’s birth story), and we’re frantically DIY’ing a party too, thanks to you guys. One question for you John- do you have a rotating set of broken-in orange UVA hats, or does Sherry just force you to launder the one daily? With the amount of work you do, that thing should be crusty and gray with sweat rings by now!
YoungHouseLove says
I have two! Both very tattered and yard-work-appropriate. Now you know my secret. I did just get a new navy one for less dirty jobs (like walking around town for example). Oh hats, how do I love thee.
-John
CandiL says
You two are beyond awesome!! And that patio is beautiful!! Love it!!
Amy says
OMG! This looks so good. I can not wait to see the finished product!
Jenn says
You two are animals! Nice work.
Susan says
Wow, it is looking awesome! It must have been so satisfying to see it coming together after all these days of preparation. John, I hope you’ve treated yourself to a huge steak somewhere along the way! Great job!
Bobi says
It looks great! I am going to have to show my husband this post and maybe he will be inspired to help me with some of the bigger projects on my list:)
Dennis says
Wow it is looking fantastic guys!
Georgia Rowe says
WoWza! that looks amazing!!!! Well done! its going to be a lovely spot when its 100% finished. (not thats its not lovely now…because it is.. lol back track, dont want johns enthusiam to go out the window.. haha)
I love the photo at the end-haha.
cant wait for the day time pics!
John i think you need a well needed beer when your completely finished! *sending virtual ice cold beer*
Lauren H. says
It’s looking awesome. I applaud your dedication. And I applaud you for doing it right. We have a wonky wood deck and paver stone path in our backyard that looks like someone just spent a few hours throwing down. I’m amazed with how professional yours looks.
Gina @ Runningtothekitchen says
The patio looks amazing. I can’t believe how much you accomplished in so little time. Can’t wait to see the birthday party pics with everyone enjoying it!
cafenoHut says
it looks wonderful. I can not wait to see the final situation…
Corinne says
That looks incredible! Way to go on this project! I’m really anxious to see the whole thing with loads of people there for Clara’s birthday.
I had no idea about the Weed Block thing, but I think I’ll be looking into it now. The not-so-knowledgeable previous owners again did something nice for the house but didn’t really know what they were doing, and thanks to them, I have a great little seating area in front of my house with beautiful pavers….and weeds galore growing between them all.
Katy says
WOOOOWWWW!!!! That looks incredible! Is there anything you guys DON’T know how to do? When are you gonna have you’re own TV show already? I can’t even figure out how to change a light bulb let alone make my own out door patio. How friggin’ cool is this!? Amazing.
Elizabeth says
The patio looks fabulous- excellent work guys! Only wish that I would have read your blog about Love & Other Drugs BEFORE watching the movie with my mother-in-law. Talk about awkward!
Tracie @ Gurtler + Home says
Ditto on that movie. I totally did not realize how non-PG it was when I rented it. I’m jsut glad that we rented it for a lazy afternoon instead of the watching it with any parentals. Whoo! Oh and the patio looks great!
Laura says
WOW! Looks professional! Almost makes me want to give it a try.