We’re back to share phase three of our sunroom mini makeover (see phase one here and phase two here). And this week’s update is all about a punchy turquoise stencil that we added. It took a bit of trial and error (like most of our learn-as-we-go projects) but we’re here to share the goods and the breakdown when it came to our method.
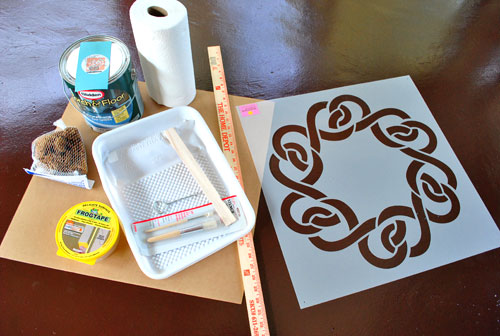
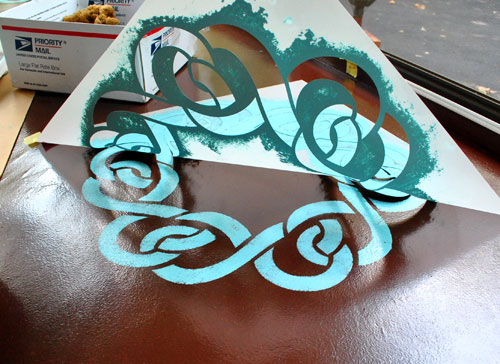
First we gathered our materials. We had a lot of painting supplies on hand so all we had to do was pick up some floor paint (Martha Stewart’s Lagoon color matched to Glidden’s oil-based porch and floor paint) along with a sea sponge and this amazing Ciel Stencil from Sunny (a local paint guru that we’ve loved ever since checking out her store and seeing her amazing stencils in this house and this house that we crashed a while back). The cost of the stencil, the paint, and the sponge came to $57 and we already owned the rest of our supplies.
After gathering our tools we measured the room to mark off where our stencils would go. Obviously this will be different for everyone (depending on the size of your room and your stencil) but we just figured out how many rows of stencils we could fit on each wall (seven on the long one and five on the shorter one) and used tape to delineate where the edge of each stencil could be placed to keep them within those rows (with about 8″ between each one on each side, since that’s how the math worked out). The lesson here is that this step is everything. As they say in home improvement, measure twice, cut stencil once. You NEVER want to get halfway done with your floor only to realize the layout won’t fit, is wonky, etc. So definitely do whatever it takes to visualize the plan before painting (like placing pieces of paper around the room to ensure that the arrangement will look balanced and even) before cracking open that can of floor paint.
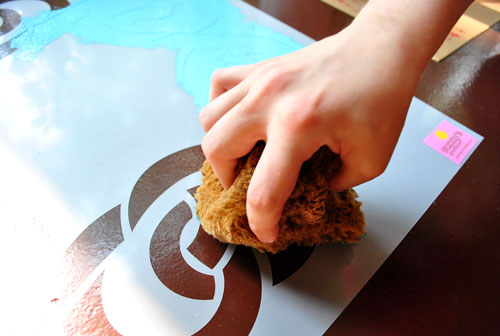
Then it was time to stencil. We used delicate surface Frog Tape to hold down each side of the stencil just to keep things in place. Then using light up and down movements with the sponge, we carefully dabbed on some paint (being sure not to go diagonally with the sponge for fear of getting under the edges of the stencil).
After we covered 100% of the brown floor paint that was showing through, it was time to peel back our stencil to reveal…
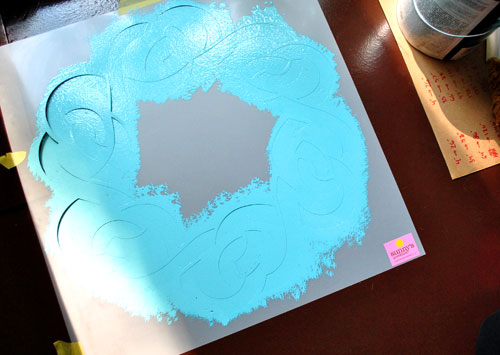
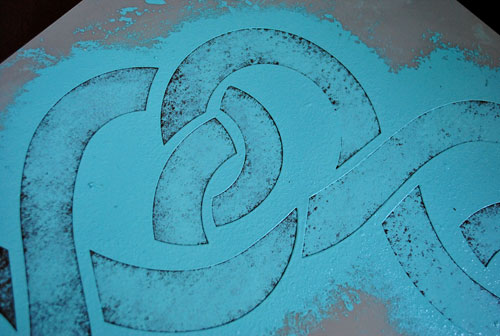
… a nasty and horrible result. Ack! The problem was clear- we had applied way too much paint and it had bled everywhere for a less than clean and pristine result.
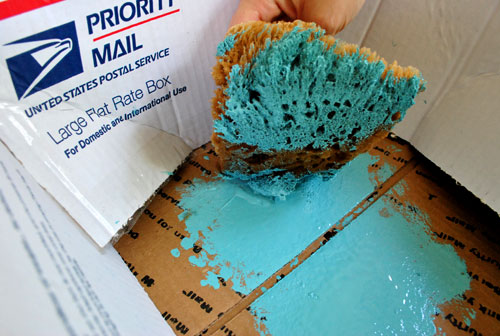
Thank goodness we had created that first stencil in a won’t-be-seen-spot thanks to furniture that will be placed there once the floor is dry. Needless to say we quickly revised our method from there on out and prayed to the paint gods that we would get a better result after our second attempt (and we’d definitely recommend testing your stenciling skills on cardboard or poster board before moving on to the floor). On our second attempt we only applied about 80-90% coverage (so the brown paint still peeked through) and we also decided we needed to dab the sponge on something before taking it straight from the paint tray full of blue paint to the stencil on the floor…
So John grabbed a cardboard box from the garage for me and I used it to dab off the excess paint for a much less gloppy application.
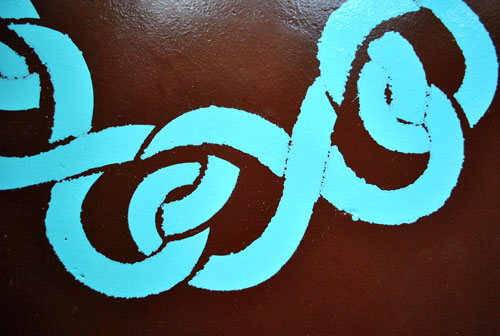
And the result this time (whew) was perfecto! Picture us beaming with pride as we peeled back that stencil. The interesting thing is that we thought it would look less than crisp since we didn’t have 100% paint coverage (remember we aimed for 80-90% instead) but it looked super clean and perfect once the stencil was removed. Victory!
Here I am smiling because we figured out that less paint = more crispness. Which meant that stenciling got a lot less stressful from there on out. Oh and you’ll notice that I’m in a corner. We actually stenciled the four corners of the room first because we figured that way we’d have four stencils in different areas of the room to use to orient ourselves, so that’s another little tip that we picked up along the way.

And after completing those four corners I just painted my way around the room, sliding my cardboard box and my piece of cardboard with the paint tray on it around the room with me.

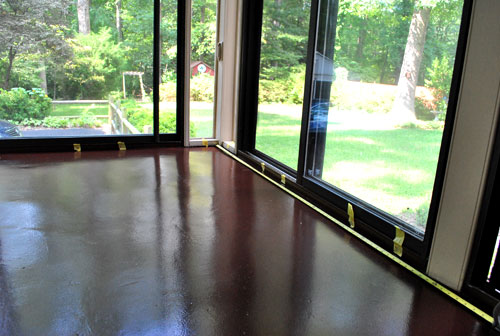
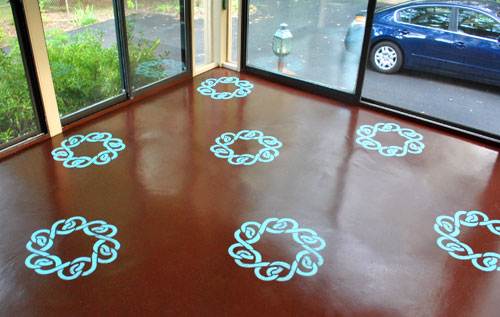
And here’s the final result:
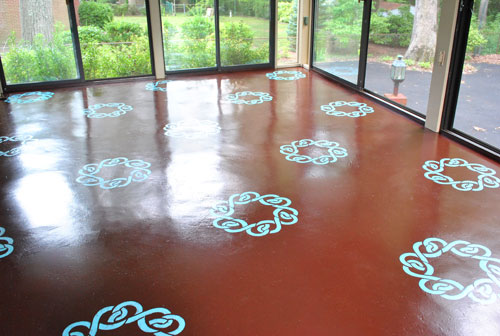
Sorry for all the glare, that’s one shiiiiiny floor.
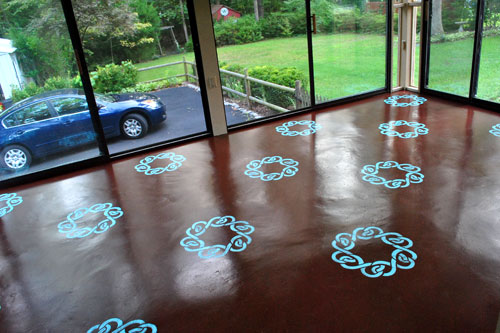
We really love that a $57 project could add such interest and texture to the room (especially since the turquoise stencil plays off of the lighter teal ceiling in the space). It’s akin to buying a super pricey area rug to spice up your room but we spent a fraction of that cost for an interesting and fun result. In short: we’re in love with our rich chocolate and link-chic patterned floor.
And we figured we’d share a few quick tips for anyone else who may attempt this project in the near future:
- Be sure to use paint that’s specifically formulated for porches and floors for extra durability (we went with oil-based stuff because that offers maximum protection and also works with the oil-based chocolate color that we previously applied – applying water based paint over oil-based paint would have made for a cracked and peeling result).
- You don’t need a lot of paint for a stenciling project (we could have gotten by with less than a quart but they only sold it by the gallon at our store).
- Measure out your layout a few times to be absolutely sure it’ll look balanced and even before beginning- and it helps to paint those corner stencils first and work around the room from there so you have a few different points of reference.
- Tape your stencil on all sides with 2″ of delicate surface tape, just to hold it in place.
- If you get any paint on the underside of your stencil (which only happened to us on our failed first attempt) wipe it off before placing the stencil on the floor again.
- Use a gentle up/down application with a sponge that you dab a few times on cardboard to remove the excess and aim for 80-90% coverage instead of 100% saturation (which we found led to bleeding and blobs).
- Give painted floors a ton of drying time before walking on them or moving furniture back in (we’re giving ours 7 full days since it’s humid, so stay tuned for the reveal pics next week once we can move things back in!).
- Cleaning up oil-paint on errant body parts is easy thanks to mineral spirits (update: many readers mentioned that a cooking oil, like vegetable oil, can also be used to remove oil-based paint in a more natural way).
So there you have it- our stenciling project from soup to nuts. Hope it helps anyone who is gearing up to add some interest to their floors sometime soon. What do you guys think? Anyone else tempted to try it?
Pssst- Wanna see how we painted our chocolate sunroom floor to begin with? Click here for all the deets.

Danielle@Newlyweds Paradise says
I have to admit, at first, I wasn’t digging the idea. I loved the warm chocolate feel of the floors. But after I saw your reveal, it actually turned out really nice!
elizabeth says
it looks fantastic … great job!
stacey says
Beautiful floor! Love the design!!
FYI: For a safer option to remove oil based paint from your skin, instead of mineral spirits, try using baby oil or cooking oil. The paint slides right off and no harsh chemicals involved! : )
susan says
stunning! does the ceiling color match with the medallions? i love virginia for all of it’s lovely blue ceiling’d porches ;)
YoungHouseLove says
The ceiling is a few shades lighter but they really play off of each other!
xo,
s
Lindsay@Tell'er All About It says
This looks awesome! Good job! Makes me wish I had a concrete floor just so I could do this!!! Someday…
Emily says
Response to Lindsey –
We actually did our entire first floor with painted concrete right when we moved into our new house. We didn’t like carpet or linoleum and couldn’t afford wood floors. You can see examples on my blog and the process we went through (our concrete was in less-than perfect condition).
The floor looks great. I, like others, am surprised at the stencil. :)
Amanda says
I’m not 100% sold on this just yet. I so much love your brown coloured floor. Maybe when I see the finished product with furniture back in, I can see it in all it’s glory!
Abby Webb says
Ah! I love this so much! I can’t wait until I am an owner instead of a renter so I can get crazy with paint. :) You two are so inspiring!
Michelle says
It’s a gutsy move to paint and stencil the floor, but the outcome looks fantastic! Aqua and brown color combination is divine!
Lauren says
This makes me wish I had a floor that I could stencil! Looking forward to the whole room reveal once you move the furniture!
Jenna says
I just bought some of Martha’s Lagoon for a project! Too cool…great minds think alike. :)
Love this project! Can’t wait to see it once the furniture is all back in place.
Bunny says
Amazing!!! And Sherry, you totally look like a young Denise Richards or supermodels like Adriana Lima!(I totally did a double take when Starship Troopers was on TV the other day, lol!) Jealous :P
YoungHouseLove says
Wow Bunny, that’s quite possibly the biggest compliment I’ve ever received. I’m blushing over here, so thanks!
xo,
s
Haley says
Hey guys, any thoughts on using oil-based floor paint indoors? We are planning to paint our bedroom floor and want a super hard finish and the glossy look oil offers but are worried about the fumes indoors.
YoungHouseLove says
We would definitely recommend doing it before a nice long vacation or planning to stay with friends while the floors dry so the smell and the fumes can air out for a while. They also sell water-based floor paint which is a bit less durable but might be a nice compromise for you. Hope it helps!
xo,
s
Julie at www.downtimeweblog.com says
Wow! What a great idea. Beautiful!
Camberley, The Bella Life says
Hmmmmmm. Maybe I should “beautify” my husband’s garage with floor stencils. That way passing neighbors would know how stylish we are. ;) In all seriousness, I love this idea! I may do something similar on my back porch in the future.
I can’t wait to see the sunroom with all of the furniture/decor put back in it.
-C
Oonafey @ Little Pink House says
It turned out great! I can’t wait to see it all back together…
Amy says
Hm, I think this is the first YHL DYI I didn’t really like. I was a big fan of the dark chocolate floor on its own. Then again, I’ve never been keen on stencils. Different strokes for different folks!
Laurie Jones says
Once again, I can’t wait to see the final reveal!! Looks awesome!! I’m thinking stencils are back in! Who knew! I too just finished a very small stencil project for my daughter’s bedroom. I actually made my stencil and traced a mirror for inspiration to save some money since I was only planning on using it once. Here’s a pic of it if you’d like to see it! http://housetoyourhome.com/2010/09/01/stencil-reveal/
sunny goode says
Sherry & John-
Your floor is LOVELY! Th color combination is AWESOME!! I am so very impressed and also happy you informed others about too much paint and stenciling- less is WAY better. Ben Moore also sells 15oz pots of paint in ANY color -$6 –
these usually do any stencil job at a fraction of the cost, and you are left with much less waste, which is great for the planet:)
These pots do not come in floor paint though-only bummer.
I cannot wait to see it with the furniture back in!
also V for the home is having a birthday sale- lighting, tables and mirrors 30% off- just a FYI
xo
Sunny
YoungHouseLove says
Wow Sunny, so nice to hear from you! Thanks so much for dropping in! As you can see we’re loving our stencil. And thanks for that V For The Home tip!
xo,
s
KKM says
Wow, the floor looks adorable (as all your projects do)..Not sure if anyone has asked this already, but how durable is the painted finish on the concrete? Do you get the occasional scratch/scuff and just consider it part of the charm, or does it hold up pretty well (as long as one doesn’t drag furniture across the floor)? It looks pretty pristine in the pics!
YoungHouseLove says
It’s pretty durable- we’ve had our painted floors for at least a year and they only get the occasional subtle mark (which becomes part of the texture of the floor). As long as you don’t drag heavy furniture around it should look great for years. Hope it helps!
xo,
s
Steph @ BirdHouse Family says
Looks amazing! I love the unexpected pop of bright color.
Amy Barber says
I have a super tip for the Stencilistas out there.
I’m a mural artist in NYC and our go to Stencil Diva taught me to use a mini FOAM roller (3 – 5 inches) for stenciling.
No bleeding, consistent, and fast!
PS- Sheryl, you can use the foam roller with acrylic paint on fabrics. Im envisioning the same stencil in subtle white on bottoms of curtains, or lighter blue on some throws.
Heres her flickr- she designs all her own stencils in Illustrator too :)
http://www.flickr.com/photos/dnewman/
YoungHouseLove says
Love it!! Thanks so much for the expert tip!
xo,
s
Beth C says
Thanks for this post. I’m thinking about stenciling a wall in my dining room. It’s good to have some tips on measuring, as that’s the part I’m most concerned about getting right!
Dana @ House*Tweaking says
Aw. I’m so glad you guys did some stenciling! You know the way to my heart.
Can’t wait to see the final product in action with furniture, accessories, etc.
A.@ Umbrella Island says
I have to say this. You guys are BRAVE!
I think I never could do something like PAINT (well, stencil) the floor. I admire you guys and… you inspire me!!! <3
kristen f davis | kfd designs says
it looks realllly great, guys! i reallllly want to use one of sunny’s stencils for a project soon – i keep trying to convince clients to let me! :)
Tiffany says
aahhh! I spy my car outside your window! Same color and everything. I knew you guys had great taste! ;-)
Vanessa Vandersande says
I don’t routinely read comments for your blog because I check it out through google reader. So excuse me if this has been said already in other comments but, seriously Sherry, are you back to pre-Clara weight already?! You look terrific! Rock on woman!
YoungHouseLove says
Aw thanks Vanessa! I still have a few pounds to go but I’m trying not to be too hard on myself. Clara’s worth a little extra pudge here and there. Hehe.
xo,
s
briar Oak Wife says
That is such a great idea! I love the turquoise against the brown. I am dying to see what the complete rooms is going to looks like. I am guessing you are not putting the rug back now?
YoungHouseLove says
We actually plan to toss the rug down to see how it looks (by our calculations it’ll only cover three stencils) but we’ll have to see if we end up keeping it!
xo,
s
Dana says
I have heard that just good old vegetable oil takes off oil based paint from skin. I tried it on a small project I did, and it worked. It was a nice switch from stinky mineral spirits.
Amanda says
Love it! You can get sponges like that for a fraction of the cost at craft stores like Michael’s and Hobby Lobby. Paint departments charge 2-3x as much. Why? Who knows?
YoungHouseLove says
Hey Amanda,
Who knew? Thanks so much for the tip!
xo,
s
Fiona Richards says
I am so impressed – what more can I say!
Katy says
Hey! What size stencil did you get? I just ordered one from them in 16×16 but now I’m wondering if I should have gone bigger. I may be able to call and get the bigger one instead if I act fast! It’s for our porch floor.
YoungHouseLove says
We got this one: http://sunnyspaint.com/stencils/ciel.html
It’s 20″ wide.
xo,
s
Chris Oropeza says
Sherry, I am so glad I came across your blog. I have some direction now. I am going to stain my bedroom closet and was going to use the same color you used for your sunroom. Question: what color is that and also what color did you use for the stensil? Thanks in advance!
Chris
YoungHouseLove says
That was actually paint on the floor, here’s the post about it: https://www.younghouselove.com/2008/08/how-to-paint-a-floor/
And as for the stencil color, it’s Martha Stewart’s Lagoon. Good luck!
Good luck!
xo,
s
Mira says
We’re doing a “stenciling” project on a board that our mailboxes are mounted to. I used painters tape and then an exacto knife to cut out the lettering we wanted. (And it only took me 5 hours..) Now its time to paint the stencils and I’ve got some serious anxiety that the paint running behind the tape. I looked at two of your tutorials: the stenciling the floor one here and the striping the bathroom. You think I should do one coat and immediately pull up the tape or let it dry before pulling it up?
YoungHouseLove says
I would rub a spoon around the edge of the tape to squish it down as much as possible! Then apply one thin coat, followed by another thin one ten minutes later (thin thin thin is key!) and then peel it off. Assuming you think it’s covered enough. Don’t want you to peel it off and not have enough coverage. Good luck!
xo,
s
Mira says
You are ON IT! Thank you so much!
alg says
This is so funny! I SWEAR I’ve never read this post before — In fact, I’d forgotten you guys even stenciled the floor at the first house, since I discovered YHL after you moved & don’t backtrack to the old posts too much — but we seemed to have had very similar learning experiences! LOL!
I guess the rules of stenciling (like hair care) are simple & finite :)
I adore your stencil, btw. I hope you didn’t have to paint over it before you sold.
YoungHouseLove says
Nope we left it all as-is! Thankfully the new buyers loved it!
xo,
s
Emelina says
OMG! I haven’t been to your blog in a while, but this is DOOOOOOOPPPE! I like the colors you picked and together, it seems like the light blue is “glowing” through the floor. They look like floor lights. LOVE IT!
Sam says
Hi Sherri – quick question. I’m getting ready to paint the cement floor in a basement art studio. Are your floors still holding up good? I heard a lot of people have problems with peeling and chipping from this paint. Thanks so much – love you guys!!
YoungHouseLove says
They held up great after being painted for around 2 years and then we moved, but I can’t imagine after 2 years of high use they’d suddenly have issues (I think you’d have issues pretty much right away or not at all – that’s just a guess though).
xo,
s
Sarah says
I’ve been in love with this room since you posted! We’re finally getting around to painting our kitchen, so I went to purchase the stencil and the link no longer works. Do you happen to know the brand name or another location for purchasing it? Thanks so much!
YoungHouseLove says
Oh no! I think it’s by Sunny Goode, so if you google her name hopefully the site comes up?
xo
s