First of all, thanks so much for the unbelievable outpouring of well-wishes for our announcement yesterday. It was great to share our news with you guys. While madly trying to keep up with the 3,000+ (!!) comments, our afternoon post sort of fell by the wayside, so we figured we’ll share an afternoon one today with you instead. In the meantime, Sherry is cutting and pasting a ton of questions from yesterday’s comments and working on Friday’s Q&A post for you, and I’m here to shake my tail feathers about managing to cross a few more things off our sunroom to-do list in this week (yes, feel free to picture that).
So let’s talk about three steps that have taken our sunroom from half-baked to feeling a lot more finished: adding trim, caulking, and painting. They’re not always glamorous project steps (especially installing trim and caulking) but details like those tend to make all the difference (wonky trim and messy caulk can add up to a shoddy looking finished product, even if a room is furnished really nicely). I originally planned to gloss over the trim-hanging part and dive more deeply into caulking and painting, but then I messed something up and, voila, it felt like info that might be helpful to share. Nothing like celebrating your screw ups, right?
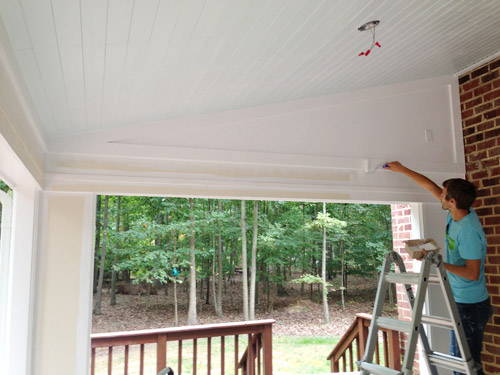
Ok, so we had to add trim to polish off our recently tongue-and-groove planked ceiliing. Originally I was just going to toss out a quick mention like: “We installed trim to bridge the gaps around the ceiling and the new triangle panels we added. To match the other simple lattice-like trim around the rest of the room, we opted not to use typical crown molding. Plus, it spared us from having to calculate how to cut all of tricky crown angles against an angled ceiling.”
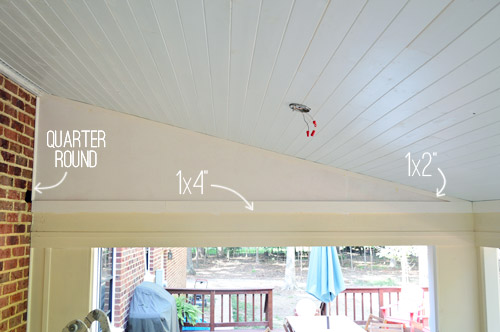
But after the trim was installed, we both stepped back and decided it didn’t look good. Not because it wasn’t crown, but because the 1 x 2″ against the ceiling and the quarter-round against the brick were too puny compared to the heft of the nice chunky 1 x 4″ trim piece along the bottom of the triangle.
I had chosen the 1 x 2″ trim piece to run along the freshly lofted ceiling because it most closely resembled the lattice in the rest of the room. The bigger 1 x 4″ trim piece was only there to cover some leftover rough patches from where the previous trim was removed (so something thicker was necessary). But we decided the 1 x 4″ board looked much better than any of the skimpier stuff, so suddenly Sherry and I found ourselves removing trim again… just 24 hours after putting it up.

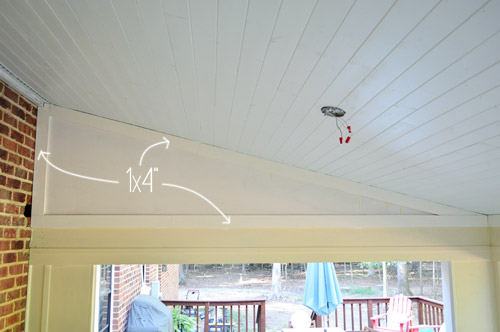
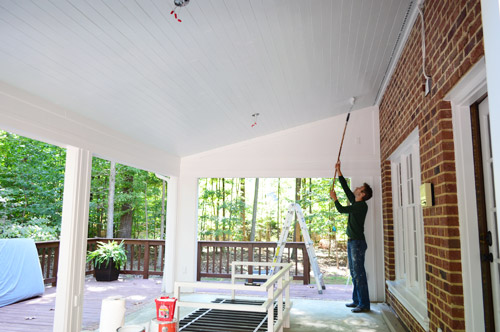
We each pried off a side and decided to install 1 x 4″ all around each triangle, so the trim near the ceiling carried all same visual weight – rather than the trim closest to the top looking chintzy. It’s hard to judge from this picture below (especially since it’s not caulked or painted) but trust me, it looks waaaay better. As for how we hung it, it’s mostly a two person job when you’re working with such long pieces up on a ladder, so one of us held it in place and the other worked the nail gun (I slipped some wood glue behind each piece for extra hold too).
And while we’re on the topic of the trim, it was a bit more challenging than a usual trim project – just because we were dealing with some angles. Fortunately we had the angle finder handy from the Kreg Crown Pro that we bought to do crown molding in our last house (though I’m sure any angle-finding tool would work). So we just set it in the nook of the triangle to find our angle.
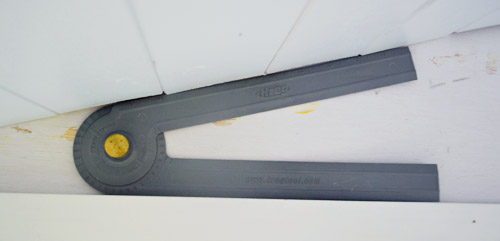
Then I marked that same angle on our board.

And then I used a circular saw to cut along the line.

Most of the cuts weren’t 100% perfect, but it wasn’t anything that caulk wouldn’t fix. So as trim jobs went, it was a relatively speedy one – even if we did have to do those two triangle sections of it twice.
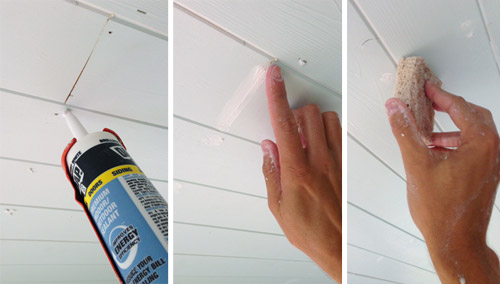
With trim up, it was time for caulking. Sherry and I usually tag-team steps like this, but outdoor caulk is too VOC-filled to inhale while carrying my baby, so I gladly flew solo. In addition to caulking all of the seams around the trim, there were also a bunch of touch-ups that I wanted to do on the ceiling itself. Call me crazy for taking the time to caulk all of our nail holes in each ceiling plank, but it was totally worth the couple of hours it took for the peace of mind that everything was sealed in and nothing would warp/rot due to the elements or the changing temps outside. Eventually I came up with quite the efficiently system: squirt a dot of caulk in each spot, smoosh in with a finger (dipped in water to help keep caulk from building up on my skin) and then smooth that over with a damp sponge. The sponge step was the key to a nice finish, and it made it go faster too.
None of our before-and-after shots of the caulked holes really demonstrated the difference (it’s one of those things you have to see in person, I guess) but having all of the little distractions taken care of was actually a big move forward in this ceiling feeling finished.
Then there was painting to deal with. Not that the cream + white + blue + primer + brick combo isn’t totally the rage these days.
In our heads painting this room wasn’t a big deal. There’s like 0.003 square feet of walls, after all (I may have rounded down a smidge). But then we remembered the 15-paned door and the three giant 15-paned windows. URGH. That’s a whole lotta mullions.
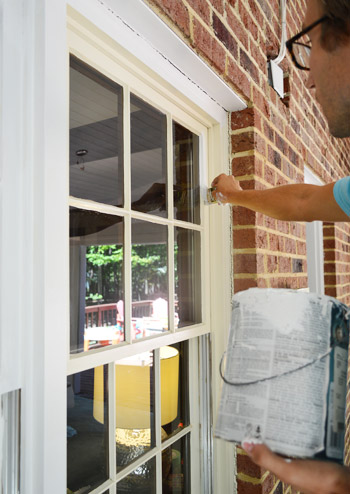
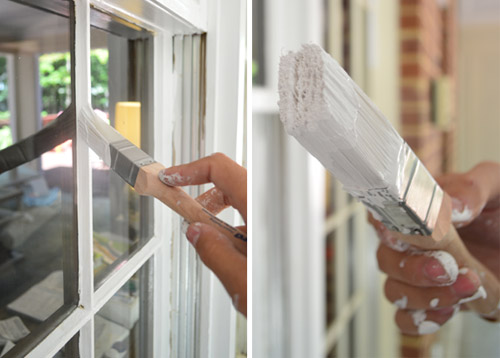
Okay, I’m being dramatic. It wasn’t that bad. It took me about four hours total to apply two coats for full coverage – but I wouldn’t call it an exciting job. Oddly enough Sherry loves to be the cutter-inner, so she was sad that exterior paint is on the no-no-pregnancy list. Did I hit the jackpot with my trim-painting wife or what? Oh and as for the color, we used Snowbound by Sherwin Williams, since the rest of our white exterior trim is painted that color.
I did my best not to get too much paint on the windows just to save ourselves time on the back-end from having to scrape all 60 of those window panes with a razor to remove the paint (we learned on the windows upstairs that scraping was a pain whenever primer was involved, so we figured exterior paint would be just as difficult since it’s a more intense formula with a built-in primer). I also tried out a new brush that’s specifically meant for this type of job – just in the name of seeing if it made things easier. In the end after both of us tried it (Sherry for just a second with a gas mask on because the girl couldn’t resist) we actually found it harder to use than our usual short-handled brush, but we’re glad that we gave it a shot, just to be sure there’s not some magic bullet out there.
With the windows and the door done, it seemed like a cinch to finally get to painting the walls, which I did with a small foam roller for the most part (I did use an angled brush to get into some of the cracks and tight spots but it was mostly a roller job).
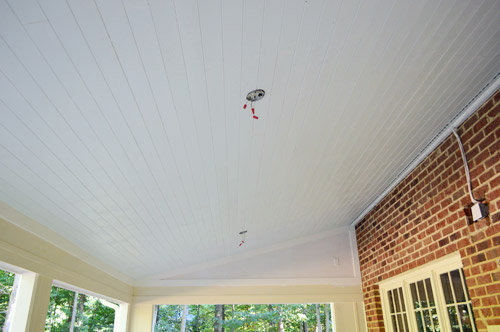
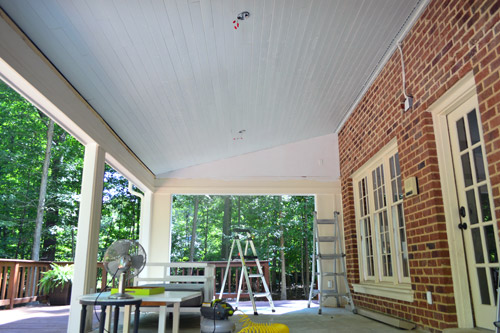
With that done, I still had one last paint job to complete: a final coat of blue on the ceiling to hide all of the caulking I’d done. Even though the white caulk blended pretty nicely with the light blue ceiling, it was still noticeable. Unpainted caulk tends to “flash” so that it’s visible at certain angles, like the row of caulked nail holes you can see below looking sort of dusty.
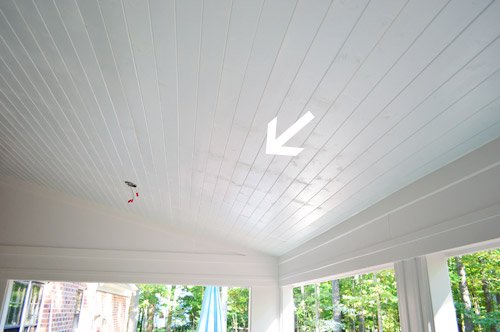
Painting a ceiling is one of our least favorite tasks, but since I didn’t have to edge this one (and it only needed one coat) it was actually pretty fast. I knocked it out in a hour while Clara was at preschool.
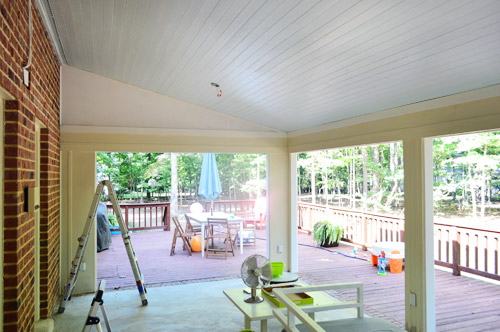
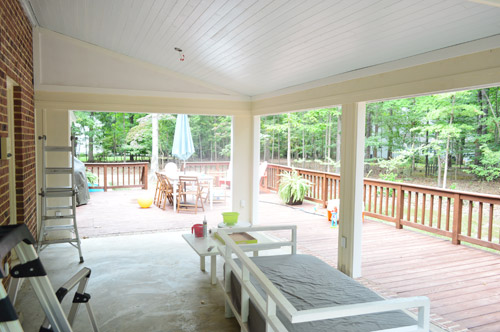
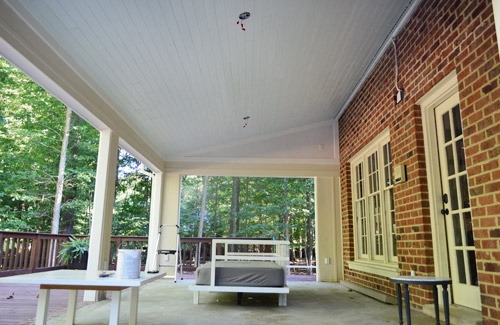
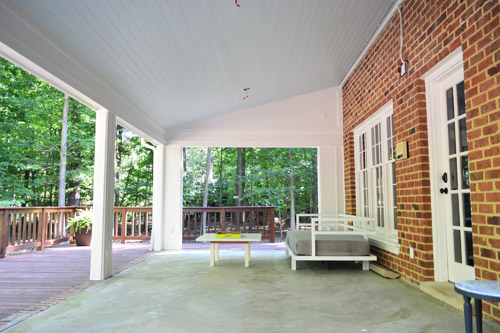
So yeah, not the most exciting updates in the world – but these little fixes really helped take our “completed” ceiling to being an actual completed ceiling. Oh except for maybe the missing fans part. Ignore that for now, and let’s just appreciate the difference between how it looked before trim/caulk/paint…
…and after.
And of course I’d be remiss to leave without a before picture of the room when we started.
So we got to cross two more lines off of our to-do list, which puts us that much closer to the part that we’re looking forward to the most: the tile floor! Hopefully that’s on the docket to get done (er, well, started) this week so that we can have a update for you next week.
Rip up the old carpeting(more on that here)
Remove the sliding doors and tracks to open things up(more on that here)
Convert outlets to outdoor-safe rain-proof ones with covers(more on that here)Add fresh casing to the openings and caulk like crazy to waterproof everything(more on that here)
Demo the old ceiling in hopes of possibly lofting it (get a pro in here for advice)(more on that here)
Remove old beams, reinforce ceiling stability, and re-route electrical for two fans instead of one(more on that here)Prime, paint, and install our beadboard ceiling(more on that here)
Add trim around the ceiling and caulk/paint thatRepaint the columns & interior of the sunroom with white exterior paint (it’s currently cream)- Hang two ceiling fans
- Tile the floors (we bought something that’s outdoor safe and less slick than the glue-stained concrete here)
- Get a rug, furniture, and maybe even add some outdoor curtains and lanterns/sconces?
- Build an outdoor fireplace like this down the line
It’s funny how going into this reno we thought “well it’s not a kitchen or a bathroom so it probably won’t take that long” – yet it involved ripping out eight doors and a ceiling, adding all new electrical, installing a new ceiling plank by plank, painting a whole bunch of trim and windows and doors. And there are still fans and tiling to be tackled, as well as the dream of adding a fireplace someday. Turns out sunroom renos can be just as involved as a bathroom or a kitchen makeover. Who knew?

Jennifer says
You guys have such an eye to identify how things could look better. Most of us wouldn’t think a thing about the small trim, but after comparing the two, the larger trim looks 1000% better. Great vision!
Evie says
Sherry, I wanted to ask a question for Friday, but in the excitement of yesterday’s post, I forgot! I’ll just put it here… My great grandmother’s name was Clara, and it’s fun to see that wonderful name again on such a vibrant little Petersik girl! I’m truly not digging for early name announcements for Bean2, you guys, but I’ve just been wondering….did you name your Clara after a family member, or do you just love old fashioned names?
John, to keep this post on topic…hahah, hard if you’re me…the sunroom is looking spectacular. I would totally live out there! And sometime, could you give some ceiling painting advice (or point me to it if you already have)? I’ve got to paint the ceiling in my house… Worrying a lot about doing it is just not making the durn thing look any better…so it must be time to take action.
Ruthie says
I love how it’s shaping up but sad for you guys that winter is headed this way! Will you add a chiminea or some sort of little fire pit on the deck so you can still enjoy in the cold(er) months?
YoungHouseLove says
We’d love to add a fireplace down the line, although it’s probably not in the budget for this year. Maybe a little store bought firepit though?
xo
s
Holly says
The details are so important, and I appreciate the detailed explanations. Thank you!
Jess says
Love the progress- I am super pumped about the outdoor fireplace!
Also, I and am so excited for Bean #2!! I can’t wait to see what you guys will do for a nursery. You are always so inspiring :)
Amy says
Inspiring thousands to think “outside of the box,” I love it!
Linda says
This is the exact sort of post that keeps me coming back to YHL (and standing in line in Chicago at 8:00 am to meet you guys!) – detailed, and here’s what went right, and what went wrong, and how to fix! So many blogs gloss over the details, or that not everything comes out perfectly the first time around. And the power that comes in doing things right, no matter how tedious. Thank you again.
YoungHouseLove says
Happy to help, Linda!
-John
erin says
ahmazing!!!! that’s a great transformation!
Jessi says
I’m really loving how the porch is turning out! Such a great outdoor space!
Quick question-are your window mullions wood? Ours on our house are vinyl, so I don’t know if we would be able to paint them?
YoungHouseLove says
Thanks Jessi! Ours are wood, so I’m not sure about vinyl outdoor mullions. Anyone know? Maybe there’s a special exterior paint that works on vinyl?
xo
s
Melissa@TheChicDream says
It looks wonderful! I’m so envious of that space. I would love to have a nice covered spot outside. I can’t wait to see it when it’s complete.
Danielle Ferretti in Miami says
Oh my gosh ! What a difference in this sunroom already ! And I need to say that I didn’t even realize how the yellowish trims and windows bothered me until I saw the before and after pictures with the nice crisp white… Guess that’s why I need you in my life ! :)
Just wanted to congratulate you guys again ! This is SUCH great baby news ! Ok, I need to also tell you how excited I was to tell my husband last night over dinner, this is kinda how it went down…
*me : you will NOT believe who is pregnant again !!! Sherry and John, from that DIY blog I am obsessed with, you know the one I read everyday, you know ?! This is SUCH great news ! (ok, there might have been a squeal and some clapping involved)
*hubby : … (silence)… (kept eating with his head down)…
*me : did you even HEAR me ?!
*hubby : … honey, you DO realize that you don’t actually know these people, right… ? (very softly spoken, no eye contact here…)
No, he didn’t make me feel like a stalking creep at all…
YoungHouseLove says
Oh Danielle! You do so know us! We’re tour buddies! Don’t let your hubby forget it. Haha!
xo
s
Sapphira says
The sunroom looks amazing! Are you guys thinking about doing something with the brick (i.e. whitewashing) or are you planning on leaving it alone since it’s outdoors? Can’t wait to see everything come together!
YoungHouseLove says
Since the rest of the house is the same brick, we think leaving it will keep it cohesive. But I’m hoping once we decorate the room and add curtains and lights and furniture the emphasis won’t be on that brick wall anymore, so it’ll blend more.
xo
s
Aimee says
You know what could work that would be good for a space exposed to the elements all the time? Long white or pale blue shower curtains for s simple, clean look. ORB some pipe/fittings to put up as rods rather than tacking sheers in corners. Hmmm.
YoungHouseLove says
That’s fun!
xo
s
Dia says
So nice!
This rates as one of your top ten projects in my eyes.
Good work you two.
And congrats on Bean II.
YoungHouseLove says
Thanks Dia!
xo
s
Liz says
We are looking to paint our porch blue, but cannot decide on a color… Which color did you use for the sky blue? Painting the porch ceiling blue is common here in New Orleans (and we noticed in Key West too!) – I have heard that if you paint your porch ceilings blue, the wasps will not make a nest because they think it the sky…
Porch looks great!
YoungHouseLove says
Thanks Liz! It’s called In Your Eyes by BM. It’s nice and light (we worried anything too bold could feel heavy and might reflect into the adjoined living room and make the walls have a blue cast).
xo
s
Karen says
Beautiful sunroom. But, jjjjjust *one* comment on yesterday’s blog, were the 3,405 comments a record for you guys?
YoungHouseLove says
Yes, other than giveaways! We are blown away!
xo
s
Jillian@TheHumbleGourmet says
I have definitely done the same thing thinking “oh, this room is just XYZ, it won’t take long at all!” I’ve stopped trusting my judgment on those things.
Jules says
I love your sunroom! I love your house, and all your projects!! I’m also really excited for about your newest addition!
I learned something very interesting about caulking this past summer… get a sandwich bag, add about 1/2 C of water, a couple drops of dish soap and a rag. Dip your fingers in the soapy mixture before smearing the caulking with your finger. (you won’t even use the rag, but it helps keep the bag steady so you don’t spill your soapy water). This will allow you to smear the caulking smooth with no mess on your project or fingers! I’m sure you’ll come across projects in the future that require caulking, so give this a try… it’s worth it! :)
YoungHouseLove says
Love that tip Jules! Thanks so much for sharing!
xo
s
Susan says
You talked about keeping your furniture out all year. I have a wicker furniture set that is meant to be indoors, but I just added a cement patio under my very high deck. Can that furniture become weather proof furniture with some kind of special spray product? I just thought you might be the perfect person to ask this question. Your outside room looks great by the way!!!! I never thought I would like it better than an enclosed sunroom, but it’s really great!!!I would kill for a room like this on my deck. It’s really like an extra room!
YoungHouseLove says
Hmm, Rustoleum just came out with a spray called NeverWet that seals things in and literally doesn’t let water penetrate things, so maybe that would be good to spray on the wicker as sort of a clear sealant? Anyone else have tips for Susan?
xo
s
Aimee says
You’d have to practically dip wicker to get every little bit of it completely sealed. It’s pretty porous and sucks up paint if it’s in its natural state, not to mention its gazillion twists and turns. I’ve painted wicker and it’s hard to get full coverage with a brush, so when it needed freshening I went with 2 coats of spray paint instead. Much faster.
You can buy clear-coat non-yellowing sealers that come in spray paint-like cans, but it would probably take a lot of flipping the furniture around, a cramped trigger finger, and about 3 coats to ensure all of it’s covered.
YoungHouseLove says
Great tip Aimee!
xo
s
Kerry says
It looks so good! The paint really makes a difference, especially on the windows and door. Can’t wait to see the finished project. (and just think about how you can enjoy the lovely room with your new addition next summer!)
Molly S. says
Looks AMAZING! I can’t believe what a difference it’s made- I’m even more excited to see it tiled and furnished down the road. Squeee!
I noticed in the photos that you can see where the ceiling used to be because the brick and grout are quite a bit cleaner above the former ceiling than they are on the lower walls. Any plans to try to even out the difference? Maybe it’s not that noticeable in person.
YoungHouseLove says
It’s more noticeable in photos than in person, but I’d still love to scrub it or gently power-wash it for a more uniform look I think!
xo
s
Jen Rayder says
John,
Looks great! But not only do you need a table for your TABLEsaw, you need a miter/chop saw. Much easier than the circular saw! Christmas is coming. Congrats to the whole fam on the cooking bean.
YoungHouseLove says
Thanks Jen, I love my miter saw! It definitely gets a ton of use too. Can’t wait to get the garage all “set up” so using that stuff is easier. Probably should get on that already, huh?
-John
Eilene says
It looks so fresh and clean! I love that you show what a difference the finishing work does to a space. It’s pretty darn amazing.
Also, I like when John posts on the blog. It’s like hanging out with a fun guy friend for a couple minutes.
Sarah B says
Are you planning to paint or white wash the brick wall?
CONGRATS on the pregnancy news too! Very happy for you and your family :)
YoungHouseLove says
Thanks Sarah! Since the rest of the exterior of our house is unpainted brick, we want everything to flow, so we’re planning to leave it unpainted.
xo
s
Jennifer I says
Every room in my house has trim that needs attention — we get so exhausted by the room redo, that it seems once we get to that point, we have no more energy left…it is a tradition that at least one thing must be left unfinished. You are right though, that attention to detail pays off, it looks so good!
I love coming to this board because of all the info I get, and because it is consistently one place on the internet I can go where people are not being hateful. Congrats on your baby! Prayers that you will have a healthy pregnancy and baby.
Tanya says
Incredible! What a beautiful transformation. I hope when its finished you show us some pictures outside of the room. I would love to see the effect it has from a distance, especially once you have curtains. I bet it looks dreamy.
Erica says
I’ve always wondered- why are outdoor patio covered ceilings painted light blue? Seems to be a pretty universal trend, and I’ve never understood why, aside from the fact that it looks pretty. Thanks for the tip!
YoungHouseLove says
I think it’s a tradition in the south (it’s said to keep bugs away and also said to do something like deter ghosts, haha!).
xo
s
Rachel says
It looks great of course, but honestly I liked it with the original dark beams showing. It looked very rustic which complimented the dark deck and wooded backyard. It does look really good white as well though!!
linda says
I’ve been reading your blog for several years now, and am impressed with the integrity and hard work that you both demonstrate, and so young! I’ve been much slower to bloom…Wanted to offer my heartfelt congratulations to you on your beautiful news. You have two (three) very fortunate children.
Kerri says
That outdoor fireplace pin is gorgeous. Can’t wait for that project to start (no matter how far in the future it may be)!
Such a lovely transformation. I bet it smells so fresh compared to when you moved in.
Alicia C. says
As a southern girl (born in Atlanta and now live in Charlotte), I was seriously concerned when you took the doors/screens out of the sunroom. My only thought was “But, but, the mosquitoes!!!!” Seriously though, it looks amazing and I definitely agree that it makes the whole deck more integrated and usable. Invest in a few thermacells and call it a day!
Megan says
Even though you guys aren’t done, I think this is seriously one of the most incredible before and afters that you’ve ever had! I can’t believe that you guys were able to see this potential in that space. Also very excited to hear your good news – I can’t wait for all the pictures and stories of your two munchkins!
Emily says
I am loving that light blue on the ceiling. I’d love to do the same on our porch ceiling but I’m not sure it will go with our house color. Currently the house is gray painted concrete block on the first floor (sounds almost as hideous as it is), blue cedar shake on the second floor with white trim but I am hoping to change to tan on the bottom and green on the top with white trim. Do you think light blue will go with tan and green?
Also, how excited are you that domino magazine is back!?!
YoungHouseLove says
Wahoo! I’m psyched! As for light blue with tan and green, it sounds like a perfect combo! The fabric we used in yesterday’s post seemed to have all those colors and looked awesome!
xo
s
Mary @ Redo 101 says
Hi I missed yesterday but wanted to say how excited I am to hear about your bun in the oven – yay!!! Also the changes John made in the ceiling trim really did make an impressive difference, great job.
Mary
Danielle Purtle says
Oh yay! I have been so excited about it being all one lovely white on the trim/doors/windows! Have ya’ll talked anymore about the floor out there? I know ya’ll said that you were leaning in the direction of tile, correct? I remember reading that you were taking paint out of the running, because for one it is slick, and also it would prevent any future tiling. Is that the case with non slip grit paint as well? Or Rustoleum deck and concrete restore? I wouldn’t think it would be slick, but I wondered if that would prevent tiling the same as regular concrete paint.
YoungHouseLove says
We found tile here! So excited to get it going! https://www.younghouselove.com/2013/08/a-floor-plan/
xo
s
John says
Looks great! You could just lay a piece of scrap wood along the slope and slide the trim under it to get the angle or just scribe it with a compass. If you didn’t paint the caulk holes they will get dirty in time.
Brooke says
It looks so great! I learned this weekend that they used to paint porch ceilings blue to keep the birds from making nests there. You’ve probably heard that 100 times but I thought that was so smart. All this time I thought people just did it because it looks awesome ;)
kristin says
Do you think you will DIY the fireplace? My dad is a tile contractor and said masonry work is the bane of his existence. He did the brick BBQ at our house and the brick around the pool and it half killed him. Will you DIY or contact out? Look at all the options?
YoungHouseLove says
I think we might hire a mason to help us frame it and make sure it’s to code and then maybe tile/add stone to the outside of it ourselves? Not sure yet!
xo
s
KathyG says
Good work John, devil is in the details for sure…
I know it is long term, but consider making it a Pizza Oven when you do it. DIYers do it all the time, although it is a bit of a project! We have one, and just LOVE it.
YoungHouseLove says
That sounds awesome!
-John
Angela-Rose says
Oh my goodness! I can totally appreciate just how much “fun” painting windows can be, having just refinished 8 natural wood windows (sanded off polyurethane, primed and painted)… I’m talking 12 over 12s which I love the look of but really never want to have to paint again! They’re really nothing in the scheme of our renovation…next up priming an unGodly amount of fresh drywall, ceiling and all – my favorite! ????
YoungHouseLove says
Oh my gosh, I bow to you Angela-Rose! I bet they look amazing now.
xo
s
Joan Klein says
This space is a perfect example of why I love your blog. Your creativity in taking a nice but not fabulous space and turning it into somewhere I would enjoy year round inspires me. I love this room and it isn’t even done yet! Congratulations on your great news!!
karen says
its looking really cleaned up! i think if you paint the door black, it would look really sharp..and i think would tie into your dark exterior windows.
Katie O says
Off topic question here, but someone above mentioned a miter saw. We are going to install new trim and crown molding in some of our rooms, and I was planning on using an angle finder and our circular saw to cut the trim and molding. Do you think I should add a miter saw to my Christmas list (last year I got a nail gun and the circular saw . . . best Christmas e.v.e.r!)? Or should a circular saw and an angle finder do the trick? Also, what size is your miter saw? I briefly looked online and saw price ranges from $69 – $600, but I’m not sure what the sizes mean that seem to dictate the price.
YoungHouseLove says
You will most likely need a miter saw to get those angles (unless you’re crazy steady with a circular saw). Mine is probably around $150 from Sears (it’s a Craftsman) – don’t know the size or model offhand, but it’s just a pretty basic one. This post might help (there’s a video all about installing crown and all the tools/steps that went into it for us).
-John
alg (amy) says
First of all — CONGRATULATIONS!!!!! I was wondering if there was a bean in the ol’ pot, because I hadn’t seen $herdog up on any ladders or anything lately, plus, John has been solo on a lot of VOC-laden projects. (Mad ups on doing that whole deck process yourself, dude. You’re a prince among men!)
BTW — I too am expecting (in early/mid March) and would LOVE to squeeze a DIYer question onto the Friday post list…
Specifically — How do you handle safety/exposure issues and still get any work done while you’re pregnant? It is Driving.Me.Crazy to sit on the sidelines for 9 months, but I — of course — don’t want to do anything that could harm the kiddo!
If you could give us a quick list of low-VOC products you like, and/or any other tips you follow while pregnant, I’d be SO very grateful.
(I mostly do furniture restoration & other “crafty” products, so any guidelines/product recommendations you have along the paints/stains/glues lines would be awesome.)
Thanks, and CONGRATS AGAIN!!! :)
YoungHouseLove says
Will do Alg! I found some pretty great products while pregnant with Clara!
xo
s
alg (amy) says
Thanks for including my question :)
Coincidentally, I had an OB appt just yesterday, so I figured the time was right to ask about painting/crafting stuff.
My (awesome) doc had more or less the same advice as y’all: No need to stop entirely, just take the necessary precautions. Both responses make me feel way better about keepin’ on with my bad DIY self! So, yay!!
She couldn’t suggest specific products, though, so thanks SO much for your recommendations — they’ll come in super handy!
YoungHouseLove says
Aw, good luck Alg!
xo
s
Isabel says
Looking great guys! And congrats again on the baby news, looking forward to all the details tomorrow.
Completely random question: what is the font you use on your header? Is it freely downloadable? I’m working on a photo/wall art project and I think that font would go perfectly. Thanks!
YoungHouseLove says
It’s Ostrich Sans! I think if you google it you’ll find it. I believe it’s free but we might have given a donation. We love the designer (Tyler). Very talented guy!
xo
s
Isabel says
Yes, found it! Thanks so much! I really love the no-frills, clean lines and it even supports international characters, woohoo!
mpsoderb says
I love love love love this. If I didn’t live in Ice Tundra Minnesota I would love to do this!
Jordan says
“outdoor caulk is too VOC-filled to inhale while carrying my baby”
I feel like a dork, but I just wanted to say that I love your word choice here, John. You could have written “while pregnant”, “with a bun in the oven”, “carrying A baby” or any other myriad of terms, but you chose “carrying MY baby”. I love to see a father already smitten with their baby in utero. Protective of your sweet little growing bean! Made this mama smile.
Mia says
When we painted a small room recently, I handed my husband the short, angled cut-in brush you guys recommended. After he was done, he said that is was “that was a good brush for cutting in. A really good brush.” Then I told him where I got the tip! Thanks guys! (oh and we are in our sixties)
YoungHouseLove says
So glad Mia! I’m such a fan of that little brush!
xo
s
Abby says
This looks amazing. What a difference!
Lisa says
In the process of repainting our semi-enclosed patio (going from a poo-poo brown to a glorious greige). I’m sure you’ve commented on this before, but I’m feeling lazy and don’t want to dig around…I still need to paint the exterior of the French doors (swing into the house). Mosquitoes are terrible right now and I have young-uns, so I’d rather not leave the doors open to let the fumes and skeeters inside. Any advice on painting the doors? Thanks!
YoungHouseLove says
Hmm, could you paint them mostly closed, just cracked? That way you don’t have them fully sealed, but they’re only slightly open so bugs hopefully don’t get in and out?
xo
s
Lisa says
That’s kind of what I’m leaning towards or taking them off the hinges and sealing up as best I can w/ a plastic sheet. Also forgot to mention…your sunroom looks wonderful! Definitely an impressive before/after shot! Sorry, all about me, me, me! :)
YoungHouseLove says
No worries Lisa! Good luck! The plastic sheet on the other side to seal it’s so smart!
xo
s
Amanda says
Are you going to doing anything with the brick like whitewash it since it kinda clashes with the ceiling and column colors?
YoungHouseLove says
The whole exterior of our house is brick, so because this open room is attached to the whole rest of the house we think it’ll look weird to paint part of the brick (it opens to the deck which is against the brick side of the house). Hope that makes sense!
xo
s
Ariana says
Have you ever thought about converting that downspout to a rain chain? http://www.pinterest.com/pin/178103360237077518/ Obviously not TOP of your todo list right now but might look swanky down the line- and always fun for kids to watch!
YoungHouseLove says
Yes, I’d love to!! The only issue is that the gutter connects to a drainage pipe that runs under the deck, so we’re not sure a rain chain could be rigged up to direct the water down that tube (it might have to hang straight to work, and the chain would have to tilt a little to enter the tube at the right point I think). Definitely worth playing around with it though!
xo
s