First of all, thanks so much for the unbelievable outpouring of well-wishes for our announcement yesterday. It was great to share our news with you guys. While madly trying to keep up with the 3,000+ (!!) comments, our afternoon post sort of fell by the wayside, so we figured we’ll share an afternoon one today with you instead. In the meantime, Sherry is cutting and pasting a ton of questions from yesterday’s comments and working on Friday’s Q&A post for you, and I’m here to shake my tail feathers about managing to cross a few more things off our sunroom to-do list in this week (yes, feel free to picture that).
So let’s talk about three steps that have taken our sunroom from half-baked to feeling a lot more finished: adding trim, caulking, and painting. They’re not always glamorous project steps (especially installing trim and caulking) but details like those tend to make all the difference (wonky trim and messy caulk can add up to a shoddy looking finished product, even if a room is furnished really nicely). I originally planned to gloss over the trim-hanging part and dive more deeply into caulking and painting, but then I messed something up and, voila, it felt like info that might be helpful to share. Nothing like celebrating your screw ups, right?
Ok, so we had to add trim to polish off our recently tongue-and-groove planked ceiliing. Originally I was just going to toss out a quick mention like: “We installed trim to bridge the gaps around the ceiling and the new triangle panels we added. To match the other simple lattice-like trim around the rest of the room, we opted not to use typical crown molding. Plus, it spared us from having to calculate how to cut all of tricky crown angles against an angled ceiling.”
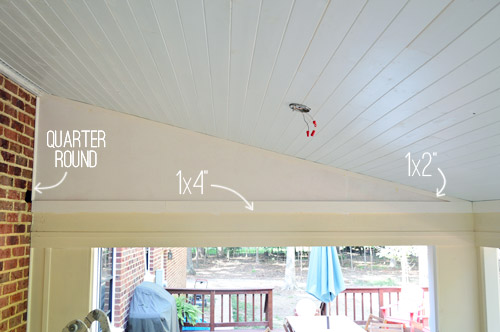
But after the trim was installed, we both stepped back and decided it didn’t look good. Not because it wasn’t crown, but because the 1 x 2″ against the ceiling and the quarter-round against the brick were too puny compared to the heft of the nice chunky 1 x 4″ trim piece along the bottom of the triangle.
I had chosen the 1 x 2″ trim piece to run along the freshly lofted ceiling because it most closely resembled the lattice in the rest of the room. The bigger 1 x 4″ trim piece was only there to cover some leftover rough patches from where the previous trim was removed (so something thicker was necessary). But we decided the 1 x 4″ board looked much better than any of the skimpier stuff, so suddenly Sherry and I found ourselves removing trim again… just 24 hours after putting it up.

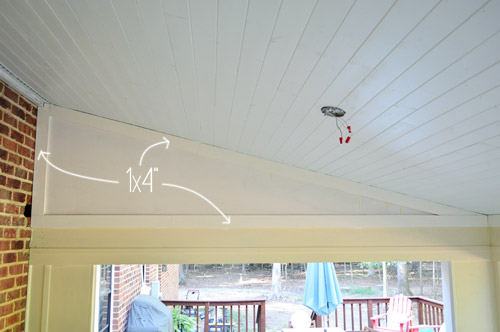
We each pried off a side and decided to install 1 x 4″ all around each triangle, so the trim near the ceiling carried all same visual weight – rather than the trim closest to the top looking chintzy. It’s hard to judge from this picture below (especially since it’s not caulked or painted) but trust me, it looks waaaay better. As for how we hung it, it’s mostly a two person job when you’re working with such long pieces up on a ladder, so one of us held it in place and the other worked the nail gun (I slipped some wood glue behind each piece for extra hold too).
And while we’re on the topic of the trim, it was a bit more challenging than a usual trim project – just because we were dealing with some angles. Fortunately we had the angle finder handy from the Kreg Crown Pro that we bought to do crown molding in our last house (though I’m sure any angle-finding tool would work). So we just set it in the nook of the triangle to find our angle.
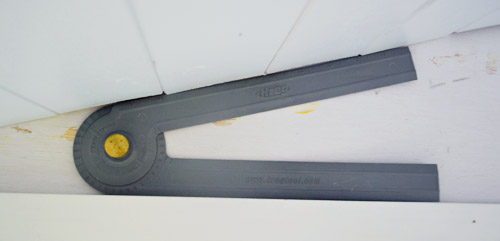
Then I marked that same angle on our board.

And then I used a circular saw to cut along the line.

Most of the cuts weren’t 100% perfect, but it wasn’t anything that caulk wouldn’t fix. So as trim jobs went, it was a relatively speedy one – even if we did have to do those two triangle sections of it twice.
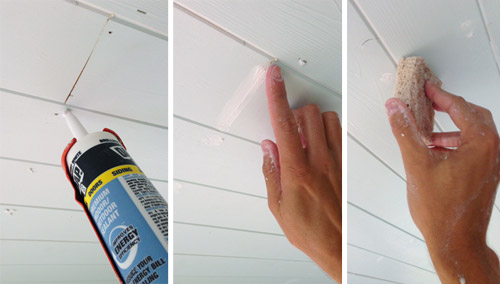
With trim up, it was time for caulking. Sherry and I usually tag-team steps like this, but outdoor caulk is too VOC-filled to inhale while carrying my baby, so I gladly flew solo. In addition to caulking all of the seams around the trim, there were also a bunch of touch-ups that I wanted to do on the ceiling itself. Call me crazy for taking the time to caulk all of our nail holes in each ceiling plank, but it was totally worth the couple of hours it took for the peace of mind that everything was sealed in and nothing would warp/rot due to the elements or the changing temps outside. Eventually I came up with quite the efficiently system: squirt a dot of caulk in each spot, smoosh in with a finger (dipped in water to help keep caulk from building up on my skin) and then smooth that over with a damp sponge. The sponge step was the key to a nice finish, and it made it go faster too.
None of our before-and-after shots of the caulked holes really demonstrated the difference (it’s one of those things you have to see in person, I guess) but having all of the little distractions taken care of was actually a big move forward in this ceiling feeling finished.
Then there was painting to deal with. Not that the cream + white + blue + primer + brick combo isn’t totally the rage these days.
In our heads painting this room wasn’t a big deal. There’s like 0.003 square feet of walls, after all (I may have rounded down a smidge). But then we remembered the 15-paned door and the three giant 15-paned windows. URGH. That’s a whole lotta mullions.
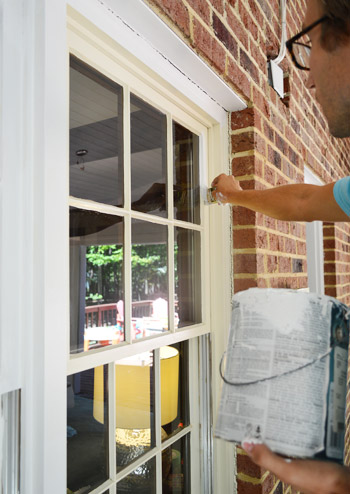
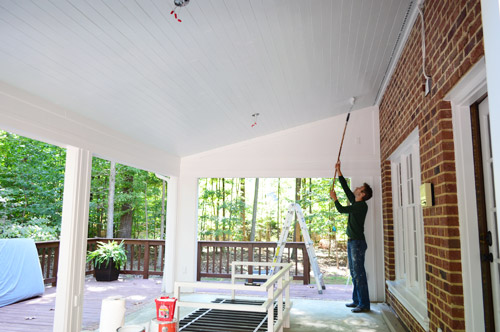
Okay, I’m being dramatic. It wasn’t that bad. It took me about four hours total to apply two coats for full coverage – but I wouldn’t call it an exciting job. Oddly enough Sherry loves to be the cutter-inner, so she was sad that exterior paint is on the no-no-pregnancy list. Did I hit the jackpot with my trim-painting wife or what? Oh and as for the color, we used Snowbound by Sherwin Williams, since the rest of our white exterior trim is painted that color.
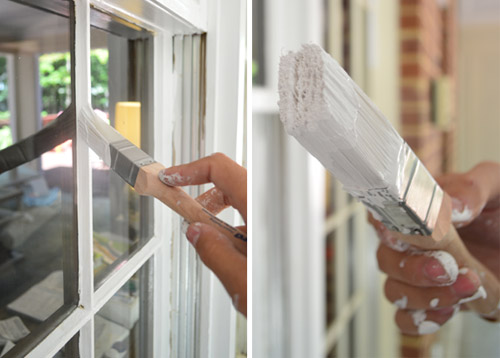
I did my best not to get too much paint on the windows just to save ourselves time on the back-end from having to scrape all 60 of those window panes with a razor to remove the paint (we learned on the windows upstairs that scraping was a pain whenever primer was involved, so we figured exterior paint would be just as difficult since it’s a more intense formula with a built-in primer). I also tried out a new brush that’s specifically meant for this type of job – just in the name of seeing if it made things easier. In the end after both of us tried it (Sherry for just a second with a gas mask on because the girl couldn’t resist) we actually found it harder to use than our usual short-handled brush, but we’re glad that we gave it a shot, just to be sure there’s not some magic bullet out there.
With the windows and the door done, it seemed like a cinch to finally get to painting the walls, which I did with a small foam roller for the most part (I did use an angled brush to get into some of the cracks and tight spots but it was mostly a roller job).
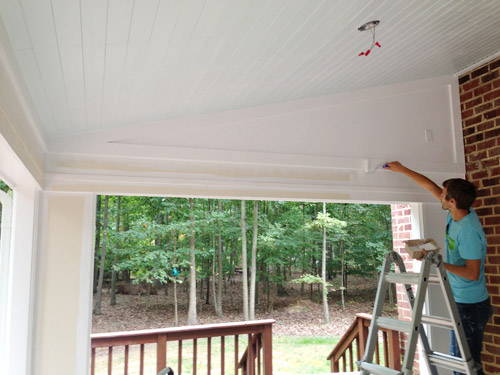
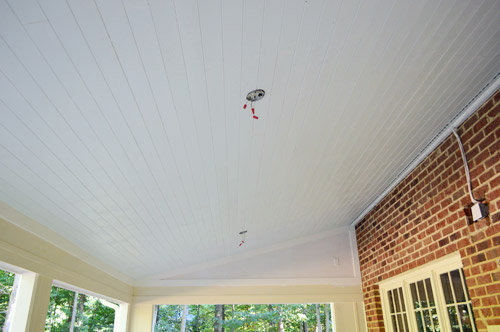
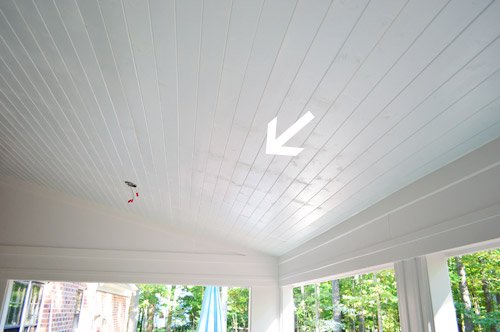
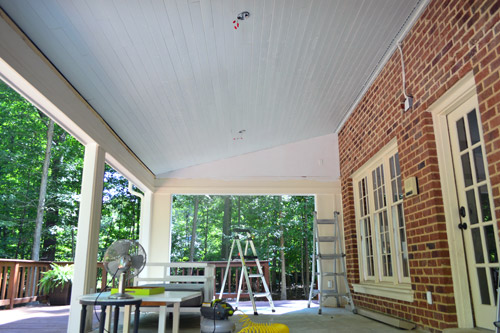
With that done, I still had one last paint job to complete: a final coat of blue on the ceiling to hide all of the caulking I’d done. Even though the white caulk blended pretty nicely with the light blue ceiling, it was still noticeable. Unpainted caulk tends to “flash” so that it’s visible at certain angles, like the row of caulked nail holes you can see below looking sort of dusty.
Painting a ceiling is one of our least favorite tasks, but since I didn’t have to edge this one (and it only needed one coat) it was actually pretty fast. I knocked it out in a hour while Clara was at preschool.
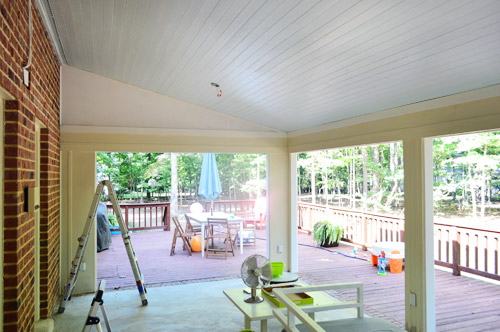
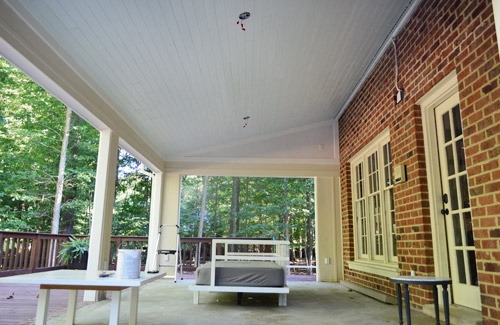
So yeah, not the most exciting updates in the world – but these little fixes really helped take our “completed” ceiling to being an actual completed ceiling. Oh except for maybe the missing fans part. Ignore that for now, and let’s just appreciate the difference between how it looked before trim/caulk/paint…
…and after.

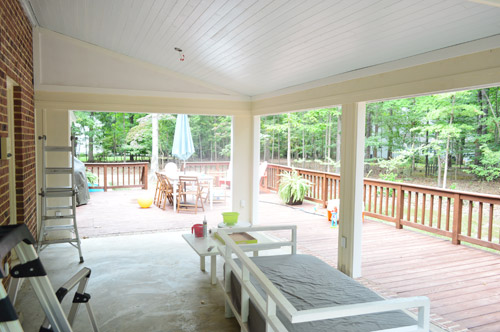
And of course I’d be remiss to leave without a before picture of the room when we started.

So we got to cross two more lines off of our to-do list, which puts us that much closer to the part that we’re looking forward to the most: the tile floor! Hopefully that’s on the docket to get done (er, well, started) this week so that we can have a update for you next week.
Rip up the old carpeting(more on that here)
Remove the sliding doors and tracks to open things up(more on that here)
Convert outlets to outdoor-safe rain-proof ones with covers(more on that here)Add fresh casing to the openings and caulk like crazy to waterproof everything(more on that here)
Demo the old ceiling in hopes of possibly lofting it (get a pro in here for advice)(more on that here)
Remove old beams, reinforce ceiling stability, and re-route electrical for two fans instead of one(more on that here)Prime, paint, and install our beadboard ceiling(more on that here)
Add trim around the ceiling and caulk/paint thatRepaint the columns & interior of the sunroom with white exterior paint (it’s currently cream)- Hang two ceiling fans
- Tile the floors (we bought something that’s outdoor safe and less slick than the glue-stained concrete here)
- Get a rug, furniture, and maybe even add some outdoor curtains and lanterns/sconces?
- Build an outdoor fireplace like this down the line
It’s funny how going into this reno we thought “well it’s not a kitchen or a bathroom so it probably won’t take that long” – yet it involved ripping out eight doors and a ceiling, adding all new electrical, installing a new ceiling plank by plank, painting a whole bunch of trim and windows and doors. And there are still fans and tiling to be tackled, as well as the dream of adding a fireplace someday. Turns out sunroom renos can be just as involved as a bathroom or a kitchen makeover. Who knew?

Brie G. says
Awesome job, guys! I think you picked the perfect blue color for the ceiling! You’re a great team!
Jen Keane says
I’m so jealous of your outdoor space! You just don’t get large gardens and sunrooms like these in urban areas or estates in Dublin – you’d have to move outside the city (and take with that all the associated isolation) in order to get it.
My own back garden is in a dire state, since I bought a fixer-upper house, and have prioritised the inside ahead of the outside. Since all of my own inside work was destroyed by my house fire (I’ve mentioned it before – it was my dishwasher!), and the professionals have basically rebuilt and refinished the whole inside of my house, now I guess I’ll have time to get cracking on making my outside (albeit small) as welcoming and cosy as yours will be! (I’m also looking forward to putting my personal stamp back on all of my now beautifully painted but blank rooms).
Also, weirdest thing. I know you spoke about hating all the pregnancy comments before (or rather, being overwhelmed by them sometimes), but I have to say, when I read the post prior to your big announcement, and John said that Sherry was downstairs working on another project, I thought “baby”. It’s funny, because actually, I don’t find myself reading your blog always looking for the baby news, since I’m really here for your gorgeous decorating (not that Clara doesn’t fall into the category of gorgeous, and delightful too!), so I just thought it was funny that, for the first time, I thought to myself “baby” and I was accidentally right! Congrats you guys!
I’ve converted my mum to a total YHL fan too – yesterday, I brought my nana to Ikea (her first ever trip) and my mum stopped at the Lack coffee tables to show her about the headboards you guys had made :)
YoungHouseLove says
Aw thanks Jen! You’re so sweet!
xo
s
Jen Keane says
I will be taking pics of my newly renovated house once I’ve done the in-person reveal to friends and family, but I bought some fab (and being discontinued!) red chairs in Ikea yesterday for my kitchen. They’re totally gorgeous, and even though they’re going next to a wooden drop-leaf table, I think they’re going to be a fun pop of colour to tie in my deep red wall tiles (my kitchen is cream and otherwise pale).
YoungHouseLove says
Wahoo! Sounds like a good time. And have so much fun with your in-person reveal! It’s such a big moment!
xo
s
Jen Keane says
I think it was you guys who encouraged me to be a bit braver and not worry so much about “matching” – out with the wooden kitchen chairs, and in with something modern and fun in a classic kitchen design.
Jen Keane says
The fire was over 4 months ago now, so I’m absolutely dying to get back into my house, to reveal it to friends and family (and everyone who’s been following my saga on twitter and my blog). And I’m really looking forward to putting in the little touches that take it from house to home. First job – refilling the bookshelves. Sadly, my first copy of YHL didn’t survive the fire – it was too sooty and dirty to retrieve, but luckily, I’ve got a new one (along with some other fun decorating books). Looks like I’ll have to start a decorating shelf in my little library!
YoungHouseLove says
Oh no! Let me send you a signed bookplate! Email me Jen! So sorry about the fire!
xo
s
Jen Keane says
That’s so kind of you to offer. I will pop an email onto you soon :)
Jen Keane says
I have sent on an email there to the “youngsters” address – it seemed the most appropriate one :)
(Completely unrelated side note: I have also just submitted my Masters thesis, which I’ve finished after 3 years studying part-time – yes, even through my house fire and some other difficulties. It’s a big night all-round!)
YoungHouseLove says
Wahoo!
xo
s
Amber V. says
I see that buying a rug is on the to-do list for the room so I just wanted to suggest that you check out rugsusa. They almost always have sales going on and I am pleased with the quality of the outdoor rug I’ve recently purchased (it’s actually being used indoors in a high pet traffic room). I snagged an 8×10 outdoor rug for $160.
The room is looking great! Next summer you can lounge in your beautiful outdoor space with sweet baby #2.
YoungHouseLove says
Thanks for the tip Amber!
xo
s
Amanda L. says
What a HUGE difference all of that made. And thank you for changing out the trim. It saved me from having to bite my tongue when looking at the 1×4 + 1×2 + quarter round all in such a small space.
You’re totally inspiring me to powerwash our front porch, fix some of the cracked steps and re-paint!
Aimee says
Funny you should mention powerwashing – I was looking at the *after * pic and wondering if it was just the lighting making it appear a bit dingy, or if John needed to break out the powerwasher on the concrete step down and lower brick before tiling.
Kenangranger says
You guys make me want to grab a paint brush! Beautiful job!
Laughing Abi says
I would swear we are back-porch-reno-soul-mates! With my beadboard ceiling finally up I’ve been scraping, trimming, caulking, and painting for the past week (interior and exterior). Isn’t caulking the most rewarding thing ever? Works like magic to turn all those warpy looking boards into a seamless, smooth wall. Your progress looks amazing, as always. Thanks for sharing!
YoungHouseLove says
I will never forget caulking John’s granny’s bathroom and saying “this stuff is a miracle in a tube!” – that room did such a 180 just from some caulk and paint. So rewarding!
xo
s
Liz H says
This is completely gorgeous! I have a neighbor who did the same thing to their previous sunroom and added a huge stacked stone fireplace, and it is unbelievably amazing. I wish I could take a picture and show you guys, but um, they already think I’m kinda crazy, and that might make them pretend to not know me anymore. But seriously, good job! And congratulations on the new baby!! We had to wait, not so patiently, for almost six years for our second and it is definitely twice as sweet the second time around. Seeing your babies loving on each other will send you right over the edge.
YoungHouseLove says
Covert picture! Covert picture! Covert picture! Just kidding…. kinda.
xo
s
Liz H says
I guess if Sherry asks you to try, you’ve gotta do it, right :) I’ll try and sneak one.
Annie says
I originally thought that the triangles would look great in blue, too, but this result proved me (happily) wrong. :) Great job! What an awesome space to enjoy spring breezes while snuggle your new bean next year!
Ceci Bean says
I cannot believe what a huge difference the trim and fresh paint made here! I loved your plan but was having trouble seeing the room as an exterior space until this.
I wish either my husband or I liked cutting in. When it’s time to paint trim, we both say “Not it!”
Ethne @ Wom Mom Blog says
Ooooo, hopefully you can get it all done before the winter comes, then maybe you can put a pretty Christmas set-up out there to look at. Poor Sherry, not being able to cut in. Baby Bean will have to leave her some fun projects like stair rug installation at least!
YoungHouseLove says
Haha! It’s true! Today I was like “pliers + crowbar + nail gun + rug + no-VOC paint (for the stair risers once we remove the rug) = fair game for momma!
xo
s
Amy E. says
since my 2.5 year old has been obsessed with watching “Rio” lately (animated movie about birds), it’s really not that difficult to imagine a full grown man dancing around with giant tail feathers angling out from his behind.
great job on all that painting! the ‘room’ looks great! i applaud your patience to do all those windows and things; i’m the cutter-inner and my husband would NEVER want to trade that job to me if we had a room like that to paint!
Emily says
The 1x4s in the triangle look tons better!! So glad you did that even though I’m sure it was a hassle removing the trim you’d just installed. And big congrats on the news! That’s great.
Tania says
I love it!! It’s amazing how much difference paint can make! I wasn’t sold on the open sunroom concept before but I’m really digging it now! not that my opinion matters :P
Deena says
OK… this may be dumb, but are you planning to decorate that porch for the holidays? I know it’s in the back and no one gets to see it but you.
This question comes from driving through this great old neighborhood in the money part of Dallas during the holidays – they have porches like yours (some visible from the street, obviously, since I’ve seen this… ha!) and they put a Christmas tree with white lights on their porch (nothing too fancy) and the whole house just seems to glow for the holidays. It’s amazing. I totally get it if it seems like a waste, I just saw the way it was starting to shape up and thought it was like those houses!
YoungHouseLove says
OH MY GOSH, I LOVE THAT IDEA!!! Seriously, I couldn’t lay off the caps lock I was that excited. Thanks so much for the idea!! We’d get to see it from the living room while we watch TV at night. So sweet.
xo
s
Amanda T. says
This sounds SO AWESOME!! I also can’t wait to see where you guys put the tree inside the house. I know it’s only October, but I’ve already been thinking about it. Haha!
Lindsay says
We’ve done a Christmas tree with white lights on our patio just outside of our sunroom and it is always pretty to look at while sitting inside!
Erin @ One Project at a Time says
The hardest part of DIY is taking down something you’ve done to redo it! My Hubs and I are always on different sides of this fence, he’s all “It’s done, and I’m done” and I’m all “It’s not done until it’s perfect.” We are both right at different times. :) Congrats to you for making the right choice- the “beefy” trim is much better.
mmm…. beef.
YoungHouseLove says
Mmmm… beef.
xo
s
leah says
Wow… all I can say is wow! What a transformation from the original room. Great vision Sherry.
Leigh Anne says
Even though I wish I was an outdoorsy gal; alas, I am not. But I LOVE this post for a different reason. As my husband and I are looking for a second home, it shows me the potential that a space can have. I’m the first to admit that I don’t often see “the forest for the trees” during house-hunting, but this absolutely amazing transformation has opened my eyes that even spaces that initially look fugly can become beautiful. Kudos to you all for your hard work – your work ethic is one to definitely be admired! And I am so excited to join you in this next chapter of DIY and life with two little ones! So happy for you and your family:)
Tyra says
So dreamy out there! Love it!!
Susan says
Those last two pictures say it all. What a difference! That space is so much more pleasant, and a really nice addition to your outdoor living area with the deck and yard. Love the blue ceiling and crisp white trim.
Matt says
So did you paint the ceiling perpendicular to the boards? Is going with the boards just harder because of the angle?
YoungHouseLove says
Yeah, I liked going perpendicular because I felt like my roller was getting into the groves more, and it was more of a steady incline than a leaning-to-one-side motion.
-John
Ian says
What is it they say… “Perfection isn’t when there’s nothing more to add, but when there is nothing left to take away”
Sounds like your sunroom!
p.s. the 4×1 looks much better, I always think quadrant is a ‘cover up’ not a proper trim.
Patti says
Wow when this is all finished, I bet you’ll be living out there all the time. It already looks beautiful! Good tip about the molding, that’s something I wouldn’t have thought twice about but now it looks so professional. It’s all in the details!
Jules says
Great job Petersiks! With my new home I’m finding that my well laid out plans to finish over a weekend/day/evening really NEVER finish during that time period. At first I would get very frustrated but after awhile, I stopped putting so much pressure on myself and just started rollin’ with the punches. I have more patience that I thought I did; who knew?!?!
You guys have been doing this for a lot longer and I’m glad to know you still have similar aspirations to complete something quicker than what reality has in store for us DIY-ers. Keep up the awesome work!
Brenda says
It looks so much brighter and cleaner with the door and windows white. It never sounds like it will be that dramatic of a change from cream to white, but it always is when you actually see it.
Jen Banker says
Looks absolutely phenomenal! I have a whole lotta caulking to do on our sunroom ceiling (which is just like yours) to cover the nail holes and some cracks. I was originally going to use spackle. Do you think that would work as well as caulk or would you recommend caulk? Also, do you have a tutorial on how to caulk around trim? I’ve also got a whole bunch of trim to caulk all over the house but I’m a little intimidated by it.
YoungHouseLove says
I always find spackle to be more dry than caulk, so it tends to shrink or crack out sometimes. Caulk seems to have more stretch (especially outdoor caulk) so I think once it’s up there and painted it’s really flexible and it holds and fills without shrinking or cracking as much. As for caulking around trim, we show that step a little bit in this crown molding video. Hope it helps!
xo
s
Kara says
This looks great, I love the openness of it all! Also, it was hard for me to see the light blue ceiling paint until everything else got painted white, but now it stands out. Looking good!
Congrats on expecting #2! I’m 7 months pregnant now with our first, so I am hoping Sherry is feeling better soon. The first trimester can be so difficult!
Haley says
This looks great!
I’m going to have to remember to get pregnant when I move in a new house so I can get out of a lot of the painting. I tried the gas mask with my last pregnancy and it always made me so sweaty that I would need lots of breaks.
Reenie says
WOW!! What a diff ~ love it. :)
Stacey says
It looks amazing! I’m actually really glad that I’m pregnant at the same time as you because I can take cues from some of your DIYing-while-pregnant decisions. I still want to keep up with our planned winter tasks, especially renovating the baby’s room, but need to remind myself to check labels, avoid heavy lifting, etc. It’s lovely to know Sherry’s doing the same!
Erin C says
I’m still amazed at how great the brick looks. I would have been so worried that somehow it was destroyed at or above the old ceiling line.
YoungHouseLove says
I agree Erin! We got so lucky! Even the framing guy who helped us lose the old ceiling said it was a miracle it wasn’t all crumbly in a big horizontal line where the old ceiling had been!
xo
s
Elizabeth says
I am slightly confused— so the reason you had to paint the windows/trim is because that was technically *inside* your house before when that used to be an enclosed sunroom? Just to clarify. :)
YoungHouseLove says
Sorry for the confusion, Elizabeth! The trim in the sunroom was cream (along with the walls) but we wanted it white like the rest of our house’s exterior trim. So John used the same exterior paint that we usec for the sidelights/windowsills to get it clean and white instead of just being cream in those spots.
xo
s
Tirsa says
It’s looking really great with all the trim painted. (love that blue ceiling) -And just in time to enjoy it during this warm spell we are having in the general area.
Jenelle says
Love the look of your outdoor sunroom! Such a beautiful change from what it once looked like! Have you picked out your outdoor ceiling fans yet? I work for an internet company called Del Mar Fans & Lighting – we have a huge select of ceiling fans from all kinds of manufacturers. Perhaps we have the perfect ceiling fan for you! Good luck! :)
YoungHouseLove says
Thanks Janelle! We’re running out later today to do some fan sleuthing!
xo
s
Katie Rose says
All this work will be so worth it next spring when it warms up again & you can enjoy your outdoor room right away instead of having to do all that work then! Smart move Petersiks :)
Jodi W says
I love your outdoor space!! I can just picture myself sitting out there with a cup of coffee and a really good book…enjoying the view. I am SO wishing I had a porch like that! Maybe someday…
Karen says
Aww, I love that you felt movement last night for he first time! It sorta-kinda makes all the puking worth it. Almost ;) (Hang in there!)
Looks great in the sunroom/veranda. Good call on the heftier trim. Painting is so much work! You guys amaze me.
YoungHouseLove says
Aw, thanks Karen!
xo
s
Traci C says
Hi there! – Just caught up with the last couple days of posts. Congratulations! I was wondering if Sherry might be pregnant when, in a previous post, there was a comment regarding another secret project, or something like that. My first thought was, “I wonder if this secret project is a baby”!?! So just wanted to send you some well-wishes from Oregon! Oh, and the sunroom is looking great! Your progress is making me seriously consider how to put one on the house we just bought! Take Care!
Traci
amanda says
It looks so beautiful, you two have an attention to detail that’s unparalleled. You’ve totally inspired me to paint my front porch ceiling blue.
Phoebe says
The sunroom looks great! Is that cream box next to the door part of your sweet intercom system? Do you have plans to remove it? We have an intercom too and are in the process of taking it out. We have done all the interior boxes but we don’t know what to do about the one by our front door. We too have brick and I’m concerned about matching up the brick if we take it out. The hole will be 5″ x 10″. Just curious what your plans are if indeed that is an intercom and you plan to remove it. Thanks!
YoungHouseLove says
Oh yeah! We have one in every room. Not sure what we’re going to do with them (whether we can convert them to an updated system or we’ll just patch them all after terminating the wires. Will keep you posted!
xo
s
Erin C says
Can I just say that when I was growing up in the 80’s/90’s intercoms seemed SO cool. Our neighbors had one and I was always super jealous. The little girl in me would want to keep it for that reason alone! Updated of course ;)
YoungHouseLove says
Haha, John’s sister has a new one and we all love it! We’re living in the future.
xo
s
Kellie says
I LOVE the before and after pics!! I feel refreshed just looking at them! Beautiful, you guys! Just awesome!
Erin says
WOWZA! Great work. I hope you are out there every minute of every day enjoying it! If you don’t have a fire pit out there on the deck (I can’t remember), maybe it’s time to invest so you can even enjoy that outdoor space when it’s cold! Add a few toasty blankets to the couches, and I’d be tempted to have a sleep-out just so I could stare admiringly at the beautiful blue ceiling and all my hard work! Enjoy (and congrats on the new baby)!!
Aimee says
Looks great and I really appreciate you using the correct word “voila” instead of “walla”. I really hate “walla”. lol.
Emily says
Congratulations on the next addition!
And I just wanted to share this article with you since I thought you were a fan of this store:
http://www.huffingtonpost.com/2013/10/02/hobby-lobby-jewish-boycott-steve-green_n_4032295.html
YoungHouseLove says
Oh no! That’s NOT COOL. Thanks for sharing the link Emily.
xo
s
Plein Jane says
This exact thing happened to me last year. I asked where I could find Hanukkah wrapping paper, and the stocker said, “Oh, we don’t carrying anything like THAT.” Two shoppers in the same aisle turned around to stare at me (I live in Texas). I was totally unprepared for the whole thing. I realize the owners are conservative Christians, but Hallmark and even the local Safeway carries Hanukkah cards and paper.
Interesting to read that others had the same thing happen.
YoungHouseLove says
I can’t believe that!
xo
s
Annie says
It looks gorgeous!
It must be so fun to be Clara and come home from preschool and check out new projects. :)
I’m impressed you redid the trim. I swear, with anything creative it’s like 3% inspiration and 97% plain old hard work.
Catherine says
I love all this talk about Sherry having a baby! Yay!!
The porch is ridiculously amazing. Great job!
Sarah says
What a GREAT outdoor space! I can’t wait to see how it will all come together with the new tile and some new outdoor furniture. After this project is complete, are there any other “must do’s” before Bean # 2 arrives in April??
YoungHouseLove says
We’re going to try to cover that in tomorrow’s Q&A post! Wahoo!
xo
s
Lillian says
First of all, congratulations on your new bean!! I am irrationally obsessed with y’all, so I felt like friends had announced their pregnancy when you posted yesterday!
The sunroom looks so good and tranquil! John, you are so not crazy for caulking those nail holes! I’ve found that if there is something that bugs me that is a relatively easy fix, I am much LESS crazy after fixing it! Also, the nail holes show up best in the picture with you using the prybar, just FYI). They’re one of those things that once you notice them, you would never have been able to NOT notice them.
Keep up all of your amazing work and thanks for all that you do! Also, come to Birmingham again sometime!
Larissa says
This has nothing to do with the post, but we closed on our house last night and I went to Habitat Restore for the first time today. O.M.G. You guys. I was all Princess Jasmin up in there – “A whole new wooooorrrlllddd…”
YoungHouseLove says
Hahahahaha!
xo
s
Dora says
Morning, would you mind sharing what caulk you used? I’m never quite sure what to use on exterior windows and doors.
Thanks in advance.
YoungHouseLove says
We like the Dap exterior paintable window/door caulk in white. Paintable is key!
xo
s
Laura C says
Looks awesome. I wasn’t 100% convinced by this whole sunroom conversion until now…it looks so good. Kudos to you two for being able to see the potential.