Alternate post title: “In A Minute, I Have To Hairdry The Chair”
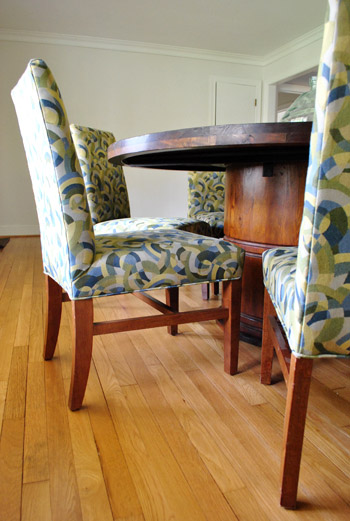
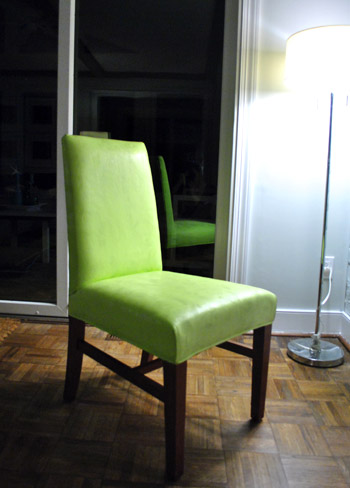
Guys, I did something crazy. Since we’d like to take our $25 hotel-ish dining chairs to a crisp not-patterned apple green (the curtains I want to make will be patterned, so I just want chairs in a fun color but without a pattern that I’ll tire of) I decided to paint them.
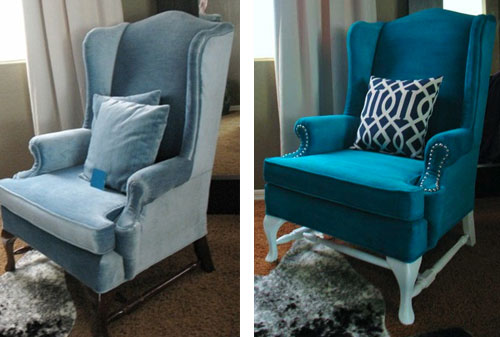
I know. Insane. But I didn’t think I had much to lose since the backup plan is to reupholster or slipcover them (both of which would still be entirely possible if I didn’t like how the whole painting thing turned out). I went into it as a hmm-this-experiment-should-be-interesting thing. Nothing was guaranteed and I felt like a crazy person the whole time. Yup, I was skeeeeered. I mean who paints a chair? Well besides a few amazing bloggers who have posted about how well it went for them. For example, this tutorial was up on my iPhone the entire time for reference and encouragement. Just look at Kristy’s amazing chair transformation. She did that with paint!
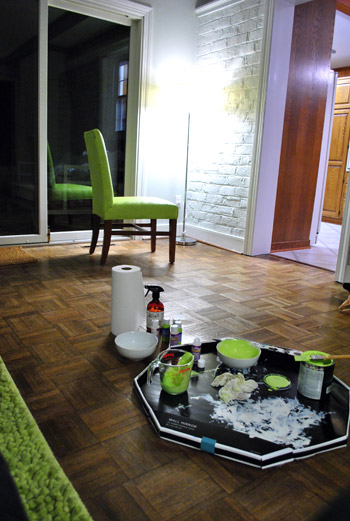
So here’s how it all went down. I pretty much just based my method on Kristy’s breakdown with a bit of flexibility since the directions on some of my supplies conflicted with a few steps. And speaking of supplies, here they are (that’s the Top Chef finale in the background BTW):

I got three tubes of “Fabric Painting Medium” and three tubes of acrylic paint in cheerful apple green from JoAnn Fabrics for under $10 total. I also picked up a quart of satin interior paint by Glidden in Granny Smith Apple (I thought it was meant to be since I’ve always talked about “apple green” chairs).
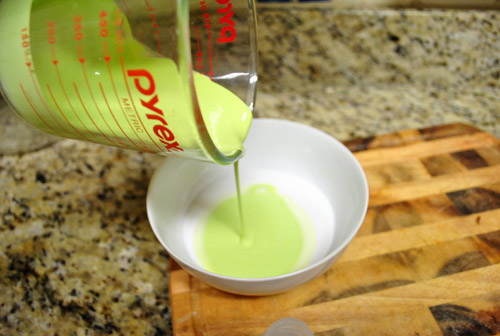
Then I just followed Kristy’s directions for the most part (admittedly not to the letter because I was also trying to adhere to the instructions on the back of my specific fabric medium, so I tried to walk the line between those and Kristy’s) and mixed one part latex paint and one part textile medium in a bowl. In order to get an even ratio I even got all type-A and dumped out the fabric painting medium into a measuring cup so I would know how much paint to add to keep the amounts equal. Here you can see that it was about a third of a cup:

Of course I accidentally dumped way too much paint into the measuring cup so I had to pour a good amount back into the can, but I was definitely happy that I wasn’t just trying to eye things (would’ve had way too much paint in the mix).
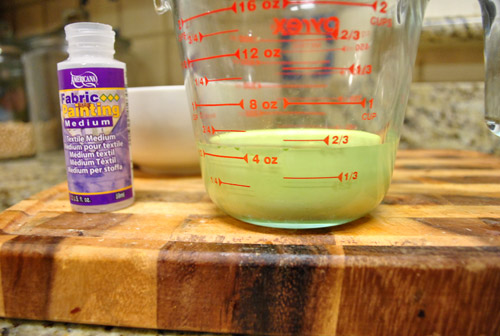
Eventually I got down to a third of a cup of latex paint and poured that into the third of a cup of fabric painting medium that I already had in the bowl.
And mixed that up with a brush that I had on hand. I was a little worried because the whole thing was looking pretty yellow but paint is always kind of an odd color until it dries and gets darker.
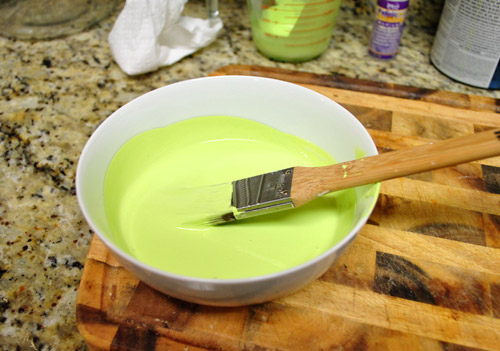
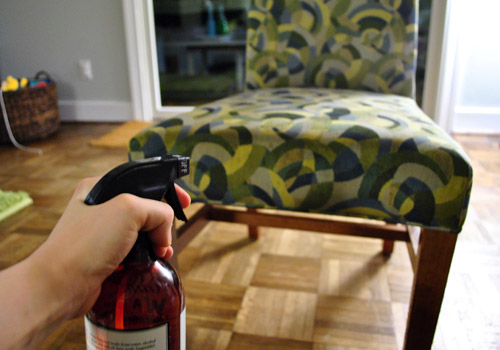
Then I added about a quarter of a cup of water to the bowl to thin things out a bit per Kristy’s suggestion. Next up was spraying down the chair with water (I reused an old cleaning bottle) so it was moist and ready for paint to glide over it evenly (instead of soaking up too much and getting all clumpy).
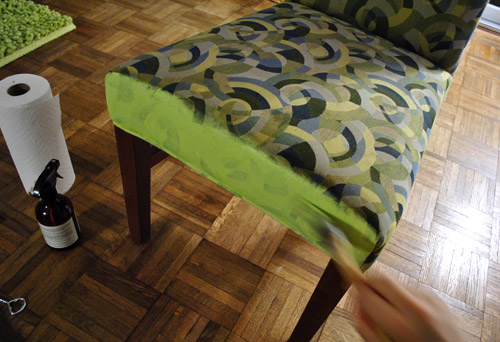
Here’s an in-progress painting shot that John grabbed over my shoulder as I went (I was too afraid of getting it wrong to stop and pose for a clear pic).
And here’s the after. Well actually I still had a few more steps left, hence the “wait a minute I have to hairdry the chair” title. John asked if I wanted to watch The Soup and I said, yup you guessed it: “wait a minute I have to hairdry the chair.” Which struck John as hilarious for some reason (I can’t imagine why) and he proclaimed that it had to be the title of this post.
The reason I was supposed to hairdry the chair was to set the textile medium (it needs heat, and when you can’t toss whatever you’re painting in the dryer, like a chair, you can apply heat with a hairdryer. But I reread the instructions on the textile medium tube and it said that I had to wait a day for the heat-setting step. So we watched The Soup and my crazy painted chair sat in the corner of the living room drying.
Here are a few first impressions:
- It’s way too neon and not as apple green as I’d like (my fault since I chose the color, but that could be fixed with different paint).
- Man, that took forever! Over an hour and a half to paint one chair (I applied a few even coats for better coverage). That factors out to 12 solid hours to do all eight chairs.
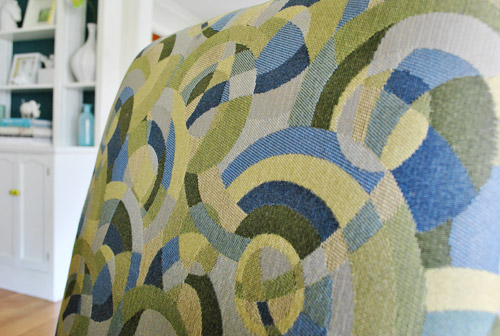
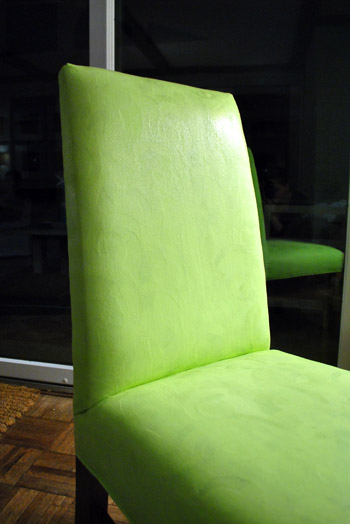
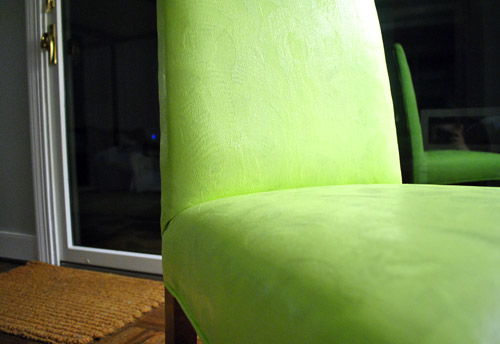
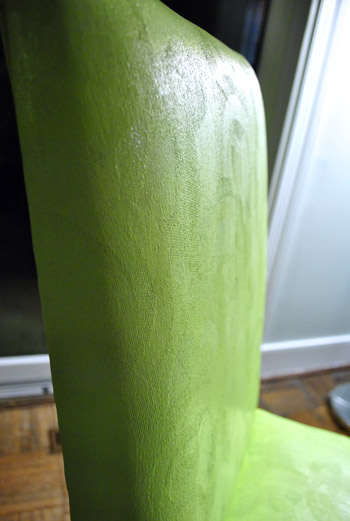
- It looks kinda cheap and those annoying swirls in the fabric still show through. See?
And here’s where we ended up after sleeping on it:
Slipcovering or reupholstering is a better solution for us since we’re not happy with the swirly texture that still shows through, the semi crunchy feeling (they’re not as smooth as vinyl, more like a rough burlap), and the odd look of painted seams (the flat parts of the chair don’t look as crazy, but the seams/folds in the corners just look gunky and unconvincing – as if they’ve very clearly been painted – since they have).
This method is obviously one of those it-depends-what-you’re-painting experiences. Because seriously, how amazing is that turquoise painted chair at the top of this post? I’ll save you the scrolling trouble. Here it is again (with a full tutorial here). So inspiring, right?
And although we didn’t have the same success, we’re glad that we tried this whole crazy process just to have it under our belts and share it with you guys (well, we didn’t end up applying the last coat of acrylic paint to finish things off because we decided to abort the mission, but I did later hairdry it to set it). And it’s definitely set for good, so for anyone wondering if a painted chair will rub off on the person who sits on it, nope. It’s just like how you can wear and even machine wash your painting clothes over and over again without worrying if they’ll smear. Once that paint is set into your shirt it’s hard and permanent (and the fabric medium is meant to help soften the paint so it’s less crunchy, in case you’re wondering about that additive).
So as of right now the green painted chair is living in the crazy cluttered playroom while the other seven unpainted chairs are still hanging out in the dining room waiting for reupholstering or cheerful apple green slipcovers.
We’ll keep you guys posted as this crazy chair adventure continues. Who knows where we’ll end up (our guess is slipcovers but you never know)…
Psst- We’re talking about how kids never fail to want the only non-toy items within their reach (the remote, your cell phone, the keys, your sunglasses) and we’re divulging Clara’s very favorite (and admittedly very weird) not-a-toy toys over on BabyCenter.

Meredith says
OK, Seriously, can I fly out there and spend an afternoon and sew you 8 slipcovers? They would be so easy!!!!
YoungHouseLove says
Somebody is going to have to save me from myself. Haha. Whenever I attempt to sew I break a needle, tangle the thread, or cry. Sometimes all three.
xo,
s
Meredith says
Hang in there Sherry! It’s usually the machine and not the person doing the sewing, swear. It’s also definitely worth getting into a class if you can (a lot of sewing machine stores offer them or try your local schools adult education or even JoAnn’s). Threading the machine and getting going is the hardest part; once you have a good needle and the thread all ready to go, start with simple straight seams and just practice those for a while—you’ll get the hang of it! My mom was on speed dial for me my first few attempts AND I took a class, but I eventually made an entire quilt, so it can be done!
YoungHouseLove says
Aw thanks Meredith! I’m definitely looking for a class I can take- cause the figure-it-out-on-your-own method is proving to be a failure. Haha.
xo,
s
Krysta @ Domestic for Dummies says
I see you put all of your painting supplies on that piece of cardboard. Did you all buy a new mirror from Tarjay?
YoungHouseLove says
Good eye! That’s the one leftover from the guest room mirror purchase a while back. Haha.
xo,
s
Melissa says
Kind of a bummer that it didn’t work, but it would have been soooo cool if it worked :) I am voting for a slipcover. I don’t think they would be hard to make and it seems like the best option with kids and after having upholstered kitchen chairs, I am done! Good luck!
Kate Ediger says
It’s good to see your experiment! Thanks for sharing. I just sold 6 chairs in a garage sale because I gave up on the reupholstering because it was a super hard situation and I didn’t realize how intense it would be when I bought them on ebay. Anyway, I love that this was a no lose situation for you. If it went horribly wrong, you know where there are hundreds more of your chairs for sale. :)
Wom-mom Ethne says
Well, I’m glad you tried it since I’d never have been brave enough. Sceered for sure. ~Ethne
Melissa Breau says
If there are any small or independently owned fabric or sewing machine shops in your area (which I’m sure there are) they typically offer sewing classes geared toward producing a specific item by the finish. You either bring in your machine or use one of the shops machines (they hope you’ll fall in love with it and buy it) and they walk you through step-by-step. Typically they aren’t expensive to take–in NY when I’ve looked into it classes are between $40-$70 for beginners (the money pays the instructor).
Then they just require you to buy the fabric from their shop for your project.
They’ll cover tension and the like and explain how to stop your needle from breaking and what’s causing that type of thing… once you have the basics down though, sewing isn’t too bad.
Some of the bigger fabric shops even offer classes; if you can’t find anything you might even be able to get a recommendation from a local craft store….
YoungHouseLove says
Yup, that’s totally what I need!
xo,
s
Threadbndr says
Sherry, it sounds like you need to get your sewing machine serviced. The ‘clogging’ thread and breaking needles are usually because the machine has a broken tension spring (or something else wrong in the tension mechanism, or the bobbin/needle plate assembly is damaged.
Ask at a local quilt shop for the name of a good sewing machine repair place.
YoungHouseLove says
Um, it’s new. Just got it. Haha.
xo,
s
Threadbndr says
Then, I think Melissa’s idea is right on, a class at a local shop or adult ed may be what you need. I suspect that you may be pulling a bit on the fabric and not letting the feed dogs do their thing. That can make the needle hit the edge of the plate and snap. But that’s the kind of thing that an ‘on the spot’ instructor can help you with.
I wish I lived closer so I could give you hand with this. I’m tackling painting trim without taping due to you all. I’d love to return the favor with a sewing lesson.
YoungHouseLove says
Aw you’re so sweet. I’m sure with some help I’ll totally get there, but it’s just funny to be where I am now (totally frustrated and annoyed) and hear everyone saying “oh sewing is so easy- just do it already.” Hahaha. I’m sensitive right now about sewing since I can’t even get the dumb machine to respect me. Haha.
xo,
s
Melody says
I had no idea that you could paint a fabric covered chair. Do you know if it’s a practical option for long term use? Does it crack?
YoungHouseLove says
From what we hear the textile medium and thin and even coats keep that from happening. I think if it went on thick it could crack though.
xo,
s
Ames says
Good for you for trying, even if it didn’t turn out the way you wanted. I can’t wait to see what you end up with, I am sure it will be awesome!
I totally get your sewing machine stress! I have one, and have made a few small quilts (just sewing squares together, nothing fancy). I find it SO difficult! I can never get the thread in right, getting the needle threaded is impossible (and it has an automatic needle threader), and my seams never come out straight. I always end up so irritated and frustrated! I am so jealous of people who can just whip up 7 slipcovers in an afternoon. If there is a sewing gene, I am definitely missing it too!!
Kayla says
So glad you two tried this! I had read Kristy’s tutorial and was amazed. Good to know that it doesn’t work on prints though! Looks good on the computer screen though!
Rebecca @ the lil house that could says
Hm did you recently buy a Target mirror (where the paint cans are sitting)? I think I just got the same one this weekend for our entryway!
And thanks for sharing your failed mission, it’s always good to see people take a risk that may not end up the way they planned. Yet you survived, as did the chair :)
YoungHouseLove says
We got that mirror for the guest room a while back (you can see it in this post) – we always save those cardboard things for paint projects. Haha.
xo,
s
Rebecca @ the lil house that could says
Ahh yes, I completely forgot it was in there! Definitely the same mirror, must have been a subconscious YHL influence :)
Andrea says
OK, but hooray for you! you tried!
And, for those of us still working on our DIY mojo, THANK YOU for showing us your mistakes and glitches along the way. It makes the whole process less scary. Much appreciated, folks.
Jess says
Your BFF Katie Bower seems pretty handy with a sewing machine (I adore the green chairs she reupholstered). I think you need to plan a visit! :)
YoungHouseLove says
I know! I have been having hilariously desperate iPhone chats about sewing mishaps with her. She’s definitely a lot more of an expert than I am!
xo,
s
Kathy says
Hi Sherry – Love your blog. You and John have such a great writing “voice”. It’s almost like you’re just talking to me.
I too, am “sewing challenged”, with all of the same issues you have. Guess what machine I have at home? A Brother! Things that make you go “hmmmm”. Makes me wonder…..
YoungHouseLove says
Haha, I told Katie Bower that I have nicknamed my machine “Oh Brother” – but she said they’re great (she’s a much better sewer than I am) and it has five stars on amazon.com. So maybe I’m to blame and not the machine. Haha.
xo,
s
Jen @ The Decor Scene says
It was worth trying it, but I would consider a slipcover. I have come across this site for IKEA slipcovers for most of there products. Worth checking out to see if it would fit your chairs also. Can’t wait to see what you come up with.
http://www.bemz.com/products/3/
Jenny B says
I swear–the home economics class I took in the 9th grade is WAY more useful in my everyday life than Bio, Physics or Algebra! That’s where I learned the basics of sewing and it really stuck. But you DO need a class. It’s not an intuitive thing (not for me, anyway). Someone suggested your local community college, I think. That’s a great start. My sister took a class that was offered at her local fabric store and learned a ton. You can do it!
Ted says
Hmmmm…except that I used Algebra to design a custom lamp for our bedroom. I couldn’t find one of those A-frame bookcases in a light color (all were black, brown, expresso, etc), so I made one from Poplar wood. To make the side triangles, I measured the side lengths based on a Pythagorean triple (5, 12, 13 -> 20″, 48″ and 52″). So, Algebra helped for my DIY project!
JenWoodhouse.com says
Yikes. Well at least now you know…
Maggie S. says
This may sound crazy, but have you considered apple green automotive vinyl?? It has the texture of leather, is super cleanable and durable. It is also much cheaper than leather and you can use spray adhesive to attach it to the big areas and a staple gun for the bottom of the chairs. Then you could finish up any seams with a nail head detail to keep them sleek.
Let me know if you need a source for auto vinyl!
YoungHouseLove says
We definitely like the idea of nice easy wipe vinyl!
xo,
s
Richelle says
I find upholstering easier than creating slipcovers. No sewing!!
counselor mom says
I remember seeing that Aqua chair on Kristy’s blog and LOVED it! I love that color too. I guess it has to be the right fabric to make it work. Good luck with your slipcover idea or reupholstery idea- both can be hard but you guys are great at saving money and knowing how to get a job done right!
Marie says
Ana White has a really good parson chair slip cover tutorial. http://ana-white.com/2010/11/drop-cloth-parson-chair-slipcovers.html
YoungHouseLove says
Oh yeah I love that one!
xo,
s
Barb says
Back again with more on this sewing bit. OK….then pay a seamstress to make them for you. So worth it. Then you are stress free. YES, you have to pay, but then no worries.
I say this is a GO!!!
B.
alg says
I guess the chairs bother you guys more than they do me!
I’d vote for reupholstering though. IMHO, slipcovers would hide their nice, clean shape :)
Centsational Girl says
Hey Sherry, you are one of those gals who absolutely can learn to sew, I know it! It takes practice, but once you get the hang of it, you’ll be shouting ‘Woo hoo!!’
Have you considered loaning out one of your chairs to a local seamstress/sewer to have him/her stitch up 8 slipcovers for you? I did that once, it worked out great! Perhaps staple the fabric to the underside of the chair underneath the legs so it looks more upholstered, less slipcovered? Just a thought!
Enjoying this room’s transformation, you two are fearless! Great post today!
xo
Kate
YoungHouseLove says
I’d love to keep trying to learn how to sew a bit more before I hand in the towel and pay someone else to do it for me (plus I’m cheap- haha) but it’s always a backup solution!
xo,
s
Ashley @ DesignBuildLove.co says
too fun! At least it was a learning adventure and now you know whether or not you’d like to do it again in the future! That wingback chair is gorgeous btw… I will definitely (cautiously) consider painting upholstery sometime soon after this tutorial!!!
Angela says
This may sound weird but Ive considered putting RIT dye in my outdoor pump type sprayer and spraying an upholstered piece with the dye. Of course I havent tried it yet. :-)
Good for you for trying!
Kris says
Hey Guys! Long time fan, first time commenter here. Not sure if anyone else has mentioned this or if you already know about it. Check out this website, it has slipcovers for Parsons chairs in all kinds of fabrics and patterns. They are specifically for Ikea parsons chairs but I’m sure you can alter if the fit is wonky. Kinda pricey though.
http://www.bemz.com/index.php/page/shop/prod_id/3/model_id/117/pattern_id/62/
YoungHouseLove says
Oh yeah we love Bemz! Sadly the Ikea parsons chairs are a different size and they’re a bit out of our price range as you mentioned.
xo,
s
Leah W says
I’ll second the local shop class option. I decided I wanted to learn how to quilt, and roped someone into taking a beginner quilting class with me (I didn’t even know how to load a bobbin, thread the machine, anything prior). Quilters appear to be awesome at giving you help with whatever you need — they helped me figure out all that stuff on my mom’s early 80s machine — and I was doing pretty well by the end of the class (having a foot pedal that allowed me to go slow at the beginning was definitely helpful).
Quilter’s Corner was the shop that had the class and helped me out… It’s really close to the Book Exchange (which I know you’ve mentioned before), plus they’re a certified Brother dealer, so maybe they know more about your machine. It may be possible it came to you screwed up — don’t know anything about tension and all that stuff myself, but I know shipping doesn’t always mean “gently transported.”
YoungHouseLove says
Thanks so much for the lead! Sounds like a great place to look into!
xo,
s
Lauren says
Ikea has two different sizes of parsons chairs and you can buy just the cover. Maybe try those out and add some dye? Odds are one of them would be the right size… And dyeing isn’t too hard. Or you could revamp your vision to loving white chairs and save a step :)
YoungHouseLove says
We thought about those but the size is sadly off by a lot. Too bad because they’re cheap and easy- which we always like! Haha.
xo,
s
Jocelyn Stott says
Hey – well, I’m glad you tried it anyway! I was curious what the texture would be like afterward. Very interesting. If at first you don’t succeed, try, try again.
Lauren says
I thought my sewing machine was broken for months. When I took it in to get fixed the man took one look and told me the needle was in backwards (the machine was NOT broken). At least the “repair” was free.
YoungHouseLove says
Haha – sounds like something I would do. Except my new sewing machine arrived with the needle already installed, so that can’t be my problem. Haha. Too bad because I need an excuse!
xo,
s
Sara says
I liked the next to last photo. Another chair and lamp photo. I think the new chair is moving in on the old chair’s territory.
YoungHouseLove says
Haha it’s true!
xo,
s
Claire says
Sherry, I’m with you. I think that sewing is so hard!
I’ve tried and my machine jams, the needle breaks, I get angry. I did have a friend come over and show me a little, but I still can’t sew a straight line. At least not yet. ;)
amyks says
I’ll give you 2 thumbs up on the fact that you tried it out. It takes a lot of guts to do that and then share the play by play with your readers. A for effort!
Kelley says
Remember when Hilda (Hilde?) used to paint furniture on Trading Spaces? That lady was all about pissing off some homeowners. Sorry to hear this didn’t work for you, but I seriously can’t imagine getting a “soft” result out of painting upholstery! Yikes!
Marianne says
I just came across this today, ironically. Thought of you!
http://lh4.ggpht.com/_KAGZ5G54N3k/TaOjpGVw5zI/AAAAAAAADUI/j66sGnA5YNg/s1600-h/image%5B45%5D.png
YoungHouseLove says
I love that kitchen! It’s been in my inspiration folder forever!
xo,
s
Cait @ Hernando House says
The title almost made me spit coffee on my monitor/keyboard.
I think I agree about the swirls showing. Slipcovers or reupholstering is probably the way to go. Maybe if you upholster them you can work in nailhead trim? Sort of like this cheerful chair that Yellow Brick Home scored.
YoungHouseLove says
I do love nailhead trim…
xo,
s
Connie says
The secret to straight seams is a seam gauge. I’ve read suggestions that layers of masking tape will work. (You want thickness so the edge of the fabric has something to hit against; one layer of tape gives a line but nothing to keep the fabric from wandering.) I have a piece of acrylic (about 6″ long, 5/8″ wide, and 1/4 inch thick) to stick to sewing machine. The longer seam gauge is really handy for long seams. The shorter, usually metal, gauges that screw into the machine work fine for shorter seams but you’ll find a longer gauge helpful for curtains.
The secret to straight seams is keeping your eye on the fabric against the gauge ahead of the needle. If the fabric is correctly placed there, you will get a straight seam. Keeping your eye on the needle won’t help. It’s too late to move the fabric then.
Could you find someone on Craigslist that would help get you over the initial sewing hump? If you can solve the broken needles and tension troubles, you can figure out much of the rest on your own.
Before you sign up for a class, see if you can eavesdrop on the teacher. Do you like the tone of voice? Too many I’ve heard in sewing shops talk down to the class.
kellie says
I saw that same post previously with the wingback chair and I was trying to decide if I wanted to try it or not. Thanks for doing this post, it’s good to get another perspective!
Andrea says
Another vote for you to sew them yourself – coming from an avid sewist, I have confidence you can do slipcovers because they’re EASY, I promise! Plus you seem to love picking out fabric, I’m jealous of the fabric stores you seem to have available to you (I order all mine online!) PLUS then you can just switch out the covers when you need a change. I’ll totally hold your hand through the sewing process…
I’d highly recommend a sewing machine investment anyhow … Pillows, real hemmed curtains(!!), clothes for Clara and future beans — I just made my daughter’s Easter dress! You REALLY should just do it!!
YoungHouseLove says
There’s that word easy being slung around again. Haha. Maybe you should scroll back to see me fume over how not easy the sewing machine is to me. Haha. I’m in the middle of a sewing machine meltdown.
xo,
s
Meredith says
Two different Meredith’s leaving comments! This is funny! Not that many of us out there. Look, I consider myself lucky I learned to sew as a child. And I am trying to teach my kids. the best way to learn is taking a class, I guess, or working along side someone who sews. Meredith is right – learning to thread the machine and using the right needle for the job are very important. I don’t think people realize how easy sewing can be, if broken down into small parts.
LauraC says
I have three friends named Meredith, they live in three different states, and none of them know each other. And they’re all within five years of age (late twenties/ early thirties). Must’ve been popular!
Faith says
Glad you tried it but it’s good to see that design mishaps happen to the best of us.
Caitlin @ Desert Domicile says
Bummer! I had high hopes that it was going to work in the end but I’m sure slipcovers is the better, more kid-friendly way to go in the end :)
rachel says
Wow! I’m impressed you guys tried it! Its definitely knock your lights out bright green – definitely WAY too neon for my taste. I just got a new sewing machine and cant wait to try it out on a large project like slipcovers. Especially with kiddos, it sounds like slip covers are the way to go!
Karen says
Maybe John should have a try at the sewing machine! He just might have the type of brain that will make it easier for him.
YoungHouseLove says
I don’t know… he likes to throw things when he gets mad. Nothing crazy like the baby or punches (usually he’ll just toss the screwdriver on the ground and fume) – but I worry he’d want to push the machine off a bridge if he had the same trouble I’m having. Meanwhile I just slowly walk out of the room and into the bedroom where I scream into a pillow. Haha.
xo,
s
ka says
“Meanwhile I just slowly walk out of the room and into the bedroom where I scream into a pillow.”
haha – awesome
YoungHouseLove says
It’s the truth. The sad pathetic truth. Haha.
xo,
s
Stephanie says
I just want to say that, for me, the hardest part about sewing is getting the machine ready to do it’s job and figuring out the patterns. I had to take a class in order to learn. And it might have been overkill, but before I took the class, I actually found someone via Craigslist to show me the very, very basics so I wouldn’t be completely clueless on my first day of classes! I would have just done private lessons with her, but she lived too far away. I took my sewing lessons at the local community college’s continuing education dept. But, I’ve also thought about doing additional classes at JoAnn’s with my 9 year old. Also, I just want to say based on what I’ve see you all accomplish, that if I could do it, you could do it. My class project was the fully functional (and lined) roman shade I have in my kitchen. I feel so proud of myself for that project. I wouldn’t say sewing is easy per se at first, but once you get the first one done the others may seem easy and you will have such I feeling of pride when you sit on your chairs and you can tell everyone else you made them!!! Good Luck!! I know you can do it!
branne @ the ravenna girls says
Any reason you didn’t try just straight fabric paint, or dabbing on dye? I suppose that wouldn’t hide the pattern/texture as much as you had wanted, but would it be worth a try on another chair to see what kind of coverage you could get? I haven’t done any interwebs research on the topic, so maybe thats something other bloggers have tried and it didn’t work? Good effort, though!
YoungHouseLove says
I researched all sorts of methods and this one seemed the best for the long haul (dabbing on dye without being able to rinse or heat set it can cause staining down the line (if someone sat down and got up with stains I’d be mortified) and apparently latex paint with textile medium is more commonly recommended than fabric paint for long term use – don’t have any idea why!
xo,
s
Amy says
White slipcovers are everywhere…. what if you got those and dyed them using something like this…
http://www.google.com/#sclient=psy&hl=en&tbm=shop&q=dyeing+fabric+green&aq=f&aqi=&aql=&oq=&pbx=1&bav=on.2,or.r_gc.r_pw.&fp=8832a671eaae94dd
?? Just a thought!
YoungHouseLove says
We’ve been searching for ready made slipcovers that fit our chairs (they’re apparently a less standard size than we thought)! And dye is definitely my kind of DIY- so it’s always a possibility!
xo,
s
shanna says
The inspiration chair is *amazing*. Wow!!
I bet upholstering would be easier than sewing slipcovers. I share your sewing woes. My mom is an amazing seamstress and I did not get those genes. I love my trust no-sew seam tape, but something tells me it would not exactly work for slipcovers. good luck!
Chels says
I think your problem with the paint was that Kristy’s chair was a velour-type fabric (lots of fibers and very absorbent), but yours looks like a more stiff, wipe-clean-type fabric. If those were actually hotel chairs, that type of fabric would be the most likely choice since it’d resist liquids.
As for the sewing machine, did you try:
1. checking your thread tension (it could be too tight or too loose)?
2. running the machine slower (don’t be a leadfoot on the pedal)?
3. making sure you’re letting the material move through the machine on its own instead of shoving it?
I hope you figure it out. Sewing machines take time getting used to–you just have to find the sweet spot with yours. Oh, and if you’re nervous about trying a pattern out, buy some cheap fabric, like muslin, for a demo. Then use your good fabric when you’re confident. It takes longer, but worth the learning experience.
GOOD LUCK!
-Chels
YoungHouseLove says
Yup, I think I tried them all (I think the key is adjusting the tension but whether I make it higher or lower I still have the same issue- hmm). Off to try them again, just to be sure.
xo,
s