“I’m Blue Da Ba Dee Dabba Da-eeeeee” (anyone remember that song?). Picture us maniacally singing it while priming and painting trim for hours days. We’re slowly losing our minds, but we’re having fun doing it. Please feel free to click over and jam out so we feel less alone (and slightly less certifiable).
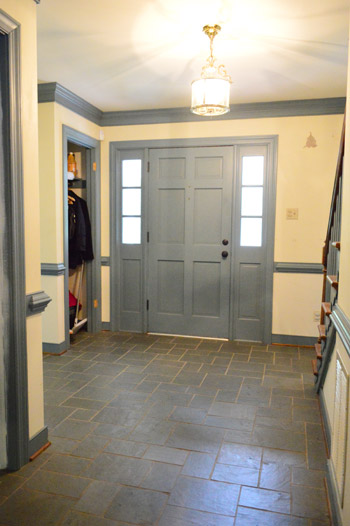
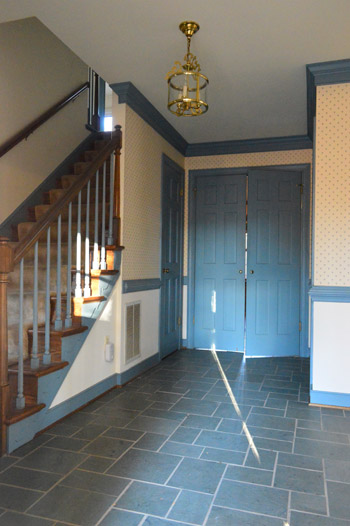
Ok, so when we last left our hero, er, our foyer, he was sporting some snazzy blue trim.
We had stripped down all the wallpaper, and had also removed two closet doors and the bathroom door so we could take them out to the garage and use our paint sprayer to apply a coat of primer and two coats of white semi gloss paint.
As for how we like our paint sprayer, it has definitely been a huge help in these two scenarios:
- when we can remove something and lay it or lean it on a drop cloth and spray it (like doors, cabinetry, or crown molding before it’s installed)
- when we don’t have a ton of other rooms/floors/areas to tape off (like when we had removed the carpeting upstairs and could quickly spray all of the trim and doors without worrying about getting it on any of the floors upstairs)
We’ll still definitely roll walls and ceilings (we think the sprayer is best for when we tackle trim, doors, cabinets, furniture, etc). Like how you wouldn’t spray paint walls but you might spray paint cabinets, doors, or furniture.
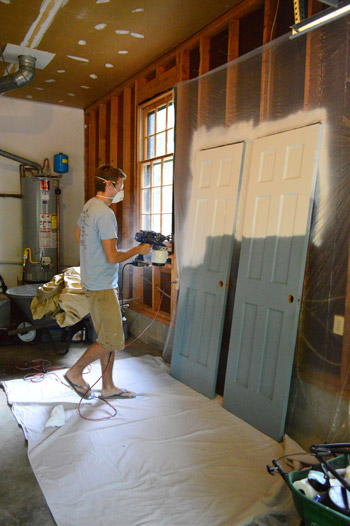
Here’s a video of it in action, just in case watching the motion of someone using it helps you picture things. John’s moving a little slow here, so for an even smoother finish we learned to go faster (it lessened the chance of drips).
The pros that we’ve found to this particular model (we had a Graco True Coat II – but we’ve since switched to this Wagner model) are:
- great coverage (it goes on thicker and smoother than a brush or roller for a faster finished result)
- you don’t have to water down the paint with anything (many sprayers require this, and it’s nice and easy not to have to worry about it)
And just to be balanced, here are the cons:
- as with every paint sprayer, there’s overspray, so it’s not as controlled of an application as using a roller or brush since you get paint flying around outside the item you’re sprayer (check out the image above – all the paint on the plastic drop cloth behind the doors is overspray)
- you have to learn how to control it so you don’t get drips – spray quickly and don’t hold the sprayer too close to the surface (this just seems to take some time to master, so it’s not as much a shortcoming of the sprayer as it is a skill that the operator has to hone)
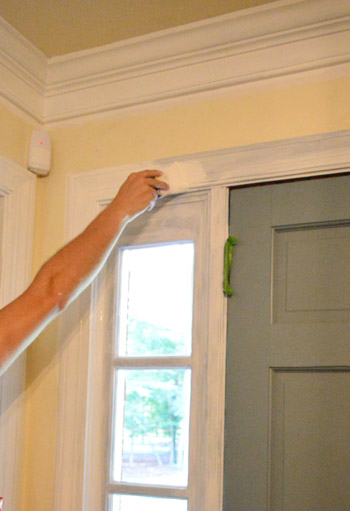
So with the doors out in the garage being primed and painted with the sprayer, we dove into priming and painting the rest of the trim in the foyer by hand.
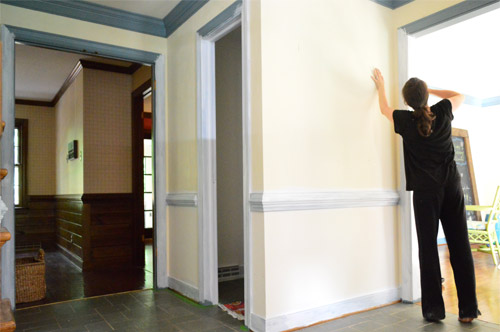
As for why we didn’t remove the trim and spray it in the garage like the doors, we were all for using it on the doors that way (which were easily removed and brought out to the garage) but removing and reinstalling all of the baseboard, chair rail, and crown in the foyer, as well as the trim around the seven doorways (!!) in there would have taken forever. We also considered taping things off and then spraying while standing in the foyer, but it leads into the kitchen, the dining room, the office, the portico, two closets, and the bathroom – so taping those all off to protect them from flying paint would have taken about a million years.
So we primed, and we primed, and we primed, and we primed (two coats on all of the blue baseboard, trim, chair rail, and crown). This is my tired of priming face.
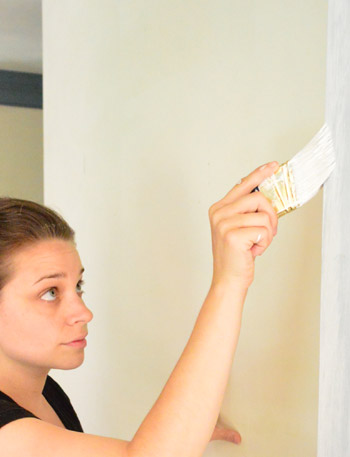
If you have shiny wood trim or glossy painted trim, you’ll want to rough it up with sandpaper and wipe it down with liquid deglosser before moving on to the primer and paint step (be sure to use a stain-blocking primer if it’s raw wood). But since ours was chalky and matte painted wood, we didn’t need to sand or degloss it, and we could skip right to applying a primer followed by some semi-gloss paint.
It really depends what color you’re starting with when it comes to how many coats you’ll need of primer and paint, but in our case it was four coats (so after two coats of primer we could move onto two more coats of paint). We used Benjamin Moore’s Simply White in semi-gloss just like the trim and the doors upstairs. Here are some other designers’ best white paints you could use instead.
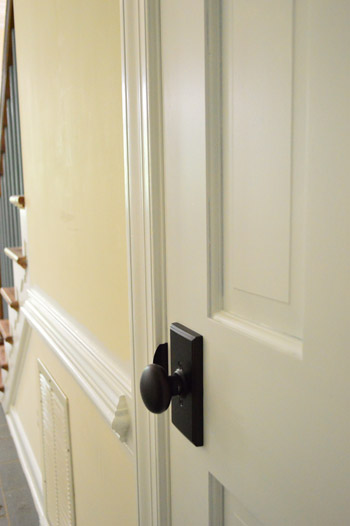
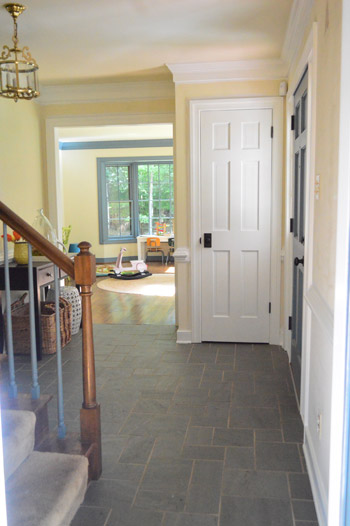
Finally after everything dried we could rehang the doors (with the new knobs that we ordered to match the ones upstairs).
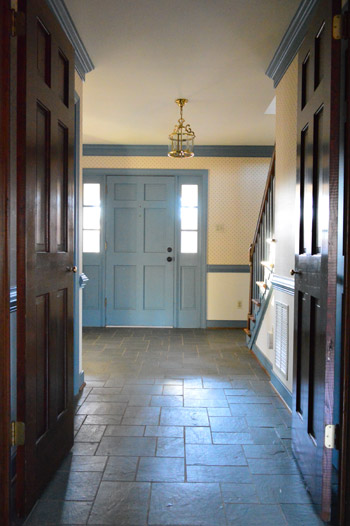
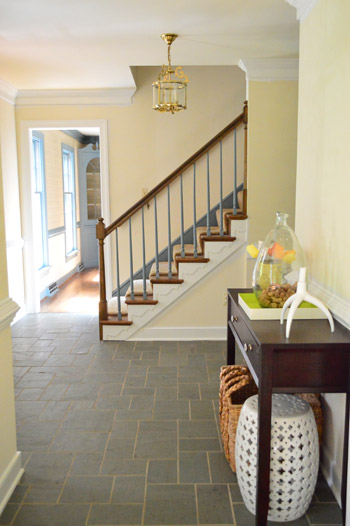
We have yet to paint the back of the front door in the same teal color as the front of it (or ebonize the stair railing and paint those blue spindles white)…
… but it’s already a lot lighter and more open than it felt when we inherited it with blue trim and wallpaper aplenty.
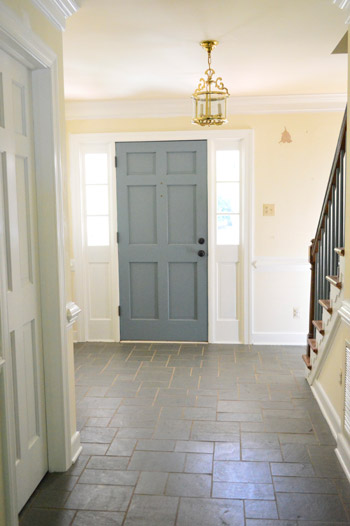
Here’s a before picture from the other side.
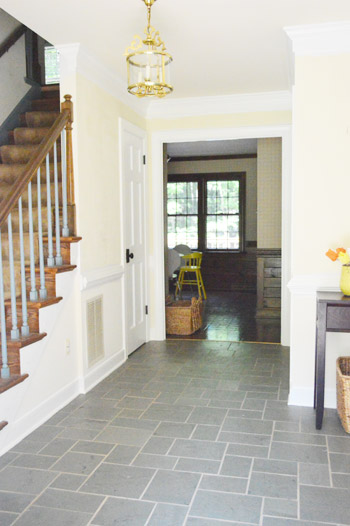
And a now shot with the white trim and doors. It’s also funny how much less blue the slate looks now that all the blue trim isn’t reflecting on it. It definitely still has some blue undertones, but it feels more neutralized now that we de-blued the trim.
So while the stairs are still quietly mocking us, we’re slowly inching towards a fresher looking foyer. We can’t wait to paint those yellowed walls.
And just in case you’re worried that we might be close to done painting blue trim, you’ll be comforted to know that it’s still hanging out in our office and our dining room – both of which not only have window trim and baseboards, but also have crown molding (along with blue chair rail and built-ins in the dining room). So there’s a fair chance you might be reading about us painting blue trim for the next decade or so. While we softly cry into our paint brushes.
But man oh man, does the glossy white result make us happy. The things we do for love.
Psst- In family news, here’s what we did for the Fourth of July and here’s how we spent our sixth anniversary.

Joseph says
Wow, yeah that slate looks way better now, not to mention everything else too of course.
Tandra@LittleHousesBigDogs says
Everything looks fabulous! How does the teal match up to the slate though? I was just thinking a front entry rug with some black in it? I know that’s not particularly your style but considering how light everything is, and the black door hardware and an ebonized staircase, a front entry rug with a little black in it might look good? Oooh darn! Now I have that song stuck in my head!
YoungHouseLove says
I love the idea of a rug with some black in it!
xo
s
Stephanie says
I’ve been following your blog since your first home and I have never commented but I have to say….when you purchased this house that trim made me gasp aloud. I’m pretty sure I said something nerdy like, ‘oh Sherry, you ambitious girl!’ Lol Well done guys, it’s looking great. Just an old fashioned Internet *high five* :-)
YoungHouseLove says
Haha, thanks Stephanie! Picture me high fiving you back and then wincing due to “sore paint arms.” It’s a serious affliction. The only cure is cupcakes.
xo
s
Hanna says
You will definitely have to have a party after you finish painting the last of the blue trim. Or at least a victory lap around the house.
YoungHouseLove says
My plan is to drink an entire bottle of champagne.
xo
s
Sarah E. says
Sometimes I almost want to by a house with dark/colored trim just to paint it bright white and feel the amazing transformation! I painted our baseboards and doors bright white from a dingy/dirty white color and even that made a difference… but nothing like this! I love it! :)
Sophie says
Wow, it’s looking great! So much fresher already.
In the ‘after pictures’ I’m just itching to ORB-ify that light fixture!
charlotte m. says
It looks so much brighter and lighter. I can’t understand why anyone would want it any other way. I knew it was dark, but the after pics, even with the yellowed walls looks amazing!
Tara says
I can describe this change in one of my favorite words – FRESH!
rlb says
heroic work, epic results!
Marcia Hooker says
Are you going to switch out the brass hanging light in the foyer? That too will make a big difference …love your blog…????
YoungHouseLove says
Oh yes, I think I’ll ORB it for now and then perhaps change it out for something amazing if we find that down the line.
xo
s
Eilene says
I think if your home could talk it would thank you for the makeover! It’s great for us to see how paint can really change the look and feel of a space. There’s hope!!!
Rachel says
The full post isn’t showing up in my reader. Did you guys make a change or is it fall out from switching over to feedly from Google?
YoungHouseLove says
No way! We love people reading in readers. No idea why it’s doing that but we didnt change anything on our end. We think it’s a huge glitch and it might be the embedded Blue video. Boo!
xo
s
kristen says
yeah, the feed cuts off right before the video. glad i can still read everything in one place! :)
YoungHouseLove says
BOOOO! Sorry guys, John’s working on it now :(
xo
s
Kate says
This may be a feedly issue – i have had this happen several times now. It cuts off the post after any embedded issues. Any ideas of how to fix it would be great!
YoungHouseLove says
Argh! I do know if you click “preview” in feedly it now shows the whole thing. Hope it helps!
xo
s
Julie @ Living on the Ledge says
Ummm…thanks a lot for getting that catchy little number stuck in my head on Monday morning. On a friendlier note, it looks awesome, guys!!! I’m curious, when you saw the house for the first time, was it fully decorated? Were all the decorations blue, too? Did smurfs live there?
YoungHouseLove says
This house was actually vacant for almost a year when it was put up for sale, so other than a small table or rug in a few places it was empty.
xo
s
Heather says
LOVE LOVE LOVE it. It’s such a great space and already looks a million times better.
Don’t count the paint sprayer out for ceilings. We rolled most of the house, but we have a few rooms that were empty, and the walls hadn’t been painted yet, so we sprayed. Holy crap, it took no time at ALL and they look amazing!
YoungHouseLove says
That’s awesome!
xo
s
Paige @ Little Nostalgia says
Holy mackerel does that look better! Any thoughts on the wall color yet?
YoungHouseLove says
None yet, but we can’t wait to figure it out!
xo
s
Ashley S says
I am loving this transformation. I am no longer afraid to buy a house with scary trim and wallpaper because it seems so quick (tedious but quick) to fix.
Kim says
I’m excited to hear of the adventures of the paint sprayer. I’m debating purchasing one to re-do our cabinets in the kitchen. I’d obviously need to practice on some other projects first, but do you think it gives a finish that would hold up on cabinets? I have someone who will spray them for me, but he charges $30 per door (and we have just under 30 doors) and I’d love to learn to do it myself…plus getting to buy a sprayer would be super exciting…
YoungHouseLove says
Oh yes, the pros use paint sprayers for cabinets and it’s amazing – so it would be perfect if you could get one and practice until it’s mastered.
xo
s
Kim says
Ok, printing this out. Passing it to my hubby with the note “See, Sherry from YHL says I need to buy a sprayer. AND, practice on lots of things.” BAHAHAHAHA…Yay!!!
YoungHouseLove says
Good luck Kim!
xo
s
Heather says
We have one that my husband used for our cabinets, and they turned out AH-MAZING! They’re so smooth and professional looking, and 4 months later they still look phenomenal (which doesn’t sound like much, but we were in a rush and didn’t let the paint cure all the way, so I’m really, really happy about that!
kristen says
not allowing us to read the blog via readers anymore?
YoungHouseLove says
Ahh, adding an update now. No idea why it’s doing that but we didnt change anything on our end. We think it’s a huge glitch and it might be the embedded Blue video. Boo!
xo
s
Peggy says
Y’all are making some major progress! I love white woodwork!
Did y’all consider removing the chair rail? I had it all over my house, and took it all out. I feel like it really opened things up. Although yours is much nicer quality than mine was.
It looks like you’re planning to keep the slate floors. Are you planning to replace the grout or just clean it? I heard recently about something that you can paint on old grout to change the color and it also makes it like epoxy grout that never has to be sealed.
YoungHouseLove says
We like the idea of working with the chair rail once it’s white and the walls are a nice color, so here’s hoping that can happen. As for the slate, it’s damaged in a few areas so we’re hoping to save it and clean it/repair it. Will keep you posted!
xo
s
Bethany Cox says
First of all THANK YOU for sharing that song since its pretty much perfect. that was hilarious. I cant wait to see it when you paint the walls too. It is already looking 100x better.
Katie Barber says
Last fall I painted our foyer and it was a huge undertaking also! We have an older home and while it wasn’t blue trim, it was a lovely dusty rose/pink color. Not attractive. The
walls were “white” but looked extremely dingy and not fresh. Similar to yours, we had crown molding, chair rail, and baseboards to deal with, as well as three doors and two other doorways. SO. MUCH. PINK. The trim took three coats to get it to a beautiful glossy white and the walls took two coats to become “pecan sandie” – a really pretty neutral tan. It was tons of work but totally worth it when you can walk in the door and be greeted by a beautiful foyer! Next to tackle? The seven pink doors and trim in the upstairs hallway :(
mieszkania poznan wilda says
That blue looks really original! I remember this song… It remind me school years. I was a little boy… ehh it was a long time ago.. ;)
JAN says
What is the world were the previous owners thinking painting all the trim blue! I know you will get it painted into shape though. Can’t wait to see the colors you choose for your house.
Brandyn says
My mom is getting her house ready to sell and she is just dreading repainting the trim (it has yellowed considerably over time). She was wondering about the sprayer since yours doesn’t look like there’s much over spray and she’s already planning to repaint the walls. Her only concern is really the floors and furniture. From your explanation it sounds like there’s a bit more overspray than the pictures show – is that an accurate statement?
Also the entry looks so much better! You’re making me wish for white woodwork.
YoungHouseLove says
I would remove all furniture from the room and tape off the floor completely. It’s like spray paint so it’s aerated (everything will get coated with a fine dust if you don’t clear out the room). Our friend Katie does rooms this way after taping off though and it works (in our case the foyer had 7 doorways leading into other rooms/floors that we had to protect so it seemed like way too much work to block all of those off).
xo
s
Rebecca says
How long have you been waiting to name a post by this title since you moved into the house of blue trim…? haha!
YoungHouseLove says
It feels like forever. Haha!
xo
s
Mary | Lemon Grove Blog says
Now THAT looks like progress ;) Love the door knobs, they looks so crisp and lovely on the white doors.
Janine says
I was watching the movie Weird Science last night, and I was super surprised to see that Wyatt’s house in the movie has blue trim and doors. The dining room also has a corner cabinet like your dining room does, also painted a very similar shade of blue. The house has a blue slate floor in the front hall just like yours.
(Yanno, I’d really like to watch a movie once JUST FOR THE MOVIE instead of actually watching the interior design. Surely there’s therapy for this?)
I as thinking that this blue trim/slate floor/wallpaper everywhere thing is a 1980s interpretation of a colonial “look”. Either way, I’m sure your interior design work is going to cause us all to redefine our terms. (Mwuuuhahahahaha my FAVOURITE line from that movie!)
Jess says
Awe-some! We have a few more spots that the trim needs done, and I just haven’t built myself up to do it yet.
Cristin says
Looks great! I actually like the slate flooring now that it doesn’t look so blue!!
Karen says
I’m both comforted and nauseated by this post. :-) While we don’t have blue trim in our home, we DO have orangey-fake n bake-tan oak trim everywhere. Blech. We’ve been trying to figure out an easy way to get rid of it…and this post makes me realize: there is no easy, there is only just doing it. So, I’m comforted to know we’re not missing the boat on some fab new process, and nauseated thinking about how much trim we need to paint. Do you have any tips on painting the baseboards? The baseboards and the window trim…those plague me. Not sure where to stop on the windows, and the baseboards seem problematic (or really, just time consuming) because we would need to tape it all off to protect our flooring. Thanks for nudging me into reality. Happy de-blueing!
YoungHouseLove says
We taped off the floor with Frog Tape and it seemed to help with the bleeding!
xo
s
Jess says
Oh, and did you watch RHONJ last night? Such a tease.
YoungHouseLove says
YES! The second I hit play John was like “you know the fight is going to be the last ten seconds” – totally right.
xo
s
Lil says
I’m curious to know what’s next? Are you going to knock out those stairs (I noticed there is still blue trim against the wall) and paint the foyer so you have one room that’s “done”, or will you continue painting blue trim, since you’re having so much fun?
YoungHouseLove says
I think we want to paint the back of the door and the foyer walls – gotta build up some momentum to deal with more blue trim (both on the stairs and in other rooms).
xo
s
KathyG says
I was surprised you didn’t start the blue trim eradication with your office? Or do you not spend much time there yet?
YoungHouseLove says
John tends to use the office more (we only have a desk for one person) while I use the kitchen table or even the living room couch. I think every room has so much that has yet to be done that we’re a ways off from any of them feeling relaxing. Haha!
xo
s
susanne says
Off topic….thanks for doing the legwork for us and our beautiful old fir floors. Despite refinishing them when we moved in 3 years ago, high traffic and a labrador have taken a toll….They have been looking a bit dull, despite Bona. Tried Rejuvenate, and we are thrilled! They look great…thanks!
YoungHouseLove says
So glad!
xo
s
Shannon says
What a difference! I can’t wait to get all our trim painted. While it’s not blue, the diningroom and kitchen have lots of the orangey colored beaded board and trim, and the rest of the house that actually has trim is all different shades of wood stain lol. So far all I’ve done is primed the trim in the master bedroom and bathroom. :\ So I feel ya on how long it’s going to take!
Ethne @ Wom-Mom says
So much better! Practically jumping up and down to see what color you pick for the walls! I still might get you a wee blue goose to memorialize the ’80’s blue trim. Ha.
Nicole says
What a difference and a sense of accomplishment! Is the light in the foyer going to get the ORB treatment or you have something new in mind?
YoungHouseLove says
We’d love to ORB it for now and if we find something awesome down and line we’ll snag that and switch it out :)
xo
s
Olivia says
Oh my goodness, hallway areas with multiple doorways take sooooooooo long to re-paint, and yet someone can easily walk through without realizing how much effort went into it. It’s looking so much better now – congrats on surviving your first de-blueing episode!
Chelsea says
Wow, I’ve heard that song a million times and never seen the video until now. I don’t think I’ve been missing a whole lot! LOL The hallway looks so much airier now. Even the blue door looks like it belongs in there now without “everything he sees is blue”. Are you planning on keeping it blue on the interior or painting it another color (sorry if you mentioned that in the post and I just missed it)?
YoungHouseLove says
We’re going to paint it the same happy teal as the front – will share pics when we get ‘er done!
xo
s
Terran says
I may have missed this in another post but how do you take care of your paint brushes? Like cleaning, re-using etc. We are in the middle of painting and brushes can get expensive!
PS – loving all the white trim it really gives the house an updated and fresh look!
YoungHouseLove says
We just rinse them all with water when it’s latex paint and with mineral spirits if it’s oil-based.
xo
s
Elizabeth says
If you’re mid-project and have to stop you can wrap the brushes (and rollers) in tinfoil and put them in the fridge until you pick it back up. I know this works for latex paint, but not sure about oil-based.
Lisa says
Looks great! Even the ‘yellowed’ walls look good ha. Maybe a pale yellow paint? Seems to nicely offset the slate floor, adding more warmth and cutting the blue tones nicely. Any idea what wall color you’re going to go with?
YoungHouseLove says
No ideas yet but we’ll share as we go for sure!
xo
s
Michele from IL says
I have pickled/whitewashed trim/doors/cabinets throughout my entire house. I’ve started painting it bit by bit but it’s BORING! Now with your inspirational pics (at least I don’t have to cover BLUE!) and that catchy song (which I will forever now associate with painting trim) I’m re-energized to get busy on it again and get it all painted white! I love your transformations….they keep me motivated to keep going in my remodeling efforts! :)
Peggy Lund says
Wow, this house really is perfect for the before-and-afters. Looks great already. And about the song…yes I remember it! It came strong and died quickly as I remember. ha ha
Shellie says
I have a question- how do you decide something needs 2 coats of primer? If primer isn’t supposed to give full coverage, its just to make paint grab- what makes you decide to do a second coat?
YoungHouseLove says
It’s often a call of “do I want to use more paint or more primer, since more primer can add up to better paint coverage and save you a coat of that on the back end. For us, primer is cheaper than paint, so we did 2 and 2 instead of 1 and 3.
xo
s
Jennie says
I was looking through old pictures the other day and noticed the house I grew up in had almost the same color trim. I totally forgot about it until I saw the pictures…must have been the cool color to have back in the day. I’m debating painting our off-white trim bright white so loving all these tips!
Megan @ Rappsody in Rooms says
Oh white, how good you are in transforming things. It makes a world of difference. It’s crazy how the slate looks so much better now too!
meghan says
So is it actually possible to re-grout tile? I didn’t know you could do that. Our tile in our kitchen needs some major help. I actually like the slate a lot, but can see how the grout needs a good brightening. It’s amazing what a difference that white trim makes! Love this house. Can’t wait to see more progress.
meghan says
oh, and wanted to add that as soon as i saw the fixture in the foyer, i thought “that would look amazing sprayed in ORB!” funny, i hadn’t really noticed it before.
Jen W says
We regrouted tile in our bathroom, both on the countertops and the floor. It’s definitely possible, and worth the work. Our countertop was grungy white grout (poor choice, huh!?!) that needed refreshing. We used a dremel and the grout attachment to make the grout spaces deeper to hold the new grout, and then went at it with the plain old regular grout. The floor’s grout was not really flush with the level of the tiles, so sweeping and mopping just left everything behind in the cracks. We filled these grout spaces with epoxy grout, carefully following the manufacturer’s suggestions. I think, given the chance (hopefully never) to do the counters again, I’d do epoxy there, too. It’s supposed to last basically forever, so for 2-3x the price initially, it is basically maintenance free… such an improvement over the nasty white grout left behind!
YoungHouseLove says
That sounds awesome!
xo
s
Kara says
It even makes the grout in the slate floor looks cleaner and whiter too! Awesome, YHL does it again with paint! *applause*
Beth G says
Holy cow! That looks a million times better! I’m most impresses with how much more gray the tile reads now without all the blue surrounding it – does that affect your plans to replace it, now that its been neutralized (to an extent)?
YoungHouseLove says
Oh yes, we only have plans to replace it if we can’t salvage it (it’s cracked/damaged in a few areas) so we’ll keep you posted!
xo
s
Krystal C. says
I’m surprised no one has let you in on this secret yet… For colors like blue that are hard to cover with primer, use a grey tinted
primer (no more than 2oz. of color in the primer or you will compromise the formula). This will make your life SO much easier! And white goes over it like a dream. I hope this helps and saves you from painter’s elbow! Looking good so far!
YoungHouseLove says
Love that tip!
xo
s
Brittany says
looks so good!
Amy@TheBlissfulBee says
Such a huge difference already! The space looks twice as big! Can’t wait to see it all finished up:)
xo, amy