Updated 2018, Originally Posted 2009
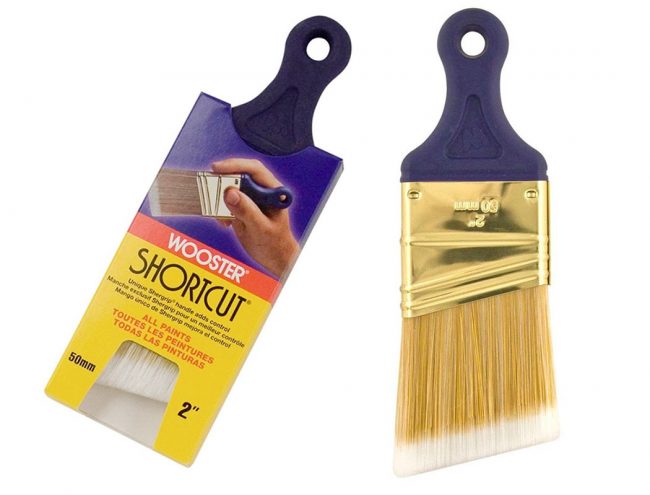
We actually get a lot of edging, cutting in, and trim-painting questions so we figured we’d share our secret… this short-handled, angled, 2-inch angled brush made by Wooster. With this brush and a little practice, you’ll be painting straight lines without painter’s tape in no time!
Best Cutting In Brush Buying Options
These days you can find these short-handled, angled brushes just about anywhere. The Wooster brush is our usual go-to (you’ll find 2 or 3 of them around our house at any time) but lots of stores sell them these days! Whatever the brand, it’s the 2-inch handle and angled bristles that make them the best paint brushes for a professional paint job.
– Wooster Shortcut ($6, available at Home Depot)
– Valspar Wall & Trim Brush ($7, available Lowe’s)
– Purdy XL Cub Sash Brush ($12, available at Lowe’s and Amazon)
Why An Angled Sash Brush Is The Perfect Cutting In Tool
The short handle on these types of brushes (sometimes called a “sash brush”) makes it easy to grip – almost like a big pencil! – and that makes it worlds easier to stay in the lines, whether you’re edging around door or window trim, or trying to cut in around a ceiling. And the angled tip keeps your paint from globbing up into drippy puddles as you drag your brush along your edge.
All this means you can paint any room like a pro without having to bust out the painter’s tape (which is a time consuming and not-always-successful process anyway). We actually love the easy control of the short-handled brush that we use it for almost any painting project: even painting the trim itself!
How To Edge A Room With A Short Angled Brush
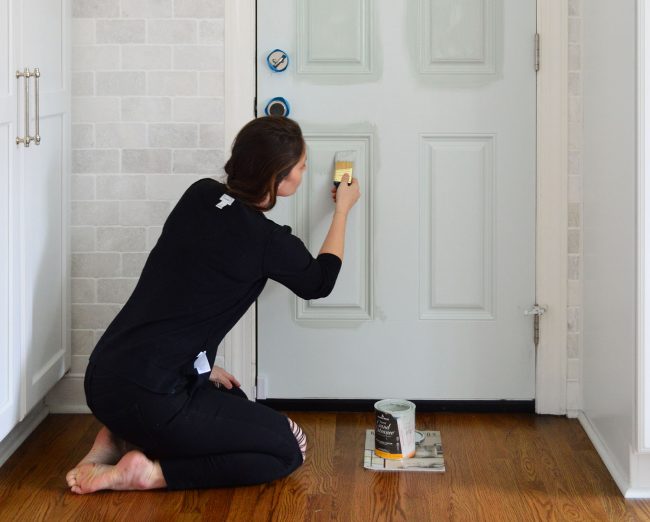
And if you want to see the brush in action, here’s how Sherry used it to get a clean edge in our guest bedroom – both on horizontal edges (like a baseboard) and vertical edges (like a door frame). You can watch the video below or see it here on YouTube.
The Big Mistake To Avoid When Cutting In
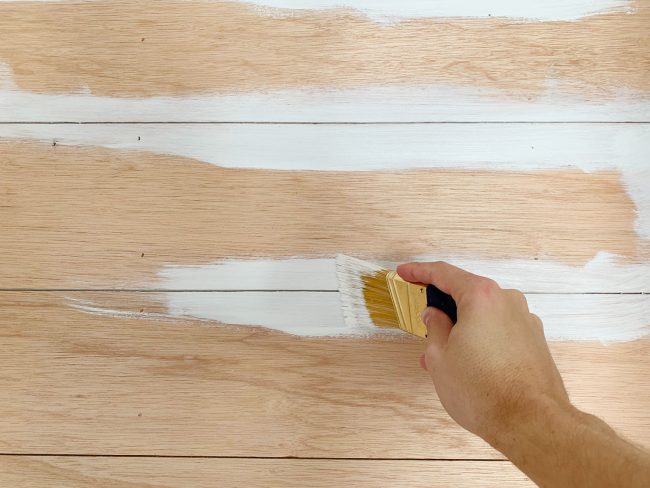
The main thing that can wrong when using this type of brush is to put too much paint on your paintbrush. That will lead to globs, drips, or a build-up of paint as you drag your brush along your edge. That’s why we always like to wipe the excess paint off in the can AND brush a little extra off elsewhere on the wall or trim before pressing our brush to our edge. This helps make sure you have the right amount of paint on your brush when you begin cutting in. It make mean you don’t get full coverage in one coat, but that’s better than having lots of drips or globs.
Storing Your Paint Brush
The polyester bristles on these brushes are easy to clean with water, but you’ll probably find yourself wanting to keep it fresh between coats. Luckily these short little brushes fit nicely in a snack-sized Ziploc bag. The tight seal keeps your brush from drying out – even days at a time!
More Painting Resources & How-Tos
If you’re looking for more help getting your painting project off the ground, here are a few other posts you might find helpful:
- How We Roll A Room To Paint Ceilings and Walls (With Video!)
- Preparing A Room For Painting (including Time Lapse Video)
- How To Paint Trim & Molding Using A Brush
- Painting Window Trim With A Paint Sprayer
- Painting Doors With A Paint Sprayer
- Tips For Making Your Paint Job Easier
*** This post contains affiliate links***

julie says
We are about to paint & I’m starting the search for this brush! Sounds like it will be a life-saver. One other paint question – going from the living room to the hallway (hallway runs perpendicular, you are about staring into the guest bath), should we paint the inside of the doorway the color of the living room or the hallway?
YoungHouseLove says
Hey Julie,
You could really go either way in this case. Actually, in our house we have some trim around thresholds like this so we paint the doorways white to match the trim. If that’s not the case in your house, the safer bet is to paint the doorway to match the hallway color (since we assume there’s more hallway wall than guest bath wall). But again, you’d probably be fine going either way. Perhaps just picking your favorite color of the two even!
Happy painting!
-John
Kristen Plumer says
Hi Sherry!
I just wanted to tell you that we took your suggestion about that great brush from Sherwin Williams and tried it out. We’ve had awful experiences using painter’s tape around the trim, windows, and doors, and because we were painting a fairly deep color (New York State of Mind, Benjamin Moore paint) over a Porter paint neutral (the builder’s choice), we were pretty nervous about the whole thing. Well after a whole weekend of painting, I can tell you the paint lines look AMAZING! We couldn’t believe it! It took us maybe half the time to paint the room than usual (it’s a medium-sized room with cathedral ceilings), and the WHOLE TIME we talked about how great the brushes were! Thank you so much! And I agree with your comment too, btw. I’ve already thrown trim paint into a cup and run around the house gleefully touching up every piece of trim in sight! :-) I’ll send before and after pictures once the room is all done!
Best,
Kristen
Juliet Robinson says
Is this brush available online anywhere? I called two Sherwin Williams stores here in Seattle and neither carry that brush… Do any other stores have them? Can’t find a Duron store here.
YoungHouseLove says
Hey Juliet,
I actually just saw a very similar short handled brush at Home Depot called “Performance Select” (2 inch angled brush for close up trim). Hope it helps!
xo,
s
Melinda says
This may seem like a weird question…but here goes! I usually paint my trim first and then paint the walls. I have an edger I use for the areas close to the trim. But it doesn’t give me a crisp line like I would like. Is there anyway you could acutually post pics of how you hold your brush while doing trim?? I would really appreciate it!!
YoungHouseLove says
Hey Melinda,
We’ll definitely put it on our request list but that’s a bit long so it might be a ways off. The only way to describe our process is to paint the walls first so that any wall paint that gets on the trim can be easily cleaned up with a fresh coat of paint on the trim which creates that crisp line you love. Most experts do things in this order so hopefully that will help! Holding it correctly will be natural once you have it in your hand- and it even has an easy-grip handle. Hope it helps!
xo,
s
Tara says
Hi Sherry! Thanks for the trim tip! I know you painted over a lot of different color baseboards and trim in your home…I’m getting ready to ask my new landlord if he would mind if I painted over the forest green trim in the living and dining room with white. Because the green is so dark, do you think one coat of the Valspar’s Ultra White would cover it? Or do you have any other recos?
YoungHouseLove says
Hey Tara,
I think you’ll probably need two coats but the second coat goes on super fast because with the first one you have to be sure to stay in the lines yet cover every edge with a perfect coat while the second coat can be brushed on the majority of the trim quickly (and doesn’t need to be applied as particularly since covering most of it with one sweep of the brush will look good enough). Hope it helps!
xo,
s
Rachel says
My husband and I are thinking of painting all the wood trim in our house (including doors and window sills, too). I know this is a HUGE job, but I think it will look fabulous. Anyway, I’m wondering if anyone has any tips. Has anyone ever removed the trim first and then painted it and then put it back on? Also, any suggestions for white paint? We painted our kitchen cabinets white, but I’m not sure if we should use the exact same color. Also, is it necessary to seal them with some kind of clear coat?
YoungHouseLove says
Hey Rachel,
We like Benjamin Moore’s Decorators White for the job, and have never removed trim since using the brush above gets a nice clean line in a snap. And you’re right about it making a huuuuuge difference. Good luck!
xo,
s
lindsaywillman says
Vanessa – Layla over at the Lettered Cottage does beadboard in her kitchen. Check it out at http://theletteredcottage.blogspot.com/
Mary says
I am embarrassed to ask this question because it shows I am such a newbie painter :) Do you have to use primer over the old coat of paint on walls before painting new? How do you know when to use oil-based primer vs. latex primer? How do you know when to use oil paint vs. latex paint?
YoungHouseLove says
Hey Mary,
Primer is never necessary on walls unless the paint color you’re covering is super dark and you’re going lighter (red to cream for example) or if the walls have terrible grease or crayon or grafitti stains. In all cases we recommend oil-based primer because it’s super durable and strong (if you’re going to take the extra step you might as well use the good stuff). As for paint we always recommend latex since it’s less stinky and dries more quickly for a seamless finish that’s less likely to get scuffed or smeared (since it cures faster). Hope it helps!
xo,
s
Mary says
What about primer on trim? I thought I read a book that said if you have oil paint on the trim, you need to cover it with oil primer before painting latex on top of it?
YoungHouseLove says
Yup, if you have oil-based paint on your trim you’ll have to prime with oil-based primer first, but very very few people have oil paint on their trim anymore. Hope it helps!
xo,
s
Jim says
Help! We just painted our dining room a deep fabulous red. I used blue tape along the crown molding and the chair rail. We did a good job along the chair rail, but when I removed the tape from the crown molding, some red paint got onto the trim. Can I simply paint over the red with my white trim paint? Will I have to repaint the entire crown molding? Thanks!
YoungHouseLove says
Good question! You should be able to just spot touch things up (although it might take two coats for total coverage). Just make sure it’s the same sheen as the trim (aka: don’t use flat white wall paint if the trim is white semi-gloss). Hope it helps!
xo,
s
Karla D. says
Thanks for sharing with all of us. I’m just starting a new painting project and the Sherwin Williams stores in Orlando don’t seem to carry that brush-eek! Hopefully I can find something similar or order it online somehow. :)
YoungHouseLove says
Hey Karla D,
Any short handled angled brush that’s of a reasonably high quality should do the trick- just in case you can’t hunt down the exact same one. Hope it helps! Happy hunting…
xo,
s
Lindsay says
A.W.E.S.O.M.E. That’s all I’ve gotta say about that brush. You have saved me hours. I can’t thank you enough! (I was telling all of the girls about it tonight at dinner) :)
YoungHouseLove says
Wahoo! So glad to hear it Lindsay! Keep spreading the word!
xo,
s
Mandie says
Ok, so I always get so inspired after reading this blog (my fiance and I just bought our first house) and I decided that I want to paint the wood trim in our house (maybe not in the whole house, in our master at least). So I wandered up and down the paint aisle today trying to figure out which type of paint to use, and which color. Is there a brand or specific trim paint that you know works well? Do we need to do anything to the wood first? We’re such home DIY newbies!
THANKS!!
YoungHouseLove says
Hey Mandie,
Here’s a brush that we like for painting trim (check out the comment section to see how many people have tried it and loved it). As for the paint, you can snag Benjamin Moore’s Decorators White in semi-gloss (always paint trim with semi-gloss so it’s wipe-able and super long lasting). And there’s nothing you’ll need to do to the wood trim first as long as it’s not splintered and cracked (in which case you’ll want to sand a bit and maybe use some wood putty to fill in the cracks). Hope it helps!
xo,
s
Margaret says
Hey guys – I’ve used this brush you recommended for both my living and dining room. I love it! The price is my favorite part, I think. I use it to get in the corners, and then follow behind with a tiny touch-up roller (http://www.homedepot.com/h_d1/N-5yc1vZ1xgy/R-100135170/h_d2/ProductDisplay?langId=-1&storeId=10051&catalogId=10053) to make the edging blend seamlessly with the rest of the wall. Thanks for the tip!
Steven says
How were you able to cut in a straight clean line? I have a Purdy nylox Sprig flat myself?
Thanks,
Steven
YoungHouseLove says
With this brush! The short handle helps you keep control of the line so it’s effortlessly straight and perfect! Read people’s comments above- it really is an amazing little time saver. Hope it helps!
xo,
s
Steven says
Can I see a close shot view of the cut? Also using your pinky also helps to guild you.
Julie says
After reading this post right before painting my kitchen, I had to run out and pick up this brush. I did indeed cut in all the walls in my kitchen (at the ceiling, above and below the chair rail, and at the baseboard) without a single mess-up. And it looks like a cleaner line than all the other rooms in our house where we spent hours taping everything out. And I just painted our bathroom and used this brush for cutting in at the ceiling and along the tile; then used it in my office for repainting all the trim. I now have four of these brushes, and can’t recommend them enough! Thanks so much for the suggestion.
Jenney says
Thanks for all the helpful advice! I plan on painting all the baseboards in my house, but I have carpet in most of the rooms. Do you have any tips on how to keep the paint off the flooring as you paint the trim?
Thanks!
YoungHouseLove says
Hey Jenney,
Unfortunately we don’t have wall to wall carpet so we don’t have any firsthand advice. We would probably try laying down a piece of cardboard to protect the carpeting and somehow using tape around the edge (where it meets the wall) so you can hopefully get a clean painted line on the baseboards without getting any on the carpet. Hope it helps!
xo,
s
Charlotte says
I love this site! I picked up the brush today after looking at a few different stores. I had better luck at a traditional Sherwin Williams store. I initially went to an old Duron (now Sherwin Williams/Duron) store but they didn’t have it. It could be coincidence but I thought it may help others that have looked but had trouble finding the brush.
YoungHouseLove says
Great tip! Thanks for sharing!
xo,
s
Sarah says
Hi! My husband and I are getting ready to paint our ugly 80s oak trim a nice, crisp white. Do we need to sand and prime, or can we just go ahead and do two coats of white latex?
YoungHouseLove says
Hey Sarah,
If your trim is glossy and shiny you’ll need to prime with an oil-based primer (it wouldn’t hurt to rough things up a bit with sandpaper beforehand) but if it’s matte and dry like ours was, you can probably just go right to semi-gloss white latex paint. Behr now sells paint that has a built-in primer so that might also be an option that’s just one step but more thorough than just using the latex paint alone. Just be sure to use semi-gloss so everything is easy to wipe down and always looks fresh. Hope it helps!
xo,
s
Emily says
We just completed a project with this brush thanks to your advice. It worked wonders…thanks so much for sharing your painting wisdom!
YoungHouseLove says
Wahoo! So happy to hear that it helped.
xo,
s
Mari says
Woo hoo! This is so exciting! My fiance and I are going to paint our breakfast room and there are lots of windows and baseboards and doors to cut in around. Thanks for the tip!
Ethan says
I’ve seen that brush – but never bought one – now I will! One tip we’ve found that works to get really crisp lines is to paint the trim first(which is pretty easy when you don’t have to worry as much), then when its dried and safe to put blue painter’s tape, put the blue painter’s tape on the trim line and quickly paint over the edge of the tape, so that if it bleeds, the trim color bleeds through… Then, it is easy to paint the walls to the trim and because of the painted over tape – it won’t bleed through – and before the wall paint dries – pull the tape. The Green “Frog tape” might work just as well, but have never tried it….
Lori says
I am a huge fan of using brushed with short handles (and cannot stand taping off trim). I picked some short-handled brushes that were not exactly like this when my husband and I first bought our house about a year and a half ago. The brushes I bought were on clearance at Lowe’s and I wasn’t sure if I would like them or not, but they are much easier to control than paint brushes with longer handles.
I am going to have to go and buy one of the ones you mention here… We are about to start some repainting.
Jen says
You saved my sanity today with this recommendation! Thank you. ThankyouthankyouthankyouthankyouTHANKYOU.
Sarah W J says
YAY!
This helpful hint has changed my life!
My husband and I just bought our first house and I am now OBSESSED with this paintbrush (which I bought for HIM for Christmas-hahah).
The Benjamin Moore stores now carry an identical brush (under a different name).
Thank you! You guys are SO inspiring!
Best with your Babe….
YoungHouseLove says
So glad to hear that it worked for you (and that BM stores carry something extremely similar). Who knew painting trim could be so exciting?!
xo,
s
Miranda says
Thank you for your wonderful blog and telling us about this divine little brush. I’ve hated cutting in my entire life until now. We’re in the beginning phases of a massive whole house remodel and started painting our guest room on Saturday. I stopped in the middle of the project and went to Sherwin-Williams to buy this brush out of crazed frustration and because I remembered you said it was good. Despite the assistant store manager’s repeated warnings that it was cheap and that I should only buy Purdy, your advice, as always, was better than the so-called experts. This brush is wonderful and I’m going to buy more of them because we have about six miles of windows and trim to paint before we’re finished. Thanks guys!
YoungHouseLove says
That’s so great to hear! I’m still using the very same brush from this post (which was created a while back) and it’s still just as good. So glad it worked for you too!
xo,
s
Jackie says
Hi Sherry!
Thanks for blogging about this brush! I hate taping so I think I am going to try to free-hand the trim in our kitchen when we paint in the next couple of weeks.
Question: We plan to paint all the trim, doors, cabinets and walls in our kitchen. In what order would you paint these things? I conflicted if we should do cabinets, trim and doors first then walls or the opposite!
Also, I am such a geek, but how can we send you guys pictures of our budget kitchen makeover when we are done?!
YoungHouseLove says
Hey Jackie,
This is one of those chicken or the egg situations so there’s really no right answer. We would start with the walls, then paint the trim and doors, and then finish with the cabinets… but it can really be tackled in any order. Hope it helps! And as for how to send us photos, there’s a button that says “click here to contact the youngsters” on the sidebar which will take you to a page all about emailing us. Good luck with everything!
xo,
s
Jackie says
Thanks Sherry! We are getting started this week and I am excited to see our kitchen transform and get a hideous mustard yellow color off our walls (left by the sellers)!
I also must be blind because I looked all over the blog and never saw the “click here to contact the youngsters” tab, duh!
Amanda says
Hi! What color white did you choose for the trim in your home? I’ve purchased Valspar’s Ultra White, but I’m worried it may end up being TOO bright white. I also don’t want it to look yellow/red/blue/gray… Thanks for the help!
YoungHouseLove says
We actually used Freshaire paint from Home Depot in off-the-rack white (we just purchased the white base semi-gloss and didn’t have them tint it with anything). We love the color! So Valspar’s stock white color might work perfectly for you, or you could try the Freshaire stuff we used (bonus: it’s no-VOC and doesn’t smell at all!).
xo,
s
Michelle says
Just a quick FYI for anyone looking for this brush. I was at home depot today and did see one exactly like it. I’m not sure of the brand or if it had a “comfort grip” but there is one there. LOL I guess maybe that wasn’t as helpful as I thought it was going to be when I started typing.
Michelle
YoungHouseLove says
Thanks for the tip!
xo,
s
Hillary says
Loved the suggestion of this brush! I’ve now painted two rooms with it, and while I still taped off the trim, I free-handed the ceiling line with very few mishaps. This post has inspired me to repaint the trim in our master and I was wondering if you still use blue tape on the windows or just wipe with a wet rag if any paint gets on the glass? Also, to repaint doors (everything is an old cream, so if I go white trim, all doors will need to be painted as well), do I have to remove them? Or can they be painted while they’re attached? Love your blog, I’ve been so inspired to take on projects in our new home!
YoungHouseLove says
Nope, you should be able to paint the trim carefully with the doors in place (and then paint the doors as well if you’d like). Just go slow and steady. And as for windows, we’ve actually never taped those off, we just paint away and use a straight razor to get the paint off the glass once it dries. So easy- and such a clean line.
xo,
s
Jennifer Doherty says
OMG! Best brush ever!!! I’ve been slowly repainting all of the oak trim in our house white… Taping it all takes FOREVER!!!!
After reading this, I ran out today and bought this brush. I love it!!! Wow, what a difference! I just finished a whole room without taping it and it looks fantastic!
Thanks for the recommendation!
Jennifer
YoungHouseLove says
So glad you’re loving it! Happy painting…
xo,
s
Jessica says
Hi guys, I picked up this brush today and love it. We just moved in to a house that has peachy tan walls and instead of just taping samples of paint on the wall, I actually went in and painted patches of different colors (probably a mistake). The darkest color I painted was Soft Chamois by Behr. We ended up picking Glidden Sand White (thanks to your inspiration!) and wanted to ask if you thought we should prime the wall first because of the samples I painted, or can we get away with just 2 coats of latex paint? Thanks!
YoungHouseLove says
No primer needed! We think two coats of paint should do the trick!
xo,
s
Katie says
I have a followup to Sarah’s question on the topic of painting trim. I am I correct in understanding that when paining glossy, shiny (wood) trim it’s okay to skip the oil based primer and use behr’s paint and primer in one? It would be nice to skip a step but am willing to use primer alone if you think it would make the trim look better.
Thanks!
Katie
YoungHouseLove says
If you’re painting already painted wood trim and you’re sure it’s not oil based paint that you’re going over you can use the two in one Behr stuff. But if it could be oil based paint on the trim, or if it’s raw or stained wood, the oil based primer is the only way to go to avoid cracking, peeling, and bleed through. Hope it helps!
xo,
s
Kim says
When you painted the trim in your house, did you first prime it and then paint it? Or did you first do any sanding to ensure adhesion? We just bought a place with off white/tan colored trim throughout the house, and we’re pretty sure (from the same home test that you used for your nursery chair) that the trim has lead-based paint underneath. The top layers are a newer latex, but whoever last painted it clearly didn’t do any prep because it’s peeling off (in large, stretchy pieces!) in a lot of places (though there is more latex under that layer). We’re already planning on using the Lead Out product in an addition that has exposed lead paint, but we’re wondering what our options are with the trim throughout…
YoungHouseLove says
If your trim is stained or raw wood you definitely want to use oil-based primer before painting it with semi gloss or glossy latex paint- but yours sounds a lot more complicated with the layers of latex paint and lead. We would recommend asking a paint pro (maybe at a place like Benjamin Moore since we’re stumped. Hope it helps!
xo,
s
Mickey says
OKAY- first things first–Love your blog!! I am a first time home buyer as well and I have dragged my husband kicking and screaming into DIY..(thankfully my dad is able to teach us everything we need to know around the house!!) With that being said I want to paint all the trim in the house white for a very crisp, clean look… all of my trim is Oak, when I tell people I want to paint it they look at me like I’m crazy. I know that I will love the end result…But I don’t want to shoot myself in the foot at resale. Any comments or advice would be greatly appreciated! Thank-you, and besides my father you guys are my go to guide for home improvement inspiration and advice. Keep up the fantastically amazing good work!
–Mickey
YoungHouseLove says
We painted all of our wood trim along with painting the dated paneling and brick and our house reappraised for over 20k more. There are definitely a ton of buyers who prefer the clean and current look of painted trim. Hope it helps!
xo,
s
Jenn says
Alright…this might go the way of “lessons learned”…we purchased our first house and set about painting EVERY surface: walls, ceilings, trim. Very exciting, at first. We have a 9-month-old baby, and I was committed to using a no-VOC paint. I did my research, went with Olympic Premium that I had color-matched to some gorgeous BM colors. The walls and ceilings look great. The trim, not so much. We just went with the off-the-rack semi-gloss ultra white. We sanded the trim, and primed with the Olympic Premium primer. The trim has needed at least three coats of paint, and a wall of built-in wood cabinets we painted (using your tutorial) has needed at least four coats in some places. Big sigh. Could this be due to the fact that I used the Olympic primer, and not an oil-based one? Thanks much for any thoughts…a friend of mine is convinced that it’s the Olympic paint being low quality, but I seem to think it’s the primer, not the paint.
YoungHouseLove says
We’d guess it’s a combination of both the primer and the paint. Olympic definitely calls for a few coats and the better the primer (oil-based being the best) the better the result. Hope it helps!
xo,
s
Jenn says
Yeah, that sounds right. The folks at the paint store I stopped at today also suggested that the trim and cabinets (which had previously been stained) were really sucking up the primer and paint after being stained for so long…like they were breathing for the first time. Who knows…at this point it doesn’t really matter. We’ll use up the Olympic we’ve got, and start fresh with new product once we finish up the current room we’re in. I don’t really question our choice to go with Olympic. It was the right decision at the time, and one that as a new parent, I felt most comfortable with. And really, for the walls and ceiling it’s been WONDERFUL. It’s just the trim and cabinets that have been frustrating. Oh well!
Many thanks – happy 5 weeks to Clara! I swear our boy was just five weeks old.
Ralph Hutchinson says
About a year ago I painted stained wood (glossy) bannisters without a primer. Can I use a primer now and then repaint or must I first remove the latex paint used originally? Love your tips and blogs. Ralph
YoungHouseLove says
We would sand everything down (not down to the bare wood, but enough to give it some “tooth” for the primer to stick to). Otherwise the primer will only be as strong as that initial coat of latex that you applied (which could peel right off the wood). Hope it helps!
xo,
s
Cari says
We have knockdown on our walls and ceilings and I was wondering if you have any tips for making straight lines? (ha!) For instance we painted my daughters a cotton candy pink and didn’t want to paint the ceiling but it looks awful because there isn’t a straight line/edge. Please help?!
YoungHouseLove says
Cari- Just tape off where you want a straight line and use paintable caulk against the tape. When it dries it’ll fill the knockdown texture. Then keep the tape in place and go ahead and paint to get a nice clean line!
Sonya- We love Home Depot’s No-VOC Freshaire paint in off-the-shelf white. Just grab a gallon of semi-gloss white from the paint aisle- no mixing required.
xo,
s
Ashley says
This may be a totally naive question but I desperately want to paint all the trim in our house…do we have to take it all off to paint it or can we just leave it on and paint?
YoungHouseLove says
We say paint it in place, Ashley. This brush (or painters tape, if you want to be really careful) will help you keep from getting it on the floor and walls. Good luck!
-John
natschultz says
OOH! I SO have to get that brush! I hate cutting in!
In response to Mickey: painting wood trim and re-sale: When was your house built? A good rule of thumb is if your house was built before WWII and the trim is original – DO NOT paint it. If it is wide oak trim, such as a Craftsman house or Four-Square then you will be killing yourself in re-sale since many die-hard purists will pay a premium for original trim in great condition. You will lose a lot in that case because such buyers know that stripping paint away is an excruciating and very expensive endeavor. On the other hand, a non-period house can be painted. Of course if a Craftsman has lost it’s original finish then it is just easier to paint it again because you probably will not re-coup the cost of striping it down and staining it (unless you are a purist and you are doing it for yourself, or if you live in an historic district where such restored houses go for big bucks).
My house is on the cusp – built in 1946 with nice woodwork, but a lot of it had been replaced, so I’ve been restoring it and most of it I’ve painted white, except the dining room which I plan to stain. My living room was really dark (no ceiling lights), and even though I knew it was crazy I painted the mantle and bookcases white (with red behind and above the mantle) just to brighten it up, and wow! That was so worth it because the room looks so much larger and the woodwork really stands out now. If I had a Craftsman I would have hired an electrician to put in some lights instead (too expsensive in 1″ thick plaster in my case).
Priming wood – definitely sand down stained / laquered wood and use either Zinsser’s Fast Dry Oil Primer (I LOVE that stuff) or for really bad wood or very glossy surfaces use Zinsser’s B-I-N. If you are going to paint with latex/ acrylic after that then you have to use Zinsser’s 1-2-3 primer after the oil primer. Seriously, only use Zinsser’s oil primer – Benjamin Moore’s regular oil primer cost twice as much and NEVER cured. Whatever you are painting though, ALWAYS wash the surface thoroughly beforehand – nothing will cause a paint job to fail more than grime and dust (I use Lestoil and water and rinse well).
On new drywall use Zinsser’s base primer/sealer first (2 coats) – it is cheaper and clay-based so it adheres well to the drywall paper and joint compound, and then one coat of Zinsser’s 1-2-3 (tinted if you are painting a dark color).
Ok, I do NOT work for Zinsser, but after the painter did a horrible job on the house I ended up re-siding the front and painting it myself and I learned a lot (I used rough-sawn Eastern White Pine board-and-batten and I sealed all sides before I installed it with Zinsser’s Fast Dry oil primer and then I used two coats of Benjamin Moore’s Fast Dry oil primer tinted to the exact color of the stain). B.M.’s fast-dry primer takes longer to dry and it costs a lot more, so it is only worth it if you are using a stain on top as opposed to a paint.
As for wood, I just bought B-I-N because a year after the new trim went up inside around the new windows (painted white) knots and wood grain are showing through like crazy. Supposedly B-I-N is the only thing that will stop that (it is shellac based).
White trim – all my white trim and ceilings are painted in Behr’s “Pot of Cream.” I brought home every single white paint chip from Home Depot and all the ones that looked good in the store looked HORRIBLE in my house. The one that I thought was too yellow looked white in my house. Pot of Cream is a nice warm white (it doesn’t look like the color you think of as cream, in fact I’d have to say that it looks like the color of the cream at the top of a bottle of raw cow’s milk – white!). All my trim is satin, not gloss. It is NOT very easy to clean – it is washable, but dust adheres to it more than it would to gloss, and since there are a lot of thick horizontal surfaces it is a pain in the butt, especially in the corners.
Christina says
Help! We primed and painted our trim in our 90s home, and from afar it looks great. But up close, umm not so much. We chose to tape (I like the stubby brush but don’t have a steady enough hand!) and when we pulled the tape off there was a jagged paint line in some areas and uneven paint along the top edge of the trim where the trim meets the wall. Almost as if the trim isn’t flush with the wall. I really didn’t want to go to the trouble of taking the trim off the wall. Can you advise? What am I doing wrong? Thanks!!
YoungHouseLove says
Our only advice would be to get a tiny craft brush (at Michael’s not Home Depot) and touch up those jagged areas. Unfortunately when you tape things off that can happen! Definitely don’t remove all that trim- that sounds like a nightmare! You can also ask the paint guys at Home Depot if they have any ideas or new tools that could help. Good luck!
xo,
s
Kita says
I’m very curious if this brush would be good for painting like borders on my picture frames? And also what kind of white do you get for the trim??
Thanks!
YoungHouseLove says
It definitely could work for painting frames, but a smaller craft brush from a store like Michael’s could work too, As for the white trim colors we like, Benjamin Moore’s Decorators White is one of our favorites. Hope it helps!
xo,
s
Adrianne says
Hi guys! Love your blog and congrats on the baby.
You have a really extensive list of how to-s, so I think I probably just need a link in the right direction.
Since my painting experience is so slight, is there a how-to just about basic room painting?
Things like rollers vs. brushes, hard to reach spots like behind toilets, etc?
Any help is appreciated – keep up the good work!!
YoungHouseLove says
Hey Adrianne,
We actually receive that request a lot so it’s on our to-do list, but until then here’s our brief summary: we like high quality rollers for smooth surfaces (for flat walls of course, if you have textured walls you should get the appropriate roller) and we only used brushes like the one mentioned here to cut in around windows, trim, ceilings, baseboard, and to paint corners that a roller can’t access. We also use short handled brushes like this to paint tight spots like behind a toilet. We don’t use primer unless the wall is super saturated or dark (ex: chocolate or ruby red) or if we’re dealing with something that could bleed through like wood paneling (which may have been oiled, stained, etc- in which case you need to seal it with an oil-based primer before painting. Otherwise we always just apply two thin and even coats (sometimes three in very rare cases) of latex paint. As for what brands we like, Behr and Benjamin Moore have been our favorites, but we often have colors by Valspar or Glidden color matched to those bases since we like a number of different paint chips from nearly every brand out there. We have wood floors and have been painting so long that we don’t use drop cloths, but you might want to consider using something like a plastic tarp from your home improvement store or large pieces of cardboard to protect your floors (especially if they’re carpeted). We have found that we don’t drip very often at all, and when we do, since our floors are wood and they’re sealed, we can just wipe the drip off as long as we don’t wait too long until it dries (in that case a drip can still be “popped” off but it’s a bit more time intensive and we have to be more careful that we don’t scratch the wood in doing that). Hope it helps!
xo,
s
Adrianne says
So helpful! Thanks!! : D
Dayna Falls says
Hello! My husband and I got our first house in mid-July and have been painting every room for the past week and a half, I wanted to give you guys (and the Premium XL Tight Spots brush) major props. I’ve discovered that I love doing trim and my husband is getting really good at using the rollers on the walls. I just wanted to add a silly little tip that’s been super helpful for us. We take a hammer and a decent sized nail and hammer three or four holes in the paint can between the inner and outer lip of the can (the groove the lid fits into) so that after we pour the paint it won’t gather in the groove, but it drips back into the can. It’s been helpful when we’re on the go in all of the rooms and don’t want to buy pour spouts and lids for every paint can in action. Hope it helps any other multitaskers out there!
Thanks for all of your fantastic advice!
~Dayna
YoungHouseLove says
Great tip Dayna! We love that one!
xo,
s
Gen says
Hi. This may well be a no-brainer but how do you clean up the trim when you have wall to wall carpet? What is the easiest way to do this? I enjoy your blog.
YoungHouseLove says
We don’t have wall to wall carpets so we’re not experts but we’ve seen people use wide spackle knives or even pieces of cardboard or drop cloths to protect the carpets from paint as they go around the room touching up the baseboard. Maybe you can google around for tips? Hope it helps!
xo,
s
ChristinaTE says
I’m gearing up to tackle the huge project of painting all the trim in our 50’s ranch as well. The previous owner stained all the wood and put a super glossy finish on all of it. Unfortunately when we painted the walls the tape we used pulled off some of the finish. So basically we have a huge job of sanding before we can even start the painting process! Is it worth it to purchase a hand held sander? Our trim is curved at the edges and there’s a lot of grooves. I’d like to save some time if possible, but didn’t want to invest the money if we end up having to do it by hand.
Also, our master bedroom is an addition to the original house structure, and for some insane reason they decided to try to mimic our marble based windows in the rest of the house. (Someday we might replace the rest of the windows, but that’s not in the budget now!) So basically we have nice new windows in there but instead of having a normal base at the bottom it looks like they put a piece of laminated countertop in at the bottom. (It’s hard to describe without a picture.) Do you think we could just paint over this surface? We have blinds in the windows so it’s not something most people notice but it bugs me that they didn’t just put in normal windows!!
Thanks for any advice!! Your blog has been so inspirational for us!
YoungHouseLove says
You can find some pretty affordable sanders which will definitely come in handy all the time so we’d recommend investing in a low cost model. Good luck! And as for the sills, you should be able to prime and paint them, but you might want to check what the pros at your local home improvement center recommend. Hope it helps!
xo,
s