So, remember that microwave that we got a great deal on a couple of months ago? Yeah. Well. We returned it.
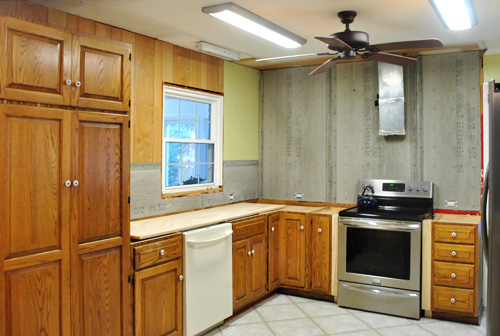
A few of you questioned why we needed “such a big microwave” when we originally posted about it, which did get us thinking that we don’t do all that much microwaving. A bowl of soup here. A bit of reheating/defrosting there. And when we took down the kitchen’s original black over-the-range microwave (which was just as wide as our oven – 30 whole inches)…

… we realized just how hulking the new 30″ one would look in its new home next to our pantry. See, we had originally planned to build it in there like the one in our first kitchen, but that meant that it would butt up right against the side of the window:
So two weeks ago (after seeing how nice and open the kitchen felt without a lot of those heavy, overbearing upper cabinets)…
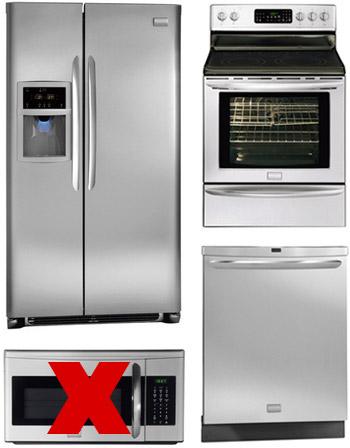
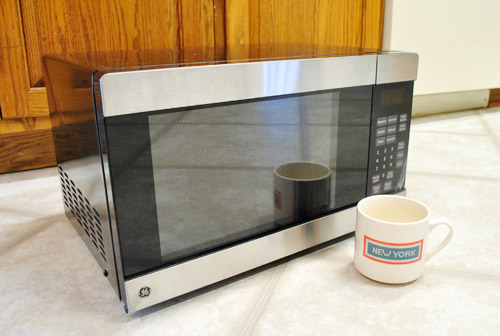
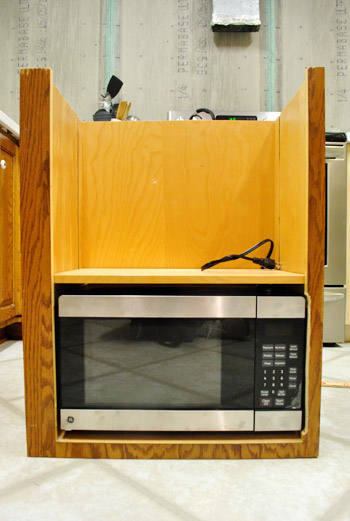
… we returned it and bought this much smaller countertop one instead for $84 (it’s 18″ wide). He’s nice and “modestly sized” as Sherry likes to say. I even tossed a tea mug in there for scale:
But much like the big original microwave that we got, we never planned for it to live on the countertop. Oh no, we got planz yo. This guy is getting built in…
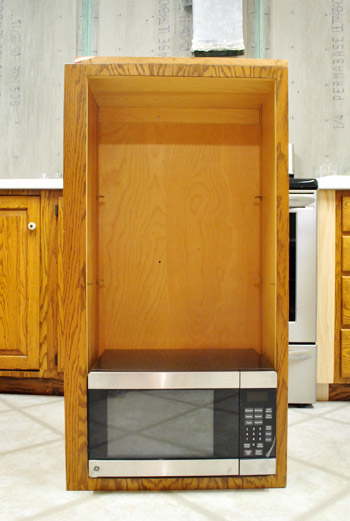
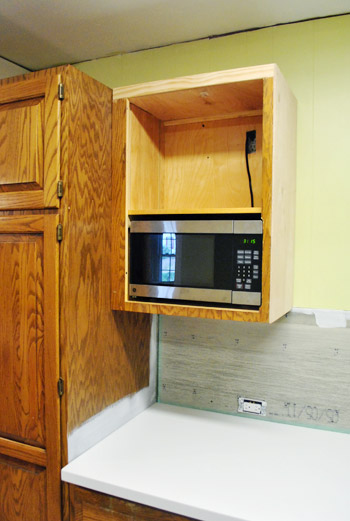
This is one of our old upper cabinets (it hung to the left of our old microwave when it lived above the cooktop) and it just happens to fit the microwave almost perfectly. It’s actually a bit snug around the frame, but the frame is built in around the front edge of the cabinet if that makes sense. So on the inside of the cabinet there’s about two inches of extra space on either side.
The only problem was that:
- the cabinet itself was too tall for its new home next to our pantry (it would hang oddly low as-is)
- it wasn’t deep enough for the microwave to sink back into it and look flush (with extra ventilation room for safety reasons)
So we had some work to do. We had to adjust the height and depth of the cabinet, then hang it next to the pantry with a new door. That way the infrequently used microwave can be hidden away most of the time and when it’s needed we can open the door and zap our food while allowing the appliance to vent (more on that in a moment). Oh and we already had an electrician add an outlet where the cabinet will hang, so the microwave will have power.
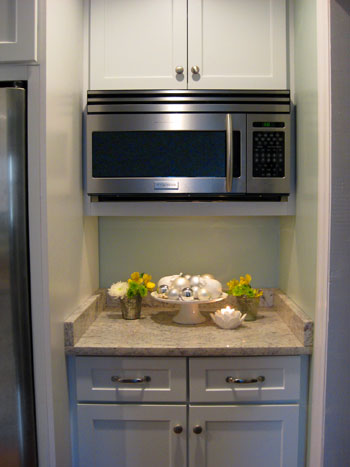
Many custom kitchens actually have built-in microwaves, like this one from here, and this one, from here. So we knew it could look great and actually be really functional (warning: read the paperwork on your microwave to see what type of ventilation it needs – some don’t need any except for the ready-made space under the little legs while some have a vent on the side or back that needs room for aeration, which is something we took into consideration as we went)
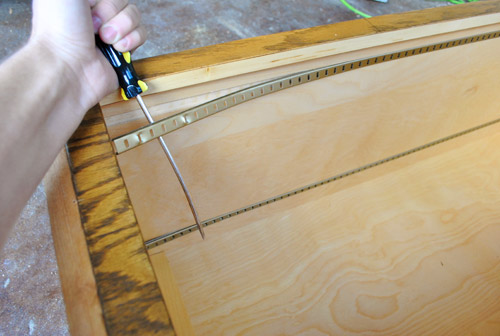
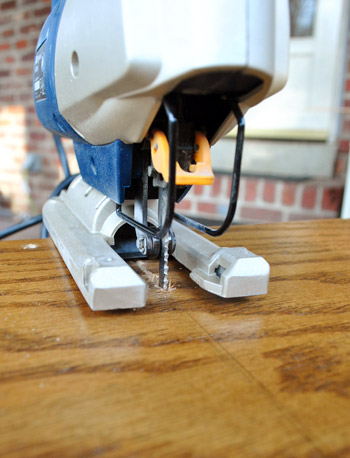
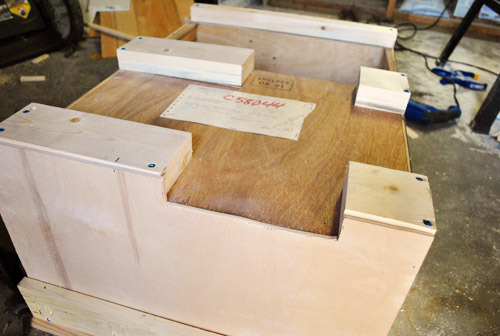
But back to the whole cabinet being too tall issue. First up was chopping that baby down to size. I started by prying out the metal shelf rails. Luckily they came out with almost no effort.
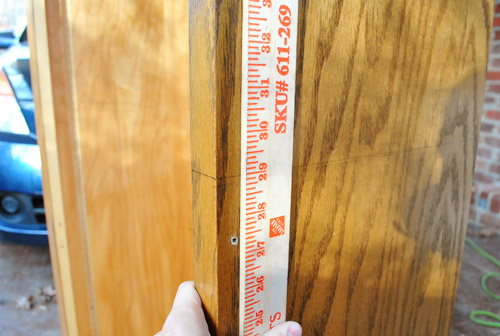
Then I measured, marked, measured again, leveled, measured again, double-checked my marks and leveled one last time…
…before taking my jigsaw carefully along the lines I had drawn on each of the three sides.
What I was left with looked like a bad magic act. All that was missing was a lovely assistant chopped into two lovely pieces.
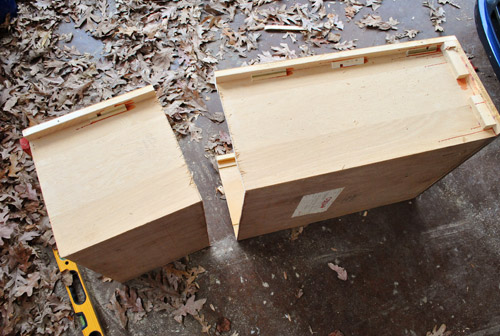
Are you nervous yet? I was. Although I felt a bit better because this was my second time doing this (I tested this method on another spare cabinet that we weren’t reusing first).
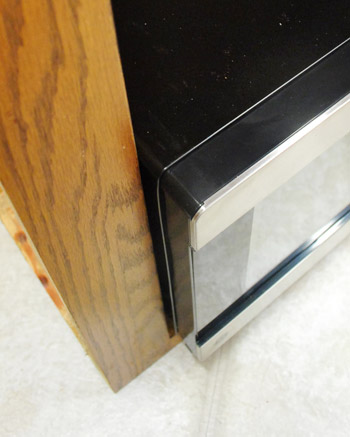
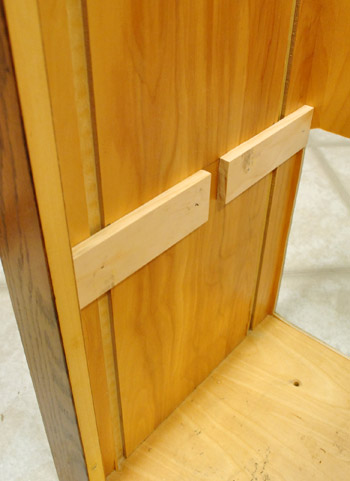
So that big cut started getting me to a better height, but I also had to cut a hole in the back to help with the depth/ventilation plan. Oh, and I had to put a slight notch in the bottom right side of the frame so that the microwave door could swing open more easily (this way we can shimmy the microwave over to the right in the cabinet, which gives the hinges on the left more room to swing so the door can open freely). Not to worry – it will later be concealed by a door.
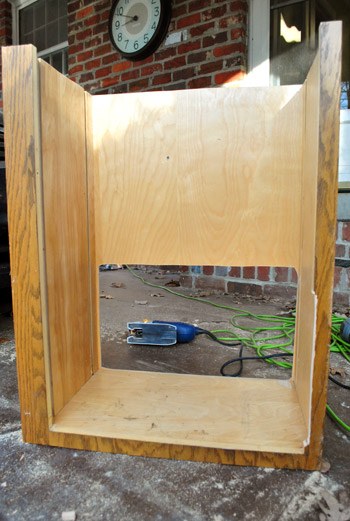
Here’s a shot to show how the microwave stick outs the back – which also helps it vent since there will be a column of “free space” behind the cabinet for aeration all the way up and out the top of the cabinet (more on that a bit later).
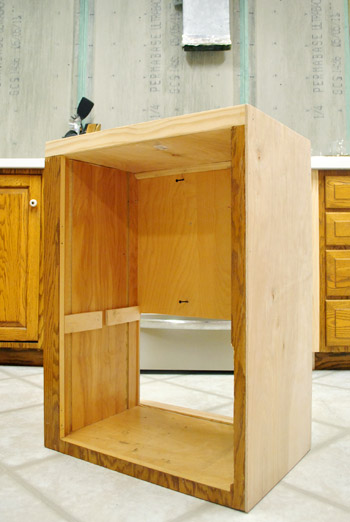
Enough looking at its backside. Let’s look at the front. Is this starting to make more sense? Remember once we add a door that small notched out area for the microwave will be concealed.
Oh, and I added that shelf above the microwave by nailing in some fixed ledges for the shelf (which we already had) to sit on.
Obviously the cabinet was far from being ready to hang. It needed a top, for one. And it needed some extra support on the back if it was gonna sit away from the wall enough to let the microwave vent out the back.
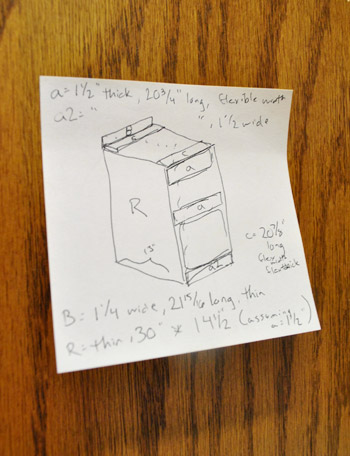
So we devised a plan, I made a sketch (which I don’t expect anyone other than me to understand) and hit up the hardware store to grab some wood.
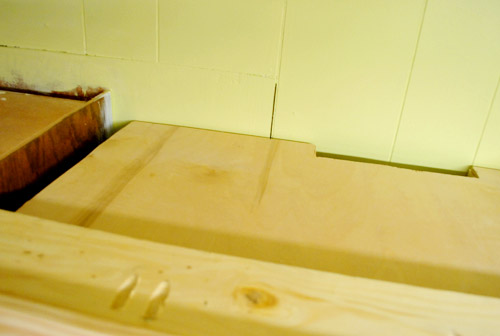
The new top was basically three pieces. A thin piece of plywood as a new top, a thin piece of pine on the front and a scrap piece of 2×4 to hold it all in place. It’s looking a bit rough at the moment, but bear with me…
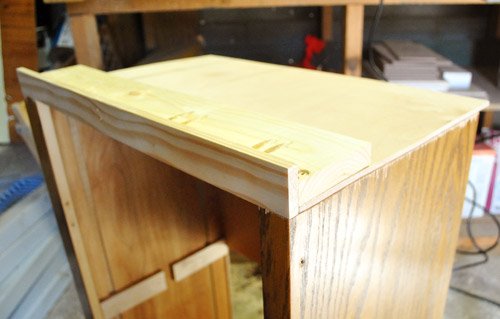
Along the back I screwed in a few blocks of 1 x 4″s doubled-up. This way the cabinet will sit away from the wall a couple of inches and I still have solid wood to screw into when we go to hang the cabinet. Oh, and we cut a wide channel in a couple of the blocks to (broken record alert) help the microwave vent up the back.
Last but not least was the side. For this I used another thin piece of plywood that I clamped on tight, cut to size, and then nailed in place.

After all that “fun” stuff, it was looking more like this:
Significantly more cabinet-like if I do say so myself. Especially once it all gets painted the same color with a door in the front and some shiny new hardware.
Then with the help of my lovely assistant (nope, not the one I pretended to cut in half earlier in this post) we hung this Frankstein’d cabinet in place.
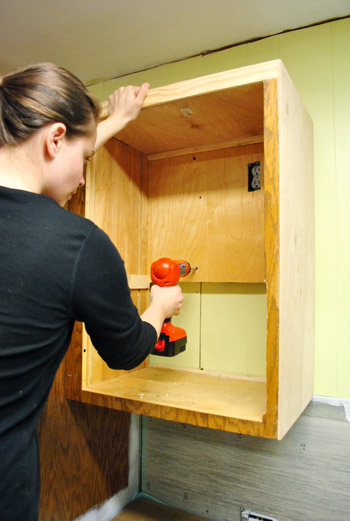
Here’s a view of the top so you get a sense of the venting on both the back and side. I drilled some holes in the left side of the cabinet to take advantage of the gap between it and the pantry (the gap exists because the cabinet frame was wider on that side).
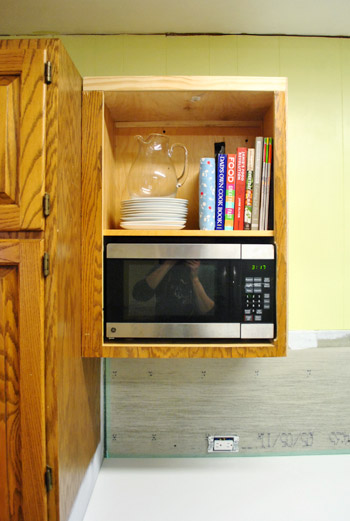
So with cabinet hung, we put the microwave in place and plugged it into the outlet that our electrician put in when he was here about a month ago (more on that here).
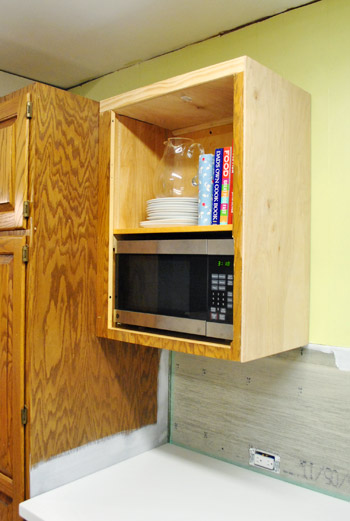
Of course it’ll look better once it has a door on it (and when it’s all painted) but even with the addition of some cookbooks and plates it’s starting to look more presentable. Even if just a little bit.
Update: as for that little routed out area that will only be visible with the door open, many of our cabinets are less than gorgeous when they’re open (picture them stacked high with cookware, blenders, tupperware, and all sorts of other stuff!) so we’re of the “what happens in the cabinets, stays in the cabinets” mindset. If the doors are closed and the kitchen looks good, we’re happy!
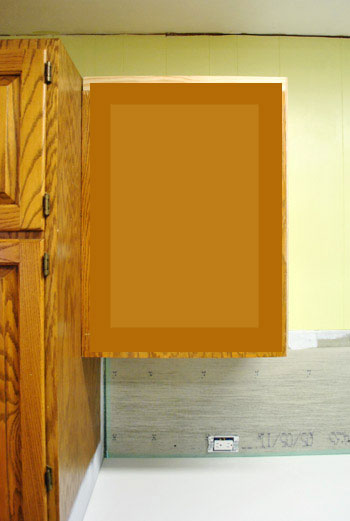
This makes us all the more excited to take care of the door situation – which we’ll hopefully be posting about later this week. Until then, allow this terrible photoshopped rendering to demonstrate how the added door will hide the little routed our area for the microwave when it’s closed (it’ll be open whenever the microwave is in use, of course).
Oh and with this cabinet now hung next to the pantry it leaves us 14″ to the right of it (between the side of the cabinet and the window over the sink). And once the new 12″ deep floating shelves get hung on the oven wall of the kitchen there will also be exactly 14″ between the front of those floating shelves and the right of that window over the sink). So it won’t look crowded, and will actually be nice and balanced. Whew.
Getting the whole cut-down microwave cabinet thing done also makes us excited about our shrinking budget. Not only did we get $255 back for returning the jumbo microwave, we also sold our old over-the-range one on craigslist for $90 (which adds up to $345 back in the ol’ kitchen piggy bank). Plus, we craigslisted our old kitchen table & chairs for $120 and actually sold our old granite counters for $350! If my math is right, that’s $815 back in our pockets… well, it’s actually $731 after we take out $84 for the cost of the new microwave. Still, over seven hundred beans is definitely a welcome “kitchen refund” as we get to that hard “middle part” of the makeover that has us eager to reach some of the bigger changes that we’re slowly but surely inching towards.
No one wants those cabinets painted and the new backsplash hung more than we do, but we’re trying to be realistic about the timeline in here (we originally estimated that we’d be done sometime in January, which we still hope to accomplish). We don’t know how much we’ll have done for the holidays, but at the very least we’ll have our microwave concealed by the time company arrives (oh man, I first typed that as “by the time cabinets arrive” – clearly I’ve been spending too much time in the kitchen). And just to lay it out for anyone wondering what our next steps are, they’re a little unglamorous for a bit longer – and then they should get a lot more exciting:
- cut down all the doors for the cabinets that we added
- add window trim and build a window sill (we had to strip the window over the sink down here)
- add toe kick around all the cabinet bases to make things like the peninsula unified with the rest of the kitchen (we’ll hold off on adding shoe molding until after we do the cork floors later)
- remove all the cabinet doors (after making sure they hang straight and are fitted correctly) and wood putty and sand any gaps/cracks/old hardware holes, etc
- prime everything
- and then we get to paint – yeee haw! (we’re still torn between white and a soft tone like gray-beige, but we’ll share as soon as we’re sure!)
Continuing the list after that step gets us all clammy and overwhelmed, but a new lighting plan, cork floors, and backsplash tile with floating shelves and a built-in range hood are all on the agenda. One cabinet day at a time. What have you guys been doing in the kitchen? Demo? Holiday cooking? Painting? Microwaving?

julie.k. says
Wow, amazing work on that cabinet! This whole kitchen project is SO inspiring/motivating! It makes me feel IMMENSELY better to see that these things happen just a little at a time and HUGE changes can happen bit by bit!
Laura says
We have that same exact microwave. We got it when we redid our kitchen and created its own cabinet just like you guys. It’s the smallest one we could fine and it’s been great. Can’t wait to see when you guys start painting!
Jessica J. says
As a fellow DIY’er, great job! But, a couple suggestions.
1. Putting down blue or green painters tape before you cut should help eliminate or minimize the splintering caused by the jigsaw. Just approximate where the cut will be, put down a strip or two of tape and then mark your line to cut (so you can see it on top of the tape, not under it).
2. I’m really disappointed in how that cabinet trim piece looks on the right side of the microwave. Cutting a little out was a good attempt to make the microwave fit but it looks like a huge hack-job. I think you’d be better off buying some inexpensive wood and starting from scratch, or completely disassembling the cabinet and building it to fit. It’s so sad to work so hard on your kitchen to make it beautiful to accept blunders like that.
Sorry, love you guys, just want to see your kitchen come out the best it can! :)
YoungHouseLove says
Great tip about the tape! And sorry that little routed area worries you! We know that many of our cabinets are less than gorgeous when they’re open (picture them stacked high with tupperware, a blender, all sorts of other stuff!) so we’re just of the “what happens in the cabinets, stays in the cabinets” mindset. If the doors are closed and the kitchen looks good, we’re happy!
xo,
s
Jen says
You know, it’s one thing to offer suggestions, or express opinions. It’s quite another to say you’re disappointed, as if John and Sherry owed you something and have let you down with the choices they’ve made in their own home. They’ve been clear about their desire to use what they have when they can, and it seemed pretty clear that they don’t mind the notched side that will be hidden by the door. You disagree, and that’s totally fine, but it just seems unnecessarily rude to say things like “huge hack-job” and “blunder.” Good on John and Sherry that they seem to take these kinds of comments in stride.
John & Sherry, I probably wouldn’t have even noticed the notching had it not been pointed out, and given that it will be behind a door the vast majority of the time, I concur with the “who cares” attitude!!!
jordan says
Do you have any dollar amount set for a kitchen budget? or an amount that you want to not go over?
YoungHouseLove says
We spent 17K on our first kitchen makeover (which was a total floor to ceiling gut job with new lighting, floors, drywall, cabinets, splurge-ish granite, etc) and although this room is much bigger we’re DIYing more of it and working with our existing cabinets so we’d like to stay under 9K (even with new floors, drywall, backsplash, appliances, counters, floating shelves, a built-in range hood, new lighting, an added peninsula, a wall opening to the dining room, etc). Should be interesting to see where we end up!
xo,
s
houseofearnest says
It looks great! I want to do something like this so bad! Our big honkin microwave takes up 75% of our counterspace… seriously….. http://www.houseofearnest.com/2011/10/03/house-tour-kitchen/
YoungHouseLove says
Love your kitchen though! So sleek and welcoming!
xo,
s
Christine says
Perfect solution! We came to the same conclusion about the size of the microwave – we just don’t use it that often and we really REALLY wanted that sculptural range hood. Instead of a built in, we opted to install a plug in the back of one of our roll-out pantry shelves. Now our microwave is out of sight except when we use it, which is almost never. I think we got the same model initially as you, but every time we had to push a buttom, the microwave kept slipping backward, so we ended up getting a similar model, but with a pull handle. Great job – you two are SO talented!
YoungHouseLove says
Aw thanks! You guys are so sweet.
xo,
s
Desiree says
Good thinkin’ with replacing the larger microwave with the smaller one. I even think the smaller one is more visually appealing.
I’m having a hard time visualizing the door and the notch, but like everything else you two create, I’m sure it’ll turn out great and be a piece of inspiration to others. Good work!
Crystal says
I love these nitty-gritty details posts! It’s great to read about all the little things that make a great design. HGTV is fun to watch but it’s just not reality. The kinds of things you post about shows how time-intensive these projects can be! Which helps us DIYer’s with our future plans. I’m really looking forward to the floor – since I HATE mine!
shanna o. says
Wow! I loved this post but not for the obvious reasons. You see, we just bought our second home in June and in the kitchen, they had a wall oven and under it a microwave in a little nook built into the wall. On the floor. I was like oh man as soon as we move in I am moving that sucker. But oh no, guess what? It is a convection oven tied right into the gas line (note: we also have a gas oven and I.hate.it — electric is so much better to bake/roast!). Digression aside, because we have plans to redo the kitchen in the near term, I have had to live with a microwave on the floor for months.
So seeing all of your pictures in the beginning of your post where your microwave looks exactly like mine on the floor? Yeah, it made me feel not so alone and crazy. Even though yours is now off the floor and mine is not. Ha.
YoungHouseLove says
Haha, so happy to help Shanna!
xo,
s
Carrie says
Looks awesome – John is a talented craftsman! Does the stove vent to the outside or is it just recirculating? We recently converted our’s to vent to the outside because the cooking odors would not go away.
YoungHouseLove says
Ours vents outside – right up and into the attic and out the roof!
xo,
s
Carrie says
O thank goodness! That project took forever – cutting aluminum siding and making sure everything lined up. I vote white cabinets by the way! Maybe with pearlescent pulls to accent the tile?
Sara says
I’m totally hoping you pick a grayish color for the cabinets… it would look amazing with the white counters, and since you have so much gray throughout the house it will really carry through to the kitchen. I know… you know that… just thought I’d cast my vote. It’s looking great! Keep up the good work!
Kitty says
WOW – that is RIDICULOUSLY AWESOME!!!! Fab job!
Meagan says
Love the new built in microwave. The smaller size is perfect!
Love seeing the progress.
I am super interested to see what color you decided to paint the cabinets. My vote is a grey/beige. I think it will help the countertops shine instead of just blending in with the cabs. And it will still look light airy and modern.
But I can’t wait to see and I know you will love anything when you compare it back to what they are now.
Kimberj says
We’ve got our current too big home on the market and looking to downsize. Your blog has inspired us to tackle a redo for our next home, thanks :)
PS Merry Christmas to You (especially your little bean)
YoungHouseLove says
Aw thanks! Good luck with downsizing! I’m sure you’ll find the perfect fixer-upper to make your own!
xo,
s
Anne G. says
Awesome. We are in the midst of a kitchen remodel, too, and are doing a lot of stuff using our existing cabinets. We haven’t cut any cabinets and retrofitted them like this, and I don’t think we’ll need to, but we did switch out our gi-normous microwave for a tiny one, and create an open shelf for it. Wish we’d thought about the cabinet door idea! I would love to have a hidden microwave. Oh well. Maybe for our next kitchen. Ha ha!
If I want to send photos of our before and after kitchen remodel, where should I send them? Facebook, or right here in comments?
YoungHouseLove says
You can link to them here in the comments and/or post them on our Facebook page. We’d love to see!
xo,
s
janie says
Are you sure about this? it would be very easy at this stage before you paint and install the backsplash to head down to lowes and grab some ply to make a cabinet that fits properly and looks right (ie, centered and no notch).
YoungHouseLove says
Yup, we’re sure about our free microwave cabinet, but we can see how if that slightly notched area that will be covered by the door bothers someone they might rather buy new materials and build it from scratch! It’s definitely one of those to-each-his-own things!
xo,
s
Michelle says
Ah that is going to turn out really nice. We too decided we really don’t do all that much microwaving…popcorn is really the only thing we use it for. Maybe a defrosting here and there. So we totally left it out of our kitchen remodel…eventually when we get our laundry/pantry/mud room thing complete I’ll put it in there.
kelly g says
That is amazing! I love it!
Sarah says
I thought I saw something hanging next to the pantry in the dark kitchen during the xmas tree post! Spoiler alert: it looks like there’s a door on it?! You sneaky Petersiks :P
YoungHouseLove says
Haha- that was just semi-fitted, so it was propped up but not attached/hinged quite yet! Working on it now though. Will post about it in a day or two when we’re done and have the whole thing photographed/written up!
xo,
s
Kristi W says
You guys are getting so good at building and woodworking (is that the right term?.. you know what I mean). I’m impressed! Very inspirational. My only concern would be when the microwave craps out and you need to get a new one down the road. You’d have to find one with the exact same dimensions. I guess I don’t know much about microwaves, so maybe they are fairly standard in size? At any rate, it’s looking good!
YoungHouseLove says
The 18″ width seems to be fairly standard for countertop models and the height is something we could easily adjust (by moving the shelf over it) so we think we should be ok for the long haul!
xo,
s
brianne says
We have that exact same lil microwave, and it has been more than enough for us for 2.5 years now. Good choice, microwaves are so ugly no one needs a big hulking one in their beautiful new kitchen!
YoungHouseLove says
Wahoo! So glad to hear that!
xo,
s
Aron says
My microwave is a toaster oven, microwave and toaster all in one. I love it! I put my microwave in an existing pantry cabinet a few months back and am so happy to have it hidden away!!!
YoungHouseLove says
Sweet! So good to hear from other folks who have used the same method since it seems to be fairly uncommon!
xo,
s
Leslie Ann says
The cabinet color is such a big thing, I think you guys should take a vote on it!!! I vote a soft tone gray, or basically anything but white, because I hate white cabinets… but maybe the rest of your readers are in love with white cabinets?
YoungHouseLove says
Haha, you’re right about them being a big thing that we’ll have to live with for years- which is why we’re waiting to be 100% sure with our decision before making one! We’ll share the deets and all of our thinking behind our choice as soon as we get there!
xo,
s
Ellen says
The extra large microwave didn’t bother me at all, but the little one looks great and I can’t wait to “see” it hidden behind a door – I love that idea! I detest an over-the-range microwave for several reasons. Mostly because, like Sherry, I’m fun-size and can’t always see what’s going on in there! Plus, hoods are so elegant and architectural these days, who wouldn’t want one?
YoungHouseLove says
Haha, fun sized. Love it.
xo,
s
Teresa says
Good call on the microwave.. I am not a fan of appliances sitting on the counters, or being seen other than the stove and fridge. And I love that you were able to use that leftover cabinet for it. When I first started reading I was wondering how you would connect it to the wall…ingenius as usual!
Keep trucking away, your almost there!
Peggy says
I bought the same microwave, for just the same reason-size! It’s turned out to be just fine- does what it’s supposed to do without taking up too much space. And I even built a cabinet for it with cookbooks above, too!
YoungHouseLove says
So glad to hear it!
xo,
s
jbhat says
I had absolutely NO idea what was going on in that post as I was reading–not because of your flawless recap, but because I am just sort of clueless when it comes to math, measuring and spatial problems/scenarios. But then when I saw the picture of the “microwave cabinet hung by the pantry with care,” it all came together. I love this plan. It looks really awesome, guys!
jbhat
YoungHouseLove says
Haha, thanks Jbhat! You should hear me and John talk things through. We’re hardly professionals when it comes to lingo so it usually sounds something like: “wait, how fat is that going to be?” “do you mean width or depth?” “um… this direction, whatever that is” – it’s kind of hilarious.
xo,
s
Ashley says
Great idea. I opted out of the over the range microwave in our kitchen remodel too. Question, what vent hood are you now using in its place? I didn’t see you mention that? Selfishly, I’m looking for one at the same time and hoping you guys have a suggestion!
YoungHouseLove says
We don’t have one in yet, but will definitely keep you posted when we hunt one down and install it / build it in!
xo,
s
Jen K says
I vote for gray bottoms and white uppers for your cabinets. I think it would look very custom and super sexy. Can cabinets be sexy…?
Jennifer says
can i ask the overall depth of the cabinet from the wall? we’re currently struggling with the microwave issue as well; we’ve had it sitting on top of our fridge for 6 years (we’re both tall) and now that we’re renovating, our default solution was to put it INSIDE the cabinet above the fridge (full depth). but then our son won’t be able to microwave things until approximately age 15 – ha! (he’s 7 months right now).
however, we don’t have a place where an extra deep upper cabinet will work (the ones i’ve seen are about 20″ deep for holding a microwave). But maybe if we could get away with say 15″, it wouldn’t be so bad. seems like y’all are about there?
and does that microwave fit a regular dinner plate? THANK YOU MUCHLY!!!!!!!!!!!
YoungHouseLove says
Yup, we’re at a little over 15 inches deep. Hope it helps!
xo,
s
Nikki Olson says
White! White! I think you should choose white. You will not regret it!
Laina says
Your kitchen is really starting to come together! Kudos to John on those carpentry skills!
We recently finished painting our dark, solid oak cabinets a nice, crisp white. We also spray-painted the hardware in a really nice, dark, almost gunmetal gray finish. We are in love with our white cabinets! The kitchen looks so much bigger. The warm fuzzies went away, however, when we tried using the Rustoleum countertop transformation kit. That little project crashed and burned, my friends. :o( We were going for black countertops, something that would really contrast nicely with the white cabinets. Unfortunately that particular product just didn’t work out for us. The countertops are very uneven – we’re going to end up replacing the countertops after all. Oh well…DIY and learn from our mistakes!
YoungHouseLove says
Aw man, so sorry to hear about your cabinet issues! You’re totally right that DIYers run into their fair share of speed bumps along the way, but I’m sure your kitchen is going to be amazing when it’s done and it’ll all be worth it! Good luck with everything!
xo,
s
Jenna says
It’s so refreshing to see remodels like this done in real time. It’s definitely a good reminder to be true to your living space, rather than doing something to get it done and end up regretting it. And with that, I will try to remain patient while waiting for the end reveal :) It’s so easy to get caught up in that while being a reader!
vaish says
When my parents redid their kitchen, their designer had a great idea that I always wonder why more people don’t do. In the first example of a built in microwave that beautiful green tile is broken up by the ugly outlets….instead of cutting your backsplash to allow the outlets to peek out, you can get undermounted cabinet lights that have outlets. So you hide your outlets and get a nice seamless backsplash. Its just a thought
YoungHouseLove says
Ooh that’s an awesome idea! Unfortunately we are working with our existing outlet locations for budget reasons, but it sounds awesome to anyone building or gutting a kitchen who still has some input on where the outlets can be installed!
xo,
s
Jill says
I have been LOVING your blog!! I started reading back in August and have been addicted ever since! Y’all are the two most creative people and to take on a kitchen redo like you have is amazing!! Your attention to detail and how y’all reuse what you have is astounding!! Keep up the great work and I. CAN. NOT. WAIT! to see the final product.
YoungHouseLove says
Aw thanks Jill!
xo,
s
sophie says
gotta say, our microwave is hideous. And too big. But, when we tried to go down in size, we lost too much power. And that just sucked. We use ours a lot for things like defrosting homemade pasta sauces and such…
John@Our Home From Scratch says
I know your background is in marketing and advertising, but are you sure you’re not closet engineers? I’m pretty sure you have an engineering degree somewhere in the house of yours… well done!
YoungHouseLove says
Haha, thanks John! That’s so sweet of you to say. If you heard us talk about projects you’d know we’re not engineers. We never know the right terms for things, so we say “now add that wood side piece thingie” – it’s bad.
xo,
s
Priscilla says
http://www.ikea.com/us/en/catalog/products/50092016/
I don’t know if you got your range hood, but I just saw this at IKEA, College Park for $199. I don’t see the price online but you could call the store and find out about the discount.
YoungHouseLove says
Wow- thanks for the heads up!
xo,
s
Jessica @ Quirky Bookworm says
Wow! As always I am impressed by your attention to detail…and the fact that you can just handily-dandily make cupboards to accommodate microwaves!
Ooh, there’s another question…you say cabinet, I say cupboard. Is it a regional thing? :)
YoungHouseLove says
Haha- yes! I bet it is. Are in in England?
xo,
s
Jessica @ Quirky Bookworm says
Actually, thought about it a bit more…and I say “cupboard” in the kitchen, and “cabinet” in the bathroom. Not sure why though!
YoungHouseLove says
Haha- that’s too funny!
xo,
s
Sew View says
This is very impressive work. Excellent work on reusing old cabinets instead of buying new. The two of you seem to be meeting all your “reuse” potential! Nicely done, guys. Nicely done.
Nikole says
Great post! We are also downsizing to a small, built-in microwave in our kitchen reno because we are so very tired of the huge, over-the-range microwave that does not even vent properly! I have been eyeing a similar small microwave at Lowe’s and am hoping to build it in in a hidden corner cabinet by the fridge. I love the sliding door idea – will definitely keep that in mind as an option to further conceal the micro-beast!
Kelly G says
It’s looking great! I’m so inspired by this kitchen reno know that we’re probably going to be embarking on a kitchen project ourselves in the future. I’m taking lots of notes on how you guys are saving money (and making money) throughout. It’s getting me very excited!
Also, I understand your microwave reasoning. Good call on downsizing. We had a number of microwave issues – somehow broke 2 in the matter of 7 months – causing me to declare a moritorium on microwaves. We’ve now been microwaveless for almost 2 years. To be completely honest, I don’t even miss it, but I certainly enjoy having that counterspace back!
Diana @ Boy + Girl says
Love it. Great idea.
-Diana
julie says
Oh how ironic, that I just got done complaining about how our microwave in our office kitchen takes FOREVER to heat anything up, took 4 whole minutes for a bowl of chili, and sat down at my desk to eat said chili….and there was our microwave staring back at me. I do think it looks great built into that cabinet though, and not having the hulk one over the stove will be nice.
Rosemary Campbell says
It’s great to see the progress you guys are making. We just had settlement on our new house last Wednesday and are gearing up for the big move this coming Monday. Our house is old. We like old it was not well maintained and that part is not great since we have an almost 3 yr old and 1 yr old twins. We were hoping to find beautiful hardwood when we ripped up the carpet and there was hardwood but it was in bad shape. We had foyer refinished and decided to have carpet reinstalled in the living room, dining room and upstairs. After seeing how well the floor in the foyer turned out yesterday we are totally bummed we can’t afford to do them all right now. I would do it myself but with 3 kids- no way. We wanted to have the floors done before the furniture came but the big blue kitchen is next on the list!!!!
Melissa @ HOUSEography says
Great choice! We had the same debate when we did our addition and went with the microwave cabinet. We didn’t have the space for the full built-in. The other bonus is that if you want to upgrade your microwave down the road, it’s as easy as unplugging it and pulling it out!
Jill says
GREAT job!!! I’m so impressed with your ability to repurpose! We had a gigantic (like, could cook a turkey) countertop microwave left from the previous owners and it was eating up valuable countertop space… so we finally (after 5 years) just took it out. No microwave. and it feels great! i have a whole side of the kitchen that i can use for baking only. I figured it’s got to be better for us too, right??
Jill says
Holy shmolies, you guys!!!! over $700 back in your pocket? I mean, wowzers! That is amazeballs. And I agree with everyone else, John’s woodworking skillz are getting intense, yo! Fo reelz. I am soooo excited for the next phase (you know, the pretty stuff)!!!!
YoungHouseLove says
Haha, holy schmolies is hilarious. Thanks Jill!
xo,
s
Joanna says
Love the progress that you’ve made! I only check in a few times a week, and am always amazed at how much you seem to accomplish! Quick question about the Pantry and Microwave cabinet: What are you going to do above them? I know you mentioned crown molding, but did you ever think of trying to build the cabinets up to the ceiling height?
YoungHouseLove says
We did, but we have beams that run across the kitchen and love the architecture they add so we have decided not to build up the cabinets to the ceiling. We like the modern look of it feeling open and sort of lighter in there.
xo,
s