It’s no secret that the real improvement we need to make to our new laundry area is in the upgrading to energy efficient appliances arena along with adding some nice built-in storage to maximize that tiny room. But as we save up and plan for those upgrades, we took a few hours after Clara’s bedtime a few days ago to tackle some smaller items on our laundry list. Pun intended.
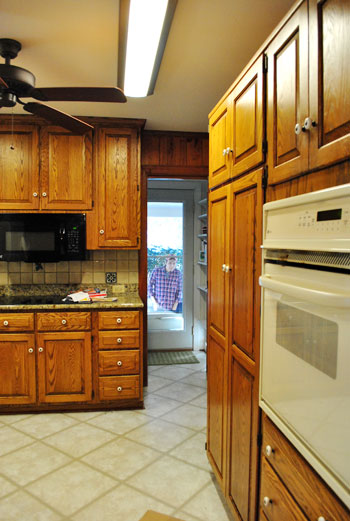
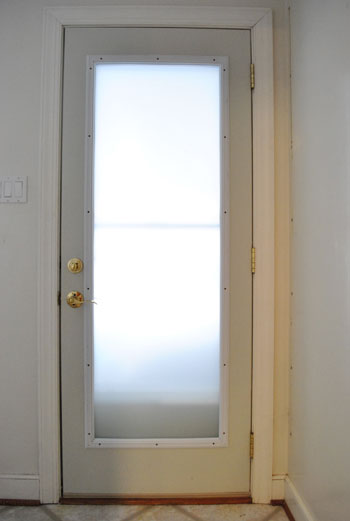
First we went to work on the glass side door. You know, the one that gave everyone a straight shot from our carport, through the laundry area and into our kitchen (here I am being creepy and demonstrating the problem, which you can read more about here).
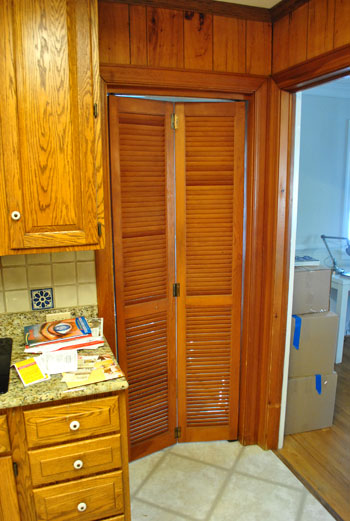
Since we were eager to get rid of this bi-fold door that was currently acting as a privacy solution in the interim…
… at first we figured we’d throw up a cheap wooden blind over the glass side door, remove the dark pocket door, and consider our problem solved. Well, after buying a bamboo rolling shade from Home Depot, we realized how much light it blocked and after learning that our kitchen is a black hole in the mornings (it’s the only room with no windows to the outside world- the window above the sink looks out into the sunroom) we didn’t want anything that would block too much light.
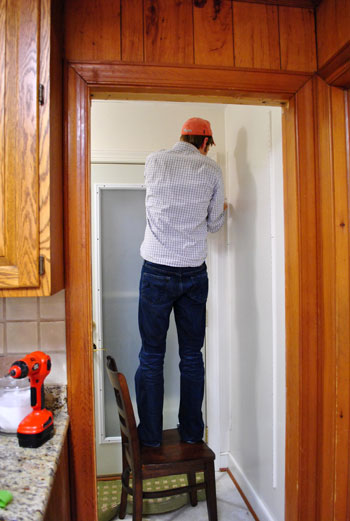
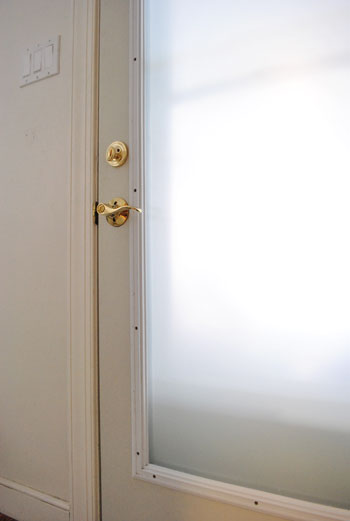
That’s when we opted to go the frosting film route. We used the same materials / techniques that we employed in our basement a while ago, so you can read that step-by-step guide here (and see what film we chose). The only issue we ran into this time was bubbles.
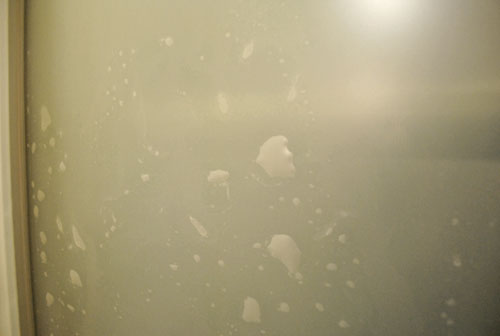
Some serious, annoying, won’t-go-away bubbles. You always have these at some point of this process, but it usually just takes a few squeegees to get them out. But these bubbles weren’t bursting, no matter how hard Sherry squeegeed. And it totally burst our bubble (too corny- had to cross it out).
We hoped it was just an issue with not having applied enough applicator spray to each surface, but we feared it was a problem with the temperature of the side door (instructions said not to apply it in under 40 degree weather, which it definitely was on the other side of that glass). We crossed our fingers, peeled off the permanently bubbled film, scraped some residual glue off of the window, and readied ourselves to try again (fortunately our leftover scrap of film was perfectly sized for a second attempt). And this time we used a boatload more of the applicator solution to keep things nice and slippery so no bubbles could take permanent hold.
And it worked. Phew.
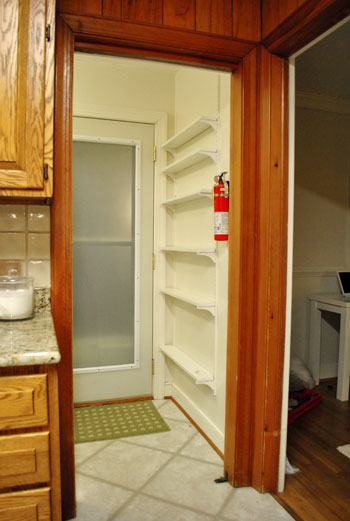
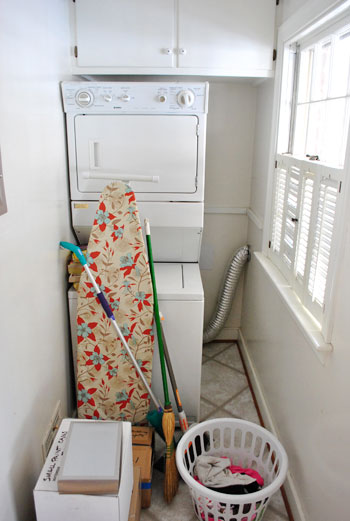
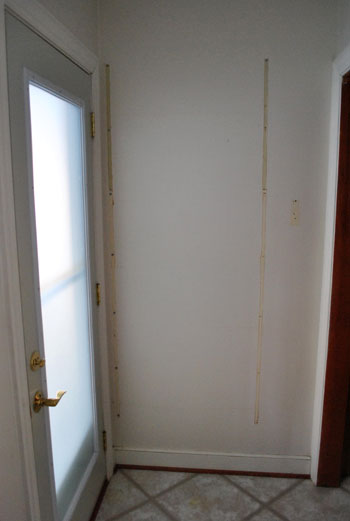
Our next little project was the removal of those shelves next to the door. We love bonus storage just as much as the next blogger, but we couldn’t figure out exactly what we’d want there since it’s not concealed- and we learned that coming through the door with our hands full meant that we routinely bumped into whatever was on those shelves anyway. So we decided to take them down and instead turn it into a place to hang art or a frame collage someday. Every laundry room needs a little space for the eye to rest and art always makes it feel a bit more welcoming and less utilitarian. At least that’s what the wife says. She’s more of the decorating brains. And I’m the take-those-shelves-down brawn. Although Sherry does get down with the power tools when the mood strikes.
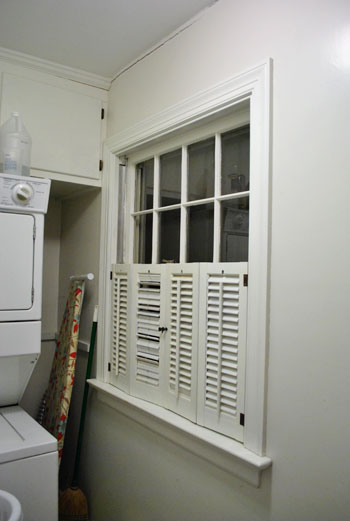
While I was in the midst of unscrewing things (despite it being about 10:30pm) we thought we’d keep the momentum going and get rid of the shutters on the laundry room window too (to make room for an eventual set of blinds/roman shade/curtain).
So by morning, our laundry area was looking more like this:
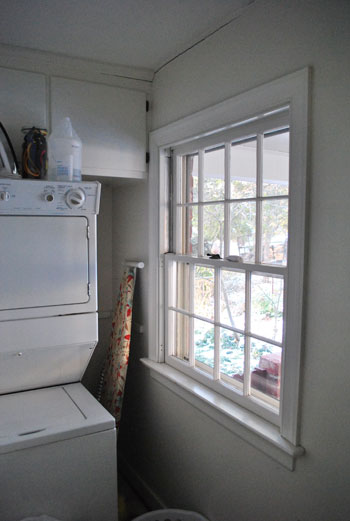
No shutters, no shelves, but a bit of touch up painting to be done.
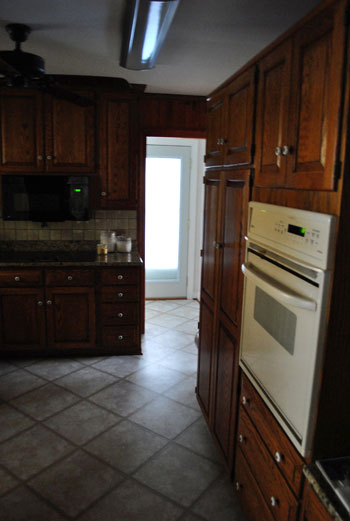
And we’re still getting a nice stream of morning light coming into the otherwise pitch black kitchen in the early morning. Frosting film was definitely the (nice cheap) way to go.
Have you guys frosted windows with the same film stuff from Home Depot? Have you ever encountered the not-coming-out-no-matter-how-hard-you-squeegee-bubble problem? Was it due to temperature or lack of applicator spray? Or something else entirely?
Psst- We announced this week’s giveaway winners back on the original post. Click here to see if it’s you.

Casey says
May I HIGHLY recommend this lil’ drying rack for your laundry room remodel?
http://www.amazon.com/Leifheit-83150-Telegant-Mounted-Clothes/dp/B000B8KYQG/ref=sr_1_3?ie=UTF8&qid=1293745918&sr=8-3
We have one and it folds flat against our wall in our kitchen (we just have W/D behind some bi-fold doors in our apartment, so we were going for space-saving).
The link above has better pictures, but this one has a better price. As far as I can tell, it’s the same rack:
http://www.amazon.com/Telegant-Space-Saving-Clothes-Dryer/dp/B0002M9JTY/ref=sr_1_4?ie=UTF8&qid=1293745918&sr=8-4
YoungHouseLove says
Cute! Thanks for the link!
xo,
s
GreenInOC says
I live in a condo so pretty much all of my windows have a lovely view right into my neighbor’s homes!
I bought enough supplies to film all of my windows. I got through one and ws done! Bubbles, mess, bubbles, sticking to itself, bubbles, uneven cuts and did I mention the bubbles?! I was my very own episode of “I Love Lucy”!
I called a window tinting company and they came in and did all of the windows in less than an hour and I went back to Home Depot and returned what I could.
I LOVE how much light comes while maintaining my privacy.
Sarah says
I’m sorry if this is a dup, but that blank wall would be cute painted in chalk board paint with a cute decorative frame. I’m sure you’ve already thought of it because you guys are awesome! Much love from KS!
Jaque says
I wish I had read this post 30 days ago – I would not have bought a louver size balcony door …
Sarah says
I love the frosted look! We have a small, oddly shaped window at the top of the front door that is positioned so that if you’re standing in the upstairs bathroom with the door open, you can see right down to the front porch! A curtain seems silly there so you’ve inspired me to get frosting! We may have to wait though because of the cold temperature, thanks for that tip! I have a question though, we have the sun coming in on that side of the house all day.. have you ever had an issue from the heat of the sun? bubbling, peeling, melting, etc. Thanks!
YoungHouseLove says
Hey Sarah,
Once it’s on there it should be good to go. We never had any heat or cold issues with our basement windows after over a year of hot and cold temps. Hope it helps!
xo,
s
lynn says
We have a similar arrangement in our entry area off our garage. My handy husband built an open shelf across the top of the stackable w&d and then a number of narrow shelves down one side. We scored a number of baskets on a run to HomeGoods for storing lightbulbs, hats & mittens, shoe cleaning products, etc., in. It’s all neat and tidy and organized. It’s amazing really, how much storage we eked out of that narrow space. We also put up a wall board with some decorative trim on top and lined up a number of coat hooks. It’s a tiny space but it works. I’m confident two clever DIYers like yourselves will make it work perfectly. Not sure if it’s an option to move the w&d next to the window – then you can build in storage without consideration for the dryer vent pipe. It’s hard to tell from the photos but it looks like it wouldn’t block too much of the window and might be worth it. Good luck.
Luisa says
Another idea —
Maybe you could relocate your washer and dryer to the future enclosed garage and that would make the laundry room a proper mudroom. I know that doing laundry in the garage might be a drag but you could gussy it up a bit (might be cold in the winter) …
Also – have you considered just refacing your kitchen cabs?
Carrie says
Can you just move the washer & dryer into your garage? My grandmothers is in her garage and she likes it there because she doesn’t have to listen to it. I understnad that because mine is in the middle of my house! :)
That would entail moving plumbing around though… that’s always a good time.
YoungHouseLove says
Hey Carrie and Luisa,
I guess we could do that, but we looked at a lot of houses with laundry in the garage and hated the idea of having to go out there in the cold and the heat of summer instead of getting to do it inside without putting shoes on and while holding the baby, etc.I guess different people have different laundry preferences though.
xo,
s
p.s. Luisa, we considered restaining and resurfacing the cabs but like the lighter look of painted cabs- like the ones we had in our last house. Thanks for the suggestion though!
Tyleet says
I’ve been a rabid reader for about six months now, though first time commenter outside the fab freebies. LOVE your site. You are very inspirational! I thought of something while reading your post today about frosting the door so that light still shines into the kitchen. Have you thought about the fact that when you close off the carport into a garage, you’ll be loosing that light? Our home has a carport, and I’ve actually come to appreciate it. It forces me to make decisions about utility type things. Do I have enough room for it in our garden shed or our laundry room. No? Out it goes! Anyway, I understand the need and desire for natural light. I hate to see you guys loose that!
YoungHouseLove says
We’re planning to add some windows to the side and back of the garage (and the garage door) so hopefully it won’t get too dark and cave-like in there.
xo,
s
Tatyana says
We used the frosting film from HD on our bathroom window, but we only installed it 3/4 of the way up. It gives us privacy but we can still see the mountains and the sky. We’ll eventually install IKEA’s ENJE blind but we haven’t had the time to trim it to fit. I really like the frosted look so far.
I’m looking forward to your laundry progress. We have front-loading W+D stacked like yours with a small space next to it that we use for the iron and the brooms, etc… but I would love to organize it. I was just looking at this, this morning. http://www.drawerslides.com/c/rev-a-shelf-5276
Expensive – maybe something to DIY in the future. Thought you might like it, too.
Luisa says
Gotcha on the issues with having the laundry in the garage.
By refacing, I guess I meant just replacing the doors with new (paintable) ones and keeping the original boxes (or cabinents). That way, you could go with a cleaner door profile …
You guys will do a great job … don’t you just love unsolicited advice?
Samantha says
Good point about the garage changing the light coming in. Putting windows in the garage brings some security considerations, but I know y’all will think all of that through. I sat looking at the kitchen thinking that a skylight would work wonders in there. I’m sure that cabinet painting and door widening will also help. (Those are some BROWN cabinets! LOL) That room in the middle of the house is always a hard one to brighten up.
I love the house y’all chose and am looking forward to all of the projects you’ll take on as you make it your own!
Karen J says
Oh, too bad about being locked into the carport size! Well, it’s probably good too because that sounds like $$$$ to create from scratch. Anyway, maybe you could use that little square of the kitchen (between the oven cabinets and the office doorway) to create a space with small bench, hooks and cubbies/basket instead.
YoungHouseLove says
That’s a great idea. That small area has already become a super helpful drop zone for things like mail and keys!
xo,
s
Jennah says
OMG, I did not realize the main entryway (or at least the one most people will use) is through that tiny laundry room! That would be a little bit of a horror for me. The stackable washer and dryer also stress me out a little because they seem cramped. Maybe the room is bigger than it looks!
Interested to see what storage solutions you come up with. My laundry room is also tiny and has to store dog food and lots of kitchen appliances (tiny kitchen) as well. And we’re actually going to have to get a tankless water heater and put the cat litter box in the space where the big water heater was eventually (when the cats’ room goes to a kiddo).
Melissa says
We used the privacy film on the shower window in our basement bathroom. Worked really well because it’s impossible to keep curtains clean and there’s really no other solution for a bathroom shower. Just remember, you cannot use windex on it!
http://houseography.blogspot.com/2010/09/suite-dreams-decorating-guest-bath.html
Larissa says
Another suggestion for that wall where the shelves were that you probably already thought of — using the magnetic paint that you used in your former study under the window. That would be a fun place for lists, pictures, future drawings or report cards, etc.
Carshena says
It’s amazing how a few changes can go a long way. You guys are doing a great job!
Danielle says
THANK YOU so much for posting this today! We have a small window near our front door that has had a hideous shade since we moved in 5 years ago because we didn’t want to pay for a custom fitted one. I told my husband about it and he picked up the film at Lowe’s this afternoon. Although ours has some bubbles towards one side (from some silicone caulking that went awry from the builders) it looks SO MUCH BETTER!
nue says
those windows look beautiful with the easy removal of the shutters!
love reading and commenting through each posts but have you two ever given thought to opening up a discussion forum on your site for your faithful readers? it’d be a great place for us to talk and exchange ideas. i am especially dying to know what those lucky readers who do win your giveaways think about the products before shelling out pocket money for ’em. i also love love how everyone shares project pictures on your facebook page–it’d be great if we could do it on a forum on your site!
YoungHouseLove says
We actually have debated starting some sort of discussion thread or forum for you guys we just haven’t been brave enough to take on the coding and upgrade our web hosting to accommodate that quite yet. It’s definitely on our wish list someday though!
xo,
s
Landry says
We used the frosted film in our master bathroom. We have a 4′ x 4′ window over our garden tub that faces part of our neighbor’s window and a intersection in our neighborhood…definitely problematic! For a while we hung up a bamboo shade and ran into the same problem-no light! The film is the best solution-light & private!
Handy Man, Crafty Woman says
great job on the window privacy. I agree with taking down those shelves; I’m a klutz; if I had those I’d knock things down all the time!
anu says
have you guys checked out these solatube thingamajiggies? we are luckily blessed to live in a house with amazing light throughout, but if we didn’t, i’d definitely consider something like this for any room like your kitchen:
http://www.solatube.com/
Maya says
So are you rethinking your carport bias? It seems like the light is a good reason to keep the carport as a carport…
YoungHouseLove says
Hey Maya,
We’re planning to add some windows to the side and back of the garage (and the garage door) so hopefully it won’t get too dark and cave-like in there.
xo,
s
SisterBatik says
You guys rock!! A great blog and so much happiness! The house sounds like an adventure : )
Happy New Year!
With warm wishes
SisterBatik
Sara says
What a great idea for that door. What are your other plans to bring more light into the kitchen??
YoungHouseLove says
Hey Sara,
Painting the dark paneling, heavy beams, dark brick fireplace and even the cabinets should brighten it up about 500%! And removing the large heavy fan will also open up the space. Can’t wait!
xo,
s
Ann says
Holy Schmoly. I love old fashion shutters like that. Really hard to find. Can I have them?
YoungHouseLove says
Hey Ann,
Just find the closest Habitat For Humanity ReStore (they’re in a bunch of places and they have tons of them!). Hope it helps!
xo,
s
Micha says
We’ve been using privacy film on both our window next to the stairs going up and the upstairs bathroom window next to the toilet to limit “exposure”. It only became a small problem when our son started peeling the edges while doing his business in the bathroom; fortunately it sqeegees back into place. In our next home we’re contemplating using some of that faux leaded glass privacy film (found here http://www.wallpaperforwindows.com/pc/Traditional-Ornamental-c41.htm )
Angie says
Would you believe I bought a frosted roll and 2 of the UV protected rolls (My daughters room gets alot of sun and it fades the curtains) after you posted this project last time and they are still sitting in the corner of my bedroom. I now have my New Year’s resolution!!
Melissa says
Hi! I would think a sky light or a couple “sun tunnels” in your kitchen which would help brighten it a lot! I have often thought about tackling that type of project… and would love to see how it’s done by a couple of my favorite expert DIYers ;) Would you ever consider those for your kitchen?
YoungHouseLove says
We’re definitely going to try brightening things up with paint first, but we’d consider them down the line for sure!
xo,
s
claire says
i like the new door, but i love the old shutters! i wish they were still there. it was extremely cute
inspiringpretty.blogspot.com
Jo says
I totally got the idea from you guys to use the Home Depot frosted window film in my bathroom! I got a fully glazed bathroom door, and for the little toilet/shower room within the bathroom, there’s a half-glazed pocket door. I put the window film on both of those, as well as the little outside window in the toilet/shower room. It worked great! There were a few little bubbles and things, but nothing unmanageable. The hardest part of the window film application was getting straight cuts in the corners.
But, anyway – thanks for the inspiration! The bathroom is full of light, and the light from the bathroom windows spills into the hallway, too. I would never have thought of it but for you guys. You’re awesome!
eliza says
Hi! I like this page, it gives me some ideas on many things , such what color combination are great,How to make your place look classy in an appropriate budget.. It’s great b/c i can find all what i want in just one page..Keep it up and more power.Happy New Year to everyone!God Bless!!!
Jennah says
Al those talking about using the film for bathrooms but wanting something more fancy….also try stained glass windows. You can score some gorgeous ones for $100 or less off of ebay etc. Then just get some cup hooks and chandelier chain and hang the stained glass window in front of your window. They’re frosted etc so will provide privacy AND beauty. I have one in my living room and hanging in front of my small kitchen window.
jr says
Here’s an idea for more light into your kitchen. Remove wall between kitchen and laundry room extending the kitchen to the outside wall with window and relocating laundry room somewhere else. Just a thought; an expensive thought, but one you guys can tackle. Love your blog. . .
Beverly says
I’ve been using rice paper on my windows, putting it up with some double-stick tape. I may try using spray adhesive…when the window isn’t so cold anymore!
Becca says
I actually had an issue with some windows in my apartment. My landlords aren’t super accommodating and they originally weren’t even going to supply blinds in the bedrooms (just the kitchen and living room). I asked if they could and they finally agreed. My apartment is the bottom floor of an old house with extra long windows and they only supplied standard mini-blinds, so they’re about a foot too short! Since it was already a hassle to even get them to supply the blinds, I wasn’t going to ask for them to fix them or get the right size. Rather than me mount them lower or take a hit on the cost of custom blinds, I found the frosting spray stuff. I only put it in my bedroom since it faces a main street, with sidewalks, and I don’t want anyone peeking in my windows! Worked like a charm! And it’s easily removed too, so if I ever move out, I just need to get some mineral spirits and I’ll be all set!
emmy A says
Maybe you’ve mentioned this already, but I’m a little behind on my blog reading–hello, Christmas. :) Did you leave your front loader washing machine and dryer at your old house? Are you sad? I use cloth diapers on my baby and LOVE my front loader for all the options it gives me, along with the efficiency. Just curious since your new space isn’t really set up for anything but a stackable.
YoungHouseLove says
We chose to convey those with the sale of the old house but we figured we’d miss them more than we actually do. We’re still keeping an eye out for deals to upgrade our new ones to something more energy efficient like stackable front loaders down the line. But so far they clean really well! Our cloth diapers are still coming out like new, which is good because we worried the new washer/dryer wouldn’t work as hard as our old (well, new) ones did. Can’t complain though.
xo,
s
annabelvita says
Just saw your answer upthread about not wanting to code a forum etc – just thought I’d let you know that there are people like ning who provide all of that for free or a fee. We nearly made a social forum that way in my old job.
Love the small changes. I’m always impressed by your vision – I thought I loved those shelves and those shutters but I see now how much better it is without them!
Oona says
Lookin’ good Petersiks! It amazing the difference just a few small tweaks can make! I wish I had as much energy (ever) as you guys seem to… lol
Becky says
Hi John & Sherry! First of all; great job! I have a question – Is this window film removable? I live in an apartment and we are allowed to make changes if they can easily be reverted back to the original design. Anyways, my front door has a bunch of little windows; I originally wanted to get blinds but ended up with a curtain, which is ugly from the back and blocks the sunlight. Frosted window film (if removable) seems like it would be perfect!
YoungHouseLove says
Yup, there’s a spray removal solvent that they sell for an easy take-down when the time comes. Hope it helps!
xo,
s
laura says
Saaweet! I now know what to do with our full glass basement door..thanks! :)
Sarah@StyleandCentsability says
I love the frosted door we are going to get one for our kitchen asap. We want the light but want to hide our mudroom mess at the same time.
http://styleandcentsability.wordpress.com/2010/12/23/holiday-card-tree/
justin says
When I made this light fixture for my bathroom [http://www.flickr.com/photos/justfuchs/5321464204/], I used spray frosting by RustOleum instead of the film. It worked great for me!
Jenanne says
I am anxious to see your repainting of that door. We have a similar one as our back door that somehow was skipped over for painting when the house was built, and my husband is hesitant to tackle it since it’s metal, not wood. Looks like yours may be the same (and hoping I can glean a little wisdom and motivation).
Savannah says
Have you thought about installing a Solartube to get some light into your kitchen?
YoungHouseLove says
Yup, it’s definitely something we might think about down the line. We’re hoping some paint will brighten things up first though!
xo,
s
katie says
as primary do it yourselfers, we had a hard time hiring someone to frost the window in our guest shower…but we figured $45 for materials and a professional install couldn’t be beat. the pro told me that it would take 30 days to fully seal and that the bubbles would get worse before they got better. hope that helps!! :)
nicole says
Last night I took my phone in to the Apple store for them to place a protective film covering on it and the guy who was installing it showed me a neat trick to get rid of bubbles caused by tiny particles or debris…thought it might work for larger projects like static cling window film too!
Here’s the process:
1. ready two pices of easily removable tape (for bigger projects painters tape would be good)
2. Stick one pice of tape on the edge of the film nearest to the bubble.
3. lift the tape toward you, and the film should come with it.
4. while the film is lifted slide other piece of tape over the debris or where the bubble emerged from.
5. Lower the film and press down on the tape piece that is now under film and over the debris.
6. Lift the film again using the outside piece of tape and peel up the tape that was under the film. The effect should be that the under tape picked up any debris with its adhesive.
7. Lower the film one last time, remove the tape and TADA! No more bubbles!
Hope this helps! My girls and I love your blog and discuss it regularly! <3
YoungHouseLove says
Wow! Thanks for passing that along. We’ll have to try it next time!
xo,
s
Kate says
I know you guys didn’t want to block light, but I was wondering ifyou had any ideas for a film or something else that would help to create privacy plus a little less light? Our front door has a window next to it that looks directly in to our living room, and the sun also shines through it with an insane amount of force in the afternoon/evening (and makes it quite hot in the living room). I want to do something that would provide some privacy as well as block some of the light, but I also want to still let in a little light and be able to see someone at the door. The surround to the window is also metal, so I’d have to hang something about 10 inches above the window to even hang curtains/blinds. Do you happen to know if there is privacy film that blocks a bit of light as well?
YoungHouseLove says
I think there is! I’d check your local home improvement center and if they don’t have it maybe google around for a specialty company that makes different “strengths” of light blocking? I think it might be called UV blocking? Maybe that’s something else. Hope it helps!
xo,
s
Adriana says
I stumbled on your site when I was looking for DIY fireplace makeovers. I am a new homeowner and currently homeowner poor. I don’t have dining room furniture and most of my other furniture are hand me downs. I LOVE the film stuff idea. I have a kitchen door that has not covering of any sort and this is the perfect solution. I am certain to spend endless hours on your site! Def subscribing! Thank you.
Leslie says
We just bought a house with two french doors that have some sort of film put on it. The problem is that the house was built in 1930s and the “film” is now yellow…ick…does anyone have suggestions on how to remove the film??? Thanks!
YoungHouseLove says
I would try a straight razor. Maybe try spraying it down first to soak it and then scrape it?
xo,
s