When we last talked floors in the kitchen, they looked pretty much done.
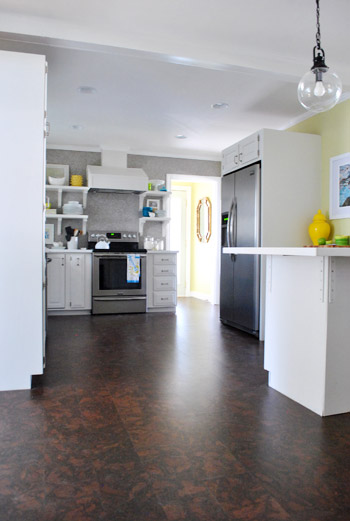
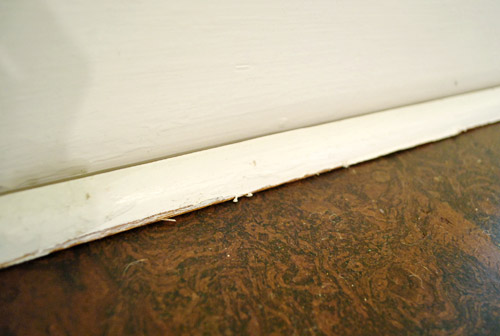
But if you looked closely, they weren’t. They still needed some finishing touches – namely shoe molding to cover the gaps around the edges (which are intentional to allow for temperature expansion and contraction) and some coats of sealant (to keep moisture out of the seams and provide some added durability).
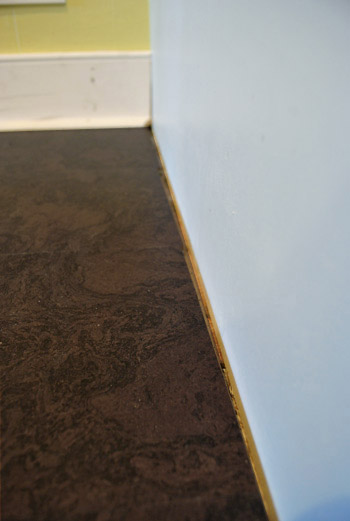
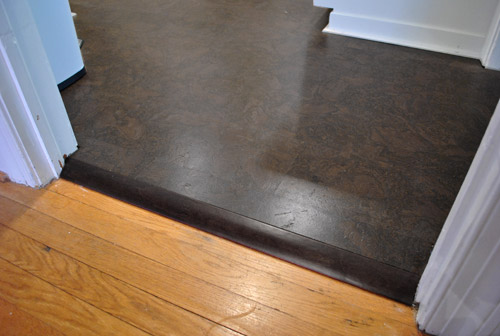
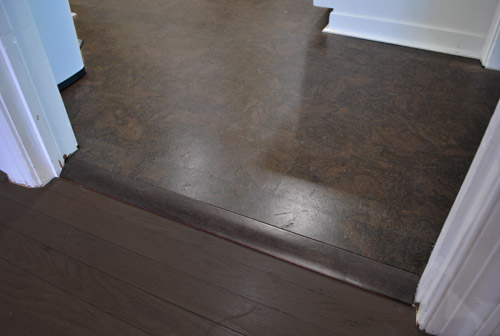
The short version of the “adding shoe molding” step goes something like this: Now you see a gap…
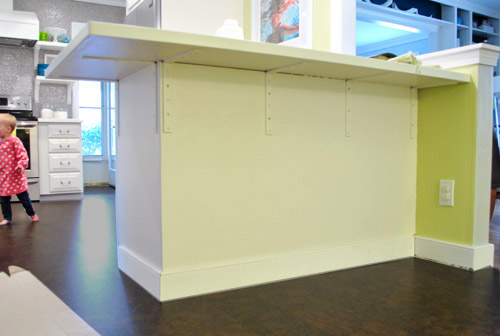
And now you don’t…
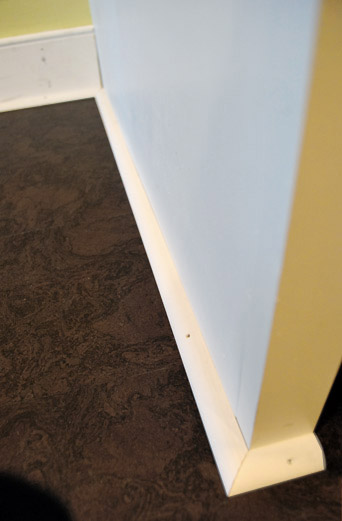
Of course then there’s caulk and paint involved (to cover the nail holes and any seams like where corners meet).
But let’s go with the longer version of the story – which has a few more twists and turns – for folks who like details. The first twist was that we actually ended up ditching our plans to reuse our old shoe molding, despite having saved (and meticulously labeled) all of the old pieces when we removed them a few weeks ago:
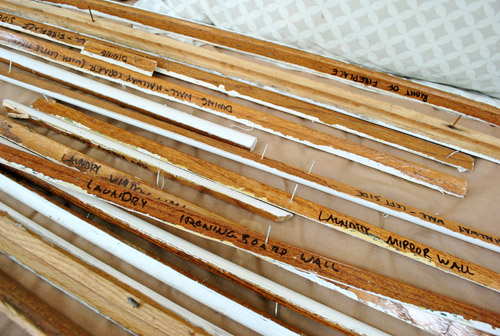
We initially thought that reusing it (after all that meticulous labeling) would make our lives easier. You know, not having to re-cut shoe molding for each span of wall. But when we tried to put some of the old painted pieces in place, they didn’t look so hot. The paint job was a little scrappy looking, and even with touch ups we worried the less than crisp edges wouldn’t look as finished as they could (especially since there’s such a high contrast between the white trim and the dark floor).
So we opted to install all new shoe molding. We had to buy some new stuff for around the cabinets anyway (like the peninsula, which didn’t have old shoe molding for us to reuse since it was newly added), so it wasn’t a bit deal to pick up a few more pieces of it. We figured it wasn’t worth “finishing” our pretty new floor job with rough looking trim. So in total, it was about $35 worth of shoe molding for a nice clean “like new” (because it is new) look.
Since we don’t own a pneumatic nail gun, we installed it old skool style (although we’ve talked about getting one – maybe for Christmas this year?). After cutting each piece, we’d pre-hammer our nails against a piece of scrap wood to get them in a ways, which minimized how much hammering we’d have to do against the floors.
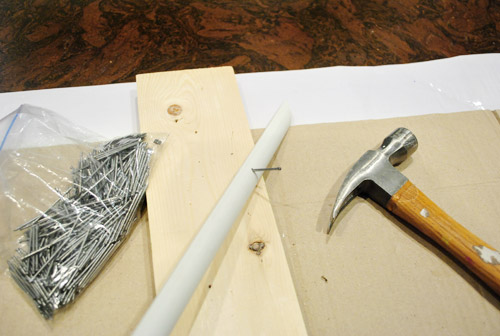
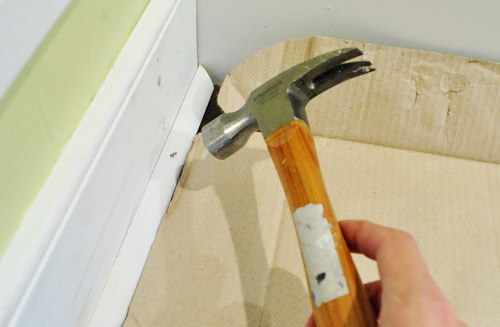
Even when it was ready to nail into place, we still put a piece of cardboard under the work area to keep from banging up the floor too much. Oh, and forgive that piece of baseboard for looking a bit beat up. It was new too (the previous piece was too short since we switched the fridge and pantry location) so we hadn’t painted it yet. It came pre-primed but a bit scraped up.
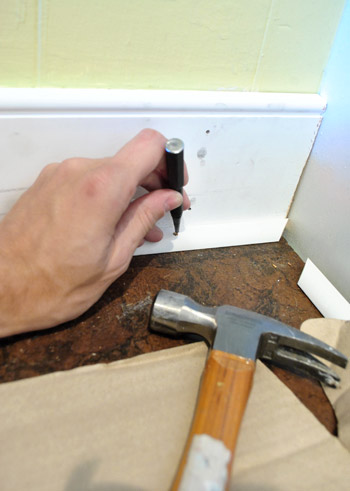
Once the nail was in as far as I could get it with my hammer, I used a manual nail punch to get it in even farther, just beneath the surface. Love that thing. It’s basically just a metal peg with a tiny head that you place right on the nail and bang the end of it to sink the nail in (without leaving big dings in the wood like hammering the nail directly could cause).
I wouldn’t say there were any “big” transformations as part of this step, but if I had to name one – it would be the area around the peninsula, which was lacking both shoe and baseboard:
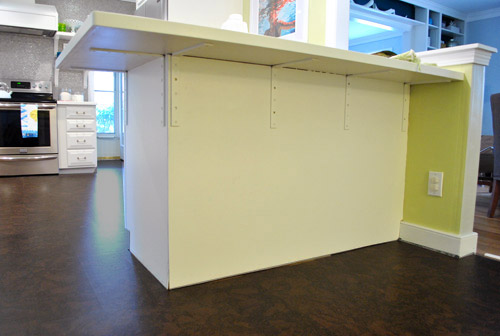
Here it is with baseboard, finally. I’d been dying to add it, but we always figured it didn’t make sense to add until the new floor was in.
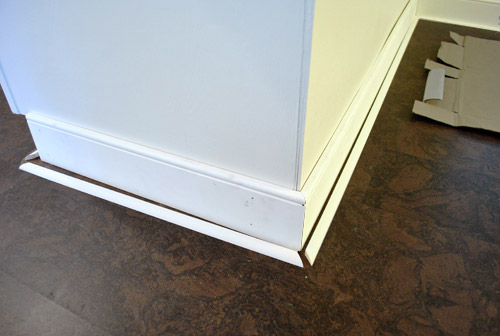
And here’s what it looked like once we had cut the shoe:
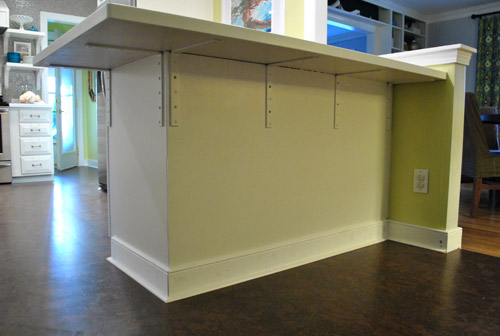
…and now here it is with the shoe all hammered in. It still needs some work (we’d love to add wood molding to hide the metal brackets and add interest to the back of the peninsula someday), but at least it’s looking a bit more finished. When the stools are in there (and you’re looking at it from a normal height instead of squatting in front of it) you actually don’t notice the brackets too much.
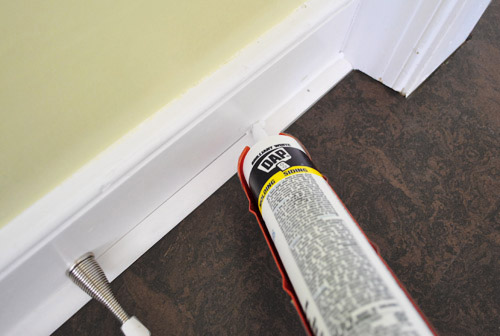
Oh and that picture above is after another important step of the shoe-ing process: Caulk! We always go over all of our seams (including the corners) with a bead of caulk to make everything look more polished. So here’s us gunning a line of it on:
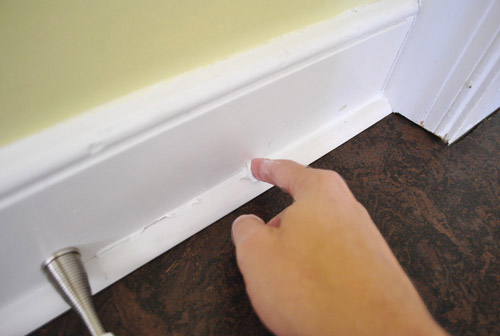
And here I am using my finger to smooth it out. We like to dip our pointer fingers in a cup of warm water to help keep it smooth as we go (and to help keep the caulk from sticking to our hands).
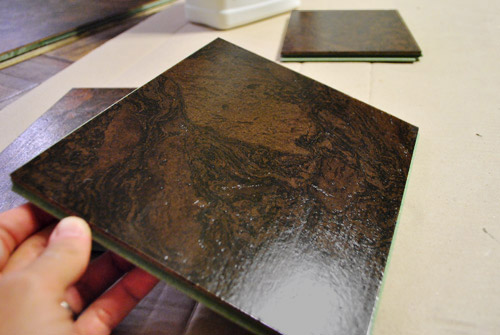
The step after this… well, after the caulk dries… is to paint. We still have to do some of this in a couple of spots, but overall it’s looking much better. But before any “after” pictures, let’s talk about sealing the cork. Even though our cork planks already came pre-sealed, experts recommend sealing them with three additional coats of water based poly after they’re installed to add protection and effectively seal the cracks between the boards (which aren’t sealed even if the tops of each plank come pre-sealed). This also should keep dust and crud from settling into any seams so it’ll hopefully look nice and smooth for the long haul.
We had trouble finding much good info about how this step should go, so we called Lumber Liquidators (where we got our cork) and got to speak with one of their installers. He actually installs and seals the Lisbon Cork that we purchased, so he was able to give us some very clear instructions:
- Hand sand with 100 – 150 grit sandpaper to remove some of the existing finish (“anything higher and you’re just polishing them”).
- Apply a layer of the poly with a 3/8th nap roller
- After that has dried (about four hours according to our poly manufacturer’s label), repeat steps 1 & 2 again… and then a third time.
So yeah, those were his explicit instructions… and we veered off course pretty quickly. But we’re so happy we decided to test things first, because even when experts recommend something, after you painstakingly install something, you want it to look awesome. Not scratched or purple. Yikes.
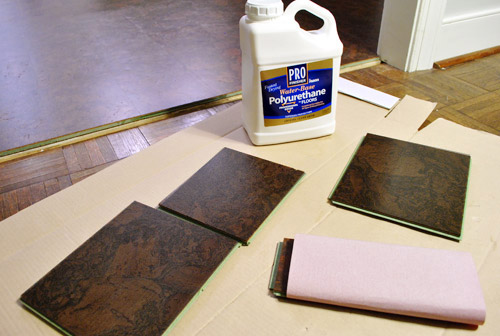
When it comes to what we used, we got some PRO Water-Based Polyurethane from Home Depot since it came highly recommended. We were so glad we didn’t have to use oil-based stuff since when we refinished our first house’s floors it stunk for months- especially on a hot day. Thankfully this stuff has no odor after the four hour drying period. So hooray for water-based stuff.
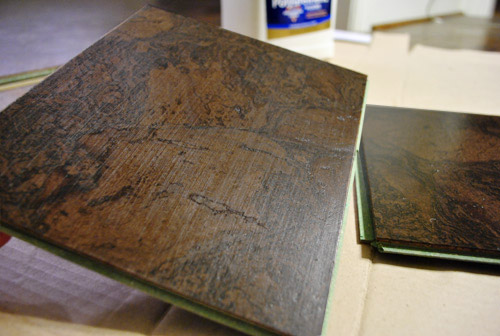
But our deviations off course began after we picked up the recommended poly. It all started at the sanding step. The sound of that very step made us nervous. Sand our pretty new floors?!? So we did some tests on scrap pieces first. On the first piece we sanded just as instructed with the exact grit he recommended. We even watched the guy demonstrate his hand-sanding technique and replicated it exactly, but it left some very obvious (and ugly) swirly scratches on it. And even after applying a layer of poly it didn’t disguise them. Bummers.
So we thought that maybe sanding in a straight motion might be less terrible looking. Nope… just a different brand of scraped-up-yuck (in person it’s really clear that the surface is scratched, although in this pic it looks sort of like wood grain). Not good.
Since sanding seemed to only make things worse, we gave it a go without any initial sanding. We feared it might bead up or slide right off or something without roughing up the surface first. But nope, it worked just fine – and even made the color of the cork really pop. And that, my friends, is how we decided to skip the sanding step. Thank goodness for testing (if we had sanded a corner of the room instead of a test plank, we’d probably be pretty ticked off).
Having opted out of sanding, we went straight to applying it with a 3/8th nap roller, as per the second instruction. Enter “Yikes” moment number 2. This purple party certainly didn’t look right:
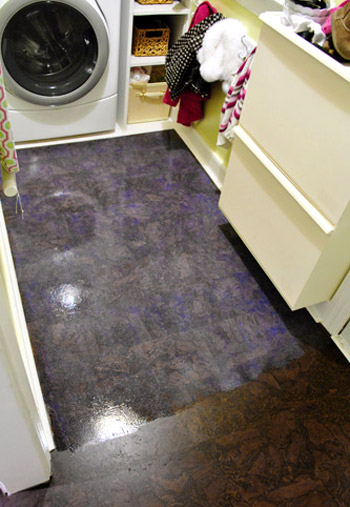
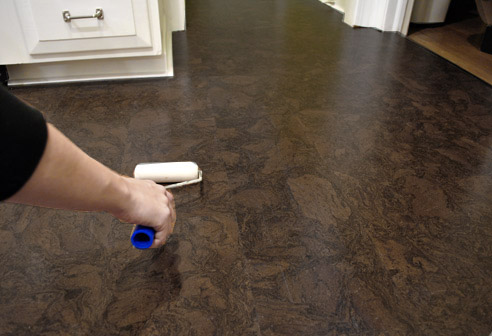
So in a total and complete panic (yes, there might have been some cursing) we quickly wiped up the thick-ish layer of poly that the 3/8th nap roller left with paper towels. It just didn’t feel right. The part of us that lives by the “thin and even coats” mantra (which is how we always apply water-based poly to seal things like wood furniture) decided that we needed to revise this instruction, pronto. So we broke out the least nappy rollers that we had: ultra smooth small foam rollers (the same thing that we use to poly furniture when we stain or paint it).
Worked like a charm. No more glowing purpley-blue haze, just nice thin and even coats to protect things and seal our floors for the long haul. Because just like when you seal furniture, the rule is that thin and even coats adhere better and last longer (anything too thick can crack or peel right off). So it actually makes sense that this works on floors too – all without the purple haze. Whew.
Our revised technique seems to have worked just fine. We can’t even begin to guess why the installer’s detailed tips didn’t work on our sample planks (perhaps he installs lighter cork more often since it’s more common, so maybe the scratches or purple haze aren’t as apparent on that color?).
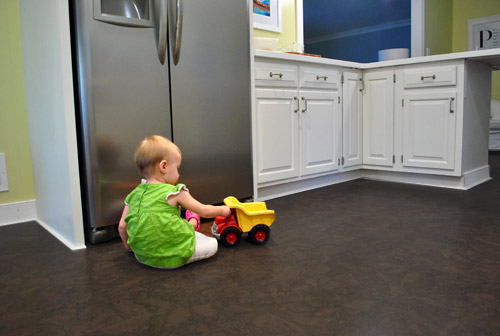
Thankfully, after three coats (one applied on Friday night right before we went to bed – so we wouldn’t have to avoid the kitchen all day – followed by one on Saturday night and one on Sunday night) it didn’t discolor and it seems to be sealed. Not that we tested it out by dumping water on it or anything. But we have had some small spills that were really easy to wipe up (one even involved boiling water that a friend was using to sanitize her bottles). And it seems to standing up to Clara just fine so far, dump trucks and all:
So now here are some “after”-ish pictures of the floors all trimmed out and sealed, with Clara doing some quality control exercises.
We even dropped a plate (which miraculously didn’t break thanks to the soft cork that cushioned the blow) and there was nary a ding or a dent. And Burger’s nails don’t make any marks either (we heard from someone on this post who has cork floors and a 70lb dog and still doesn’t have any nail scratches, which is pretty cool since we weren’t sure how a larger dog would work with cork).

Oh and there was one other thing that are required to “finish” the floors: transitions. We have four doorways in this room, and each needed its own “reducer” – which is a piece designed to join two rooms where one floor is slightly higher than the other. Ours is only about a half-inch higher in the kitchen (due to the asbestos liner under our original vinyl tile, which meant that we couldn’t tear it up and would have to float the cork over it). The guy at Lumber Liquidators suggested getting oak transitions since cork, being a slightly softer wood, could get more beat up on an edge like this where things can catch. LL sold transitions for about $45 a pop, but I found similar options at Home Depot for $29. So after measuring, cutting, and nailing them in – our floors were officially transitioned. Okay, well, I’m actually waiting for two longer length reducers to come in on special order at Home Depot (they only carry 47″ lengths for $17 in the store), so our floors are officially mostly transitioned, to the tune of $140 total (including the special order pieces).
And once we get around to having our other floors stained darker, we might have something that looks more like this (the cork and hardwoods will never look identical, but the same rich mocha tone will unify and help with flow, so our rooms don’t feel as chopped up and disjointed). Ahh, if only getting floors refinished were as easy as Photoshop…
So we’ll call that a wrap on the kitchen floor. And since it was the last big project in the kitchen, we’re thinking we owe you guys some real after pictures and a full-on budget and time breakdown for the entire project. How does that sound? We have some photos to take and some receipts to tally up, so let’s say Wednesday. Same time, same place. In the meantime, what did you guys do this weekend? Any shoe molding installation or sealing going on?

Ariana says
i was looking at your pinterest board and loved this.
http://pinterest.com/pin/227994799855124247/
might be a cool DIY way to cover up the brackets on the peninsula? add some visual interest without taking away from the seamless white? so happy for you guys!! the kitchen transformation is unreal. keep it up, you motivate me!!
YoungHouseLove says
Oh yes I love that pic! Definitely a possibility!
xo,
s
Heather C says
Looks great!
Quick question. Since trim paint is typically not a low VOC product, what did you guys use on your trim? Does it hold up well to kids and dogs or do you have to touch it up often. From what I’ve read, trim paint has more of an enamel hard finished surface and of course is supposed to be very self leveling.
YoungHouseLove says
We have a can of Olympic Premium paint (it’s no-VOC) in off the shelf white that we love for our trim! That gallon has lasted for over a year for trim painting stuff, and we have used it in every room we’ve tackled and loved it! Of course Benjamin Moore makes some awesome Natura stuff (it’s no-VOC and probably has better coverage than Olympic).
xo,
s
Esther says
Moulding is the bling to a room. Just like a necklace is the bling to an outfit!
Our weekend was spent building cubbies! Yay!
http://the6wolfeden.blogspot.ca/2012/03/can-we-build-it.html
YoungHouseLove says
Cool cubbies! And I agree about molding, it’s totally the finishing touch!
xo,
s
alison says
I can’t belive you guys had the patience to hammer in all those finishing nails! It looks great! But if you do ever want to get a finishing nailer, you can find a good one at Harbor Freight Tools for a lot less than any other store. And they do have a store in Richmond, I checked :)
YoungHouseLove says
Thanks for the tip Alison!
xo,
s
Nicole says
They look amazing! Kudos to planning and practicing your techniques, you guys saved yourselves a LOT of headache!Isn’t it so nice to finish a project? You can sit back and enjoy now!
Lisa@wanderdownpennylane says
Wow! No nail gun. You guys must have amazing patience. When my hubby and I built our shed I don’t know what we would have done without it. Your arms must be sore still. Definitely put it on your Christmas Wish List!
ps: Happy Birthday!
Stephanie says
I have an incredibly small house. 800 sq ft total, 2 bedrooms, 1 bath , living room and tiny kitchen, and a garage we cut in half to make into a laundry room and closed in. I feel like I want to re decorate some things but don’t know where to start…
YoungHouseLove says
You can do it! Just check out our Project page (see that link under our blog header?) and see what small one hour projects sound good. Sometimes starting small is nice to get the momentum up!
xo,
s
Amy says
One question: Did you take any special steps to clear the cork of dust or other debris before applying the poly? We actually have the exact same flooring ready to install in our 1950s ranch, and I assume a dust mop or something would do the trick, but I would love the benefit of your experience. :o)
Gorgeous floors — well done! We always love your blog, and we actually delayed installing our floors until you completed yours, so we could learn! I’m so glad we did. Great tips.
Oh, and add us to the crew of nail gun supporters. We’re able to borrow one from friends, and it’s so helpful.
YoungHouseLove says
Thanks Amy! We just swept the floor, first with a broom and then with the equivalent of a fabric swiffer (we got this pole with a fabric head that is shaped like a big rectangle that grabs dust at Target). Hope it helps!
xo,
s
heather s. says
Looks great! I added quarter round to every single room in my house and did it with a drill, nail and hammer (no air compressor here!). I found that if I drilled a small pilot hole before nailing, the wood wouldn’t split and it made the job a lot easier for me.
YoungHouseLove says
So smart!
xo,
s
Angie says
Asbestos abatement in our hallway this weekend…DIY style. It was miserable, in fact, the most miserable DIY project ever. EVER. Between the head to toe disposable suit that traps in all heat, the respirator that was slipping out of place due to all the sweat, the goggles that were steaming out of control due to said sweat, being trapped in the hallway for 8 hours until the mission was accomplished, the chemical adhesive remover that took a lot of elbow grease (or perhaps it seemed that way due to pure exhaustion), I will NEVER do that again. Thankfully, the flooring wasn’t too brittle and didn’t stir up much dust. We had read all of the State Dept. of Health instructions multiple times, so even if it had, we took the appropriate precautions.
But, enough about me. I LOVE how your cork floors turned out! My husband and I are now considering that for our asbestos laden bathroom floor (assuming it works in high moisture settings). I need to do some research, but its just too soon to think beyond the terror that was this weekend. Love, love, love reading about your DIY adventures!
YoungHouseLove says
Wow- that sounds miserable- so glad you got it done!
xo,
s
sara says
This weekend I followed your cabinet painting steps and began doing my laundry room cabinets. They looked to be about the same style and color as yours. I went darker rather than white. My plan is to impress my hubby so he will give me the green light to do the kitchen! A new counter top (Corian)is coming this spring so our cabinets need a makeover.
YoungHouseLove says
Sounds awesome! Good luck Sara!
xo,
s
jen says
LOVE the floors…well I LOVE the whole kitchen redo. i see it’s your b-day sherri – it’s mine too! only i wish i were turning 30 again!! LOL i am the big 39 :) enjoy your day!! :)
YoungHouseLove says
Aw thanks Jen! Happy birthday right back!
xo,
s
PatC says
The floors are beautiful!
…and happy Birthday Sherry! :)
YoungHouseLove says
Thanks PatC!
xo,
s
KC says
This is beautiful!! Completed just in time for John to prepare a BIG homemade birthday meal for the birthday girl. ;)
Happy Birthday, Sherry!! :)
YoungHouseLove says
Haha, here’s hoping!
xo,
s
Jessica says
This looks so great!! It’s amazing how trim can transform a room. I was wondering (and sorry if anyone else has already asked this question, I didn’t read through all the comments), but what do you think about adding a little piece of base board to the side of the fridge cabinet? It might just be the angle of the pics but I think it could be a nice touch. If course it might look different when you’re standing in the room vs. seeing pictures but I thought I’d bring it up anyway. Regardless, the kitchen looks FABULOUS!
And happy birthday Sherry!!!
YoungHouseLove says
As for what got baseboards, all walls got them and the fronts of all cabinets got them. The side of the pantry and fridge didn’t get them since they already had trim around the front of them, so adding it to the side of them would mean it would look raw in the front (it wouldn’t connect with anything or look the same as other cabinets which already have trim as well, so it would be double deep in some parts). Hard to explain, but we just put it where it looked best and connected to keep everything looking seamless.
xo,
s
Melody says
Happy Birthday Sherry!
YoungHouseLove says
Thanks Melody!
xo
s
Shunta says
Happy Birthday Sherry!!!!!!!!!!!!!!!!!!!!!!!! :-D
Angela M says
Just wanted to say HAPPY BIRTHDAY to Sherry! I always remember when yours is because mine is also today (28) :) Wish we could celebrate together but we’ll have to settle for virtual margaritas and pretend to dance around on your lovely new kitchen floors! Well guess you can actually do the latter but we can pretend Im there! Happy 30th! Great Job on finishing the kitchen!
YoungHouseLove says
Aw thanks Angela! Happy birthday girl!
xo,
s
Fiona says
Wow! It looks fantasics. I just love the contrast between the floor and walls.
P.s. happy birthday Sherry.
YoungHouseLove says
Thanks Fiona!
xo,
s
Paige @ Little Nostalgia says
The little details really finish it off nicely! I’m glad to know about the sanding troubles, too, since we want to do cork when we move.
Heidi P. says
Happy Birthday Sherry!! How do you feel about 30? I only have a few months left and I wish I could stop time now! My SIL says last year was the last birtday I’ll ever have – 30 and over don’t even exist :).
As for the floors, phew and yay that they didn’t come out/stay purple and are done!
One question: How did you decide on which areas got baseboards and which ones didn’t? Perimeter walls = baseboards. Everything else = only shoe molding? (for instance, that “and now you don’t” picture) Just curious.
p.s. I love your mantel display. So spring-y and happy :D
YoungHouseLove says
Haha, I like thirty! It’s an exciting year! Clara’s growing and chatty (and cracking us up daily) and we have a book coming out this fall (how crazy is that?!) so 30 is cool! As for who got baseboards, all walls got them and the fronts of all cabinets got them. The side of the pantry and fridge didn’t get them since they already had trim around the front of them, so adding it to the side of them would mean it would look raw in the front (it wouldn’t connect with anything). Hard to explain, but we just put it where it looked best and connected to keep everything looking seamless.
xo,
s
Heidi P. says
Ah, I see :).
Margaret says
Happy Birthday Sherdog! I’m sure 30 will hold so many exciting things for you (hopefully exciting things that I can read about, during my YoungHouseLove breaks at work :))!!!
YoungHouseLove says
Thanks Margaret!
xo,
s
Tamara says
Happy Birthday, Sherry! We’re birthday buddies (except I’m an ’83 girl so just a little behind ya!) Hope you have an awesome day today with your cute family :)
YoungHouseLove says
Happy birthday Tamara!
xo,
s
Sarah says
Why yes, I did have shoe molding installed this past week! I have to chuckle, I don’t think any of your end-of-post questions ever happened to meet up with something I’m doing. I just had my floors refinished and it’s amazing the difference the finished look has from the previously shoe molding-less version. Also, I’m in love with my floors. Is it weird that I want to hug them?
YoungHouseLove says
Haha, not weird at all. I do snow angels on mine.
xo,
s
betty in munich says
I bet that thin even coat mantra works for nail polish too. I will think about that next time I am messily trying to quickly apply that last coat of nail polish. The kitchen looks great!
YoungHouseLove says
Haha, yes!
xo,
s
erika says
Happy 30th Birthday Sherry!
Amiz says
It’s official, I have kitchen envy. It looks amazing!! I cannot wait to finally start on ours!
P.S Happy birthday $herdog!! Didn’t want to spam your freebie post :D
YoungHouseLove says
Thanks Amiz!
xo,
s
Nicolle Belchamber says
Your floors look amazing. I had never considered cork before but will keep it in mind for my next reno. That purple haze was so scary. So glad it worked out.
Happy Birthday Sherry!
I was in Custer State Park Sunday and saw hundreds of buffalo. It was a great day!
Jennifer says
I certainly hope that the lovely folks at LL were kind enough to inform you that by coating your cork floors you voided your warranty.
I did not have a good experience dealing with Lumber Liquidators and from what I hear, not a lot of people have.
Here’s hoping that you knew that before you did it.
P.S. Your kitchen turned out awesome.
YoungHouseLove says
Yeah, they did tell us that, but we have heard from so many experts who recommended it for a long-lasting finish and extra durability so we went right ahead and protected those babies!
xo,
s
Joy Franks says
Happy,happy birthday, Sherry!
YoungHouseLove says
Thanks Joy!
xo,
s
Jenny says
The room is looking soooo amazing! You guys did an amazing job.
And this is unrelated, but I saw these and thought of you two. Maybe you could use these knobs somewhere in the house?
http://www.knobsandhardware.com/knobs/emenee-mk1152-a-bumble-bee-knob_g174754.html?linkloc=cataLogProductItemsName
Jenny
YoungHouseLove says
So cute!
xo,
s
Jenny says
And shoot sorry I also wanted to say HAPPY BIRTHDAY SHERRY!
Jenny
http://www.simcoestreet.blogspot.com
YoungHouseLove says
Aw thanks Jenny!
xo,
s
Colleen says
It looks really nice! Good job!
Crystal says
The floor looks fantastic! Quick question though and I apologize if this has been asked and answered already as I haven’t read all of the comments.
How does one decide where to install baseboard with molding vs. just the molding? There’s a picture of Clara in front of the fridge with her toy truck (OMG, she is sooo cute! I miss the days of little people, or perhaps its simply missing the simpler days before college tuition bills for my two…)
Anyways, the picture shows the refrigerator cabinet/enclosure with only the molding along the side panel and facing, but the peninsula cabinets have both baseboard and molding showing. Both the peninsula in my old house and the island in this one has only molding. I think it looks better with both, so is it simply personal preference or perhaps a regional thing? Is it because you still have something yet to do with that refrigerator cabinet side?
Or perhaps I’m so jealous of those gorgeous cork floors, I’ve stared at the pictures so long I’m not making sense?
YoungHouseLove says
As for what got baseboards, all of the walls got them and the fronts of all cabinets got them. The side of the pantry and fridge didn’t get them since they already had trim around the front of them, so adding it to the side of them would mean it would look raw in the front (it wouldn’t connect with anything or look the same as other cabinets which already have trim as well, so it would be double deep in some parts). Hard to explain, but we just put it where it looked best and connected to keep everything looking seamless.
xo,
s
Tina Bland says
HAPPY BIRTHDAY SHERRY! Enjoy the day…well, I guess I should say evening now;)
YoungHouseLove says
Thanks Tina!
xo,
s
Amanda T says
I love the finished floors! I think they look like they have less of a reddish tone in the pictures now that they’re sealed. I like it :)
jenny says
One of my fondest childhood memories is watching my dad make a cup of tea each morning after giving me breakfast. He’d flick the kettle on, walk over the the cupboard with the mugs, spin the mug down onto the cork floors, the mug would bounce up and away from him and he would catch it as he stepped back in front of the kettle. I’ve thought of that each time you post a flooring update- it still blows my mind! Cork floors are awesome! Congrats on how fantastic yours have turned out!
YoungHouseLove says
THAT. IS. AMAZING. I love it.
xo,
s
Jaimie says
Oh goodness… we have to replace our shoe moulding at some point… whoever installed our laminate floors did a decent but not stellar job, and never painted over the caulk… so now it’s all brown and icky from years of dirt sticking to it. Seriously gross!
YoungHouseLove says
Yuck, but you can do it! Good luck!
xo,
s
Adam says
Nice use of the sealant. I am about to install some laminate flooring in my kitchen, do you think that polyurethane would seal it as well or is it really just for the cork?
YoungHouseLove says
I’m not sure laminate calls for additional sealer, maybe google around or ask some contractors/floor installers what they think?
xo,
s
Kim says
Happy Happy 30th Sherry!!! I actually really enjoyed my 30s as I felt more confident in my own skin. Hope you had a great day – can’t wait to hear the fun things John and Clara had planned for you!
YoungHouseLove says
Thanks Kim!
xo,
s
Gillian says
Pre-hammering you nails against a piece of scrap wood, is SUCH a great idea, that I had never ever even thought of. Thanks for posting that tip. Thats a great way to save the floors from being beat up!
Anika says
Oh my goodness that purple scared me for a minute – it was very, very purple! I really admire that you guys always do a test anytime you take on a big project; from using photoshop to test out a color to newspaper outlines on your wall it’s really reminded me to slow down and take my time on projects to make sure it turns out right the first time. So glad it all eventually went smoothly for you guys – it looks amazing!
Side note – I love the metal of your stools since they tie in to your appliances, but I wondered if you guys ever considered darkening the center section of the seat (like a chocolate brown to tie into the floor)? Just a random thought.
YoungHouseLove says
Yes, I love that idea! I have been thinking that stain could do the trick.
xo,
s
Jennifer says
The floor looks great! I have a question about your transitions. I’m thinking of laying new tile over existing tile, which would obviously result in a higher floor. Like you, I have 4 door ways that would need reducers. Do you notice the height difference when walking over the transitions/pushing a vacuum over the transitions/etc? Could it cause a small child (i.e. Clara) to stumble a little? I’m so paranoid the higher floor will be noticeable, even if it’s a minor difference!
YoungHouseLove says
I read somewhere that over an inch is a noticeable jump in flooring, but half an inch isn’t a big deal. Waking into our current master bedroom there’s actually a half inch change that I never even noticed until we were tackling the floors (and I was nervous about it, until I noticed that I hadn’t even noticed the transition into our master, haha). Hope it helps!
xo,
s
kristen says
I used that exact same product on my dark brown painted concrete floors and RUINED them. Purple haze. Had to sand down and start over. So glad ya’ll went with your instincts and wiped it up! Looks great!
Tiffany Bennett says
So pretty! I wonder what it would look like if you used the same brackets as the shelves under the eating area? You are both so talented!
YoungHouseLove says
Oh yes, now that we have two leftovers we have thought about trying them there- just don’t want to be bumping our knees into them so we’ll have to try them out and see!
xo,
s
Angela says
Nicely done Petersik’s! I can understand your “yikes” moment with the purple haze, but just wanted to let you know that it’s totally normal with the nap roller. We had the same thing happen to us when we refinished our timber floors. Carpenter husband was not worried, but when I saw that cloudy haze I aired more than a few concerns.:-) As it turns out, he knew what he was talking about & it’s just what happens to the chemicals as they hit the air & then when they dry it’s all clear again. Actually, that’s how you know it’s completely cured, once it’s all clear & shiny.
YoungHouseLove says
Thanks for the tip Angela! I’m not sure if there was an issue with the way ours interacted with cork, because even the test one we applied to a sheet of spare cork dried with a blue-purple haze! It wasn’t as bright, but it was definitely still there days later when it was all dry!
xo,
s
Ali says
Good for you for testing things out first – yikes! I’m glad that you were able to salvage the purple haze as well. I would have panicked, for sure (and cursed :)). Did you call the installer back to tell him about it? Not that I would have, just curious. :)
Everything looks great!
YoungHouseLove says
Nah, we just adapted things as we went and figured calling him might confuse us more if he offered more alternatives or things to try, so we just tried to keep our heads down and get the job done!
xo,
s
Julie says
We’ve contemplated cork in our kitchen, however have heard that it fades easily. This has proven true in our basement, where the cork has faded by the sliding glass door. However, we didn’t know about sealing the floor. Will sealing cork prevent it from fading? I’d much prefer to put cork in our kitchen than tile, but we have so many windows, we’re afraid it will fade quickly.
YoungHouseLove says
I’m not sure if sealing it will help – we just picked it for our kitchen since it has no natural light (the window in there leads to a sunroom, not the outside world – and the side door in the laundry room leads to the carport/future garage). We’ll definitely keep you guys posted though!
xo,
s
Jess B. says
Aw guys, this looks great. I just have to say — I’ve been reading the blog since the old-house times, after I saw your wedding pics profiled. You guys are a wicked inspiration for me – your teamwork & dedication to your projects is so awesome, & the way you write about DIY & day-to-day living is incredibly captivating.
My BF & I are just about to move into a new apartment together – so exciting! I will proudly admit: reading YHL totally gave me confidence that couples can live together awesomely and do awesome things. Thank you!
YoungHouseLove says
Aw thanks Jess! Good luck with your new apartment! I’m sure you’ll have so much fun making it feel like home!
xo,
s
Meghan S says
HAPPY BIRTHDAY SHERRI!!!!!!!
Meghan S says
A day late!
YoungHouseLove says
Haha, no worries! It was a great birthday!
xo,
s