Update: Holy cow, you guys are full of so many fun ideas today! I’m having trouble keeping up with comments since they’re rolling in so furiously, but please know I’m reading them all and loving all the suggestions!
Happy Friday! We’ve been all over the place this week, painting the walls/trim/ceiling in the bathroom & closet, diving into some basket craftiness, de-wallpapering our biggest room yet (the 21′ long kitchen), and now we have a little Clara-room update along with some photoshop percolating as we plot our next move in there. But first, here’s the tiny (and twinkly) addition:

Things just got a little brighter in here…
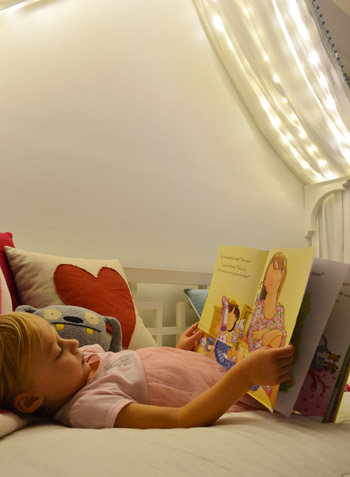
Ever since we hung her canopy, we’ve thought about adding lights to it. Both for the magic of it (Clara loves them) and also for the function of it being a well-lit place for bedtime stories. We feared traditional Christmas lights would be too heavy and make the fabric sag in weird ways (plus, they could look a little messy when they were off) so after some hunting online, we came across what are often dubbed “Fairy Lights.”
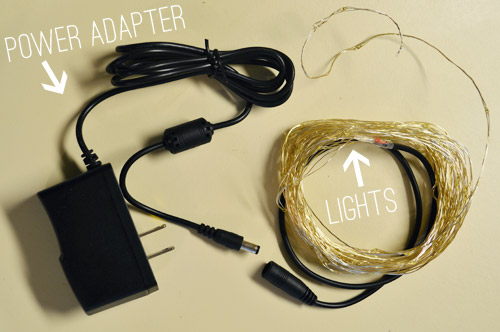
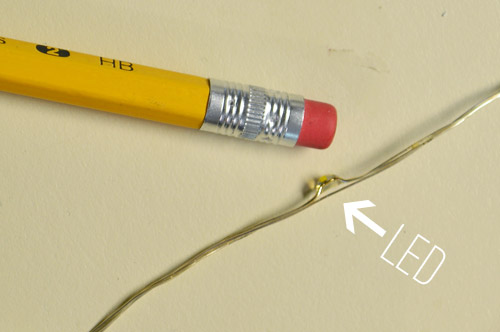
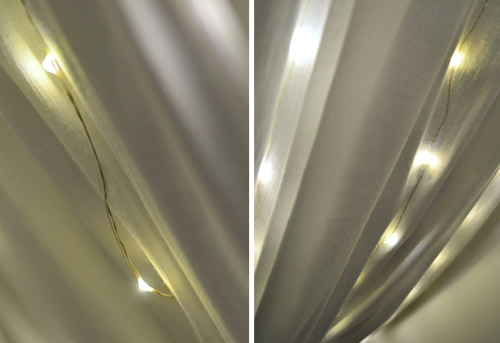
They’re basically small LEDs (check out this picture for scale – they’re tiny) that are strung on a thin wire. The particular set that we bought was 33 feet long and sold for $14 on Amazon. They’re not longer available but here’s an affiliate link for something similar.
The wire itself is extremely light and pretty moldable, so it was easy to weave it back and forth across the 18″ corbels that the fabric rests on. And by some luck of the draw, 33 feet was just about the perfect length to go back and forth four times on each side of the peak to the side brackets and secure them at each turn with white tape, so they’re not something Clara easily unwind and swing around like a lasso – but they will easily release under her weight, so she couldn’t strangle on them.
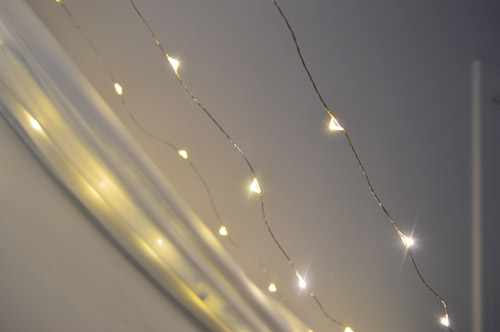
The next step was just draping the canopy back over them. The LEDs are so small that they tuck into the folds and are barely visible when they’re off. And when they’re on, well, you can see how they twinkle below. And since they’re LEDs, they’re completely cool to the touch – so we don’t have any fear of them being against fabric. I also love that they’re small resin-ish glowing dots instead of larger glass bulbs that could shatter.
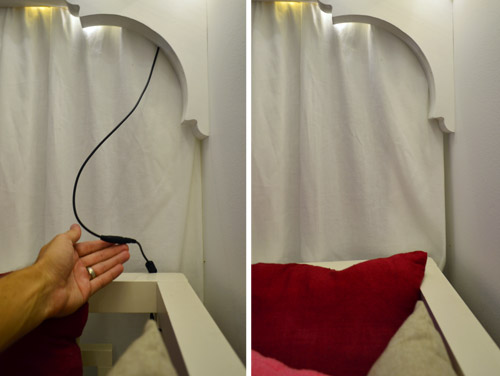
I wish the part that plugs in weren’t big and black, but we were able to plug it in behind the bed and wrap the cord around the bed in a way that it’s able to be hidden behind the canopy most of the time, but easily accessed when it’s time to connect the cords to the power adapter. See how you can see it on the left, but it’s tucked away and invisible on the right? Thank you John, hand model of the ages.
Clara LOVES them. Partly because they’re called “Fairy Lights” but mostly because she feels very special having her own set of secret lights above the bed. We intended just to put them on for story time at night or other special play times, but they actually put off a fair amount of light, so we’ve found ourselves putting them on just about any time we’re in the room and the sun isn’t fully out.
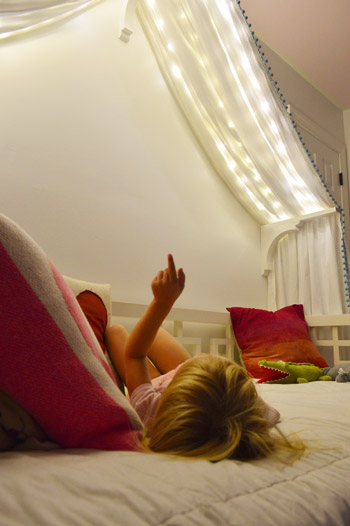
We’ve had them up there for a week or two (didn’t want to sing their praises too soon only to have them burn out or something weird) and so far they have been awesome for our gentle girl. She hasn’t touched them once, but loves gazing up at them. Meanwhile, my best friend’s four year old daughter is nothing short of an acrobat, so we laughed about how she’d probably scale the canopy and hang from the fabric like she was Pink in concert.
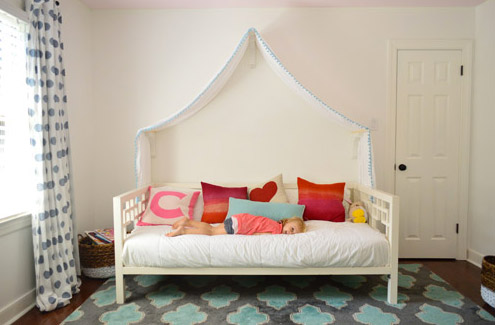
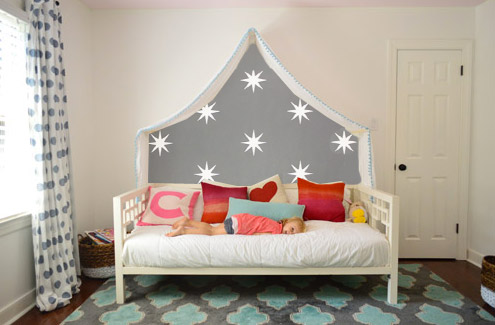
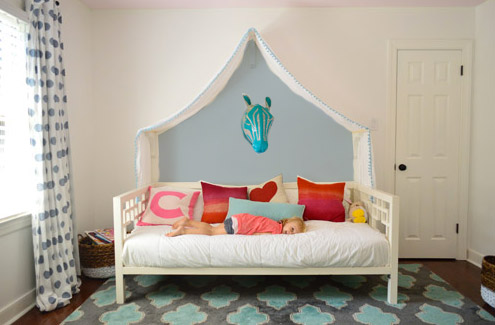
But even with the addition of the lights, the canopy is still definitely missing something above it. There’s still so much white on white on white that we’ve been brainstorming which way we want to go. We’ve debated painting just that peaked area under the canopy for a while and then adding something else in there (like a hanging paper lantern or mobile or even a cute little animal head or something). So here are a few ideas, thanks to our good friend Photoshop.
Idea #1: A gray tone on the walls to add drama and a little dreaminess to the canopy, inspired by this wallpaper by Osborne And Little.
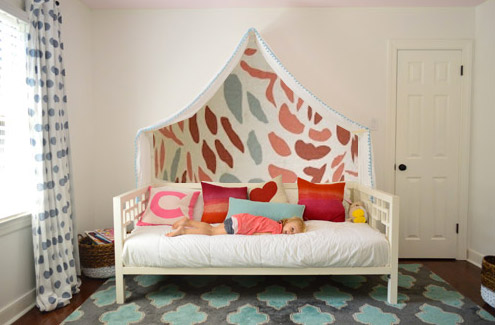
Idea #2: Maybe I could freehand some sort of imperfect painterly-ish mural, inspired by this awesome fabric covered lamp shade?
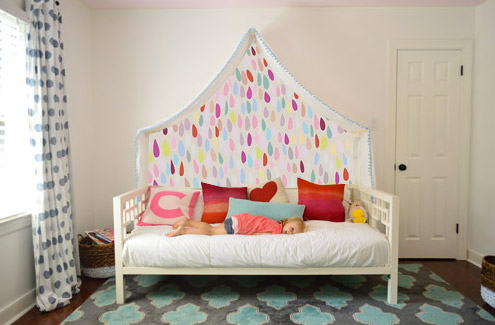
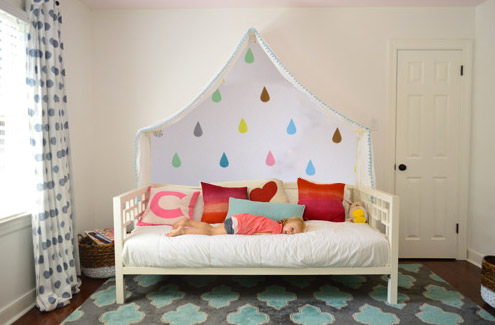
Idea #3: Another hand painted mural possibility could be something like this cluster of colorful raindrops in a variety of colors (inspired by this amazing but sadly sold out print).
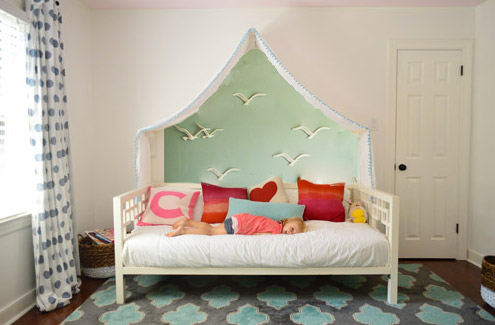
Idea #4: Then I saw this picture of a pretty blue-green wall with little birds on it and thought that could be fun.
Idea #5: Since Clara’s quite the animal lover, we thought maybe a friendly giraffe or zebra (like this one from Dwell Studio) peering down at her while she sleeps could be fun with a blue-gray wall.
Idea #6: These little teardrops in a few different colors had my mind spinning with possibilities too.
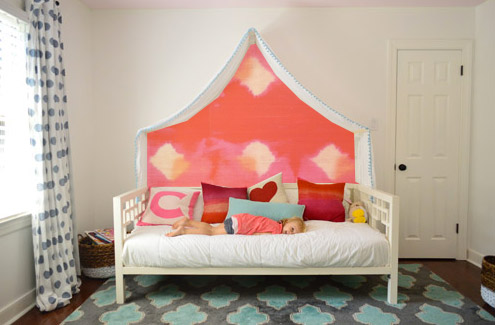
Idea #7: Then I thought about a colorful fabric hung along that back wall, perhaps something with the same large-scale boldness of this pink and red wall coverings that Jenny shared here.
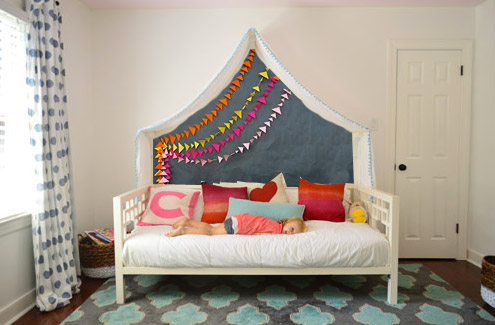
Idea #8: And then there was the possibility of even darker charcoal paint on the walls and some asymmetrical handmade banners in a few colors like these (which were actually a super cool photo background for this party). Update: since this one looks chalkboard-ish there have been a lot of suggestions to do that so Clara can doodle away, but we worry that chalk dust over her bed might not be the best call (there are chalk markers but they’re not as charming, so we’ll have to see where we end up).
What do you guys think? Any favorites? Or combos? I think we’re leaning towards the gray background tone in Idea #1 or the dark charcoal color in Idea #8, but we’re not sure if we’ll stencil stars or something else – and we might just combine it with something 3D (like a little felt circle bunting or a hanging paper lantern or something). We’d love for Clara to weigh in on things too, and then I’m hoping to work on it this weekend (along with stenciling the bathroom floor and helping John finish that sunroom tile). What are you guys up to this weekend?
Update: Clara weighed in on these photoshopped pics as well as some more that we made based on people’s suggestions and then we made one last photoshopped picture for her, since she wanted to combine a few ideas (we even video-taped her reaction, which was pretty funny). Can’t wait to get it done and share what she liked best!

Haley says
I love the garland/bunting idea and definitely with the lighter gray.
For some reason, Clara laying on the bed in that long series of photos is so hilarious to me even though it is the same photo over and over.
YoungHouseLove says
Haha, I thought the same thing. So funny!
xo
s
Stefanie says
I’m not sure what your plans are for the rest of the wall, so… have you considered painting the colorful teardrops on the wall and leaving the part under the canopy raindrop-free? Maybe doing something under the canopy that looks bright and sunshiny, contrasting with the teardrops around it, since they look like magical raindrops.
That was just my first thought when I saw #6 (which I think is super cute). In any case, I’m sure Clara will love whatever you decide to do!
Brittnia says
#1 or #8!
Linda says
Definitely #1
Jalene says
3,6, or 8 without the gray. I think the solid color (non-white) options look messy.
JenB says
Does Clara have a favorite?
YoungHouseLove says
We’re going to ask her tomorrow when we can dive into the project! Can’t wait to see what she thinks!
xo
s
Ray Ray says
Oohhh a fun colored chandelier would be absolutely perfect!
Ray Ray says
But my fav of these would have to be the birds :)
Kelsey says
I love the last pic, with the charcoal gray color. However I would probably suggest painting the whole wall, I think a wall of that darker color will look great with the white canopy and the lights would cast a great glow against it as well.
Liz says
#1 or #6 – love them. :)
Colleen says
Love the lights! Could those be used as undercabinet kitchen lighting? Love LEDs, (had led tape under and above my cabinets in my previous home).
If you go the animal head route, one idea you’ve probably thought of is Cardboard Safari? Cardboard (flat pack) animal heads, so many great options.
Another idea is a wreath of sorts, maybe Clara’s own (guided) DIY project?
YoungHouseLove says
Holy cow, I bet that would totally work!
xo
s
Katie says
What does painterly-ish mean?
YoungHouseLove says
Painterly is just a term for something that looks painted and hand-done (not perfect or super crisp) and I have a bad habit of adding “ish” to things when I mean “sort of” or “somewhat” – so “painterly-ish” would mean “sort of like something hand-painted or imperfect” in this strange mind of mine.
xo
s
Kylie Helm says
I just LOVE idea #2! I want it for my room…and i’m all grown up haha! (I don’t know how the hubs would feel abou rainbow animal print? hahah!)
Melanie says
I love #1 & #3.
Megan says
I love the first raindrops option, but what about putting it on the outside of the canopy? A lot more work though!
Sarah says
Oh, so her canopy looks like an umbrella shielding her from the rain! How cute!
Rachel says
Not sure if anyone has mentioned this, but just FYI. Chalk markers usually make indentions on softer surfaces like walls. They are usually better suited for much harder surfaces like porcelain. Also I totally agree about the chalk dust being messy over her bed. We have a chalkboard in our kitchen and, as much as I love it, it can definitely be messy!
YoungHouseLove says
Thanks Rachel!
xo
s
Constance says
The first one and the last one are my favs!
Alyssa says
My first thought for that wall and this room would be to stencil the whole wall behind her bed but leave the main background color white. Then, add some wall accents or hanging lanterns (what happened to the birdcages from the last house?) Oh, and bring back the pink rug!
Alyssa says
You could always add a layer of the same sheer fabric over the wall, underneath the canopy area.
Amy says
What about a fun cluster of paper lanterns in different colors that match the rest of the decor? Hung over the canopy, I feel like that could be super cute! I LOVE those fairy lights!
YoungHouseLove says
Another fun idea!
xo
s
Katie says
I noticed the book “I’m a big sister” that Clara was reading. I used to read that to my daughter every night when I was pregnant with my son. I love that book!
And…I like option 1 the best!
YoungHouseLove says
Yes, such a cute book!
xo
s
Kayli Schattner says
Wow! What a fantastic idea. I think all of them are just too cute!
Lucy says
This is a fabulous idea and adds so much to the room. #1 all the way.
Jess says
OKAY.
First: I LOVE LOVE LOVE number 3, and 8. I like all of them, really. I just want 3 and 8 in my own room.
I like one, since that seems to be what you are leaning towards, but I love a little more colour, and I JUST WANT NUMBER 3 IN MY ROOM RIGHT NOW! I will live vicariously through Clara.
So much potential though, I think you could do almost any of those ideas, and make it work. I like the 3D aspect.
Could you do Number one, but make it magnetic paint, and have movable 3D stars? So Clara can make it her own style? And, that would add potential for adding new 3D things to the mix as needed!
Also, as I was staring jealously at the ideas, I realized I totally had almost the exact same set up as a teenager (duh)! I loved it! Except I had grey sheer curtains, with butterfly shaped lights twinkling throughout! and I had a simple framed hand-drawn butterfly framed in the centre (except the butterfly was drawn by an artist, haha, not MY hand-drawing. Because that would not have looked like a butterfly). Anyways, making me nostalgic! And making me want to get some of those twinkly LED lights for my room right now.
Okay sorry for rambling about my teenage bedroom, which I am SURE you were DYING to know about.
Jess.
YoungHouseLove says
Love the idea of using magnetic paint and movable 3D stars! Although I wonder if when she’s supposed to be sleeping she’ll be playing with them! Haha!
xo
s
Maggie Baker says
I think Idea#3 will best draw in all the colors from the curtain, the rug and the pillows! :)
Angela says
I love the little fairy lights, it looks so dreamy. I am probably in the minority, but I don’t like the idea of painting the wall underneath the canopy, it looks kind of random. I think doing some graphic 3-d mural-esque type wall art that frames the canopy and maybe some of the art trickles under the canopy, like a tree or an umbrella scene, this probably makes no sense to anyone but me…
Anyway, I’m sure whatever you do is going to look good, you guys are so inspiring!
Cecile Blake says
I definitely think you should cut a piece of fabric of your choice in that peaked back ground shape, then sew the drape to it, so it basically forms a background like the painted one, but it wont look funny when you move the bed/the drape moves slightly.
YoungHouseLove says
Another possibility for sure!
xo
s
Rachel @ Health My Lifestyle says
#1 all the way! The neutral grey won’t fight for attention with her colorful pillows. Plus the stars mimic the lights and bring it all together. Cute ideas!
Margie says
As a lover of clean lines and sharp edges, I’d be wary of going with something too dark. As the canopy shifts, you’ll either see color above it or white below it. I tend to favor the ones that allow you to add a pattern and color, without having to have a demarcation between “under” and “over” the canopy. It’s like that picture frame that always shifts just a hair off square and drives you nuts…
Jaime says
I am not gonna lie, I wasn’t super crazy about the cantopy at first, but adding these lights just changed everything for me. So much so that I am debating doing this in our nursery for our little girl. My question is regarding how you fastened the lights to the brackets: you say you just taped them, so I am assuming you taped them to the top of the bracket and they are below the fabric and are so small they are hidden in the folds?? I know you described the process but apparently my brain can’t visualize it and I cant see them in any of the photos (which is the goal, of course). I cant wait to see what you do to the covered area, I like the first option with the grey wall and stars, so sweet!
YoungHouseLove says
Yes, that’s exactly right, they’re strung across the top of the brackets and taped in place and then the fabric drapes over it and they sink into the folds.
xo
s
Callye Lawrence says
#7 or #8… for sure. And by “for sure”, I of course mean that all of them would be super awesome and it’s so hard to choose!
YoungHouseLove says
Ha!
xo
s
Diane says
I love #1. For some reason it reminded me of the book Peter Pan where Wendy and her brothers are looking out the window at a starry night. Very calming and peaceful.
Lesley says
I loved all of the options, but had an actual visceral response to the final one. LOVE it! I think it’s the deepness, and richness of the colour in the otherwise currently light room.
I agree about the chalk over a bed though, wouldn’t even do it in a room with carpeting to the wall. However, Clara being the perfect child that she is (I jest…), you could put that colour as non-chalk board there then the same colour as a chalk board elsewhere. It’s always good to repeat a concept a few times in a room, and she is a smart enough little cookie to know chalk goes on one but not the other.
Lauren says
Option #1 is definitely my favorite!! I also like the zebra head option though so that’s my number two vote!
Jennifer says
What about idea paint? That turns any surface into a whiteboard, which wouldn’t have the chalk issues since you are just using markers and could still be colorful.
Amanda says
1, 4, and 8 are my favorites. So cute! We have a fairy light project in our future as well but it’s going to be a while =).
Cassie says
I think you guys should paint that whole wall an accent color, like Peach Daiquiri by Essie, and the white canopy and everything else will play off of that wonderfully!
Andrea says
#3, and I feel like you should have done a poll for this one!
hollyloo says
you’re such a fun mum and dad. clara is a lucky little girl!! here are a few ideas if you’re looking for more:
http://honeywerehome.blogspot.com/2013/06/gold-desk-ikea-hack.html (see walls)
http://www.inthefunlane.com/2013/08/wrens-mini-room-makeover.html (see walls)
http://emilyaclark.blogspot.com/2013/06/our-book-nook-reveal.html (see walls)
i think you could even bust out a potato or two and get stamping!
YoungHouseLove says
So much fun!
xo
s
Eilene says
I really liked 4… not so much for the color or the birds, but for what they did to the space. It was like looking out a window. Are murals not cool anymore? I think a very sweet and understated sky with wispy clouds, bugs or birds, even sunset colors for the sky would look so sweet and like she was transported into her own story book. Ok, I didn’t read all the suggestions but what about magnetic paint with clouds over it and then get piece for her own story board? Way cooler than a mural and it’s interactive!
Tara says
I LOVE idea #8!! You’ve inspired me to do something like that for our little girls’ “Big Girl” room makeover. Super cute!
Kelly Lightbeam says
I’m sure someone else may have mentioned this, but have you considered painting the rest of the wall, and leaving the space beneath the canopy white? I think it would be charming with the fairy lights to have a little white oasis, since her bed is mostly white too.
Meredith says
What about painting the wall a bold color and adding decorative metal grate under the canopy? Then Clara could add magnets to hold up art work or a banner or anything else special over her bed. The metal would also twinkle with the lights!
Barbara says
You are so creative! I have to say, I love #2 and #8-the dark gray picks up the gray in the carpet and give a nice, cozy feel to the space above her bed. I love the stars with the lights, but also the idea of some 3D banners strung across the space seems so fun.I can see you and Clara working together making the banners as a fun project.
Celena says
#8 for sure!!!
Nikki says
What about a magnetic wall under her canopy. You can make some fun felted magnets and she can put her favorite pictures and paintings up, and change them out to her little hearts content.
Dallas says
What about framing lots of Clara’s art and hanging beneath the canopy? Her very own private gallery (visitors must pay to view of course…). Also there is a great website in the UK called notonthehighstreet.com which sells great tree mural wall stickers (can be personalised) with birds and all the things which little girls love and which big girls wish they could legitimately use on their bedroom walls. Sigh.
YoungHouseLove says
Cute idea everyone! Thanks again for sharing!
xo
s
Karen says
I think the multi-colored drops are cool. The would be less permanent than a big swath of color, and enable the room to be rearranged without worrying about repainting. We used the starch+water technique to stick fabric circles to my nieces walls and she loves them! They stay up just fine and come down without any difficulty. It could be an easy way to do the drops of color.
Love the twinkle lights!!!
YoungHouseLove says
I really like that idea! Has anyone else done this in a kids room? I just wonder if Clara would peel them off all the time like they’re big stickers! Haha!
xo
s
Karen says
Mary hasn’t peeled any of hers off yet and she was 3 1/2 when we put them up…so Clara might do just fine as well. They don’t seem to come off too easily unless you wet them first, so dry it might be kind of hard. But if she does, just re-wet and stick back up!
YoungHouseLove says
Thanks Karen! That’s awesome!
xo
s
Sarah says
I don’t think I’ve ever commented before, but I love the options too much not to.
In order of preference: #3, #8, #7, #1. Although ideas 3 and 8 are pretty much tied for first.
I love the colorful whimsy of #3 (without being as “perfect” as #6), but I also love the contrast and texture (layered banners) in #8.
I think option #7’s colors and #1’s stars coordinate well with the current furnishings.
Anyhow, that’s my two cents on the subject. Ya know, in case you were short on change. :)
Ewa says
The lights are absolutely gorgeous… but my favourite options are: 4 and 1. Those birds on a pale green background look fantastic! Good luck choosing one!
Melissa says
I love #8 too! It reminds me of an old fashioned tent and makes it look like you’re bringing the night sky in under the canopy, which is so cool with those lights. What a great find!
Sara says
Call me boring, but I think you should paint the entire room a light aqua. Another pattern competing with the curtains and rug is going to take this room from eclectic to chaotic in my book. Light aqua would match the tone (? cant think of the right word- saturation level?) of the light pink ceiling and tie in the turquoise in the rug. You could paint all doors then aqua.
But in and of themselves, those patterns are pretty cool! ESP the raindrops. :)