Update: Holy cow, you guys are full of so many fun ideas today! I’m having trouble keeping up with comments since they’re rolling in so furiously, but please know I’m reading them all and loving all the suggestions!
Happy Friday! We’ve been all over the place this week, painting the walls/trim/ceiling in the bathroom & closet, diving into some basket craftiness, de-wallpapering our biggest room yet (the 21′ long kitchen), and now we have a little Clara-room update along with some photoshop percolating as we plot our next move in there. But first, here’s the tiny (and twinkly) addition:

Things just got a little brighter in here…
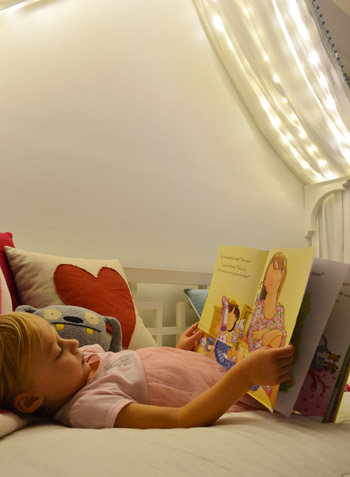
Ever since we hung her canopy, we’ve thought about adding lights to it. Both for the magic of it (Clara loves them) and also for the function of it being a well-lit place for bedtime stories. We feared traditional Christmas lights would be too heavy and make the fabric sag in weird ways (plus, they could look a little messy when they were off) so after some hunting online, we came across what are often dubbed “Fairy Lights.”
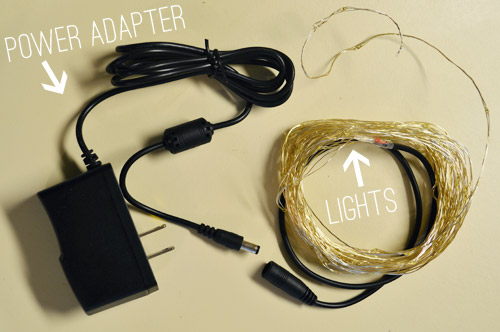
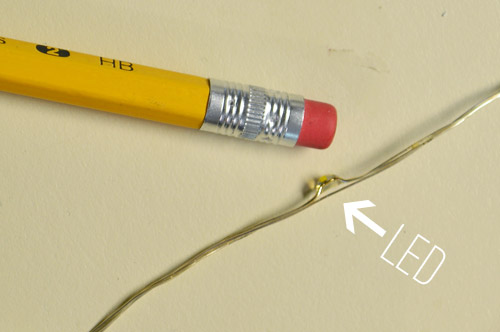
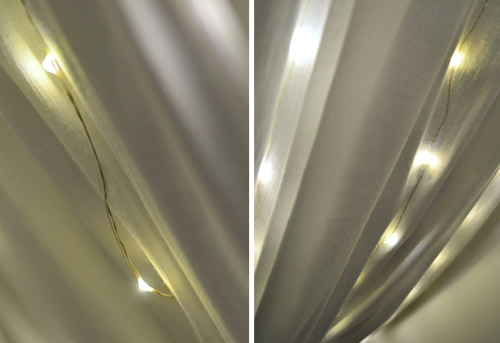
They’re basically small LEDs (check out this picture for scale – they’re tiny) that are strung on a thin wire. The particular set that we bought was 33 feet long and sold for $14 on Amazon. They’re not longer available but here’s an affiliate link for something similar.
The wire itself is extremely light and pretty moldable, so it was easy to weave it back and forth across the 18″ corbels that the fabric rests on. And by some luck of the draw, 33 feet was just about the perfect length to go back and forth four times on each side of the peak to the side brackets and secure them at each turn with white tape, so they’re not something Clara easily unwind and swing around like a lasso – but they will easily release under her weight, so she couldn’t strangle on them.
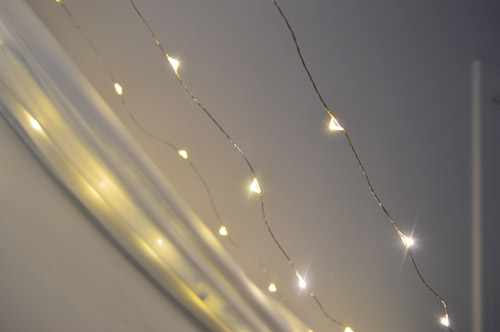
The next step was just draping the canopy back over them. The LEDs are so small that they tuck into the folds and are barely visible when they’re off. And when they’re on, well, you can see how they twinkle below. And since they’re LEDs, they’re completely cool to the touch – so we don’t have any fear of them being against fabric. I also love that they’re small resin-ish glowing dots instead of larger glass bulbs that could shatter.
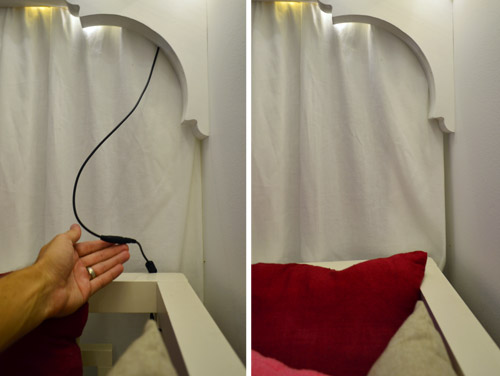
I wish the part that plugs in weren’t big and black, but we were able to plug it in behind the bed and wrap the cord around the bed in a way that it’s able to be hidden behind the canopy most of the time, but easily accessed when it’s time to connect the cords to the power adapter. See how you can see it on the left, but it’s tucked away and invisible on the right? Thank you John, hand model of the ages.
Clara LOVES them. Partly because they’re called “Fairy Lights” but mostly because she feels very special having her own set of secret lights above the bed. We intended just to put them on for story time at night or other special play times, but they actually put off a fair amount of light, so we’ve found ourselves putting them on just about any time we’re in the room and the sun isn’t fully out.
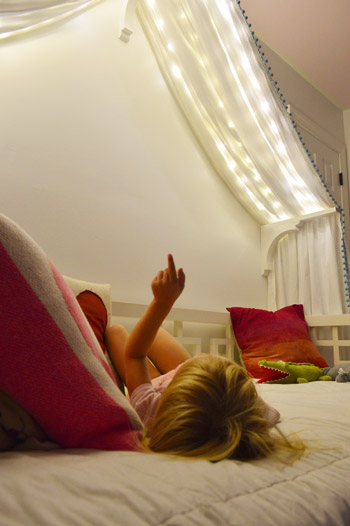
We’ve had them up there for a week or two (didn’t want to sing their praises too soon only to have them burn out or something weird) and so far they have been awesome for our gentle girl. She hasn’t touched them once, but loves gazing up at them. Meanwhile, my best friend’s four year old daughter is nothing short of an acrobat, so we laughed about how she’d probably scale the canopy and hang from the fabric like she was Pink in concert.
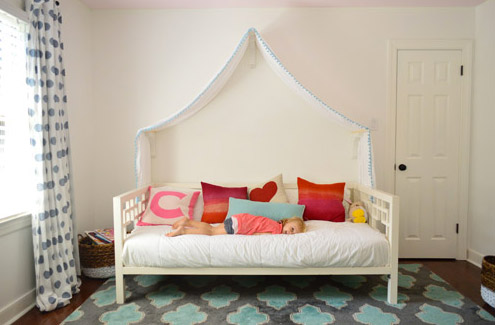
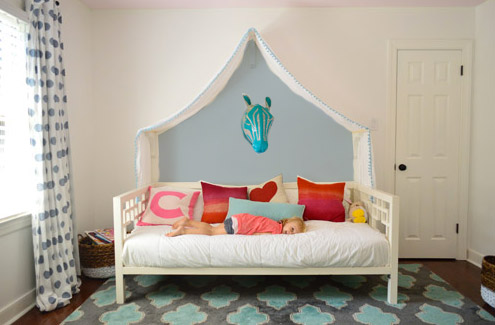
But even with the addition of the lights, the canopy is still definitely missing something above it. There’s still so much white on white on white that we’ve been brainstorming which way we want to go. We’ve debated painting just that peaked area under the canopy for a while and then adding something else in there (like a hanging paper lantern or mobile or even a cute little animal head or something). So here are a few ideas, thanks to our good friend Photoshop.
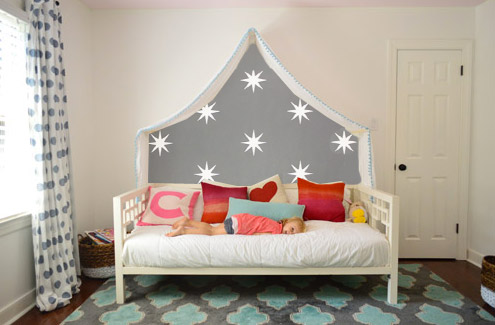
Idea #1: A gray tone on the walls to add drama and a little dreaminess to the canopy, inspired by this wallpaper by Osborne And Little.
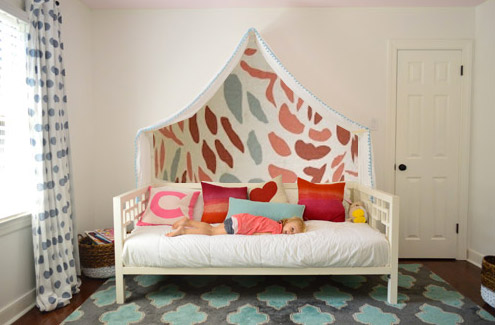
Idea #2: Maybe I could freehand some sort of imperfect painterly-ish mural, inspired by this awesome fabric covered lamp shade?
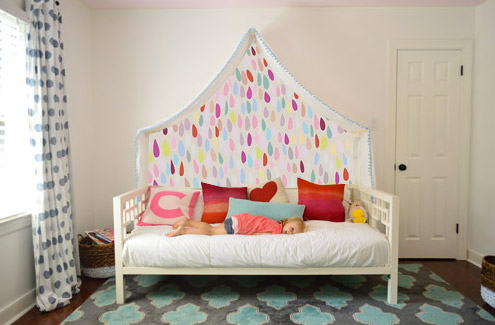
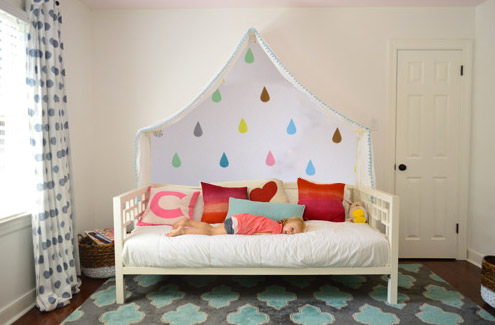
Idea #3: Another hand painted mural possibility could be something like this cluster of colorful raindrops in a variety of colors (inspired by this amazing but sadly sold out print).
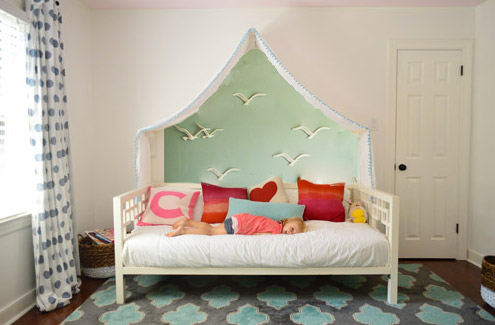
Idea #4: Then I saw this picture of a pretty blue-green wall with little birds on it and thought that could be fun.
Idea #5: Since Clara’s quite the animal lover, we thought maybe a friendly giraffe or zebra (like this one from Dwell Studio) peering down at her while she sleeps could be fun with a blue-gray wall.
Idea #6: These little teardrops in a few different colors had my mind spinning with possibilities too.
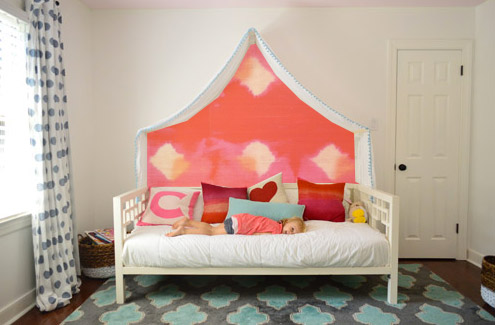
Idea #7: Then I thought about a colorful fabric hung along that back wall, perhaps something with the same large-scale boldness of this pink and red wall coverings that Jenny shared here.
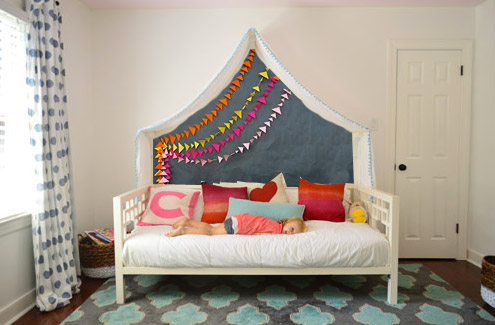
Idea #8: And then there was the possibility of even darker charcoal paint on the walls and some asymmetrical handmade banners in a few colors like these (which were actually a super cool photo background for this party). Update: since this one looks chalkboard-ish there have been a lot of suggestions to do that so Clara can doodle away, but we worry that chalk dust over her bed might not be the best call (there are chalk markers but they’re not as charming, so we’ll have to see where we end up).
What do you guys think? Any favorites? Or combos? I think we’re leaning towards the gray background tone in Idea #1 or the dark charcoal color in Idea #8, but we’re not sure if we’ll stencil stars or something else – and we might just combine it with something 3D (like a little felt circle bunting or a hanging paper lantern or something). We’d love for Clara to weigh in on things too, and then I’m hoping to work on it this weekend (along with stenciling the bathroom floor and helping John finish that sunroom tile). What are you guys up to this weekend?
Update: Clara weighed in on these photoshopped pics as well as some more that we made based on people’s suggestions and then we made one last photoshopped picture for her, since she wanted to combine a few ideas (we even video-taped her reaction, which was pretty funny). Can’t wait to get it done and share what she liked best!

hyzen says
I wasn’t really feeling any of the options (I liked 3, 4, and 7 because they are pretty and could spark the imagination [in a tent looking out at the rain, or looking out at blue skies and birds, or just inside a cozy tent with a pretty tapestry on the wall] but on a design level they didn’t jump out and grab me) until I got to #8. I think that #8 definitely has the best visual impact–fun and festive and modern and cute without being too distracting for sleep. As for sparking the imagination, it makes me think of a night at the circus, or a fancy evening party, with the dark background and bright garland. Good luck! (P.S. I love the canopy and fairy lights–I am planning to do something similar for my kids soon, based on your model–thanks!!)
Carmen says
My personal favorites are 2, 4 and 7. Looking forward to see what you do!
heather says
sorry if this was posted already but that print is available on etsy directly from the artist.
https://www.etsy.com/listing/76813366/abstract-art-print-the-rain-8-x-10-open?ref=shop_home_active
i have 2 of her prints that i got in a raffle- she donated them to the animal rescue i work with for an event i coordinated. she has truly beautiful artwork!
YoungHouseLove says
Thanks so much Heather!
xo
s
Sarah says
I’m right with you guys again… #8 is my fave. Those little flags add just the perfect balance of color and texture, and #1 is my second fave. Maybe it’s the big graphic stars under those twinkly little starlights. There is so much color and texture going on in C’s room already all the other options just seemed like overkill to me. But I’m sure no matter what you choose it will be adorable. I love watching this house come together!
Cori says
I think I like #1 the best, especially with the little star pattern…with the fairy lights, it’s like sleeping under a star-lit sky! I would just stay away from anything too busy or dramatic, because I think that would take away from the canopy.
Whatever you guys do, I’m sure it will be fantastic, and I can’t wait to see it!
Ely says
Really cute ideas! Makes me want a canopy on my bed! I love Option #1 and Option #7. Will be great no matter what you decide on though!
BTW, we just purchased a house last week and are using your blog and Bower Power as points of reference for fun and stylish DIY projects! You guys are awesome! :)
lauren says
I love the gray and stars in #1!
Karen says
My daughters came up while I was reading this post. They vote for the birds or the chalkboard one. You can always try dustless chalk, and/or stick to white chalk. That way the bedspread would not get smudged. LOVE the fairy lights! Every kid’s childhood should be a little magical.
Sarah says
Idea #1 is PERFECT. I absolutely love that one. Somehow it just fits with the rest of the room and the decor of the bed.
Jennifer says
I love the little lights! Is it crazy that I kinda want some for over my bed? Haha. I like the first option with the stars. It would be neat if you could find some similar fabric and cut little holes in the stars for more lights. Clara could have a fun glowing starry sky as the backdrop for bedtime stories!
Ashli | sommarmorgon says
I LOVE the fairy lights – I wanna do something like that in my room now! haha! As for the options, my favourites are definitely #4 and #8!
Kelly says
The twinkle lights are adorable. I like options 1, 7 or 8!
Stephanie says
Those twinkle lights are so cute! Thanks for sharing where you got them…thinking I’ll have to get done for my girls.
I love the last option! Maybe you could do magnetic paint? I agree that chalkboard paint would be a disaster, but little movable felt pieces could be super cute.
Karen says
Thank you, thank you for this post!!! My daughter wants a canopy over her bed, and I was trying to figure out how to put white lights in it, that wouldn’t crack or get too hot. This is perfect!!! So excited to make one for my little girl!
Your blog is a constant inspiration for us “too tired to think of it ourselves” moms!
Charlotte says
#8 is definitely my favorite – love the little banners!
You mentioned felt, one fun idea (and much less messy than chalk!) would be to do a felt wall and have a bucket of felt cutouts for Clara to do little scenes and stories. You could have stars and raindrops and all sorts of other stuff so the wall is constantly changing, plus Clara could interact with it.
Completely in love with those fairy lights too!
YoungHouseLove says
Ooh that’s fun too! So many good ideas from you guys I can’t keep up! So sorry if I’m not responding to every single suggestion – I promise I’m reading them all and John and I will re-read them together tonight too!
xo
s
heather says
I LOVE this idea! So cute.
Kirby says
I like ideas 1 and 3. I like 1 because its subtle but a nice pop, and I like 3 because it looks like it matches Clara’s room and the fun of being a kid. Whatever y’all decide, I’m sure will look fantastic though. Have a great day. :)
Emily Callejo says
I love all these ideas. The colors and patterns instantly reminded me of some of the removable wallpaper I’ve seen on this site.
http://www.wallcandyarts.com/removable-wallpaper-half-kits
It maybe a great way to get the look in a temporary way that could be moved around in the event that the urge to rearrange furniture hit you.
YoungHouseLove says
Those are so much fun!
xo
s
Dizee says
What about faeries floating around? Maybe above the canopy? Or is that not your thing? Something secret garden/impish to go with the fairy lights theme?
I am sure whatever you choose I will love it!
YoungHouseLove says
Holy cow, there are so many ideas rolling in we can’t keep up! Thanks to everyone for sharing their thoughts and fun suggestions! We can’t wait to ask Clara what she thinks and share wherever we end up!
xo
s
Michellelhb says
I am completely anti pink but number seven is sooo adorable. I am trying to figure out how I can do something boyish like that for my seven year old, but something that will stay on at night as he stills needs his nightlight. Ideas? As I type this, my poor baby is laying on the couch next to me with a bad belly:-(. This does not bode well for our formally busy weekend.
YoungHouseLove says
Hmm, maybe one of those plug-in constellation things that shines stars on the ceiling?
xo
s
Nancy says
#1 – hands down!! Love the dark grey, and those white stars just pop.
Katy says
I love the first idea. We’re huge fans of that fantastic yet expensive wallpaper. We just did our baby girl’s nursery ceiling using vellum decals to copy the wallpaper EXACTLY a la Honey and Fitz style http://honeyandfitz.com/2012/10/18/diy-starry-ceiling-tutorial/. The math equation was ridiculous – John would be impressed. Anywho, I have almost a full sheet left (they are gold metallic – perfectly sized to copy the wallpaper). I would love to send them to you. Those pretty stars are just going to waste sitting in our closet! Please reach out to me if you’d like them.
YoungHouseLove says
Love that! You’re so sweet to offer to send them our way, but we feel bad taking things from you guys! Maybe I can email you to buy them from you and pay for shipping if we go that route?
xo
s
Megan says
I love the last one but what about letting Clara decide?! It would be interesting to see what she chose!
YoungHouseLove says
Oh yes, check out the bottom of the post. We’re asking her opinion this weekend (when we can actually start on it, since asking her ahead of time makes her feel like it’s taking foooorrrreevver, haha!).
xo
s
Lacey says
#3 is adorable and just reminds me so much of Clara already. I think it suits her.
Megan H says
I love the gray, but also wondered about the whole wall being gray with the stars or pennants (#1 or #8) only in the featured area under the canopy. I know you replied already that you thought that the door on that wall would make it look unbalanced with the big white square, but what if you painted the door a bright fun color to make the whole wall crazy-fun (and make the entrance to Clara’s secret hideaway fancy-pants!)?
You know, like the inside of your front door :) I’m also smitten’ with:
http://www.pinterest.com/pin/173670129350721807/
http://www.pinterest.com/pin/173670129354105007/
http://www.pinterest.com/pin/173670129350664875/
YoungHouseLove says
I’ve actually been oogling a bright coral door but since there are two doors (one that leads to the hall) I just worry the whole room might look off-kilter if there’s a wall of color and one bright door on one side, and the other side has a white door and a white wall. We’ll have to see where we end up though! Who the heck knows!
xo
s
Noel M says
I love number 8, but they all have great possibility!
Caitlyn says
Oh, idea #1 is gorgeous. What a dreamy thing to go to sleep to!
Tara says
I LOVE #1! The others are pretty too, but #1 just feels more calming and ethereal(with the stars) which is perfect for a bedtime space.
Amber says
I like #1, but I really feel like the canopy doesn’t “pop” enough on that wall. What about painting the rest of that wall some light color and still doing a fun accent under the canopy? The white just gets lost (at least in pictures).
Jennifer says
Do you send out any email to the winner of the giveaway? It only says Jennifer and I’m sure that there are a lot of us out there :)
YoungHouseLove says
Yes, we send an email and the winner usually comments too, so checking out the comments might shed light on if she’s been emailed yet. Also, commenting with a nickname will help you pick out if you’re the winner right away (ex: JennWahoo) instead of just your name :)
xo
s
Lisa says
I really like option #1. It just seems to match the twinkling fairy lights.
You have quite an ambitious weekend planned! We have so many projects for our home, but full-time work and being very involved in church limit our time. Still, we are amazed at the progress we have made since buying our 20 y.o. ranch-in-need-of-TLC back in March. I totally agree with the Phase 1 plan. It’s made a huge difference in making our home feel like “ours” and not feeling like we are living in someone else’s house.
Tiffany says
I love #8!!
Emily says
I love the fairy lights- they are so magical! Having lights on like that in my room as a kid was always so much more fun and special than the overhead light- such a great idea!
Jeanna says
#1 is my favorite :) Very sweet, and just enough.
Jerrika says
They are all very cute, #8 is my favorite!
CandiL says
Why not some chalkboard paint that way you can switch it up?!
YoungHouseLove says
Check out #8 in the post (I added an update about that since so many people are asking). Hope it helps!
xo
s
Dail says
I am loving #6!!
Michelle says
Why not let Clara pick her fave?
YoungHouseLove says
That’s the plan this weekend! Check out the last paragraph for that mention :)
xo
s
Candace says
LOVE #3… which I may be the only one? I think it’s perfect weight (i.e. light and airy) and added whimsy while unifying all the other colors in the room.
Also love the idea of #1, but would have to see the exact color. And really am dying over #4, but I don’t think it works with the rest of the room… but I want that all over my face.
Lisa says
3d wall butterflies are cute for little girls.
Kelly says
Love the lights. I did something similar for my daughter when she was Clara’s age which was 20 years ago (!!). What about some swirly clouds on blue for the canopy accent? This is another thing I did long ago – this time for my boys. It lead to ‘cloud stories’ where we made up stories of them floating on clouds and having sleepy-time adventures :).
Erin says
I like #1 or #8 the best!!!
Elizabeth T. says
I love the raindrops also! Didn’t read all the comments but think it would look awesome if the raindrops were on the outside, like the canopy was a big umbrella. Could do them in something like vinyl so you could peel them off when you want a new look! Also the lights are adorable, I’m sure your little girl loves them.
Jessica says
I love the raindrops and the teardrops! Both so cute!
Caroline says
I vote #1 or #7. You want something flexible, interesting, but not weird or easily outgrown.
Amy M says
LOVE the “birds” option and the “charcoal with banners” option. love the canopy with lights!!! every little girl’s dream to sleep under fairy lights…
Carly says
My favorites are the gray with stars and the green with the birds. So I guess something sky like! The rain drop ones are cute too!
Love the lights.
Jen says
I like #8! The photoshop pic makes it look a little like chalkboard paint- which could be cool.. or messy.. or a bedtime distraction :)
Jessie says
Oh I love option 1. Really ties in some of the colors from the rug and curtains!!
Jenn says
I think I might be with the majority when I say I love #1 and # 8 best – for me these are the perfect balance between whimsy and design – love it and love the addition of the lights! What an enchanting room for sweet Clara! I’m probably in the minority to not be grooving on the ubiquitous animal head trend. I cannot get past the abstract reference to the literal display of animals killed during hunting and mounted for display (I have nothing against hunting for sustainability – I live in a region where it’s so important – but it’s the “trophy” display of dead animal heads that gets me). I wish I could turn off that practical side of my brain and just enjoy the whimsical reference – it’s such a design buzz kill!
Nichole says
#1 & #8!! You could mix & match ideas & make a garland of fun colored or white oragami stars!! Clara could even help fold. How bout orange has an easy star folding tutorial. I can’t wait to see what it looks like!!