Did you know you can easily convert your existing toilet to a fancy dual-flush model? It takes no plumbing experience and less than an hour to do. It’s kinda like getting a new, eco-friendly toilet without actually having to buy a new toilet. Plus, by reducing your water usage you might even save money on your water bill. Just follow these steps for a quick and easy water-saving upgrade.
What Is A Dual Flush Toilet?
Unlike traditional single-flush models, a dual-flush toilet has separate options for liquid waste vs. solid waste. This allows you to use less water when a less powerful flush is all you need. A standard toilet uses 1.6 gallons of water per flush (GPF) which can be overkill when you aren’t flushing solids. In fact, on average 4 out of 5 bathroom visits don’t need the force of a full flush. So dual-flush toilets give you to option to use less water (typically 0.8 – 1.1 GPF) in those cases. According to the EPA, dual-flush toilets can reduce household water usage up to 67%.

You can identify dual-flush toilets because they usually have a push button on top or a split lever. Most represent the two flushing options with 1 or 2 water droplets, indicating the different amount of water they each use.
Converting A Toilet To Dual Flush
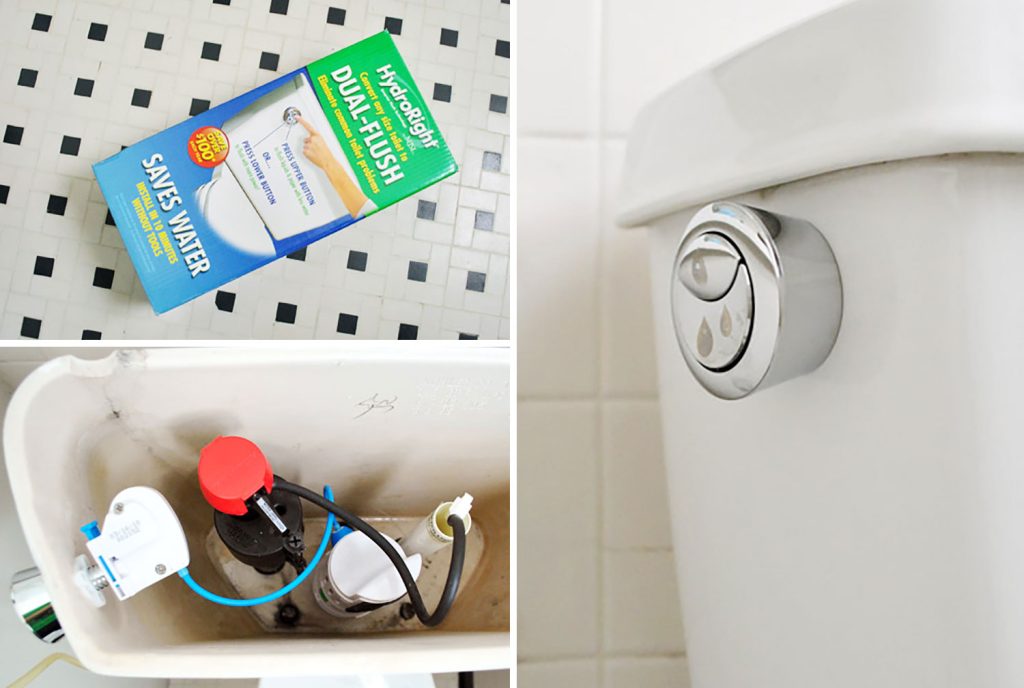
For owners of most standard toilets, it’s easy to convert them from single-flush to dual-flush models with a dual-flush conversion kit. We used this HydroRight converter that cost us $25. It took us under an hour to install ours, and required few tools. Here are the steps to convert yours:
Step 1: Remove the old flush handle
The box claimed that this installation would be tool-free. But sadly we quickly required a wrench to remove the tightly-screwed old handle. The good news is that it was still a super easy undertaking.
Step 2: Remove the toilet flapper
The next step of removing the flapper. That’s the gray thing that you can see a sliver of in the bottom-right, which was far less involved (no tools required at all). Oh and turning the water off was optional, but I did decide to do that so I didn’t have to keep sticking my hand into toilet tank water.
Step 3: Attach The Dual Flush Converter
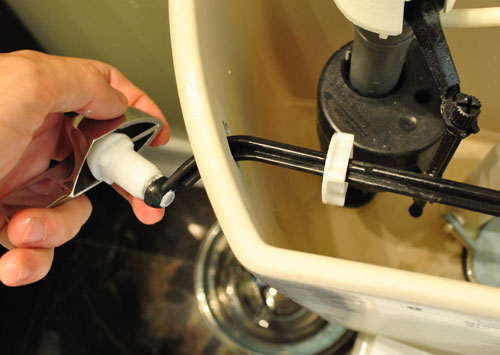
With the old pieces removed, the first task was to slide the bottom part of the dual-flush tower into place where my old flapper had been. You’ll want this to have tight fit over the seal to prevent water from leaks from the tank to the toilet bowl (aka, making your toilet run).
Then I wiggled a tight, black rubber band over the fill tube to keep the dual-flush piece in place and firmly pressed against the opening. There’s also a zip-tie at the back of the piece that I pulled tight to help keep things in place. I had accidentally cut the tie off at first, thinking it was part of the packaging, but thankfully the kit actually supplied a backup!
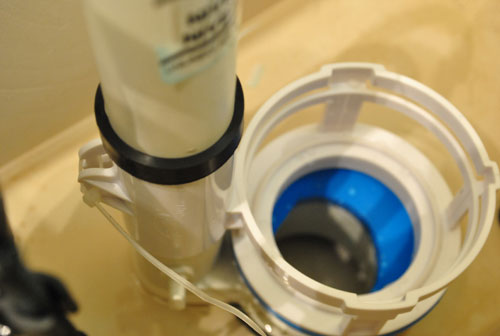
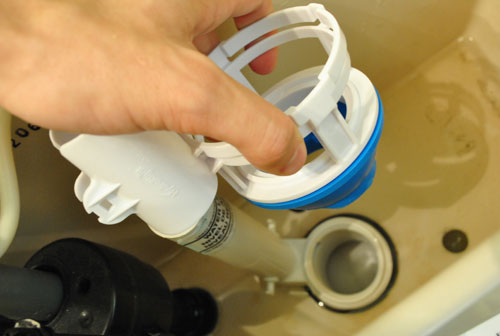
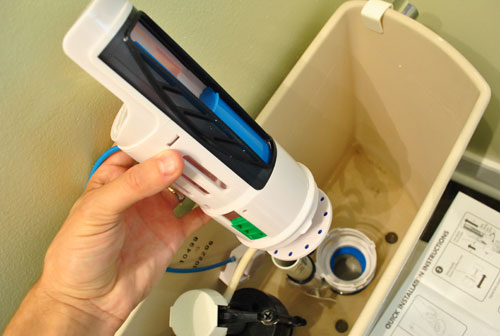
Step 4: Install The Flush Tower
Then it was time to set the rest of the tower. It looks like quite a beast, but it clicks into place very easily with a simple drop-and-twist motion. You can see some of the technology in this shot – the adjustable blue slider is what helps to regulate how much water should be used in the quick flush function, and the green switch does the same for the full flush.
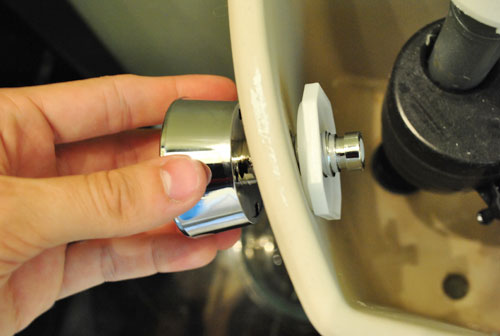
Step 5: Attach The New Dual Flush Button
My next task was to put in the new button where the old handle had been. I was able to securely hand-tighten this (again, no tools required). Oh and hand-tightening is always a good approach because over-tightening things can potentially crack the porcelain of your tank or bowl. Not good.
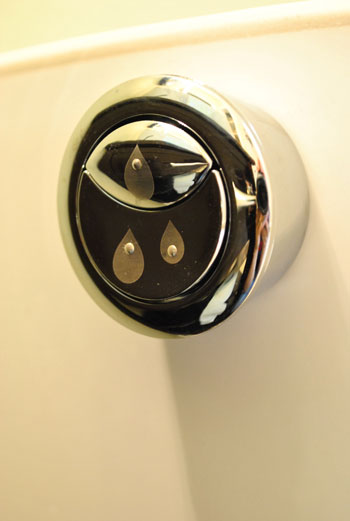
Here you can see what the button looks like. It’s split for what we’ve been calling a “single flush” (for liquids) and “double flush” (for, as the packaging describes, “when you need more power”).
From there you just pop the button device (the white box at the other end of the blue cord) onto the back of the button. And there’s no electricity or battery involved, despite the fact that it all started to look somewhat bomb-like at this point.
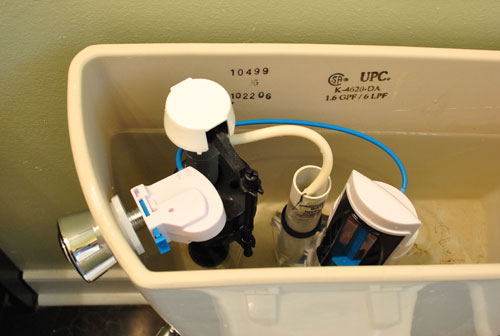
It took me about 20 minutes to get this far, but my eagerness to start flushin’ was damped by the fact that the buttons didn’t work at all at first. But through a few minutes of trial and error (which is pretty much how we do everything around here at Casa Petersik) I realized that the level of my blue slider was very important. If it was too close or too far from the water level, my button pushing wasn’t strong enough to lift the tower’s built-in flapper. Fast-forward about ten minutes and this John was happy with his john. Both buttons worked every single time once we found that magical placement of the blue slider.
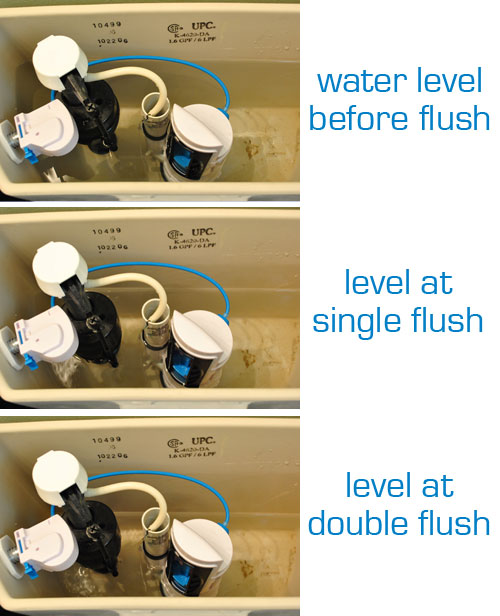
Step 7: Observe Your Water Levels
To demonstrate exactly what this dual-flushing function means when it comes to saving water, check out the difference between how little water is used at the single flush setting, and how much more goes out on the full flush setting. There was definitely an obvious difference in the water level, and you could even hear the toilet working a lot quicker for the single flushing action. Score.
Update: We enjoyed having this dual flush converting installed on this toilet so much, we installed it two more times when we moved to our new house! Both in our guest room toilet and our hall bathroom toilet
Install A Dual Flush Toilet
If you don’t want to mess with retrofitting your existing toilet, you can also purchase a new dual-flush toilet. Costs have come down considerably on dual-flush models since they were first introduced, and now many are just as affordable as standard models. Plus, as we show in this tutorial, it’s not that hard to install a toilet yourself. Here are some options with prices as of this writing:
- Project Source Dual-Flush Toilet ($99)
- Glacier Bay Dual-Flush Toilet ($160)
- American Standard Dual-Flush Toilet ($260)
- Kohler Dual-Flush Toilet ($315)
Some dual-flush toilets always feature a wider trapway (the S-shaped pipe that connects the bowl to the sewer line) which always helps reduce clogs when using less water. We also always recommend getting a toilet with an elongated bowl and comfort or chair height. These features to be the most comfortable to use.
Other Toilet How-Tos
Now that you’ve become better acquainted with your toilet, here are some other tutorials and information you might be interested in.
- How to Install A Toilet
- Our Favorite Toilet (Yes, We Have One!)
- How to Fix A Rocking Toilet
- How To Unclog A Bathtub Drain Without Chemicals
- Convert A Toilet To Dual Flush
- Fixing A Backed Up Toilet Line
*This post contains affiliate links, so we may earn a small commission when you make a purchase through links on our site at no additional cost to you.

Heidi says
Oh my gosh! I love the dual flush in Europe – I had no idea you could get them here! That’s so exciting! Hahaha – well, you know, exciting as far as toilets get ;). (But seriously, their toilets are ingenious.)
Susan says
I love this blog
Much better than the last blog I read on dual flush toilet!
hilary says
hi! i know this is an old post but i was wondering if i could ask you a logistical question with the diaper sprayer and cloth diapering. our boy will be here in less than 6 weeks, so trying to anticipate it all! so when you changed clara in her room, or really anywhere in the house i guess, i know you have a wetbag next to her dresser for soiled diapers. but for #2 dipes that you would theoretically have to take into the bathroom to spray off, do you have a wetbag in there as well? instead of then going BACK into the nursery with a dripping #2 diaper to put it in that bag? or was it never really that wet from the sprayer that it wasn’t even an issue to go back into her room? again, i apologize if this is a ridiculous question, but i’m thinking i would need 2 bigger wetbags, one for nursery for #1s and one for bathroom for #2s to use sprayer? anyways, any insight to your logistics would be very helpful! thanks and congrats on the 14 mos of breastfeeding!
YoungHouseLove says
The way we spray them we sort of shoot the water at them at a diagonal and everything goes into the toilet and we roll them to sort of squeeze them out (from the outside so we don’t get anything on our hands) and carry it back into the nursery where the wet bag is. There weren’t any drips or spills or anything. We used this method in both houses and it wasn’t a big deal, but getting a second wet bag for the bathroom could definitely work!
xo,
s
Steph says
I did not scroll all through the comments, but I was wondering… we have been cloth diapering for almost a year now without a diaper sprayer, and as we think about baby #2 and more cloth diapering, I am thinking about investing in a sprayer. I got scared away by some reviews on Amazon. One person said that the sprayer leaked all over the bathroom, causing $5k worth of damage!?! I am worried about the fact that we have older toilets that work well, but are not brand new, by any means. Will we have any trouble achieving an acceptable fit, in your opinion? Any problems to consider? Thanks!
YoungHouseLove says
Ours has never had any leaking issues and we have used it at two houses now. We love it and couldn’t live without it! Oh and both of our toilets (at the old and new house) weren’t standard since they’re older homes but it fit right in and worked great! Maybe just give it a try and possibly return or resell it if it doesn’t fit your tank? Hopefully you won’t have any problems!
xo,
s
Victoria says
I have a question: How is the sprayer working out for you? We’re on the fence about buying one. So far plastic gloves and a toilet flush are working okay, but things are getting, um, more complicated now with the introduction of solids to our baby!
YoungHouseLove says
It’s great! Still us it every day. Twice a day actually. Haha. Clara’s regular.
xo,
s
Heather Hawkins says
Why did I not think to hang my sprayer on the right side? Duh! The tube is so long and it can be seen when entering the bathroom. I’m totally moving mine tonight!
Tom Clarke says
Hi guys,
I’m currently living in Chiang Mai, Thailand. I wanted to let you know that every western toilet (sit-down), has a Bum Genius attached. However we westerners call it a “bum gun”. It is nothing more than a simple kitchen sprayer attached to the water feed for the tank, used as a handheld bidet for personal hygiene. Much cheaper than $45.
I’ll never own another toilet without installing one. :)
Kathryn says
Now that you have lived with the dual flush for a while, how do you like it? Have you had any problems with it? We are moving into a “new” house and are thinking about adding this upgrade to our older toilets.
YoungHouseLove says
No issues! We even installed two more since then. Love them.
xo,
s
Joanna says
Hi John!
Thanks so much for your awesome tutorial, I got 2 of these at Home Depot and installed them in about 40 minutes. Your tutorial was so much better than the instructions in the package, it was very easy to follow. I never would have guessed that I (an 18 year old girl) could make our toilets dual flush!
YoungHouseLove says
SO glad! Congrats Joanna!
-John
Valerie says
Ohhh I love this, who needs a bidet when you have a sprayer!
Heather says
Sorry to bug you on an incredibly old post… We’ve been cloth diapering for 15 months now and (not to go all TMI on you) our little Henry’s poos have not been cooperating lately. We bought a Mini Shower brand sprayer a while back, but it’s terrible to use. The water pressure is so high that it sprays water and diaper contents outside of the toilet. (Poop on walls – not cool.) And if we hold it close enough inside the toilet to contain it all, we end up dunking the diaper in the toilet water, which is super messy. I’ve been resorting to scraping the diapers with toilet paper, but it’s not as effective, and also – ew. Any suggestions? Can the water pressure be adjusted somehow? Any tips would be welcome.
And you guys are great, btw – reading your blog always feels like reading an email from a friend. Congrats on the new lighting line and keep up the great work!
YoungHouseLove says
The mini sprayer we own has a lever on it (right where it attaches to the toilet) that is used to adjust the water pressure. It’s a lifesaver for us because when it’s at full blast we had the same issue.
-John
Kirk says
I was curious how well the bidet (diaper) sprayer worked, and particularly how durable it was. I just got back from Brazil, and they have these sort of things with nearly every toilet. They are not for diapers though. They are for everyone because they save a vast amount of paper and are much more hygienic than paper (which really is not very). In any case I am looking for a good sprayer now, and want to get one that is well made, durable, so as not to need replacing anytime soon.
YoungHouseLove says
We’re really happy with ours. It worked for 2.5+ years without leaking (right up until Clara potty trained) and we’re sure we’ll be able to use it again for a possible future kiddo. No complaints!
xo
s
maureen says
Great post and helpful as I just installed and now know how to adjust the water level on the dual flush meachanism. I used to wash my kids diapers by hand in the toilet first (seriously- just dunk in, soak and shake out a bit with gloved on of course) before thowing them in my diaper pail before the wash so love the idea of the diaper spayer. I can imagine it is also helful for washing up little kids at times right on the toilet (or adults for that matter) if desiring an easy sponge bath which I also have done with washcloth and water on occassion when in a rush having to get kids cleaned up. Cold water is of course less desirable that a warm washcloth so wouldn’t recommend trying that if the water is too cole- but maybe for a quick rinse of soap AFTER a hot wash cloth or in conjunction with a hot wash cloth for a better rinse.
Elizabeth Roe says
Love your blog
GarageLogix says
This is pretty cool and great way to help the environment and get things done well. Thank you for sharing this!
James Malone says
Thanks for this, this is really gonna be helpful!!