Did you know you can easily convert your existing toilet to a fancy dual-flush model? It takes no plumbing experience and less than an hour to do. It’s kinda like getting a new, eco-friendly toilet without actually having to buy a new toilet. Plus, by reducing your water usage you might even save money on your water bill. Just follow these steps for a quick and easy water-saving upgrade.
What Is A Dual Flush Toilet?
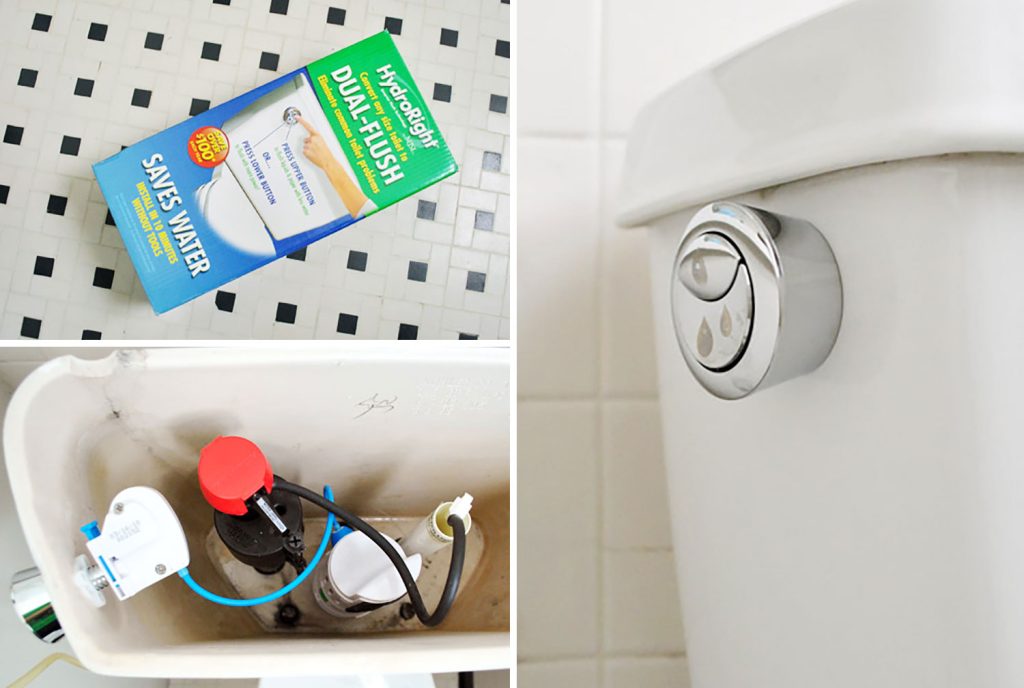
Unlike traditional single-flush models, a dual-flush toilet has separate options for liquid waste vs. solid waste. This allows you to use less water when a less powerful flush is all you need. A standard toilet uses 1.6 gallons of water per flush (GPF) which can be overkill when you aren’t flushing solids. In fact, on average 4 out of 5 bathroom visits don’t need the force of a full flush. So dual-flush toilets give you to option to use less water (typically 0.8 – 1.1 GPF) in those cases. According to the EPA, dual-flush toilets can reduce household water usage up to 67%.

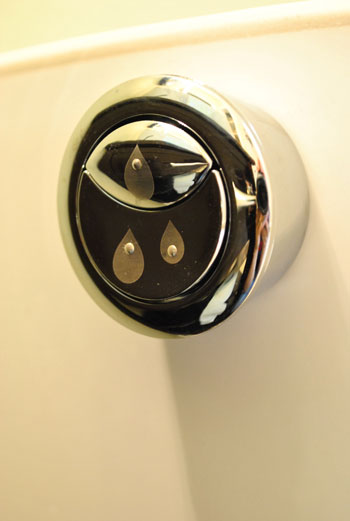
You can identify dual-flush toilets because they usually have a push button on top or a split lever. Most represent the two flushing options with 1 or 2 water droplets, indicating the different amount of water they each use.
Converting A Toilet To Dual Flush
For owners of most standard toilets, it’s easy to convert them from single-flush to dual-flush models with a dual-flush conversion kit. We used this HydroRight converter that cost us $25. It took us under an hour to install ours, and required few tools. Here are the steps to convert yours:
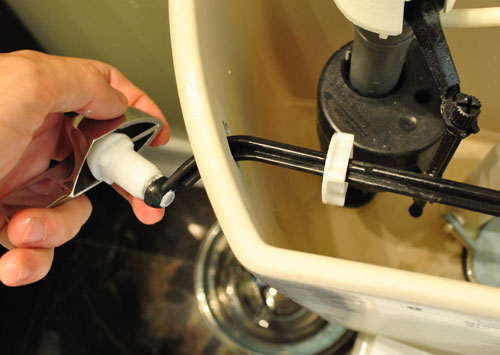
Step 1: Remove the old flush handle
The box claimed that this installation would be tool-free. But sadly we quickly required a wrench to remove the tightly-screwed old handle. The good news is that it was still a super easy undertaking.
Step 2: Remove the toilet flapper
The next step of removing the flapper. That’s the gray thing that you can see a sliver of in the bottom-right, which was far less involved (no tools required at all). Oh and turning the water off was optional, but I did decide to do that so I didn’t have to keep sticking my hand into toilet tank water.
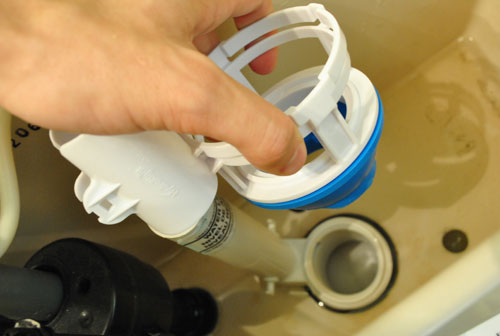
Step 3: Attach The Dual Flush Converter
With the old pieces removed, the first task was to slide the bottom part of the dual-flush tower into place where my old flapper had been. You’ll want this to have tight fit over the seal to prevent water from leaks from the tank to the toilet bowl (aka, making your toilet run).
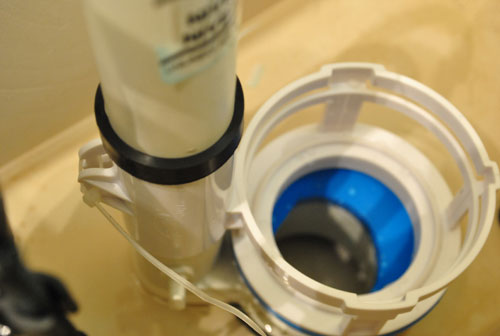
Then I wiggled a tight, black rubber band over the fill tube to keep the dual-flush piece in place and firmly pressed against the opening. There’s also a zip-tie at the back of the piece that I pulled tight to help keep things in place. I had accidentally cut the tie off at first, thinking it was part of the packaging, but thankfully the kit actually supplied a backup!
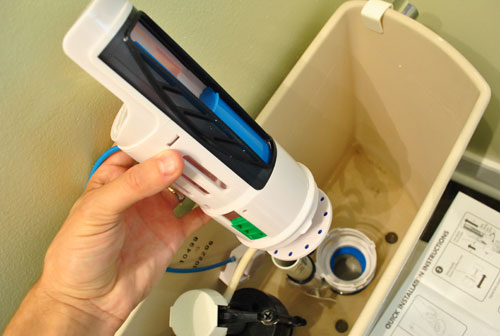
Step 4: Install The Flush Tower
Then it was time to set the rest of the tower. It looks like quite a beast, but it clicks into place very easily with a simple drop-and-twist motion. You can see some of the technology in this shot – the adjustable blue slider is what helps to regulate how much water should be used in the quick flush function, and the green switch does the same for the full flush.
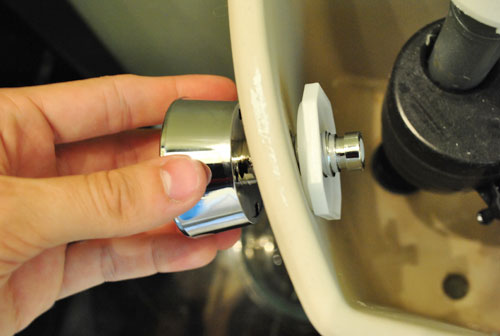
Step 5: Attach The New Dual Flush Button
My next task was to put in the new button where the old handle had been. I was able to securely hand-tighten this (again, no tools required). Oh and hand-tightening is always a good approach because over-tightening things can potentially crack the porcelain of your tank or bowl. Not good.
Here you can see what the button looks like. It’s split for what we’ve been calling a “single flush” (for liquids) and “double flush” (for, as the packaging describes, “when you need more power”).
From there you just pop the button device (the white box at the other end of the blue cord) onto the back of the button. And there’s no electricity or battery involved, despite the fact that it all started to look somewhat bomb-like at this point.
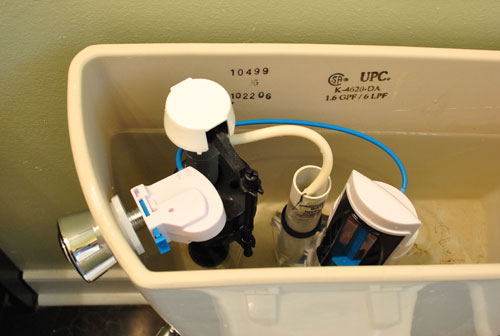
It took me about 20 minutes to get this far, but my eagerness to start flushin’ was damped by the fact that the buttons didn’t work at all at first. But through a few minutes of trial and error (which is pretty much how we do everything around here at Casa Petersik) I realized that the level of my blue slider was very important. If it was too close or too far from the water level, my button pushing wasn’t strong enough to lift the tower’s built-in flapper. Fast-forward about ten minutes and this John was happy with his john. Both buttons worked every single time once we found that magical placement of the blue slider.
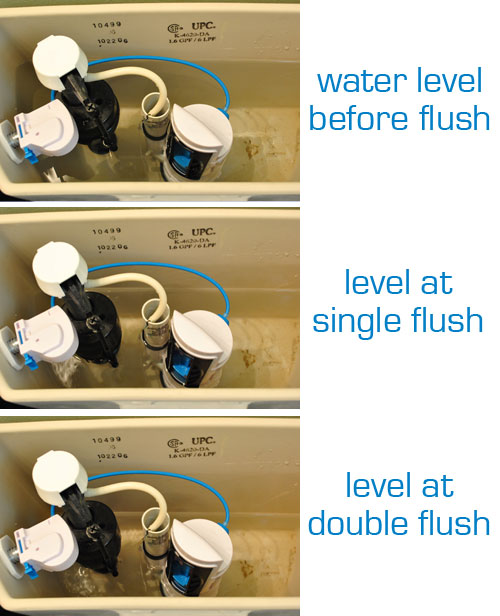
Step 7: Observe Your Water Levels
To demonstrate exactly what this dual-flushing function means when it comes to saving water, check out the difference between how little water is used at the single flush setting, and how much more goes out on the full flush setting. There was definitely an obvious difference in the water level, and you could even hear the toilet working a lot quicker for the single flushing action. Score.
Update: We enjoyed having this dual flush converting installed on this toilet so much, we installed it two more times when we moved to our new house! Both in our guest room toilet and our hall bathroom toilet
Install A Dual Flush Toilet
If you don’t want to mess with retrofitting your existing toilet, you can also purchase a new dual-flush toilet. Costs have come down considerably on dual-flush models since they were first introduced, and now many are just as affordable as standard models. Plus, as we show in this tutorial, it’s not that hard to install a toilet yourself. Here are some options with prices as of this writing:
- Project Source Dual-Flush Toilet ($99)
- Glacier Bay Dual-Flush Toilet ($160)
- American Standard Dual-Flush Toilet ($260)
- Kohler Dual-Flush Toilet ($315)
Some dual-flush toilets always feature a wider trapway (the S-shaped pipe that connects the bowl to the sewer line) which always helps reduce clogs when using less water. We also always recommend getting a toilet with an elongated bowl and comfort or chair height. These features to be the most comfortable to use.
Other Toilet How-Tos
Now that you’ve become better acquainted with your toilet, here are some other tutorials and information you might be interested in.
- How to Install A Toilet
- Our Favorite Toilet (Yes, We Have One!)
- How to Fix A Rocking Toilet
- How To Unclog A Bathtub Drain Without Chemicals
- Convert A Toilet To Dual Flush
- Fixing A Backed Up Toilet Line
*This post contains affiliate links, so we may earn a small commission when you make a purchase through links on our site at no additional cost to you.

Elizabeth says
I always wanted one of those… I didn’t bother doing anything when they weren’t eating solids (exclusively BF poo washes right out, in my experience) but it would have been so nice to have those once my girls were eating solids. Toddler poops are the WORST but they actually “glop” enough that they plop.
I know many folks who use BG and like them, I have used just about everything around (WAHM and big names) and will probably just buy a bunch of BG’s for #3 should that happen. :)
Oh- clothesline… do you have a clothesline? Does wonders for any stains to sun them, plus I think it keeps them fresher. And would make for cute pictures. :)
Congrats you guys, I’m excited for you! :)
YoungHouseLove says
We definitely plan to implement the clothesine method. We’ve heard so many good things about them!
xo,
s
Renee Smith says
Love it! A total man-post, that I will definitely be passing along to my husband who installed the toilet sprayer just a few months back for our own cloth-diapering venture!
I hope everything is going wonderfully for you guys; where are you keeping your diaper pail? or better yet, what kind of diaper pail did you guys opt for? could we file that question under “decorating with kids,” since it is kind of a necessity, and one that tends to be pretty ugly!
YoungHouseLove says
Hey Renee,
Stay tuned for a post all about that (of course it might be a few weeks away since we’re enjoying our time with our wee one these days). We actually picked up two airtight metal trash cans (one small one for wipes and one larger one for cloth diapers- which we’ll hose down first if they have solids on ’em) and we hung them from the far side of our dresser near the window (which you can’t see unless you’re standing there changing diapers on the pad and look to the left in the corner). So far it has worked out wonderfully!
xo,
s
JenniferS says
Congrats again!
We did the CD’ing thing too and love our BG diapers (I have half organic and half pockets AIOs). We used Kissaluv fitteds from age 0-3 months, then switched to the BGs – they seemed HUGE when we first started! Now she’s almost 2 and we’re on the biggest size – where does the time go!
We used a DIY version of sprayer – definitely not as nice as the BG one – esp since I don’t have a hook to hang it on – maybe I can fashion one in a DIY way :)
This is the tutorial the hubby followed and we even were able to uninstall it when we moved and take the whole gizmo with us!
http://gidgetgoeshome.com/2008/08/25/diy-tutorial-make-your-own-diaper-sprayer/
Hope you like the CD’ing. If you’re ever looking for a good wetbag, I LOVE the ones from goodmama (thegoodmama.com). I love their diapers too :) The wetbags are just really cute and do a good job of keeping the stink in.
Becki says
I’m SO glad you guys figured out the diaper sprayer trick! I CD, and I can tell you that the single most disgusting thing I have to do is dunk that gross poo diaper in the toilet water. Makes me want to wretch everytime…hence why I haven’t CDed in like a month! Now that I’ll have 2 babes in dipes come August, and after reading how super easy it was to install, I’m going to buy one for sure!
Oh,not sure if you’ve figured this trick out yet, but I use those soft cotton washclothes instead of wipes and I keep them in a wipe warmer. I just get 5-10 a day, get them wet, and then pop them in the warmer. You can spray some essential oils onto them (tea tree oil is a good natural “disinfectant” and helps prevent rashes) too!
She’s just beautiful, by the way!
Carolyn says
Dual flush toilets are quite common here in Australia. Never given much thought to the fact that they aren’t common in other bathrooms around the world.
So since we’re talking about the toilet here, the baby poo only gets really gross when they begin eating solids. That’s when I would start using a gas mask..hehe
Julia says
Dual flush toilets are standard here in Austria/Europe too. Last summer when I went to the US for the first time I was shocked by the amount of water you waste when you just flush once. But it’s nice to see that there’s some movement.
Blayne says
We haven’t needed the diaper sprayer yet, but it is on our list for when she starts solids. I have started putting her in her bum genius this week and they have been working great. One thing I like about using the pocket diapers is that after washing, I can hang dry the insert and shell separately and they are dry in the morning. All my other diapers didn’t get dry by morning so I had to put them in the dryer. I don’t know what laundry regimen your friends recommended, but I have been having good luck with spraying poo diapers with BioKleen Bac Out, doing a cold rinse in the machine with no detergent, then washing warm with Charlie’s soap.
If you decide to try CDing before she fits the BG, there are several websites that let you do a cloth diaper trial. I am doing one from jilliansdrawers.com and they also offer a newborn trial. I was rediculously excited when my diapers came in the mail yesterday :)
joseph says
Just finished installing this. Lifehacker had an article about these things about a month ago, maybe. And I thought about it then. However, your in depth install convinced me to bite the bullet. Testing this on the upstairs toilet that doesn’t always stop running. If I am gonna buy something might as well upgrade.
I am having the same problem as Brent with the small flush. I can’t get it to take tp down and have pushed the blue part all the way down. If I hold the button a second or two longer it does work better.
I may upgrade the main toilet in a couple weeks.
YoungHouseLove says
I know it’s not the most helpful description, but I also had issues with perfect flushing every time, but playing around with the blue slider was the answer (the key wasn’t positioning it all the way down or up, it was finding the right increment somewhere in between). Luckily this only took about ten minutes of trial and error and now it flushes seamlessly every time. Hope it helps!
-John
Kate says
Welcome sweet baby Clara! (Love the name – it’s my grandmother’s name, too.)
Since you are already cloth diapering, you might want to check out the concept of Elimination Communication. Not only is it super-green, but it’s a lovely way to bond with your baby and you guys are in prime position to start with a newborn.
Give it a google and try it for yourselves!
YoungHouseLove says
Thanks for the suggestion! We’ll have to check it out.
xo,
s
joseph says
Thanks for the suggestion John, but I have already been there. The instructions lay it out pretty easily. Start a 1/2″ below the water level and work your way down until you get a piece of tp to flush on lite-flush. Never happened until I got all the way down and held the button in a bit.
I will play more another day.
Regardless, it is working better than the flapper.
YoungHouseLove says
Glad to hear it’s at least an improvement! Good luck.
-John
Lindsey says
We used 100% Fuzzi Bunz with our daughter. They were so much easier to use than disposables. In the rare times we had to use a disposable, we had to stare at it a few moments to figure out how it was supposed to go on. :)
Never had a need for a diaper sprayer.. just swish the diaper around in the toilet to loosen up any solids as needed. If the idea of sticking your hand in a toilet grosses you out now, just wait. You will get over any squeamish tendencies you have.
Lexi says
The sprayer reminds me of the ones I used in Thailand. They are quite refreshing on hot days.
MommieDawn says
I am ALL over this now! My husband’s HoneyDo list just got a little longer! THanks for sharing!!
Katie says
Like a few of your other commenters I am also from Australia where the half and full flush buttons are a standard feature. I was actually surprised when visiting the states earlier this year that none of your toilets had buttons but levers like the really old toilets here …
Also surprised – the way they filled up with water when the flushed – oh my I thought I’d broken it and the way I first thought all the toilets were children’s cause they were lower and longer than I was used to :) funny how something so simple can be so different and such a topic of conversation!
but thanks for showing us this and how much water you actually save doing a half flush too!
Bethany says
Ok I have to tell you that your blog is my new favorite blog out there!! Two things: 1) We’re doing a bathroom remodel and our bathroom is the exact same set up as yours and what you guys did with it is exactly what I’ve been imagining but can’t find the stuff. So thanks for the inspiration…i might just copy everything:)
and 2) We use BG’s and love love love them but to help with the #2’s you should get Kushies liners…they make everyone’s life a whole lot easier and less messy. Also we use cloth wipes (my husbands old cut up t-shirt) and they work so perfectly because once you’re done you dont have to split up the wipes and toss them out you can just toss it all in the diaper pail together.
Anyway, just wanted to share my thoughts! Thanks for having such an awesome house and blog:)
Mary S. says
Awesome tutorial on both plumbing projects. The three photos showing the different water levels is just perfect. You are a born teacher (and a pretty good plumber too)
Mad Jayhawk says
I understand from user reviews on Amazon that HydroRight does not work on 1.6 gpf toilets. Is this true?
YoungHouseLove says
We’re definitely not experts on what toilets work or don’t work with this kit. All we know is that we blindly got it for our bathtoom and the box said “works on any toilet” and it easily attached and works flawlessly on ours. In fact we’ve since picked up a second one for our half bathroom as well. Hope it helps!
xo,
s
Rachel S says
We have been using Bumgenius 3.0 diapers since our daughter was 8 weeks old and love them! They were a shower gift to us (a very generous one!)! I found the diaper sprayer at a garage sale for $3 (score!), and it is a LIFESAVER!!! No dunking them in the toilet, and it has a powerful spray! Also, if you are having problems later on with the diapers smelling, the Bumgenius can be washed with a 1/4 bleach once a month…between that and the clothesline, mine kind of look like they are new again. “Kind of” being the key word. :) Congrats on your little bundle and enjoy!
Amanda says
Hi Sherry and John!
I JUST installed my very own dual flush kit (managed to get the same one as you guys, so the pictures worked great) Thanks for the breakdown, I managed to tackle it without my hubby or dad :) I will definitely be getting a second one for our other bathroom! I should have gotten a picture of me looking at my toilet and then your blog on the laptop right beside me… maybe next time!
Thanks for the helpful hints!
-Amanda
Lori says
Just wanted to say THANKS! – I ordered this same converter after I saw your post and it was just delivered this weekend. The install was SO easy I couldn’t believe it.
I really appreciate all the great ideas & inspiration you guys dish out!
kelley says
We just purchased and received the same converter (amazon link). We talk about doing everytime we take a trip abroad, but seeing the simple instructions on here prompted us to go forward.
Unfortunately, we have the old ballcock toilet and it hits the new part. :( I’m trying to research the piece needed, but this project is becoming more difficult and costly as we go. Bummed!
YoungHouseLove says
Boo! So sorry it wasn’t as simple as our install. Fingers crossed you can get it to work- every flush makes us happy so it’s definitely worth it! And visitors are super charmed by it too.
xo,
s
Erin says
Woot! Just did our first one this weekend. My 14-year old son did it for me, as Dad is out of town. $24.99 and 10 minutes later and he was done. Thanks so much for the tip.
Claire says
I was so esxcited about this I ordered one for each bathroom….and I hate to say this but I have a 1.6 gallon toilet. I installed this and a hydroclean flush valve (since I had a ballcock flush valve) and it now fills the tank with much more water, and the low flush doesnt seem to do the job no matter how I adjust the slider….its all the way at the bottom now and doesnt have the requisite 1/2 inch of water above it-of course thats with the increased amount of water in the tank. Don’t know if any other folks here have had success with 1.6 gallon flush toilets but a potential heads up to the other DIY-ers considering this…I’m gonna try and fiddle with it more but I’m grateful I saved all the original parts….
YoungHouseLove says
So sorry to hear that! Maybe the fiddling will help… or they’ll come out with a model specifically made for your toilet soon. We’re crossing our fingers for you!
xo,
s
Trisha R. says
We just bought the dual flush kit at Home Depot, and it seems to be the same as the one you have. Just wondering how you liked it so far? We haven’t installed it yet, so we’ll see how that goes (nothing is ever uneventful for us when it comes to home improvements :-).
PS: Love your blog and Clara’s adorable! :-)
YoungHouseLove says
We still love it Trisha R! Only thing we’ve learned since posting is that sometimes you need to instruct your guests about how to use it so they aren’t perplexed when it comes time to flush!
-John
Cindy says
Looks like a great idea. My diapers rinsed nicely in a toilet the old fashioned way. Looking forward to hearing how your baby loves to play with the sprayer when she turns 2! As far as I know, we only had one diaper flushed…
Michael Lynton says
New-ish house, and they used a ball-cock. Looks like I will need an extra piece, but it should help even more so that’s good. Home Depot here I come again. Looking forward to the final product!
Grace says
So which would you install first if you had to do it over again: the diaper sprayer or the dual flusher? Thanks so much!!
YoungHouseLove says
Do you mean in what order? Or which one’s more valuable to us? We love them both and honestly wouldn’t choose one over the other (one saves us water when we flush and one saves us water on the back-end when it comes to washing diapers). If you were just asking if we’d recommend a certain order of installation, it really doesn’t matter. They’re completely independent of each other (the sprayer deals with things outside of the toilet and the flusher deals with things inside of the tank). We probably would stick to the same order because the dual flush project took a bit longer and we like tackling bigger projects first so we’re done with them and then it’s onto the easy stuff.
xo,
s
Andy Parks says
I love your blog, guys! I had to show this to my wife to convince her to let me do this type of project, and prove that other homeowners can do this easily too. I bought the HydroRight dual flush product too and it has been great so far! I actually found it on Amazon a little bit cheaper than Home Depot. Have you seen a decrease in your water bills? I saw a decrease this past month, so something has to be working1
YoungHouseLove says
So glad it’s been great so far! We have noticed a slight decrease in our water bills (they’re bi-monthly so we haven’t had enough bills to really see much of a trend). But we definitely appreciate saving water with the dual flush since we’re doing more laundry and spraying cloth diapers (thanks to the new baby addition) and still seem to be using less water than before. Wahoo!
xo,
s
Mike C says
Thanks a bunch for this info. I have a major problem with the general public mis using restrooms at our retail building and nearly no supply house nor plumber knew where to go to get any parts to retro a modern toilet back to a high volume flush, to push the stuff down. We have a low water volume problem caused by these 1.8 gal units. So, at least the super flush aspect component part of this rig might help us. Thanks. PS, is there any way to put the configure the handle so that it always does the super flush, without the low volume option? Took a whole pizza out of the sewer line last week and what a mess. Thanks. Mike C
YoungHouseLove says
Hi Mike C,
Sorry to hear about your issues. This system doesn’t actually increase the power of your toilet, rather just gives you a sort of “half-power” option. So actually any setting of only doing “super flush” would be equivalent to leaving your current single-flush system in place. Sorry that doesn’t solve your problem!
-John
Angie says
Thanks for the tips, very helpful. Quick question, where did you find the signs above your toilet? Very clever :)
YoungHouseLove says
We made them! Here’s the link: https://www.younghouselove.com/2010/01/show-me-a-sign/
xo,
s
Sev says
I was sold after reading your blog entry! Especially since I come from France and this is the norm over there (I had to teach my US husband how to use the toilet lol).
Anyways, I have a 1.6 gpf toilet and bought the Hydroright and the water saving fill valve that goes with it since I had a ball-cock system (although the Hydroright worked perfectly fine even when I still had the ball-cock in p^lace). I just wanted to save even more water. The fill vavle allows me to caliber exactly the water level inside the thank and inside the toilet bowl saving an extra quart of water every time we flush!
To Claire, there is a long blue stick on the fill valve ( called thumb screw) that you have to turn (clockwise or counterclockwise) and it will set the water level inside your thank. It has the same function as the ball-cock. It’s explained in step #12 of the instructions for the fill valve. Set your tank water level 1st (you’ll have to flush several times to get to the right level) and then make sure the blue slider on the Hydroright sites at least 1/2″ below water level. You should have no problem after that.
Jennifer says
Hi Guys!
I installed the exact same dual flush retro kit and my toilet is now making a shshshshshsshshshshsh sound like every fifteen minutes. Any ideas why this peice would have made my toilet start “running”? It was fine before… Has anyone else had this problem? I would hate to take it out! I love the idea of it!
Thanks so much for your response.
Jennifer
YoungHouseLove says
Hmm, we wish we could help but we have no idea. Maybe try adjusting it a bit to see if that resets things? Or googling to see if anyone has info on why toilets run in general. Good luck!
xo,
s
Sarah says
Regarding the diaper sprayer, has anyone experience difficulty installing it on a Toto toilet? I ordered this exact sprayer after reading this post and my husband is struggling to install it right now. He’s already made a trip to Home Depot and asked around there. I guess they don’t make the size fitting needed for our toilet. Anyone have any suggestions before I send it back? Totally bummed!
YoungHouseLove says
Does anyone have any advice or help for Sarah?
xo,
s
erika says
I know this is an old post, but I was wondering, what amount of water did your toilet use before installing the dual flush (ours is 1.6 gal per flush) and it is coming up on the 6 month mark so I was curious as to how yours is holding up for you….as well as the sprayer-have you found you use it to tidy up the bathroom-i.e. shower/sink sprayer
as one commentator mentioned?
YoungHouseLove says
We just use the sprayer for diapers but it’s fantastic. We’re creatures of habit so we clean up the same way we always did before the sprayer. As for the amount of water that our toilet used before, we’re unfortunately not sure. It was purchased a few years ago so we know it’s probably a bit more efficient than a 20 year old model that uses tons of water but beyond that we don’t have a clue!
xo,
s
Crystal says
So although this post was made a long time ago I thought I might post to get some feedback about the diaper sprayer. My husband and I are expecting our first in 10 days, are doing the cloth diaper route, and were thinking about getting the diaper sprayer – is it worth it (from everything I have read when you installed it many recommended it) but how have you found it since Clara arrived??
YoungHouseLove says
Hey Crystal,
We’ve found the diaper sprayer invaluable. We use it every day and are so glad we have it. Even though Clara’s not to the stage where she’s “making” the type of “stuff” that absolutely can’t go in a washer, it feels great to be able to rinse the diapers before they get washed in the machine. So we’d highly recommend it if you’re going the cloth diaper route!
-John
Ali P says
I have been reading your blog and the comments here on the HydroRight. I decided to try this product out and bought one for less than $20 at Home Depot. That’s a good price! I was also pleased with how easy it was to install. We are now using a dual flush toilet and it feels good to be conserving water. I never really realized how much water was wasted in just flushing a toilet. Thanks for the info!
Oh, and I also love the signs and read that post. Very cool!
Drew says
Hey guys,
Hope the move and settling in is going well. We LOVE your blog. We’re expecting our first anytime in the next couple of weeks. We’re using the BumGenius Diapers and we just bought the sprayer. Quick question on the sprayer without trying to get to “graphic”. Do you ever have problems with water spraying everywhere??? Or heaven forbid anything else!?! Like when you are actually spraying everything off the diaper. I could see it potentially spraying water everywhere like when you spray off a dish or something in the kitchen sink with the sprayer there. Any tips/advice/expectations would be much appreciated. Keep up the good work!
YoungHouseLove says
You can adjust the water pressure with the turn of a knob, so there’s no issue with splattering or anything!
xo,
s
reny says
oh i just read this post today. actually, regarding the diaper sprayer, where i come from (Indonesia, but i live in AZ) this thing is very common. no, not for spraying diapers but to clean yourself. LOL. we don’t like using just tissues, we just have to get our hands wet and use soap to clean our bums after we got down and dirty ;P. I don’t know why it never occured to me to install one here in my bathroom, if not for my baby’s diapers then for me.
Alexis says
Hi John and Sherry,
We are using cloth diapers on our little one and just got the diaper sprayer. Do you have any tips on how you are able to have a splatter free episode. I saw your comment Drew on this matter, but it seems that even when I attempt to adjust the water pressure, I end up spraying water. Then I get really grossed out and end up cleaning the whole bathroom- obviously not a convenient scenario. Any tips at all would be great. even if they seem obvious to you. I clearly have no idea what I’m doing! Thanks!
YoungHouseLove says
Oh no! We definitely don’t have that issue and can only think that it’s the water pressure. We can turn ours down to nearly nothing (a small dribble) but of course we prefer it a bit higher so we just played with the water pressure until we had something that rinsed things off easily but didn’t splatter. Hopefully you can turn yours down extra low and then slowly increase the pressure until it’s just soft enough to do the job without spraying everywhere. Good luck!
xo,
s
Angela says
So many months later, how is the bumgenius diaper sprayer working for you guys? We recently bought cloth diapers (Best Bottom) and are trying to decide which diaper sprayer to go with. Thanks!
YoungHouseLove says
Still love it and use it at least once a day. Sometimes a lot more if Clara’s feeling especially prolific! Like today.
xo,
s
Ken says
Hi, Great article. I have a pool area bathroom with brown paint. Anychance you could tell me where you got the Grand Central Station Picture? That would be great!
YoungHouseLove says
We actually made that. Here’s a tutorial for ya: https://www.younghouselove.com/2010/01/show-me-a-sign/
xo,
s
SwissMiss says
Hey guys, saw this upgrade which you linked to in your towel bar rampage (tee hee) in the new place. Can I just say, holy clean water tank batman! How’d you get the inside of your water tank so frahking clean? Merci!
YoungHouseLove says
Haha. Well, we replaced that toilet about two years before snapping the pic, so maybe just the fact that it wasn’t 50+ years old made it look clean? We never actually clean in there. Haha.
xo,
s
Kiran says
I want to DIY my toilet now. Thanks for these nifty ideas :)
Jo @ Jo In the Kitchen says
That diaper sprayer is so freaking cool!! How have I never heard of such a thing?
YoungHouseLove says
It rocks my world on daily basis. Haha.
xo,
s
Judi B says
So for the dual flush mechanism that you installed in your old house I was wondering if you noticed any real difference in your water consumption. Just curious if the advertising lives up to reality and this definitely seems like a better solution than err, uhh, taking on the philosophy of “It’s yellow let is mellow and if it’s brown let it go down.”
YoungHouseLove says
We definitely heard it half flushing and noticed a lot less water going down so it seemed worth it to us. We’re adding them to this house, so we’d “do it again.” Haha.
xo,
s
Elizabeth says
In the netherlands we don’t have that kind of nifty diapershower; we just flush the toilet holding the diaper moving it up and down, so “everything” comes of. Ready to put in the washingmachine. A tip for others, maybe?
lots of love, Elizabeth
YoungHouseLove says
Love it! Thanks for sharing!
xo,
s
MommaMcCarthy says
We’ve has that exact sprayer for a couple of years now and the tube is starting to yellow. I know the water that comes ou of it is clean but still… It looks kinda nasty. Do you know of a way to get the tube looking clean again? (I know, you probably haven’t had it long enough to notice a problem yet but you guys are a wealth of sneaky information). Thanks!
YoungHouseLove says
Hmm, we don’t seem to have this issue, but maybe try removing the tube and soaking it or even trying to clean it by running soap or watered down vinegar through the tube and then rinse it and let it air dry in the sun outside (which has bleaching properties)? Good luck!
xo,
s
Colyn says
Like a few of the comments already posted, I was also surprised to find the “diaper sprayer” sold as such. After visiting Helsinki, Finland, I found that almost all public toilets have little sinks and “hand-held bidets” in the stalls. Sprayers are hooked directly to the sink so you can adjust the temp and force of flow to be just right. I finally tried it and I LOVED it! My hubby recently installed one in our house here (made by Sanicare). Have you guys used it for your own purposes yet? You’ll feel amazingly clean and very civilized. Love your site — thanks for sharing.
YoungHouseLove says
Haha, nope. Might be one of those cultural things, but we only use it for diapers!
xo,
s
Allison says
I was so excited about the dual flush attachments that I bought two! Unfortunately I failed to read the small print and faqs (always a good idea before purchase, duh me) beforehand and the dual flush converter will not fit a 3″ flush valve (the website literally says something about no adjustments being possible to make it fit; at least they tell it like it is). But I will not be deterred! The next house I buy will be receiving the full toilet DIY treatment! If you are interested in this attachment, go ahead and measure your flush valve to make sure you can use it (it will apparently fit 2 and 2.5″ valves fine). Thanks for the great blog; it keeps me inspired to keep improving my space.
YoungHouseLove says
Oh man so sorry, but it sounds like you’ll get to enjoy them someday! Have fun!
xo,
s
Elizabeth says
I too jumped on the button toilet bandwagon…I love it!!! Plus, pushing a button is WAY more fun than a handle :-) Keep up the good work!