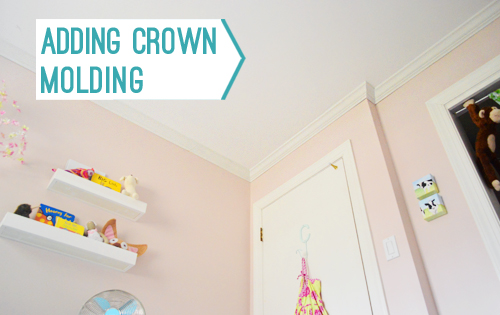
Feeling too nervous to install crown molding yourself? We were too. But we just installed crown molding in our daughter’s bedroom and it was surprisingly cheap to pull off (less than $100!) and easy to execute. *PATS SELF ON BACK*. All it takes is the right tools and some attention to detail.
So let me back up, tell you how I did it, and explain why installing crown molding went from one of my most dreaded projects to one I’ll surely be doing again.
Steps To Install Crown Molding
We’ll provide a more detailed photo and video tutorial below, but here are the basic steps to installing crown molding in any room:
- Select your crown molding
- Determine the angle of your cuts
- Set your cutting platform
Adding Crown Molding: Video Tutorial
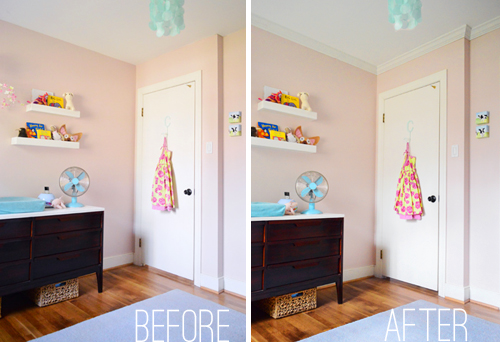
The photos in this post will show you how we installed crown in our daughter’s nursery, but it was so easy that we decided to do all of the other bedrooms too. So in the video below you can see each step in detail as we install crown molding in her big girl room.
Note: You can also watch this video on YouTube.
Selecting Your Crown Molding
I bought standard 3 5/8″ crown molding from Lowe’s because it appears to be what the previous owners installed in our other rooms. It’s almost the most affordable option available. There are other options with different profiles as well. Or, you can use this easy trick to make standard crown molding look thicker.

Each 8ft, pre-primed piece was about $9.50 so, including a couple of extras to cover my butt, my total material cost was $72.
Tools & Materials Needed
You can cut and install crown molding by hand, but simple power tools make this project MUCH faster. We used a miter saw like this one and a nail gun (the ones photographed in this post are no longer available, so I’ve updated these link to our current favorites).
- Miter saw
- Nail gun
- Kreg Crown-Pro
- Measuring tape
- Stud finder
- Pencil
- Caulk & caulk gun
- Paint
- Short handled paint brush
- Ladder or step stool
We already had a saw and nail gun on hand, but we did purchase the Kreg Crown-Pro. It was the real hero of this project!
How To Use A Kreg Crown Pro
I had read great reviews of the Kreg Crown Pro and considering my love of the Kreg Jig, I figured it was worth the $30 price tag to give it a go. Spoiler alert: I love this thing.
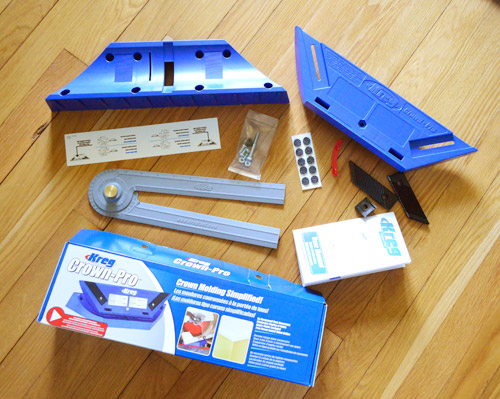
Once assembled (which takes all of five minutes) it looks like this. It creates an angled, adjustable platform so you can cut your crown molding at the same angle that it will sit against the wall. Sounds simple, and it is, but this is a huge help when it comes to cutting crown.
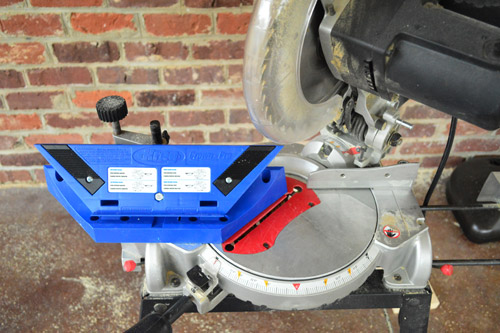
To find the angle the cutting guide should be set at Kreg includes an Angle-Finder tool so you can determine the “spring angle” – or the angle at which the crown leans away from your wall. Apparently, most moldings sit at either 38°, 45° or 52°. Mine was 38°.
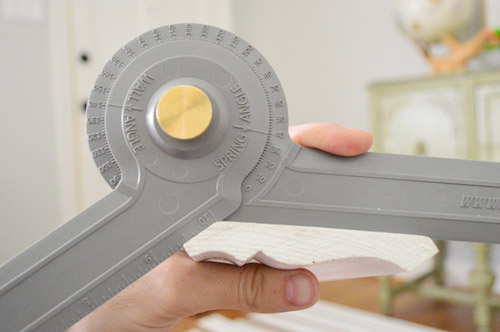
Then you just use the red guide on the underside of the Crown Pro to match.
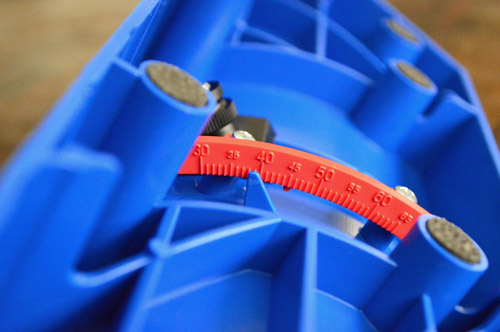
Now the cutting guide is ready to help you cut.
Determine Your Wall Angles
Before cutting anytime, measure and record the angles of each corner of your room. Walls aren’t perfect, so son’t assume every corner is exactly 90°. And these not-quite-right angles can mess you up if you’re not careful. Thankfully, you can use the same angle finding tool for this task.
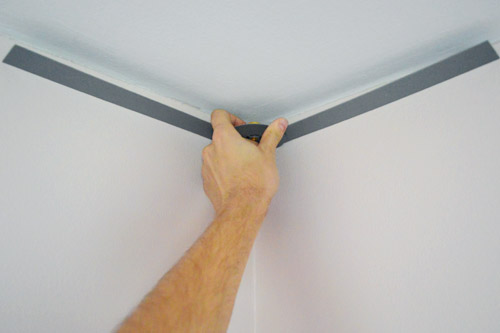
So after measuring and recording every angle, I could figure out how my miter saw should be turned to give me the right cuts. Luckily most of my corners were very close to 90°, so I could set my saw at 45° (half of 90°) for pretty much everything.
For the non-so-perfect corners there was a bit of extra math involved that I won’t get into here because it depends on how your particular saw is labeled, but the instruction booklet that came with the Kreg has a great illustration for this.
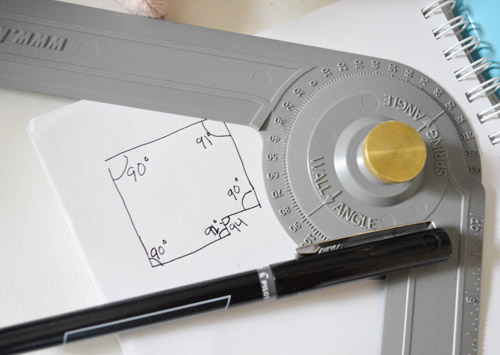
Measure Your Wall Lengths
Next, Sherry and I took precise length measurements from corner-to-corner of each wall using a tape measure. This goes MUCH faster with an extra set of hands or you could purchase an inexpensive laser tape measure tool.

We made a sketch of our room with every measurement to help us stay organized while we started cutting.
Set The Angle of Your Miter Saw
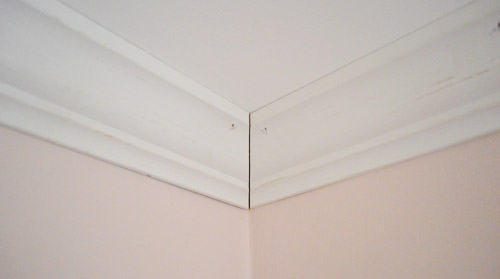
Since you’ll be cutting your molding on an angle, you’ll need to swing your miter saw blade to the left or right. Which way depends on what kind of corner you are adding molding to (inside vs outside) and which side of the corner your piece is going into (right vs left).
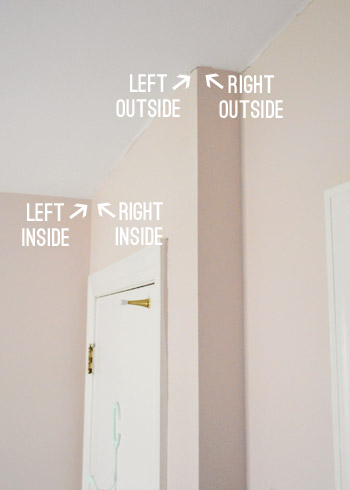
Luckily, the Kreg Crown Pro has a handy guide on the bottom. It shows exactly how your blade should be angled and where you should place your wood to get each of the four most popular cuts.
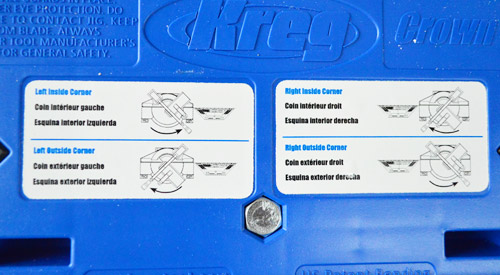
While you’re getting the hang of this, be sure to double check this guide before starting a cut to make sure you’ve got your saw set correcting.
Cutting Your Crown Molding
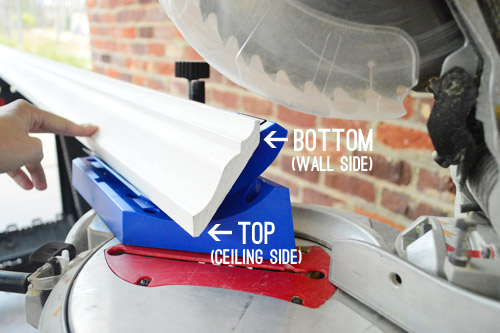
The other important thing to remember when cutting is to put your corwn molding pieces UPSIDE DOWN on the Crown Pro. This means the edge that sits against the ceiling is down on the bottom of your saw.
So with my measurements all taken, my Crown Pro all set up, and my saw blade angled I was finally ready to get cracking, er, crowning.

And remember the old adage: measure twice, cut once. Or, leave a little extra on your first cut. You can always shave off a little extra wood. You can’t add it back!
Nail Your Crown Molding In Place
Securing your cut crown pieces to the ceiling is easy, especially if you have a nail gun on hand. The one pictured was bought for our DIY board and batten project, but we’ve since upgraded to one that doesn’t require an air compressor.
We used 2″ 18-guage brad nails and placed a nail about every 12-16″ inches, hitting both the top and bottom edges of the crown. This keeps it tight to the ceiling and the wall.
I think it took me just about 2 hours to get all of the molding cut and nailed in place this time.
How To Make A Scarf Joint
One shortcoming of the Kreg tool is that it doesn’t address scarf joints. That’s when two pieces of crown meet along a straightaway, not at a corner. This happens when your wall is longer than your piece of molding. I could only fit 8ft pieces of crown in my car, so I had three of these joints in the room.
You’ll get a more seamless transition if you overlap the two pieces (like below) rather than simply butting them together.
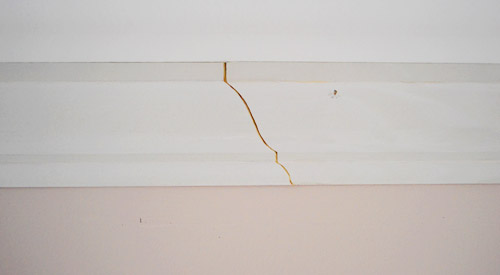
To achieve this, you’ll want to cut one side like an inside left corner and the other like an outside right corner. Or you can do switch left and right listed above, as long as they’re opposites.
Finish With Caulk & Paint
Once everything is hung, you’ll want to caulk the seams, gaps, and holes before you point. We used white paintable Dap caulk. Use a caulk gun in the following places:
- Where the crown meets the ceiling
- Where the crown meets the wall
- Where two pieces of crown meet
- Any nail holes (you could also use wood putty or spackle for this)
This will help hide any places your walls or ceilings are flat, while also giving you a seamless surface to apply paint.

See, much better. And the stuff isn’t even painted yet!

After the caulk dried, we used a small angled paintbrush to apply a coat of semigloss paint that matched the rest of the trim in the room.
Total Crown Molding Project Cost
Our material cost ended up being $67. Add the cost of the Kreg Crown Pro ($30)and my total project cost at just $97. Not bad! We’ve seen enough house listings that say “crown molding throughout” to know that it’s a nice selling point – and now we’re one room closer to a fully crowned house.
More Crown Molding Projects & How-Tos
Since first publishing this post, we’ve tackled a few other crown molding installations – include how to make beefier, more fancy looking molding. Check them out below:
- How To Install Chunky Crown Molding For An Upgraded Look
- Adding Crown Molding To Kitchen Cabinets
- Installing Crown Molding Around Built-In Bookcases
Does anyone have any tricks to their crown molding installations that they’d like to pass on? Or have you had a similarly discouraging first experience with crown, only to crack the crown molding code on your second attempt?

Cassandra says
Looks wonderful! I’m with Clara and just so proud! Do you have plans to include any of the art/pictures hanging in the nursery in Clara’s big-girl room?
YoungHouseLove says
Oh yes, she still sleeps in the nursery so we don’t want to strip that room bare just yet – but things will definitely transfer over when she does :)
xo
s
Carol @ Elephant Buffet says
I tackled crown when I did my fireplace mantle
http://elephantbuffet.blogspot.ca/2013/01/come-on-baby-light-my-fire-place.html
I think I actually cried a couple times during the process. I could NOT get the angles right for the life of me. At one point, I had my laptop open to about six different sites while I tried to figure out the exact bevel/angle. I’m not 100% thrilled with out it turned out (that sucker’s practically *made* of caulk at this point), but I am TOTALLY going to snap up that Kreg tool for my big kitchen project. Fo’. Sho’.
Laura L. says
Let me just say I was so flipping excited when you guys posted that you were doing crown molding. We are soooo intimidated by crown molding, and have spent a ton of hours researching on-line how to do it, more than the 2 hours it took you! When I saw this post I immediately turned the computer to my husband, pointing… SEE SEE!!! John and Sherry did it! (Mind you, this is a common occurrence in our hosehold!) LOL. Thank you guys so much for the photos and write-up!
Deborah Nowland says
My husband and one of our sons put up crown molding in our entire house. A friend suggested that on particularly large gaps that using Bondo to fill in the cracks is a good idea. Bondo is some type of stuff that is used for filling in holes in auto body repair. I don’t know much about the stuff except that they used it and sanded it down and it filled in some large gaps that we had on a few corners.
Laura James says
I find it so odd that houses in America don’t have crown moulding! Pretty much every single house I have ever been in here in Australia has crown moulding as standard, only it’s made of plaster rather than wood.
Great job!
andrea says
loving this post soooo much! I’m embarrassed to admit that I tried putting up crown in our basement (rest of the house already has it), and after hours of frustration, more wasted molding than I’d like to admit, and maybe even a few tears had to give up. this kreg tool could be a game changer though…just need to work up the courage to give it another shot!
Fiona says
I found this so interesting. I think “crown moulding” is just what we call “cornice” here in Australia and it’s just a normal thing to have. So I was surprised to see you say it’s a selling point and often mentioned in house listings?! Is it not common to have it? Some modern homes here are now going without it, but it’s more costly as it requires a skilled plasterer to achieve the look (called “square set”). Cornice hides a multitude of sins! So it’s practical to have it – not just for looks. I love your blog, BTW!
YoungHouseLove says
I think a lot of newer homes have it standard, and lots of really old (like early 1900s) homes have it too, but something about our era of house meant it didn’t come standard.
-John
Jen @ RamblingRenovators says
Looking good John! Crown moulding is the one thing my resident handyman is hesitant to tackle. I think I’ll have to show him your post – you’ve made it seem so simple!
Linda says
“BYOF ME!”
Erin says
…..this is me forwarding this post to my husband :-)
YoungHouseLove says
Hahah!
xo
s
Kate Thompson says
Wow!!! Love this! I was just talking to my husband about this cause we are in the process of buying our first home (YAY! lol) and I noticed it too did not have crown molding but it does give a beautiful finishing touch, we will totally have to invest in some of those handy dandy Kreg thingy ma bob!! lol Looks beautiful you two! Thanks for sharing your tips!!
Ian Anderson says
Looks great! Just be a bit careful ‘crossing’ your arms when using the power saw John.
I know you can’t always avoid it, but you lose a bit of grip and control if you do. For cuts on the right hand side of the saw I try to hold the wood with my right hand and operate the saw with my left (if that makes sense)
You still have all your fingers so it wasn’t too bad :-)
Cheers
YoungHouseLove says
Thanks for the tips Ian! Safety first!
-John
Megan says
Amazing how much more polished a room can look with crown molding added. I’ve been dying to put it up in my home but have been so intimidated taking on such a big project. You definitely make it look manageable in this post! Maybe I’ll just start with the smallest room and go from there.
Sarah says
We just did crown for the first time a couple of weeks ago, so I was very excited to see your experience with it!! We did the coping method, which was pretty easy after getting the hang of it… and I’d definitely second what others have said about painting the molding first – especially if the wall is already painted. So much easier that way! Now, I’m ready to put crown molding on anything that will sit still. :D
YoungHouseLove says
Haha!
xo
s
jenna says
Hi Folks!
I love your blog! Question for ya, how do you handle when your home architectural style doesn’t reflect the personal taste you would like to have in your interior? Any tips for blending opposing styles?
thanks much!
YoungHouseLove says
Oddly enough we don’t really believe the decor of your house has to match the style (and in some cases a Victorian full of victorian furniture or a mid-century ranch with only mid-century furniture can even feel a little “theme-y” – so I would say that bringing in stuff that you love and maybe trying to keep the architecture true to the house (ex: keep ornate molding even if you’re bringing in clean-lined furniture) can make for a cool mix that feels layered and interesting. Hope it helps!
xo
s
Audrey says
years ago, i painted my oldest daughter’s room with random sized pink and white vertical stripes. random, because i didn’t want to actually measure them out. i didn’t trust myself with crown molding, so i found a really nice 4 inch wide black and white ribbon that had a really pretty design. i just pined up the ribbon, and it really made the room!!!
YoungHouseLove says
SO cute!
xo
s
Corinne says
So I may have a ridiculous question, but we purchased our first home in July and are slowly working on it. It doesn’t have crown molding and it’s something that I want to add that I know would just add the finishing touch on rooms. The problem is that our ceilings aren’t flat. We have popcorn ceilings which I don’t like but looked past as I loved the house too much to let that hold me back. Do you have any suggestions as to what we could do if we wanted to add molding? Should I bite the bullet, remove the popcorn and then install the molding? I think the back of my head I know that’s what I should do, but wasn’t sure if I could install the molding and then remove the popcorn.
YoungHouseLove says
Oh yes, you can just install the molding per these tips and then when you caulk the line between the ceiling and the crown it’ll fill in any textured parts and it’ll all look seamless. I would definitely remove the popcorn before hanging the molding if you plan to do that though (rather than down the line) since it’ll make everything easier!
xo
s
Kelsey says
Great work! It looks “complete” now. I want to do this in our bedrooms too, but we’re dealing with heavily textured popcorn ceilings. Have you every DIYed popcorn removal or have any tips? Thanks, you two!
YoungHouseLove says
We’ve never tackled that but I love searching youtube.com for videos of things like that (it can be easier than reading posts sometimes). Hope it helps!
xo
s
Madhukeshwar Anakal says
Only 3 words to say: “Fabulous” “Fabulous” “Fabulous” :). Great Post. Keep up the work guys.
YoungHouseLove says
Aw thanks!
xo
s
Suzanne @ smallchangesbigimprovements.com says
Hey Guys,
I tried my hand at Faux crown molding in my bedroom, someday I would love to try to tackle this! Do you think crown molding works with even standard height rooms? Is that what you guys have in your home?
x
Suzanne
http://www.smallchangsbigimprovements.com
YoungHouseLove says
Oh yes, we have all 8′ walls and it really makes them feel taller and more polished.
xo
s
Melissa says
My husband is going to die when I show him this post and introduce him the the Kreg Crown Pro. He spent hours meticulously deriving a formula for cutting perfect crown angles with a miter saw (it involved the cosine of something and was WAY over my head). Too funny.
YoungHouseLove says
Haha, maybe you shouldn’t show him…
xo
s
ashley rachelle says
you guys! this post was awesome. i feel so enabled. now we are so going to install crown in our house. thanks for sharing your tips and making it look doable!
YoungHouseLove says
Aw, you’re welcome Ashley! You can do it!
xo
s
Nancy says
Wow! This has just totally inspired me to tackle crown molding again! I love the finished look but have struggled with the infamous (and dreaded) coping saw in years past. This tool (plus a nifty nail gun) make it actually seem possible again. Thank you so much for the fabulous step-by-step tutorial!
YoungHouseLove says
Of course Nancy! Good luck!
xo
s
Teresa W says
We have just added a suite onto our house for my father-in-law and the builder put crown molding up. Now, I want it throughout the rest of the house. I am so glad you posted about the Kreg Crown-Pro. I have already told my husband we need a nail gun (and I think he may agree), so the crown may be in my future after all.
Margy says
I feel kind of ridiculous asking this, but what was the guage of the nails you used? Doesn’t that matter, if you use nails that are too big, it can split the wood? Anyway, I need to know which nails to get!
Thanks!
margy
(if you run out of projects for your house, feel free to come to ours! ha!)
YoungHouseLove says
They were 18 guage nails, which worked really well for us! We hear that 16 guage nails can work well too (we just had an 18 guage gun, so that’s what we used).
xo
s
jrsplichal says
After reading this, I noticed that our master bath is the only room in our “new” house that has crown molding. Might have to tackle the rest of the house, one room at a time. Thanks for the tips!
Matt S says
Great work!! I am actually looking to install crown in my house. I’ve been looking into a variety of jigs as well – and I think you’ve sold me on the Kreg!
So, some quick installation questions:
1. When you’re nailing the crown up, was it necessary to find the studs first? or were the nails fired-into the drywall strong enough to hold everything up?
2. Also, I assume you nailed into the wall (along the bottom of the molding) and the ceiling (along the top of the molding), correct?
YoungHouseLove says
We definitely only fired into studs, so we wouldn’t know but it’s much more secure that way (worked really well!). Oh yes, but we nailed into the wall studs and then fired a nail at the top of the molding up into the ceiling at the same increments as the stud nails went in.
xo
s
John says
Sir –
What guage nail gun did you use and what size nails? Do you shoot a nail at every stud? Or does it not matter whether you hit studs or not? Did you put any glue on the moldings, or is the nail sufficient? Thanks so much!
YoungHouseLove says
We used an 18 guage nail gun (we hear 16 guage is awesome too but we had an 18 guage on hand and it did the trick and held everything nice and securely). We did go into every stud just to make it nice and strong (there’s no glue necessary if you do it that way).
xo
s
Beth says
Does the Kreg crown tool make it easy to do crown with sloped ceilings? We live in a manufactured home with sloped ceilings – 8 ft at the lowest and 10ft at the highest point in the center. We have always been stimied by figuring out the angle/bevel for these corners in or out. It would be great to know that this tool takes the rocket science out of that and makes it easy. Anyone have experience like this? It’s confusing!
YoungHouseLove says
That’s a great question. I’m sure the crown tool would be helpful figuring this out, but it still requires figuring out the angle at which it will lean against the wall – which is a bit beyond my geometry skills. So if anyone else has a tip, I’d love to know too for curiosity’s sake!
-John
Liz@Craftbaby says
Sooooo pretty! Wow – the crown molding makes such a difference. Love it!
Brandi says
I LOVE it!! Thank you so much for the step-by-step, I’m going to be passing this on to my husband :) Do you think it would look ridiculous with popcorn ceilings?? (for some reason they are standard up here in Canada)
Gabbi @ Retro Ranch Reno says
Love love love!!! I dream of the day we can get some crown up in our house! It looks fantastic. Great job, John! :)
Priscilla says
You two always take on the best projects. The crown you installed looks fabulous, and your post is so helpful for those of us who are now inspired to take on a project like this ourselves. Now a few quick questions… is your crown made out of wood or mdf? Also, what color, and sheen, did you paint your crown, and what color do you paint your ceilings?
Thanks for your help! Love everything you do.
YoungHouseLove says
It’s wooden crown (we got it pre-primed) and we painted it with white semi-gloss paint in Decorators White by Benjamin Moore. The ceilings are just the stock color they were when we bought the house. Hope it helps!
xo
s
Monique says
Thank you for this very informative post. We recently took down crown molding that one of the previous owners had put up. It had cracked and was too small. Unfortunately, we discovered that through the years as the room was painted, paint leaked behind the crown molding. Now we have a wedge of old dried paint where the crown molding had been.
We’re probably just put crown molding over the paint ledge to avoid disturbing possible lead paint. I’ve said all this to say that caulking the upper part of the molding is a good idea to avoid paint residue later.
Did you caulk both sides of your molding?
YoungHouseLove says
Oh yes, anywhere it didn’t lay flush we caulked it to completely fill the gap :)
xo
s
Kelly says
Hey guys, let’s pretend you just pulled this message on a scrap of ancient paper, from a raven’s little leg!! Yesss!!!
I’ve been looking at getting a miter saw and I’m so overwhelmed by the ‘compound’, ‘sliding’, ‘bevel’, ‘dual-bevel’…yada, yada. I only want to do small projects like you guys, maybe crown molding (not going to build all my kitchen cabinets from scratch or anything). Do you have any advice about what to look for in a miter saw, necessities?
Thanks!!! You guys are the best!!!
YoungHouseLove says
Haha! First of all the raven letter on ancient paper made our day. As for the miter saw info, we have one from Sears by Craftsman. It’s a fairly simple model (it’s not sliding but it is compound, which is helpful). Maybe checking reviews on amazon will help too? Good luck!
xo,
s
Tom says
Where did you get the stand for your skill saw?
Tom says
I meant Miter saw.
YoungHouseLove says
Oh yes that came with it too!
xo
s
YoungHouseLove says
That came with it.
-John
Heather k says
Hi
We are hanging crown molding today in our house and I was wondering the following:
When you hung the crown molding and nailed the top to the ceiling did you tie it into a stud or just the ceiling. Do all ceilings have studs if the wall is not load bearing.
Thanks
YoungHouseLove says
Every mark on the wall was where a stud was, so we knew those nails were going into studs and holding well. In the ceiling we weren’t ever sure what they were hitting, but all the wall nails were secure so that helped to keep the crown firmly attached.
xo
s
Satnam says
Hi John,
Thank you for sharing, you took all the mystique out of a crown molding installation, making it DIY doable!
Question: Can you use a regular table saw with a fixed blade for making the cuts?
Satnam
YoungHouseLove says
You will most likely need a miter saw (or a miter box, which is cheaper but takes a lot longer) to get those angles unless you’re crazy steady with a circular saw. My miter saw is probably around $150 from Sears (it’s a Craftsman) – don’t know the size or model offhand, but it’s just a pretty basic one.
-John
Kristen says
Did you guys make Clara’s ceiling light or buy it? If you made it – is there a post for the DIY instructions? I would love to make a shorter ivory one!
YoungHouseLove says
We bought that from an outlet here in Richmond back in 2010 before she was born (it was the only light we took from our first house). We loved that thing! I have seen bloggers make them with wax paper though, so maybe go on pinterest and search wax paper capiz chandelier and see what comes up?
xo
s
Kristen says
Clever! I was googling beaded curtains to see if I could find something similar with no luck. I never would have thought of wax paper! Thanks :)
Valeri says
Beautiful job! Just a quick question! I gathered that you used 3 5/8 inch crown, and it looks like you have 8 foot ceilings? We too have 8 foot ceilings and I’m trying to decide between 3 5/8 and 4 1/4. I’ve seen it in a room where it’s too small (2-3 inch range) and just looks pointless and silly, and then I’ve also seen it where it’s way too fat for the space (height of the walls) and looks equally terrible. I want to make sure I’m getting it just right. I was leaning toward 4 1/4, but then I found this post and think yours looks perfect! You clearly have a good eye for this type of stuff. Are you happy with the size, and is it what you’d recommend to another fellow-8 foot ceiling home owner? Thank you for sharing your talent!! :)
YoungHouseLove says
We have used 3 5/8 and 4 1/4/ in 8 foot rooms and love either one, so you can’t go wrong! I just wouldn’t go much smaller or larger than that range for the reasons you mentioned (the proportion can start to look wonky).
xo
s
Jarrett says
Just wanted to say thanks for this super helpful post on how to use the Kreg Crown Pro. I picked one up for a project (adding crown molding to the top of our cabinets) but had the darndest time getting the edges to align on an outside corner. Did you have any trouble with that, John? Any tips for getting the edges to be super clean like yours? I did a lot of trial and error and some corners were great, others a little quirky. I’m hoping going back with spackling compound will fix the gaps. Anyway, super helpful post. Thanks!
YoungHouseLove says
Caulk can hide a multitude of sins!
-John