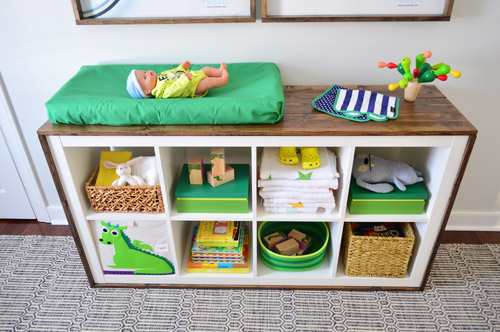
One more thing can be crossed off the ol’ nursery to-do list! Changing table? Check!
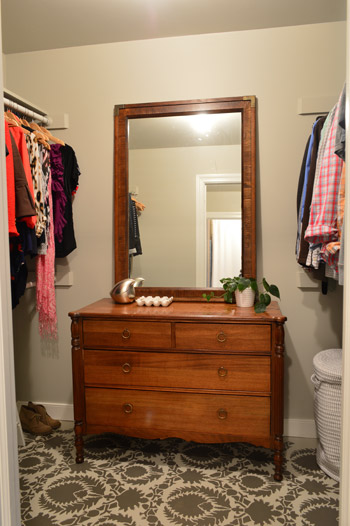
I remember before Clara was born a co-worker told me that changing tables were unnecessary since you usually end up changing the kid wherever is most convenient – like on the floor or the nearest piece of furniture – rather than going through the formality of walking all the way to the nursery. This was after we had already bought & refinished Clara’s changing table/dresser so the comment stuck with me, thinking I’d fallen into some first-time parent booby trap.
Surprisingly enough, we used Clara’s changing table religiously. Maybe because our house was small or because it was all one level. If we were at home she got changed on that table. And that routine stuck with us even when we moved to our second house, which was twice as big (but still a one level ranch).
Stairs might be a diaper changing game changer, though. So in this house we plan to keep some changing supplies downstairs for convenience. Anything to make your I-have-a-newborn routine easier, right?
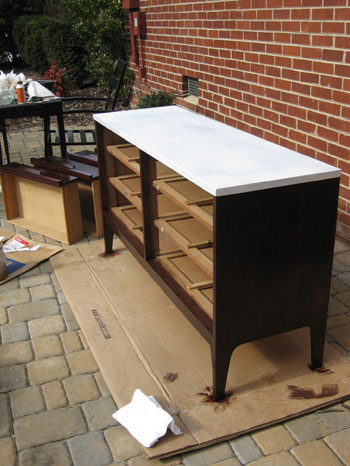
We offhandedly mentioned when we started the nursery that we were considering using my dad’s old dresser that’s currently in our closet, which could double as a changing table. It’s not a permanent closet solution for us (we’ll eventually add a built-in closet system), and we kinda liked the story of our son having his grandfather’s 50-year-old dresser. But after completing the built-ins we realized that the eight drawers of storage they afforded us were awesome, and it was probably overkill to add four more on the other side of the room – especially when some sort of open, easy-access toy & game storage would be more useful for us over there.
So we scratched our heads for a little bit, and then we broke down our criteria:
- It needed a wide and flat surface to accommodate our changing pad (at least 15″ wide)
- It needed to have open storage mixed in with the possibility of adding a few bins or baskets to hide diapering stuff for a fleeting period of time
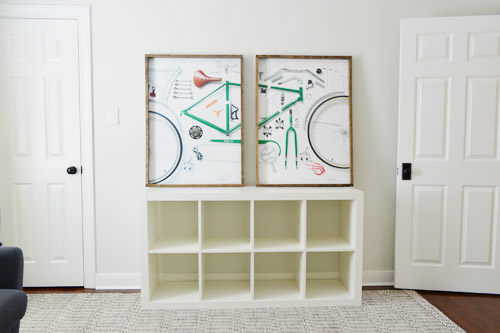
- It most likely needed to be wide (around 60″) to make sense on that long empty wall, while grounding the large bike prints that we planned to hang over it. Sort of like the storage cubbies in the photo below from our last sunroom…
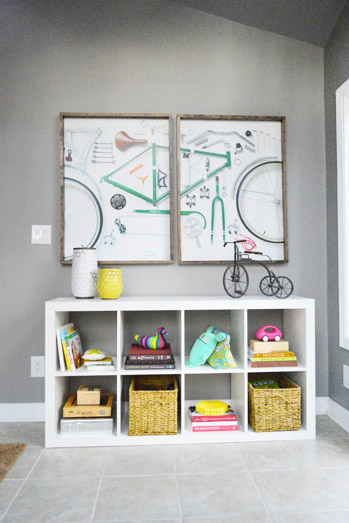
It was literally looking at that photo above (we were checking to see how closely we had hung the prints together) that we had our A-HA! Why not the Expedit? It met all of our criteria and wasn’t serving a permanent function in its current home in our office (where we someday dream of adding an L-shaped file-storage area along with a floating desk/meeting table). And yes, this all happened right right as the news of the Expedit’s demise (or reincarnation?) hit the web – so it was sort of an all-signs-point-to-Expedit moment.
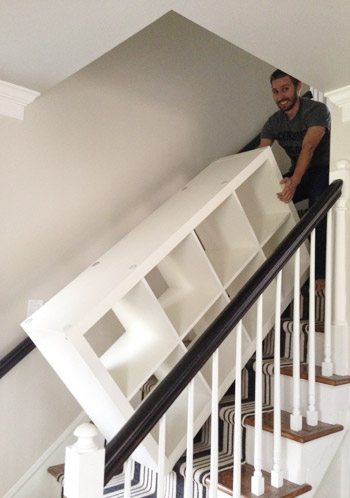
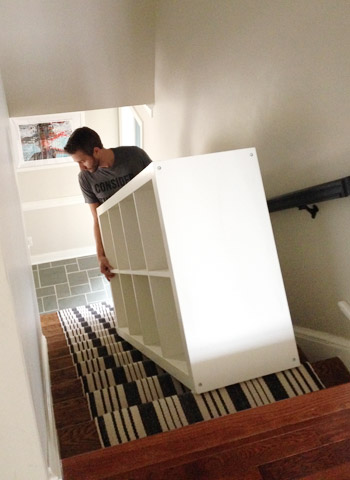
We unloaded everything (contributing more to the disaster that is our office) and I dragged it upstairs to see if the nursery should be its new home. And I say “drag” literally because I didn’t feel comfortable asking Miss Preggers to lift it. It was heavier than I remembered!
We put it in place on the wall opposite the built-ins and well, it was a bit underwhelming. Granted, it was very very empty and even the changing pad would eventually get a colorful cover. But it wasn’t a compelling case for the Expedit.
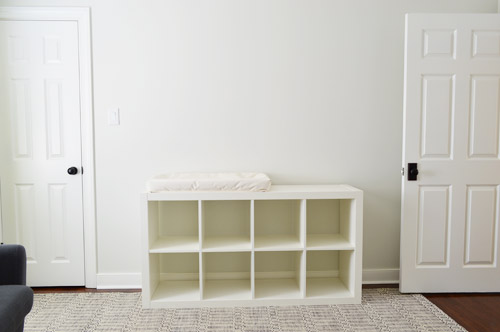
We leaned the bike art up to see if that helped, which it did, but we still felt like something needed to be done to make the Expedit a little more upgraded and not as blendy with the wall, rug, and doors.
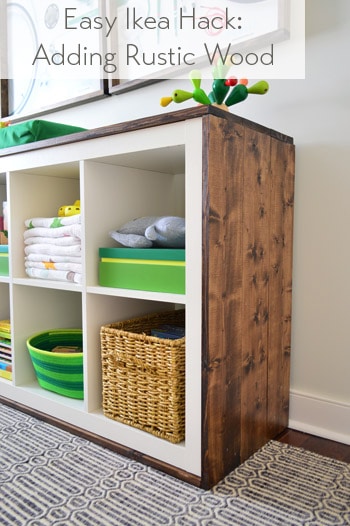
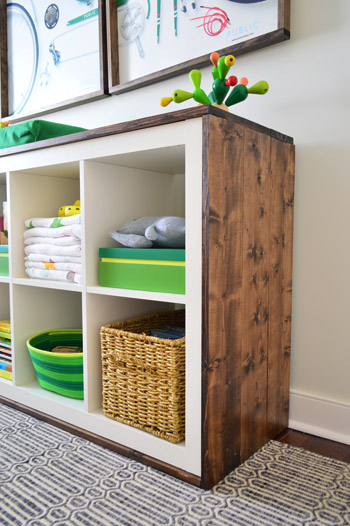
So we had an idea. A hack, if you will. To add some contrast, and sort of nod to Clara’s white-and-wood changing table, we decided to wrap the outside of the Expedit with stained wood. This would also tie it into my homemade bike art frames, as well as the wood-topped built-ins across the room. You know, kinda like this…
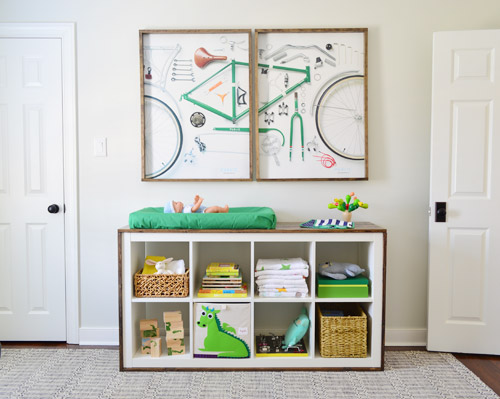
That’s not Photoshop above (I wish I was that good!) – it’s the real after. I thought it would help for you to see that before I dove into the How-To part of the post. So let’s rewind to that, which started with me dragging the Expedit back out to the garage.
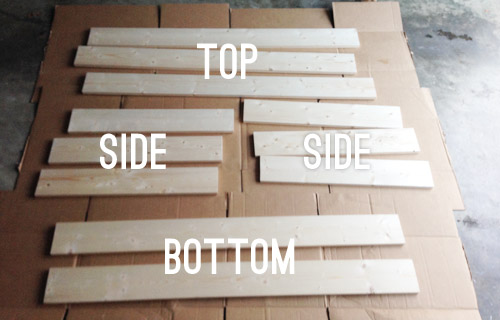
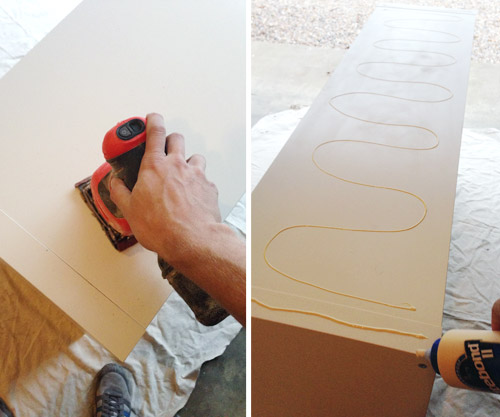
Our measurements revealed that three 1 x 6″ boards would be wide enough to cover the Expedit, leaving about a 1/2″ of an overhang on each side. This was nice because it would give the changing pad a bit more surface to sit on (it was the exact width of the original Expedit). We bought basic whitewood because it’s the same stuff we used to make our living room console table, which has held up great for the past few years, and the price was right ($5 for a 6 foot piece). We also wanted a slightly rustic wood look, like we achieved with the console table.
Here are all of the pieces once they were cut to size at home on our miter saw.
To attach the boards into big panels, I used my Kreg Jig to create pocket holes and then I could join each set of 3 side-by-side. It’s the same technique I used for the console top, so you can read more about it here. Note: I often make two holes if they’re going to be hidden when using the Kreg, just so if my first attempt at joining doesn’t line up perfectly, I can try again without having to break out the drill again.
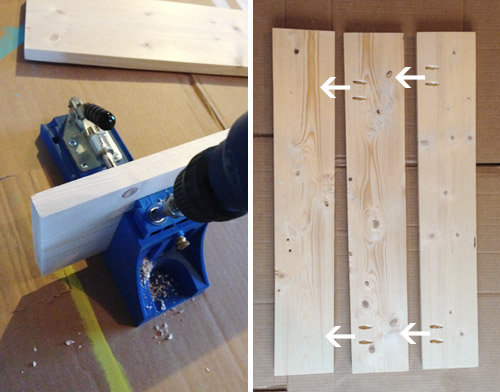
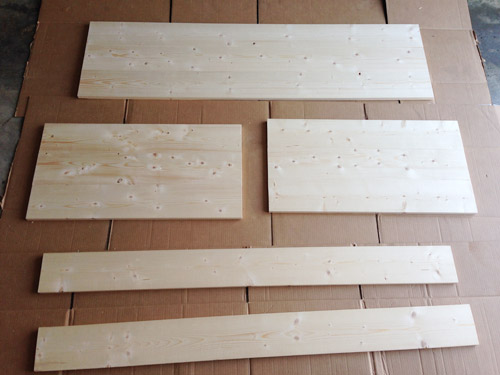
Here are the finished boards all joined together. It’s also after I gave them a quick sanding to soften the edges and any ridges between the boards. I only bought two pieces for the bottom since no one will ever see the missing middle piece – so that explains why those are hanging out by themselves at the bottom of this shot.
Before staining, we decided to take wood conditioner for a spin. Its job is to “prepare” the wood for staining, reduce unevenness/blotchiness, and enhance the color. This small can was $6, so it’s not much of a “risk” – and richer and more even results sounded good to us. It goes on much like stain – you brush or wipe it on, let it penetrate for a few minutes (I gave it 15), and then wipe off the excess. You just have to be sure to stain within 2 hours of the application.
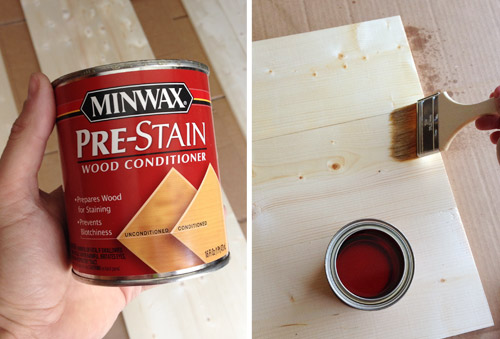
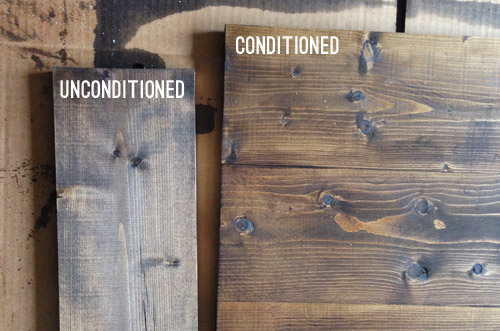
We used the same Minwax Dark Walnut stain that we’ve used elsewhere in the room for consistency (like on the counters of the built-ins and the bike art frames) and only needed one coat. For demonstration purposes, I stained a piece of unconditioned scrap wood (it’s the same exact type of wood, just a leftover piece) to see if there was a difference in using the conditioner. Both Sherry and I were pretty surprised by the comparison. I definitely felt the stain soak in more on the conditioned wood during application, and the color is noticeably richer/warmer on the conditioned wood.
When the stain and my two coats of Safecoat Acrylaq were dry (that’s our favorite poly alternative because it’s non-toxic and locks in any potential fumes or offgasing) I could finally begin attaching these wooden panels to the Expedit. I decided to go with a simple wood-glue-and-nails system, so that I wouldn’t have screw heads to hide after the fact. I prepped the Expedit surface by roughing it up a bit with sandpaper and then applying a bunch of wood glue.
Then I used my nail gun to secure them in place with some 1.75″ brad nails (thank goodness for the thick frame on the Expedit).
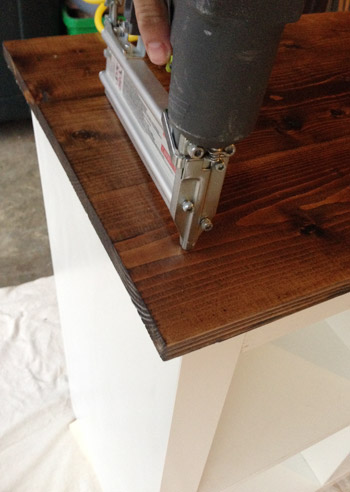
Then I did the same with the sides for sort of a waterfall-edge effect.
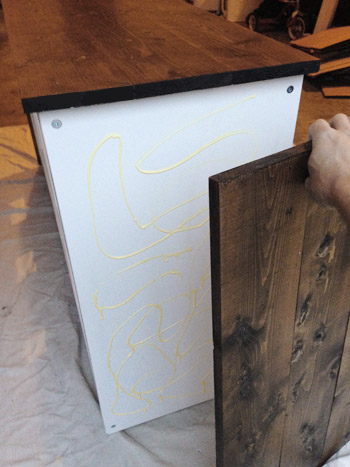
I let those dry overnight before attempting to flip the piece over and attach the bottom pieces. You can see how I just put them on either end in this shot, since that middle slice will never be seen.
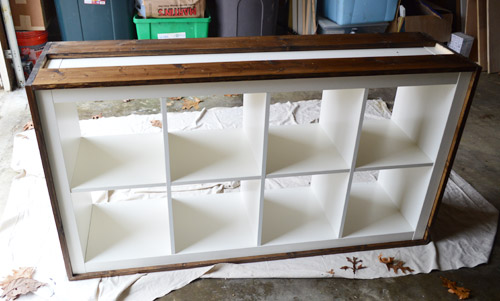
After letting everything dry for a couple of days, I dragged it back upstairs and started on the next step – adding legs and casters. Sherry and I thought two of these chunky $5 casters from Home Depot would be a nice touch, while some stationery legs (made from 2 x 2″ pine and Kregged to the back and middle) would keep it from rolling around mid-diaper-change.
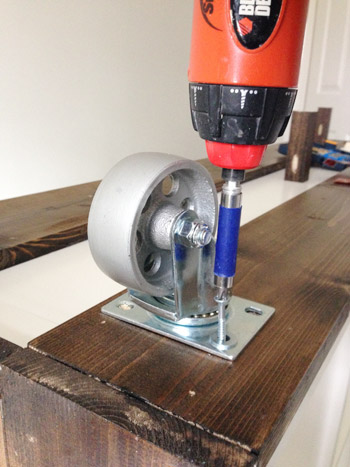
If you’re scratching your head about where the casters were on the after picture, well, they weren’t there. Because we decided they weren’t right for this application. The height they added made the changing pad uncomfortably high (we thought we’d like that added height, but it was a good deal higher than the changing pad height that we were used to in Clara’s room) plus it would’ve meant the art above it would have to hang even higher than the doorway tops, which we thought would look off.
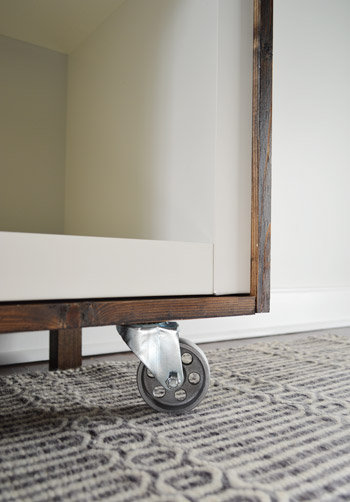
But we really liked the look of it, so we wanted to share the idea in case it worked better for someone else’s application…
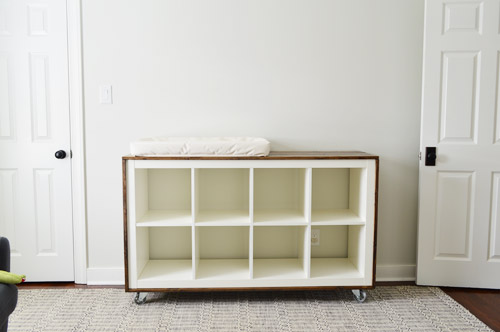
It was just a matter of unscrewing a few things to get back to the sitting-straight-on-the-floor look (which also has the benefit of not creating a spot for dust and toys to collect). Then Sherry helped me hang the art and fill the shelves.
Update: There have been a few questions about the height of the changing station. The Expedit itself is 31″ and the wood frame added a few more inches, and the pad itself sits on top of the dresser, so the baby is around 34″ from the ground on the Expedit with the pad on it. Clara’s dresser with the pad on it was around 33″ from the ground – so that range seems to be what we prefer.
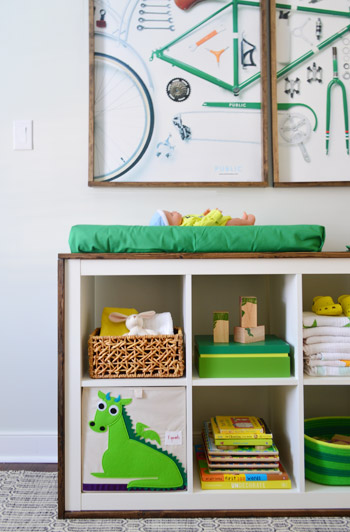
The stuff on the shelves is mostly placeholder items (another bin or basket for diapering supplies will definitely end up in the mix). In fact they’ve already been tweaked a little in the rest of the photos in this post. But you hopefully get the idea of how this’ll function for us.
It’s nice to have some concealed storage, plus some open toys and books that he can easily access. The 3 Sprouts dragon box was a gift from Sherry’s friend Cat during Clara’s dragon-loving days that Clara brought in and said was for her brother because he likes green (yes, Sherry melted into a puddle). Who knew those bins were perfectly sized for an Expedit? Apparently Clara did.
We might need to get a few more large baskets to house diapers and wipes more easily, but other than that, this changing area has shaped up quite nicely. Well, except for the fact that the changing pad cover is just leftover fabric that Sherry tucked around it – so we have to buy/make a real cover soon.
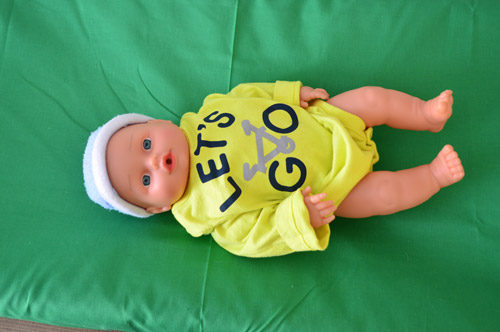
The funniest part of this entire endeavor was when Clara brought in a baby onesie from a to-be-washed pile in the guest bedroom and said Barnacle wanted to wear it while we took his picture. Apparently we have an accidental tradition of dressing up not-real-babies in the nursery before the real baby arrives, since this happened in Clara’s crib after we set it up.
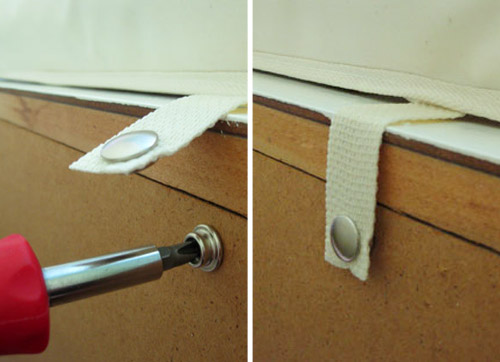
Oh and for anyone wondering how the changing pad is secured in place, it’s the same one we used for Clara, and it has two over-sized snaps on the back that attach to snaps that get screwed into the furniture or wall from the back. These are pics from making Clara’s dresser (which you read more about here) but we were easily able to remove them and screw them into the back edge of the Expedit.
We’ve also used heavy duty 3M command velcro to adhere the bike art firmly to the wall beyond the screws-into-studs/anchors hanging method that we used. So the little guy shouldn’t able to knock it off the wall or even pull it off (not that he’ll ever be unsupervised up there anyway). We did joke that it could get peed on, but the slick poster board material will hopefully work in our favor. We also have a hilarious tiny tent-like item that was a gift for keeping the spray at bay, if you will.
We’re really happy with how this little upgrade turned out, and we’re hoping it has some lasting value as toy and book storage when Barnacle gets older. I’m already picturing it stuffed with bins of legos. And the cost of our update was around $45 – the wood was $39 and the wood conditioner was $6 – since we already owned the stain and returned the casters (you can add $15 to cover those if you don’t have ’em).
The nursery is feeling much more complete now that we’ve dealt with that formerly empty wall. And Sherry’s putting the finishing touches on her mobile project for over the crib (this is just a photoshopped version of what she’s going for), so she’ll be back with those details in the next few days. It’s amazing how much more homey a room feels without two big blank walls staring back at you.
Aaaaaand I just realized the fun part of diaper changing is pretty much over. It only gets uglier from here. Speaking of which, we haven’t forgotten that we need to add a place for dirty diapers (we’ve had luck with this method for Clara, so we might go that route again). How’s that for a note to leave off on?
Do you guys use changing tables, or are you bed/floor/random-other-spot folks? Have you done anything fun to an Expedit lately? It’s amazing how many hacks there are. Can you believe Ikea’s retiring them (or at least tweaking and renaming them)? Will the new name stick, or will we all still call them Expedits?
PS: Wanna see another fun furniture hack? Check out this cool paint pattern we added to a thrift store desk.
Update – Wanna know where we got something in our house or what paint colors we used? Just click on this button:


Sara says
We totally used the Expedit as a changing table for a while! Now it houses toys and our DVD collection (in baskets) to keep them out of little boy hands :)
And, I just had to comment, because my boy is wearing that very onesie TODAY! He loves to say “bike” when he looks at it :)
YoungHouseLove says
That’s so sweet! Gotta love Expedit changing table twins & boy bike onesie twins ;)
xo
s
Marla says
I love the changing table. This room almost made me want to have another child. Almost, I said almost.
YoungHouseLove says
Haha!
xo
s
kim says
I’ve been looking for a solution for our new nursery – thanks to you I just found it! As soon as my husband finishes up the train table I know what he will be working on.
YoungHouseLove says
Good luck Kim!
xo
s
Rachel says
Remind us what happened to Clara’s changing table? Did it go the way of a garage sale?
YoungHouseLove says
That’s still living it up in her room as her dresser! We hope she uses that thing forever! https://www.younghouselove.com/2013/12/the-crib-is-no-more/
xo
s
Rachel says
Oops… I thought she was still using the dresser from the last house… THAT one must have gone to a garage sale, right? In any case, her former changing table/new dresser is such a lovely piece! I’m glad it still lives with y’all. :)
YoungHouseLove says
Thanks Rachel! Yes, we ended up moving the one we got for her playroom all the way here, only to find that we didn’t really have a spot/use for it. So we craigslisted it after realizing that John’s dad’s dresser could work for a nursery, so it was just a second extra dresser with less meaning to us than that one.
xo
s
Erin @ The Impatient Gardener says
Once again, that’s a genius hack! I love the look of it so much. I’m a little sad that the casters made it too high because I loved the look of it with a little space under there, but if there’s one thing in the world that better stress function over form, it’s a changing table.
I’m so happy you guys are having a boy (well, I’d be happy for you either way, of course) because it’s nice to see this side of your design style. I’m really enjoying seeing this nursery come together.
Sara says
We also like having our changing supplies on top of the table. We really only do our first and last of the day diaper changes on our changing table (stairs are definitely not your friend when it comes to this!). We purchased a ton of baskets from target to organize our supplies in the living room. I refinished a piece given to us by a friend bc hand me downs mean more $$ to spend elsewhere, right?!? Here’s our nursery. Working on our playroom design now. Kids rooms are THE best!
http://embracemyspace.com/2013/10/02/final-nursery-reveal/
YoungHouseLove says
Looks so sweet in there!
xo
s
Ashleigh says
We have been religious changing table users as well. We used the IKEA Hemnes dresser for our daughter in our first, one level, teeny tiny house. I thought stairs might be a game changer too but even after moving to a house with 3 levels, we STILL make a trip to the changing table for nearly every diaper for our son. I think height for changing IS what you’re used to. I definitely couldn’t use anything lower than the Hemnes at this point but so many are fine working off the floor so it’s all in what you’re used to. And you do it enough that you definitely get used to it! The hack is GORGEOUS!
YoungHouseLove says
Thanks Ashleigh!
-John
Pat S says
Nice solution! I love the wood wrap. It really gives a nice custom look.
Stephanie says
I had an emergency c-section with our second baby, and was advised not to go up and down the stairs more than once a day. I’m sure it’s been mentioned by other commenters, but you’ll probably want a second changing station downstairs near the TV, if that’s where you’re going to be parked most of the day. We just used our Pack N Play, which worked great. Of course, it helps that John works at home, so maybe he can just do all the diaper changing!
YoungHouseLove says
Haha, I like that last idea ;)
xo
s
Victoria Scott says
I never had a real nursery until number 3 – and even at 6 months old I’m just putting the finishing touches to it. (He was born 4 days before we moved into our house …)
So I found an old changing table on Craigslist for $10. I fixed it up and spray painted it to match our sleigh crib and book shelf that my good friend gave me, and it’s perfect. All it needed were a couple of baskets and a new changing pad and cover.
I make a point of using it for every change now, since so much time and love went into it. Such a great addition to the room!
Kate says
Fun! Love it! You mentioned “buy/make” a changing pad cover… You may have already had luck making Clara some (I can’t remember!) but if not, this tutorial is awesome:
http://prudentbaby.com/2009/12/baby-kid/diy-changing-pad-cover-tutorial-2/
I used it to make two for my little guy, and the concept even works perfectly for crib sheets, too, in case you stumble on some can’t-live-without-it octopus fabric or something. ;-)
Good luck!
YoungHouseLove says
Thanks for sharing the link Kate!
xo
s
wizzer says
Love the board wrap hack!
Here’s another cute Expedit hack that has me thinking of combining your project and theirs.
http://littlefolkdesign.wordpress.com/2011/01/28/clever-cute-storage/
YoungHouseLove says
Such a sweet one! Love that!
xo
s
art girl says
Oh my gosh, we did the SAME THING not three weeks ago to an old (70s) stereo cabinet and set of speakers – the record lover in our house refuses to give them up, and they needed a serious upgrade. Simplest/cheapest solution was to paint the front of the cabinet white and build a dark-stained wooden “box” around the set, just like your “box” around the Expedit. So perfect, made a huge difference! A beautiful update for our cabinet, and for your Expedit!
YoungHouseLove says
That sounds so awesome!
xo
s
Anja says
We re-did our office this weekend and I kid you not, moved an identical white Expedit from the office to the “future-potential” baby room, laid it on it’s side and said “That could make a great diaper changing station!” LOL
The nursery looks great. Can’t wait to see pics of the little guy in there.
YoungHouseLove says
Haha, that’s so funny!
xo
s
Christine says
That is a GREAT idea! I love that look of the Expedit with the wood wrap.
Brie says
I too was told changing pads were a waste of money and space, but we use ours every single time we change a diaper and have been for almost 15 months. We have a 2 story house and ended up purchasing a second changing pad for the main floor because there are so many diaper changes those first few months and it was uncomfortable to walk up and down stairs for awhile postpartum.
I highly suggest cloth wipes. They are awesome. They clean baby up a lot faster and you throw them straight in with your diapers. They are really terrific. We use Thirsties wipe solution spray with them.
We use a stainless trash can that we got for $30 from Home Depot with a Planet Wise pail liner inside it. I have been happy with the setup.
YoungHouseLove says
Thanks for the tips Brie!
xo
s
Amber @ Wills Casa says
This is a genius hack! Seriously great job y’all.
Theresa says
I LOVE this Ikea hack! It would be a great sideboard in an office or dinning room too. Love it! The nursery is coming together so well, love the pops of green with the wood and grey tones.
Susan Z.F. says
Although I haven’t changed a diaper in 19 years and have never owned an Expedit, I am so impressed with your hack. The inspiration I glean from YHL never ends and I’m so thankful for what you & hubster do and all the ways you share with us and teach us hope-to-be-good-diy’ers. I am logging on to BHG right now to cast my vote for YHL as my fav DIY blog because you guys deserve that! Here’s the link if anyone wants it and thank you Sherry and John for all you do to inspire us everyday.
http://www.bhg.com/blogs/better-homes-and-gardens-style-blog/bhg-blogger-awards/
YoungHouseLove says
You’re so sweet Susan, thanks so much for the kind words!
xo
s
Jihane says
WOW this is PERFECT! You’re so creative guys! And you make it sound so simple… I can’t tell you how much I’m inspired by this post. You gave me the motivation to build a bar cart with my husband ( = to make my husband build it haha!) because we can’t find the perfect one for our home… Thank you
YoungHouseLove says
All the best with tat Jihane! Sounds like a really fun project!
xo
s
Maria says
Beautiful! Where did you get the bike art? Love it!
YoungHouseLove says
Here’s that post for ya: https://www.younghouselove.com/2013/01/my-most-favoritest-art-ever/
xo
s
Brooke says
Love what you guy’s did! Such a good idea! Right after my son turned one, we moved from a one-story plus basement house to a two-story house where the bedrooms are upstairs (like your home). I filled our leather storage ottoman that we keep in our living room full of diaper supplies so I could easily change him downstairs, instead of lugging him up to his changing table. (I’m lazy!) :) But I miss using his changing table! Much easier on the back!
Tanya says
I think it’s perfect for this space, and it looks SO NICE with the wood trim! Great job, you guys (as usual).
We used a changing table that my dad had built for us (well, our son, technically), and it served us really well up till this weekend (nothing wrong with the table, but it was time to switch it with a bookshelf, as our son’s been potty-trained for several months now).
I did have a diaper/wipes stash on the first floor, but I found that walking up the stairs to get to the changing table did not seem like that much of a problem, and I’ve used that table religiously. It has a drawer that I used to store diapers, a shelf on which I kept a basket with pajamas (for some reason, it made sense not to keep them in the dresser?), extra sheets + clothes that could still be worn without getting washed, and I had a basket under it for dirty laundry, so it was very much utilized with no wasted space.
It’s in our basement now, but is probably going to get passed onto the next family member to have a baby (since I’m the oldest child in the whole of the extended family) and it will be so nice to know that not only was it handmade, but that it had served not one, but a few little cousins.
Incidentally – it was nice to read some posts back that Sherry was all hot and bothered about decorating the book cases, because that’s what I was doing yesterday, and MAN, it’s a rush that no one around me seems to understand and share. So it’s nice to know I’m not the only weirdo like that ^_^
YoungHouseLove says
Yes, I’m like “outta my way, I’m a lady with a mission!”
xo
s
Lorien says
I love the look, but I do question where baby clothes are going to live?
I have to say, when I’m dealing with the inevitable poop-covered rolling twisting crying newborn, dashing across the room to get clothes out of drawers is not going to be my happy place :( We have our change pad on a dresser for that exact reason.
We also have two stories and I had a change station on both floors but still only found myself using the change dresser in our room after the first few months.
YoungHouseLove says
We have eight drawers on the other side of the room in the built-ins, so that’s where the clothes will go. Here’s a post with some shots of those for ya: https://www.younghouselove.com/2014/02/top-o-the-built-in-to-ya/
xo
s
Kim says
Yeah I cant imagine not having the changing pad on top of a dresser for that reason either. It is just too convienent to keep one hand on the baby and reach down for a non-poop/spitup covered onesie or those pjs for bed! but im lazy and dont plan well.
traci says
It’s so nice to see that I’m not the only one who spent way too much time going back and forth on whether or not to have a changing table. So many people say it’s not necessary but having worked in childcare I know it is such a back-saver and the germs, oh the germs! I love your non-traditional changing table! I am converting a Markor (also from ikea) tv cabinet into a changing table for my expected little guy. We took the doors off and are going to shorten it to the right height. We are also in a multi-story home and I am going to use a desk as a changing station in my living room on the first floor (I know I’m too lazy to go upstairs and with pre-fold cloth diapers I think a station is going to be more than worth it). The desk was emptied and was going to be moved out of the living room to make more room for baby and then I realized it would make a great changing station! Why not? Thanks for making me feel better about being out of the box!
Teresa @ wherelovemeetslife says
I’m having some really wierd deja vue here…. I was laying in bed last night wondering what our Lack coffee table would look like if I covered the top and sides with stained board to create a waterfall effect… I think I can actually here the twilight zone music now….
lol.. anyway, I really like this update. Too bad those wheels didn’t work, they were pretty cool.
YoungHouseLove says
So funny! Send pics if you hack your lack. Also, that should be a dance craze. HACK YO LACK, FOOLS!
xo
s
Teresa @ wherelovemeetslife says
Oh I’m all over that… running man with a little dougie thrown in. LOL My family would disown me.
And how about some typos in my first comment?? eek.
YoungHouseLove says
Don’t even worry about it! They happen to me all the time!
xo
s
Kristen says
Ooh! Pick me! I covered the top of our lack coffee table with stained wood :)
http://i61.tinypic.com/jskchi.jpg
http://i60.tinypic.com/2akzls.jpg
Not great pictures of it, but you get the idea. It makes it so much cuter! Although, I wish I owned a kreg jig/knew how to use it. I used four separate boards and one of them is getting a little warped and coming up in the center. But I’m not as pro as John with my carpentry!
YoungHouseLove says
That looks awesome Kristen!
xo
s
Kimberly says
Again, I thought, well, it looks ok to me when you shared the first image of the plain Expedit in the baby’s room…then you blew me away! What an amazing upgrade – I think you all may start some kind of crazy Pinterest storm with this one.
Sarah says
When we lived in a 2 story town house, we had our first baby girl… I found it really convenient to have a little basket of diapers and diaper items on the first floor, and I actually rarely used my changing table, thankfully it was just a dresser that we put a pad on top of, so it wasn’t a total waste. :)
Laurie says
That looks freaking awesome! I am so doing this with the expedit in my office.
Jenny G. says
Maybe it’s a cloth diaper thing, but we religiously change on the changing table (well, pad on top of dresser) and we live in a 3 story townhouse! I really didn’t want random wetbags of dirty diapers all over the house, plus I like to match Ruby’s diapers to her outfits, so I want all my cloth in one place! ;) I am a total stair-hater, who dreams of having a one story house one day, but even with the nursery on the top floor, I’ve loved the way the changing set up has worked out (and we’re almost 2 years in).
Barnacle’s room is looking fantastic. I can’t wait to see more!
Phoebe K says
This looks really great. I love the piece with castors! I think they add a finished look. Too bad you couldn’t make them work in the space!
Marianne in Mo. says
Love the “hack job”!! You guys are genius! Waaay back in the dark ages (late 70s, early 80s) was when I went thru baby stuff. Tried cloth diapers on my first one, due to costs, but said no way with the second. Of course, we were just beginning to worry about the environmental issues then too. Even so, I had a bit of guilt using disposable diapers – guess I had a conscience on that. We never had a changing table, just a changing pad wherever we were did the trick. I guess cloth diapers are different than what we had – all the folding and pinning was crazy hard, but I have to say, Mr. mastered it fairly well! One of the many things that made me beam with pride around friends! ;-) He’s a true renaissance man, can handle anything! After almost 39 yrs., He’s still a keeper!
Stacy B says
I too am a cloth diapering mama. I set up a second changing area in our home (something with a real pad, all the supplies, etc) and I hardly use it. I still make the trek upstairs. If I was to use disposables (or had twice as many cloth diapers), I feel like it would get used more because there would be less restocking and carrying diapers back and forth. Maybe I’m crazy that every other day stocking it with diapers & cloth wipes and making sure the dirty ones are brought upstairs for cleaning is more work than just walking upstairs for each diaper change?? At 10 months too, we are working like clockwork (and she’s not constantly releasing some sort of bodily fluid). With my first we were in a smaller home, so I had the pack n play for diaper changes on the main level and that too quickly went by the wayside after about 3 months for the same reasons. I still have the area set up because it’s nice for visiting babies to use and it’s right by our garage door so I will use it when the diaper change is that last thing to do before leaving the house. Another diaper washing note – I inevitably would forget one diaper to clean down there and do you know when you have a fresh load clean and you remember that dirty one in the bin downstairs – most irritating thing ever (ok, there are worse thing, but still)!
YoungHouseLove says
Oh man, that’s a good tip to make sure we only start a load of laundry when we’re sure both bins are empty!
xo
s
Alexandra says
We used our changing table every single day, multiple times. and when we moved to a two story house when the littlest was a baby we had a changing table downstairs in the family room too.
Also
I cant believe the Expidit is leaving! I have like 5 of them, and will be scavenging Ikea as soon as I can get there for more.
Karen says
I love this project! What a great way to customize a generic storage unit (of which we have several in our home that I’m now eyeing…).
I’m in the camp of always using the changing table. Before I had children, I saw someone change their baby’s diaper ON THE DINING ROOM TABLE…and they didn’t clean it off afterwards. That just stuck with me, and we were pretty religious about keeping the dirty-diaper mess located to one place in the home. Yuck-o. :-)
bethb says
If it makes you all feel better, my little man never “sprayed” even once and he is going to be one in a month! hopefully this doesn’t genx it. I’ve also heard that if you go slow opening the diaper he will get used to the air quicker and not get that rush of cold air that makes them want to go again. ha. by the way, I love the casters on the stand. bummer it didn’t fit… maybe you guys could try again on something else. Then they wont have to go to waist (like anything ever does in your house anyways.ha ;). )
YoungHouseLove says
Woah! That has to be some sort of world record for not spraying!
xo
s
Abby J. says
Yay! The stained wood is a great tie in – both with the bike frames and the stained wood tops of the built ins!
I will tell you that we have a 2 story house, with our nursery and changing table on the second floor, and 80% of the time we still walk up the stairs to change our daughter. It’s actually more of a strain on your back to change the baby on the couch or the floor, and having a changing table at the right height makes it much easier. Plus, with cloth diapers you will still need to remember to take the dirty diaper upstairs to your diaper pail, and it’s kinda gross to have dirty diapers sitting waiting to be taken upstairs to the pail. (I guess with disposables they could just go in the closest trash can.)
Abby J. says
We cloth diaper, too, FYI.
Sarah @ Sarah's Daybook says
Wow! I am so impressed at your creativity. It looks AMAZING! Clara is probably the cutest kid ever and will be the best big sister to the bun. LOVE that shade of stain!
Sarah
http://www.sarahsdaybook.wordpress.com
Holly says
I have a little boy and we have this changing pad. http://www.amazon.com/Keekaroo-Peanut-Diaper-Changer-Solid/dp/B009A7VTUO
I totally recommend it! Little boys have all sorts of “squirts” and this has been such an awesome purchase. It has saved us lots of laundry!
YoungHouseLove says
That looks awesomely wipeable! Never seen anything like that!
xo
s
Holly says
Target has a cheaper version (but the colors aren’t as fun). I have given this as gifts and people have loved them.
http://www.target.com/p/soft-gear-deluxe-changing-mat-blue/-/A-14001676#prodSlot=medium_1_23&term=changing pad
YoungHouseLove says
Thanks for the link Holly!
xo
s
Jenny B says
It is amazing how the wood mixed with white really makes it all come together in such a warm and bright way. You guys are the master of that, starting with Clara’s changing table, I think. It looks awesome.
Really, my only concern is the pee/posters! My son would go high and wide at the most inopportune times (when you least expect it, expect it!). Despite tenting, cleaning, etc., we ended up having to paint the wall by his changing table. Please try and come up with a temporary protective shield/coating for those posters, I love them!!
Tara says
This looks wonderful. But did you guys hear that IKEA is discontinuing the Expedit bookcases? Terrible news.
http://m.huffpost.com/us/entry/4817314
YoungHouseLove says
Yes, we mentioned that in the post. We hear it’s just a few tweaks and a new name, but still – very jarring news indeed!
xo
s
Rachel says
We also have a small ranch, and we use our changing table every time. For a few weeks before our Blubber (yeah, that’s what we called him. Oddly enough, it’s a family nickname) was big enough to fit his cloth diapers, we had a changing station on the pack n play in the living room. Maybe the CDs contribute to using the changing table every time? Since you don’t have extra supplies hanging around as you might with ‘sposies.
YoungHouseLove says
That definitely could be it!
xo
s
angel says
I used changing tables until my kids were 3. It was so much easier to get them dressed at that height.
Kay says
Love the ikea hack! On a diaper-related note, have you thought about cloth wipes? We bought about 24-36 wipes http://www.cottonbabies.com/product_info.php?cPath=110&products_id=104 (although you could easily make your own out of flannel) and we just use a small spray bottle with a wipe solution (1 c water, 1 tbsp baby oil, 1 tbsp baby shampoo) to wet the wipe, or baby’s butt, and then all of the laundry gets tossed into one wet bag. Super easy and we don’t have to use disposable wipes. Just an idea!
YoungHouseLove says
Thanks Kay! We always meant to try those with Clara, and would love to check them out for the bun.
xo
s
schmei says
Cloth wipes are super easy to DIY, too. I found a bunch of cute random clearance flannel at a fabric store and just cut it in to squares. Then I started hemming them all… and my mom finished because I am the world’s slowest hemmer. :-) 2.5 years later, we’re still using them to wipe crumbs off toddler hands, etc.
YoungHouseLove says
Haha, I love that! I also, could qualify as the world’s slowest hemmer.
xo
s
Michelle Kersey says
Looking good in there! I did a similar back with two 9 cube units from lowes. I secured them together to make the changing area deeper and when my daughter was outta diapers I unattached them and out one in my daughters closet and one in my sons for added storage.
I do have an Expidit unit in my living room. Kinda sad they’re changing it, I hadn’t heard that yet, but I get it!
Michelle Kersey says
Oh. And on the peepee thing… My daughter peed while changing more than my son! He only got me once! So, maybe you’ll get lucky like me. :)
YoungHouseLove says
Clara peed on John every time he changed her for the first 6 months or so. Like clockwork. It was hilarious (to me, not to him).
xo
s
YoungHouseLove says
That sounds really smart! You DIYed your own Expedit!
xo
s
Kimberly | Turning It Home says
We are definitely changing table kind of people (we actually have a similar dresser refinished liked Clara’s – http://www.turningithome.com/2012/09/refinishing-veneer-dresser-twice.html), although I did change my toddler in the living room quite frequently when I was pregnant and lazy with her younger sister.
YoungHouseLove says
Your dresser is so pretty! It’s just like Clara’s!
xo
s
Britny says
What a clever hack! So I am a bit confused and this is coming from someone who is NOT at all a carpenter! Why is there an extra board on top? It seems like you would need 3 boards on top and bottom?
YoungHouseLove says
There are three boards on the top and sides so the whole area is covered with wood, but for the base we just used two boards (like how a base of a dresser might have legs along the front and back but not in the middle) since you don’t see that the board is missing when you flip it back over, and you don’t need it for stability or anything. Hope that makes sense!
xo
s
Emily Oien says
My favorite part of this post = baby doll Barnacle on the changing pad.
Amy in PA says
The husband went to Ikea yesterday to buy an Expedit to be the downstairs changing area for our son (due in 3 weeks). We got a set of capita legs to raise it up, if needed, since we’re a bit on the taller side. It’s going to be set up in the living room turned into playroom, so having the open storage was quite appealing! Hope ours looks as good as yours!!
YoungHouseLove says
Wahoo! Hope you love yours too Amy!
xo
s
martha says
I had a changing table epiphany last summer after we welcomed #2. Why do we put them in the bedroom?
Our girls share a room so when one was napping the other had to be changed somewhere else. We set up a small changing station in the bathroom and I realized our lives would have been so much easier if we had planned for all diapers to be changed in the bathroom where you’re inches from soap and water. This seemed particularly practical with cloth diapers since the sprayer and the pail are in the bathroom.
Of course we didn’t change anything — our primary station is still in their bedroom, but if I could press rewind I’d have built a custom shelf in the bathroom.
YoungHouseLove says
Never even thought of that!
xo
s
schmei says
We’ve been changing our son in the bathroom since we moved in to our house when he was 8 months old. Super convenient and makes early potty training a bit simpler, I think… but it confused the heck out of a babysitter (she seriously thought we just didn’t have ANY diapers, wipes, etc!) so if you go that route make sure the babysitter knows where all the changing supplies are!