This is it. My most favoritest art ever. Yes I know that’s a big statement. A big statement with a non-word, at that. But it’s all deserved because I’ve framed and hung my bike art and I’m in love. Not only with how the final product looks, but how easy and cheap it was to achieve. So forgive me if my enthusiasm is more annoying than usual today. I’m a man with a love of all things bike and all things easy. Wait, that sounds wrong…

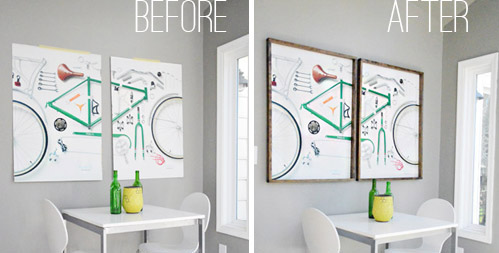
So here’s that wall before with my retail display cast-offs just pitifully taped to the wall.
And here they are all framed up. In frames that only cost us $14 to make ($7 each!) and whose most challenging step was finding the patience to let the wood stain dry before I could finally hang them. Seriously, they weren’t hard to make in the least.
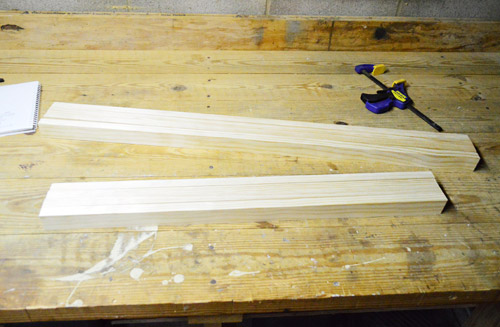
Here’s how it all went down. Er, up. My $14 was spent on four boards of 6 foot long 1 x 2″ pine from Home Depot.
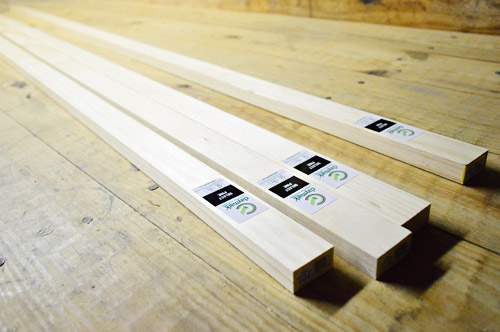
Since we were building two frames, that meant we needed four boards of the same length (for the sides of each of the two frames) and four shorter boards of the same length (for the top and bottom of each of the two frames). To make sure I cut the four sides of my frames (and the four tops/bottoms of my frames) evenly, I clamped four boards together and cut them all at the same time (you could have your boards cut to size at the store if you don’t have access to a saw, btw).
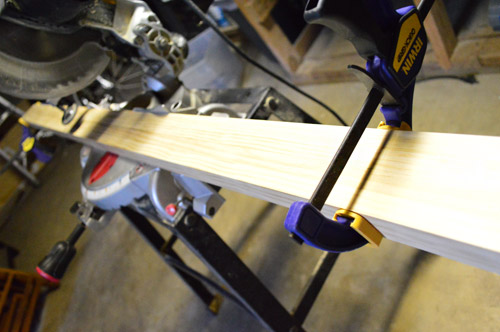
So two clamped cuts later I had four long boards (for the two sides of the two frames) and four short boards (for the top and bottoms of each of the two frames).
The short boards were cut to 1-inch longer than the width of the poster to create some overlap (i.e. each poster is 27″ wide, so I made the boards 28″ wide). The side boards were cut to 1-inch longer MINUS the width of the two top boards (i.e. each poster is 39″ tall + 1″ – 0.75″ for the top board – 0.75″ for the bottom board = 38.5″). This will make a bit more sense soon, I promise…
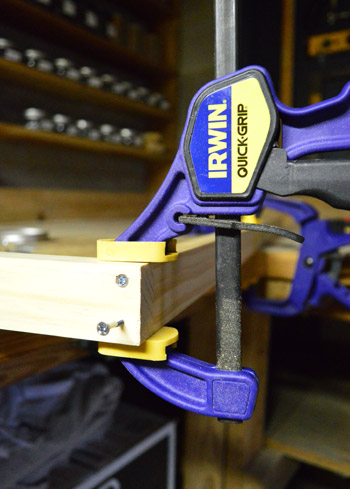
I chose not to complicate matters by doing mitered corners and went for more of a rough and raw look. So attaching the boards into a rectangular frame was pretty easy and completely miter-saw free (seriously, if you had Home Depot cut your four boards to the right sizes, all you’d need to do is the following part at home).
I clamped the pieces tightly together and screwed through the top and bottom boards into the side boards. Oh and it did help to make pilot holes first with a small drill bit so my wood didn’t split when the screws went in.
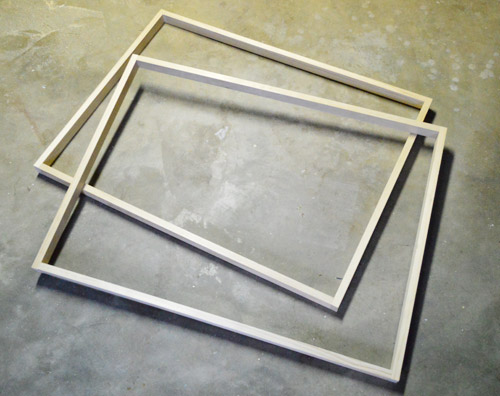
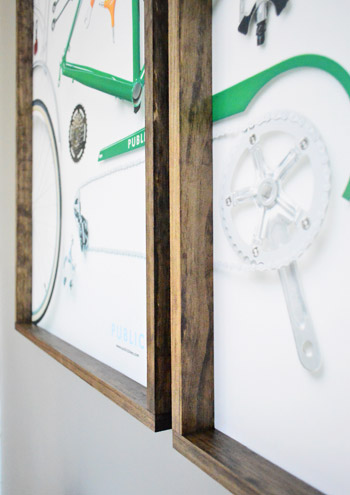
Here’s what my two frames looked like once everything was screwed together. I didn’t do anything to cover up my screwheads since I figured not many people will be staring at the tops or bottom of the frames once they’re hung (you’d have to be pretty dang tall or lying on the floor to see them). Plus I was going for the raw and imperfect look anyway. A bike’s gears show, so what are a few screws in a few not-easily-seen locations?
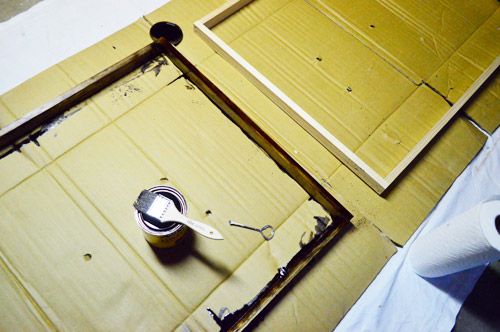
I contemplated leaving the wood raw (since that’s how we originally saw them at store) but Sherry and I agreed they’d look better in a dark stain (we used Minwax’s Dark Walnut since we still had a small can leftover from some project long ago) to tie into a few other wood items in the room like a wood side table and some wooden art over the daybed. Once the stain dried, I put a coat of Safecoat polyurethane over it and patiently waited another night (torture I tell you) to put everything together and hang them up.
With everything dry, I laid my posters face down on the back of the frames. The inch I added to each side meant the poster sat on the frame comfortably without being visible along the edges. My poster was printed on pretty sturdy paper (it’s similar to thick poster board) so I was able to just staple it around the edge in a few spots as a means of attaching the art to the frame. If you’re trying this with a poster on thinner paper you might want to consider gluing it to a piece of sturdier poster board to make it less flimsy (maybe use a glue like rubber cement or spray adhesive that won’t make the poster wrinkle when it dries?).
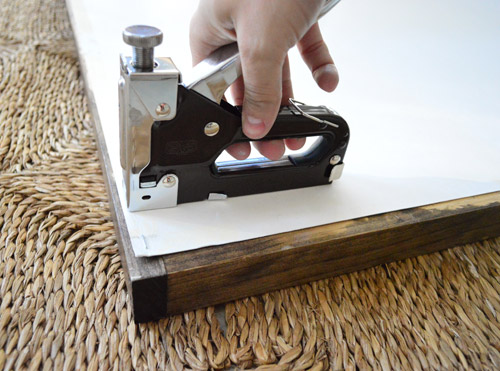
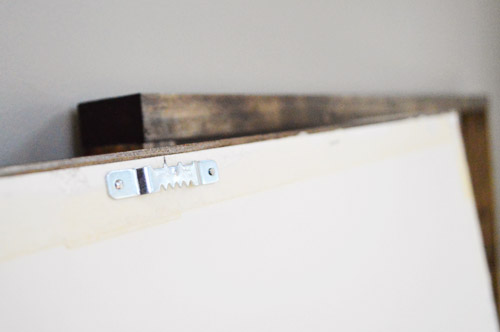
Once I put a few staples around the edges (I did about four per side, but depending how stiff your paper is you might need more) I attached some simple picture frame hanging hardware through the poster and into the wood of the frame – so it wouldn’t show through on the front or anything:
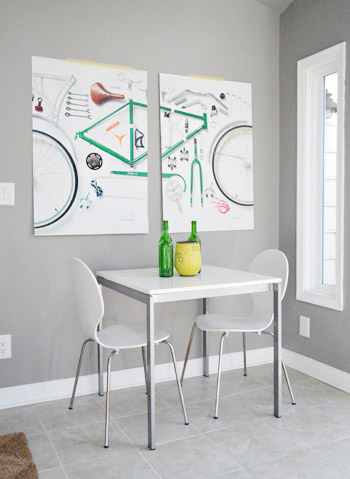
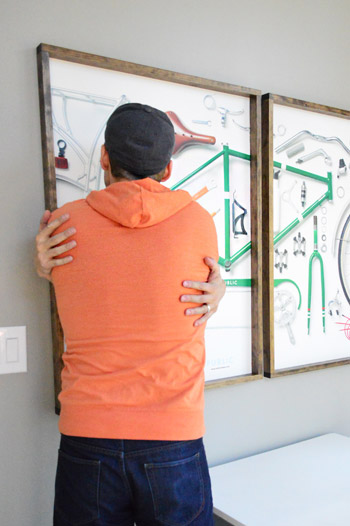
Then those babies were ready to hang. Cue the angels. Part the clouds. I am in bike art heaven. Oh yes, and ignore the way-too-airy table and chairs. Once we have a chunky storage piece of furniture (we have our minds set on something, so we should have that update for you soon) the bike art will have the nice grounded and proportionate look that it deserves.
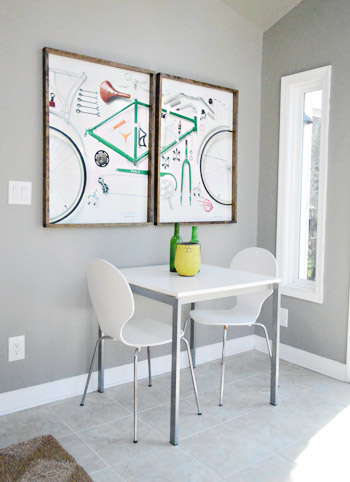
Seriously though, I’m pretty stoked about how they turned out. Obviously the art itself (featuring a deconstructed bike by Public Bikes) is the real star. But I like to think that my frames have at least earned a “best supporting actor” nomination. And heck, they’re honored just to be nominated.
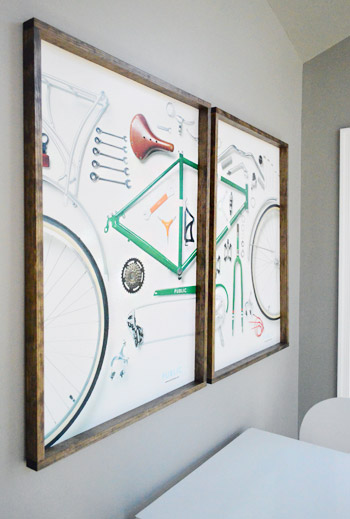
We’re both really happy with our decision to use the boards so they raised off against the wall a little bit – giving the poster some dimension instead of just being big and flat. That thick frame feels uncommon and artful – and thanks to the posters being so firm and un-delicate, we don’t anticipate any issues with there being an absence of glass. They’re just like poster board so we think they’ll hold up for a nice long time (of course we can always add glass or plexi if we change our minds, but for now we love them completely unobstructed).
Then I had an impromptu make out session with them.
Sherry probably won’t have to witness that again (I can’t make any promises), but I’m glad I can see these babies from the window over our kitchen sink. So she may catch me gazing lovingly at them while doing dishes. And it might just be a love triangle since she occasionally lovingly gazes at me while I do dishes.
So that’s the latest in the sunroom. Can’t wait to share the storage-y piece of furniture that we’ll be adding under the bike art. Soon I hope!
Update: We finally created this Shop Our House page to help you hunt down any furniture/accessories that you see in our house, along with all of our paint colors.

Rebecca @This Nest is Best says
*gasp* These look FANTASTIC! So excited to see what you add in this room next!
Kirsten says
Love the frames, LOVE the bike art and most of all love the last photo with John….
:)
Chelsea @ Riding Escalators says
Haha! This my be my favoritest post ever! Making out with bike art? Loves it. And the frames are pretty sweet (and oh-so-simple in their beauty!) too!
katie s says
Well, HELLO! These are awesome! Easy, yet such a big statement maker! Love it.
Kara says
I cracked up at the “making out” picture! LOVE IT! I really like how the pieces look, good score!
So now… the latest sunroom score? John’s got his bike art love (check!) and Sherry has her pillow loves (check!). Now we need a bit of a Clara love and a Burger love in there too!
YoungHouseLove says
Haha, it’s true!
xo
s
Michelle M. says
Burger’s painting! That’s Burger love no?
YoungHouseLove says
Oh yes! And Clara loves the beard guy painting- haha!
xo
s
Kristi - SimplePrettyThings says
I really like how this project turned out but I would need glass/plexi over the print. That’s just me and my weirdness.
Lilli says
These look fabulous. It’s funny how sometimes all you need is a simple change/addition and it makes things that much better!
Leah says
John Petersik, you are hilarious!!! I cracked up at your “make out” picture at the end… took me back to being 10 years old! LOL :)
This is a great idea… I wonder if it would look good around canvas also? May have to try it!
YoungHouseLove says
Oh yeah that’s a cool idea! Bet it would look great.
-John
Nicole says
That looks great! I agree; I like how they add a bit of dimension to the wall.
Sandy P. says
LOL!!! I’m really digging the way the art frame looks. BUT, I have to admit I love John’s embrace. That is soooo funny! Hahahahahaha!!!
Amy in PA says
Awesome!!
Elieth says
I’m missing something…how did you end up getting the posters? Love the frames!
YoungHouseLove says
Oh yes, someone sent them to us after the display was over at their store! Such a surprise to see them pop up at our PO Box!
xo
s
Anne @ Planting Sequoias says
NICE! Love the art and the frames look great, John! We have a huge map that I’d like to frame out with some trim soon but I may wait until we have a more permanent location for it (in a house soon hopefully!).
Lauren says
Love the frames! I think it’s time I start buying hubby tools. :)
Meghan, UK says
The art looks a million times better with the frames – you did a fab job of this! The colour in both pictures really stands out now and they look great in position.
Side issue, but did you change a bunch of the headers to the blog?
YoungHouseLove says
Yup, we cleaned up the sidebar and the top to hopefully make it easier for you guys to get around :)
xo
s
Meghan, UK says
Ah, I had hoped it wasn’t me being dense! It looks fab – I particularly love the shortcuts/galleries area. Thanks for the reply!
YoungHouseLove says
Aw thanks Meghan! It’s funny how many little pages and links we have, so we’re trying to make it feel cleaner and less chaotic :)
xo
s
Sarah says
You guys are adorable. Haha! Love the art, love the frames! Nice work, John!
Linda says
That last picture made this entry go from “informative and great” to “DOWNRIGHT AMAZING AND FANTASTIC AND WONDERFUL”.
Fyi.
YoungHouseLove says
Hilarious!
xo
s
Emma (Broke Ass Home) says
That looks great! So easy and SO CHEAP. Those would have cost a couple hundred bucks to frame at a store. Very nice Dude-Art, John
YoungHouseLove says
Thanks Emma.
-John
Ariane says
Good job John !
Andrea R. says
I love how they came out!!!!! But I feel like its naked with out glass in front to protect the art from dust, discolorations, etc ….
YoungHouseLove says
Oh yes, check out the post for that info – we can always add glass or plexi, we just like them bare for now (they’re easy to wipe down since they’re made of posterboard and were displayed sans glass at Gap as well).
xo
s
Debbie C says
Wow, truly a man in love. Awwww. ;D
Julia @ Chris Loves Julia says
A walnut frame around a bike that’s showcasing the color of the year!!!! You guys are so cool!
YoungHouseLove says
Haha, any coolness is completely accidental.
xo
s
Brad @ Mr. Write Away says
While the rest of the room is coming along at warp speed, I’d have to say this is my favorite part! I love it.
PS – I noticed you guys #hashtagging Mariah a few times. I started a new little feature today regarding her! Check it out when/if you get a chance. Or don’t. That’s up to you. #please #imnotbegging #maybealittle
YoungHouseLove says
Haha, hilarious! Love your blog Brad.
xo
s
Lori says
John, you are so funny! (And way talented!)
Lauren says
“And it might just be a love triangle since she occasionally lovingly gazes at me while I do dishes.”
baaahahahaaaa. Hilarious. And true, my husband is sexiest when the dishes are clean :-)
YoungHouseLove says
Ohemgee, he’s never hotter. Except while doing yard work. Me-ow.
xo
s
rachael says
that’s the part that made me laugh the most! great post today john!!
Heidi P. says
Hahaha. I think the pictures look good all three ways they’ve been hung!
Alexandria (Not the Other Alex) says
That’s probably the funniest post of John’s I’ve read thus far! I just literally laughed out loud! Oh and the frames look great too. haha!
schmei says
Wow – it looks amazing. I think the wall color helps it look even more gallery-cool.
I daresay that sunroom is starting to become my favoritest room of yours…
YoungHouseLove says
Ten points for us the use of favoritest.
-John
Maribeth says
I love those prints!! I used to work at a frame shop and learned a lot about protecting art from the sun. Y’all may want to look into getting some glass that will block out the harmful rays that will bleach out John’s beloved prints! It looks like from pictures it gets pretty sunny in there? Just a thought, as always great ideas and amazing execution : D thank you for inspiring us!
YoungHouseLove says
Thanks Maribeth! It’s a great tip, and definitely something we’re open to adding sometime.
xo
s
JessicaB says
I was thinking that too…. I had a very sad experience with hanging a print I loved near a window with no glass (or frame for that matter), and it was ruined. :(
YoungHouseLove says
You can bet that we’ll be keeping a close eye on these guys and adding plexi/glass or even moving them to hang in a less sunny spot (there’s talk of the guest room) if we worry they’re getting bleached!
xo
s
julie s says
its getting weird that projects on my to-do list keep popping up as your blog tutorials….now i have absolutely no excuses to ‘get on that already’….thank you
ps love those posters!
YoungHouseLove says
Haha, good luck Julie!
xo
s
Jamie says
I am going to have to try this! I’ve got some owl pictures that would look amazing like this.
Jess says
That looks awesome!! Sweet make-out sesh too.
meerasedai says
The last picture made me laugh :)
I have a poster that I’ve wanted to frame for awhile now but its a little more delicate than your posters sound. I’ve looked into just buying something cheap from Ikea before. Where do you guys get most of your frames, like for your gallery wall?
YoungHouseLove says
Ikea has awesome and inexpensive frames (with great mats which tend to make things look more expensive). We also occasionally check out Target clearances and love finding them at yard sales and thrift stores since those bring the collective cost down a lot.
xo
s
Leah says
IKEA is a good place for smaller frames. Just so you know, I have one of their huge frames (maybe a ribba one? I should look), and it looked great when I got it, but it hasn’t held up over the years. It’s plexi + wood. I’m looking into new options for that poster now.
YoungHouseLove says
Good tip Leah!
xo
s
Robin @ our semi organic life says
I love them! And how simple they are. I could even see them being a bit longer – for more of a ledge. Perhaps 1×4 or 1×5! Eaks love it.
bridget b. says
very cool! i actually like yours better with the stain than what you saw at the store. thanks for the simple way to frame large art pieces.
YoungHouseLove says
Aw shucks, thanks Bridget.
-John
Jess @ Little House. Big Heart. says
I drove past the Gap not too long ago and wondered what you had done with these! They look great.
Since the posters were free, how much did the project set you back?
YoungHouseLove says
Total cost was $14 for the wood since we already had the stain and the hanging hardware/screws. Woot!
xo
s
Dusa says
Hey kids? Every thing ok, $her-Dog? Just noticed John doing a lot of the posts recently (which is totally fine) just didn’t see your byline.
YoungHouseLove says
Oh yes, I’m back here doing comments and working on some other projects and posts behind the scenes :)
Some weeks are John-heavy and others are Sherry-heavy. Haha! But I’ll be back tomorrow with a post I’m working on right now.
xo
s
Gabriella @ Our Life In Action says
LMAO!!!!! Impromptu make-out session…..didn’t see that coming. Well played sir!
DeeJay Conley says
Ehehehehehe
Those are fabulous, John!
The impromptu make-out session…so fun. lol
Jessica says
Those frames look great! Sometimes the simplest things make a big impact!
Do you have any concerns about the colors fading from the posters due to sunlight exposure? John might need to keep a backup set handy just in case… ;) #hoardallthethings
YoungHouseLove says
Hahah! That room does get a lot of light, but we’ve talked about possibly migrating them to the guest room (not sure yet!) but if they sit in that spot getting beat on by the sun I think we’ll definitely add the plexi or glass that we mentioned in the post. Or we could hoard more if we ever saw them again! Haha.
xo
s
Emma says
Dude – that’s so bad a**
Tina says
amazeballs!
Katy @ The Non-Consumer Advocate says
A make out session with the frames?!
I just finished having a mirror cut down for a antique library card catalog coffee table, that I also put chunky swivel casters on.
I think I’ll take it to the airport today so we can join the mile-high club together.
Decor geek? Not me! ;-)
Katy
YoungHouseLove says
Hahahahah!
xo
s
Ashley@AttemptsAtDomestication says
They look great with the more rustic frames! Love them!
That make out session picture brought back so many memories of me doing the same thing with me old Jonathan Taylor Thomas posters… I mean that’s weird.
Leah says
I love the process information — it makes me feel better about my own home in transition. So nice to hear the “the table is there because it’s there and not because we love it there” information. We’re in a similar process with coffee tables and side tables in our own home.
YoungHouseLove says
Aw thanks Leah! It’s always a work in progress over here :)
xo
s
Krystle @ Color Transformed Family says
Love the frames. Love the art. I’m so glad you kept the frames minimal because the art works better that way. It is seriously beautiful and probably one of my favorite pieces in your house.
YoungHouseLove says
Thanks Krystle!
-John
Kate says
question John – I always see your love for bikes, but do you actually ride?
I love that print. My husband would be just as full of glee if I got it for him. We are really into road cycling and triathlons around these parts.
YoungHouseLove says
I used to ride more, but now I mostly do the dad ride with Sherry and Clara (see it here). Richmond is an awesome city for biking so it has lots of trails.
-John
Megan @ Rappsody in Rooms says
Hahah. Oh man, you guys crack me up. That makeout session? The love triangle? HA! But in all seriousness I love the artwork and the super simple frames!
Sarah says
I love this! I recently ordered this print and I’ve been searching for a frame worthy of it’s awesomeness. You have inspired me to give it a try on my own! If everything is a complete fail, I’m only out $14.
Thank you!
YoungHouseLove says
Good luck Sarah!
xo
s
sue says
i don’t know why, but this is one of my favoritest ever posts! your happiness is palpable & i think it’s so lovely that something so simple can bring so much pleasure… personally i think the bike posters look fab and i love to see elements that represent the man of the house in a home (my poor boyfriend is currently reduced to some poker chips & a tv… i’d love to have more stuff in our home that represents him & his taste)… you guys are my daily fix! oh, & more making out with furnishings photos please, that cracked me right up! :)
YoungHouseLove says
Haha, thanks Sue! You’re sweet.
xo
s
Brenda says
This definitely has me contemplating framing out some of my art canvases, especially the ones with unfinished edges. It looks easy enough that even I could do it!