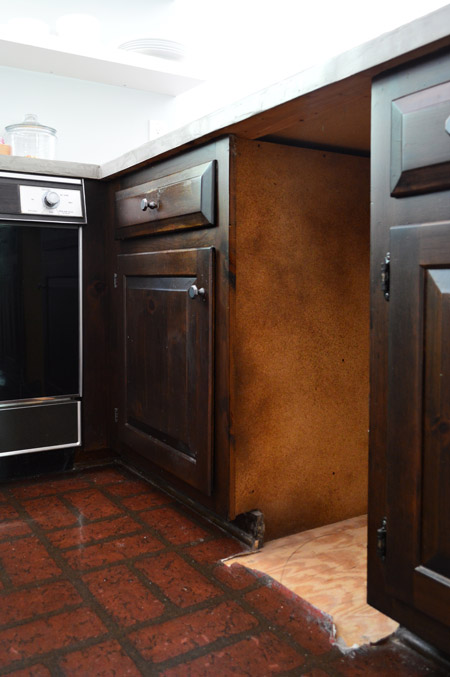
Remember how we had a trash compactor in our kitchen? Remember how we removed it waaaaay back in March? Well, we have officially filled the void with some slide out baskets.
Only took us three months.
Not that the hole it left wasn’t super attractive and crazy functional. I mean, if incorporating a “great Clara hiding spot” into our kitchen was the goal (and I put that in quotes because Clara’s hiding spots are frequently preceded by “I’m going to go hide in the [insert one of four usual locations here]”). So yeah, it’s time this hole worked a little harder.
We debated a few options – like putting a trash or recycling bin there (but this cabinet hack is already working nicely for us) or adding some open shelves (like we did in our master bath). Ultimately we decided to attempt some sliding basket storage, kind of like what we’ve admired here and here. It would help us get our dishcloths, cloth napkins, and paper napkins out of the various spots they’re housed throughout the kitchen and into one distinct spot, and it would satisfy our curiosity as to whether it’s a feature we’d appreciate in our eventual kitchen remodel (you know we love to use Phase 1 projects as a do-we-even-like-this test before committing long-term).
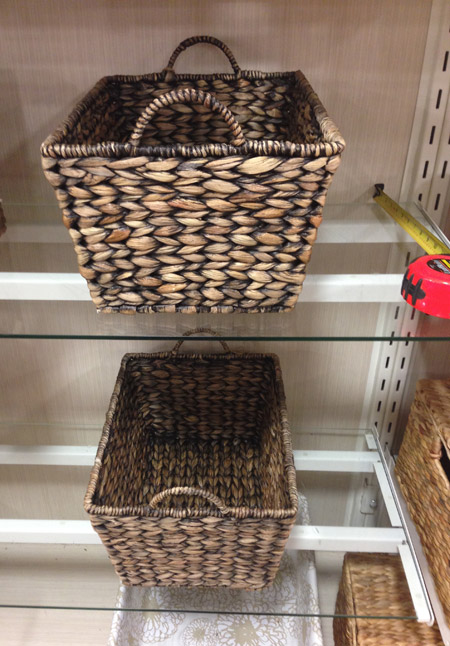
So with a few key measurements in hand, Sherry hit up HomeGoods and found these two perfectly-sized and nicely-colored winners. And she almost left our tape measure there. Close call, guys.
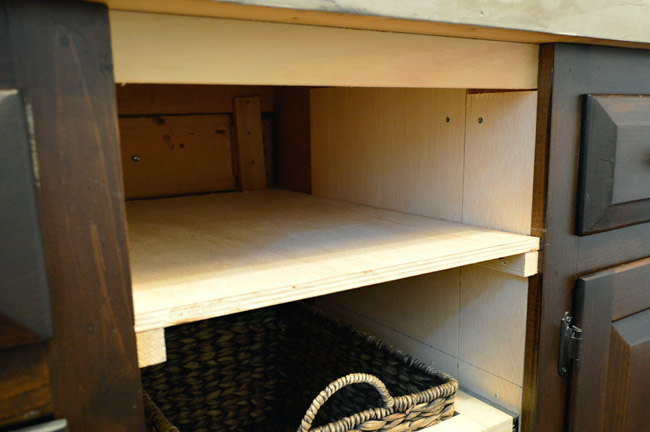
Before we could put those baskets to use, there was work to be done. I started by filling in two basic areas to make the hole look more cabinet-y thanks to a board across the top and the toe-kick. I attached both by screwing a brace piece into the back of the existing cabinet lip, then nailing the face pieces in.
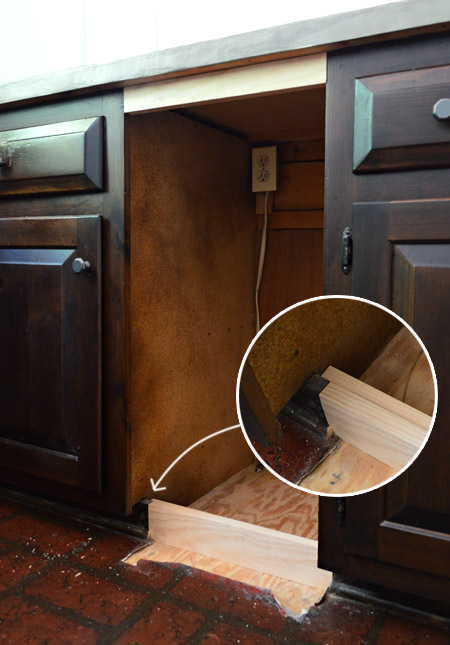
Next I had to build out the sides of the cabinet to make them flush with the outer lip, that way the drawer slides could attach inside without being obstructed when we tried to slide them out. I did this by screwing in a few pieces of scrap wood that I cut to fit. Actually, up to this point in the project I was able to pull everything from my scrap pile. Am I the only one who feels a special kind of victory when this happens?
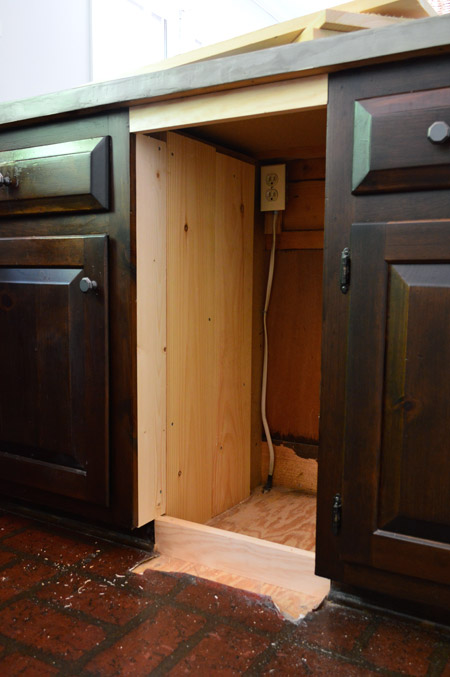
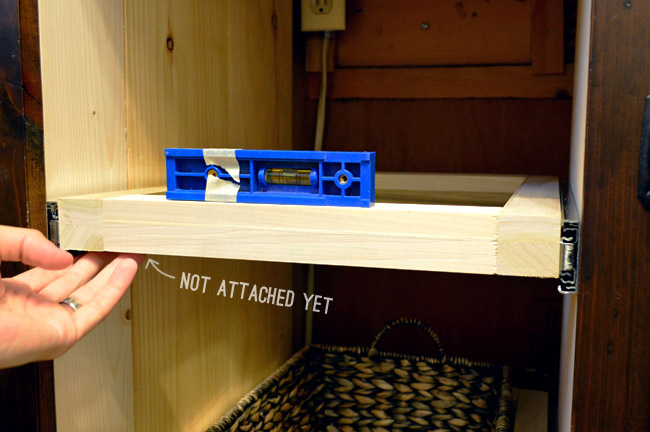
With the cabinet hole built out, it was time to create my drawers. Simply put, I used my Kreg Jig to create a frame that the tapered basket could then slide into. I built them out of 1.5″ square dowels from Lowe’s. That was a pretty precise thickness that I needed, so my scrap pile couldn’t help me here. Sad face emoji.
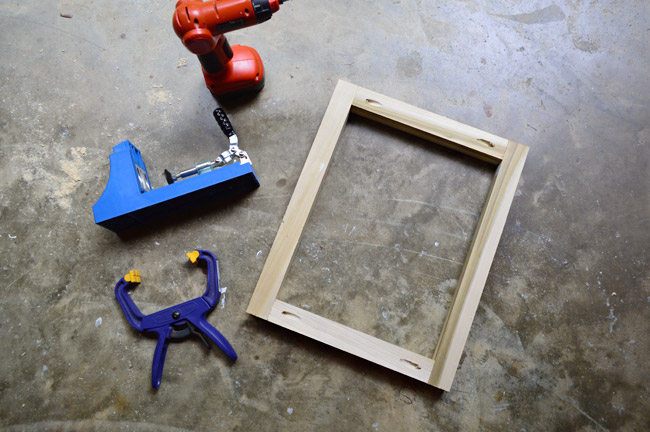
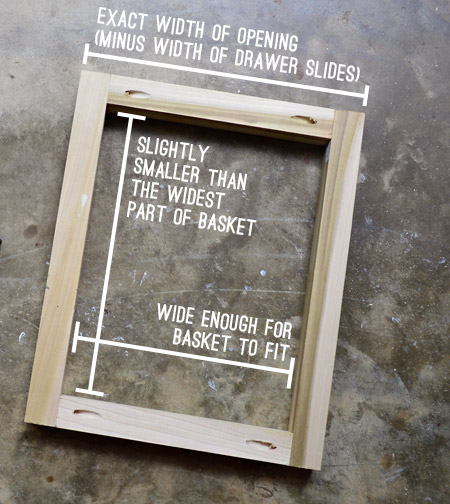
This was probably the most complicated part of the project to figure out. There was lots to take into account to make sure that the frame:
- was sized so that the basket fit snugly into the opening without falling completely through
- fit perfectly into the cabinet hole, while accounting for the width of the drawer slides
- was thick enough for the drawer slide to attach to securely
There was lots of triple-checking myself. Since my exact measurements would only work if you have exactly the same opening and exactly the same baskets, just use the descriptors below to create your own frame that should fit whatever specifications you’re working with.
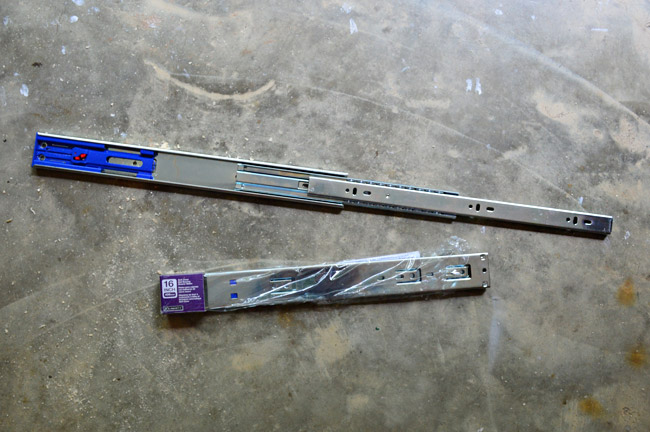
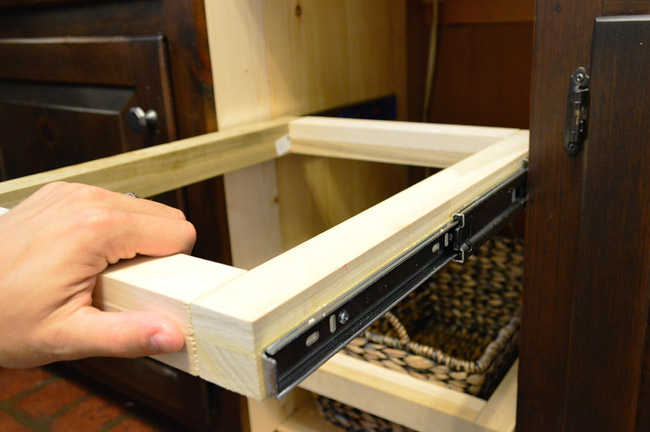
The drawer slides we selected were these ball-bearing ones from Home Depot. They’re a little pricier than your basic wheeled slide ($15 vs. $5), but I thought the full-extension would come in handy – and who doesn’t love a soft close?
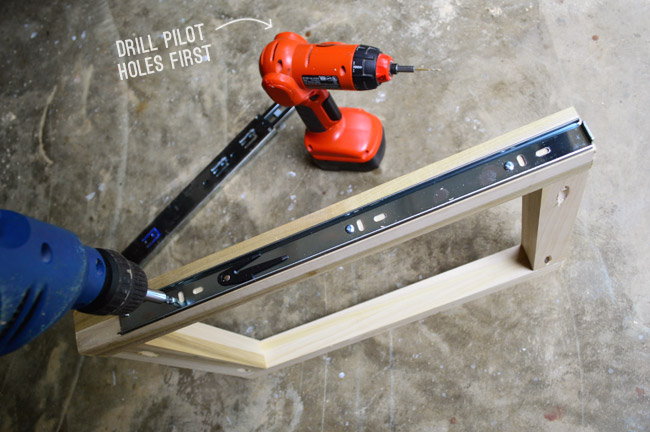
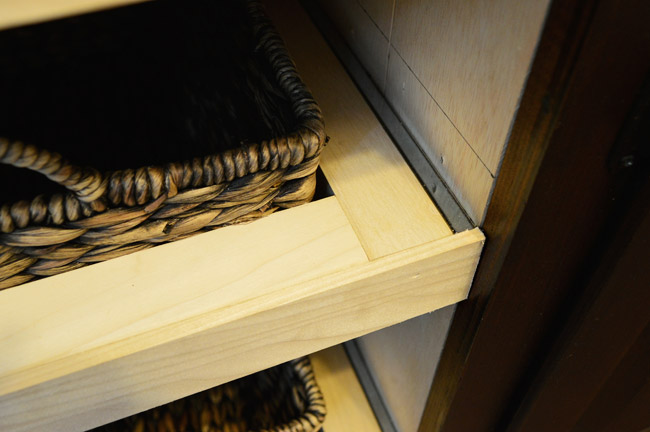
Per the instructions, I detached the drawer rail part and screwed it into each side of my two frames. I found it helpful to mark the holes with pen, drill pilot holes, and then come back with the screw to ensure careful placement.
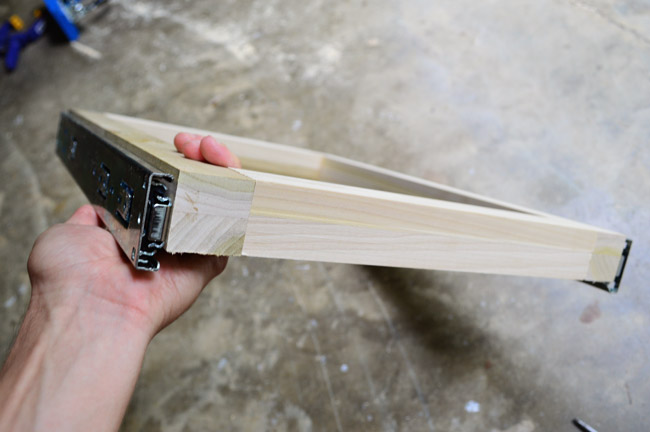
I attached them along the bottom edge of my drawer frame. It not only made keeping them straight/level easier, but also meant when we reattached the rest of the slide (which was thicker) it didn’t stick up above the frame. #thinkingahead
Back inside, I held up my frame in the cabinet hole to mark its placement. Then I detached the cabinet rail part of the slide, held it in place, marked my hole, drilled pilot holes, and screwed the first one in place. This was possible with two hands, but easier with four, so I recommend recruiting your lovely burp cloth sporting spouse (or a friend, neighbor, relative, but probably not your dog) if you can. You can see below that we already had the bottom drawer done and in place.
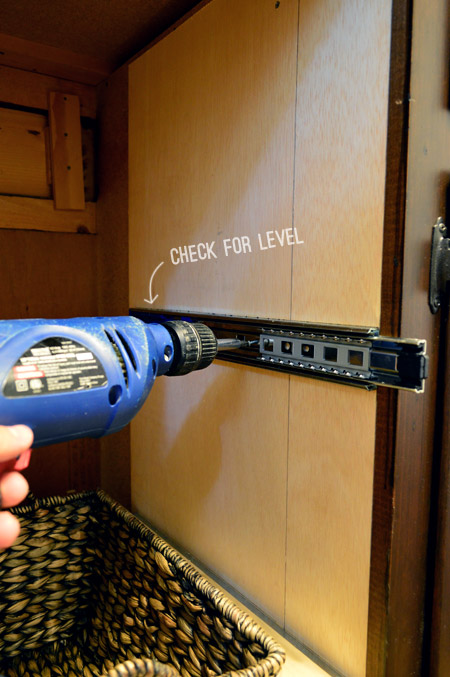
Before screwing the second one in, I temporary reassembled everything so we could check that it was level first. Not only would this ensure that it looked straight, but it helps the drawers slide more smoothly.
With the second side screwed in, I reattached the drawer, held my breath and checked that everything worked. Insert sigh of relief here.
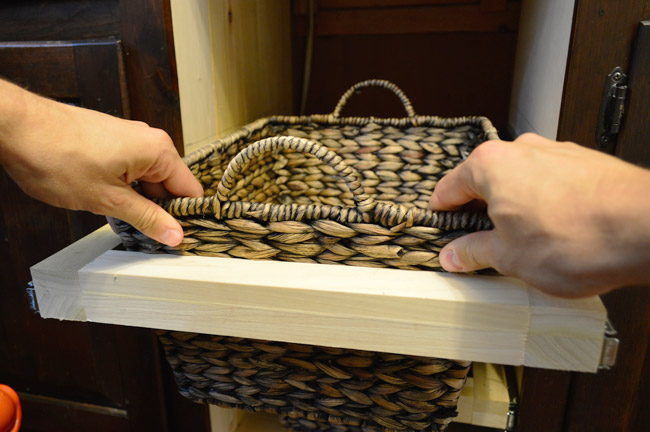
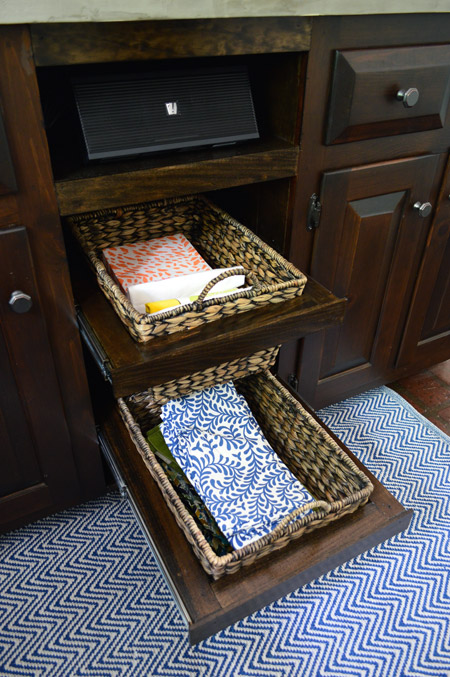
The next step was to place the basket into the frame. They sat in there nicely, but I shoved them down a bit to keep things snug.
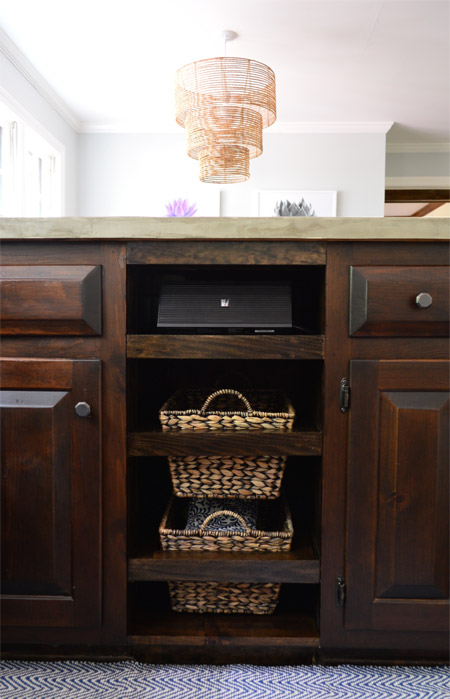
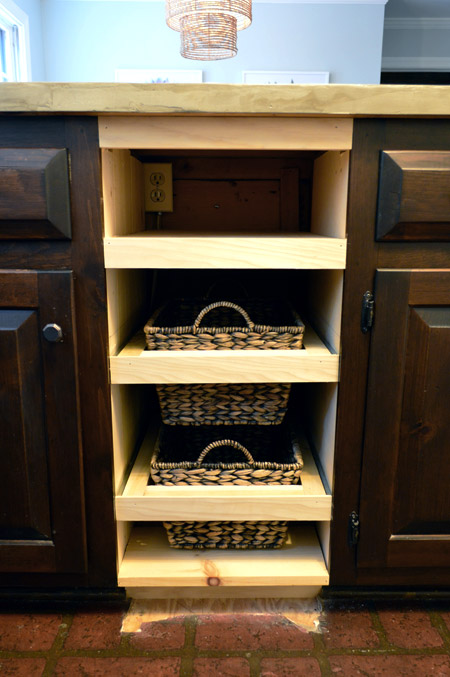
Here are the two basket drawers installed (after we decided after the fact to shift the top one down a couple of inches). We contemplated doing a third, but HomeGoods only had two baskets, and we thought we’d take advantage of the fact that there’s already a working outlet back there (the trash compactor was plugged in, not hard-wired).
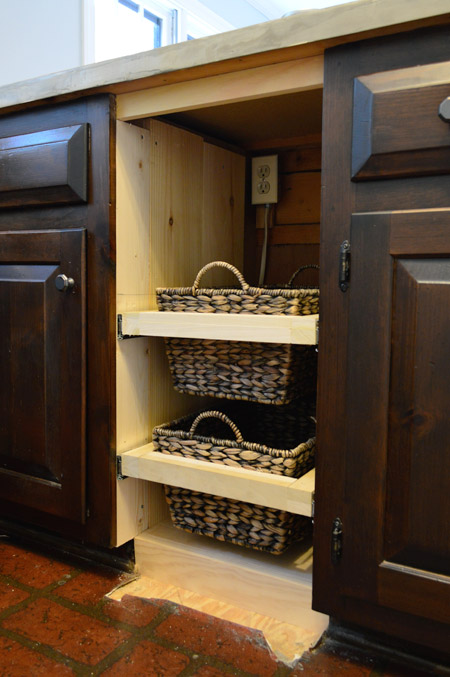
Taking advantage actually just meant adding a simple shelf (built from scrap wood!). Sherry suggested that we use it as a phone charging spot, but I saw it as an excuse to buy the Bluetooth speaker that I’ve been trying to justify buying for a while now. Our kitchen radio reception is really spotty at this house, and having my phone tethered to an auxiliary cable has meant that it has gone largely unused since we moved in.
One last finishing piece was to add a few thin boards to the front of each drawer (and the shelf) to give the fronts a clean and consistent look. Plus, it hid the drawer slides even more.
Here’s everything built. Now it was just a matter of staining everything to match. Well, match-ish.
We stained our existing cabinets with PolyShades in their Tudor color, so I wish it was as simple as just repeating that process. But obviously the raw wood finish here is pretty different from the medium brown-red stain that the other cabinets already had going on. So first Sherry darkened the new pieces with a coat of Dark Walnut stain that we had on hand.
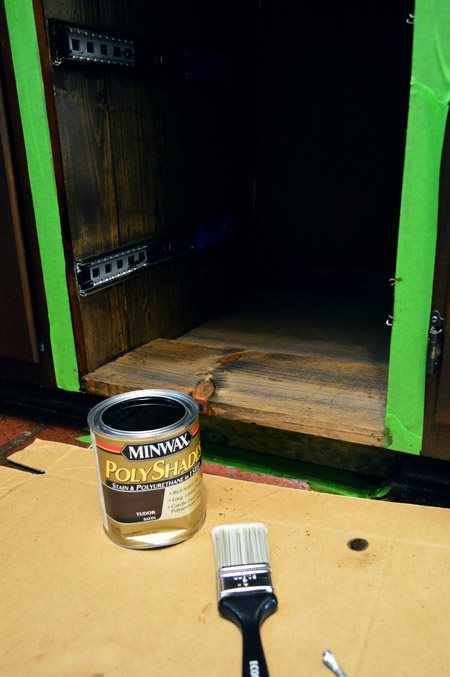
After that dried she started in with the PolyShades coats. It ended up taking three coats of it to get a similar tone to the surrounding cabinets. It’s not a perfect match (the cabinets are a little redder) but its close enough for us.
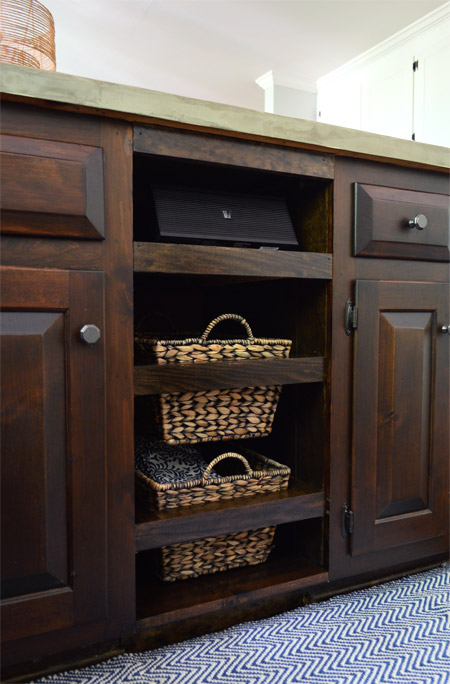
Oh, and you can see that Sherry found a $12 HomeGoods runner to help cover the fact that the laminate floor under there wasn’t looking so hot. Not that the scratched up faux brick is looking very hot anywhere in here.
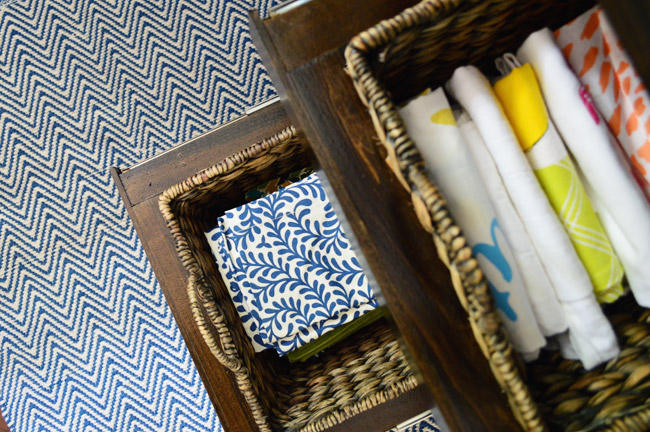
As planned, the baskets got filled with dishtowels & paper napkins (top basket) and cloth napkins (bottom basket).
Oh, and the bluetooth speaker that we ended up buying is this one from Target. It’s plugged in/charging below and can be has been easily removed for use around the house (so far mostly out back on the deck).
Sherry suggested I include a video of a drawer in action, specifically to demonstrate the soft-close function. Sure I could have uploaded a three second video and called it good, but I just couldn’t resist some music and some slow-mo action.
It’s almost as titillating as our console video from back in the day.
Not sure there’s much to say after those. I’m sorry? You’re welcome? But so far we’re digging the sliding baskets.
What projects have you guys been tackling lately? Kitchen stuff? Building? Painting? Outdoor updates? With these done we simultaneously want to deal with the kitchen floors rightthissecond and ignore them for a few more months.

Cassie Dearborn says
Liked the new video a lot and forgot how funny the one one was. Had to show my husband the this time. So funny!
Erin C says
OMG that is exactly why we all love you guys so much! Thank you for making my bummer of a day just a smidge brighter. The baskets are amazing, I’ve always wanted to do that in my kitchen, just not enough space.
Mindy says
Nice!
Iryna says
Lol, the videos are hilarious!
And gotta love Home Goods!
Missy says
I forgot how much I loved the last house. Where is the console now? And those
shiny, mirrored lamps?
I would love to see your garage, right now, no cleaning or fixing up. Is it a workspace, storage, chuck it in there I don’t want to look at it anymore space? I wish I had a chuck it space!
I like the posts where you try things you may not love. It gives me courage to “play” a little.
YoungHouseLove says
Thanks Missy! The lamps and the console are still behind our sofa in the living room. As for the garage, the side that we park on is nice and organized – and the other side is a mess of half-finished projects, tools, and Clara stuff (her bike, her baby pool, etc).
xo
s
shannon says
Looks great!! I had the same problem when I removed the trash compactor that came with our house. I put in a vegetable fridge. Its actually a wine/beverage fridge but I use it for veggies. By taking all the veggies out of the main fridge, it left a whole lot of room for other food. It took a while to locate the right size and price.
shannon says
Looks great!! I had the same problem. We purchased a home with a non working trash compactor. I replaced it with a veggie fridge. Its actually a wine/beverage fridge but I use it for all my veggies. It took a while to locate the right size/price.
Emily @ Life on Food says
I am obsessed with tea towels and cloth napkins. It looks like you have some fun designs.
Megan says
OMG..that music is hilarious with those videos!
Lesley says
Just about finished the city to country move, gathered screws and nails and hooks as we took things down/apart in a container to keep things neat. During move in I repeatedly heard the husband asking where mummy’s bit bin was, “maybe something in there will work.” It even provided a fix for the new shower assembly that was a screw short!
My spare wood pile has been known to be just as helpful. So satisfying!
keisha says
The functionality of drawers with the aesthetics of pretty baskets… brilliant. Nice work. Also, you make me want to upgrade my washcloth “napkins” to something nicer! PS Would love to know where the runner is from (though I’m thinking Dash & Albert?).
YoungHouseLove says
HomeGoods! It was just $12! I don’t remember the name that the tag said, and I’ve ripped it off, but I’d check out their store if you have one near you.
xo
s
Classy Glam Living says
What a great idea and transformation! My son also loves to inform us of his hiding spot, so we need to do a little pretend find when we play hide and “seek”. funny kids.
Summer Newell says
I am so stealing this idea when I buy my own house! It is so cute and so functional. I love it!
Sara says
Hi! Sorry if this was already asked, but can you give the dimensions of the $12 rug from Home Goods? That would work PERFECTLY in my hallway!
YoungHouseLove says
It’s 27″ x 45″
xo
s
Melissa @ Loving Here says
Yes, we’re also working on a kitchen…but our project was a complete gut job…We’re currently barely into the “done with drywall and ready to paint” stage…and I’m so so so so so so so so so so so so tired of washing dishes in our (tiny) bathroom sink.
Sidenote to self: buy cute cloth napkins. Who says they have to be used only for special occasions??
Avone says
That basket video is awesome! I love you guys. :)
Totally feeling your pain with that near miss of leaving the tape measure. I do it all the time, hence the name of my blog.
Thrilled (for you) with the new schedule. Those babies will be grown in a heartbeat and then you can blog 5 times a day. Soak ’em up!
Jonia says
Haha as if it was a surprise at all to me, but after setting Salt N Pepa to a drawer closing, I can say with absolute confidence “Y’all are my kinda nerdy!”
Alisha Jewell says
Love love LOVE the baskets and the pull out drawers! The hubby and I are planning on inserting a pull out drawer system with one of our furniture renovations soon! Thanks for the break down ;)
Pic A Memory Photo Booth
Claire @ Claire K Creations says
Oh my god I have tears streaming down my face from the video. You guys are hilarious! Love love love the basket drawers idea although I got a bit stressed for you John with the measuring and calculations to fit it in (especially considering you guys have a little bubba stealing some brain power!).
Nelle says
LOVE this! It looks great and what a great idea!
Brittany says
OH MY GOSH love you guys for those videos :) hahahaha