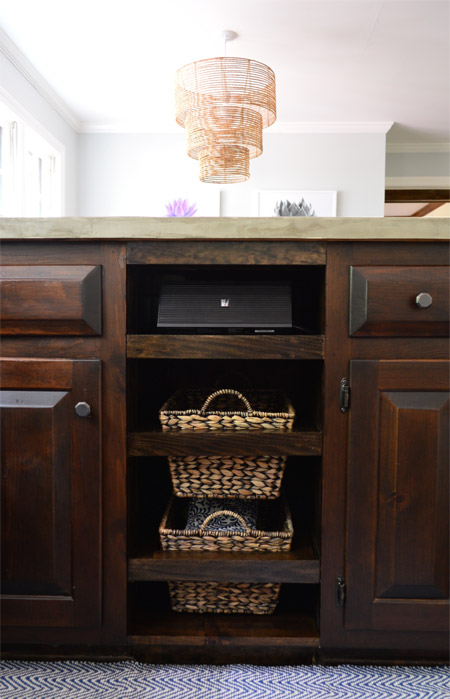
Remember how we had a trash compactor in our kitchen? Remember how we removed it waaaaay back in March? Well, we have officially filled the void with some slide out baskets.
Only took us three months.
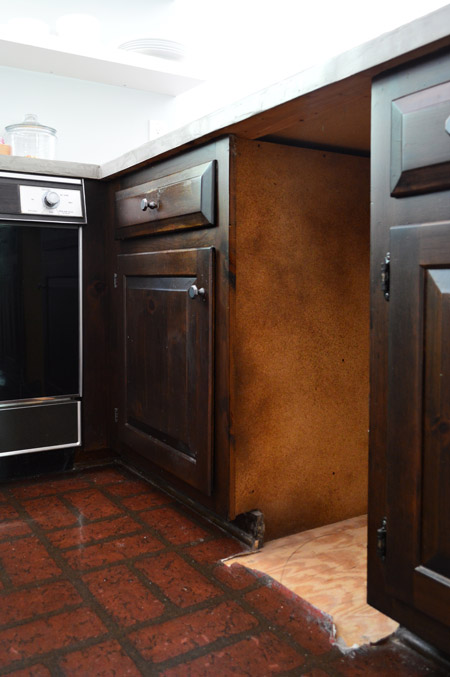
Not that the hole it left wasn’t super attractive and crazy functional. I mean, if incorporating a “great Clara hiding spot” into our kitchen was the goal (and I put that in quotes because Clara’s hiding spots are frequently preceded by “I’m going to go hide in the [insert one of four usual locations here]”). So yeah, it’s time this hole worked a little harder.
We debated a few options – like putting a trash or recycling bin there (but this cabinet hack is already working nicely for us) or adding some open shelves (like we did in our master bath). Ultimately we decided to attempt some sliding basket storage, kind of like what we’ve admired here and here. It would help us get our dishcloths, cloth napkins, and paper napkins out of the various spots they’re housed throughout the kitchen and into one distinct spot, and it would satisfy our curiosity as to whether it’s a feature we’d appreciate in our eventual kitchen remodel (you know we love to use Phase 1 projects as a do-we-even-like-this test before committing long-term).
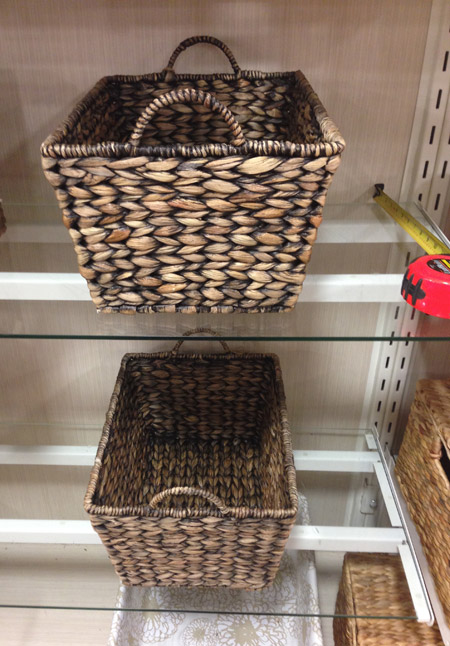
So with a few key measurements in hand, Sherry hit up HomeGoods and found these two perfectly-sized and nicely-colored winners. And she almost left our tape measure there. Close call, guys.
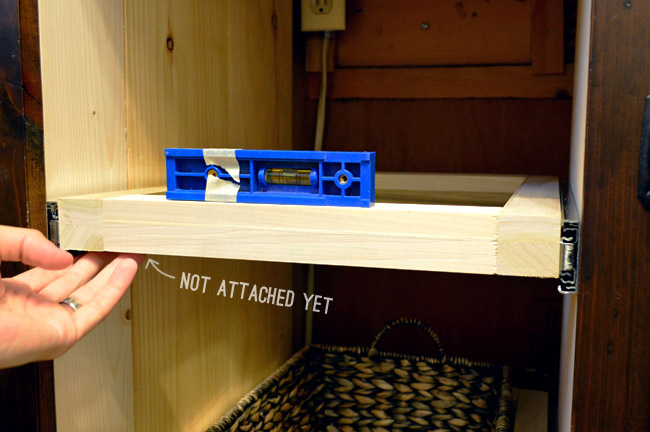
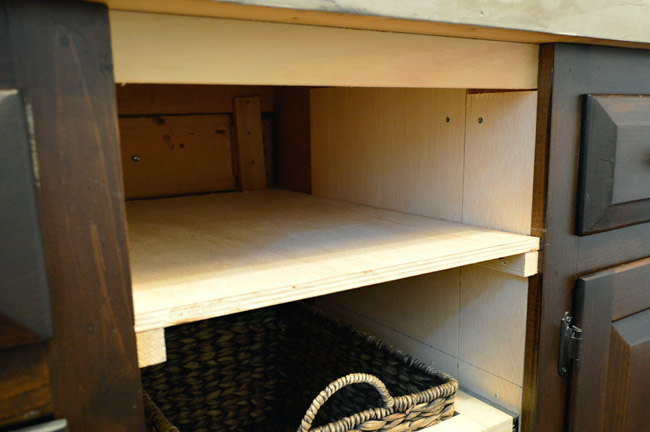
Before we could put those baskets to use, there was work to be done. I started by filling in two basic areas to make the hole look more cabinet-y thanks to a board across the top and the toe-kick. I attached both by screwing a brace piece into the back of the existing cabinet lip, then nailing the face pieces in.
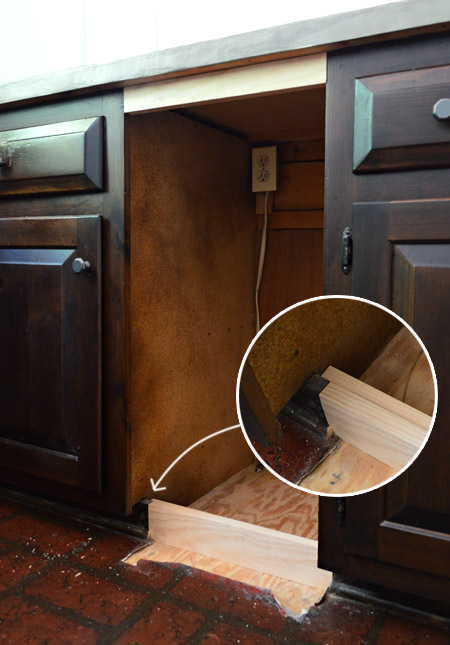
Next I had to build out the sides of the cabinet to make them flush with the outer lip, that way the drawer slides could attach inside without being obstructed when we tried to slide them out. I did this by screwing in a few pieces of scrap wood that I cut to fit. Actually, up to this point in the project I was able to pull everything from my scrap pile. Am I the only one who feels a special kind of victory when this happens?
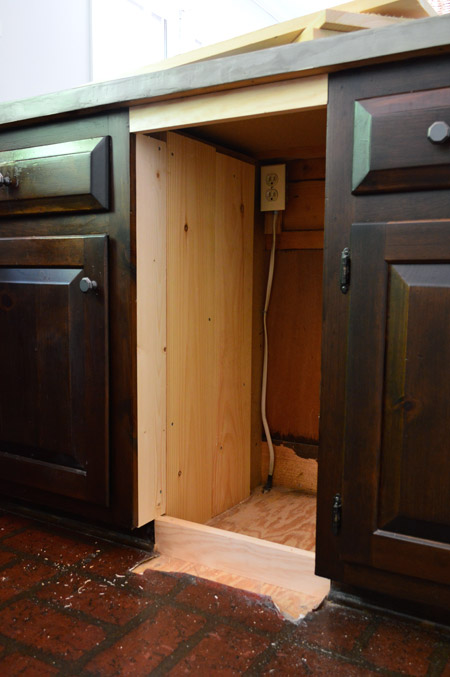
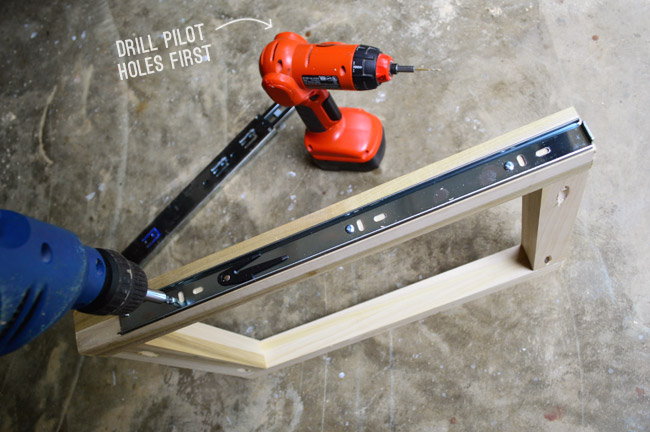
With the cabinet hole built out, it was time to create my drawers. Simply put, I used my Kreg Jig to create a frame that the tapered basket could then slide into. I built them out of 1.5″ square dowels from Lowe’s. That was a pretty precise thickness that I needed, so my scrap pile couldn’t help me here. Sad face emoji.
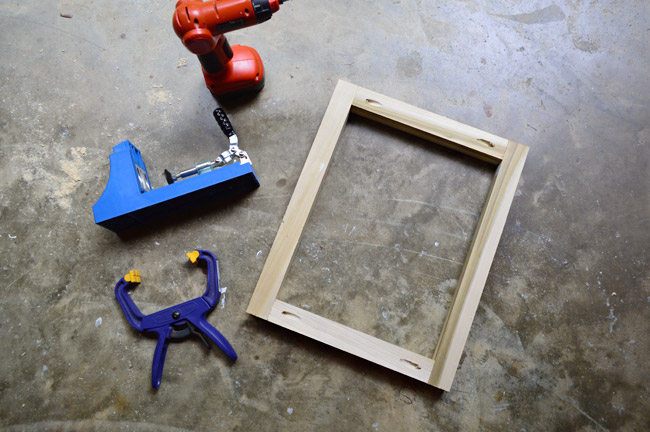
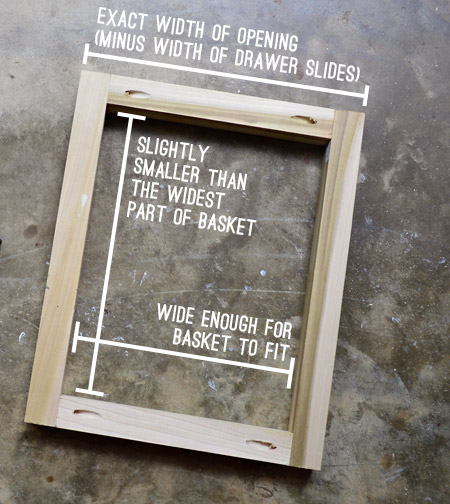
This was probably the most complicated part of the project to figure out. There was lots to take into account to make sure that the frame:
- was sized so that the basket fit snugly into the opening without falling completely through
- fit perfectly into the cabinet hole, while accounting for the width of the drawer slides
- was thick enough for the drawer slide to attach to securely
There was lots of triple-checking myself. Since my exact measurements would only work if you have exactly the same opening and exactly the same baskets, just use the descriptors below to create your own frame that should fit whatever specifications you’re working with.
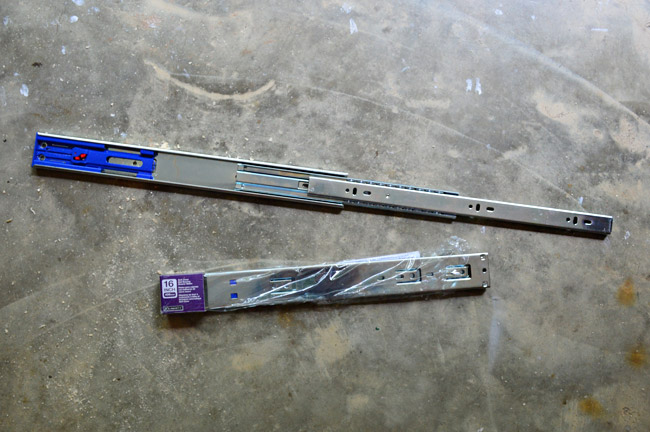
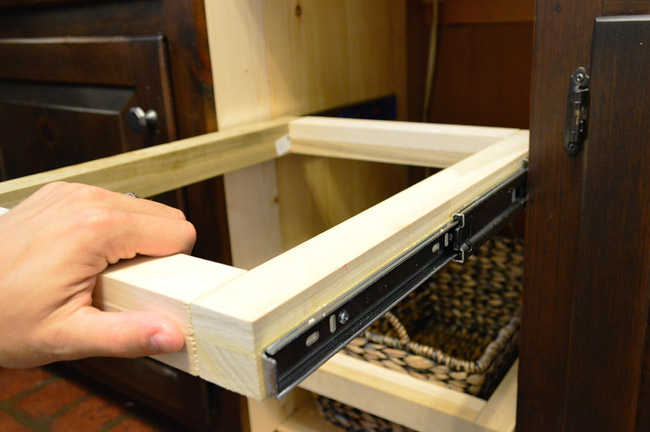
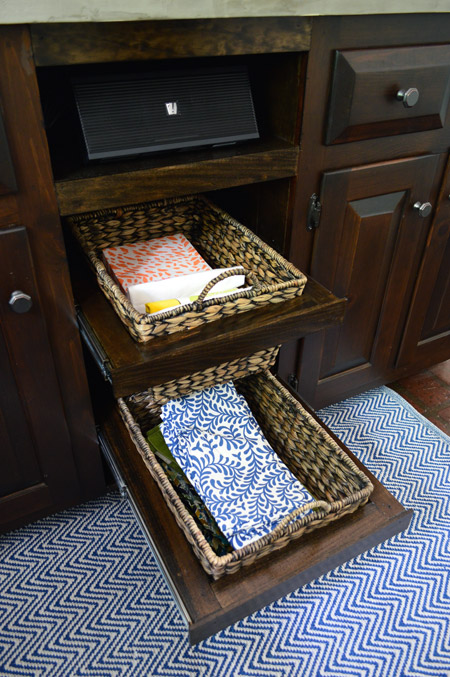
The drawer slides we selected were these ball-bearing ones from Home Depot. They’re a little pricier than your basic wheeled slide ($15 vs. $5), but I thought the full-extension would come in handy – and who doesn’t love a soft close?
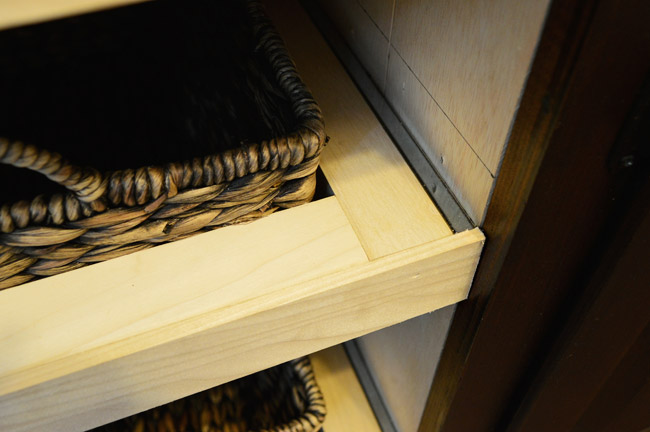
Per the instructions, I detached the drawer rail part and screwed it into each side of my two frames. I found it helpful to mark the holes with pen, drill pilot holes, and then come back with the screw to ensure careful placement.
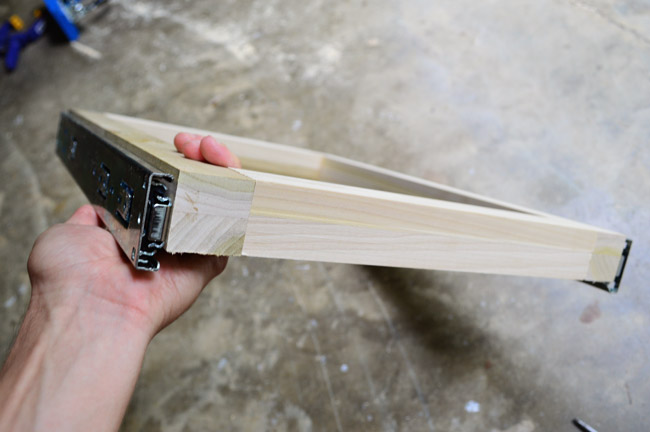
I attached them along the bottom edge of my drawer frame. It not only made keeping them straight/level easier, but also meant when we reattached the rest of the slide (which was thicker) it didn’t stick up above the frame. #thinkingahead
Back inside, I held up my frame in the cabinet hole to mark its placement. Then I detached the cabinet rail part of the slide, held it in place, marked my hole, drilled pilot holes, and screwed the first one in place. This was possible with two hands, but easier with four, so I recommend recruiting your lovely burp cloth sporting spouse (or a friend, neighbor, relative, but probably not your dog) if you can. You can see below that we already had the bottom drawer done and in place.
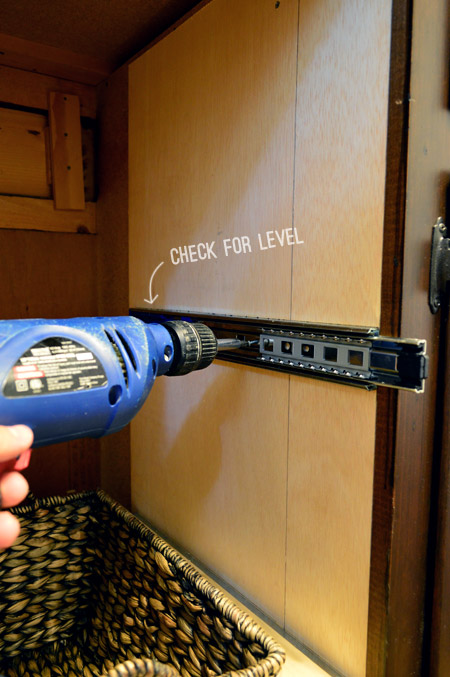
Before screwing the second one in, I temporary reassembled everything so we could check that it was level first. Not only would this ensure that it looked straight, but it helps the drawers slide more smoothly.
With the second side screwed in, I reattached the drawer, held my breath and checked that everything worked. Insert sigh of relief here.
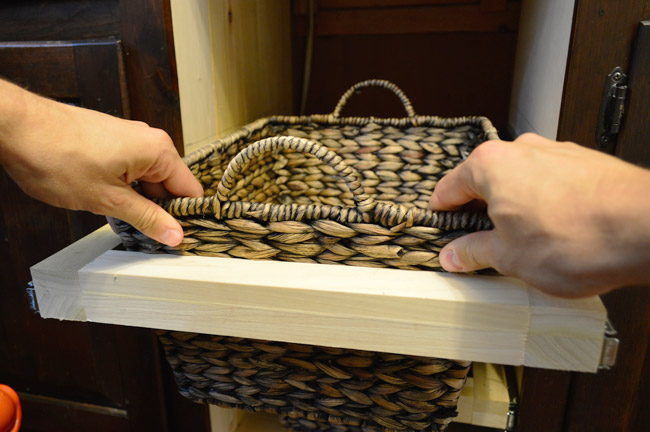
The next step was to place the basket into the frame. They sat in there nicely, but I shoved them down a bit to keep things snug.
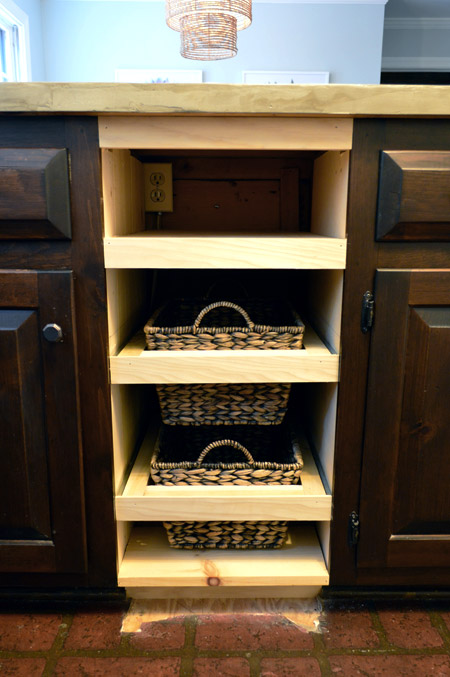
Here are the two basket drawers installed (after we decided after the fact to shift the top one down a couple of inches). We contemplated doing a third, but HomeGoods only had two baskets, and we thought we’d take advantage of the fact that there’s already a working outlet back there (the trash compactor was plugged in, not hard-wired).
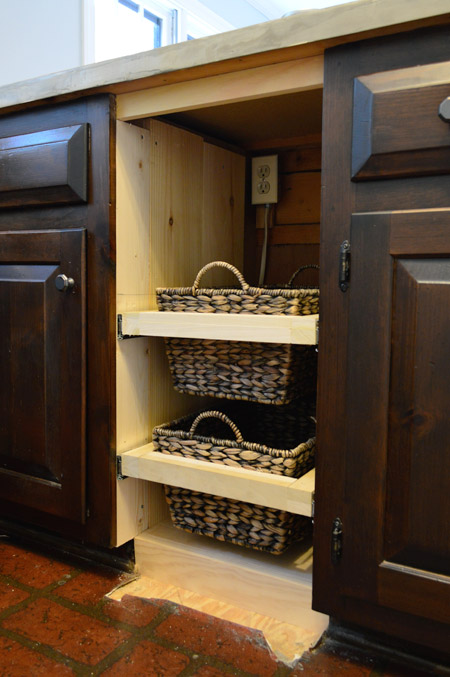
Taking advantage actually just meant adding a simple shelf (built from scrap wood!). Sherry suggested that we use it as a phone charging spot, but I saw it as an excuse to buy the Bluetooth speaker that I’ve been trying to justify buying for a while now. Our kitchen radio reception is really spotty at this house, and having my phone tethered to an auxiliary cable has meant that it has gone largely unused since we moved in.
One last finishing piece was to add a few thin boards to the front of each drawer (and the shelf) to give the fronts a clean and consistent look. Plus, it hid the drawer slides even more.
Here’s everything built. Now it was just a matter of staining everything to match. Well, match-ish.
We stained our existing cabinets with PolyShades in their Tudor color, so I wish it was as simple as just repeating that process. But obviously the raw wood finish here is pretty different from the medium brown-red stain that the other cabinets already had going on. So first Sherry darkened the new pieces with a coat of Dark Walnut stain that we had on hand.
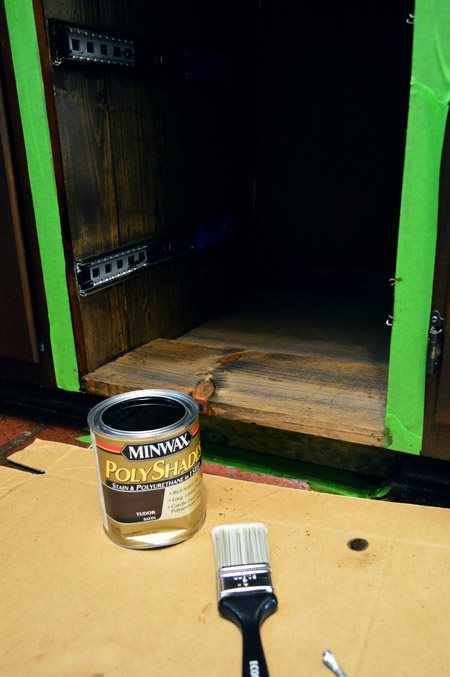
After that dried she started in with the PolyShades coats. It ended up taking three coats of it to get a similar tone to the surrounding cabinets. It’s not a perfect match (the cabinets are a little redder) but its close enough for us.
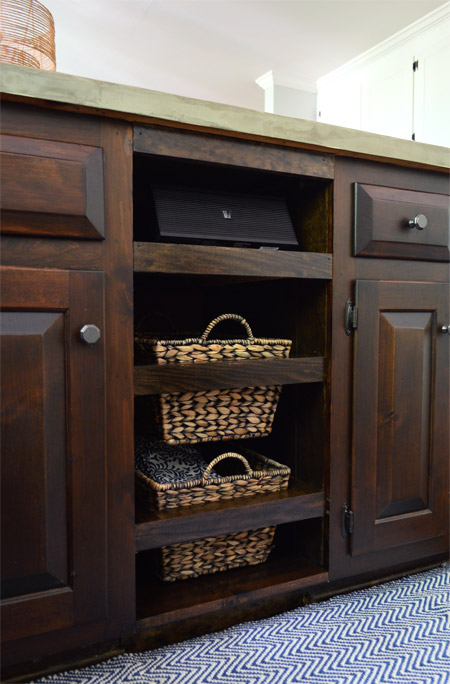
Oh, and you can see that Sherry found a $12 HomeGoods runner to help cover the fact that the laminate floor under there wasn’t looking so hot. Not that the scratched up faux brick is looking very hot anywhere in here.
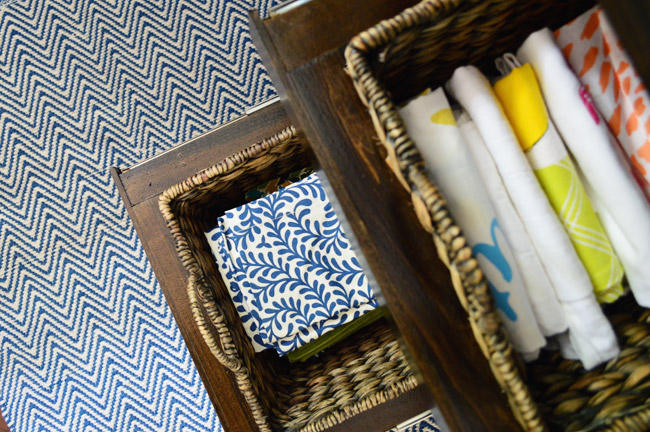
As planned, the baskets got filled with dishtowels & paper napkins (top basket) and cloth napkins (bottom basket).
Oh, and the bluetooth speaker that we ended up buying is this one from Target. It’s plugged in/charging below and can be has been easily removed for use around the house (so far mostly out back on the deck).
Sherry suggested I include a video of a drawer in action, specifically to demonstrate the soft-close function. Sure I could have uploaded a three second video and called it good, but I just couldn’t resist some music and some slow-mo action.
It’s almost as titillating as our console video from back in the day.
Not sure there’s much to say after those. I’m sorry? You’re welcome? But so far we’re digging the sliding baskets.
What projects have you guys been tackling lately? Kitchen stuff? Building? Painting? Outdoor updates? With these done we simultaneously want to deal with the kitchen floors rightthissecond and ignore them for a few more months.

ajira says
Looks great. Love the video. Puuuuuuussssshhhhhhhh itt!!!
Andrea says
We bought a new to us house a few weeks ago and have found plenty of little projects to fill the weekends. Most recently caulking the master bath shower and hanging bars next to each sink for a hand towel. Up next is replacing the every so fun dripping kitchen faucet, unless you turn it off at the exact right spot, it drips. Which is troublesome when you use your kitchen faucet what seems like a million times a day. We also seem to keep having an issue with toilets clogging. So that will be lots of fun to solve on a more permanent basis.
On the long term list, figuring out why the granite is always greasy even when we’ve cleaned it, and refinishing the hardwood which the previous owners must have tried to do themselves. There are lots of hairs trapped under the finish. It kind of gives me the heebee-jeebees.
Courtney says
I freaking love you guys! The videos and background music are hilarious! Too cute! Keep on keepin’ on y’all! <3.
Monica says
I am sure missing reading your blog on a daily basis but I know you are enjoying every minute you have with precious Teddy. I had my third baby on April 5th and now my hands are way full! I have managed to get some DIY in the mix though! :) Love reading updates on your beautiful house!
Kate says
I like the basket idea, it’s something I’ve never seen before! Is that a “thing” or did you guys just think it up?
I’ve been very busy in the living room lately, and last week’s project was hanging up a “rustic” shelf I made. I procrastinated a lot so the whole project probably took me 8 months, but it’s finally done and I like it! We also bought some bamboo blinds this weekend to layer under our white curtains (which I’ve wanted to do for YEARS thanks to your first house), and I switched out the gray slipcovers for white on our Karlstad couch (though the cat peed on the couch last night – I guess she didn’t appreciate the change).
John will also appreciate this one – Last night I cut and sanded all of the pieces for a doll bed for my toddler using ONLY SCRAP WOOD! ;)
YoungHouseLove says
We can take no credit for thinking it up. It’s something the Home Depot designer for our first kitchen suggested, and we were afraid to commit back then so we skipped it. There are some great inspiration photos on sites like Pinterest (I linked to two of them in this post, if that helps).
-John
Katie @ Red House West says
Those videos kill me! The disembodied hands and the music – weird and fantastic. I’ve fallen down the rabbit hole of deciding on paint colors for my dining room (staring at swatches in every light on every wall until my eyes cross), and am quickly becoming a Home for Wayward Chairs – can’t seem to stop bringing the beautiful, broken things home.
http://redhousewest.com/2014/06/18/katies-house-paint-colors-for-the-dining-room-and-how-i-dragged-home-another-chair/
YoungHouseLove says
Save the chairs! You’re doing your part.
xo
s
Megan says
Literally clicked on the video at work without thinking and my speakers were turned pretty far up. Oh the stares and awkwardness! #happymonday
YoungHouseLove says
Oops! Sorry Megan!
xo
s
Cindy says
great redesign of that space! I love and have learned from you guys to allow things to just be and not to have to get everything done at once — to accept the process of life.
as I looked at this post my “educator of young children” in my came out and I could just picture how much fun Teddy might be having with those in just a few short months!
Summer says
Do you have a dust problem with your open baskets and open shelving in your previous house? I am always drawn to open baskets, but I am always afraid of dusty linens!
YoungHouseLove says
As long as things are in rotation (like everyday plates and bowls on an open shelf or dishcloths and napkins that get pulled out pretty regularly) we don’t seem to have much of an issue. I think if they sat there for a month and you went on vacation you might want to wash or shake out the towel on top if it got super dusty for some reason though.
xo
s
Amber B says
The video made my morning! Thank you so much.
Jessika says
Oh my goodness! The timing on this post is perfect! Our son’s bedroom (his due date was 2 days after your Teddy’s, but our James came 10 days late) has these two built-in drawers, and one just broke. THey are stupidly deep (over 2′!!) and don’t have any guides. I’ve been itching to replace them with something, but had no idea what. This is great, and we could do a few baskets with each pull-out for better organization in there. It’d be a great semi-temporary fix (I eventually want to tear out the entire section and make it a much more functional closet). Thanks for the idea! I’ve already emailed my husband. :)
YoungHouseLove says
Good luck Jessika!
-John
Renée says
Super clever. Y’all never cease to amaze me. Love the speaker idea.
Christy says
Love the video with Push it as the song. Wasn’t expecting that song but that’s what makes it better. Also I happened to run across your April fools video and OMG hilarious!! Love it. :)
Angela says
I love the video! Y’all are to funny I just know we would be friends if we weren’t in Texas. Teddy and Clara are too cute!! I think I may have missed it or forgot ( you know mommy brain) are you waiting to do something with the kitchen floors later or are you guys doing something temporary sooner.
YoungHouseLove says
Ugh, that’s a constant debate. We are vacillating between doing peel and stick just to make it more livable for Phase 1 (we actually did that in our first kitchen before we started this blog) or just leaving it until Gut-Day.
xo
s
Shannon Summers says
Blends pretty well to me! Love the basket idea. Question, why didn’t you also make the top shelf a sliding out shelf?
YoungHouseLove says
We debated that, but reaching in to grab the speaker isn’t too hard. We worried about yanking a cord out of the outlet or accidentally knocking the speaker onto the floor in the sliding process.
-John
Melissa says
As others have said, love the baskets – I’d probably want to use something like that for potatoes and onions and other food that I’ve heard you shouldn’t really store in the refrigerator but we do because we don’t have a better place for them.
We keep our napkins and extra dishtowels and what not in an old library card catalog. All of the little drawers give me plenty of storage space for non-food items. :)
YoungHouseLove says
That’s such a cute idea!
xo
s
Marie says
Dorks!!!! =D But I watched both videos….so I guess it takes one to know one right!?!
Joanna says
One of my favorite kitchen organizing tricks is the three bamboo baskets that line up and look cute on top of the refrigerator. One for clean towels, one for napkins and the third for LAUNDRY! Our laundry area is at the opposite end of the house and before we usually had a little pile waiting to go out. This has made a big difference in keeping the place looking tidier. I highly recommend it.
YoungHouseLove says
So smart!
xo
s
Jenni T. says
Man.. I want just 10% of your creativity gene. Love that you two see things and turn them into amazing organizational functions. Bravo YHL!
Sara says
Wow, really glad I took the time to watch the video. Hilarious.
Also, good choice on getting one of those speakers. We love having one we can take around with us. Have you guys considered adding permanent outdoor speakers, though? They’re great for parties!
YoungHouseLove says
Those would be awesome.
-John
Laurie says
I love the idea of the pretty kitchen linens being kind of visible. I know I have really cute ones and wouldn’t mind them being featured a little at all!
Heather says
Great update to the kitchen. I was really paying attention to the gap in your linoleum… Updating my 70’s kitchen, and when we put in our new slate dishwasher, the linoleum was looking quite raggedy underneath. My plumber told me to get a rug! So here you guys are solidifying that a runner will be my placeholder until floors can get done in phase 2.
p.s. – phase 1 of my 70’s reno will be relying heavily on your current kitchen cabs and tutorials on staining them darker – they have been super helpful!
Lori Anderson says
Such a great idea to make that space so functional! I especially love the shelf for the speaker. The summer weather in SoCal has inspired us. My dad found a rusted windmill that a neighbor was giving away. We took it home and restored it this weekend: took it apart, sanded, painted, and put back together with new screws. Now we have a cheery yellow and white windmill sitting in our backyard. DIY is hard work, but so rewarding!
Elaine - Visual Meringue says
That looks great! And those videos – gah! So freakin’ funny. Thanks for the trip down memory lane too with the console lovin’ on. Too hilarious. Happy Monday!
Gina T says
I find it funny that you think 3 months is a long time to complete a project! Overachievers! I’m working on 16 years to get things done! Thanks for the daily inspiration and humor.
Paige @ Little Nostalgia says
So much better than a trash compactor! My parents have one at their house, and nobody ever uses it because the trash brick at the end of the process is so heavy and awkward to move. Baskets forever, y’all.
I did a small kitchen update over the weekend, too. We painted our ceiling! Woot!
http://www.little-nostalgia.com/2014/06/painting-the-ceiling.html
YoungHouseLove says
Ugh, ceilings are the worst, aren’t they? Looks awesome though!
xo
s
Mary Beth says
Ooooooh, soft close. Love it. You have talked me into getting a bluetooth speaker. Thank you very much. I need a cigarette after watching the console video.
Tricia says
That’s an adorable use of space! I love it, but alas, it would never be functional in my house because a cat would ALWAYS be in the basket. I can’t have nice things; I have cats.
Video made me laugh!
Kara says
We have that same bluetooth speaker! My husband had to talk me into it… And now I love it and use it constantly. Wish I had a nice little space for it to be tucked away, like you’ve created for yours!
YoungHouseLove says
So glad!
xo
s
Lillian says
I burst out laughing at the soft close drawer video!! I am a die-hard Salt ‘n Pepa fan (I know all the words to “Shoop,” “Push It,” “Whatta Man,” & “None of Your Business”…. and Spinderella is my girl, in case you were wondering!!) so any chance to incorporate a song into a video of an ordinary thing is a big win for me!
Also, I love to see the mix of colors, patterns, and prints in your dish towels!
Brooke says
I adore this and I adore the video! You guys are awesome!
Teresa says
HAHAHA! Love the video!
And I have to mention… I saw you in a Virginia commercial this weekend! I did a double take. And thanks to technology, I rewound and double checked… that’s awesome! :)
YoungHouseLove says
So funny! We were so honored when they asked us to be a part of their real person campaign. You know we love VA!
xo
s
cc says
Yay, scraps! I actually started to dabble in scrapbooking and quilting because of this– but I’m the only one I know who is doing it that way instead of buying all-new materials to do new projects. So, yeah, I understand that feeling!
Cynthia LaPan says
Hello Petersiks!
Very cool solution! Would you please be so kind as to include a wider shot, so that we may see how it looks with the rest of your cabinetry?
Your posts make me ache for a Kreg Jig. And other tools. Do you guys ever use a rotary tool (like a Dremel rotary)? I don’t think I’ve ever seen you use one, and I’m curious for when I can actually afford tools.
And this is very different, but I’ve been wondering about Teddy: most of what I’ve seen about him is about his clothes, his room, his photo project, and his vital birth stats (as well as, of course, that he is dearly loved by your whole family). How has he changed your lives as your second child? Does he have little quirks? What’s his voice like? (Is this too personal?) I just feel like your audience knows and has grown to love Clara, and knows so little about your new bundle of joy! But of course you know we’re happy for you! :-D
YoungHouseLove says
I’ll have to grab a wider shot for you! As for using a Dremel, we’ve used a Multi-Max for projects like this to cut out old tile and add a new border. Very helpful, but we use the Kreg more often. As for Teddy, he’s the man! We love having him around (feels like he has been with us forever) and his little coos make me beam. I’m sure we’ll share a video one of these days. He loves to eat, loves to suck his thumb, tries to stand up and walk all the time (such strong little legs) and is obsessed with watching his sister and Burger. Life has changed so much with him here (two = a game changer) and I definitely spend a lot more time being a full time momma than ever before, but I wouldn’t have it any other way!
xo
s
Lindsey says
That video was exactly what this post needed! Loved it!
Lydia K says
I left my measuring tape on a shelf at Garden Ridge yesterday. I was almost in tears.
YoungHouseLove says
Oh no! I hate when that happens!
xo
s
Cindy says
Great use of that space.
Though now I wish I had a similar space in my kitchen. I would have my Kitchen-aid Stand Mixer on a pull out shelf, plugged in to that outlet and ready to use all the time!
Liz || Shopping My Closet says
Love this idea!
Liz @ http://www.shoppingmycloset.com
Valerie W. says
That console video! Thank you for including that throw-back vid; it was my first time viewing it and I about peed my pants I was laughing so hard. Way to spice up a Monday. ;)
Diane says
Burger doesn’t get into your baskets?
Another reason to love him!
YoungHouseLove says
He’s the best! I bet Teddy will though…
xo
s
Megan says
This is random and I don’t often comment, if ever, but this is one of my favorite projects of yours!! So creative but SO useful and relatively easy … I love it! I immediately kept thinking, “I need one of these! Which cabinet could I take out?!” :)
YoungHouseLove says
Thanks Megan!
-John
Jenna Sue says
Love it. Super creative. I think I love your videos even more…
Kelly says
To meet code and for general safety purposes, that wire leading up to the outlet probably should be protected by conduit now that it’s fairly accessible from your living space. If the shelf is permanently attached, that would make it difficult to put the conduit in, so if it was me, I’d leave it alone at this point. Just make sure the drawers aren’t bumping the wire at all, because over time that could damage it and create a fire hazard.
YoungHouseLove says
Thanks Kelly!
-John
Holly Minutaglio says
I love love love this idea for keeping root vegetables (potatoes, onions, garlic, etc) out of the fridge and off the floor! I currently throw them on the pantry floor where I promptly forget about them. I also need a better place for our cloth napkins since ours go largely unused and forgotten in the utility closet. Smart + simple.
We’ve been drooling over the Sonos too. But the price hurts with a new baby on the way! Maybe when we’re all grown up. ;)
Caroline B. says
Totally unrelated question: Does the light in the background of the 1st picture cast enough light? Thinking of using it in our mudroom along with a couple of downlights over the hooks. Thoughts?
YoungHouseLove says
I bet it would be great! We have that along with a few lights on the kitchen-prep side of the room, and it does us well!
xo
s
Beth says
Love the basket drawers in the inspiration pictures. I think your DIY version is pretty good for your Phase 1 reno, but it really seems like the handles on the baskets need to be removed. The circular handles are visually distracting and throw off the linear nature of the project.
It’s been a few months, how are the concrete counters holding up?
YoungHouseLove says
Thanks Beth! Didn’t even think about the handles that way. Something to consider for sure! As for the counters, I’m writing an update for you guys right now to hopefully share this week. So many folks have been asking about those (and our new washer and dryer, and the appliance paint that we used on the fridge, and the list goes on and on!).
xo
s
Cathy says
What a super smart use of that old compactor space! I love the more useful and stylish basket storage! Many thanks for sharing!
Michele from IL says
HAHAHA! The video MADE MY DAY!!!!!!!!!!! :)
Sally G says
I really am enjoying these phase one solutions. I think it gives people an idea of what can be accomplished on a tighter budget. I like that you’re using it as a way of exploring options before committing. A play canvas, if you will!
thedogsma says
Query about the rug tape–which I had never heard of. Is it easy to pull the rug up to shake it/wash it, & then re-stick? Do you need to re-tape eventually? If that’s easy to do, it might solve a major annoyance in my life–double-sided fleece dog beds on a laminate floor, which are constantly being scuffed into messy heaps. I tried the rubber non-skid stuff, which the label assured me was organic; a good thing, because my dog thought they were delicious.
Your baskets are very cute, but, like the above poster, they would become slide-out cat beds in my kitchen. Also, a warning to anyone who wants to use them for potatoes–exposing potatoes to light will make them turn green, & the green parts are toxic. You can either cover the potatoes or cut the green parts out when you prep them. If you go thru them fast enough it might not be a problem.
Anxiously awaiting the counter report.
YoungHouseLove says
We haven’t tried reusing rug tape yet, but it seems like you might be able to peel it off, wash the rug, and re-use it maybe once or twice. You can buy a roll of it, so it would probably last a while, even if you don’t reuse it more than once. It’s being used on tile, so I’m not sure how it would work on laminate or wood or anything. Anyone have tips or experiences to share?
xo
s