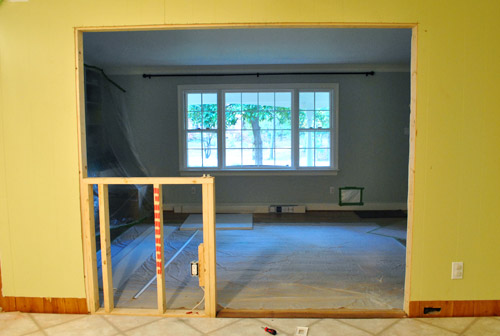
The wall is down (more here). Drywall is up (more here). Time for trim.
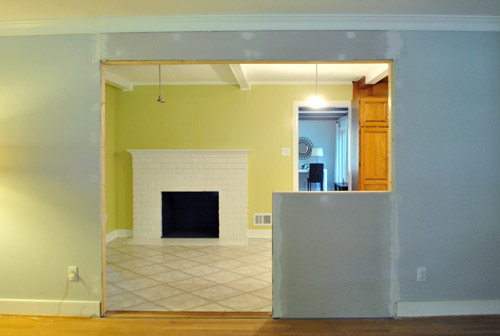
I actually kinda enjoy doing trim. Despite it requiring lots of focus and attention to detail, it’s very satisfying to see all of those rough edges turn into crisp white borders. But before I could get to trim, I actually had to take care of the ledge on our half wall and the door jambs first.
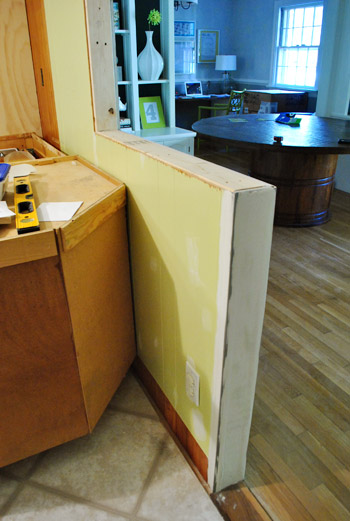
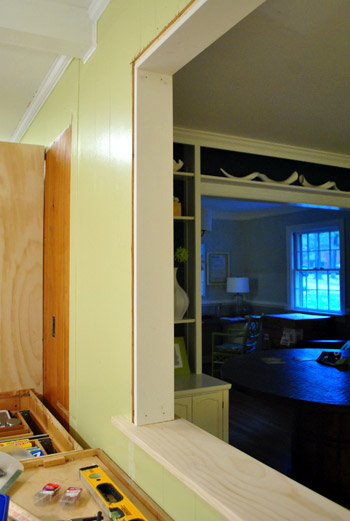
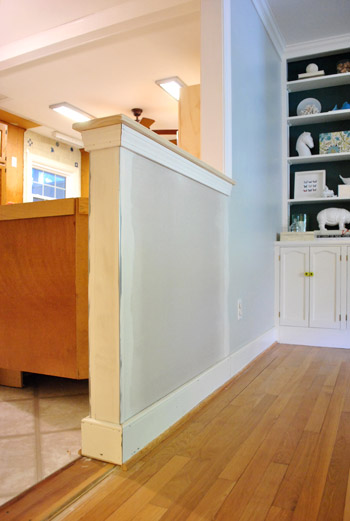
Our neighbors recently had a similar wall opening project done in their house (these guys), and we really liked how they treated their half-walls with a wood platform on top and trim beneath to dress it up a bit. It looks really finished and balanced and is also a great place to set stuff out when entertaining (like a few small dishes of nuts or candy or some pre poured drinks). So we bought this basic plank of pine that’s eight inches wide and four feet long to use for the top ledge.
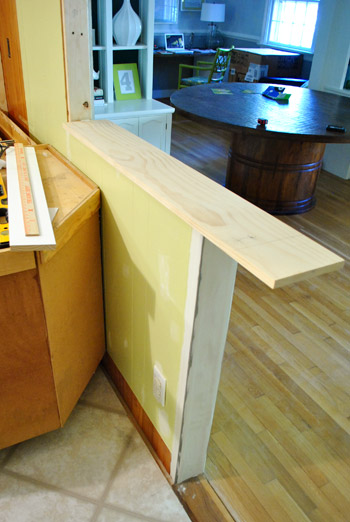
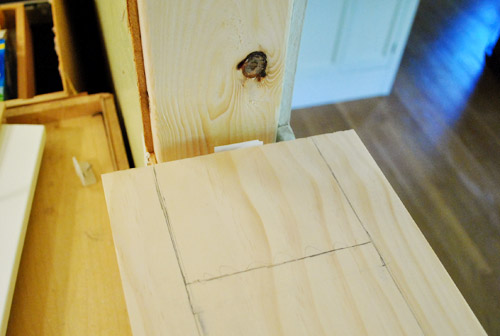
Obviously it needs to fit a bit better than that. On one end we just sliced it a bit shorter, but on the other we actually wanted to notch it over the wall so in the end it would have the same amount of overhang on each side (we had to factor in that it would have to extend beyond the trim on the inside angle, so it’ll look crazy long until we add that a bit further down the page). So we both measured and marked the wood (twice, to avoid any weird little mistakes)…
…and I ran outside to make the cuts in our driveway (using a jigsaw to cut the notch and a miter saw to get a straight edge on the other end).
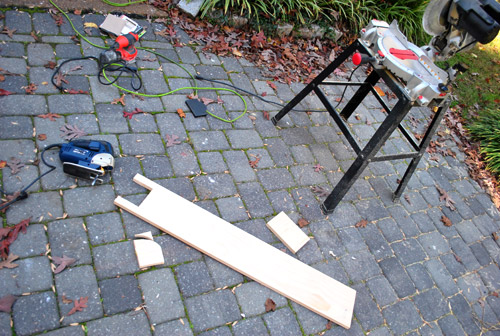
Before installing it, I also sanded down all of the edges to make them a bit softer. No one wants to slice their arm on a sharp corner walking through our new opening now do they?

Fit-wise, we got lucky. Perfect on the first try. This was either a very good omen for the rest of my trim cutting, or a sign that it can only go downhill from here. See how it looks oddly long here? That’s just because there’s no trim on either side, which will end with just a slight overhang of the ledge under it to ground it like many of the windows in our house.
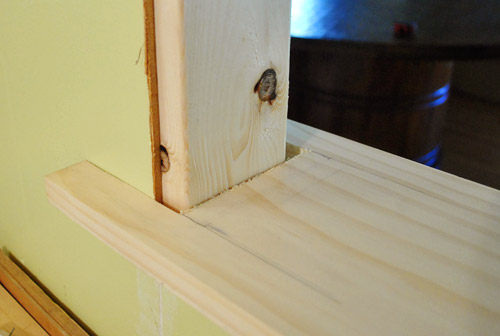
With a couple of nails on either end, we hammered that guy right into the frame and it was set (we’ll eventually prime and paint it white like the trim). Then we could begin to set the door jamb in on top of it.
Fortunately our doorway was a standard jamb width of 4 5/8″ so I could rely on this pre-packaged door jamb kit they sell at Lowe’s for about $18. Well, not completely. It was meant for a normal-sized doorway (aka a 3ft opening) so I had to buy another $6 side piece to help extend my top jamb.
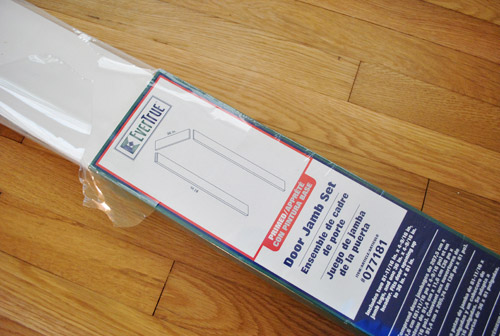
The reason you install a jamb over the wood that frames the opening is because the jamb is wider so it covers the sides of the drywall and paneling so that once the trim is added the entire opening is seamless and sealed (so you can’t peer beyond the wood framing piece from the side and see the side of the drywall).
The instructions said to assemble the jamb first and then lean it into the doorway as one piece. That didn’t seem very practical given our unique situation (aka: our uniquely sized opening), so we hung each jamb piece separately and it worked out really well. I cut the short side of the doorway first then together we held it in place and nailed it in with some finishing nails.
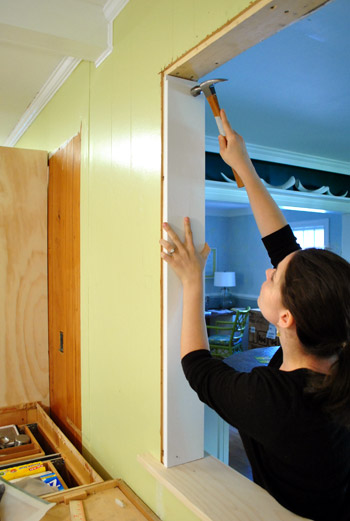
Then we slid in the short side of the top jamb and hammered again. It was finally starting to look kinda like a doorway. And trim would definitely seal the deal.
Here’s where we had to line up the two pieces of the top jamb. Ideally we’d love to have one piece, but we couldn’t find a 92″ piece. Fortunately caulk and paint will make this look pretty darn seamless. Especially since I took a minute to sink every finishing nail’s head into the jamb with a nail punch (it’s a cheap little manual tool explained more here).
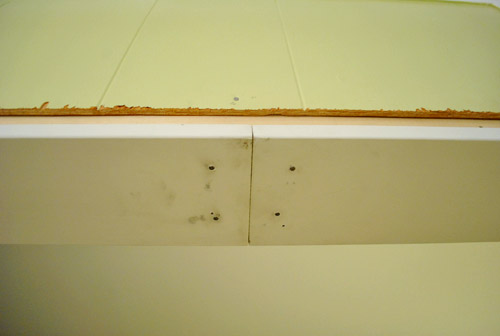
With the top on and the other side hammered in place, the jamb was officially done. So with that and the ledge checked off of our list, we could officially turn our attention to the trim.
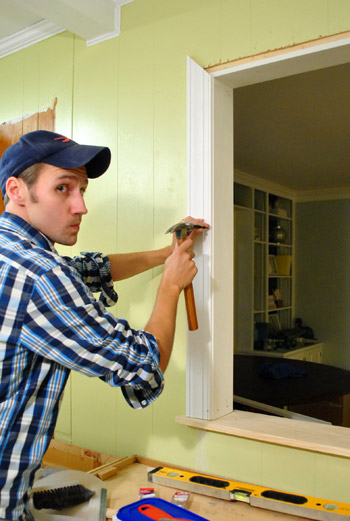
I’m not gonna go into crazy step-by-step trim installation here (you can read all about that when we re-trimmed our old bathroom). As usual it involved lots of measuring, cutting it on an angle with my miter saw, and hammering it carefully into place (using a nail punch to manually sink the finish nails to keep the trim ding-proof). This happened on all three sides of the doorway, in both the kitchen and dining room sides of the opening.
We also added some slightly smaller trim under the ledge to beef it up a little bit because:
- we had seen our neighbors treat their half-walls this way and liked how it looked
- the big picture window in the dining room along with many other windows in our house are treated the same way (with a ledge on the bottom that’s grounded by some slightly smaller trim)

In addition to installing trim around both sides of the doorway, we also had to reinstall a bunch of baseboard that had to come out during demo. Fortunately enough of it was intact enough that I didn’t have to buy anything new. Some the paint got scraped off during the removal and rehanging process, but once everything is caulked and painted again no one should be the wiser.
Some of this baseboard and quarter round may have to come up again when we do the floor, so we left some of it unfinished (like the quarter round where the transition will go after it’s added). But we tried to complete most of it so that it looks as polished as possible during our construction phase (which will last the next couple of months).
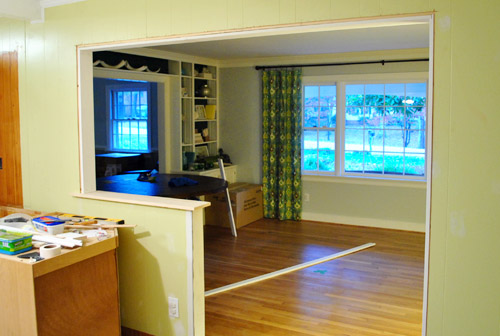
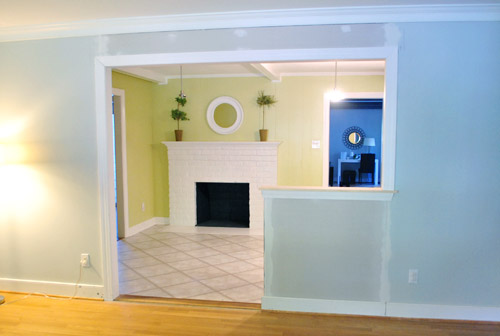
So here’s the room from both sides with the finished trim. Definitely looking more doorway-like, eh? Remember we’ll be painting the wood ledge white like the trim so it’s more integrated.
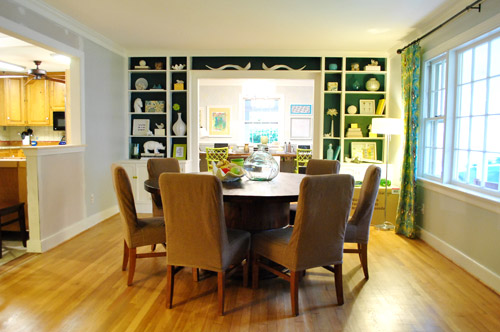
Now to make it look a bit more like a kitchen and dining room, we’ve moved furniture back in! Although the chairs in the kitchen are just placeholders (we’ll get some counter-height stools that are a bit lighter looking – maybe even acrylic or something to keep things from feeling too heavy or wood-riddled). So excuse the chaos and busyness of things that are out of place and soon-to-be changed (it’s a lot crazier and busier than it’ll look in the end).
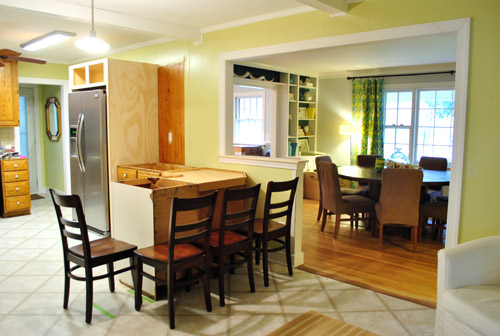
Of course there are still missing counters, walls, and trim that need to be painted, kitchen cabinets that need to be painted, and we have a million other kitchen updates to do (lighting, flooring, backsplash, yadda yadda yadda).
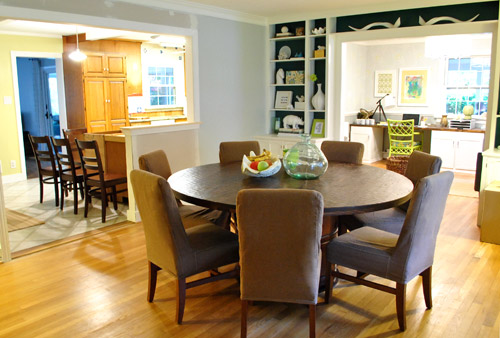
You might also notice that we acquired our last cabinet for the peninsula. Woot. See him there on the end? Guess how much it cost? Rhymes with “dero zollars.”
It’s from the ReStore, and no we didn’t steal it. When I told the guy I was looking for an 18″ base cabinet, he said they had one out back I could have for free. Apparently the donor left them outside where they endured a light rainstorm before the ReStore noticed them. So even though they hadn’t gotten damaged, it was against their policy to sell them. So why not take it home and give it a try? We gave it a couple of days in the carport/sunroom to ensure that it had aired out and wasn’t damp or anything. Then we looked it over and it checked out a-okay (no water damage/mold, etc). And the bonus? It’s the closest match to our existing cabinet doors and drawers that we’ve seen (the doors and drawer are beveled so they’re half-sunk, making them the same thickness as all of our half-sunk doors and drawers).
Oh and see the tape lines in the pic above? The first one marked where the peninsula would end and the second one marks where the 12″ counter overhang will end- so we can try to picture it as the rest of the room comes together.
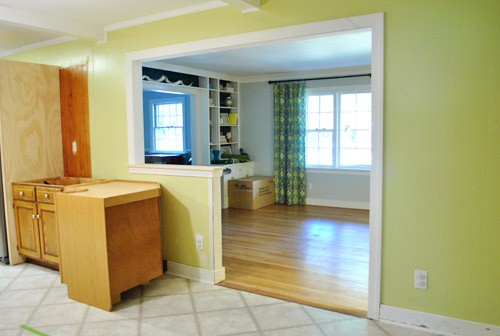
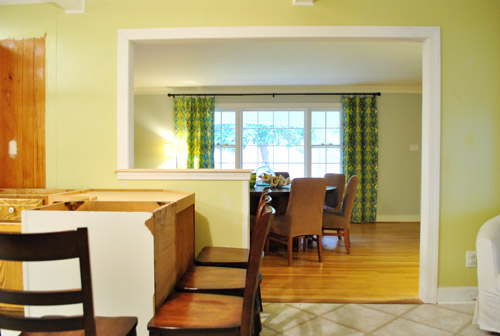
Here are a few more shots to show you how much the opening is a game-changer around here. Even with full chaos going on, it’s such a difference. It’s so nice to have more daylight in the kitchen thanks to the opening. And once we paint the cabinets and install our new white counters it’ll be even lighter in there (with mocha cork floors to ground things).
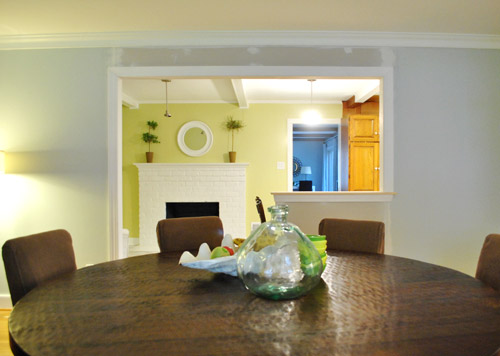
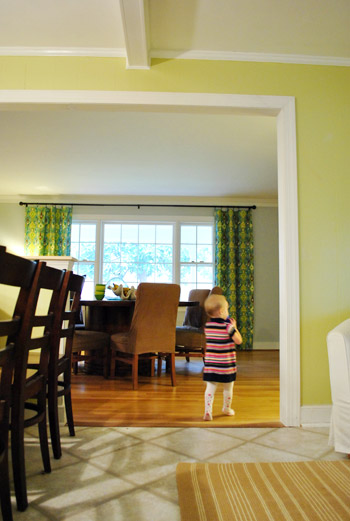
Here’s a shot through the opening now that there’s trim and the table is back and we re-hung the curtains. We love how the opening lines up so well with our big picture window in there.
Here’s the other direction. Now we can enjoy the fireplace from the dining room.
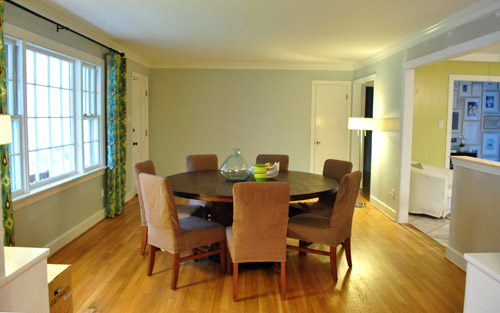
Here’s another shot looking past the dining room into the office. Ignore the abundance of odd items on the dining table (a faux clam fruit bowl, a stack of serving bowls, and a big clear vase) and the big box and floor lamp near the curtains on the right (they’re not permanent of course – just need to add a big chandelier over the table and install the new dishwasher in the box). So it looks crazier than it eventually will when things are settled.
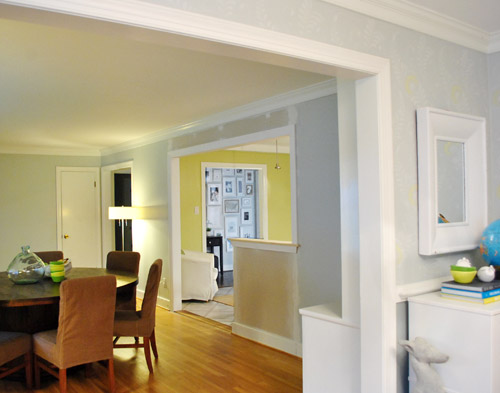
Here’s that room from the other direction (still need to add a big buffet with some large art over it and a nice sized rug to anchor the entryway area (among other things).
One of the coolest “bonus views” that we gained was the peekaboo into the hallway frame wall all the way from the office. It’s so nice to see the sunny avocado kitchen framing the view.
We sadly didn’t manage to get any photos of Burger running through the new doorway (the little guy was a blur), but here’s Clara loving the new route.
She’s such a quick adapter. She just sees something new, smiles, and tries it out. A day later it’s old hat. Like it’s always been there. Although we’d argue that it should have always been there anyway. Burger is completely used to the new flow too. He cuts through there all the time.
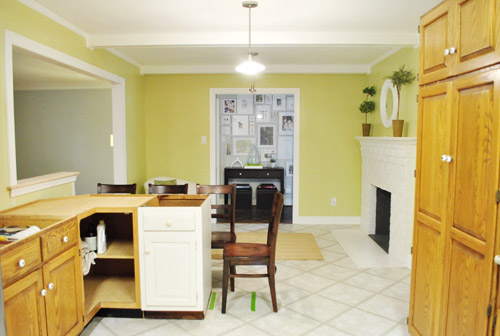
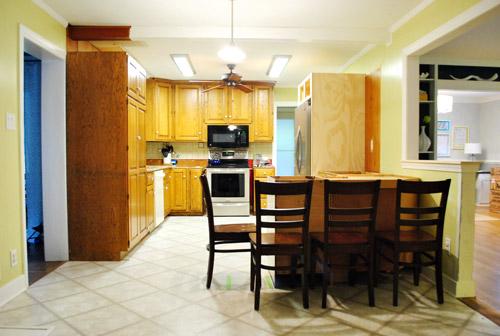
Oh and since we always love taking a look back, here are some older shots from similar angles to some of the ones above taken right after we moved in last December:
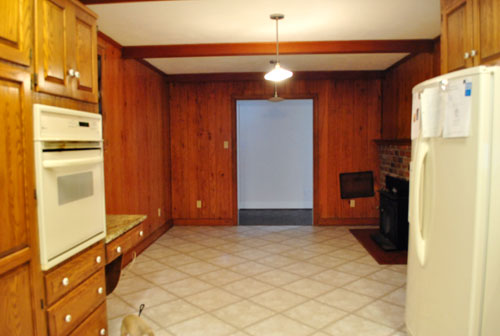
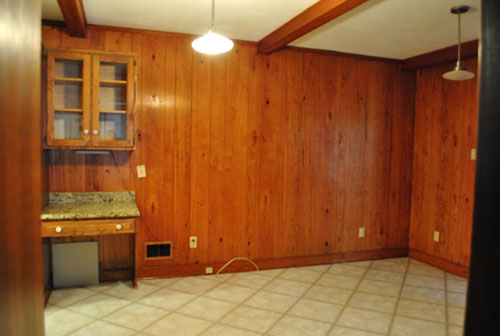
What a difference eleven months can make, huh? Still have lots to do, but it’s getting there one day at a time.
Oh and when it comes to costs, finishing the entire opening ourselves was $90 (that includes doing drywall, adding door jambs and the ledge, and adding trim on both sides of the opening). It would have been $250 to pay the contractor to do that stuff, so we’re thrilled that we could take it from here…
… and save 160 big ones.
What did you guys do this weekend? Any other door jam, ledge, and trim stuff going on? Any standing around and gazing lovingly at a new doorway? There was a fair amount of that going on here.

Lisa in Seattle says
Oh my gosh. Oh my gosh. I just can’t get enough of the view through your new opening toward the dining room window. Do you ever just get caught up in it and lose track of time? I would. And did you cry a little? I kind of want to cry a bit, it’s just such a wonderful change. You’ll have to have that amazing photographer (can’t remember her name) come out and shoot your place again with all the new angles.
Spent this weekend picking out swatches #16, 17 and 18 for the basement. Eventually we will have exhausted all the colors in the world.
YoungHouseLove says
Haha- we would love to have her back out to shoot! Funny you should mention that because she commented today to say the house was looking so different it would be ready for a photoshoot in no time! After the kitchen is done I think might be the perfect time!
xo,
s
Tammy O says
I LOVE watching this project move along — you guys always blow me away with your ability to do things yourselves. I wish I was that handy! I can’t wait to see what you choose to do with the open shelving — that’s on my to do list too so I look foward to watching and learning from my favorite DIYers!
Dana Jacobs says
This looks so amazing. You did such an incredible job designing the opening and kitchen layout. It really does look like it should have always been this way. And the flow of the house seems so great and open. I love it. I think once things get a little more settled, you should definitely do another video house tour so we can all experience the new flow, too. I’m very impressed!
houseofearnest says
I really love how open everything is looking with the wall gone. It already seems more modern and open concept-y! Can’t wait to keep up with the progress!!
Jessica says
Forgive me if this is a repeat question (I didn’t read through all 350+ comments!), but I was looking back at your post with the original renderings you guys did, and it looked like you were planning to extend the peninsula countertop into the doorway. Was that the original plan and it got changed, or was that just the way it showed up in Sketch-Up but was never the actual plan? I like both ideas; the thought just struck me today when I was reading this post that I was thinking something different was going to happen! :)
YoungHouseLove says
We went back and forth about it and decided we liked having the ledge to more subtle separate things so the peninsula is definitively on the kitchen side of the space and grounded by the half-wall instead of floating more in the middle (which we think would read a lot like kitchen-counter-close-to-table instead of having more of a visual separation). Hope it helps!
xo,
s
Jessica says
Makes sense, it’s going to look great! :)
Crystal S says
Love it, Love it, Love it!!!!!!
kyla says
It’s so much more “alive” in that area of the house. Amazing transformation!!
Meredith says
I really really love it. It ties so well with each room now and really opens/brightens the space. Great job. Loving the process of the reno.
Ashley says
I can’t wait to see the end result!
Next weekend we are planning on painting our great room. I have been looking to do a color similar to your dining room/office/living room. Do you have a picture that is most true to the color? I am looking for a gray with blue undertones. Any suggestions?
YoungHouseLove says
Hmm, it’s mostly a soft platinum gray. Not much of an undertone at all in our house – but all paint colors read differently in different homes (someone else might think it’s a green-gray in theirs!) so I’d just bring home a bunch of swatches and see what you like!
xo,
s
Joelle says
Wow, looking back at those before photos…i remember when you posted them and thought…eeks, they have a lot of work, i’m not sure how they are going to pull this off…that kitchen, not so cute. But you did! And it’s amazing! love being apart of it “real time.”
you know you guys have a knack for this! you should think about quitting your day jobs and becoming home bloggers! :)
Julie says
I had serious doubts about the half wall which is funny because we put on in a similar place in our own kitchen. i just thought it would look funny in your place. What a surprise that it ended up working so well.
Elise says
I’m so in awe of this right now. It makes me want to knock a hole in one of our walls, just because! Fortunately (or unfortunately?) we already have a really open floor plan, so no extra walls around here. Dog gone it!
Keep up the fantastic work and take lots of pics!
Sara says
Love it – Amazing how much difference a small trim makes. This week I finally got around to putting a draught excluder on the back of the new front door letter box (after spraying it Pewter so that it matches the handles)- Amazing how much more finished it all looks. xx
Kirstin says
Looks rad guys! We just removed a load baring wall from our dining room to our living rooms, its such a huge difference! Love it! Maybe one day I can submit pictures as a reader redesign :)
Chrissy Henry says
It is looking so lovely!!!
Just a questions… Have you considered extending the peninsula out to the second tape like (where your countertop will end) or a little further beyond that, and not having a counter top overhang on that end of the peninsula. So that you would be able to fit all four stools on the one side of the peninsula instead of having that one rouge, I don’t fit with the group, stool hanging out on the end?
Of course I don’t know if space will allow for this and or if this will work. But I am sure you have thought of every option and everything you do is always beautiful… I should probably just be patient and not doubt you ;)
YoungHouseLove says
We actually thought a lot about it and even talked to a certified kitchen designer friend of ours, but it’s really functional to have someone who doesn’t have to sit in the same line as everyone else. For example, we’ll probably put Clara’s highchair in that spot so the person who is feeding her isn’t right next to her, but at a 90 degree angle, which is how we feed her now since it’s more comfortable.
xo,
s
Chrissy Henry says
That makes sense… I knew you had a plan! :)
I am sure it just looks really strange to me right now because there are no counter tops and the chairs are not stools. You all never cease to amaze me so I am sure it will be just as amazing as everything else once it is completed :)
FYI: the picture from the front door location where you can look into the kitchen and both the office from made me want to jump up and down for your guys!! This new doorway is amazing!!
Ami says
Holy cow guys that is looking AMAZING!! I love it! You 110% did the RIGHT thing!! :D
Heidi P. says
Wow wow wow WOW!! Wow and wow.
Sharon says
WOW!!!! It looks FABULOUS!! You two have such vision–turning your cave kitchen into such a light and connected space is a great accomplishment. I can’t wait to see it finished.
Wrenaria says
It’s coming along beautifully. Congrats on finally having natural light in your kitchen. :)
georgia says
O-M-G
It looks so amazing! its so open and it makes such a massive difference! Well done!
i feel so motivated to do something major in my apartment!
Kelly says
I’m loving each step you guys make with this kitchen project. You both are magical. Pure and simple! It’s coming together beautifully.
Kirsty says
It looks awesome! I am so excited for you guys! I’m sitting here grinning like a crazy person right along with ya and I can’t wait to see what changes the next two months bring! xo K
Eve says
It looks fantastic! I love the pop of color that you get from seeing the dining room drapes in the kitchen, too. And acrylic stools sound lovely – for some reason the picture that popped into my head when I read that were ones that look like Philip Starck’s ghost chairs, sans arms. But who even knows if they make those!
Melanie says
You both have such an eye for design. Taking out that wall completely changed your house in so many great ways! The kitchen in my opinion is the core of a house. Where people gather while food is prepared and it’s so accessible to the dining room, I just love it! Well done, younghouse!
Sharon Schech says
You are so right, that opening should have been there all along. It looks fantastic.
Great job you guys. I can’t wait to see what you do next.
Jessica Wood says
I’m seriously impressed by this.. I never would have guessed that the whole “half wall” thing would actually look good. I’m kind of in love with it. You guys are so good at knowing what would look good. PS.. I might be coveting your kitchen just a little. Keep up the awesomeness.
Naomi says
How are you liking the room colors together now that its all open? Is it just me or do these two room colors bear a striking resemblance to your first house, first painted wall colors?? ;)
YoungHouseLove says
We love the colors! As for the resemblance to the first house, nearly all of the rooms were cream, tan, or soft blue-gray. Meanwhile this house has grays, grellows, and teals going on (along with a blue-green master bedroom and a pink nursery). Although we did have a mint-green living room about five years ago – haha. No gray anywhere though…
xo,
s
ashlee@238windsor.blogspot.com says
the teal is the awesome. i love it! goes so well with all the white ceramic animals.
renee says
This is lovely and all, but where the heck is Miss Clara’s 18th month pic, for heaven’s sake?!!?
:)
YoungHouseLove says
Well, we have an 18 month old running around.. hence the fact that it takes us a few days to photoshop/upload them! Haha. Forgive us! We hope to get that up tomorrow or by Wednesday at the latest!
xo,
s
Suzanne @ The Wine{a}be says
Amazing!! What a transformation from 11 months ago. Your blog is so inspiring…you have totally motivated me to blog.
As for my weekend projects…making a chalkboard to fill a large. blank. wall. {that has been staring at me for too long!} Our Fun-Things-To-Do-As-A-Family bucket list. Hubby is staining the frame today. ;)
YoungHouseLove says
Love that idea! Send pics for sure!
xo,
s
Meghan says
Wow! What a difference. It looks amazing! Kinda makes me want to rio a wall down or somethin’! Can’t wait to see the end result.
Maureen S. says
this is looking incredible!! love it!
Jen F says
oh, so much better. Especially when looking at the before pics! you guys have got to be thrilled. Yay!
Allison says
Amazing! And so cozy to be able to see the fireplace from the dining room as well, love it! We added an island in our kitchen (when many kitchen planners told us it wasn’t possible, pshaw, whatever!) and I can’t imagine living without it!! You will love your peninsula!
Priscilla says
It’s beautiful!
Lindsay L. says
Hey Sherry, everything looks awesome! as usual!!! Just wanted to tell you about a store (Quince) with a big sale in VA about an hour away from y’all. Seems like a pricey one but I saw the info on another blog and couldn’t not share it in case you would be interested. Here’s the link:
http://www.smallchichome.com/2011/11/quince-is-moving-big-sale-starts-now.html
YoungHouseLove says
Thanks for the tip! Off to check it out…
xo,
s
Molly says
Would you guys ever consider putting a window in above the sink that looks out onto your sunroom? (I had to do a little floorplan consultation to see what was on the other side of the wall.) I assume that wall used to be an exterior wall since the back half of your house is an addition. It probably is a tough job—likely not a DIY since it’s a load-bearing wall.
Since you said that the new doorway USED to be there, I’m curious if a window used to be on the back wall too… And got closed in with the addition.
YoungHouseLove says
We have a window above our sink that looks into the sunroom already! Haha.
xo,
s
ashlee@238windsor.blogspot.com says
good lord. i can’t get over how it opened up the space and made it look so much more light and airy. good job guys!
Samantha says
It looks SO GOOD. You guys made a great decision!!
Karen says
I see that this post was mostly about trim, but I think you should have called it “My Jamb”, or at least prepped us for a jamb drinking game! It looks great, I can’t wait to see the rest!
YoungHouseLove says
Haha- someone else said we should have called it Pump Up The Jamb. No idea how we missed that opportunity! Haha.
xo,
s
Molly says
I am a certified genius. No–that’s funny. I guess it’s a rarely shot angle of Casa Petersik!
Carry on… :)
YoungHouseLove says
Haha- I love it!
xo,
s
Diana says
I was really looking forward to today’s entry; you guys did a great job!!
Mollie says
The difference that opening makes is just incredible. It seems to make the entire house feel like one big room. That’s awesome. Thanks for the inspiration :)
jeannette says
the fireplace nook you’ve created in the kitchen is my favorite part of this whole dealio — or maybe it’s THE JAMB KIT, who knew? or the suave smaller trim under the ledge…..
or maybe it’s the view of the fireplace from the DR table.
you guys are the best.
kat says
Love all your work! It is impressive!
Congratulations!
Jess says
looks fantastic, guys! your vision is so spot-on… it truly looks like the house was designed that way, and it’s hard to imagine that wall NOT being opened up now. another home run for YHL! :)
Michelle N says
How crazy am I…I currently have strep throat so I have been sleeping just about all day. I had a dream about your wall opening and wondering if you guys added trim. When I woke up my husband said “who the heck is John and Sherry and what wall opening are you talking about?” haha I guess I was talking in my sleep.
I had to explain and told him you guys are the king and queen of DIY blogging.
YoungHouseLove says
Hahahaha, I love it. Your dream was surprisingly accurate too! Sometimes people dream about us doing crazy things like painting the whole house pink and purple stripes! Haha.
xo
s
Bethie says
Looks great! Congrats! My weekend was much less exciting (Christmas shopping and meeting other Americans in London) but was still a good time!
Chris says
What an awesome transformation! My favorites are the first two pictures with chairs. So cool how the rooms blend together and you can see so much more of your house. We tackled the little project of adding a table over our washer and dryer. (Not on our blog yet, I am not as good as you about updating. My last post is from June when I first found your blog and haven’t missed a post since) PS. From Sherry I am now hooked on Pinterest and we saw the laundry table idea on there! Thanks!
Anne says
Acrylic Counter-height Vapor Barstools from CB2…
We bought them for our loft island because we didn’t want to add too much visual weight. They are perfect.
We were really picky because we didn’t want anything flimsy or cheap looking. They are SUPER sturdy, hefty and well built. (Without looking bulky.) Easy to clean and very comfy.
Random example: They are the stools that the judges sit on at the end of each episode of Work of Art: The Next Great Artist on Bravo.
http://www.cb2.com/dining-chairs-barstools/furniture/vapor-barstools/f4967
:)
YoungHouseLove says
Love that show! And those chairs. Thanks!
xo,
s
ashlee@238windsor.blogspot.com says
ashlee’s totally random and bizarre question of the day:
do you recommend any certain cleaning product to dust furniture/baseboards with? do swiffers really work? i am so sick of seeing dust cluttered on the base boards!
YoungHouseLove says
I usually use a moist microfiber cloth for that. And if you don’t have semi-gloss paint on them, they can look really dirty (flat or satin paint doesn’t wipe as easily) so once I repainted all mine they were a lot easier to wipe down.
xo,
s
ashlee@238windsor.blogspot.com says
i’m in the process of repainting all of mine (room by room!). so far i have the kids rooms and the playroom done. the rest of the baseboards look as though they’ve previously been painted by the last owner, and they look really good. it’s just that dust collects on them (and cat hair!) but it brushes right off. but who wants to get on their hands and knees all day? not me. lol.