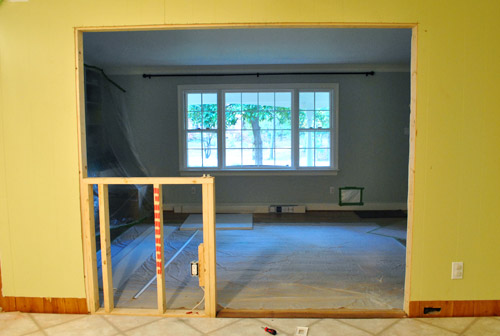
The wall is down (more here). Drywall is up (more here). Time for trim.
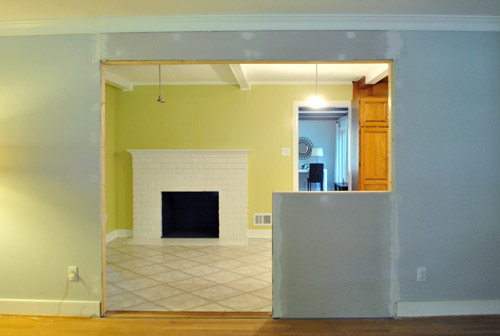
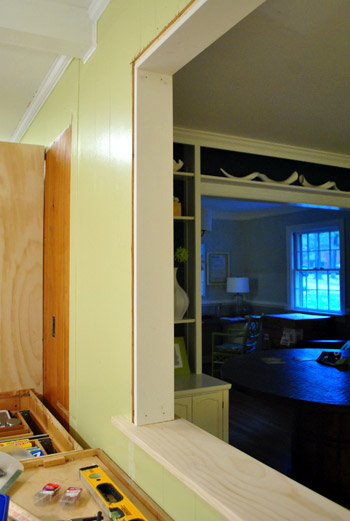
I actually kinda enjoy doing trim. Despite it requiring lots of focus and attention to detail, it’s very satisfying to see all of those rough edges turn into crisp white borders. But before I could get to trim, I actually had to take care of the ledge on our half wall and the door jambs first.
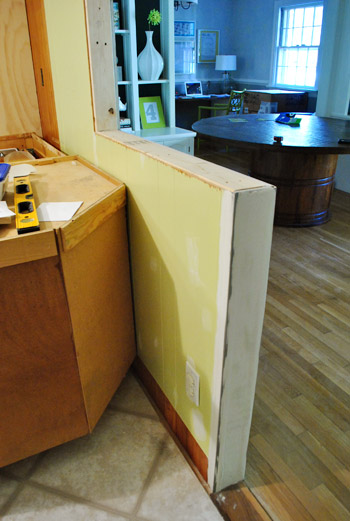
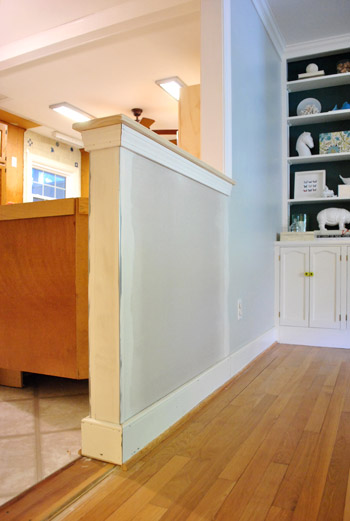
Our neighbors recently had a similar wall opening project done in their house (these guys), and we really liked how they treated their half-walls with a wood platform on top and trim beneath to dress it up a bit. It looks really finished and balanced and is also a great place to set stuff out when entertaining (like a few small dishes of nuts or candy or some pre poured drinks). So we bought this basic plank of pine that’s eight inches wide and four feet long to use for the top ledge.
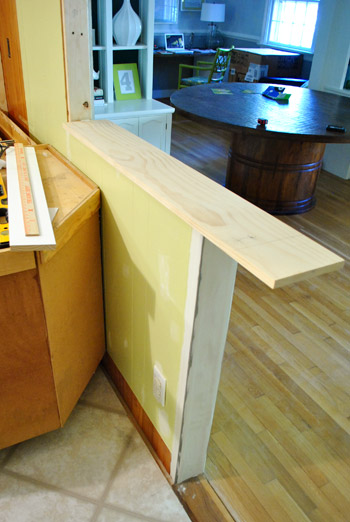
Obviously it needs to fit a bit better than that. On one end we just sliced it a bit shorter, but on the other we actually wanted to notch it over the wall so in the end it would have the same amount of overhang on each side (we had to factor in that it would have to extend beyond the trim on the inside angle, so it’ll look crazy long until we add that a bit further down the page). So we both measured and marked the wood (twice, to avoid any weird little mistakes)…
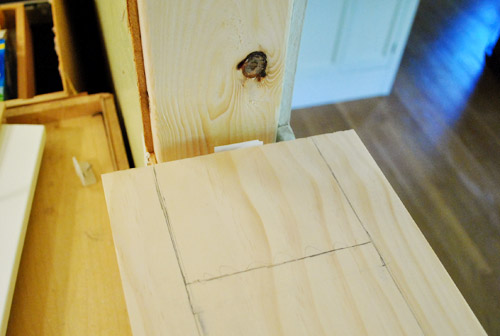
…and I ran outside to make the cuts in our driveway (using a jigsaw to cut the notch and a miter saw to get a straight edge on the other end).
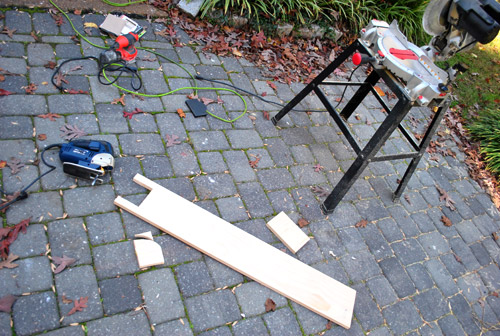
Before installing it, I also sanded down all of the edges to make them a bit softer. No one wants to slice their arm on a sharp corner walking through our new opening now do they?

Fit-wise, we got lucky. Perfect on the first try. This was either a very good omen for the rest of my trim cutting, or a sign that it can only go downhill from here. See how it looks oddly long here? That’s just because there’s no trim on either side, which will end with just a slight overhang of the ledge under it to ground it like many of the windows in our house.
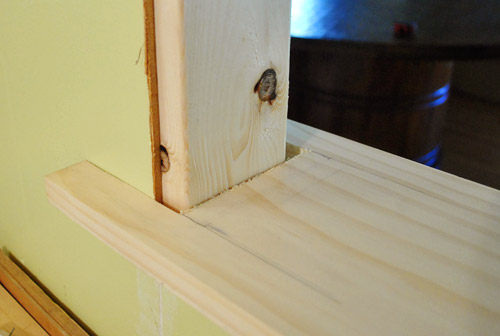
With a couple of nails on either end, we hammered that guy right into the frame and it was set (we’ll eventually prime and paint it white like the trim). Then we could begin to set the door jamb in on top of it.
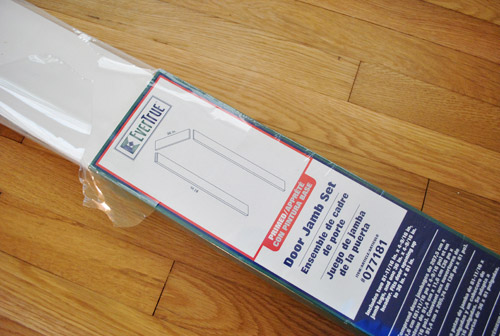
Fortunately our doorway was a standard jamb width of 4 5/8″ so I could rely on this pre-packaged door jamb kit they sell at Lowe’s for about $18. Well, not completely. It was meant for a normal-sized doorway (aka a 3ft opening) so I had to buy another $6 side piece to help extend my top jamb.
The reason you install a jamb over the wood that frames the opening is because the jamb is wider so it covers the sides of the drywall and paneling so that once the trim is added the entire opening is seamless and sealed (so you can’t peer beyond the wood framing piece from the side and see the side of the drywall).
The instructions said to assemble the jamb first and then lean it into the doorway as one piece. That didn’t seem very practical given our unique situation (aka: our uniquely sized opening), so we hung each jamb piece separately and it worked out really well. I cut the short side of the doorway first then together we held it in place and nailed it in with some finishing nails.
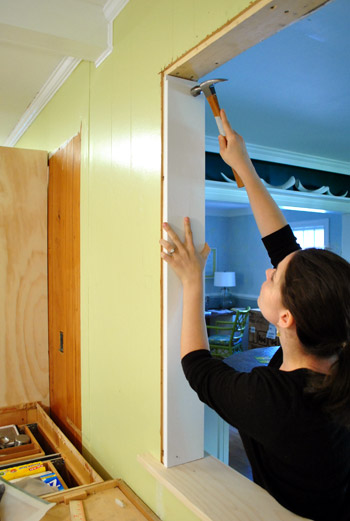
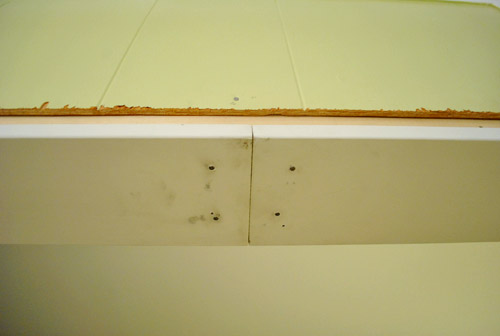
Then we slid in the short side of the top jamb and hammered again. It was finally starting to look kinda like a doorway. And trim would definitely seal the deal.
Here’s where we had to line up the two pieces of the top jamb. Ideally we’d love to have one piece, but we couldn’t find a 92″ piece. Fortunately caulk and paint will make this look pretty darn seamless. Especially since I took a minute to sink every finishing nail’s head into the jamb with a nail punch (it’s a cheap little manual tool explained more here).
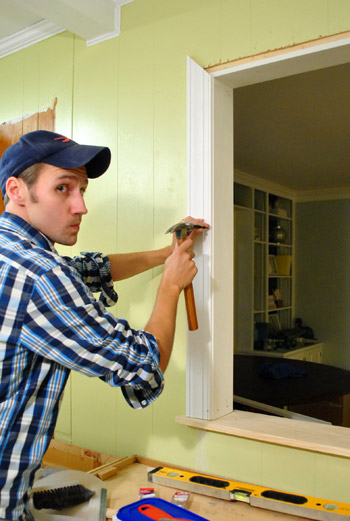
With the top on and the other side hammered in place, the jamb was officially done. So with that and the ledge checked off of our list, we could officially turn our attention to the trim.
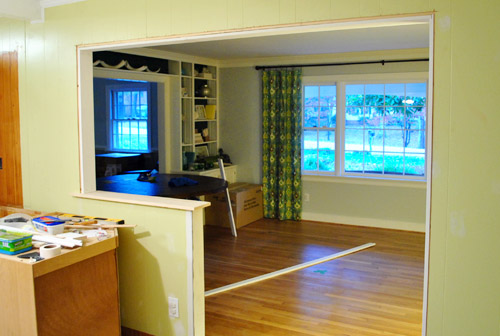
I’m not gonna go into crazy step-by-step trim installation here (you can read all about that when we re-trimmed our old bathroom). As usual it involved lots of measuring, cutting it on an angle with my miter saw, and hammering it carefully into place (using a nail punch to manually sink the finish nails to keep the trim ding-proof). This happened on all three sides of the doorway, in both the kitchen and dining room sides of the opening.
We also added some slightly smaller trim under the ledge to beef it up a little bit because:
- we had seen our neighbors treat their half-walls this way and liked how it looked
- the big picture window in the dining room along with many other windows in our house are treated the same way (with a ledge on the bottom that’s grounded by some slightly smaller trim)

In addition to installing trim around both sides of the doorway, we also had to reinstall a bunch of baseboard that had to come out during demo. Fortunately enough of it was intact enough that I didn’t have to buy anything new. Some the paint got scraped off during the removal and rehanging process, but once everything is caulked and painted again no one should be the wiser.
Some of this baseboard and quarter round may have to come up again when we do the floor, so we left some of it unfinished (like the quarter round where the transition will go after it’s added). But we tried to complete most of it so that it looks as polished as possible during our construction phase (which will last the next couple of months).
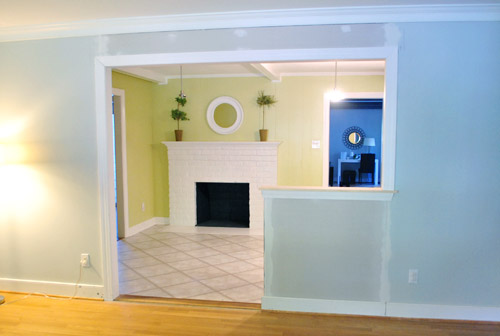
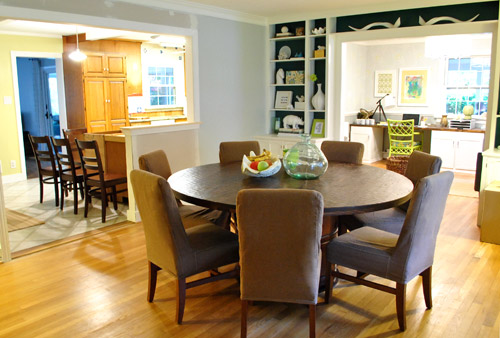
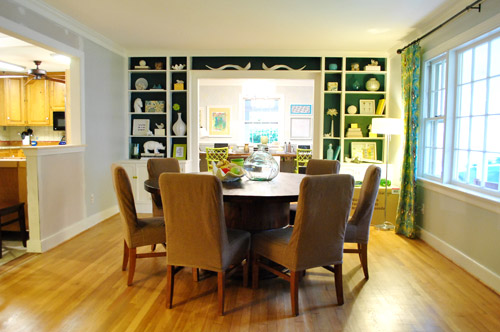
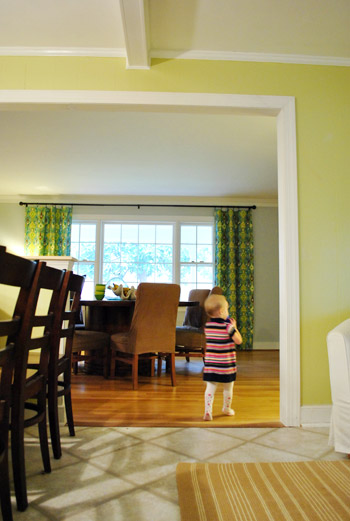
So here’s the room from both sides with the finished trim. Definitely looking more doorway-like, eh? Remember we’ll be painting the wood ledge white like the trim so it’s more integrated.
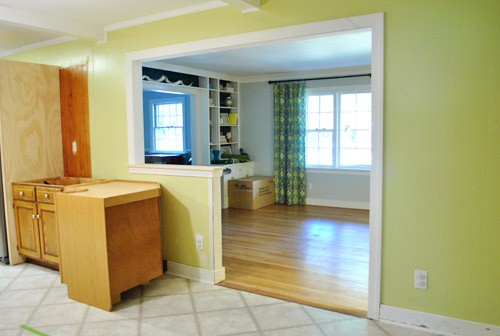
Now to make it look a bit more like a kitchen and dining room, we’ve moved furniture back in! Although the chairs in the kitchen are just placeholders (we’ll get some counter-height stools that are a bit lighter looking – maybe even acrylic or something to keep things from feeling too heavy or wood-riddled). So excuse the chaos and busyness of things that are out of place and soon-to-be changed (it’s a lot crazier and busier than it’ll look in the end).
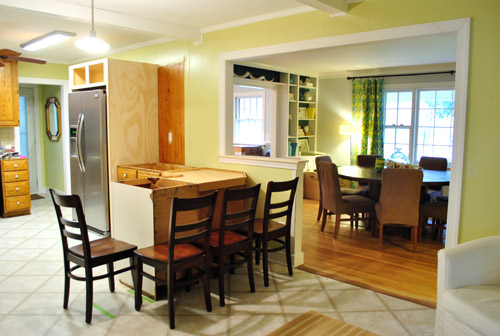
Of course there are still missing counters, walls, and trim that need to be painted, kitchen cabinets that need to be painted, and we have a million other kitchen updates to do (lighting, flooring, backsplash, yadda yadda yadda).
You might also notice that we acquired our last cabinet for the peninsula. Woot. See him there on the end? Guess how much it cost? Rhymes with “dero zollars.”
It’s from the ReStore, and no we didn’t steal it. When I told the guy I was looking for an 18″ base cabinet, he said they had one out back I could have for free. Apparently the donor left them outside where they endured a light rainstorm before the ReStore noticed them. So even though they hadn’t gotten damaged, it was against their policy to sell them. So why not take it home and give it a try? We gave it a couple of days in the carport/sunroom to ensure that it had aired out and wasn’t damp or anything. Then we looked it over and it checked out a-okay (no water damage/mold, etc). And the bonus? It’s the closest match to our existing cabinet doors and drawers that we’ve seen (the doors and drawer are beveled so they’re half-sunk, making them the same thickness as all of our half-sunk doors and drawers).
Oh and see the tape lines in the pic above? The first one marked where the peninsula would end and the second one marks where the 12″ counter overhang will end- so we can try to picture it as the rest of the room comes together.
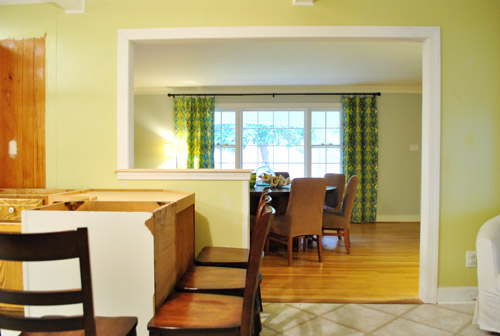
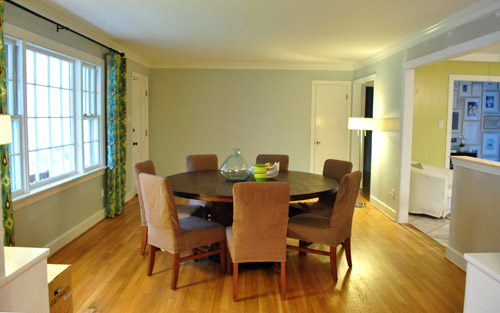
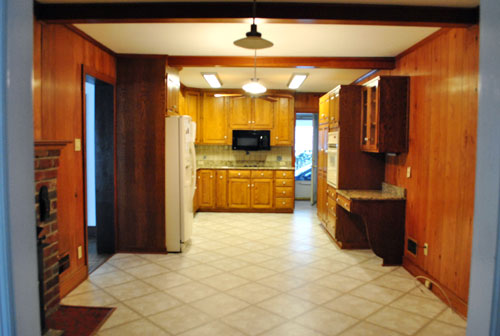
Here are a few more shots to show you how much the opening is a game-changer around here. Even with full chaos going on, it’s such a difference. It’s so nice to have more daylight in the kitchen thanks to the opening. And once we paint the cabinets and install our new white counters it’ll be even lighter in there (with mocha cork floors to ground things).
Here’s a shot through the opening now that there’s trim and the table is back and we re-hung the curtains. We love how the opening lines up so well with our big picture window in there.
Here’s the other direction. Now we can enjoy the fireplace from the dining room.
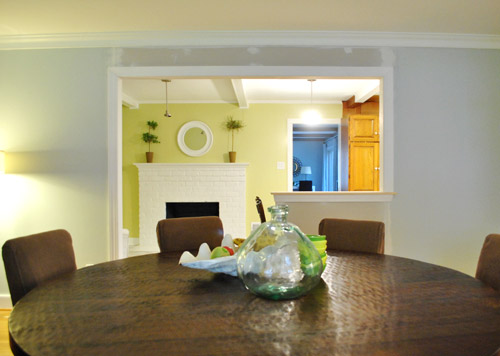
Here’s another shot looking past the dining room into the office. Ignore the abundance of odd items on the dining table (a faux clam fruit bowl, a stack of serving bowls, and a big clear vase) and the big box and floor lamp near the curtains on the right (they’re not permanent of course – just need to add a big chandelier over the table and install the new dishwasher in the box). So it looks crazier than it eventually will when things are settled.
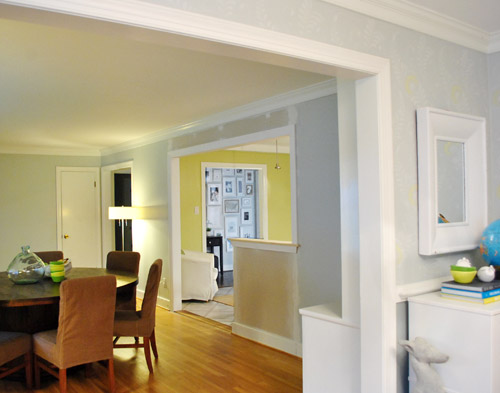
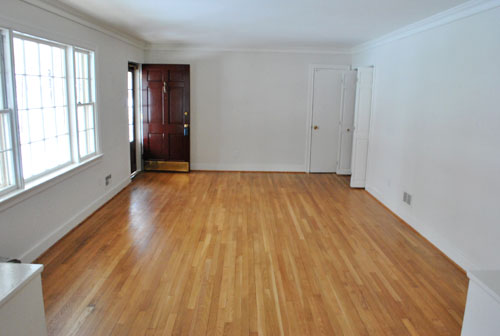
Here’s that room from the other direction (still need to add a big buffet with some large art over it and a nice sized rug to anchor the entryway area (among other things).
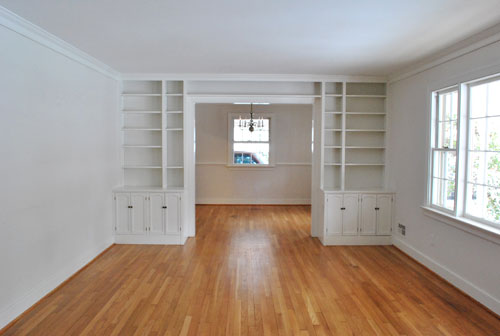
One of the coolest “bonus views” that we gained was the peekaboo into the hallway frame wall all the way from the office. It’s so nice to see the sunny avocado kitchen framing the view.
We sadly didn’t manage to get any photos of Burger running through the new doorway (the little guy was a blur), but here’s Clara loving the new route.
She’s such a quick adapter. She just sees something new, smiles, and tries it out. A day later it’s old hat. Like it’s always been there. Although we’d argue that it should have always been there anyway. Burger is completely used to the new flow too. He cuts through there all the time.
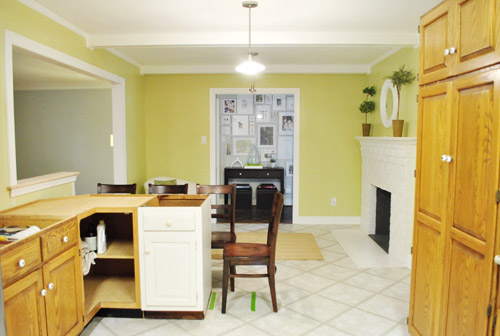
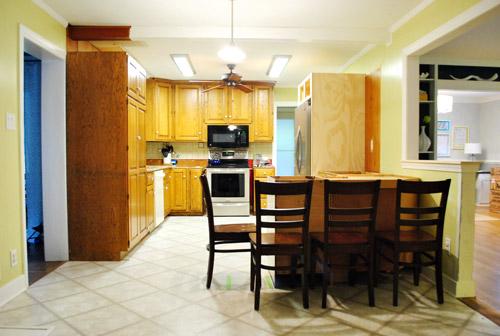
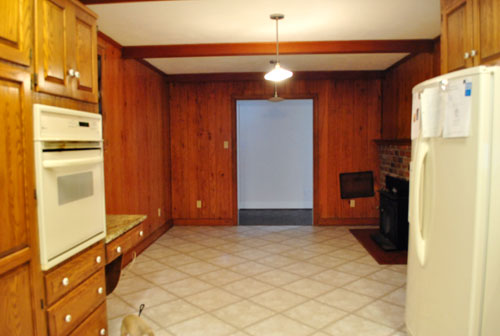
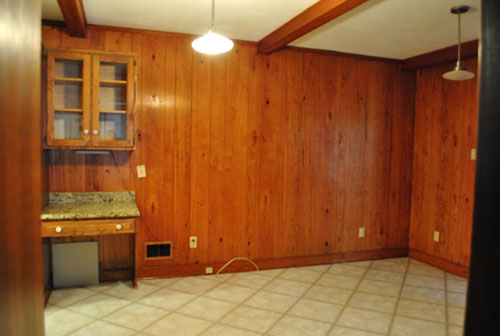
Oh and since we always love taking a look back, here are some older shots from similar angles to some of the ones above taken right after we moved in last December:
What a difference eleven months can make, huh? Still have lots to do, but it’s getting there one day at a time.
Oh and when it comes to costs, finishing the entire opening ourselves was $90 (that includes doing drywall, adding door jambs and the ledge, and adding trim on both sides of the opening). It would have been $250 to pay the contractor to do that stuff, so we’re thrilled that we could take it from here…
… and save 160 big ones.
What did you guys do this weekend? Any other door jam, ledge, and trim stuff going on? Any standing around and gazing lovingly at a new doorway? There was a fair amount of that going on here.

Christine says
I love how now the strange fireplace placement is PERFECT. It makes sense!
I can’t wait to see how it all turns out!
Penny says
It looks wonderful!
However,”The reason you install a jamb over the wood that frames the opening is because the jamb is thicker so it covers the sides of the drywall and paneling so that once the trim is added the entire opening is seamless and sealed (so you can’t peel beyond the wood framing piece from the side and see the side of the drywall).”
Do you mean wider not thicker? And I KNOW you mean peer not peel : )
YoungHouseLove says
Haha, yes and yes. Off to fix it!
xo,
s
Briel K. says
Lookin’ good guys!
Mike says
John, next time opt for mdf istead of a door jamb kit. You can get it in longer lengths, so you don’t have to deal with seams.
YoungHouseLove says
Great tip Mike! Thanks.
-John
Andrea says
Wow, it looks awesome!!!! What a great job.
April says
That’s awesome that Burger adapted to the new doorway so quickly. I had a half wall taken out in my home to facilitate easier flow, and my dogs still won’t walk where the wall was- they go around like the wall was still there. Weirdos!
YoungHouseLove says
Haha- I half expected that too, but since there’s food being eaten in the dining room now he beelines right for it. Haha. Whatever is the fastest route to dropped crumbs, Burger takes it!
xo,
s
Loren says
This looks SO great! The kitchen & dining room both look MASSIVE now.
YoungHouseLove says
Isn’t it funny how taking something away can actually make things look bigger when they’re just open to one-another and exactly the same size as they always were?
xo,
s
Kristen @ Popcorn on the Stove says
The trim makes the opening look so much nicer! This is coming along so well!! I love the peninsula, too.
Ellen says
Okay, so I’m finally on board. Usually I have no trouble picturing future designs, but I just wasn’t felling the half-wall/peninsula combination. With the shots of the dining room window from the kitchen and the fireplace from the dining table, I’ve been converted and love the new look. Can’t wait to see the stools you pick out…acrylic is a fave of mine for looking ultra cool but blending into the background, too.
Carey-Jane says
LOVE it!!!! I want your house.
I also love how the ledge on top of your pony wall kind of copies the mantle on your fireplace…It is all coming together so nicely!!
Heather says
I love, love, love all the work you guys have done. Your home is just sooooooooo beautiful!! You guys are sooo talented :)
Sarah says
Wow! I cannot get over how much warmer and inviting the whole house looks now! It already looked good, but now there’s so much more dimension in the view lines. How pumped are you that you can make your mantle look all pretty for Christmas and enjoy if from the dining room now?
YoungHouseLove says
Yay! So excited! And we’re thinking about setting the Christmas tree up on the slice of wall to the left of the opening as you face the kitchen, so it can be seen through the picture window from the street!
xo,
s
annabelvita says
I vote two trees! One there and one in the back room. One could be all the breakable ornaments up on a little table.
YoungHouseLove says
Love it!!!
xo,
s
Ariane says
Hi ! I just love it when everything comes together with just a few nails and a trim ! What a nice job you did ! Here in Auvergne, we had a 3-day weekend (Friday was off, end of WWI) so I spent a nice amount of time tweaking the house. You can check it on my blog (it in French though but pictures are universal language !!) take care !
http://lecloslafayette.over-blog.com.
YoungHouseLove says
Love your blog! Thanks for sharing!
xo,
s
Jen @ The Decor Scene says
OMG I love it!!! Really makes it look finished. Your kitchen doesn’t look as long anymore. So much better!
So what are you guys thinking about using on the back of the cabinets…when you get to that point of course?
We painted some door moldings and base moldings the last couple of weekends actually. I love when it’s nice new white crisp molding. Rock on YHL!!! :)
YoungHouseLove says
We’ll probably use some thin wood and maybe frame it out to create some sort of simple clean-lined paneled look like lots of the backs of islands and peninsulas on Pinterest. Haha. More deets as we go!
xo,
s
Jen @ The Decor Scene says
Thanks Sherry! I can’t wait to see how it turns out. I wish I had been more into the whole DIY scene when we bought our house 4 years ago and redid our kitchen. Our contractor had no ideas of how to “finish-off” our island, since it’s an odd shape. I can’t wait to see what you guys do with yours and then I might consider making our cabinet backs even nicer. You can see what I’m talking about here: http://thedecorscene.blogspot.com/2011/02/house-tour-how-my-kitchen-was-born_25.html
Of course I would have to match stain first before installing trim. All they did was put the side panels that came with the cabinets on the backsides and put some wood filler in the seems and then stain over the wood filler. It’s not that bad at all, but it could have been prettier. ;)
YoungHouseLove says
Aw man, good luck with it! It actually looks really nice to me in the pics!
xo,
s
Teresa says
LOVE IT!!!! Awesome work, love how you envisioned it and then made it happen.
odd question, but one I battle.. what color will you paint the end of the knee wall? The color of the dining room or the kitchen? I would think the dining room, but for some reason this one always gets me.
YoungHouseLove says
Since it’s drywall and not paneling like the kitchen we’re going to go with the dining room color (soft gray) since it’s also a pretty muted choice so it shouldn’t draw too much attention to itself.
xo,
s
Teresa says
Makes sense… I just wasn’t sure if there was some kind of decorator’s rule on those areas. :)
Lisa says
I had thought, at first, that you would trim out the end of the knee wall with the jamb material, rather than just drywalling it. Did you consider that? Then the trim would completely wrap around the door opening, instead of stopping under the knee wall ledge. Hmm, hard to explain what I mean….I hope that makes sense. But I love the way it looks! My concern would be that the exposed drywall corners would get “beat up” a lot — plus I don’t recall that you have any exposed (untrimmed) corners like that anywhere else in the house.
YoungHouseLove says
Yup, we just looked at photos in magazines and in other homes (like our neighbors) at how the knee walls were treated and they were never trimmed out so we followed protocol! We actually like it because vertical knee-wall trim might be too much with the ledge and the trim under it, etc.
xo,
s
Joy says
I was wondering that too! I thought you would continue the jamb on the half wall or paint it trim white.
YoungHouseLove says
We knew if we continued the jam down there we’d have to trim it out and then it might just be too boxed in (all the other half walls we looked at in person and online didn’t have trim or jamb and were just painted the lighter color of the two conjoined rooms).
xo,
s
Lindsay says
It looks amazing!!! So open and spacious. It’s amazing how fast you guys accomplish this stuff. Good job!
heather says
Nicely done! Just a quick question – why not paint the walls before putting the trim up? I’m sure it’s just a preference thing (and an I’m messy when I paint thing personally), but I’ve always seen it done the other way around. Not that it really hurts anything not to, just curious.
This weekend I spent 11 hours consistently prepping, running errands to pick up necessary items, and painting the ceiling in our laundry room, the first coat in the kitchen, one of the four walls in my guest-room-soon-to-be-office-room. That was just Saturday. Sunday I finished painting & finished scheming how to make my office. I’m pretty excited. I still have to post on the “finished” (pre renovation) kitchen, but here’s Saturdays doozy.
http://www.likeacupoftea.com/return-of-the-claw-hand
YoungHouseLove says
I just like getting into my painting clothes and getting messy once, so we knew we’d be doing other kitchen painting and priming a bit later (when we set the pantry in its final place we can finally paint the ceiling beam and the paneling around it) so we’re just waiting to do that and we’ll paint all at once.
As for your weekend- man you were busy! Looks great!
xo,
s
heather says
That’s how I tend to roll too (no pun intended, but laughing at myself for making one). I prefer to get it done at once – hence my 11 hour day Saturday haha. Once we redo the house though I will probably try to paint it before any trim goes up. Let’s just say I was scraping paint off of surfaces it shouldn’t have been on. Me = Messy.
YoungHouseLove says
Haha- love it!
xo,
s
Kim says
Looks awesome! What do you think about the traffic flow through the opening with he dining chairs and stools in such close proximity to each other? Like when they are pushed away from the peninsula and table?
YoungHouseLove says
All is well since the opening beyond the chairs and the opening is 4 feet – so even if the chairs are pushed out a whole foot (a lot more than they’d be with someone in them) there’s still 3 feet to walk through- which is wider than a standard doorway. And the dining table’s chairs are about 3.5 feet away from the opening so there’s nice flow. We have already used the dining table to have some family over to eat and people walked behind the chairs even when they were in use really easily! So glad.
xo,
s
kate says
WOW! You guys never cease to amaze. It looks wonderful, and I am so looking forward to the final product! Keep up the good work.
Lauren Nicole says
The view from the dining room looking in at the fireplace is so awesome!
Brenda says
My husband and I just closed on a house here in California on October 3rd. It was a hoarder home and nasty BUT we have demoed many things and are slowly cleaning up so we can starting putting stuff back in. I have before pics that I would like to share. We are taking some “during” photos right now. I know you both will enjoy what is going on there.
I LOVE your colors and all your DIY willingness. I read your blog often for ideas and links to other DIY blogs and sites. Thanks!
YoungHouseLove says
Would love to see your before pics! Feel free to link to a blog or flickr account here in the comments or post them on our facebook page!
xo,
s
Lanie says
Wow! I am SUPER impressed with the way that turned out. Your house looks so warm and open.
Martha says
Wow – I’m thoroughly impressed with how this is turning out. It’s just a beautiful layout and it looks so nice walking in the front door. I’m blow away!
Melody says
I love how the doorways in your house frame the view into the other rooms.
DeeJay Conley says
Stunningly beautiful. Especially the view of the fireplace from the dining room table. Simply fabulous, as always.
Jayme Mount says
It looks amazing! This is the first post where I’ve truly been able to see what a difference it makes…and understand the layout of your house a little better! lol it really opens it up! Job well done! I can’t wait to see it continue to move right along..
Patty says
Congrats! It’s looking amazing!
On a complete side note: Where did you buy Carla’s breathable bumper? And did you use it when she was a newborn until she could sit up on her own? There’s a kinds of stuff I’m learning, just about silly bumpers. Thanks!
YoungHouseLove says
We added that breathable bumper from Babies R Us when she was around 8 months old (she didn’t have anything before that) since she got more mobile and her arms and legs were finding their way out of the crib. It wasn’t waking her up or anything, but we thought she might be more comfortable with a little barrier. Hope it helps!
xo,
s
Cair says
It looks great!
I love all the pictures of the front living part of your house. A walk down 11-months of memory lane. I love how you aren’t confined by the name of rooms on the blueprint. I love your deep blue shelf paint. I love how you have seven chairs around the table when convention says six or eight. I love how you built in your fridge (so much more seemless). I love your splashes of color. I love how your house is now so very much more open. I love that your kitchen no longer looks like a bat cave. Where have the bats gone?
YoungHouseLove says
Haha- I think they might be living in the sunroom which is crammed with removed cabinets and extra kitchen stuff. It’s a mess out there! But it’s a necessary evil to get the kitchen going! Haha.
xo,
s
Nancy says
It looks like a different house now! I am amazed at how you could walk through this house and see all this potential when looking for a new home. I thought I had a good imagination but you all take it to another level. :) I also love how you apologize for a house that is barely messy mid-renovation. Especially when it is neater than my house is normally. I blame it on the three kids.
I thought that I read somewhere in the account of this new doorway that there was one there before? Did I totally hallucinate that?
YoungHouseLove says
Yes, when the contractors that we brought in for estimates investigated some of them discovered some reinforced areas that indicate that there was once a door there (the kitchen and the fireplace used to be two different rooms, a small den and a kitchen – so perhaps it was a walkway into the den).
xo,
s
Beth says
It looks so great! Really does seem like it should have been there from the start! We spent the weekend re-wiring and putting a vent fan in our bathroom!
Sara says
Excellent work. It looks great … all that new light in the kitchen! The views from each angle also work well.
Kathy says
Looks like it’s always been there—specially after you finish it with paint, etc.! And the opening is so great for keeping an eye on Clara from the kitchen now that she’s so mobile! :-)
Kelley says
The pics with the furniture back in place look so great. Opening that wall and being able to enjoy both rooms at one time adds an instant new warmth to you house! Love it!
Angela says
I love the change so much I want to buy it dinner and see how it goes. :)
It looks fantastic. Great job!
Ryan Elizabeth says
i was having a hard time imagining the peninsula everytime you asked. but i’m getting it now. and it looks amazing. i even could imagine the buffet and art. keep up the good work. i am always happy to check out your progress every morning. :)
Kelly @ Corner of Main says
Wow! What a difference; it looks amazing and it’s not even done! Great work =)
kitchen and bath Charlotte says
Beautiful work! I’m sure that 11 months so far was worth it when looking at the progress your home has made AND knowing you did it yourself. Great job, good luck as you continue to remodel :)
Kim @ Wonderings says
The opening looks great!! I painted my bathroom this weekend. Major change for us!
http://wonderingsofatwentysomething.wordpress.com/2011/11/14/what-a-day/
YoungHouseLove says
Pretty!
xo,
s
Catherine says
It’s posts like this that make me just LOVE this blog. I admit I thought your plan was a little wonky at first, but it looks so good. The fireplace looks so centered and nice now. Great job!
In case you decide to go with basic wood barstools, I wanted to recommend these ones: http://www.barstools.com/bar-height-stools/wood/beveledseat29inchstoolsetof2.cfm We searched high and low for something very simple and finally landed on these. (everything in stores was very heavy with backs or leather seats, etc) On second thought they might not be great if you want Clara to sit there… Well, I wanted to pass along the bargain anyway :)
YoungHouseLove says
Thanks Catherine! Yeah, we’re wondering if we’ll appreciate a back for the kiddo(s) after they outgrow the baby seat. Should be fun to see where we end up!
xo,
s
Donna Jean says
WOW! it looks so good. once you paint everything no one would be the wiser that this opening wasn’t always there. I am so excited to see how everything looks once all the major stuff is finished – kinda makes me wish i had a wall i could knock a hole in!!
Happy 18 months to Clara!
Holly says
I’m loving all the changes – it’s coming along great! I absolutely love seeing how you guys have transformed it so far, knowing that you’ll make it look even more awesome!
Tracey says
I say this with all love and affection: You guys suck. Do you remember the amazing “bee” mercury glass pendant you got at the Pottery Barn Outlet for over your kitchen sink? Why didn’t you get me one, too? I just bought the same one online for $123. UGH. I’ve loved it ever since you showed it off and I finally just saw it in a catalog. They’re all sold out save for three. No sale or outlet price though. ;( You guys for the win! ;P
YoungHouseLove says
Aw man, I have no idea why that was so cheap when they’re still selling it online for more. I wonder if we got a returned one that wasn’t all packaged up nicely? So sorry we suck!
xo,
s
Kris says
I love your new opening and all the long views, and peekaboo views that draw you further into the house. I have long been a fan of Sarah Susanka and she talks about sight lines and long views.
Here’s what we did this weekend: http://kristenbalvin.blogspot.com/2011/11/craft-room-update.html
I didn’t get quite as good a deal on the cabinets as you did for your office, but I am excited about how my little room is coming together.
Have a great day!
YoungHouseLove says
Wow- that looks great!
xo,
s
Mama D says
I was a little skeptical about the whole peninsula, but it looks awesome! All that added light in the kitchen is the best part, I think! Great job!
Carrie says
Looks great! I assume you will be getting new chairs for your bar/peninsula? Right now the view from the front door screams “lots o’ chairs!” I think a tolix stool or something else backless would look really nice. Or if you are keeping the bar table height, a bench? :)
YoungHouseLove says
Yup, we mentioned in the post that those are just placeholders and we’d love something less chair/wood-ish. Maybe even clear acrylic so they slide right in without being too obvious. Can’t wait to see where we end up!
xo,
s
Amanda C says
Or maybe even an acrylic bench? Do they even make those? ha!
YoungHouseLove says
That could be fun! Although we don’t know if for function reasons it would be nice for folks to have their own individual chairs (so John can get up to get us more water while I stay seated and stuff my face- haha).
xo,
s
Katie says
looks great! have you ever considered widening the doorway to the living room? seems you could widen it a bit and gain even more openness.
YoungHouseLove says
Yes, we’d love to but it’s a big thick brick wall (used to be the back of our house before the addition) so it’s a for-later kind of thing!
xo,
s
Alissa says
Still can’t believe how much your home has changed in less than a year! Crazy!
Gotta admit, the half wall kinda looks funny to me from the dining room side. Is there a reason you didn’t just punch the whole wall out and have the peninsula & counter act as the half wall? I’m sure it’ll come out amazing in the end but I just can’t see it right now.
Alissa says
Sorry, by “whole wall” I meant have a square hole without half wall. Not asking about completely eliminating the separation between the kitchen/dining room.
YoungHouseLove says
No worries! We listed a bunch of reasons why we wanted the half-wall here in this post. It’s definitely something we thought a lot about. Here’s a summary:
1. we didn’t want the peninsula to look like an afterthought (like it was placed in the middle of a doorway without much planning)
2. we thought the half-wall would ground the peninsula, so it would feel solid and supported (instead of more like it’s floating between two rooms)
3. we already have four base cabinets in the dining room thanks to the existing built-ins (so we don’t need additional cabinetry/storage)
4. because of those existing built-ins, we thought an open bookcase, cabinet, or other form of built-in located less than three feet from the giant wall of existing built-ins would be a bit much
5. our threshold would be a lot more seamless (if the half-wall weren’t there, there’d be an awkward strip of cork flooring between the peninsula cabinet and the dining room floor)
In the end it’s definitely just one of those personal preference things though!
xo,
s
Alissa says
Totally understand the personal preference thing, and I love that you guys love it. Can’t wait to see how it all comes together! :)
Meghan says
this is looking AWESOME! To me…it seems to have come together quickly, but for you guys i’m sure this is a little slower moving than you’d like! Will SO be worth it!
Amy Annette says
I love that the dining room curtains go so well with the grellow walls in the kitchen. So lovely! :D
Karen @ Aurelia Interiors says
It’s looking so great! I especially love the view from the office to the hall that you pointed out and how you can see the paint colors of all the rooms once!