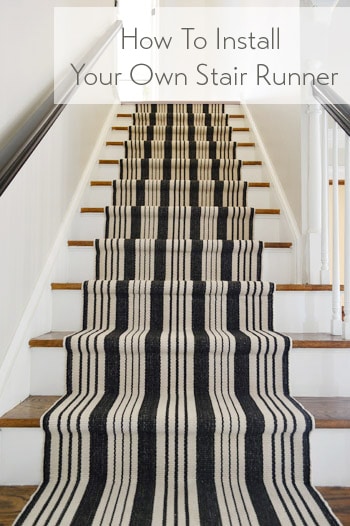
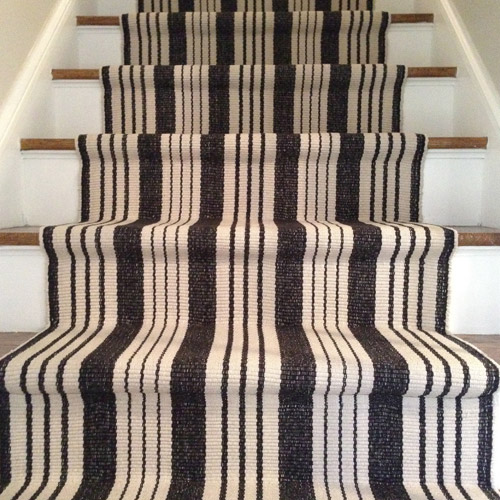
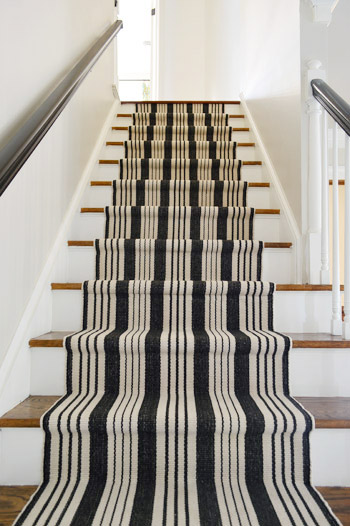
Installing a stair runner may seem intimidating, and the good news is that adding ours was pretty darn easy and we love how it looks (and feels underfoot). So here’s a full tutorial for how to install one yourself, including how to join two runners if one isn’t long enough for your stairs, how to finish off the bottom cleanly, and how to give the stairs and railings a fresher look too.
Update: For anyone asking for the rug info, here’s an affiliate link to the exact one we used.
Project Step By Step
The whole project took us about 20 hours in total, but that included more than just installing the runner itself. We also gave the whole staircase a fresher look with painted risers and darker stained railings. So here are the total steps for the makeover, but we’ll be picking up around Step #5 today.
- Priming and painting the trim and railing
- Selected your runner (more on that and the previous bullet here)
- Remove the old carpet and rug pad
- Paint the stairwell walls and ceiling (more on that and the previous bullet here)
- Prim and Paint the risers
- Stain the railings
- Measure and mark your runner placement
- Cut and lay out the rug pads
- Install the runner (including where to staple and how to keep ends looking finished)
- High five like maniacs!
How Much Did This Project Cost?
Here’s a general cost breakdown of what it took us to complete this project:
- Two runners (here’s an affiliate link to the exact ones we used): $199
- Electric stapler & staples: $54
- Rug pad: $39
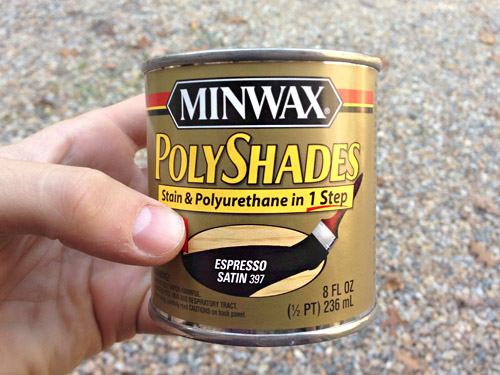
- PolyShades stain & brush for the railings: $11
- Primer & paint for the risers, posts, trim, walls, and the ceiling: $0 (we had it already, but a guess for what you’d spend might be $80)
- TOTAL: $283 (or $363 if you need to buy primer, trim paint, and wall paint)
We read here that it would typically cost about $318 for a similar installation job by a pro – which doesn’t include the cost of the runners or the padding themselves (or the staining/painting/priming that we squeezed into this makeover), so this could easily been twice as much if we had hired it out.
Preparing And Painting The Stairs
Wednesday, November 6th – LATE AFTERNOON: Time to paint those risers. Since we knew it would take lots of coats, Sherry taped off the bottoms to make things speedier than having to meticulously edge each time and I applied a coat of primer (since it’s low-VOC, but not no-VOC) to block any wood bleed.
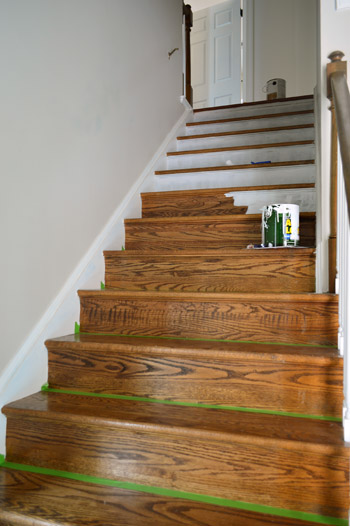
Wednesday, November 6th – NIGHT: With the primer dry, Sherry applied the first coat of paint (it’s the same no-VOC Simply White in semi-gloss that we’ve used on trim everywhere else).
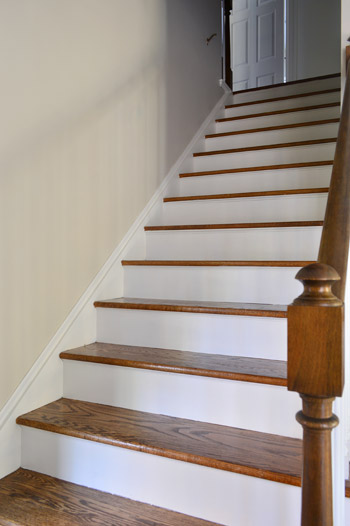
Thursday, November 7th – MORNING & AFTERNOON: Sherry applied coat #2 of paint and I went in for coat #3 later, just to be sure we get a good solid white tone on each tread.
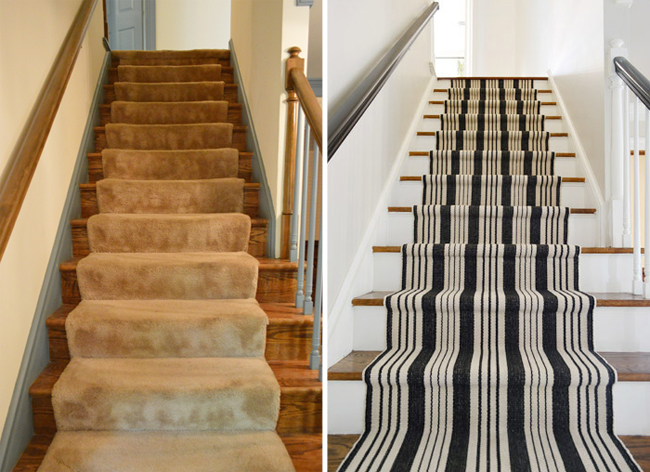
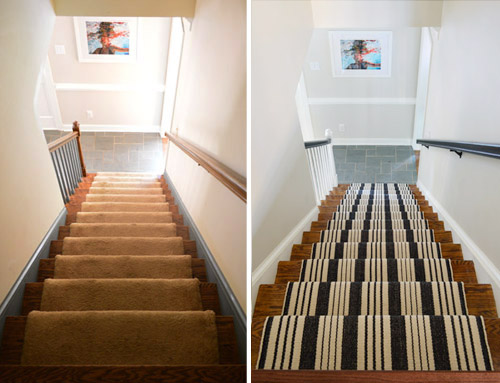
Thursday, November 7th – NIGHT: Right before bed, I applied a coat of Rejuvenate to each tread to restore the wood finish (more on that here). I worked my way up the stairs right before bed so that it could cure overnight while we were all up there sleeping. In the morning we woke up to a much fresher looking staircase. We love the look of bare stairs like this, so we soaked up this pretty sight, and then pushed onward towards our goal of a fresh new runner (we’d just prefer some extra padding with young kids in the house to cushion the blow if anyone does fall).
Painting & Staining The Railing
Friday, November 8th – MORNING: Since we wanted to get as much messy stuff done before the runner was installed (stain drips on a new carpet = the stuff of nightmares) we dove into staining the railings a deeper tone so they’d pick up some of the black in the runner (more on what inspired us to do that here). We found this PolyShades stain + polyurethane that didn’t require any heavy sanding (just a light roughing up) in a nice deep color, so we grabbed it.
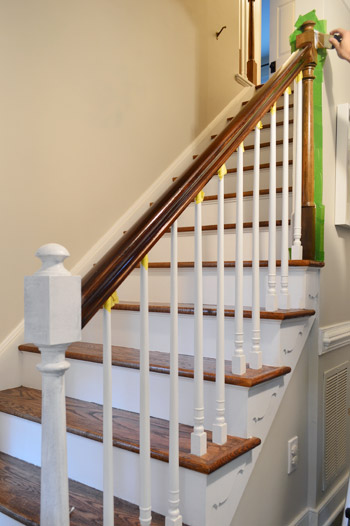
Unlike stain, you don’t wipe off the excess once it’s applied. The railing on the right side of the stairs is pictured here, but I also did this to the long rail that goes up the left side of the wall (we had removed that when we painted the walls and ceiling last week and decided to just keep it off so I could easily do that staining outside).

Friday, November 8th – AFTERNOON: The first coat didn’t quite dry as dark as we hoped, but we crossed our fingers that a second one would do the trick. The first should’ve been dry after 6 hours but it was still tacky, so rather than wait an unknown amount of time for it to cure, we switched gears and started painting the newel posts, which we decided would look best white like the other stair posts after seeing some Pinterest images like that and loving them. Like the risers, Sherry taped it off so I (the less perfect cutter-inner of the two of us) could apply the primer.
Friday, November 8th – NIGHT: Sherry applied the first coat of white paint (also BM Simply White) to the posts while I read weird Buzzfeed articles to her out loud to pass the time. Oh yeah, we know how to party on a Friday night.
Saturday, November 9th – MORNING: Sherry applied coats 2 and 3 of white paint to the posts about three hours apart.
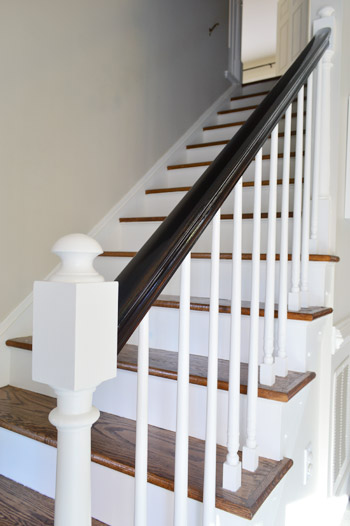
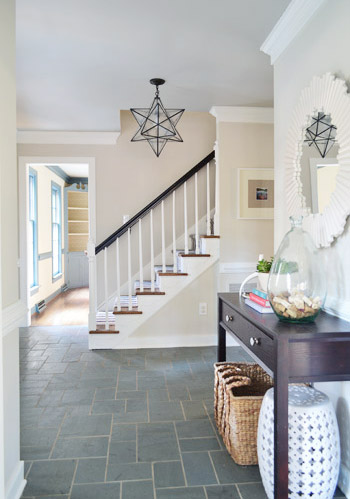
Saturday, November 9th – AFTERNOON: With the post paint dry and the first coat of stain on the railing more than fully cured, I could go back to applying our second coat of stain. Beforehand, I had to rough it up slightly with some fine steel wool. Thankfully the second coat made it darker, just like we hoped. We were aiming for it to pick up on the black stripes in the runner as well as the dark espresso console table and the oil-rubbed bronze light fixture nearby in the foyer.
Planning And Marking The Runner Placement
Saturday, November 9th – LATE AFTERNOON: With all of the messy stuff done, we could finally turn our attention to the runner. Thanks to a couple of helpful tutorials (like Rhoda’s and Jenny’s) we had some goods tips to go off of – like when Jenny mentioned that she wished she had measured to keep hers centered so the stripes aligned all the way down. Thanks to her post, we decided to create some tape guides to follow so we could make sure the runner didn’t shift from side to side as we move down the staircase (which can be especially obvious when it has stripes). In order to be centered, our guides needed to be set 4″ from each side of the wall, so we marked that line with some tape.
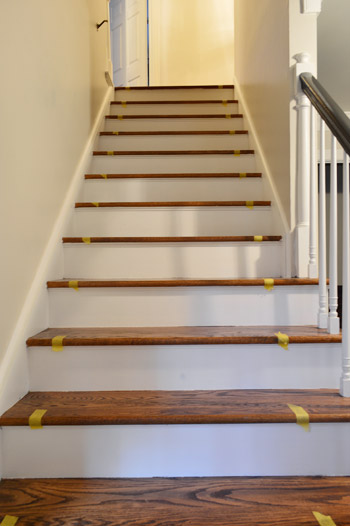
We read that if your stairs widen on one side at the bottom like ours do, it’s recommended that you center them on the narrowest part of the staircase, which means the part up top (if we had centered the runner on those few wider steps at the base of the stairs, it would have rubbed against the right wall on all of the upper steps and looked a lot less balanced).
Adding Your Rug Pad
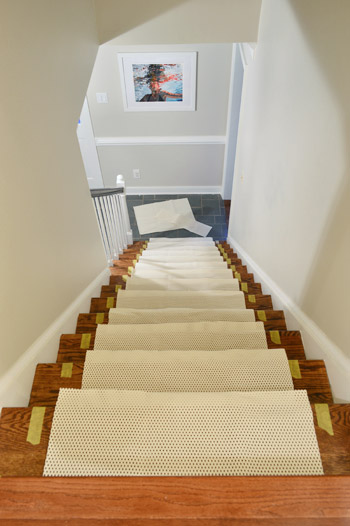
We also wanted to use some sort of padding to keep the runner from sliding and to add some extra cushioning, but we wanted to be sure to go with something that wouldn’t adhere to or damage the wood stairs, just in case we want to go runner-less again sometime when the kiddos are older, so we got a standard 5 x 8′ rug pad at Target and discovered that cutting it in half made it just about the perfect width.
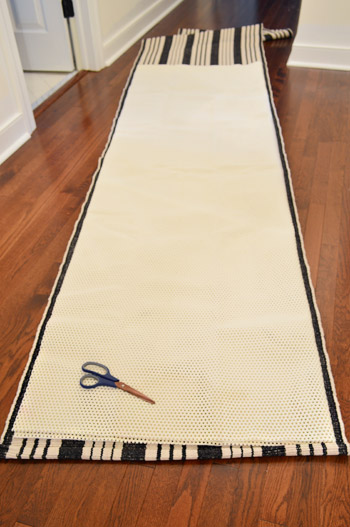
We took the time to cut individual pads for each riser (long enough to wrap around the nose of them) so that we could get this all done for the cost of just one rug pad instead of needing to buy two. We didn’t adhere these at all, knowing that stapling through the runner on top of them would hold everything nice and firmly.
Starting Your Runner Installation
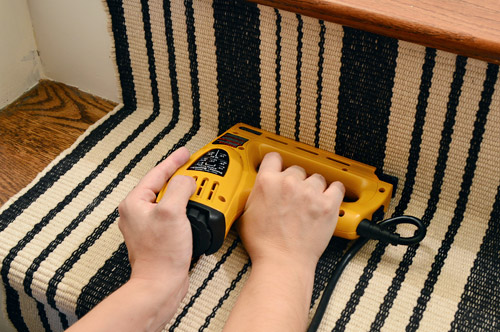
Sunday, November 10th – MORNING: We took Saturday night off to do something fun, so Sunday was crunch time. Less than 24 hours ’til posting time. Yikes! We started off by using an electric stapler like this one to set the edge of the runner right under the nose at the top. Our runner had a pattern all the way to the end and the rolled edge was barely noticeable, but had it been more distinct, we would’ve cut off the edge and rolled it under so the pattern would look seamless instead of having an obvious border at the top.
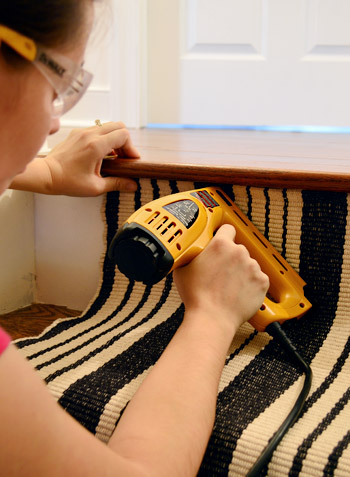
We noticed the first staple that we shot through the runner was more visible than we’d like (since it was a slice of silver on a black stripe), so we took a second to color the tops of a row of staples with a black Sharpie (a trick Sherry saw on Pinterest for making decorative gold staples). Then we were sure to staple only into the dark parts of the rug so they’d blend in. Worked like a charm.
With a row of staples in at the top, we then pulled it tight along the riser and Sherry stapled a row along the bottom into the riser, not the tread. We wanted to avoid stapling into the tread since that’s where people would be stepping and we didn’t want the staples to “surprise” any bare feet (even though they generally sink into the rug and aren’t pointy or anything).
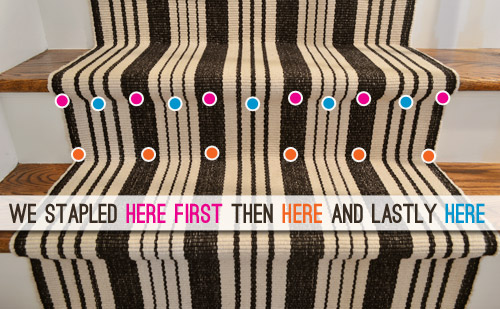
Sherry had been firing a staple into each of the big stripes (the pink ones in the diagram below) but we found it wasn’t enough – at least at the top under the nose, where it seemed to sag a bit between staples. So she went back and did another row of staples up top (the blue ones that you see below). Here’s a sense of where we put staples and in what order:
How To Adjoin Two Runners Seamlessly
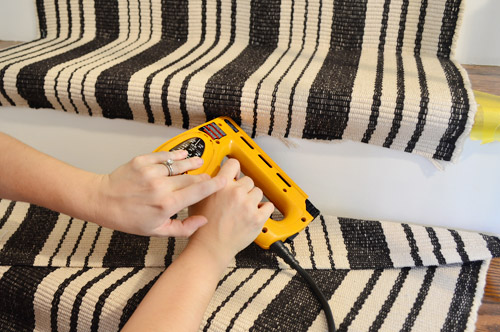
One runner wasn’t enough to get all the way down the stairs, so at some point we knew we’d have to join the second one as seamlessly as possible to the first one, so we wanted them to meet under a tread nose where the joint would be least visible. First we snipped off the end of the first one so it would wrap just below the nose.
Then we stapled that one under the nose, just like we had done on all the steps before it.
I didn’t get a good picture of the next part (picture us sweating bullets and using all available hands) but we just lined up the edge of the new runner as flush under the nose as possible. Our goal was for the edge to catch your eye as little as possible, so by tucking it under the nose of the stair, it seemed as hidden as we could get it. Can you see the seam in the photo below?
You really have to look for it, but it’s under the nose of the the step there on the bottom. The line where they meet is a little more defined than the underside of the other steps if you’re this close (Sherry was about a foot away when she snapped this photo) but if you’re standing up you really can’t detect it at all, which is a relief because during this “joining of the rugs” we were both really nervous that it would be bulky and obvious.
Finishing Off Your Stair Runner Installation
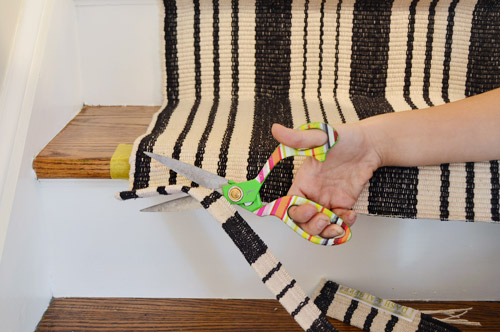
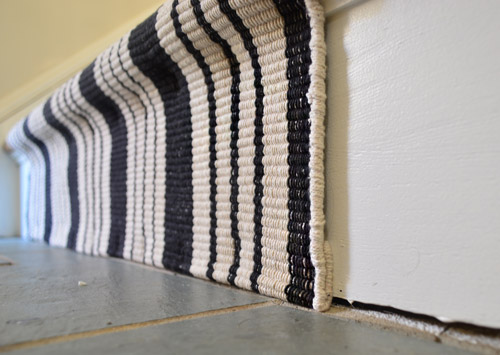
The other tricky part was the very end, where we also had to cut off some excess runner, leaving about an inch that could be rolled under.
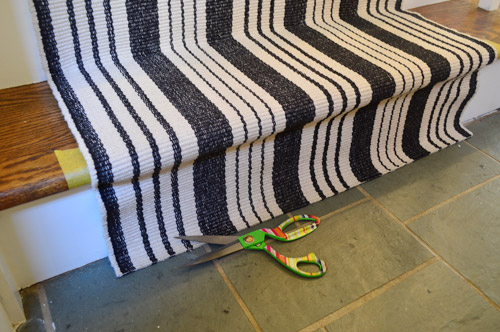
By rolling it under and stapling it like this, it meant that our cut didn’t have to be perfect and the edge would look more finished (and would be protected from fraying).
I’ve kinda broken from the timeline structure that this post started with, but despite the many steps to installing the runner, it only took us about three hours. In fact it was the fastest step of the whole stairway makeover process (removing those old staples and painting the ceiling while balancing on a ladder were waaay more intense). So to anyone wondering if you can install a stair runner, we’d rank this task as simple and straightforward. Especially if you spring for an electric stapler, which really made things easy.
We’re both pleasantly surprised at how soft the runner is (since some flat weaves can be scratchy). As for the light color, we’re a no-shoes household, so that should cut down on lots of potential dirt or staining (we’ve had light colored rugs like this in rooms like our living room and kitchen for years without any issues). We also hear that Dash & Albert rugs hold up well (Sherry’s friend with two young kids has a white and brown one on her steps and is really happy with it) but we’ll keep you posted either way!
Oh and this photo shows why we opted not to stain the vertical newel posts on the railing that you see below on the left (and painted them white instead). Since we knew the railing on the right would just be a clean dark stripe on that side of the stairs (with nothing vertical going on) we thought something dark on the left going down to the floor might look unbalanced.
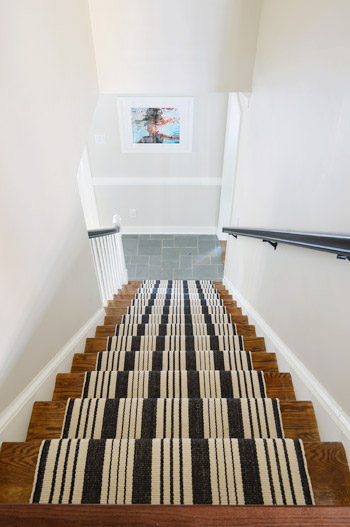
We’re really happy with how it turned out. The color scheme and pattern of the runner are still pretty classic and not too wacky, but the high contrast elements still make it interesting.
We especially like how the dark stripe in the runner and the new railing color ties into the light fixture and the console table. If only there weren’t all that blue trim winking at us from the dining room…
Oh yeah, and to complete my timeline…
Sunday, November 10th – EVENING: Finally finished sizing pictures and writing a super long post about the previous week of stair projects. Poor Sherry’s gotta proofread this sucker in the morning. Sorry honey! But the good news is, we made it!
What did you guys do this weekend? Any runners going in, or old carpet coming out? How about using dark stain on something to accent it? We’re really having fun with contrast these days, which is admittedly something that used to scare us. Change is good.
Update – Wanna know where we got something in our house or what paint colors we used? Just click on this button:

Note: this project was originally posted in November 2013
*This post contains affiliate links to products we have purchased and loved *

Leave a Reply