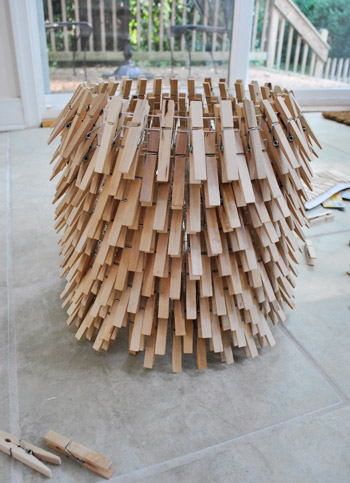
Archive for August, 2011

The Best $6 We Ever Spent

Last weekend we journeyed two hours north to Arlington, Virginia so Clara could have some quality time with her cousin Elsa (and apparently so my cousin Travis and I could rock some daddy-plaid, shorts, flip flops, and matching Kettler bikes together (the latter of which were both his, found for a huge deal on craigslist).

While there, Elsa’s mom, Cat (who is Sherry’s BFF that we introduced to my cousin back in 2007 – and now they’re married with two kids) took us to this cool shop in Old Town, Alexandra called Red Barn Mercantile. It had tons of beautiful stuff, but what caught our eye most was this bowl of vintage printing press letters.

Six bucks later we snagged a “C” so that Clara can be now represented amongst our original collection of letters and numbers (7, J, S, L, O, V, E). The first three were purchased at a NYC flea market just weeks after we started dating on 7/7/05 (which explains our love of the number 7) and the last four came from a flea market in DC a few years later. We also looked for a “B” for Burger, but they only had lowercase ones (which just look like a “d” instead, since they’re backwards). Sorry Burgs! The search for an uppercase B continues…

But that’s admittedly not that amazing as $6 purchases go. It was actually our other $6 find on that trip that we’re still pinching ourselves about. You ready for this jelly?

Six dollars got us more than just this cabinet hardware…

…it even got us more than this whole cabinet…

…it actually got us SIX CABINETS. All for just six measly dollars. Not each. Total.

If you’re in as much disbelief as I was when Sherry first told me about her find (Clara was napping in the car, so I stayed outside with her and Sherry went in and called me with the details), here’s some proof:

We found them at the Habitat for Humanity ReStore in Alexandria (sooooo glad we decided to swing by there while visiting the area) and they truly were just selling them for a dollar each. Apparently they were once nightstands at a hotel. The hotel donated a truckload of them and the ReStore had finally gotten rid of them all (priced at $15 each)… until some overzealous purchaser brought back a bunch that he had leftover. So the ReStore guy told us they priced them at just $1 to get rid of them quickly (they already made their money we assume, since they have a No Refund policy).

Oh and for anyone worried about bedbugs, I’m an obsessed checker-outer due to a life-changing encounter with them back in NYC, so I frantically looked over every inch of them like a paranoid weirdo before taking them home (and then did another thorough check once at home, just to be sure). You can read about that harrowing NY experience here. When it comes to what I look for, I’ve learned that bed bugs are visible to the naked eye, so you should be able to see them and their droppings if you look everything over and check cracks & crevices. They also don’t like slick surfaces like glossy cabinets or plastic bags and prefer softer things like mattresses and upholstery where they can more easily walk, along with dark crevices where they can lurk/hide/ruin your life. So when buying something with more places to hide than cabinets (like an upholstered armchair) you’ll want to be extra careful – but you should still see some evidence of them in the form of small little stains on the upholstery, usually along the seams – which are (shudder) their droppings. You can also leave things in a holding area like a garage or sunroom for a day or two and recheck them again before bringing them inside.

And speaking of getting them home, miraculously we could fit two into our Altima – even with all of our travel gear like a pack & play, a dog crate, a baby in a big ol’ carseat, a husband, a wife, etc (one cabinet fit in the trunk and the other sat in the front seat while Sherry rode in the back with the Burger, the bean, the pack & play, and the folded up dog crate). The ReStore held the others since my dad was serendipitously going to be in the same area for a meeting (he drives a Honda Pilot so the remaining four fit nicely inside). We’re usually the suckers without any means to get big things anywhere (especially when we’re so far away from home), so it was a nice change of pace. I guess these $6 cabinets were just meant to be ours…

Well, as evidenced above, they actually cost us $6.30 with tax. So I guess it was the best six dollars and thirty cents that we ever spent.

They certainly don’t feel like shoddy $1 cabinets. I mean, just check out the interior fittings on them. Hellooooo slide-out shelves!

If you didn’t already connect the dots, they’re meant for our built-in office workstation that we talked about in this post and we hope to set them up like this: two cabinets against the left wall, open space for a chair, two cabinets in the middle, open space for a chair, two cabinets against the right wall to create built-ins that we discussed right here in this floor planning post…

… just like the set up in this inspiration room (found here on Pinterest, originally from here):

With that arrangement we’ll have exactly 30″ for each of our chair openings, which is perfect since our chairs are 24″ wide (and six inches of wiggle room is a lot more than we have in our current small-homemade-desk-made-from-a-door situation). Of course our new cabinet friends do need a bit of work before they’re ready to move in permanently. For starters, they need a coat of primer and some glossy white paint (they appear to be 100% solid wood, so they should be great when it comes to adhesion and durability like traditional painted cabinets). Oh but we’re not going to paint the inside of them (lots of white built-ins actually have wood interiors – which hide marks and smudges a little more, too). All of the new white KraftMaid drawers from our first kitchen were wood on the inside, and we really loved it. But don’t worry, we’ll share all the painting details as we go.

We also need to do something about their height, because they’re only about 26″ tall and our chairs are 27″ (so the arms wouldn’t even slide under them if we added a countertop at this point).

Ideally we’d like our desk to be about 30″ tall, so I’m thinking I’ll build just a simple box on top of each cabinet pairing that I can paint along with the cabinets so they look seamless. Haven’t decided if it’s worth building it as a little open shelf up there or just fronting it with a solid piece of wood (kinda like those dummy drawers in front of kitchen sinks). Or we could build them up from the bottom. Not sure yet, but we’ll definitely keep you posted.

It was not only amazing to find $1 cabinets, but to realize that they weren’t too tall like 99.9% of the base cabinets out there (which are 35″ and hard to cut down since they’re one solid piece that includes the kickstep) was such a relief. Plus they were still deep enough for a desk (upper cabinets were the right height but only 12″ deep, which would make for a very very skinny desk or all need to be built out from the back with a lot more lumber than building these up a few inches). So yeah, we’re psyched. After some pretty thorough searching, the cabinet gods were good to us. Which was especially nice after the file cabinet gods weren’t as sweet (we searched for eight months for secondhand file cabinets for the office and ended up giving up and spending $150 on this system from Ikea). You win some, you lose some I guess.

Anyway, since not everyone can stumble upon the cabinet equivalent of The Dollar Store, we thought you might appreciate hearing the other places that we looked and the other solutions that we considered (of which there were maaaany). So we’ll be back to fill you in on all of that research / legwork / consideration in a few hours. Hopefully sharing a few other options that we considered may help someone else who can’t find secondhand cabinets that work for their project. In the meantime, what’s the best under-ten-dollar purchase that you’ve made? Was it clothing? House related? Did you buy a movie ticket and meet the man of your dreams there? Someone out there has to have one of those should-be-made-into-a-movie stories.

  Leave a comment

Fab Freebie: It’s A One-derful Life

***This giveaway is no longer accepting entries – see who won below!***

Thanks to random.org, our four winners are…Kathryn (who wants to know how long this paint will keep, since she’s in an apartment now), Kristen: Turning A House Into A Home (who wonders if it’s better to dust or vacuum first), Alisa Decatur (who’d like to get to the bottom of her daughter’s summer-time procrastination) and Kassie (who wants to know how much painting she’ll be doing when she buys a house). Congrats ladies!

Toss on some old clothes, because four of you are about to get painting. This week’s giveaway will cover everything you’ll need, starting with $60 worth of Olympic ONE paint. ONE is Olympic’s new paint + primer in… wait for it… one. It hides stains, resists mildew, and survives scrubbing. And at about $25 per can, you’ll be able to score at least two cans with your prize (and maybe even an extra quart).

But you can’t paint without the proper supplies, so the folks over at StackExchange are also hooking up our four lucky winners with a bunch of stuff that we hand-picked for ya (cause we paint kind of a lot, actually). So we know good rollers, Frog Tape, a drop cloth, and a short handled brush can come in handy. If you still need another boost to get painting, head over to one of StackExchange’s 50+ community-driven Q&A sites. Their DIY channel in particular is always abuzz with topics like “What is low VOC paint?” or “Can you paint a popcorn ceiling?

Note: We weren’t paid or perked for hosting this giveaway, we just do ‘em to thank you awesome folks for stopping in. See our Giveaway FAQs page for more info. Pics courtesy of Lowe’s.

  Leave a comment

A Pallet-able Compost Post

Ever since we started composting back in 2008 at our old house, we’ve enjoyed doing it (snaps for free fertilizer, reusing “trash,” and getting some subtle encouragement to eat more compost-able foods). But our composting adventures have been somewhat limited by the size of the DIY compost container that we made 3 years ago (we did eventually make a second bin, but it’s nothing like those bigger composting systems that we’ve seen at stores or in DIY magazines).

Even back in 2008 when we created our little bin, I initially wanted to make a more “legit” system out of shipping pallets (like I read about here and here) but hunting down and transporting a bunch of bulky pallets was a bit more than I was ready to sign up for. So I figured starting off with a bin and later graduating to something more built-in might be the way to go. And now just three short (ok, loong) years later, thanks to our patio supplies having arrived on pallets, I finally had my excuse to upgrade our compost system. It just took us a few months to decide where we wanted our new bin to sit. We finally agreed on this corner:

In case you need a clearer reference point, here’s that little not-at-all-to-scale map of our yard (the house is way too big and the almost-an-acre yard is much too small) that  Sherry whipped up (marked with an arrow where we added our little “compost station”):

We picked that spot because:

One perk to losing some of the ivy is that I uncovered some unexpected treasures in the process, like this ancient Hooters frisbee and a random plastic tire. Looks like this upgraded composting system is already paying off in major free-stuff dividends.

After a bit more work with my shovel and rake, I was eventually left with this clearing. Some of the online instructions that I googled around for suggested putting an extra pallet down for your base, while I read others who complained that a pallet on the ground made turning the compost a big ol’ pain (picture pitchfork tongs or shovels getting stuck between the slats). Some others even suggested a slanted base to help collect the tea (the nutrient-rich “run off” from your compost pile), but I just opted to keep things simple and make my life easy – at least for now. So this flat square of dirt did the trick:

With my area cleared, I gathered my supplies:

Fortunately these were all things we already owned, so our project cost rang in at a big fat goose egg. Even better than a free project? The whole thing only took me about 20 minutes (not counting photo-snapping time). Which was a nice unexpected surprise. Remember, I go into all small projects expecting them to take forever and throw me ten curve balls so I don’t get my quick-project hopes dashed by an obstacle or two (which I’ve learned are par for the DIY course). So yeah, it was awesome that this quick and easy project really was quick and easy.

First I dug a small trench (about 4″ deep) at the back of the compost area so that my pallet had a little groove to stand in while I secured the other sides:

Then I put the second pallet next to it to create one side:

Notice how the side with the more closely-spaced slats faces in (otherwise we’d get lots of compost spilling through). But that doesn’t mean you should use a completely solid piece of wood (the slatted pallets help air circulate, which helps the decomposing process while also keeping odor down).

To secure the pallets together, I just drilled three screws (one in the top, middle, and bottom) to connect the two pallets. Some tutorials that I read called for zip ties instead, which I’m not surprised to hear (they, like duct tape, can accomplish almost anything). I just had screws on hand, and since that was another recommended method I went for it. I also enjoy projects a little more when I get to break out my power tools (I can almost feel Sherry rolling her eyes at this sentence). The funny thing is that the pallets were practically sturdy enough to stay together on their own so the screws kinda felt like a formality, but they were nice “insurance” so I’m glad I took a moment to add them (and say hi to my drill).

Then I rinsed and repeated the whole joining shebang with the third pallet on the other side.

Then, um… ta-dah? That was pretty much it. Some of the instructions that I read included using a fourth pallet to create a hinged door in the front (I guess a fifth if you added an extra pallet on the bottom). I wasn’t inclined to do this because (1) that seemed more complicated than I wanted to get into – at least off the bat, and (2) I didn’t have any hinges on hand. Initially I was just going to leave my bin open-sided and not stress if my pile started to migrate a bit beyond its three borders…

… but I realized it probably wasn’t the best idea in practice, especially since it was on a slight slope and one big rain could wash our pile-o-decomposition into the yard. Gross. So I improvised a bit and found a nearly-perfectly-sized piece of scrap wood that could act as a fourth wall (with the help of two leftover wood stakes). It stays in place just fine and can easily be picked up when it’s time to turn our pile (or grab a big heaping batch of nurtrient-rich soil when it’s ready).

As the pile grows, I’m thinking I could easily upgrade my system with a few more boards stacked up or a taller piece of wood with taller stakes or poles to hold them flush against the pallets. But this’ll do for now:

And to kick off the competition composition, I threw in a layer of nice brown leaves from the backyard. Ooooh. Ahhh.

Now we’re the first to admit that we’re still kind of novices at this whole composting thing. Even after three years of doing it. I’ve thrown out references like “turn the pile” as if I know what we’re supposed to do (and how often and why) but I’m really just going off of tidbits that we’ve picked up online. When it came to our old system we just stirred things when we tossed in a pile o’ stuff (we had a lidded plastic container that we kept under the sink for compost scraps and emptied that into the bin twice a week or so). And we printed out a list of compostable stuff and taped that to the inside of our under-the-sink door near the compost container so we could consult that if we didn’t know if something could be added. So admittedly I’m not quite Captain Compost yet (so if anyone has any pointers or resources for us, we’re all ears). The good news about compost is that it seems to just do its own thing for the most part (you can read about a few of our experiences with it over the years here, here, here, and here). We’ve never had any issues with smell or anything, so it’s a pretty painless auto-pilot process.

Oh, and I should mention that if anyone is hesitant about using wood that might be chemically-treated (like pallets) for their bin, you can limit your use of the resulting compost to non-edible plants (i.e. use it in your flowerbeds, not in an herb or veggie garden). That’s definitely what we’ll be doing just in case. We’re a bit late in the season to have much usable compost this year anyway (darn, no accidental pumpkin growing for me this Halloween) but hopefully next year we’ll have more free fertilizer than we’ll know what to do with. And maybe some of that ivy will have grown around the pallets to help it “blend” in a bit more. You know, so we end up with a charming secret garden compost situation. Of course we could also stain or paint the palettes to help them blend in (dark green, brown, gray, etc). We’ll keep you posted.

Do any of you have a pallet compost bin (or other composting system) going on at your place? How has it been working out? Anything you think we should know as we start this new chapter in our composting lives? Has anyone else accidentally grown a pumpkin? That’s my crowning composting achievement thus far.

  Leave a comment

Any Given Day

Can you believe it has already been almost five months since we shared a house tour with you guys? So I decided to walk around with the Flip cam and show you how each room can look on an average day (since we had lots of fun with a no-cleaning-first tour back in April). And yes, this is the real deal. I didn’t pick up a thing (as demonstrated by my embarrassing bra on the chair in our bedroom, so just pretend you didn’t see that, ok?). Oh and for those of you who are at work, you can watch it on mute and pretty much get the gist of the average everyday glory. Or just try to read my lips (just kidding, I’m not on camera):

Things to note:

What about you guys. What would people see if you randomly made a shaky nausea-inducing video of your house before picking up a single thing? Anything embarrassing out there like a Carebear night light in the bedroom or an NKOTB poster in the closet? John actually had a Britney Spears calendar when I met him in 2004. Not lying. And she was wearing things like red leather bodysuits and braided pigtails. What can I say, my man has good taste.

Speaking of which, I was just going through old folders on my laptop and I found a bunch of funny old pics that I thought I’d share in the spirit of “any given day.” Here’s me and Alicia Keys back in 2005. We’re old friends. Just kidding, but I did get to meet a bunch of celebs when I used to work in advertising back in NYC (and they were all super nice except for one “star” who is rumored to be not nice – and let me tell you the rumor is true).

Here’s John’s passport pic from when he was 16 next to the one snapped when he was 24. Aw, Johnny’s all grown up.

Here’s John as a life-sized doll back in 2005 when we worked together (we met at an ad agency named Lowe where I was a copywriter and John was an account guy – aka: a suck up). The entire office cracked up about this project (it was for a certain deodorant client of ours). I definitely prefer John The Doll to the smarmy Ken doll that I had growing up.

Aw, here’s our engagement announcement photo (that we emailed to a bunch of friends and family, hence the photoshopped writing) from 2006. It was snapped about a minute after John got down on one knee at the top of a mountain (more on that here). Best day ever. Well, top five at least.

And here’s me and John the last time I chopped off my hair (right after our wedding in 2007). That’s Thomas Jefferson with us in case you’re wondering.

So how’s that for Friday randomness? What odd old photos are sitting around on your computer? Would you ever have guessed where you’d be today five years ago? We had no idea we wouldn’t both still be working in advertising (we really liked it and miss it all the time!) and after six years of calling NYC home, I never thought I’d leave. So funny how things work out.

Psst- Check out our first ever messy house tour here (it’s fun to see how many rooms have changed since April when we filmed it).

  Leave a comment

Anatomy Of An Ikea Visit

First off, this post wasn’t paid for or perked by Ikea. We just wanted to share a recent pilgrimage. And we like them (especially with this cool announcement). Anyway, some people say you can tell a lot about a person by looking in their purse, their closet, maybe even their iPod. But what may give you a good peek into our lives is a look into our car trunk… after a trip to Ikea.

This was the scene after a recent trip. It was our first since my parents moved out of the same area as the Ikea (which is about 90 minutes away) meaning no more quick stops after a family visit. Clearly, we’ve already become hoarders. Not knowing when our next visit will be we found ourselves grabbing more than usual “just in case” since we were up there visiting friends. Here’s the breakdown for ya:

1. Two Retur recycling bins turned shoe cabinets for our laundry room, as you’ve already seen (they were one – er, two of the main reasons for our visit).

2. The boxes that would become our Effektiv file cabinet for the office, as you’ve also already peeped here.

3. Cute napkins for big ol’ family gatherings at our house (when we run out of cloth ones). Specifically these, in green.

4. A door mat. Why? Long story short: rainy night + full-bladdered chihuahua who hates to get wet = need for a new mat. We did let the rain rinse it out and planned to continue using it. Problem is Burger had the same plan (guess it was still “marked”). The new one is so far unscathed by this silly dog (who much prefers to sunbathe with his tongue out).

5. Two woven planters. Because we’re suckers for natural textures. And in need of more indoor plants ’round here.

6. This blanket. We were so excited about this purchase. We’d been hunting for a spare blanket to keep in the living room, since our current brown one doesn’t jive with Karl as much as we’d like. This one looked perfect. Problem is, it doesn’t feel perfect. Despite a couple of washings, it’s still a bit scratchy. And because of those couple of washings, it’s a bit unreturnable. Shucks. At least it still looks good! Maybe someday we’ll use it to recover an ottoman or something. But warning: this is not a blanket that you want to get cozy with for very long (Sherry plans to layer it with the softer one underneath it during the winter months for extra warmth without the scratchy texture touching her skin).

7. A light kit. Since we used our other “spare” for our clothespin light, we wanted to have another on hand. Someday we’ll get around to hanging the paper lantern that we picked up a while back in the playroom. We were just paranoid that Ikea will stop making them when it finally comes time to tackle that room (and at $3.99 they’re cheaper than any others we’ve encountered).

8. Various white frames. Do we even need to elaborate on that after this and this? We just figure they’re always good to have around, and we still have a lot of bare walls and about five million cute baby and dog pictures. Yikes, we’re those people.

9. A white duvet cover that we thought could work in our bedroom. Long story short, we’re still on the fence. So it’s still sitting in the packaging until we’re sure (since Ikea doesn’t take back opened bedding). At $50 for a king sized duvet and two shams it was a pretty good deal (we just wanna be sure there’s nothing else out there that we love more) so we’ll keep you posted.

10. Toys! Since we’ve admitted in point #8 that we’re quickly turning into “those people”, we couldn’t resist getting Clara this soft set of farm animals (she loves farm animals) and a soft set of tools (we desperately want her to love tools). The good news? She LOVES them both (esp. the goat and the ruler). Bad news? It’s not teaching us a lesson about buying her too many toys…

We also scored a couple of other items while there that didn’t make it home in the trunk. For example, thanks to being on the catalog mailing list I got a random email about joining this new “Ikea Family rewards program” the morning before our trip. So I picked up my free card later that afternoon right in the store from this handy little futuristic kiosk:

I don’t totally understand exactly what it gets me, except for a free coffee or tea at each visit. Sold. Except that it would have been a more time-efficient idea had we not had to linger in the restaurant area for twenty minutes while Sherry waited for it to be cool enough to sip (my wife is such a diva). At least it bought us plenty of time to take pictures like this one of Clara “drinking her tea”:

And on this particular visit thanks to picking up that free Ikea Family card we also got a free ice cream cone. Guess saving that buck really makes up for all the money we spent on everything else, right? Clara demonstrated her appreciation by smearing it all over her face. And it was adorable.

Do you guys have any recent shopping trips that are particularly indicative of your personality or a particular moment in time? Perhaps a recent grocery store run for a party you’re throwing? Or a spending spree at Bed Bath & Beyond or Office Max? Do you have more Ikea, Home Depot, Lowe’s or Target receipts than you can even count these days? We used to feel like we lived at Target, but lately it has been Lowe’s and the ReStore.

Psst- We (finally) picked this week’s random giveaway winner. Click here to see if it’s you.

  Leave a comment