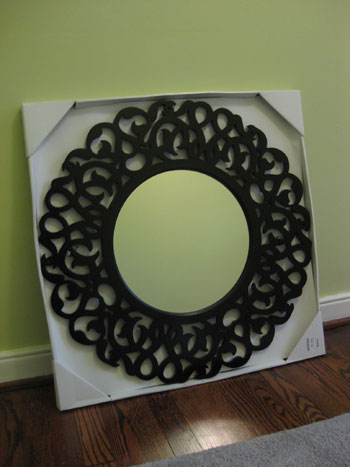
We’re back to share how we painted our $39 Marshall’s mirror so it’s a bit less upscale-formal (in black) and a smidge more playful and nursery-ready (thanks to a few coats of deep asparagus green paint).
It was a super straightforward process, although I’m not gonna lie- all those curvy openings definitely took me a bit longer to work around than a basic mirror frame would have. But it was totally worth it in the end. As in, I’d do it again ten times without a second thought. We just love it!
We were inspired by the deeper green tones in the leaves from our curtain fabric so the color that we decided on for the mirror was a nice deep-ish green tone called Behr’s Scotland Isle (we got it color matched to an inexpensive quart of Olympic’s No-VOC Premium Paint in a semi-gloss finish). We passed on using any primer since our mirror was already painted (not stained) so we didn’t worry about anything bleeding through (and we wanted to avoid the primer fumes if at all possible). But we did rough it up with a bit of high-grit (350) sandpaper before picking up a paint brush. Note: if you’re not prego and not making over a mirror for a nursery, you could easily use a spray primer like Kilz followed by a few thin and even coats of spray paint in your color of choice for a perfectly polished finished product- just be sure to spray in a well ventilated area because those fumes aren’t great for anyone- pregnant or not.
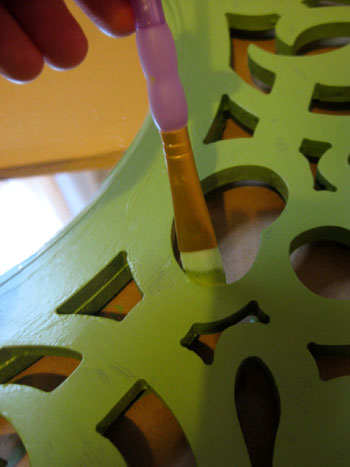
So as I mentioned, I passed on the spray paint approach and resolved to do the work with a small craft brush instead. I left my usual 2″ angled paint brush in our tool drawer and reached for a tiny less-than-one-inch brush from Michael’s from my craft drawer instead- just to get into all those nooks and crannies. Two coats, and about two hours later, I was looking at a gorgeously green mirror that appeared as if it had always been that color. Not an ounce of black paint bled through the paint or peered around the cut outs thanks to my tiny brush. Oh and I painted the mirror on a flat piece of cardboard to catch any drips and make it easy to spin around so I could access it from all sides (which was crucial to ensure that I didn’t miss any of the many edges that needed green paint to cover the black).
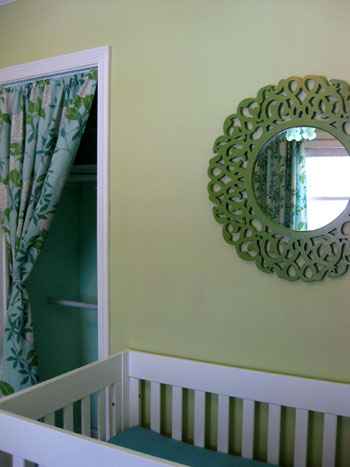
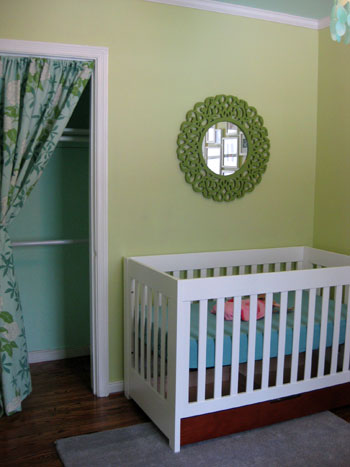
Then I sat back and let everything fully dry (I didn’t even attempt to hang it for 24 hours, just to be sure it was fully cured) and used a simple straight edged razor to scrape the small amount of paint that had dripped from the frame onto the round face of the mirror in the middle. Then we used two heavy duty anchors to securely fasten it to the wall in the nursery. We intentionally hung it across from the only window in the modestly-sized room to reflect lots of light and make the space feel more open and airy.
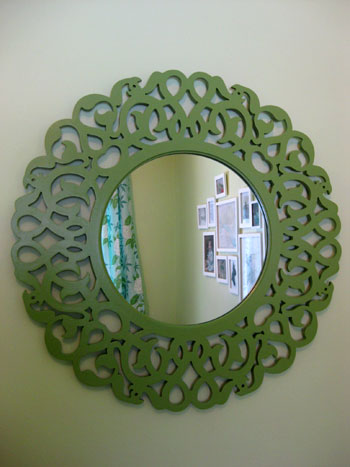
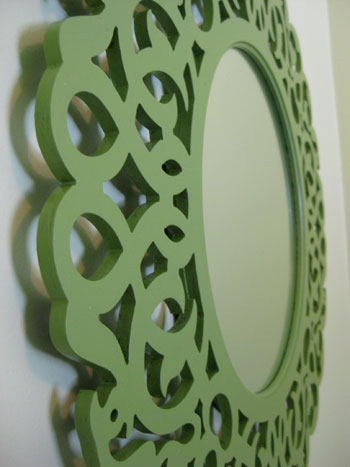
We love how the color works with the tones in our curtains. And of course we adore all the fun little shapes that it makes on the wall (that we’re sure the beanette will love to stare at). We especially enjoy the four little hearts around the mirror’s perimeter that we never even noticed back before we painted it green.
See how smooth our paint job came out just from applying two thin and even coats of latex paint with a small craft brush? Painting a frame or a mirror is really one of the most simple and rewarding projects that you can take on (how about painting a bunch of them in a bold punchy color and hanging them in a grid above your sofa?). Easy peasy. Especially if they’re less ornate than this guy.
So there you have our latest little nursery project that we completed with just one cheap-o brush and a quart of colorful semi-gloss paint. Oh and we should mention that we do realize that when the beanette gets bigger and eventually can stand up in her crib (even though we’ll be lowering the mattress at that point) hanging the mirror even more securely on the wall will be in her best interest. At that time we plan to screw right through the frame and into the wall (we can countersink, putty and paint the heads of the screws to hide ’em) so the mirror can’t even be yanked off the wall by a hulking adult. Stay tuned for all those little childproofing adventures that we’ll take on as Baby P grows and becomes more mobile towards the end of 2010…
And before we forget, did you notice that we snagged an awesome aqua colored 100% organic crib sheet? We actually ordered two of them (we’ve heard that it’s easier to always have a spare on hand) and also grabbed two 100% organic changing pad covers in the same color. We love the pop of happy hue that it adds without being too busy (we considered some patterned options but realized that with the scrolly mirror and the printed curtains it might be a bit too much).
Best of all? After sleuthing out about twenty organic crib sheet and changing pad cover options, these were the cheapest and the color happened to be perfect- plus they even offered free shipping so we couldn’t have been happier. Not bad for $18 and $15 a pop respectively. Of course we did that thing where you cross your fingers that the color n the monitor is close to the real color, but as soon as they arrived we breathed a sigh of relief. Now we just have to pick up about a million other things (waterproof mattress cover, changing pad, dresser, side table, lamp, art, cloth diapers, toy baskets, etc). Not to worry, we’ll get ‘er done.
Psst- Wanna see our nursery progress from the very beginning? Here’s our painting post, our big shopping spree, our crib hunting rundown, our curtain-making tutorial, and our fun little chair search.

Cindy @ The Flipping Couple says
I absolutely LOVE the green!! Such a fun accessory, and way to be patient with all those little openings to fill in with green loveliness. I love seeing each little piece come together in this room!
Wendy says
Love the green color!
For the crib matresses, I would suggest putting on one sheet, then putting on a waterproof layer (BRU and Target sell these), and then another crib sheet. Therefore, if you have some type of diaper explosion in the middle of the night, you can just peel a sheet off and put the baby back to bed (without having to full-out change the sheets).
YoungHouseLove says
Great suggestion! We can’t wait to put it into use!
xo,
s
Shelly says
LOVE the mirror! It looks great with the blues and greens! Your chandelier inspired me, so I found on amazon a purple capiz windchime that I’m going to put in our nursery to go w/ the ongoing greens/purples theme. Can’t wait for it to come in the mail!
The nursery is looking great!
Kelly says
Gorgeous! I really love how the colors in your fabric pull the entire room together. Such a great idea to paint the mirror in a tonal color to your walls – definitely adds a pop but in a beautiful, subtle kind of way. I can’t wait to see what’s next!!
Jen says
The mirror looks sooo much better green. The color really makes the details pop! Kudos to you for taking on this tedious painting project!
Will the crib stay under the mirror? I’m not a parent but even to me that seems kind of dangerous. I’d be terrified it would fall on the baby, especially when they get to the toddler stage and grab and pull on things.
YoungHouseLove says
Hey Jen,
As we mentioned in the post:
We used two heavy duty anchors to securely fasten it to the wall. Oh and we should mention that we do realize that when the beanette gets bigger and eventually can stand up in her crib (even though we’ll be lowering the mattress at that point) hanging the mirror even more securely on the wall will be in her best interest. At that time we plan to screw right through the frame and into the wall (we can countersink, putty and paint the heads of the screws to hide ‘em) so the mirror can’t even be yanked off the wall by a hulking adult. Stay tuned for all those little childproofing adventures that we’ll take on as Baby P grows and becomes more mobile towards the end of 2010…
Hope it helps!
xo,
s
patti says
I also love the mirror – one of my favorite shades of green. And I second Wendy’s suggestion about the sheets. My daughter is going on 6 and I still do this with her bed (in case of a middle-of-the-night illness).
Rebekah says
It looks like such a happy, little room! Great job, guys!
Ericka says
I ABSOLUTELY LOOOOVE the mirror! Your little girl’s room is coming along beautifully! It makes me want to redecorate my 16 month old girl’s room! She was a surprise for us and we had to convert our office into her bedroom and it’s pretty, but not everything that I dreamed it would be for my little girl. (She came after I had my two wonderful boys ages 9 and 11) I look forward to redecorating it when we have to get her a big girl bed. Is your crib convertible or are you buying a bed when she grows out of her crib?
Stephanie Dunn says
I am so glad that you have GRACED ME with the awesome blog! (I know, very unoriginal and cheesy.)There are many beautiful phrases in other languages that have complex meaning and perfect sound, but my favorite has neither. When I was in high school, I took two years of Spanish. One of my teachers was this lady who’s first name was Candy.(Her name is just the beginning of all the fun.) She was hilariously awkward. (The understatement of the day!) She made facial expressions that ingrained in my mind and still pop up from time to time and make me laugh. Old high school friends and I still get together and talk about her class with very fond memories. Every time we would leave the classroom, she would say (with the craziest looking smile) “Vaya con Dios!” So, “Go with God!” is definitely a favorite foreign phrase.
Amy says
Looks great!
(I have an 11-week-old son. I thought two changing pad covers would be enough, but we now have four. Just an FYI. :) )
YoungHouseLove says
Thanks for the tips Amy and Patti. We love all these little make-life-easier tricks so we’ll definitely be putting them to good use!
xo,
s
Jessie (Vegan-minded) says
The mirror came out beautifully, I just love the color! The room looks amazing already. :)
Jason says
Fabulous – you know I love that mirror! Why didn’t I buy it I say!?!? And I am in Marshall/Homegood/TJ Maxx daily mode now looking for stuff and still no – they can’t get 2 of them? =)
DE – J
s lee says
it looks like a different mirror all painted green! I hope that mirror is stuck to the wall good because once your baby starts standing up they will definitely be tearing it down. I’ve learned my lesson when I had canvases above the crib.
YoungHouseLove says
Hey S Lee,
As we mentioned in the post:
We used two heavy duty anchors to securely fasten it to the wall. Oh and we should mention that we do realize that when the beanette gets bigger and eventually can stand up in her crib (even though we’ll be lowering the mattress at that point) hanging the mirror even more securely on the wall will be in her best interest. At that time we plan to screw right through the frame and into the wall (we can countersink, putty and paint the heads of the screws to hide ‘em) so the mirror can’t even be yanked off the wall by a hulking adult. Stay tuned for all those little childproofing adventures that we’ll take on as Baby P grows and becomes more mobile towards the end of 2010…
Hope it helps!
xo,
s
Handy Man, Crafty Woman says
love the mirror! love how all this is coming out!
Audrey says
that green color is absolutely perfect! such a nice change from white(what would have been my first thought)!
Lorena says
Adorable……..I can’t wait to see it all finished….
Shannon says
This looks awesome, you guys! The mirror looks 10 times better in green and the crib sheet aqua is perfect! Actually it will look perfect in my soon-to-be nursery as well so I’m gonna order both the sheet and the pad.
Since you guys haven’t gotten a changing pad yet either, is there a size on the changing pad cover or a coordinating pad you can buy to make sure everything fits correctly?
YoungHouseLove says
Hey Shannon,
The changing pad cover has an edge of stretchy elastic so it can be stretched to fit any standard changing table pad. We registered for this organic one: https://www.buybuybaby.com/product.asp?order_num=-1&BRN=1&sku=16163350&
Hope it helps!
xo,
s
Sarah Sarniak says
What a beauty! I love the green color you chose too. To make it faster you could have spray painted it too, do you think? I probably would have and then put a couple clear coats over it. AWESOME job! The room is looking beautiful.
YoungHouseLove says
Hey Sarah,
Yup, we could have spray painted but we wanted to avoid those VOCs and fumes since I’m prego (and it’ll be living in a baby’s room). This is why opting for no-VOC paint seemed like the best choice for us. Hope it helps!
xo,
s
Kat says
Since you mentioned cloth diapers, I thought I’d send along a little advice. We use bum genius one size and they are great 8 months later and they are still in good condition. And if you are ordering them make sure you get the cloth wipes that come with. They are great and you only use one, as opposed to 10 of the disposable wipes. Also we got one of these as well
http://nickisdiapers.com/catalog.php?category=207
It works great, goes right in the wash with the diapers.
Good luck with everything!
YoungHouseLove says
Thanks so much for the suggestions Kat! We’ll definitely check out your link and the cloth wipes.
xo,
s
Sabrina says
I second (third?) Wendy’s idea: we actually had several layers and the first time we needed a midnight sheet change my husband was thrilled to be reminded all he had to do was pull up the top sheet and top liner. I considered the layers in the crib to be the single best piece of baby prep advice we got. You may never need it but when you do, it is such a relief!
Sarah says
Love it!! The room is coming together so nicely!!
Any tips for hanging heavy mirrors? You all have inspired me to hang one to reflect light in my bedroom, but I don’t want to hang until I know what I’m doing (I’m assuming it’s not as simple as putting a small nail in the wall, ha).
I can dig through old posts later if you’ve already talked about it.
Thanks!!
Sarah
YoungHouseLove says
Hey Sarah,
Just use heavy duty anchors from the hardware store. Swing through and tell them you’re hanging a mirror and see what they suggest. We always have a pack of these on hand because we love hanging heavy things nice and securely on the wall- whether they’ll be in the nursery or not. Hope it helps!
xo,
s
kat says
Oh and also we bought about 12 diapers but wish I had a few more so I think about 15 diapers should do you fine! Oh and you can also register at some sites so people can buy them for you as gifts!
YoungHouseLove says
Good to know!
xo,
s
The Starr Family says
This nursery almost makes me want to have another baby… almost :) Its a bit ridiculous, how excited I get each time you post a nursery update!!
Carole says
so pretty! you’ve made such smart design choices for the long term–I could imagine a pre-teen loving this room, too!
suzanne says
I love love love the color you painted the mirror. I’ve seen that mirror @ my Homegoods and have been trying to figure out what color to paint it. White just didn’t seem right for this one. this green would be perfect for my living room…hope they still have it!
Jennelle says
Love the mirror! The whole color scheme for your nursery is just awesome. :)
Dana @ House*Tweaking says
Somehow taking the mirror from black to green made it more dainty! I love this mirror! What a great find for your nursery. When you had mentioned the mirror in an earlier post, I knew you’d be hanging it on that wall…see what I’ve learned from reading your site? Mirrors are great across from windows. Can’t wait to hear/see more about the dresser-changing table combo you’re working on.
Thanks for sharing your progress! I always look forward to reading your blog.
D says
The mirror looks great! The green really brings out the details in the frame…awesome choice!
Cheryl says
This mirror turned out fabulous! oh, I do love it!
Shannon says
Wow, you guys. This looks amazing. I’m buying and painting a mirror today (for our long-overdue completion to our bathroom color conundrum). Perfect timing. The beanette will love staring at that amazing pattern as she falls asleep. Gorgeous.
kitliz @ DIYdiva says
Minus the prego-rules, have you done this before and used any kind of polyurethane finish? Everything I’ve painted before springing for a sprayer and coating my entire life with a layer of satin finish seems to chip… Not that your mirror is going to get heavy traffic.
Could be that you’re just using better paint than I do… ;) Love the color.
YoungHouseLove says
We actually only use poly or some sort of sealant on painted furniture (like our sunroom table that we made with a new top and thrift store base). When it comes to painting frames and mirrors, we’ve done it many many times with just a coat of paint (and sometimes a coat of primer underneath if something is stained and we’re afraid that will bleed through). A lot of times a gentle sanding or priming will help the paint adhere so it doesn’t chip and poly isn’t necessary. Hope it helps!
xo,
s
Anne says
LOVE love love what you guys are doing so far, right up my ally!! Great mix of grownup and whimsy. Can’t wait to see the finished product!
:)
Lisa says
I love the double liner trick.
I would also advise to get purchase one more sheet. I have lost track of how many times an upset tummy “decorated” the second sheet before I had the first in the wash and/or dryer the next morning and to be honest laundry was not my priority after staying awake all night with a sick little one. Maybe I am the exception with needing three sheets? (I have 4 kidlets, three now grown)
It never crossed my mind to look for organic sheets, but back then the internet didn’t even exist! I really love the direction you two are taking.
Lastly, that mirror is fantastic. Brilliant to think of anchoring it to the studs.
Harper says
I really admire how you are making this nursery with organic and “green” products.. I try to make the switch with my household products, but it’s hard when organic is a little pricier! Kudos to you two though!
I noticed your friends at Bower Power just upgraded to an SUV for their new baby. Are you looking into purchasing a newer (maybe Hybrid) car in the future?
YoungHouseLove says
Hey Harper,
Oh how we’d love a new car but we’re all about saving up until we can afford something outright so it might be a bit of a wait on that front. We have always loved the Prius but wonder if it’ll fit all the trappings that come with a baby and a dog (we travel with his crate and realize that we’ll soon be adding a stroller and a pack & play into the mix). We also love crossover SUVs that get better gas mileage than the average SUV (like the Nissan Rogue) but it will probably be a while before we’re the owners of a new car. It’s really hard for us to get rid of things that are still fully functional and our ten year old Nissan Maxima still gets great gas mileage- and although it has over 180,000 miles on it, it still runs like a charm. Sometimes the greenest thing is just to work with whatcha got! Hope it helps.
xo,
s
Jen says
I’m in love with that mirror! I wasn’t all that excited with it when you first showed us. But it’s perfect painted green – I love that color!
Maria says
This really makes me want to go out and buy a mirror. Love the color scheme and those curtains, makes me giddy! Can’t wait to see what’s next. I’m really thinking of repainting my son’s room which is currently Valspar Jalapeno Jelly. What can I say, I love green! Anyhoot I’m diggin that color you have on the wall. Congrats on the beanette! Adios!
cait says
I love this! I am all about the Marshall’s and TJ Maxx deals. You make me want to decorate a nursery everytime I look at your nursery posts. :) Don’t think that will convince the hubby quite yet, though!
Jacquelin Hicks says
Love the mirror. it looks great.
Jackie says
I would order about 6 sheets if it were me. Maybe not all the pretty colored ones, but definitely more than 2. You can go through a ton in a single night.
amyks says
Gorgeous mirror…I love that color and I see what you mean about the four little hearts now. So sweet!
Bromeliad says
Awesome mirror. And much better in green.
Lesley H says
I was so sure you’d paint the mirror pink but I’m LOVING the green. What a beautiful tie in to the fabric! It’s all coming together so nicely – good work, lucky baby!
Nads says
I’m so impressed! The mirror looks amazing! I’ve always loved Marshalls’s and Ross but just this last weekend stepped inside of a Home Goods…oh-my-god!!! Here in California we actually only have a few of them and the nearest one to me is about an hour away…sigh! Oh well, better for my wallet I suppose! Btw… I saw on your Facebook page that you’d asked about clothes hangers. My own little tid-bit of advice is get the little hangers! You just can’t quite get some of those teeny outfits on the big hangers and, really, all those tiny baby dresses look so cute on tiny hangers! At Target we got a dozen or do for a dollar so it’s definitely a cheap-o solution. We figure we’ll be using them for quite a while for our baby girl and her siblings to follow, plus our local thrift shop lady says they’re always in need of them too so in the end, we’ll donate them.
Jill Stigs says
Gorgeous mirror! I ? that green.
Personally I preferred the solid crib sheets because if the baby spit up, you can easily see it vs. it “hiding” in a pattern. Great job Youngsters!!
Carrie says
Something that has worked great for us is to buy one waterproof mattress pad then some waterproof pads too. And put your waterproof mattress pad on, then a sheet, then a waterproof pad then another sheet. So if/when in the middle of the night your little girl hads a mess all you have to do is take off the top sheet and the waterproof pa underneath and your crib is all ready made and you and your babe can go back to sleep with minimal work in the middle of the night.
Another thing you might want to consider are changing pad mats. If you go to babies r us and search for “Boppy canging pad mats” you should see what I am talking about they come in packs of 3 – then you can probably find organic ones somewhere too. These are great for when you have a mess on the changing pad all you have to do is replace the mat and not the whole pad cover. :)
YoungHouseLove says
Thanks for all the tips everyone! We’re definitely taking them all in and we look forward to seeing what methods work for us as we go!
xo,
s
Monica says
The mirror turned out gorgeous! Great color choice. As far as storage, we have this bin from Land of Nod in the blue/green stripe. They are also available in solid colors. It holds lots of toys and is very durable.
http://www.landofnod.com/family.aspx?c=106&f=840
Lauryng says
I am dying in suspense with all these detail shots! I can’t wait to see to every wall and every angle all finished :-) I love the mirror.
oneida says
wow! that looks amazing. such a different look from the same mirror. that’s what i love about paint, it just transforms things hugely with a little bit of money and work.
amelia says
the mirror turned out beautiful! love the green colour, especially against the green wall – just enough contrast.
Kelly says
I love it!
I would suggest screwing it in sooner, however. Just in case you get an earthquake or something. May as well do it now if you’re going to do it later!