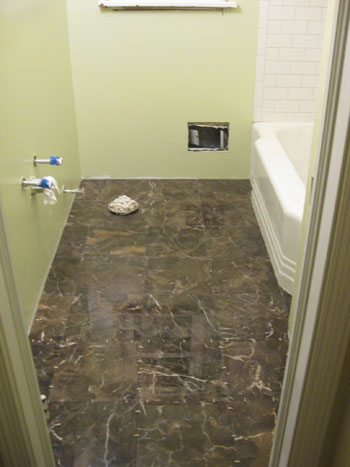
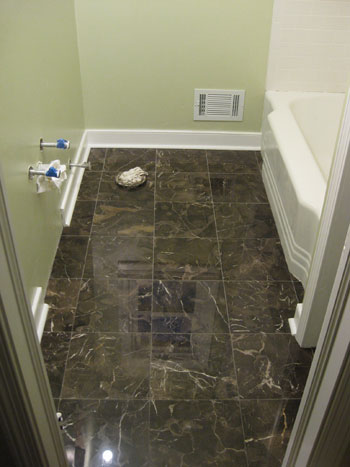
With all of our shower/tub and floor tile set, grouted and sealed, it really felt like the bathroom was finally coming back together. But the absence of one major finishing accent was still making the room look under construction: baseboards and trim. Take this pre-grouting shot of the floor for instance:
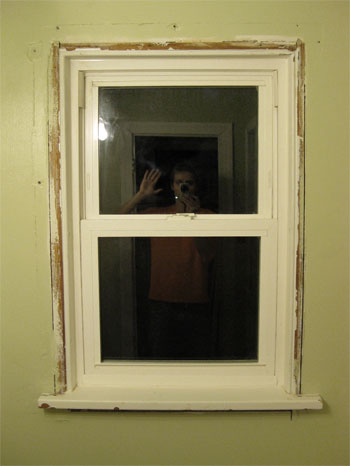
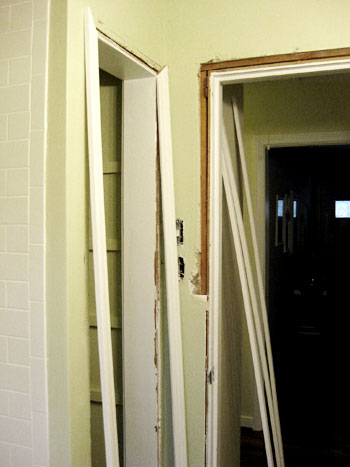
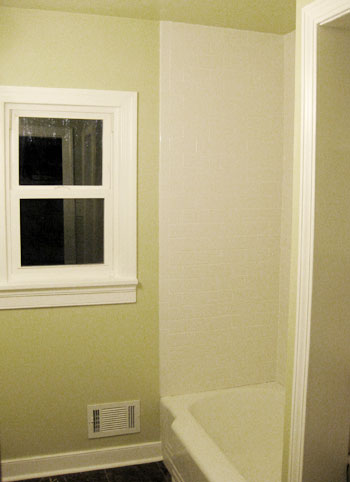
During demo, I started with the naive notion of salvaging the existing trim around the window and doors (both the main door and the linen closet). But I quickly realized that pipe dream was a lot more trouble than it was worth (many pieces were splintered, broken, or otherwise worse for wear). Not to mention that I couldn’t avoid installing new baseboard around the floor anyway, since it had once been a tile border back when the walls were also tiled. So thanks to my handy crowbar and a hammer, out it all came… leaving things like the window looking like this:
So once the grout had set for 24 hours and had been sealed a couple of times, re-installing the trim became my #1 task. Having borrowed my dad’s miter saw (have you noticed a theme here? thanks for all the tools dad!), I was mostly set in the “supplies” department. And, I’ll admit, having another power saw to play with was basically all I looked forward to when it came to this task. Okay, that and the bit of math and measuring that I got to do too along with it (yes, I am a nerd thankyouverymuch).
Once I measured everything (lengths of each wall, each side of the doors and around the window) we headed off to Home Depot with samples of our old trim in hand. We wanted to get something similar so it matched the rest of the house, though we did opt for slightly wider versions of the same style, just for a bit more crisp presence. Home Depot, like most home improvement stores, sells trim in HUGE strips. Fortunately, they also offer a cutting station to hack the pieces down to transportable sizes. I actually spent a good 30 minutes at the station cutting every single section we needed, leaving a bit of extra on each one and even going as far as to label the backs of each piece with things like “44 inches, back wall under window” or “35 inches, spare.” This came in handy when checking out because I could quickly add up how many feet I was buying without making the checkout girl suffer through measuring thirty-some sections of trim.
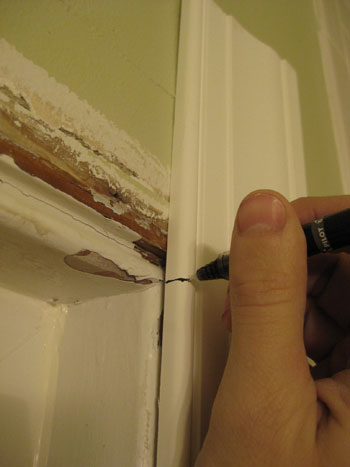
Rather than detailing my step-by-step process for all thirty-some sections that I installed, let’s use the window as an example. First, I located the sections that I had roughly cut for each side and marked the inside edge of my cut with a regular old ballpoint pen. Honestly, the hardest part of this step was holding the camera and the pen at the same time.
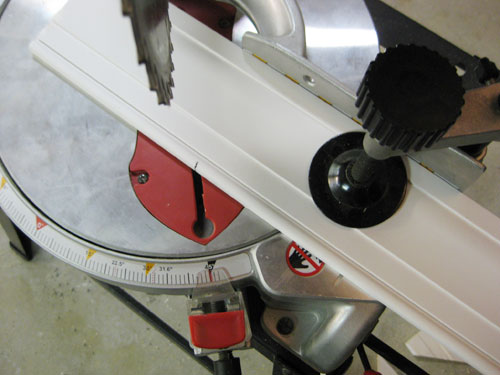
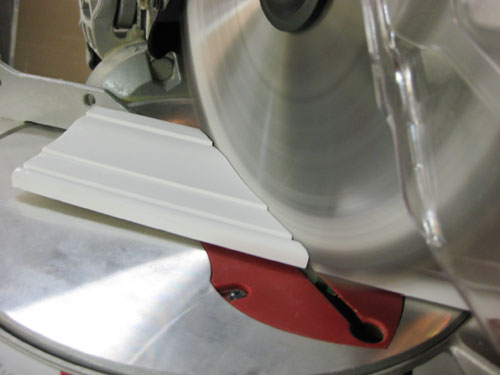
Then I marched through the house, out the sunroom, across the driveway and into the garage where I had the miter saw set up. This is a path I would travel quite frequently as I cut (and re-cut) everything. The miter saw is designed to easily cut angled (or mitered) cuts, so things like molding and trim can meet perfectly around corners and edges. Being new to the miter saw, I found it really easy to use. You just swivel the saw base to match the angle you need (I was doing all 45-degree angled cuts, fortunately), lock it into place, and then line the piece of wood flush against the guides. Oh and even though my dad’s saw was equipped with a laser guide, I always pulled the saw down in power-off mode to see for myself where the blade would contact the trim first- just to be sure before firing her up and making my cut.
Cutting each piece was a cinch. And like the wet saw, I found it easy to come back and finesse each cut if I saw things were a bit too long once I got back inside. I live by the motto “it’s a lot easier to cut more off than to put more back on,” meaning I’m sometimes very conservative on my first cut and end up trimming things fairly frequently. It might not be the most efficient method, but it’s definitely easier (and cheaper) than running out to buy more trim if you mess up and cut too much off from the start.
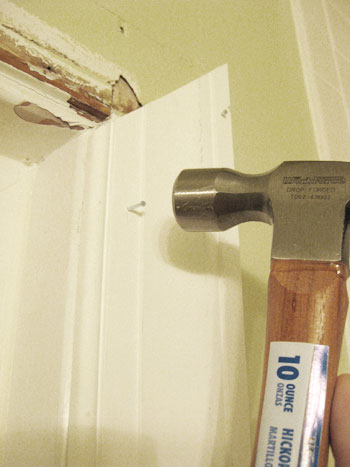
When it came time to affix the perfectly cut piece into place, we opted to go low tech. Rather than spring for some sort of power nail gun for such a small job, we bought a small 10 oz hammer (so we weren’t swinging our usual monster anywhere near our tile when it came to the baseboards) and a small “nail set” to recess each nail into the trim without bashing in the trim with the hammer. Again, it might not be the fastest technique but it got the job done with zero damage to the rest of the room (and kept us blissfully under budget). Basically we just used the hammer to drive some finishing nails most of the way into the trim (leaving about an 1/8th of an inch sticking out).
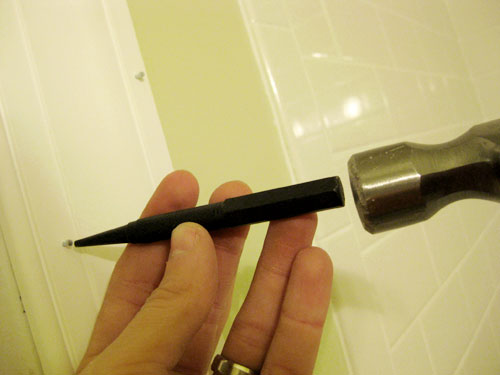
Then we came back with the nail set, a short metal piece that’s (not by coincidence) the size of the nail head on one end. That way you can drive the nail all the way into the wood without damaging the trim around it with the wide and unwieldy head of the hammer.
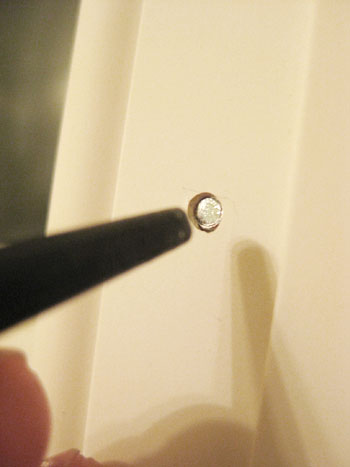
We actually drove the nail just slightly deeper than the surface of the wood so we could easily hide it with caulk later.
Oh and while the trim we bought is white, that’s only because it’s pre-primed, not painted. Some people choose to paint before installing their trim, but we’ve painted already-installed trim so many times that it’s practically second nature to us (there’s no whipping the paint out twice- once before installation and once afterwards for all the touch-ups- instead it’s all one go at the end).
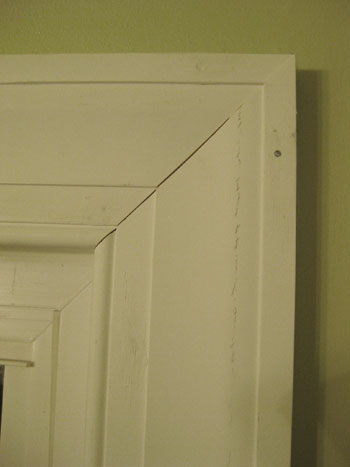
Anyway, once I got all of the pieces installed around the window, it looked 98% perfect. The trim was a little smudgy from all of the handling and, try as I might, the pieces weren’t flawlessly flush in all spots but they were close enough. And that’s where caulk and paint come in.
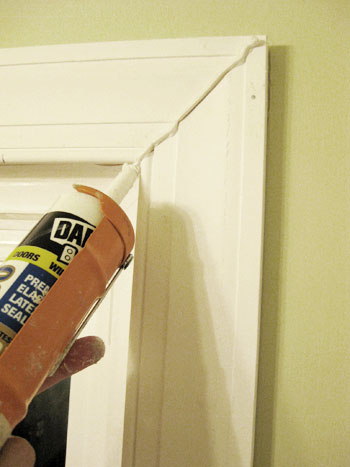
We chose to use white paintable door, window and trim caulk to fill our cracks and nail holes (we tend to like Dap as a brand, since we find it’s among the easiest to work with). Here we are applying a generous strip at the corner seam of the window.
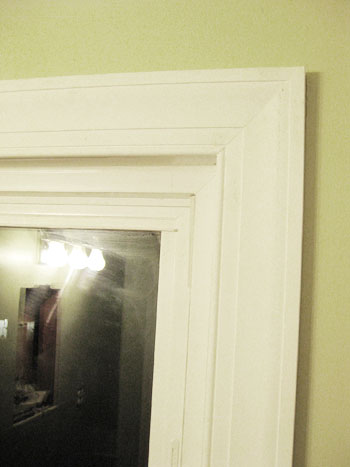
After squishing it into the seam with our finger and then wiping away any excess, it comes out looking pretty seamless.
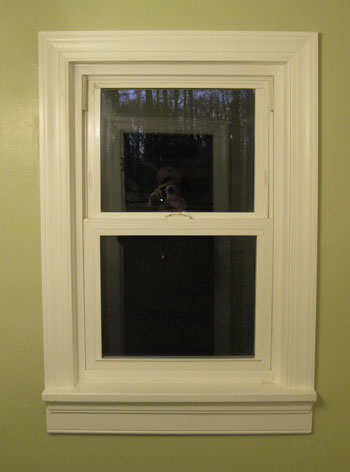
And once all of the caulk dried on the corners and nail holes, we put on a couple of coats of No-VOC Freshaire white semi-gloss paint and TA-DA!
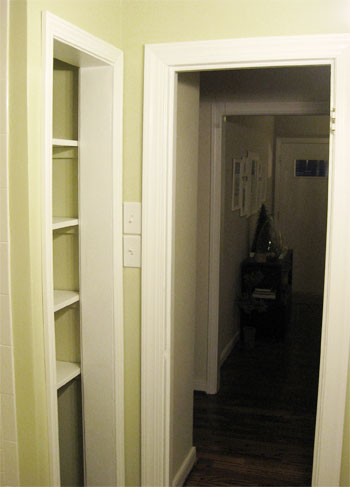
The trim around the linen closet and door were pretty much the same process, so here’s a quick before (complete with trim pieces I was checking the lengths of)…
…and after: all caulked, painted and ready to rock.
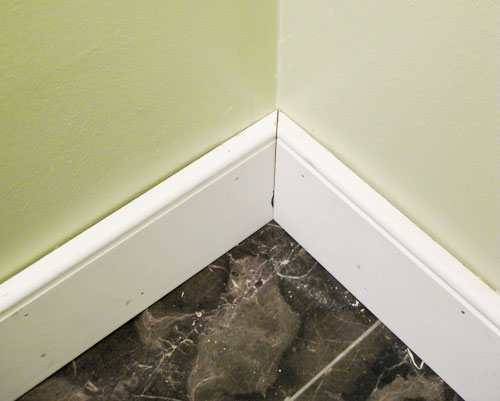
Now the floors were a slightly different task. Here I installed baseboard along the base of all the walls, including the interior of the linen closet, followed by quarter-round shoe molding to really finish everything off. I was excited by this part because it meant I got to cover up all the spots where my tiling wasn’t exactly flush to the wall. Plus, I got to experience the miter saw’s ability to make bevel cuts (these are still 45-degree angles, but they’re made by tilting the saw blade to the side, rather than rotating the saw base). These bevel cuts allow pieces of baseboard to meet in the corners like this:
Meeting in the corners perfectly wasn’t a big fear, since caulk would help me hide small flaws. My biggest fear was hammering so close to our precious floor. So as a safety measure I kept a towel under the hammer zone at all times for at least a little bit of a buffer and I used my smaller 10 oz hammer which was easier to control than our usual heavier and larger one. Here’s a peek into what the project workzone looked like.
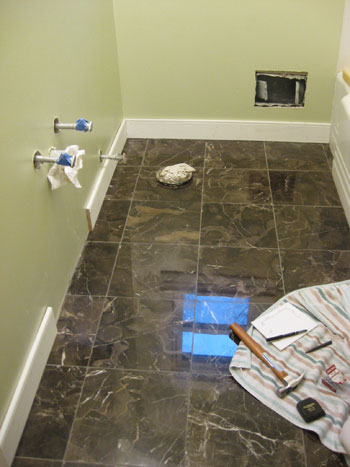
You’re probably wondering why there’s a big, missing piece of baseboard on the long wall. No, I didn’t forget. That’s where the vanity is going and, since we want it to sit flush against the wall, we didn’t want baseboard in the way. So we placed the vanity in the room earlier to figure out where we wanted it (and where the plumbing forced it to go). Then we just marked the walls and measured and installed the baseboard accordingly.
After getting all of it in, we measured and cut the quarter-round the same way. The only difference was that we attached the quarter-round with Liquid Nails (ok, and a couple of real nails too) because despite wanting a flush fit everywhere, I was too chicken to manually hammer that close to the marble if I could avoid it. And we’re happy to report that it worked like a charm.
A little bit of caulk and two coats of paint later… presto-change-o.
In the end it was about a five hour process. And just like grouting, the difference was amazing. More and more it was starting to look like a real bathroom. Imagine that. Next on the agenda was installing the toilet, building the vanity and then we’d practically be done (stay tuned for our DIY vanity play-by-play later this week). Can’t you just taste the finish line? Us too, and it tastes a little bit like silicone caulk.
But enough about us, what are you up to this week? Any fellow bathroom re-doers? Anyone hanging trim or baseboards? Let’s commiserate.
Psst- Wanna read about the first few chapters of the big bathroom makeover? Check out Chapter One, Chapter Two, Chapter Three, a little teaser post, Chapter Four and Chapter Five right here.

tara says
Is it totally weird to be excited that we have the same kind of bathtub?
At any rate – looks amazing guys! Gives me hope for a bathroom reno. of my own.
candace says
It looks beautiful – you are on the home-stretch! Thank you for the play by play – I have learned so much!!
Sarah Belknap says
Okay, I’m wondering if anyone else experiences what I experience when I read your blog? I feel this weird sense of pride, as though I’m a parent watching their child in a Christmas play. It’s like I’m cheering you guys on the whole time you’re doing a project. I find myself laughing at your missteps, smiling at your jokes (okay, sometimes Burger’s jokes have me falling out of my chair, laughing so hard!), and beaming with pride when you finish something. It’s an amazing thing to be able to live through your blog, experience projects with you and feel a little like I contributed something (moral support?) to the both of you. Ahhhh.. so rewarding, with so little actual sweat on my end (and no caulk on my fingers..haha!). Keep up the good work. We’re cheering you on (and trying out some of your tips) in Ohio!
Abby says
Wow! Lookin’ good! I can’t wait for the big reveal, it’s going to be beautiful!
My husband and I are installing baseboards this weekend too! It is such a tedious task but it looks so good when it’s done. I think we are going with the 4 1/2 inch stuff. I really wanted to put in bead board too, but it is so expensive that we’ll skip it and go with the thick trim. We are trying to find ways to add character to a vinyl sided builder basic 1980’s house. I’m happy to have the four of you to commiserate! :)
Annie, bossy color says
Wow, guys! I can’t believe how crisp that new trim looks! I always wrestle with this question – we all want to salvage stuff original to the house, but when it comes to moulding, sometimes the years have taken too much of a toll. Love the step-by-step. Thanks!
Katy @ A Starter House says
I’m working on a little bathroom project…not nearly as extensive as yours. Although once I’m finished it will have involved some peel and stick (a temporary fix), some wainscoting, a “new” light fixture and a newly framed mirror. Nothing over the top, but its already making a difference! I love all the pics of your bathroom makeover, its making me want to redo our other bathroom too!
Bridget B. says
Wow. Looks great!
Quick questions:
How many pieces of trim did you use to border each side of the window? Maybe I misunderstood, but I can’t seem to see more than one in the “after” picture.
How hard was it to get the door off the linen closet? We’d like to do the same thing in our bathroom, but the hinges on our old doors are so tightly stuck, that I can’t get them to budge. Any tips?
YoungHouseLove says
Hey Bridget,
Yup, there’s just one piece of trim installed on each side of the window. Sorry if it sounded like we used more than one on each side (there are four sides to the window so maybe that was contributing to the confusion somehow?). As for removing the door to the linen closet, we just use a hammer and a screwdriver to knock the pin in the door up and out, then the door is free to be removed. Here’s a post all about that project: https://www.younghouselove.com/open-wide/
Hope it helps!
xo,
s
Cindy @ The Flipping Couple says
That’s looking so good you guys!!! We’re also working on a bathroom gut-job, but ours got interrupted by building a garage so we’re just finally getting back to it. The trim is all that’s left for us so we’re super excited to get it finished up! Race to the finish??
Susan Solo says
Absolutely stunning. I *think* this is giving me the confidence to take a stab at tiling my own bathroom floors. Thank you so much for the super helpful step-by-step instructions and photos!
armchairdesign says
Ohhhhh a miter saw! I’m jealous! I *just* finished the boys’ room (baseboards and door casing) with a circular saw and a handheld. Gah!
Looks beautiful, Lovies! Can’t wait to see it all put together!
N.
TG says
I was interested to know the difference. I noticed that the floor tile did not go partially up the wall, but there was moulding installed instead (Baseboard).
Is there a particular reason?
Is one way better than the other from your expertise?
YoungHouseLove says
Hey TG,
Deciding between using tile as baseboard vs the wood moulding we used is totally a subjective decision in our opinion. While the tile option might create an extra bit of moisture protection on your floors, we chose to go the wood baseboard route so that it would match with the crisp white trim we were putting around the windows, plus we thought a light baseboard would help our tiny bathroom look bigger. Plus the tile border would’ve been extra moolah and extra elbow grease to get more tile in place. Not to mention we were fighting the tile-all-over-the-wall look we had lived with for so long. But again, it’s really personal preference.
Hope it helps!
xo,
s
Erin @ Domestic Adventure says
Ah, the trim is like a cherry on top of an ice cream sundae–it makes it look so finished. I’m so impressed with your patience and precision. Can’t wait for the big reveal!
Lms52 says
It’s looking great!!! Can’t wait to see how the sink/vanity turns out!
Jessica @ How Sweet says
You guys are so brave – I would have chopped off multiple fingers! looks great!! :)
Kerry @ First Time Fancy says
We have been redoing our laundry room in the basement and last night we JUST grouted the tile. So we’re waiting for it to finish setting and then we’ll be sealing and painting before the trim goes up. As we have been for the last two weeks – we’ll be spending it in the basement, hopefully finishing up our first big reno on our home!
P.S. the bathroom is looking great! Can’t wait for the final reveal!
Jen says
So interesting … our bathroom is identical (built in 1956) so this is nice to see what options there are in changing it.
Erin @ Cultivating Home says
What an amazing transformation. Trim creates quite an affect. Kudos to you for being a pro at the miter saw! I usually have to buy a couple extra board feet for my “oops”. Looking forward to seeing the final reveal.
travis says
Lookin fantastic! I, too, borrow tools. I have a community of guys to go to for power tools that way we all aren’t spending a bunch of money on the same tool! I have a couple…my friends have a couple…my brother-n-law has a couple and they all live within a few blocks. Its a perfect system. Sometimes we don’t always give the tools back after our projects so its kind of fun cause you never know who might actually have the miter saw or the nail gun! But this is also a good thing because that way you might get lucky and have to call two buddies before you find where the tool is staying. Then those two buddies are so interested in what you’re doing they come over and help out! Perfect!
chacha says
Baseboard and casing. Yeah, we’ve got about 200+ feet of baseboard and 180 feet of casing throughout the downstairs to install (we’re about 50% done). Luckily we have a pneumatic nail gun and compressor otherwise this would take years. It is a must for large trim projects.
Also – sometimes, caulk doesn’t do the greatest job covering nail holes (you still see the little indent). Wood filler or spackle compound does well – just requires a very light sanding. Then obviously you have to give it a coat of paint.
Bathroom is looking great!
YoungHouseLove says
Thanks for the wood filler or spackle tip! We found that our tiny recessed holes worked well with caulk (which saved us the sanding step) but for anyone else out there (including us when it comes to future projects that might not work out as easily) it’s great to know!
xo,
s
Rachel says
Hi Sherry and John! Your bathroom is looking amazing and I love the color. What color did you use? I am thinking of using it in my kitchen. Thanks and good luck with the rest of the remodeling :)
YoungHouseLove says
Hey Rachel,
The color is Benjamin Moore’s Dune Grass (which we had color matched to No-VOC Premium paint by Olympic). It’s a gorgeous sandy khaki color with subtle warm green undertones. Hope it helps!
xo,
s
CasaCullen says
yay john! so glad y’all are using freshaire…specially for the sweet lil’ tiny that’s on the way…i shot pics of our kicthen re-model and we used the white for our kitchen cabinets and it rocked!!!! the windows look great and totally inspiring me to re-do all our trim (more of a creamy/light yellow than white – BARF!)
congrats on moving right along on the gorgeous new ‘spa’ in your home :) cheers – casacullen
Eryn says
I am picking out granite for our kitchen this week! S & J, are there any granite rules you abide by while choosing for a kitchen? We have dark hardwoods and white cabinets. Thanks for your input! :)
YoungHouseLove says
Hey Eryn,
We have one major rule, and that is: go see the entire slab in person at the stoneyard before making a final decision and DON’T rely on a tiny sample in the store! Here are two posts about the near-disaster that we thankfully avoided by viewing our full slab.
https://www.younghouselove.com/see-spot-run/
https://www.younghouselove.com/bullet-dodged/
It would have been a nightmare situation. Whew.
Oh and another tip would be to bring a cabinet door (and even a similarly stained plank of wood to represent the floor if you can) to the stoneyard to see how everything will look together. Hope it helps!
xo,
s
Christin says
It’s looking fabulous! Can’t wait to see the finished product.
We live in an apt, so as much as I would LOVE to gut our bathroom, no can do. But, we are making a few small changes. We found a steal of a deal on a new mirror medicine cabinet and over head lights, so we’re doing that small upgrade. We’re also painting. The past paint jobs in this bathroom have been door very poorly and with plain old bad paint – not at all the kind you want to paint with in a room with lots of water and moisture. So although we’ll be most likely painting it white again, we’ll clean all the mold (yuck!) and paint it properly and with the right kind fo paint so it’ll be clean and oh so much nicer. :)
Melissa says
Your bathroom is looking great! I can’t wait to see the final product with vanity and all. My husband and I just finished tiling our bathroom this weekend and now we need to put trim up so this post has come at the perfect time for us! Thanks!
Amy says
Wow- it must have felt great to finally see the finish line! We are in the midst of a bathroom reno right now, and it’s amazing just how much longer it really takes than you originally assume…and we’re still on the first steps! But it all pays off in the end. Great job guys!
Arlee Leo says
It looks great! I’ve been wanting to add crown molding to our bedroom and your step-by-step helps a lot in making the idea less scary. And we’re (hopefully) completing a tile project this month – not a floor, though, a coffee table, so a smaller operation; but your tiling project has answered a ton of questions I didn’t know I had. Thanks so much!
Michelle says
John you have done an amazing job!!!! I’d hire you any day. You’re so patient. I’m learning from your work, that patience is critical. You’ve got to take your time and not rush…like I always want to do. I know Sherry is uber proud :)
Eryn says
Thanks Sherry!
Vic says
Bathrooms are my most FAVORITE room of a house. So your bathroom remodel has me feeling like a little kid waiting for Christmas morning! Each new bathroom post update is like you are peeling away just a tiny little piece of wrapping paper! I can’t wait for the big reveal at the end!
Raven says
We re-did our guest bath and will be re-doing our master very soon (as soon as I make some decisions to deal with the very odd layout and lack of storage). I think the most tedious part was the trim work because we did wainscoting so we had double the trim to deal with and VERY wonky walls.
Here is our bathroom http://blog.justexpressive.com/?p=899
foobella says
Lookin’ good! But I gotta tell you guys. This bathroom makeover is drawwwwwwwing out just like every season of LOST! lol.
Amanda says
It’s amazing how a few pieces of wood trim really make it all come together.
As for me, this week I will be installing quarter-round in my bathroom, since the baseboards, lovely as they are, don’t go all the way to the floor.
Grace says
Your bathroom is looking great! I love that your sharing the play by play with your readers. Your bathroom renovation series has given my husband and I several ideas for our own bathroom renovation – thanks!
Kristen says
We’re doing the same thing to our bathroom right now. We’re not quite as far as you but drywall is going up next week! You guys inspire us to keep going with ours and keep making our new house our own! Love your blog!
Ashley M. [at] (never home)maker says
You guys did a superb job on your trim! We absolutely HATE that part . . . ugh! It’s so detailed. But, if you do it right — it looks great, like yours. Also, I like that you went low-tech. Sometimes a good ‘ole hammer is all your need to spruce up your space. None of this fancy stuff!!!
Anyway, it’s looking fantastic. Can’t wait to see the end result!
nicola says
after seeing how much care you have put into this bathroom, and how stylish it looks even without fixtures, I can’t wait to see the new vanity!
Lesley H says
Isn’t it amazing how the trim sets everything off!? Looks fabulous. I have loved your floor tile choice from the beginning and now love it even more when I see how it reflects your window – you planned that, right? Keep up the great work.
Erin says
You guys are inspiring me to finally tackle our bathroom. We moved in 7 months ago and still have flat white walls, a big unframed mirror and the awful Hollywood lighting fixture. I think I will be using the three day weekend to paint, trim out the mirror, switch out the lighting, and maybe even the faucets!
TG says
Thanks Sherry. The bathroom looks great. You both made some great design choices.
amelia says
beautiful! really can’t wait to see this vanity and all the finishing touches!
Ana says
I love watching the progress of your bathroom — I’m planning a small bathroom update and you’re helping me troubleshoot possible issues in my own 1950s bathroom. I don’t have tools (or mad tiling skillz like John) so a lot of the work will be done by professionals. I am, however, taking a free class at Home Depot on Thursday to learn how to change faucets and showerheads.
kristen says
Its really looking good.. Almost done!!
Sara @ Russet Street Reno says
I know the previous owners had your tub refinished before you bought your house. Is there any particular reason you decided to keep the tub when you were gutting the bathroom anyway? I know that the refinishing only lasts for so many years and you can’t place items on the tub surround, etc. We also have an old dirty tub (but it’s deep and otherwise wonderful) and aren’t sure if we should try to refinish it or rip it out. Your thoughts would be helpful! Sorry if I missed the answer in your posts somewhere :)
YoungHouseLove says
Hey Sara,
Good question! Our tub was actually reglazed when we inherited it with the house and that treatment lasted over 12 years (we received the original paperwork from the first time the job was done years ago from the last owners). And this job should last just as long even with everyday use. The key is finding the best professionals who use the best equipment and the best formulas for a long lasting finish that looks amazing (we call for references, look them up with the Better Business Bureau, etc). Our tub is actually already done and it’s gorgeous! Better than new. As for why we opted to get ours reglazed instead of replacing it, we love the large, deep, original cast-iron tub. It’s too great to send off to a landfill (and too heavy and expensive to try to remove & replace). We’re all about working with what we have so because we couldn’t salvage the tile, the least we could do was salvage the tub. And because we’ve lived without putting shampoo bottles around the edge of the tub for years (since it was previously refinished) it’s not an adjustment at all when it comes to the newly reglazed finish. Hope it helps!
xo,
s
Amanda @geekdetails says
I tackled my stairs this week. They’re not completely done yet, but the carpet is gone, stairs are sanded and painted, and I’ve caulked all along the edges of them with DAP paintable caulking to help seal up the drafty old house. They look TONS better and the DAP stuff is worth the couple extra bucks. We only tried it because we read about it here but the husband and I were both happier with it.
The bathroom is looking lovely!
Meredith says
It looks awesome!!!! I wish the hubs and I had the know how to tackle our bathroom!!! One day, we will do it!!!!
Nicole C. says
Hi Guys! Your bathroom is looking great – I can’t wait to see the finished product!
I have a question about caulk that maybe you’ll have some ideas on… I used Dap Painter’s Caulk to fill in small gaps around some crown molding I installed last May. However, I just noticed that it started cracking! It looks terrible, and I’m not sure why it’s doing that. Obviously, I’ll have to redo it, but I want to make sure I don’t repeat the same mistake. Any ideas on why this would happen? I thought caulk was supposed to flex/expand/whatever so that cracking wouldn’t be an issue.
Sigh. Sometimes this house stuff drives me nuts!
YoungHouseLove says
Hmm, we honestly have no idea. The DAP caulk we use says “crack proof, paintable, fights the growth of mildew” etc. Maybe picking up a DAP tube labeled “Premium Indoor/Outdoor Sealant for Windows, Doors, Siding, Molding” is the answer? That’s exactly what we used. We always look for buzz words like paintable and crack-proof to save us time and trouble. Hope it helps!
xo,
s
Michelle says
It’s looking gorgeous! I’m just curious, did you buy extra baseboard in case you ever want to swap out your vanity, or is that the kind of thing that should always be available?
YoungHouseLove says
Hey Michelle,
Good question! We did have a bit of extra baseboard leftover that we stored in the attic, but in a pinch we could probably find something either identical or extremely similar (in which case we’d just reframe the baseboards so they all match but leave the window and door trim since it would coordinate so closely no one would notice). Of course having extra matching trim on hand is the easiest solution so we recommend that if you have room to store a few extra feet somewhere. Hope it helps!
xo,
s
Katharine says
Wow, it’s really coming together now! I love the color choices :)
Deb says
We’re working on our upstairs full bath now (which is the kids full bath). I have a really BAaaaaad feeling it’s going to take FOR-EV-ER, since my husband and I both work full time and I’m finishing up grad school. Luckily we have other bathrooms to tide us over. I have no idea how you guys lived without a bathroom so long – and with Sherry pregnant too! Kudos to you guys!
The bathroom has a tile floor that’s in bad shape (broken tiles) and I’ve heard so many different things I’m not sure which would be better and more cost effective- completely ripping it out or just covering it with something else? Comments? Suggestions?
Love your website:) My husband, however, isn’t too crazy about it because it gives me ideas – ha!
YoungHouseLove says
Hey Deb,
Definitely rip it up and start fresh. You can tile over floors that are perfectly level and in mint condition, but if there are broken tiles you might be setting yourself up for a major disaster (as in, a week after you lay the new tile it’s cracking and breaking because the foundation wasn’t sound). Plus you have to shim up toilets and thresholds and doors when you raise the floor so sometimes it’s worth stripping out the bad floor and starting over (we rented a little demolition hammer to make quick work of it). Hope it helps!
xo,
s
schmei says
I get unreasonably excited when you post a bathroom update, and I can’t wait to see the final product! (Though I’m guessing you two might be a little more excited than I am, seeing as it’s your shower and all).
This week my big project is… the start of my master’s thesis proposal. I need to think of it as a paper-based version of your bathroom reno, and then it will seem more exciting and doable.