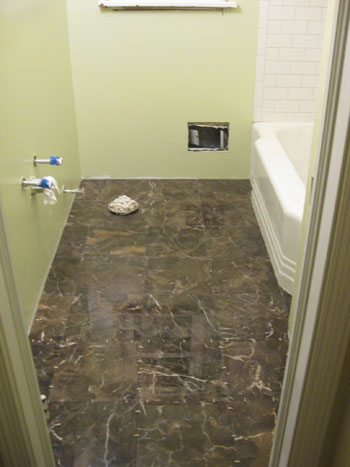
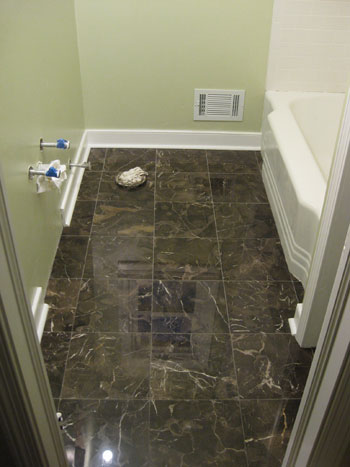
With all of our shower/tub and floor tile set, grouted and sealed, it really felt like the bathroom was finally coming back together. But the absence of one major finishing accent was still making the room look under construction: baseboards and trim. Take this pre-grouting shot of the floor for instance:
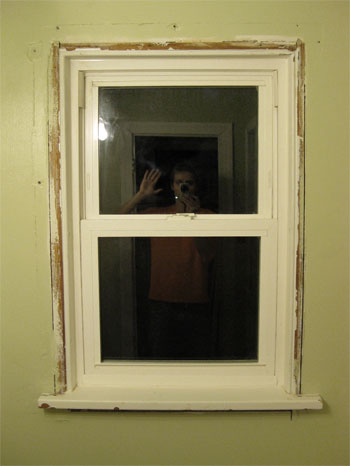
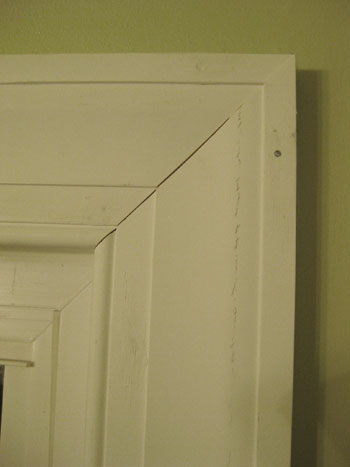
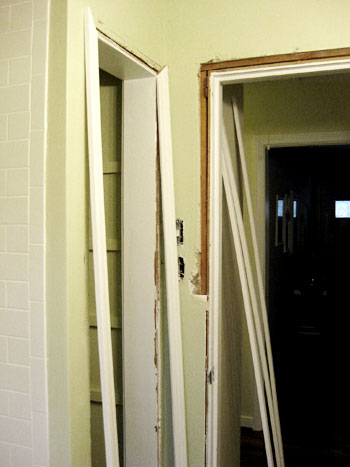
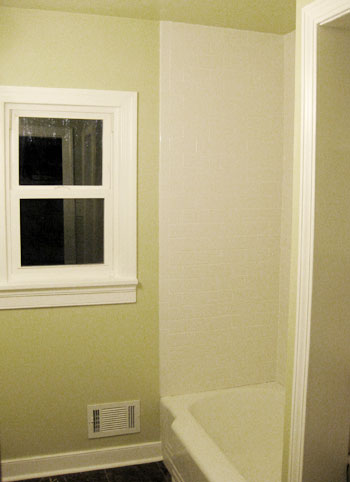
During demo, I started with the naive notion of salvaging the existing trim around the window and doors (both the main door and the linen closet). But I quickly realized that pipe dream was a lot more trouble than it was worth (many pieces were splintered, broken, or otherwise worse for wear). Not to mention that I couldn’t avoid installing new baseboard around the floor anyway, since it had once been a tile border back when the walls were also tiled. So thanks to my handy crowbar and a hammer, out it all came… leaving things like the window looking like this:
So once the grout had set for 24 hours and had been sealed a couple of times, re-installing the trim became my #1 task. Having borrowed my dad’s miter saw (have you noticed a theme here? thanks for all the tools dad!), I was mostly set in the “supplies” department. And, I’ll admit, having another power saw to play with was basically all I looked forward to when it came to this task. Okay, that and the bit of math and measuring that I got to do too along with it (yes, I am a nerd thankyouverymuch).
Once I measured everything (lengths of each wall, each side of the doors and around the window) we headed off to Home Depot with samples of our old trim in hand. We wanted to get something similar so it matched the rest of the house, though we did opt for slightly wider versions of the same style, just for a bit more crisp presence. Home Depot, like most home improvement stores, sells trim in HUGE strips. Fortunately, they also offer a cutting station to hack the pieces down to transportable sizes. I actually spent a good 30 minutes at the station cutting every single section we needed, leaving a bit of extra on each one and even going as far as to label the backs of each piece with things like “44 inches, back wall under window” or “35 inches, spare.” This came in handy when checking out because I could quickly add up how many feet I was buying without making the checkout girl suffer through measuring thirty-some sections of trim.
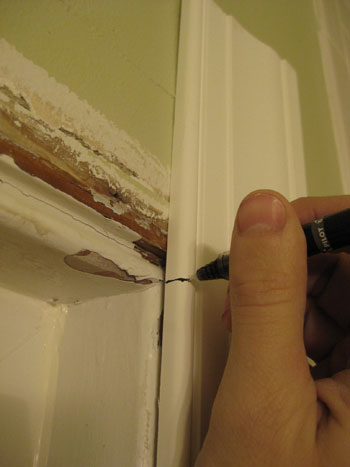
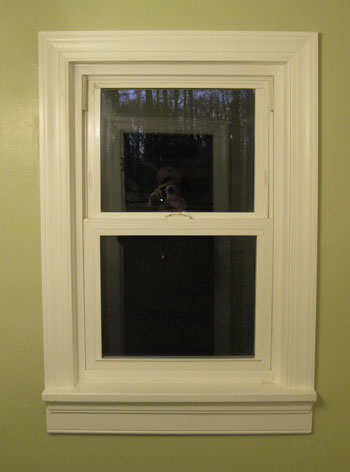
Rather than detailing my step-by-step process for all thirty-some sections that I installed, let’s use the window as an example. First, I located the sections that I had roughly cut for each side and marked the inside edge of my cut with a regular old ballpoint pen. Honestly, the hardest part of this step was holding the camera and the pen at the same time.
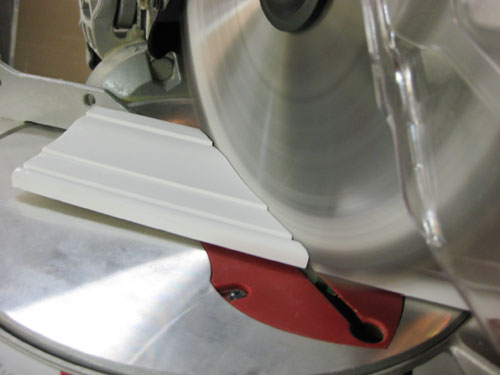
Then I marched through the house, out the sunroom, across the driveway and into the garage where I had the miter saw set up. This is a path I would travel quite frequently as I cut (and re-cut) everything. The miter saw is designed to easily cut angled (or mitered) cuts, so things like molding and trim can meet perfectly around corners and edges. Being new to the miter saw, I found it really easy to use. You just swivel the saw base to match the angle you need (I was doing all 45-degree angled cuts, fortunately), lock it into place, and then line the piece of wood flush against the guides. Oh and even though my dad’s saw was equipped with a laser guide, I always pulled the saw down in power-off mode to see for myself where the blade would contact the trim first- just to be sure before firing her up and making my cut.
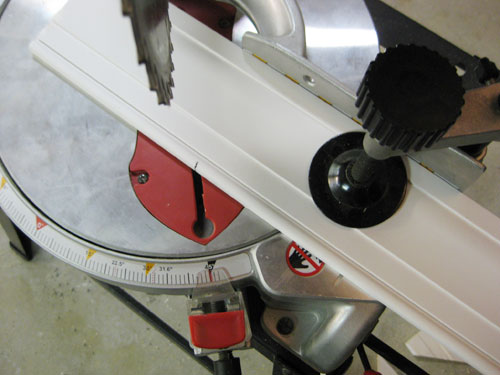
Cutting each piece was a cinch. And like the wet saw, I found it easy to come back and finesse each cut if I saw things were a bit too long once I got back inside. I live by the motto “it’s a lot easier to cut more off than to put more back on,” meaning I’m sometimes very conservative on my first cut and end up trimming things fairly frequently. It might not be the most efficient method, but it’s definitely easier (and cheaper) than running out to buy more trim if you mess up and cut too much off from the start.
When it came time to affix the perfectly cut piece into place, we opted to go low tech. Rather than spring for some sort of power nail gun for such a small job, we bought a small 10 oz hammer (so we weren’t swinging our usual monster anywhere near our tile when it came to the baseboards) and a small “nail set” to recess each nail into the trim without bashing in the trim with the hammer. Again, it might not be the fastest technique but it got the job done with zero damage to the rest of the room (and kept us blissfully under budget). Basically we just used the hammer to drive some finishing nails most of the way into the trim (leaving about an 1/8th of an inch sticking out).
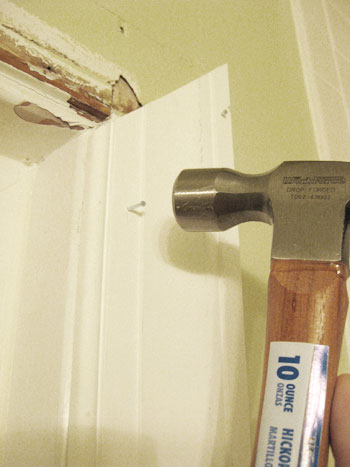
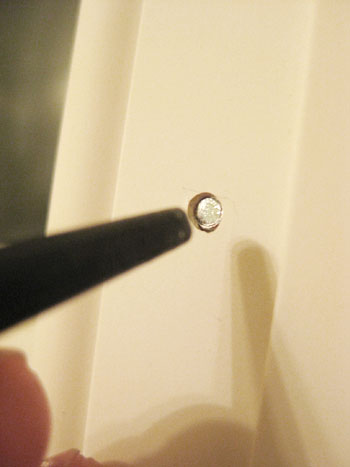
Then we came back with the nail set, a short metal piece that’s (not by coincidence) the size of the nail head on one end. That way you can drive the nail all the way into the wood without damaging the trim around it with the wide and unwieldy head of the hammer.
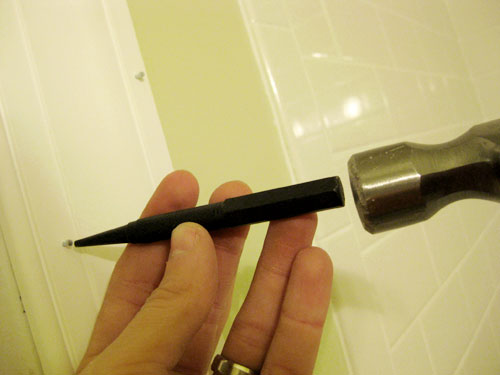
We actually drove the nail just slightly deeper than the surface of the wood so we could easily hide it with caulk later.
Oh and while the trim we bought is white, that’s only because it’s pre-primed, not painted. Some people choose to paint before installing their trim, but we’ve painted already-installed trim so many times that it’s practically second nature to us (there’s no whipping the paint out twice- once before installation and once afterwards for all the touch-ups- instead it’s all one go at the end).
Anyway, once I got all of the pieces installed around the window, it looked 98% perfect. The trim was a little smudgy from all of the handling and, try as I might, the pieces weren’t flawlessly flush in all spots but they were close enough. And that’s where caulk and paint come in.
We chose to use white paintable door, window and trim caulk to fill our cracks and nail holes (we tend to like Dap as a brand, since we find it’s among the easiest to work with). Here we are applying a generous strip at the corner seam of the window.
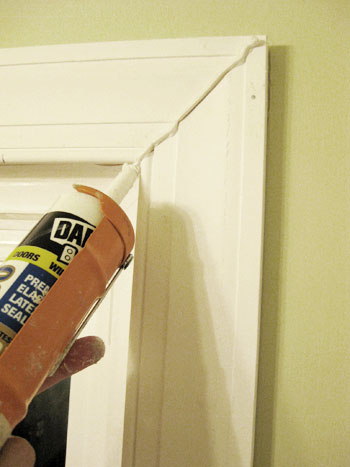
After squishing it into the seam with our finger and then wiping away any excess, it comes out looking pretty seamless.
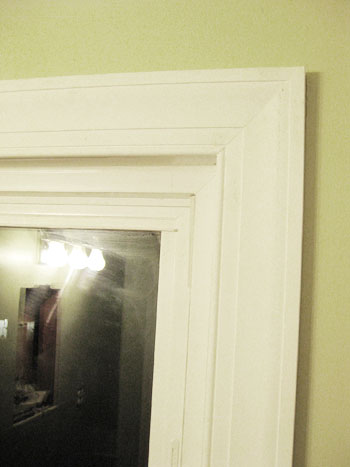
And once all of the caulk dried on the corners and nail holes, we put on a couple of coats of No-VOC Freshaire white semi-gloss paint and TA-DA!
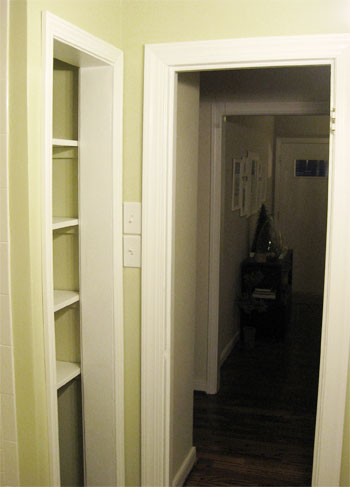
The trim around the linen closet and door were pretty much the same process, so here’s a quick before (complete with trim pieces I was checking the lengths of)…
…and after: all caulked, painted and ready to rock.
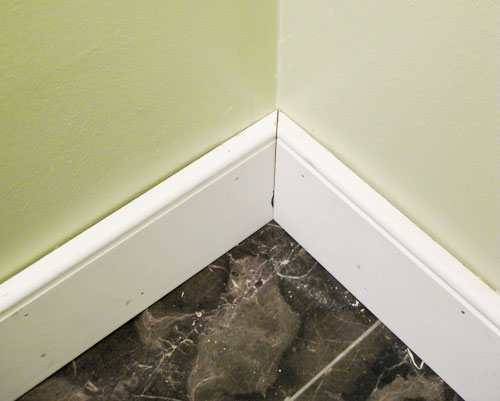
Now the floors were a slightly different task. Here I installed baseboard along the base of all the walls, including the interior of the linen closet, followed by quarter-round shoe molding to really finish everything off. I was excited by this part because it meant I got to cover up all the spots where my tiling wasn’t exactly flush to the wall. Plus, I got to experience the miter saw’s ability to make bevel cuts (these are still 45-degree angles, but they’re made by tilting the saw blade to the side, rather than rotating the saw base). These bevel cuts allow pieces of baseboard to meet in the corners like this:
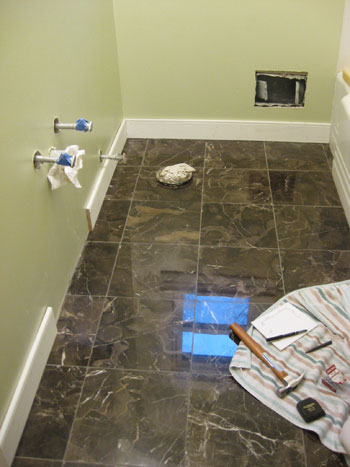
Meeting in the corners perfectly wasn’t a big fear, since caulk would help me hide small flaws. My biggest fear was hammering so close to our precious floor. So as a safety measure I kept a towel under the hammer zone at all times for at least a little bit of a buffer and I used my smaller 10 oz hammer which was easier to control than our usual heavier and larger one. Here’s a peek into what the project workzone looked like.
You’re probably wondering why there’s a big, missing piece of baseboard on the long wall. No, I didn’t forget. That’s where the vanity is going and, since we want it to sit flush against the wall, we didn’t want baseboard in the way. So we placed the vanity in the room earlier to figure out where we wanted it (and where the plumbing forced it to go). Then we just marked the walls and measured and installed the baseboard accordingly.
After getting all of it in, we measured and cut the quarter-round the same way. The only difference was that we attached the quarter-round with Liquid Nails (ok, and a couple of real nails too) because despite wanting a flush fit everywhere, I was too chicken to manually hammer that close to the marble if I could avoid it. And we’re happy to report that it worked like a charm.
A little bit of caulk and two coats of paint later… presto-change-o.
In the end it was about a five hour process. And just like grouting, the difference was amazing. More and more it was starting to look like a real bathroom. Imagine that. Next on the agenda was installing the toilet, building the vanity and then we’d practically be done (stay tuned for our DIY vanity play-by-play later this week). Can’t you just taste the finish line? Us too, and it tastes a little bit like silicone caulk.
But enough about us, what are you up to this week? Any fellow bathroom re-doers? Anyone hanging trim or baseboards? Let’s commiserate.
Psst- Wanna read about the first few chapters of the big bathroom makeover? Check out Chapter One, Chapter Two, Chapter Three, a little teaser post, Chapter Four and Chapter Five right here.

Heather says
You guys are my heros.
SarahV says
I JUST finished laying a new hexagonal tile bathroom floor in my 55 year old house. The tiles are white matte ceramic and I used an extremely dark grey grout (to go with the white subway tiles and narrow black trim on the walls). I’ve never done a tiling project of this size before, but it turned out so beautifully! It’s rad when the picture in your head is transformed into reality. Your bathroom looks great, too! HOORAY FOR DIY!
Karrie says
Wow! It’s coming along nicely. The baseboards and trim really make a difference. We’re tackling a mini bathroom makeover and one thing that bothers me about our bathroom is we have corner round only on two sides (by the tub and on one wall) and no base boards since the walls are tiled. Isn’t it weird to have in on the tub?
Anyway, great job and I can’t wait to see more!
YoungHouseLove says
Hey Karrie,
Hmm, we do think the tub should just meet the tiled floor with a bit of caulk (no trim or quarter-round necessary). That way any water that dribbles down the tub hits the tile and caulk (which are much more “water friendly” than trim over time). Hope it helps!
xo,
s
Jill Stigs says
It looks fabulous! Measure twice and cut once sticks in my head. AND…..that reminds me to pick up some caulk for my mirror frame. THANKS!!
Graham says
Awesome job! Just last night I was sanding baseboards to I can cut/install them very soon– makes me feel nice to see somebody else (who isn’t a contractor) do it without any trouble. Thanks!
Coasting anon says
One of these days we will finish our master bedroom re-do and I will submit our pictures to you all…along with my endorsement of your having lots of childcare options once the baby comes along as our own 6-month old son is the reason why our bedroom project has taken us 4 months!!
Annnnnnywho…the last project in the room is crown moulding; but we are so scared to tackle it because our house is 100 years old and the walls/ceiling are made of crumbly plaster. However, I have new hope seeing your bathroom trim and your use of DAP Caulk to fill in the gaps.
My question to you is if your walls were flat and if not, did you use the caulk along the baseboard? As I write that I remember that you took your walls to the studs for this project, so my guess is your wallboard was fairly straight…have you had this issue anywhere else in your home? If so, did the DAP Caulk work to fill in any gaps between the baseboard and/or trim and the walls?
Thanks,
–mzb
YoungHouseLove says
Hey Coasting anon,
We actually did have fairly straight walls but small seams where baseboard meets up with the wall are relatively common (even with perfect walls) so we did use a smidge of caulk along the top of the baseboards (where they meet the wall) to make everything look seamless. It definitely makes all the difference when it comes to creating a perfectly polished and finished look!
xo,
s
Rose says
Fantastic job! Thanks for providing all the step-by-step info. I am eager to fix trim in our bathroom that I accidentally ripped off when power vacuuming last week…
Beth says
Everything looks great! I love how molding/trim makes a room feel like a room again.
heather s. says
Trim definitely makes a difference! I’m planning on ripping out my tile trim along the floor and replacing it with white trim that matches the rest of the house. For some reason the trim is only on two of the three walls (tub takes up the fourth wall) so I figured I might as well rip out the old and replace with new!
Christy R. says
My last bathroom project was replacing the old ceramic toilet paper holder and towel holder in our guest bathroom. I thought that this would be relatively easy and painless, but after I discovered that the fixtures had been set into the wall…it was a different story. Late at night, I ended up with 3 holes in the wall, no home improvement stores open and 18 hrs until my in-laws were coming to stay with us (Remember this was the guest bathroom)! Luckily, my parents came to our rescue and we were able to repair the holes, paint the room, change the light fixture and cabinet handles within the allotted time (There may have been some clever distracting done by my husband when his parents arrived to buy us some extra time). It was well worth it for the results, but I learned the importance of time management in a home renovation project!
Love reading about your projects…You inspire me!
Court@BeautyFullyUsed says
We’re planning to redo our 1950’s bathroom this Spring, so it’s great to get your play-by-play as we make our plans. We were organized enough to get it done pre-baby (our bundle arrives anyday now), but it’s great to see what effort was required to make this happen so we can plan accordingly.
Wendy says
STAMP ME!
I have a necklace charm that has my initials + my husband’s initials on the back. Then….on the front, it has the baby’s initials. I wear it longer, under my shirt so that it is closest to my heart.”
Cristy says
You are so close to being done…we just completed our master bathroom remodel about 2 months ago. We lived in the house for a year without using the master bathroom because it was so gross and we weren’t sure what would leak if we used it. So, we finally ripped the whole thing out, moved some walls, and then put everything back. Our bathroom is very similar to yours, actually. We used white subway tile for the entire shower surround (so, I completely understand how tiring that can be, but it is oh so worth it). We purchased an antique dresser, painted it white, retro-fitted the drawers to allow for plumbing, installed our bargain marble top (found at a marble/granite yard as a remnant), and installed our vessel sink. We love it! We splurged just a bit and put in a dual flush toilet and radiant heating under the limestone floor as well (which, we live in San Diego and don’t really need it, but I LOVVVE it).
All that said, congrats on a job well done! You are going to love it when you finally get to use all of it. I will have to send a picture so that we can see our before and after and the similarities among our bathrooms.
Great job…I love your helpful hints, and just lets me know that someone else out there is doing hard work on their house!
jbhat says
What a fantastic tutorial. Nice work on the john, John.
: )
Misa says
It looks great. I can’t wait to see the finished product. Quick question: did you paint your ceiling the same green? If so, do you like the results? I’m about to repaint a small bathroom, and I’m wondering if I should paint the ceiling as well, to make the room feel less broken up.
YoungHouseLove says
Hey Misa,
Yup, we painted the ceiling the same soft greeny-tan color as the walls. It actually makes the room feel bigger and more seamless (it blurs the boundaries of where the wall meets the ceiling so it feels open and sort of ambiguously airy). We actually love the look of painting the ceiling the same tone as the wall as long as it’s a light-ish color that won’t close in the space (you can also slide one shade lighter on the color swatch for an alternately airy effect). Hope it helps!
xo,
s
Deb says
I’m in the midst of my bathroom redo – not necessarily a remodel. Thanks for your advice on the ikea butcher block – I think its going to look awesome.
I started out with a completely white wall bathroom, with an outdated and dirty looking wood vanity – I think the stain was oak? A metal and rusted nasty medicine cabinet and a seashell sink. *shudder*
The new plan:
paint is a coral color…its behr Tangerine Dream I think (or something near that). I bought the vinyl beadboard wainscot and home depot – it’s really cheap and comes in small easy panels to put up. I’ve had my friends over to help and we’ve got most of the chairrail and base cut and tomorrow night is install of the beadboard. I painted the vanity white – a nice bright clean white (same that I used on my kitchen cabinets) and added new door pulls that are chrome with ceramic white inserts. I already purchased and installed a new medicine cabinet that fit into the previous opening that is simple with a white frame around the mirror. Since there was barely any storage I added a wire shelving unit and use the black and white flowery boxes from ikea as drawers. I’m going to finish off with a butcher block vanity top and a classic round vessel sink with a tall faucet.
patti says
i’m having trim envy in your bathroom. we did a full overhaul of our bathroom…ready for this…two years ago and we still haven’t trimmed it out.
the dilemma is this: our house was built in 1939 and the entire interior of the house is sheeted with 3/4″ redwood. then you put 1/2″ drywall over that and you have a substantial gap to fill when trimming around the window and door (the floor, we put the slate tile up the wall instead of a typical kicker…we like it. so, we have to learn or figure out how in the world to trim with filling in the large gaps. one day, i too will have a lovely finished bathroom. we did large subway tiles to fill in our shower/tub area – i love love LOVE them!
Fran says
Okay, John. You’re making this look totally do-able! I have a bathroom like the one you’re remodeling, and I am feeling myself get braver about gutting it with each post I read of your re-do. Many thanks!
megan @ a life's design says
Fabulous job! Everything looks so good.
Mark D says
The bathroom is coming along great! Is it just me, or is the color you chose the same as the color box of your comments?
I have a (hopefully) quick question about my own bathroom renovation, which is just about finished. The heat intake vent is up high near the ceiling in the corner, so close to the corner in fact, that when I bought a replacement vent, it doesn’t quite fit! It fits over the hole, but the metal frame around the actual hole of the vent doesn’t fit flush against the wall. Grrr. Any thoughts?
YoungHouseLove says
Hey Mark,
Hmm, we’ve actually heard that you can use a dremmel to “sand down” the side of a vent slightly to help it fit. You can also bend the interior metal frame with everything from your hands, a hammer or even pliers. Since it’s not visible it shouldn’t mar the finished look and should function well once you get it flush. If all else fails just ask around at the home improvement store and hopefully they’ll have an idea or two. Good luck!
xo,
s
Emily says
Love! We just bought a miter saw (our entire house needs new trim! bah!) and I can’t wait to get started… :)
You are doing such a good job in that bathroom John! Sherry is one lucky lady!
-Emily
Rebecca says
I think you mentioned in an earlier post that you would be done with installation today. If so, congratulations!
YoungHouseLove says
Thanks Rebecca! It’s a big day over here. Wahoooooooooooooooooooooooooooo!
xo,
s
Myrna says
Good job on the window trim!! Question: are the walls around the window plaster?? I always wanted to add window trim, crown molding but I have plaster walls and wasn’t sure how to attempt it, if at all.
Love your how-to’s!!! Excellent!
YoungHouseLove says
Good question! Yes, the walls around the window are plaster and it wasn’t really different at all to hang that trim as opposed to the baseboard (which was going into new drywall). Hope it helps!
xo,
s
Jessie (Vegan-minded) says
The baseboards and door/window frames look great! Amazing how they make the room look so crisp and tied together. Love it. :)
Sarah says
I’ve loved reading your bathroom re-do details. We took ours down to the studs, and it was quite a task in our tiny 50-year old house. And it was our first major undertaking. Since then we’ve undertaken the kitchen and will soon tear into the “finished” basement… I wrote about it here: http://theidochronicles.blogspot.com/2008/08/youre-remodeling-bathroom.html. Congrats on the new little one!
Ashley @ SouthMeetsSouth says
Looking great!! We have replaced almost all of the trim throughout our house. It is a lot of work but fairly simple once you get the hang of it. And we have to thank my parents and grandparents for all the borrowed tools (and free labor), too! My husband now has a miter saw on his wish list. Maybe for our anniversary? How romantic! Haha!
Roeshel @ The DIY Show Off says
It’s looking awesome! Thanks for the tips. I plan to learn how to use my husband’s miter saw this spring so I can get creative. ;)
Kristy says
Oh wow, I never thought it could be so easy! That cute little window looks awesome in that big lovely trim.
Molly says
Hi! This is the best trim tutorial I’ve ever seen — just what I needed!
I have two questions, though:
1) What kind of nail gun do people usually use instead of your nail-set method?
2) What do you use to wipe away the excess caulk? A sponge?
Thank you!
YoungHouseLove says
Hey Molly,
Good questions! Many people use pneumatic nail guns to shoot nails into the wall and hang trim in seconds flat. There are tons of different types so we’d suggest dropping by a home improvement store to see what they recommend (and what fits your budget). You can also rent them at places like Home Depot, Lowe’s and True Value so that’s another option. As for wiping caulk, we just use our finger. Keeping a paper towel on hand (for wiping excess caulk off your finger afterwards) also helps. Oh and a cup of warm water really comes in handy as well (you can dip your finger into the warm water so most of the caulk slips right off). Hope it helps!
xo,
s
Dana says
Can’t wait to see that vanity! Curious to know why you chose green over blue in the end for the wall color, but I’m sure you’ll address that later. I LOVE the wall color, btw. That first shower in your ‘new’ bathroom is sure gonna feel good.
I’m painting and organizing my laundry room this week… it’s hard painting around the washer/dryer (I’m too little to move them myself) and already installed cabinets but I found a great little roller with an extended handle that did the trick. Maybe I’ll send you some before and afters?!
YoungHouseLove says
Hey Dana,
The choice to go with a subtle greeny-tan (sort of a soft khaki color) in the bathroom was pretty easy once we realized we already had two blue rooms (both the bedroom and the kitchen are painted a light blue-gray color called Gentle Tide by Glidden). So it felt nice to introduce some soft green to our house’s color palette (since we also plan to bring green into the nursery and have green accessories all over the house so it feels integrated and cohesive). Hope it helps!
xo,
s
KK says
Another secret trick: in old houses, they would put moulding around both the outside AND inside of doors. So if you can’t find moulding that matches, stick your head inside and see if there’s some in there you can pop off and use. We did this in our old house and it was awesome.
Meredith says
Hey there – I’m new to your blog, happy to have found you! We’re planning some big work at our place – but it’ll be a couple of years out at this point. We did a big bathroom renovation at our old place, you’ve inspired to me write that story soon.
Looks great! I’m going to point my better half to your blog for inspiration :) He’s gearing up to install the trim around the windows and the baseboard in the kids’ room soon.
Looking forward to seeing the finished product!
Amanda says
Great job, John! We did tons of trim work in our old house and I know it is a lot of work.
We currently live in a 1965 ranch. I’m hoping that we can start working on it this year as it’s almost all original. Does the trim you put in match the rest of the house? I can’t decide if we should stick with something similar to what’s here, or upgrade it a bit. Also, what do your interior doors look like? Ours are hollow, plain doors stained sort of a honey color. I’m trying to convince my husband he wants to take them all down and paint them for me:).
I can’t wait to see your bathroom when it is done.
YoungHouseLove says
Hey Amanda-
It’s not exactly the same trim but it’s extremely similar. As in, no one would ever notice it’s not exactly the same (except the new stuff is so crisp and mint looking). Mmmm.
As for all of our doors, they’re gross hollow core doors that we painted white to help clean them up. They look eons better and much more polished so we definitely recommend it (and substantial new knobs can be the icing on the cake).
xo,
s
micaela @ hishouse;herhelp. says
hey yhl! we are in a similar dilemma about replacing the window/door trim in our kitchen renovation. check out the link below. we love the old charming trim that is throughout the rest of the house but it cost 3x as much to get it custom made than to use a stock trim. can’t decide if that’s worth the money! whatchu think?
http://hishouseherhelp.wordpress.com/2009/11/14/1-hardware/
Keira says
FINALLY painting our front living room this week. Started Saturday tackling the wall above our fireplace. For 3 years this room has been all one color (painted brick fireplace included). Saturday I covered the grand piano and fireplace with plastic and painted the wood paneled wall above the wood burner DARK purple. Now, (while still overcoming sickness) my husband is painting the rest of the room then we might actually decorate (instead of hanging pictures on the nails the previous owners left behind!). So excited. We’ll send pics when we’re finally finished! You guys are so inspiring! Thanks for keeping me excited about updating my 1950s house!
Hey BTW.. how much was it to reglaze your bathtub. I’m pretty sure we have the same one and it’s NASTY!
YoungHouseLove says
Hey Keira,
More reglazing info is coming down the pipeline soon, but we did tons of research and didn’t mind paying top dollar for a long lasting and durable result. It came out to $399 because our tub had previously been reglazed (and had to be stripped bare before they could refinish it again) but they only charge $299 if you don’t have a tub that was previously reglazed. Hope it helps!
xo,
s
Jen says
I was just wondering why you decided to go with quarter-round. Once the trim was up did you find there were still some gappy tiles? We just installed some hardwood in our family room and were giddy to realize that we were tight enough to the walls to avoid having to use quarter-round. Maybe it’s just a preference thing?
YoungHouseLove says
Good question! The rest of our house has quarter-round so we just did it to keep things consistent. The baseboard definitely hid all the little tile & wall gaps so the quarter-round was purely cosmetic (and it’s so cheap and easy to add at the end that we went for it). Hope it helps!
xo,
s
Christine says
We’re a little behind you. Drywall is going up and plywood flooring is going down this weekend, with possible floor tiling, if there is time. We might even pick up paint and think of that! (We had to demo all the walls in our bathroom. So time consuming going back up.) Trim is soon, so thanks for the play-by-play. And you’re right–I had originally planned on salvaging what we had, but there’s no way I’m dealing with that. The most salvaging I’ll do at this point is stripping the paint off our beautiful door.
Jess says
I can’t wait to see your finished bathroom! We also thought we could salvage the trim while doing our half-bath reno but, just like y’all, we ended up having to purchase and put up new trim. It looks great though! And the project is almost done. John was nice to set up the miter saw in your garage…my hubby just brought it right into the kitchen! :)
Pamela says
I’m jumping the gun, I know, but I want you to know how interested I am in the reglazing. I’ve heard so many horror stories and no really good ones, but our 1920s bathroom sink is irreplaceable. Did you use a national company or a local craftsperson? What kind of guarantee did you get? This is just a plea for when you do the reglazing post to give many, many details.
YoungHouseLove says
Hey Pamela,
Well we knew tub reglazing could be done right because our reglazed tub (which we inherited with the house) held up over 12 years until we decided it was time to have it redone (we had the original paperwork to prove when it was done). We used sites like Angie’s List and did some looking around at the Better Business Bureau to whittle it down to a few contenders and then we called their references (many who had the reglazing done 5+ years ago) to be certain that we landed on the best company for the job. Long story short: we’re super confident with the guys we hired! They’re a locally owned and operated father & son team who had great online reviews and they personally do all the work themselves (the father did our tub) so they don’t farm any work out to people who can leave your house and mess or take any shortcuts. They also warranty their work for two years and say that it should last 10-12 years (just like our previous reglazing job) so we have all the confidence in the world in our choice. Of course you have to take care with reglazed items (you can’t use abrasive/acidic soaps and cleaners or grippy bath mats with suction cups which can cause the finish to mar) but since we lived with a reglazed tub ever since we owned the house it’s nothing new to us and totally easy to live with. Hope it helps!
xo,
s
Jacci says
Good work, John. Your miters look great! After watching Sam working on our trim, I have a new appreciation for the craftsmanship that goes into stained woodwork. I will never take a perfect miter for granted again :) Like you, though, we’re personally glad our trim is painted and we’re thankful for caulk! :)
So, are you able to shower in there, yet?
~Jacci
YoungHouseLove says
Yup! Our bathroom is now officially 100% functional and shower/able! Wahooooooooooooooooooo!
xo,
s
Handy Man, Crafty Woman says
Its coming along great! I love befores & afters. Bathroom renos are SO satisfying! :-)
Marelis says
Absolutely beautiful! I love love love the color you guys picked out. I’m thinking of doing the same type of color in my kitchen/family rm area :)
Amanda says
Awesome job John. I’ve been trying to get my husband to finish our baseboard job. We installed new baseboard but needed some shoe or quarter round. So it has been purchased and some of it is done but my husband isn’t as thrilled as you guys are to do DIY projects. So maybe I’ll harrass him this weekend to finish it off!
Jenn says
Your bathroom looks great! I love the floor and the wall color together!
Taylor says
Congrats on all your hard work! Everything looks amazing and it’s been so awesome to read the play-by-plays. Hope you took an inaugural shower together when it was finally finished to celebrate ;)
Molly says
My husband and I are in the midst of a bathroom remodel. We finally took down the plastic tiles covering the walls (yes, plastic, the horror!) and pink seashell border, which we’re planning to cover partly with white beadboard, partly with enlongated white subway tiles.
I pointed my husband to your blog over the weekend and came back 30 minutes later to find him engrossed in your chapters on the bathroom. Thanks for providing BOTH of us with inspiration! :-)
Jeannine @ Small & Chic says
Fantastic! You make this look easy! The difference really is dramatic. Congrats, you two. The bathroom is looking great. Can’t wait to see the next installment!
Raelene Faith says
We had new baseboards installed almost two months ago (Yup, 2 months and we still have not finished the caulking, filling, and touch-ups!!) Needless to say….I’m jealous yours is all done. Your bathroom looks very, very nice.
Meghan says
WOW! I’m speechless! It looks amazing. I can’t wait to see the finished result.
Ruth says
I went to buy paint samples this week. I can’t decide between two colors. I have to repaint my guest room and patch some holes in the walls after my brother lived with me.