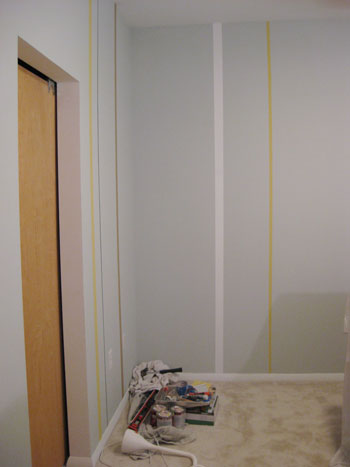
We’ve slowly been making over John’s sister Emily’s nursery on a major budget and we’re back with another update. We already shared how we painted some modern vertical stripes…
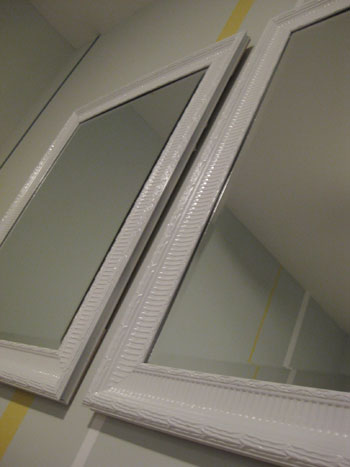
… added large mirrors to open up the small windowless room…
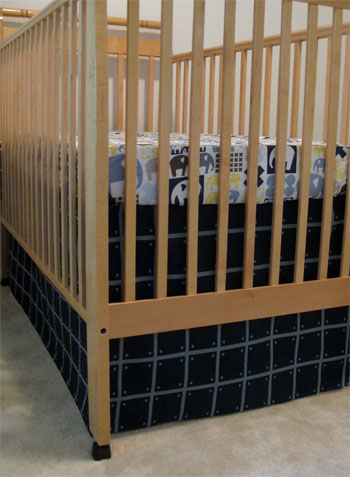
… and whipped up a super easy no-sew bed skirt.
But what about art? We wanted something modern and graphic to hang in the room, but didn’t want to spend much money to get it. The solution? Why not DIY it? So I did. To the tune of zero dollars and zero cents. Victory!
It all started when Emily was given some hand-me-down nursery art from a friend who mentioned there was no pressure to use it or anything, just that she was done with it and wanted to pass it along. The blue color was a bit more pastel than the muddier gray-based blue that we had going on in the nursery, so Emily suggested that we repaint it to create something new. We even had some leftover wall paint from our stripe painting project so it really was a zero cost project (that was guaranteed to work with our color palette no less). Here it is before we primed it with some oil-based Kilz to prep it for repainting:
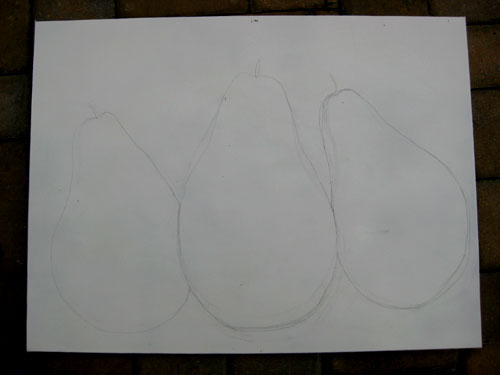
I was actually super excited to get back to my art school roots. Four years of it in NYC had me creating all the time, but in the five years since graduation I had slowly segued into painting rooms instead of art so I knew I was a bit rusty. The good news is that Emily’s modern nursery called for clean and contemporary art, so I settled on a simple two-color composition of three pears, which absolutely anyone can do. First I sketched the outlines of three not-at-all-perfect-and-that’s-ok pears in pencil on the freshly primed canvas. I liked that they leaned in different ways and were slightly varied in size for interest, especially since I was only going to be using two colors for a simplistic result:
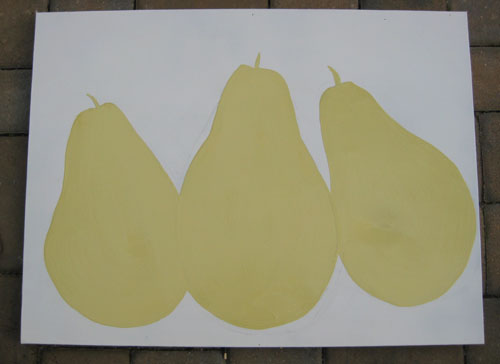
Then I filled in the pears using leftover yellow paint that we had laying around from some of the stripes that we painted in the nursery.
Next I added a slate blue background (with more leftover wall-striping paint) which ties into the crib’s deep blue skirt for even more cohesion in the room. Here it is after the first coat (about half dry, hence the different shades of blue):
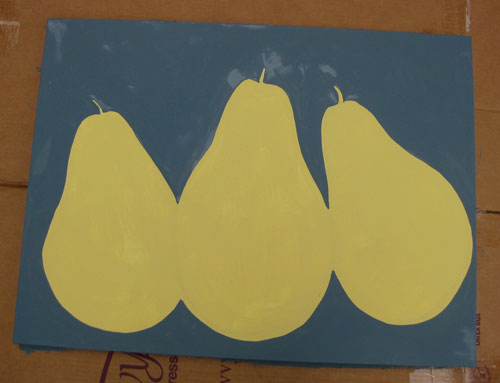
Another coat of blue paint along with a second coat of yellow on the pears had everything looking a lot more solid and even. And we love that three pears fit perfectly across the canvas since this will be Emily’s third child (and her son and daughter really got a kick out of picking which pear they were and which pear was for the baby on the way).
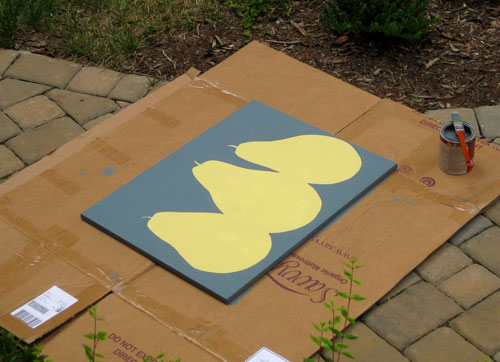
As cute as the new DIY art looks on that lovely cardboard outside on our patio, you’ll just have to stay tuned to see it in the nursery as we continue on with the makeover (next up: some storage, lighting and accessories to finish off the room). But that’s how we got some fun art for no moolah and next to no work. Really, anyone with a canvas (or even foam core, poster board or a piece of plywood) can do this project with some leftover paint. Just pick a simple shape (an airplane? an apple? a heart?) and sketch it out. Then fill it in with two coats of paint and add in the background in another color for a modern pop-art-ish result.
What about you guys? Made any fun DIY art lately? Got any other easy ways to decorate naked walls on the cheap? Let’s put on our virtual black berets and turtlenecks to talk about how you channel your inner artiste.

Lindsay says
Looks great, Sherry! I have a quick question and I am by no means an art student, but would it have been easier to do the background first and then the pears or am I overthinking it too much? Just seems like it would be hard to get that blue in all the nooks and crannies!
Great job, though! Too cute!
L
YoungHouseLove says
Hey Lindsay,
Good point! Typically you would do the background first but since I was unsure if I would like the yellow on white look (or if I’d want to go in and add a darker background color at the end) I did things in the opposite order so I could play it by ear as I went (instead of committing to the dark background from the get-go). Most latex paints like the ones I used will call for two coats of paint anyway, so you can do things in either order since you’ll be going back to touch up both colors with the second coat. Hope it helps!
xo,
s
Allison says
I love this art project! My hubby really wants to hang more art in our home and this would be a simple but great way to dress up the house. I’m completely inspired! Thanks Sherry!
Alysia says
The pear shapes are too cute! We are always looking for original art. Luckily, my husband’s uncle is an artist, sowe are able to steal his art…I mean borrow his art for long amounts of time…
Shaunda says
So I have an interesting question baby related question for you. We all see how you like to place items around the house. Bottles, boxes, all those glass ceramics. What will you do when you have children, because Lord knows kids looove touching stuff they shouln’t. Will you put the things within reach away? And if so, will you feel that your house is nekkid without all of the knick-knacks? I know that is a long way off but it is something I’ve wondered for awhile.
YoungHouseLove says
Shaunda- Good question! And one that we probably won’t know the answer to until our little bundle of joy starts crawling. For now our house is little-dog-proofed (meaning there’s nothing within our tiny chihuahua’s reach that he can eat/break/otherwise ruin) so we would imagine it would just call for moving our favorite breakable things to the mantel, the glass fronted cabinet in the kitchen and other out-of-reach areas to keep our bambino safe (along with our prized possessions). I’m sure we’re in for quite an adjustment but we’re actually looking forward to it. We definitely mastered living with a playful pooch, so babies will be another fun challenge to tackle.
Heather S- Emily actually has a giant metal pear on their kitchen table so it always reminds me of their family. We definitely plan to bring in some other pear references to tie the artwork into the rest of the room though, so stay tuned…
xo,
s
heather s. says
So why did you choose pears vs. another shape? Are there more pears in the room or could that be a family inside joke? :)
Looks cute!
Lydia says
Those pears turned out great! I like that it wasn’t baby-specific and can be just as at home on the walls when the baby gets a little older.
I love DIY art – and not having any artistic ability really makes it quite a feat that I’ve been able to churn out quite a few DIY decorations. Usually just involves cutting up a calendar or printing out images on a color printer, but I painted three canvas panels with red stripes a few years ago and my favorite was my Mosaikit wall made up of removable vinyl stickers.
You can see pics of both here: http://lydiasnextstep.blogspot.com/2009/07/flashback-walls-that-came-down.html
Mozaikit blog here: http://www.shalgo.com/mozaikit/blog/mozaikitblog.html
Kimberly says
Thanks for posting nursery photos. We have our first, a little girl coming this November and I still haven’t decided which direction I want to go. I’m looking forward to see what else you’ve done. Thanks
Dana Miller says
Great minds MUST think alike. Seriously, 4 days ago I painted over some old 12″x12″ painted canvases I had that weren’t working with our current color scheme! I have 10 of them but am only using 9 to make one large square (3’x3′) art piece for our living room. Maybe I’ll send you a pic!
Susie says
Very cute – great job!
You two are mightly talented!
Rachael says
Im just wondering, this room is windowless? Isnt that a fire safety issue? I would never have a newborn or anyone for that matter sleeping in a room with no windows! lol How come they dont have windows? Thats kind of scary!
YoungHouseLove says
Hey Rachael,
Our sister in law is a stickler for safety- she even teaches a fire safety class! We don’t specifically know the details of her house-building process but we do know that she was super involved with the engineer to create a room that meets every single fire and safety code here in the state of Virginia (it’s adjoined to two spaces with large windows which we assume is part of the solution- there’s an open doorway that leads to one of the rooms with windows which we assume is why it’s not considered truly windowless- since it’s adjoined to a bigger space that has them). Hope it helps!
xo,
s
- Sarah :-) says
Well, actually… I just finished a really simple project the other day with a lot of stuff lying around. I used an old plate rack that was lying around, gave it a fresh coat of black (wrought iron textured) spray paint, and put a few different sized picture frames on it, instead of plates. Not it hangs in that awkward space next to my BGE thermostat where nothing else would quite fit, but something had to be done. It’s not hung on the wall, yet, but it is finished, and Hubby’s glad he doesn’t have to drill 3 aligned picture holes to hang the frames correctly.
You can check it out here: http://thepuhlfamily.blogspot.com/2009/08/feeling-crafty.html
KaityWhite says
Love this – will look so cute in the completed space. I fortunately have an artist mama that will whip up anything I am craving for the walls. It’s pretty nice to have her around :)
Emily says
Sherry already answered this but to chime in as the homeowner: the two adjoined rooms (one which has huge windows) are actually only considered “one room” by county and fire code standards. We realize for resale this means that we technically only have a three bedroom house although we use it as a four bedroom but we’re not worried about that. Safety first!!! The fact that we have a large sliding door adjoining the rooms that DOES NOT LOCK is why it is not considered a safety issue and therefore meets code (plus there’s another entry door to the nursery from the hall for even more access to and from the room). If the sliding door that adjoined the rooms locked it would be considered a fire safety hazard (and considering I’m a freak about fire safety I didn’t want it to lock either). I hope that further clears it up!
-Emily (who is very pregnant and very ready to have this baby)
Jill says
Looks awesome! You guys are too creative!!!
I can’t wait to see the finished nursey! The Hubs and I have a similar room in our house (one room that is actually two rooms), and I can’t wait to see how you utilize the space. Eventually our upstaris bedroom(s) will be a nursery. Eventually…
Rachael says
That makes more sense now, Phew!
Nursery is lookin good! Cant wait to see it completed :)
Audrey says
Love this! I recently whipped up a DIY fork painting for my kitchen (that I’m not completely sold on yet) with leftover paint and a cheap-o canvas. Gotta love affordable art, right?
Michele Daggar says
Okay Sherry,
Time for you to add this pear project to your YHL shop. It would look sooo perfect in my kitchen. I love how you try to repurpose things without buying new.
I’ve been so inspired by you guys!!! Thanks!!
Christine says
What a great idea! I love the way it turned out=)
Jeannine @ Small & Chic says
What a cute project! It looks great!
Years ago, I saw a painting in a magazine that I loved, but couldn’t find any info about it. I tried to replicate it and thought I did an okay job (it was modern, so there was plenty of room for interpretation). Three years later, I was on a business trip and saw the painting in a hotel lobby and realized I didn’t do such a great job after all. I am not an artist.
Maybe it’s time to paint right over that canvas and see what happens.
Let me just add that I grew up in a home full of Waterford, antiques, and even a square, glass coffee table. We knew what we could touch and what we couldn’t. Until we were old enough to know that stuff, I imagine the higher shelves were a little crowded. I ran into that coffee table a few times, but I learned pretty quickly to slow down around it.
I think Genevieve Gorder said something about not letting the entire house turn into a nursery and I think that’s smart. Obviously, everyone wants their baby to be safe, but that doesn’t mean you have to sacrifice having a stylish, aesthetically pleasing home.
Chrissy says
Wow! I am so impressed! I might try this idea with some flowers for my 2 year old daughter’s room. I haven’t come up with some diy art for her room yet. We’ve got a few other diy art pieces hanging around (http://homekidslife.blogspot.com/search/label/art). My most recent project was 3 framed collages of old stamps we inherited from my husband’s great grandma. Thought we should display then rather than hide them in a box. Thanks for all the inspiration!
Elizabeth says
This is great! I have been looking for some art work to hang in my kitchen but didn’t want to spend a lot of money! This is perfect! Thanks for the inspiration!
Lauren says
I love this; I don’t have a steady enough hand to paint inside the lines though. If I can’t tape it off, I’m doomed!
Erin says
Sherry – my husband & I are obsessed with this blog. For one, we’re the Young family as well. For two, we are do-it-yourselfers. We’re both in the web field – I’m at an Ad agency – so we’ve got a ton in common with you guys, and its a wonder that we haven’t started to blog our misadventures in renovation yet. Are you guys still working full time, or is this blog your full-time gig now?
YoungHouseLove says
Hey Erin,
Although I took a pay cut to make it happen, the blog is happily my full time job! John still works downtown at an ad agency but does a ton of blog stuff after hours since the internet is a 24/7 kinda thing. Of course we dream of the days when we can make it his full time gig too. Someday…
xo,
s
Lindsay says
I recently painted some modern-ish paintings to fill up some space in our new home. I love how they turned out and was surprised to check on your blog to see that you were doing something similar! You can check out my paintings here: http://www.chrisandlindsaywilkins.blogspot.com
Love the blog! It’s quite inspirational as we are settling in to our rented house here in HI. Thanks!
Allison Harris says
http://gimmeakisss.blogspot.com/2009/08/making-birthday-art.html
As you can see in the link I provided, I made some DIY art for my husband’s 25th birthday. It wasn’t free, but it cost less than $50.
Autumn says
Love the finished art piece. It’s going to tie in so nicely with the rest of the room. Hurry hurry!
Tegan and Tage says
Thanks alot! I just finished my son’s nursery and now I want to re-do the whole thing using that painting as inspiration… :)
Chelsea says
I love the pears, very cute. I can’t wait to see how the painting looks in the bedroom! I love that you reused an old canvas, I must say, some of my best paintings are on top of not so good ones :).
Chelsea
Michelle says
So cute! You guys should do that with all types of fruits!
SShaw says
Pears in a nursery with elephant bedding? I don’t get it.
YoungHouseLove says
Hey SShaw,
Since we didn’t want a theme room with elephants everywhere we decided to bring in another graphic element (the pear art) using the same colors that are in the bedding and on the walls to tie everything together. Since Emily has a huge metal pear on her dining table it always reminds me of her family, and since we were able to get three pears on the canvas it represented her two children and the one on the way. We’ll also be bringing in some other pear-references to connect the art to the rest of the room. Hope it helps!
xo,
s
Cecelia says
I love the fact that the bold graphic nature of the pears is suitable for a kid’s room, yet the art work highlight the room as being a contemporary space, rather than just a nursery.
Sarah Burlingame says
Love it! I’m buying my first home (I get the keys tomorrow!!) and my friend told me about your site since I’ve been looking for some inspiration for decorating ideas, etc. I can’t wait to use this idea and others on your blog!
I used some canvas from JoAnn Fabrics to create a multi-media triptych of sorts for my rental bedroom a few months ago. The photos don’t do it justice, but it was a fun project!
http://missarahlou.wordpress.com/2009/03/04/new-projects/
Catherine says
I started painting wooden letters from Michael’s ($3) for my friends who were bringing little ones into the world. They were always a hit, so I started venturing away from the animal, very nursery-oriented themes and starting to make fun patterned ones for friends and folks in college. I am now offering these online for custom orders! Full names or initials. I’m updating the website now, but check it out! http://www.lovelylettersonline.com And for those of you based in Richmond, I am too, so let me know if your tot’s room needs some pizazz…
Dianna says
Working on a budget get’s the creative blood flowing. I think it’s satisfying when it’s your creation and not bought in a store. Great way to personalize the room.
Ami says
I have done tons of homemade art around my house by buying different sizes of canvas when it is on sale and then drawing on it with oil pastels… sometimes abstract, sometimes tracing etc. Then you just spray varnish over it and it seals it. I have even had girl parties where we have done pastel canvases and had drinks :). Super cheap, fun and unique!! I like the pastels because of the texture and blending you can do with it that you can’t do with paint, plus it looks like you meant for it not to be perfect!
Tracy says
This may be a stupid question, but are you guys expecting? I know this is a nursery for your sister(in-law), but this comment you made earlier had me wondering. :o)
“Shaunda- Good question! And one that we probably won’t know the answer to until our little bundle of joy starts crawling.”
YoungHouseLove says
Hey Tracy,
Nooooooo! So sorry if our comment was unclear. We definitely want to expand our family someday, but we’re not currently expecting. We were just musing about what we may do waaay in the future when there is another member of the Petersik clan under our roof (since Shaunda was wondering about how we would decorate when that day comes). Hope that clears it up! And sorry for the false alarm!
xo,
s
Cecelia says
Comment by Sarah Burlingame on August 26, 2009 @ 7:25 pm
Sarah, your art work is lovely!
Nicole says
Recently, I decided to do something a little different with an old canvas I had lying around, and some wayward scrabble tiles… the result can be viewed here:http://bubbymakesthree.blogspot.com/2009/08/what-do-you-get-when-you-cross.html
“Home is where the heart is…” xo
doahleigh says
They stole my wedding! :) Actually it’s funny how many of the same ideas we have. We want to do a pinata and a mexican bar. And instead of gelato we plan to have an ice cream bar. This wedding sounds so fun and I hope mine is equally awesome!
Jennie says
Love how this project turned out! The pears look fantastic, and I like the symbolism of three pears for three kids. Great idea to reuse an old canvas! Filing this one away for future use.
Btw, so fun to see this nursery come along!
Jenny says
I am so excited that I have a comment on this post! For a few years now, I have had some b&w prints from an old calendar, featuring photos of the sights of Paris. They are all different sizes so while finding frames would not have been that difficult, the thought of trying to cut all the mat boards for each one just seemed like way too much effort for prints from a calendar! I finally came up with a WAY easier and cheaper (score!) alternative a few weeks ago. I will be buying various sizes of canvas and painting the edges and some of the “top” of the canvas black. Cut the prints down to size (that is remove the white border), break out the spray adhesive, adhere prints to canvas, and finally display!
YoungHouseLove says
Great idea Jenny! We’d love to see photos of the process if you have a chance to send them our way. Good luck!
xo,
s
Jessica says
Check out a nursery some of my friends did for their new baby girl. She used some cute ideas for wall art, hanging bird houses and then the line across one wall holding different cards with clothespins.
http://www.theestateofthings.com/wp_teot/2009/08/20/rhoney-design-nursery/
Kiki says
I know you hear this all day everyday but your creativity is really amazing! How do you stay inspired? I just started a blog and it is so much fun to share projects and thoughts with the blogosphere but I am afraid my enthusiasm will wane once all of the ideas in my head run out!
YoungHouseLove says
Hey Kiki,
Such a good question! We feared our blog would end about three short months after we started it (since we began blogging to document our kitchen renovation and wondered what the heck we would talk about once that project ended). Almost two years later we’re still at it, and lots of projects and ideas just keep popping up. Take this nursery makeover for example. We never thought that Emily would have another baby so we had no idea it was a makeover that we would get to take on… but the opportunity arose and we jumped at the chance! Here’s hoping new project and ideas keep inspiring you and giving you endless blog fodder. I’m betting they will…
xo,
s
Melissa says
I actually just recently did something similar to this. I have had this one piece of canvas art for a really long time. I loved the long slender look but I was tired of the picture so I painted it white. I wanted to use it in my office so it went for awhile just white until I decided what I wanted to do with it. I let my 2 yr old daughter finger paint on it in my room colors. I love it and I don’t think I will ever get tired of looking at now.
Jess Sykes says
I LOVE the pears. I am going to have to get some canvas today and do some paintin’! I did the same thing with 2 old canvases (sounds weird in the plural tense).Canvasi? http://jessicasykes.wordpress.com/
Erin says
What’s with the ads at the bottom of the RSS feeds now?
YoungHouseLove says
Hey Erin,
That’s too funny. Those RSS ads have been there for months but it looks like Google has stepped up their game and added videos into the mix. So sorry if they bug ya but a girl’s gotta eat!
xo,
s
sfvrealestate says
Wow! The pear idea is so easy that even I could do it!
kristen f davis says
cute! love the pears…you know i love painting over old canvases :)
Melanie says
LOVE THE PEAR ARTWORK! yes, I too have stopped painting art and have started painting my house! It has been a loonnng time and I sure miss being creative and using my art skills as well. (BFA)
Kim @ Yellow Brick Home says
Sherry, I love that you got back to your Fine Art roots! Just like you, I have a degree in fine arts, but rarely paint canvases, and instead, I’m painting walls and furniture. Recently, I made the leap back to my old past time, and I whipped up a few little works for recent birthdays. Here’s more detail on that: http://www.yellowbrickhome.com/painting-puppies/.
Keep up the great inspiration!