Tons of people have written to request a step-by-step guide to painting wood paneling so we’re here to deliver the lowdown.
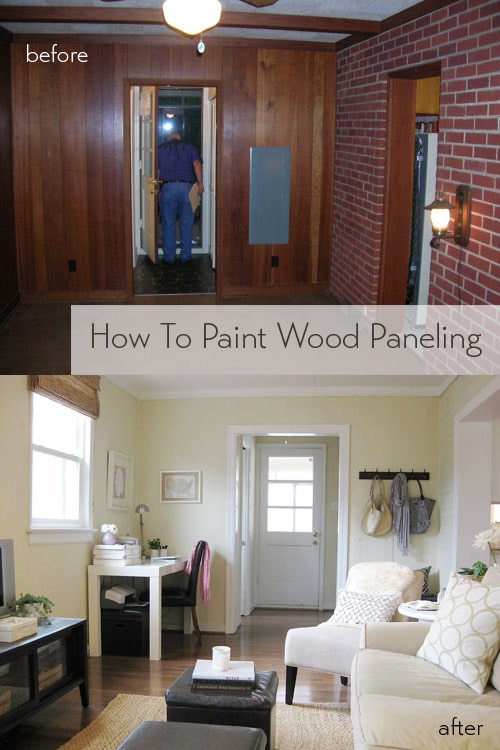
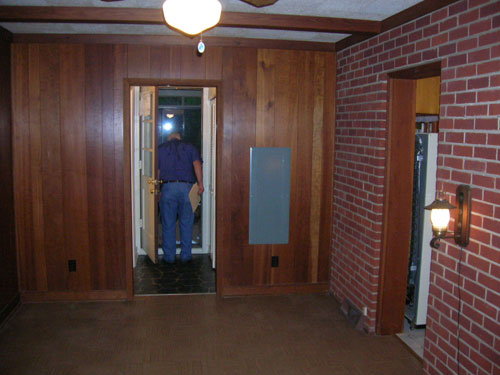
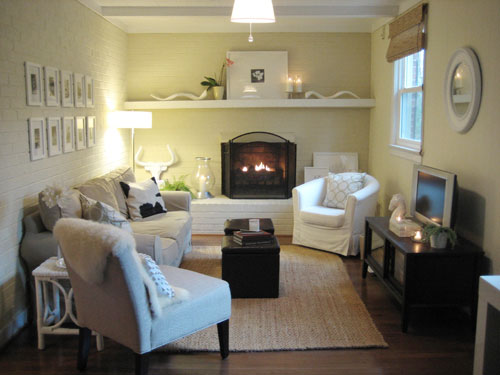
It’s one of the easiest ways to transform your room in an afternoon (and on the cheap) so get ready to do the happy dance because there’s virtually no skill or mind-numbing concentration required. Just look at what a little bit of primer, paint and elbow grease did for our den:

Oh paint, you’re the peanut butter to our jelly. Here’s the play by play for anyone who’s ready to say goodbye paneling (this works for either the real stuff of the thin “fake stuff”):
Step 1: Give Em’ The Brush Off. Fill any nail holes with caulk and once it dries sand it down and wipe away any cobwebs or dusty areas with a moist rag so your paneled walls are clean and ready for their big makeover. No overall sanding of the paneling is necessary unless yours is splintered (or otherwise needs to be smoothed out) or if it’s extra glossy (as if it has been shellacked).
Step 2: It’s Prime Time. Use a roller to apply one thin and even coat of oil-based primer and a paint brush to get into any cracks or corners that the roller can’t reach. This application might look spotty and uneven but as long as the entire surface is covered you’ll end up with a flawless finish. We do not recommend water-based primer for this step as oil-based formulas are stronger and more durable so no grease or wood stains will come through and ruin your finish.
Step 3: Get Your Paint On. Once your thin coat of oil-based primer dries, apply one thin and even coat of latex paint with a high quality roller and again use a paint brush to get into any cracks and crevices that the roller misses. And once your first thin and even coat dries, apply another one the same way for better coverage and long-lasting durability. And when it comes to getting a clean line along the ceiling and baseboards, blue painters tape works but we also love this short handled brush for the perfect edge every time.
Step 4: Hug It Out. You’re done! It’s really that easy. Feel free to snuggle your spouse, dance with the dog, or do anything else you normally do to celebrate a job well done. Your room should feel bigger, lighter, and oh so fresh- and that’s definitely deserving of a little victory cha-cha or two.
So there you have it. Our easy how-to-paint-paneling tutorial. It’s definitely one of the cheapest and most dramatic ways to snap a room into the 21st century in under $50, so don’t be surprised if you amass more hours of complements than it even took you to transform your room in the first place. What about you guys? Is there any paneling near you that’s about to be freshened up with some crisp clean paint? Does anyone have any other painting tips while we’re on the subject? Do tell.
And if you’re wondering how we painted all the dark brick in our den, check out the painting play by play right here. Happy makeovers to one and all!

Shannon says
My husband and I painted the wood paneling in our basement and we were amazed at the transformation of the room! It’s so much more inviting.
You did a beautiful job with your den, it’s gorgeous!
Danielle Burneika says
Hi. What color did you use for these walls. Lovely!
YoungHouseLove says
That’s Wishes by Glidden. Hope it helps!
xo
s
salley says
i’ve painted the (fake) wood panelling in my den as well, and you are right- it does make a huge difference. i love the color you used as well!
a question- did you all replace the ceiling as well? i’ve got a similar ceiling- it is like acuoustic tile but attached to whatever is behind it (as opposed to a drop ceiling) and, well, i really dont like it. any tips on how you all removed it/what was behind it/ whether you had to use a contractor/cost would be most appreciated!
thanks- and congrats on all the recent press! you all are making this richmond native proud!
Jenny @ Words On Wendhurst says
Ok, question. Did you not sand before hand at all? Is your paneling kind of rough already then? We have smooth paneling in the kitchen, and I figured I’d have to go crazy sanding it first before I could get to painting it.
YoungHouseLove says
Salley- Again we did the super cost effective thing with the den ceiling and just painted those dingy gray tiles. It took some oil-based primer followed by about 3 coats of paint (those suckers are porous!) but the difference is night and day and it now looks crisp and new. Hope it helps!
Jenny- Nope, no sanding required (unless your paneling is splintered or damaged where you’d need to smooth things out). Oil-based primer makes your walls nice and sticky for paint to cling to and three years after we painted our paneling it’s in mint condition (it actually holds up better than a regular painted wall thanks to the primer base). Good luck!
xo,
s
vika says
we have a “sunroom” covered with wood paneling. I’d love to paint it but the paneling is super shiny…I’m guessing the previous owner put a gloss on top. Do we have to strip it off or can we just put primer over it?
YoungHouseLove says
Hey Vika,
Here’s a case were a gentle sanding should make all the difference in the world. The oil-based primer would probably do the trick without it, but the extra tooth you’ll gain by going over everything with sandpaper first (and of course wiping down the sanding dust before priming) will make for a flawless finish that lasts. Hope it helps!
xo,
s
Debra says
You two have “vision”!!! The before shots are scary. It looks so amazing in the afters, I just love it.
Ashley says
I love the transformation in your den! I wish I could convince my parents to do this to their living room… the paneling and dark brick make for a very dark room!
Karen says
What kind of rollers do you guys use? On some of the HGTV shows they use a small cigar roller (I think that is what its called). I think they use the skinny foam kind. Anyway since you guys are the paint experts, I just wondered if you favored a certian nap, size, brand etc. . . Thanks!
Cristina says
Hey Sherry I have a question for ya! How come you decided to paint over it versus removing the paneling altogether?
We had the same stuff in about 4 locations in our house and we’ve removed them all. One room actually was painted over, but the panel was buckling so removing was the best option in that case.
YoungHouseLove says
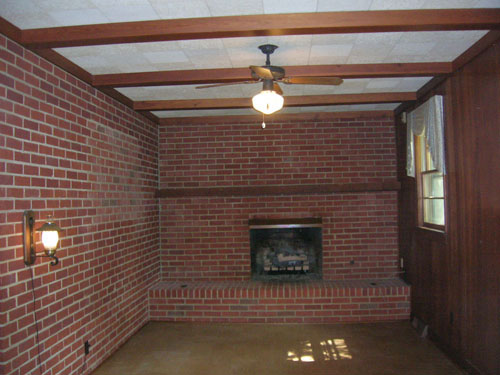
Cristina- We’re all about working with what we have when we can (less waste, less money spent, less effort, etc) so because our paneling was in good painting condition it was the perfect solution. Plus since two of the walls were brick and had raised and recessed grout lines the paneling balanced that nicely since it also had recessed seams. Hope it helps!
Karen- We do not recommend foam rollers as they tend to rile up the paint more and result in annoying bubbles that can ruin a flawless finish. We prefer high quality wool or poly rollers and Purdy is our favorite brand (sold at Home Depot). Hope it helps!
xo,
s
Kim says
Hi there!
Thanks for the tutorial.
My husband INSISTS that since our paneling is the “fake” kind (not real wood paneling), we can’t paint it. He thinks it will peel, not look right, etc. So, if you don’t mind me asking — is your paneling real or fake, and do you think it matters when painting? Thanks again.
Monika says
My basement, which is only about 7 years old, was designed to look like it was closer to 30 years old. Berber carpeting, dropped ceiling and lovely, dark faux paneling. It’s like a cave from 1972 and my husband loves it.
Do you know if I could paint over paneling the same way, even if it’s the thin, cheap, fake stuff? Thanks. :-)
YoungHouseLove says
Hey Kim & Monica-
Good news! Ours is the fake kind. It’s not true, thick wood paneling at all but the thin cheap “fake” kind and three years later the paint is holding up better than other non-paneled walls in our house! You can definitely definitely paint yours too.
xoxo,
s
BG says
We just bought an old beach bungalow with dark wood walls (in EVERY room!) and have started to paint room by room. We started in the master bedroom and after 2-3 coats of water based primer (Kilz) and 2 coats of Behr, the room is amazingly different. Does water vs. oil based primer make that much of a difference? As our wood is old and has never been painted, I wonder if we used oil based if it would require less coats. Any thoughts?
YoungHouseLove says
BG- Water based primer is a bit less strong and protective, so it usually calls for more coats of paint over it and blocks less stains/bleeding than oil-based does (for example, if the stain/wood sap on your paneling decided to bleed through once it was moist with primer & paint, oil-based would have had you covered). Luckily it sounds like yours turned out just fabulously anyway!
Tara- I would definitely try asking around at your local home improvement store to find someone with experience with the texture you’re describing. That being said I would guess that you could definitely skim coat over it to even out the surface (although scraping the spikes down beforehand might be a smart first step). Hope it helps! Good luck…
Britiney- We have heard so many great things about your tape-caulking trick! We didn’t need it in John’s sister’s nursery since the walls are nice and flat in there but it’s a great tip for textured walls!
xo,
s
Tara says
This is sort of off topic, but since you are talking about pesky-weird-hard-to-hide surfaces… I have a guest room with some weird texture. The walls are sheet rocked and covered with (what I think) is just drywall texture. The problem is that the texture is horrid. It is spiky and it actually hurts if you brush against it. Can a person retexture over another texture? Or do I have to try and scrape this stuff off before doing that? Any experience with weird wall textures like this? Thanks in advance for any advice you could provide.
PCL says
Tara: My response might be a bit late for you, but if you (or anyone else who happens to see this) still has unwanted textured walls, here’s one way to get rid of them. Just buy a cast aluminum mason’s float, as long as possible (a trowel, joint knife or even a board will also work, but any of these will leave more surface imperfections, so the job will take longer). Then, apply joint tape and mud, as you would over a Sheetrock joint, to the wall, spacing the tape at intervals a bit shorter than the length of the float; sand only enough to ensure a smooth ridge at the center of each length of tape. You can use pre-mixed joint compound, but the setting type is better for moisture-prone areas. Then, mud the spaces in between each tape piece, running the float in a bridged position between every pair of tape runs. This will give you a smooth, plaster-like surface which can be skimmed, sanded smooth and painted like any other wall. The end result should be indistinguishable from veneer plaster. Good luck!
heather s. says
I’m actually debating between installing panelling or drywall (I can hang panelling but have no clue how to do drywall) in the basement with the intent that I will paint either option. Anything will be better than looking at cement blocks. :)
Kari says
In a previous house, we had the cheap, thin, fake paneling in a back room (that became a reading/guest room) and we painted it no problem. We did the oil primer, two coats of good paint, and it looked fabulous. Don’t be scared off by the fake stuff–it is worth the effort and it will look SO much better.
Kari–now in a house with no paneling, fake or otherwise
Britiney says
My favorite painting tip came to me from my brother in law. If you have an edge you’ve masked with tape but there’s a lot of texture, I’m sure you know how easy it is for the paint to bleed under the tape, no matter how hard you try to get it adhered well. His trick is that if you apply a very small amount of caulk along the tape line (so you’re painting over the caulk when it’s dry), it fills in the areas the tape misses and produces a PERFECT line every time. I was wondering if you did this on the nursery stripes. That would have been a perfect application. Our walls are all orange peel texture and this makes a world of difference in getting a professional vs. amateur result.
Courtney says
Do you think the new Paint with primer mixed together would works as well? Or should I just use the oil-based primer?
Thanks. Love the before and after.
YoungHouseLove says
Courtney- Since the new paint with primer mixed in is water-based and not oil-based we still highly recommend using the oil-based primer step recommended above.
Susan- You’re thinking about oil-based paint over latex paint. Definitely a no no! But when it comes to primer, oil-based followed by latex paint is the industry standard. Hope it helps!
Corinne- Laminate furniture is a tricky beast indeed. The above steps (without sanding) would probably be your best attempt (although we’d recommend using a high quality brush instead of a roller for furniture). Then only issue is that long-term durability might be a stretch (there might be some scratching or cracking over the course of a year of heavy use) but it’s a good way to “save” a piece for the short term until you can save up to replace it completely. Good luck!
xo,
s
Susan says
I’m questioning painting latex paint over an oil primer. I thought that was a big no no. Can you explain?
salley says
sherry, thanks for the ceiling response. i’m going to put painting the yucky tiles on the to-do list! a tutorial on how to paint a celing might be timely….
also, my paneling is the fake stuff too. i’m actually happy i kept it (and painted it)- it gives some dimension and interest to the walls of what would otherwise be a very obvious retrofit of an old porch.
Lindsay says
Not paneling-related, since we are thankfully clear of that, but I did want to thank you guys for inspiring me to paint my super old ugly metal garage door this weekend. Painting it never would have occurred to me otherwise, and the difference is AMAZING. So thanks for the idea!! :)
Susan the shoppe owner says
Every time I see this transformation, I am overwhelmingly amazed at what a little paint can and sweat can do! This room is so beautiful and relaxing to look at. I’ve probably already said it on a past post about this, but great job!
corinne purnell says
Hey I love your room! I was wondering do you think this technique would work for furniture that has fake laminete wood? thanks for the help! i love your blog!
Kevin M says
Great transformation. Truly amazing what a little paint can do. I did a similar thing in my first house – painting over some lovely faux brick on one wall in the living room. It took a few coats, but the result was worth it.
I’ll have to check out the little brush for edging too since I’m definitely anti-taping. That stuff is expensive, not to mention the waste involved.
Melissa Arlena says
My entire house is paneling, ugh yucky!!! I am an expert in painting paneling now and I can tell you it makes a world of difference. It can be time consuming to make sure you get in all the cracks but it is totally worth it. Much cheaper then drywalling the whole place, I just embrace the lines now and decorate for a beachy cottage look :)
Melissa
Vanelie Velez says
Did you primer the paneling before you painted or just went right ahead & painted? Im in the process of doing the room in the basement & its that cheap panel “wood” & wasnt sure if I should primer before hand or if painting a couple of coats will do the trick…
Amanda Wright says
The first thing we did after we moved into our house was paint the hideous faux wood paneling. DEFINITELY use oil based primer! We made the mistake of using water based and it took 3 coats of primer!
Amanda Wright says
Oh, I forgot to mention—on one wall we didn’t want the paneling cracks to show after we painted so I filled them with spackle before painting and sanded the wall smooth. A year later it looks pretty darn good!
Carmen Leanne says
I was wondering if spackle would work, thanks for the testimony! :)
Amanda says
I was wondering if paintable caulk would work to fill the cracks. just smooth it out with a sharp edge or something.
YoungHouseLove says
Hmm, I think that could work, although you couldn’t sand it down like spackle, so you just want to make sure it doesn’t shrink up or look pitted or anything :)
xo
s
Vicki says
We painted our 70’s style dark paneling Rec-room hahaha family room about 5 years ago. It went from dark, dank basement stuck in the 70’s to a bright airy I wanna be there space!!! It was amazing that just changing the walls to a light buttery yellow would make such a transformation. People keep asking us if we tore down walls or redecorated!! heck no $50 of paint was all it took for us too!
liso says
okay, I literally spent my ENTIRE weekend reading through your pages – and getting completely re-inspired to finish tackling our projects and decorating in our house. we’ve done a complete update since buying it in 2007, but lost some steam.
to your reader with the prickly (dry wall mud) texture coming out & the one with the cinder block walls: we started out in our home with cinder block. Major NO WAY! so we textured over it with dry wall mud – smoothing it with a circular motion to try and avoid those high places. (sort of the same idea as venetian plaster but worlds cheaper and sans sheen.) when it was dry, we sanded to get a smoother finish and painted. TA DA – regular, cinder block free walls!
since then, i have found some spots that were missed…i’ve just used a putty knife as a chisel to knock it down and then hand sanded to smooth it out. it sounds like it may be a bigger job on her wall, but do-able!
thanks for such an inspiring blog! i have questions for you, girl. later.
Sarah says
Great advice! We just purchased my grandmother’s house which has lots of fake wood paneling and wallpaper…in fact, the den has wood paneling on the lower half of the wall and is wallpapered on top. Any tips on how to remove wallpaper? I am ready to start my home makeover!
YoungHouseLove says
Sarah- Good luck! Lots of people have different ways to remove wallpaper but no matter how you slice it, it’s usually a doozie. The good news is that it’s oh so worth it in the end. Trust us! We sprayed the walls with a warm water and vinegar mixture and then scraped the paper & glue backing off, but many people also love to use steamers (you can rent them from Home Depot) or even use other methods (just google it for a slew of suggestions). Hope it helps!
Emma- That’s another doozie. Maybe lean art and floor mirrors against it and put furnishings in front of it to break it up as much as possible? If you’re allowed to hang curtains, mounting them extra wide to obscure more of the paneling (and picking a crisp color like white) should really lighten things up too. Hope it helps!
xo,
s
Jackie says
A steamer. It is well worth the $30. I have removed so much wall paper in my life. Don’t use the chemicals it takes way too much time. We did a room this past weekend in about a day. I did a small bathroom a couple of years ago and it took about a month. It also doesn’t destroy the walls which sometimes happen with the chemicals!
celia says
Wow, that a redo!!! lol…
Great project! love the final look of the room! I trust you it’s the same room because for my eyes is another one! lol…
Fantastic!
Emma says
Now, I have a challenge for you. What do you do with ugly, wood panneling in a rental house? Where you can remove or paint.
:)
debbie lariscy says
Hi, probably late with this, but you could hang bedsheets on the walls to mimic wall paper. We did that in a rental and it really ligtened a dark paneled room, We used staple gun, very close to ceiling and holes are small. Then we put some trip around the edges to hide the tacks. It looked a lot better than it sounds, and you get a lot of choices in bed sheet colors. Save money if you can and only buy the flat sheets you’ll use. Hope it helps.
leah says
Luckily I just talked my landlord into letting me paint the paneling in our living room! It’s a log home so 2/3 of the wall are logs which I actually like. We have high, two-story ceilings and above the logs he installed paneling. That’s the part I don’t like. Even with two sky lights the room is very dark. Oh, did I mention the paneling is on the ceiling too? lol Yes, a beautiful beamed ceiling with… PANELING! Good gosh what was he thinking? Anyway, I’m going to paint the walls but I’m not tackling the ceilings. If I owned the house I would, but I’m not breaking my back on a rental even as much as I’d like to get rid of it. It’s just too high. Anyway, I know painting the walls alone will help tremendously.
Anyway, my point was: Did you try to talk to the landlord about it? As long as you put out the money, time and effort he/she may want to take advantage of the free labor. I can’t imagine anyone actually preferring ugly paneling over painted walls. Mind you, I have seen some gorgeous real wood paneling. I don’t know about yours, but the stuff we have was bad even in the ’70s.
Anyway, I hope it works out for you. Otherwise debbie’s idea is a good one. I’ve thought about doing that in our bedroom which isn’t paneled but it’s the utterly boring rental beige. My landlord said I can paint it but I’d have to change it back when we move. Uh, no thanks. The room is huge and moving is bad enough without having to worry about painting too.
Also, thanks to YoungHouseLove – you’ve informed me of everything I needed to know to do the job correctly which is extra important since it’s not my home.
leah says
Geez! Just noticed this blog and the comments are four years old! I guess I’m a bit late to the party. Well goes to show what you’ve written is still relevant four years later even if my comments to Emma more than likely aren’t. ;-)
YoungHouseLove says
Haha, thanks Leah!
xo
s
Meagan says
I am amazed! That is beautiful. I can’t wait to have my own house to decorate. You’re such an inspiration!
patti says
the transformation is astounding! we had a similar room in our 1939 house. the room off the kitchen (which prior to kids was our dining room and now after kids is the playroom) that was floor to ceiling pine wood paneling. I wasn’t really into the “ski-lodge” look (unless I’m actually at a ski lodge!) – so I opted to paint it. the difference is night and day. now it has this light beach house feel and much less of the “we might need to hang a deer head on the wall” feel. :)
Rachel says
It seems there was an embellishment on every wall when we bought our home. Even the garage had paneling – the dark and dreary kind!!! It was as though I parked in a dungeon 10 stories underground. It was our last “oh dear! what are we going to do about this wall nightmare” so we decided we would try ourselves. After priming it one time, we saw that it ate up almost all of what we had applied. Our painter (that had textured a few walls for us previously) called to ask if we had anything he could do. He was able to finish the entire garage for less than we could have bought paint! YIPPEE!!
nicole says
what color of paint did you guys use? it looks stunning.
YoungHouseLove says
Hey Nicole,
We actually have a room by room source list which includes paint for every room (it’s linked to on our House Tour tab under the header) but since we’re all about instant gratification we’ll just spill the beans: Wishes by Glidden. They no longer offer paint swatches of it but they can look up the formula at Home Depot and whip up a batch for you. Hope it helps!
xo,
s
Kristin @ Domestic Ease says
Every single time I see this B&A I am sooooo reminded of how amazing the transformation is!! I have walked into dark, wood paneled rooms like this while house hunting and now (thanks to you guys!) I can see the potential. It’s literally like you have turned on the lights in there after they had been “off” for decades!
Many blessings!!
Kristin
val says
I noticed you had tile ceiling in the before picture. I just baught a house with wood paneling and tile ceiling. I am curious what you did with your ceiling. We are planning to put dry wall over it and then texture and paint. Do you have any advice or other ideas you could give us?
YoungHouseLove says
Hey Val,
Scroll up a bit for more details, but we actually painted the old dingy foam tiles!
xo,
s
Madelaine says
I have been preaching this for years. My mom lives in a former one-room school house that recieved and “renovation” in the 70’s which meant one thing – paneling. We painted it not long after she moved in and it was such a huge difference! I have told so many friends to paint, paint, paint and not let a little paneling stand in the way of an otherwise great house.
Marina says
LOVE LOVE LOVE your blog, 1,000% awesome and helpful. Here’s my Q: My honey and I are about to move into a; you guessed it – 51 year old house – faux wood paneling galore!! We agree on painting it, however we cannot decide whether we should fill in the vertical grooves or not. Do you have a more detailed pic of your painted paneling that shows the grooves? Thanks ~M
YoungHouseLove says
Hey Marina,
We looked back through the blog but even in close-up shots of the den curtains the vertical paneling groves aren’t visible. Probably because everything is painted the same tone so they don’t stand out on camera at all. In person they’re very soft and hardly noticeable but we decided not to fill ’em in because we liked the subtle texture and dimension they add up close. Hope it helps!
xo,
s
carol h. says
Sherry – did you make a boo-boo in your comment above at 11:44 am?
BG- Water based primer is a bit less strong and protective, so it usually calls for less coats of paint over it and blocks more stains/bleeding than water-based does (for example, if the stain on your paneling decided to bleed through once it was moist with primer & paint, oil-based would have had you covered).
Did you mean to start off talking about oil-based primer?
And i’m still confused! (Help! I am trying to get my house ready to sell.) What can i do about the knot-holes that have bled through on my beadboard that is painted with water-based primer and paint? Can I touch up the knot-holes with oil-based primer and then re paint over just the knot-holes with water-based paint? Or is that a no-no?
Thanks for your help. I love your blog! When we get moved into our new place I’ll be lining up to click your buy now button for sure!
–Carol
YoungHouseLove says
Hey Carol H,
Yes, that’s exactly what we meant. Fixed now. Sorry for the confusion!
xo,
s
Danielle says
I am currently painting the wood paneling in our office. It’s all primed and ready to be painted–and it already looks 100 times better!
We have the thick, real wood. Which might have been half way decent if it wasn’t so DARK in such a small room.
I’m excited to go home and get that painting finished now!
Karla says
Wow, I asked and you answered! Thanks for the great detail on my question about painting panelling. I can’t wait to transform our den!
BTW-Your transformation is AMAZING! What a HUGE difference it made. I LOVE your new space. :)
~K
Megan S says
We used the new Behr primer/paint to do our sun room a few weeks ago. It’s an addition- wall to wall fake paneling with lots of windows. We edged with a paint brush and rolled the rest- no problems with getting in the grooves. We opted for the primer/paint mix because we are LAZY! This time, it worked out for us- two coats and we were finished. I can’t say whether using the oil based primer with two coats of latex over it wouldn’t have looked nicer, but the finished product looks very nice- certainly better than that wretched paneling!
Jana says
A very helpful post indeed! I’ve just recently bought a house (my first!) that is actually only 10 years old but has fake wood paneling throughout. I’ve been tossing around the idea of painting it but wasn’t sure how to go about it. Now I know!
Thanks bunches! :-)
Dale Howard says
I have been a house painter for 30 years.
You made a cave look like a place to relax and enjoy your time at home.
Yes of course I have done alot of jobs like the one you did at your house. But, its alot of work, even for me. Like my boss told me when I was a young teen painting for $2.15 per hour, “No paint job is hard, just some take a lot of time.”
And thats why you will always have good results. You are well organized, and go step by step. And I get the feeling that you enjoy the process, and even more the payoff.
And wow! You did get good results!
YoungHouseLove says
Wow Dale. Thanks so much for the kind words. Coming from a professional painter it definitely means a lot!
xo,
s
De says
Hi! Awesome room!!!! I have stained wood cabinets in my kitchen and built in wooden (stained the same) bookshelves in my living room and I really would like to throw some color on them! Do you think I could use this same process with positive results?
Thanks!
De
YoungHouseLove says
Hey De,
Check out our cabinet painting tutorial (which you can always find on our How To page by clicking that tab under the header) for step by step cabinet painting instructions (which will also work for your stained living room shelves). The process is slightly different but equally as easy and we’re sure you’ll have a super dramatic result! Good luck…
xo,
s
Nicole says
Somewhat trivial question, but where do you get all of your fabulous throw pillows? I’ve checked all the normal haunts (Target, overstock, amazon, etsy, etc.) but can’t seem to find anything neutral, yet modern enough without breaking the bank. Any tips?
YoungHouseLove says
Nicole- The pillows with the circles are Thomas O’ Brien ones from Target, the loopy cream one on the chair is Crate & Barrel and the cow one is from Ikea. While we don’t believe any of them are still for sale at those stores, they’re a few good places to look (as well as Bed Bath & Beyond, which we also like- and it wouldn’t hurt checking out ebay for ’em). Hope it helps!
Patricia- Hmm, it does sound like your husband either likes the look of the wood or doesn’t want to have to go through the trouble of painting (John always says something looks fine to avoid getting off his duff to help me fix it- men!). I think it would look soft and lovely and textural with some crisp paint on it (and have actually seen an amazing painted sauna-ish bathroom in an old Domino magazine) so definitely take that as an endorsement on our end!
xo,
s
Patricia says
I love the job that you did with your den. How fun! You are my inspiration! My husband and I are buying a new house. The downstairs bathroom looks like a sauna without the heat. Would it still look good to paint over paneling that has the deep grooves? My husband says it will look funny and cast weird shadows in the windowless basement bathroom. (I personally think he just likes the wood look! Oh men!)
Jennifer says
I am just painting our office, so have a painting related question. I did three walls in a mossy green color, and the fourth accent wall in the same color of green, just a lighter shade. We have heavy texture walls (I have to use the thickest nap roller to paint them), so when I did the edging for the accent wall, though its truly the ‘corner’ it looks crooked, not straight at all. Any ideas on how to overcome this?
Thanks!
Jenn
YoungHouseLove says
Jenn- Try taping off the corner so it appears perfectly straight from bottom to top and smush a thin bead of paintable caulk into the crack of the painter’s tape in the corner. Then paint the edge up to the tape. Thanks to the caulk, the paint will not carry over into those crevices of the textured walls and you’ll have a totally clean looking line. Hope it helps!
Trace- This is definitely something to consider and we’re so glad you’re on the hunt for something less toxic! In our experience water-based primer is much lower VOC and can even most likely be found in a no VOC formula at a local green building supply company (you might want to try google or the yellow pages to locate one) but it’s a bit less protective. In the end it will most likely result in a gorgeous finished product though, you just might need a few more coats of paint. Hope it helps!
Kristin- Assuming that the paint isn’t peeling or bubbling you can prime right over it with one coat of oil-based primer and follow that with two thin and even coats of paint. If it is peeling or looks worse for wear, you might want to sand it down a bit before priming and painting. Hope it helps!
xo,
s
Trace says
Thanks for the great post!
Are there any primers out there that are no or low VOC? We want to paint our knotty pine paneled basement and there’s not a lot of air circulation down there.
Kristin says
Love the room. I know you painted the brick also and wrote a tutorial about that, but what if the brick is already painted. How would you suggest going about that?