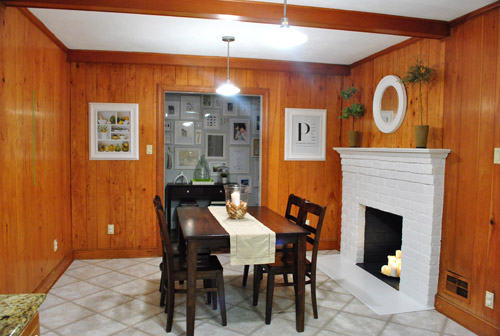
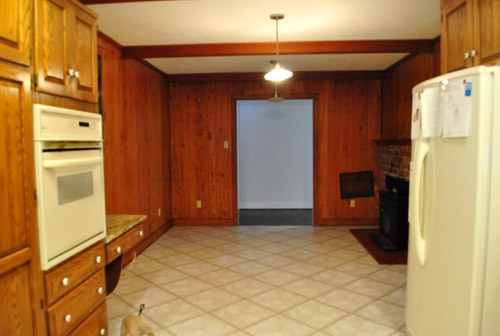
About a week ago (after we painted our brick fireplace) our kitchen looked like this:
Then we removed the desk and upper cabinet (that will be in the way of our big future doorway to the dining room) and after one coat of not-covering-at-all primer it looked like this:

Then we finally got the primer thing right after dealing with maddening bleed-through issues thanks to two days of applying coat after coat and three different types of primer (more on that here):
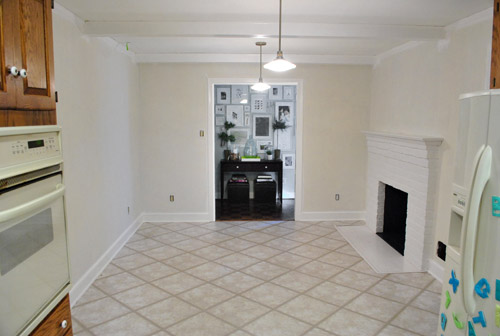
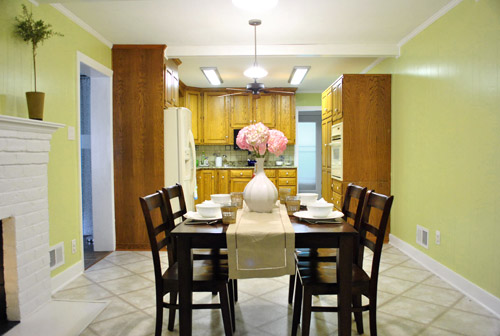
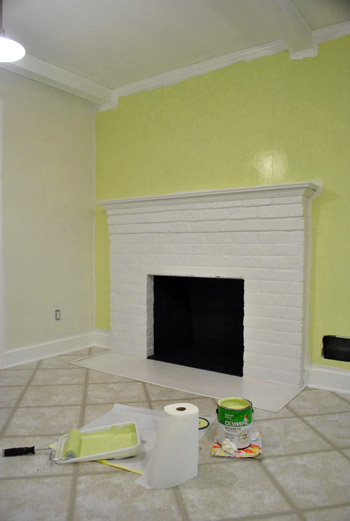
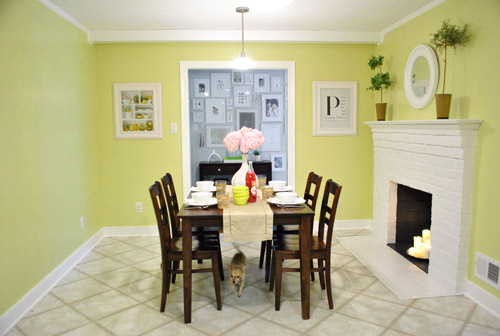
And now it looks like this, although it reads a bit more yellow in these photos than in person (it’s a smidge greener in real life).
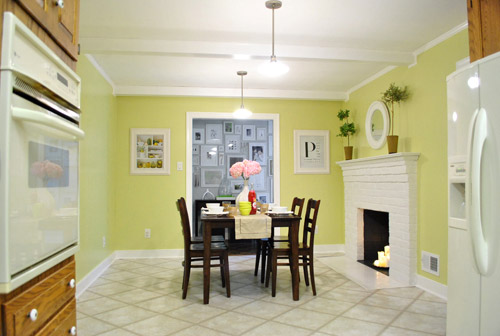
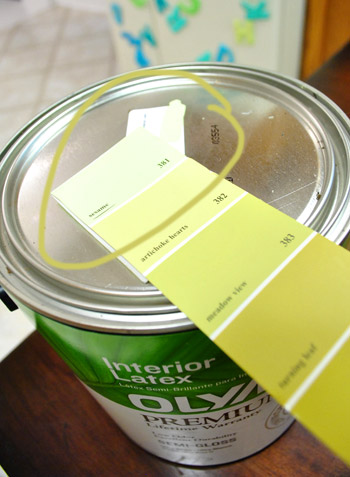
It’s definitely a warm golden green tone (aka: grellow). Sort of like the color of an artichoke heart.
There’s definitely a lot more to do in there, but we’re so glad to have the whole prime-and-paint-the-paneling thing checked off. Here’s a fun little video that encapsulates the entire process in three short minutes. Which is more than a little ironic because it took us just a wee bit longer in real life (you know, just a smidge). Just convert those minutes to days. See it below or here on YouTube.
As for the paint color, after a decent amount of debate (and some pretty thorough consideration of the adjoining rooms that will be seen along with the kitchen) we opted for our new favorite color, which turned out to be Sesame 381 by Benjamin Moore (color matched to Olympic No-VOC paint in semi-gloss).
We were inspired by this kitchen (found here via Pinterest) since our cabinets will eventually go white, possibly along with our backsplash.
We chose this warm yellow-green color because we want the kitchen to be bright and happy (there aren’t any windows to the outside world – just one that looks into our sunroom) and it was suuuuuuper dark before we painted that paneling. We also knew the room could take a decent amount of color because:
- it won’t have any big long walls remaining when we add the extra-wide doorway to the dining room across from the fireplace (just slivers of wall here or there will remain, so the color won’t be overwhelming)
- we’ll be painting the cabinets glossy white later in this phase of our little kitchen makeover along with un-busying the backsplash (which will further temper the color on the walls)
- we’ll be adding an island in the place of our too-small table someday (with a different countertop and most likely a non-white base color to keep things interesting and layered)
- this room is surrounded by the dining room, the hallway, and the living room, which all have soft gray walls (so we wanted this space in the middle of them all to have some cheerful color going on)
When it came to our swatch-selecting technique we just hung up a ton of them and looked at them at all times of day to see which one we preferred. As for why we chose this swatch specifically, we decided:
- this golden-green tone will tie into the chartreuse curtain tones in the dining room and the cheerful green tone in our shaggy living room rug without being too matchy-matchy across the board (we didn’t want the exact same tone of green everywhere for fear that it would look a bit too “orchestrated”)
- a warm yellow kitchen is always a classic choice, but this color feels modern and crisp with the green undertones (and it’s not completely terrible with the oak cabinetry, which will stay for a little while)
- this tone is in Sue the Napkin – albeit a bit darker (a sure sign it’ll work with our whole house palette really well)
- unlike some of the other softer greens and greeny-gold tones that we considered, it really makes the white trim pop (lighter swatches didn’t have the same crisp effect next to the fireplace or the trim)
Here’s how it looked with the first coat going up around the fireplace (thanks to all that primer prep– we had really awesome coverage). Again, it’s looking more yellow and less green than it does in person in these photos, but you can really see how the white pops and how it turned a dark and brown-everywhere space into a sunny and bright room in the middle of the house.
We also decided that it was high time we switched out all of the “bisque” colored vents, outlets, and light switches.

So we grabbed a bunch of crisp white ones from Lowe’s, turned off the power, removed the old ones, connected the new wires the same way they were connected to the previous switches, added the outer switchplates, and turned the power back on. The whole switch swap took about twenty minutes. So much better:
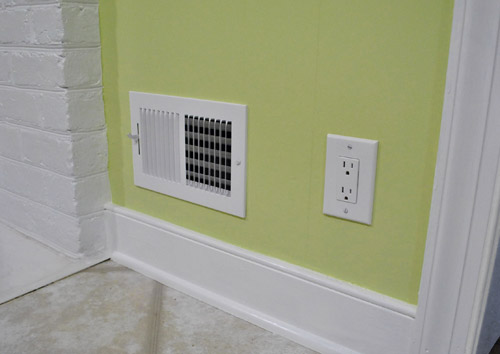
Some people opt to paint their vent covers so they blend in more, but for now we’re happy to leave ours crisp and new since we’re so used to old drippy painted-over covers (clean paint-free ones kind of feel like a luxury). Who knows if we’ll decide to add a few thin and not-drippy coats of paint to blend those vents in later though. We’ll keep you posted.
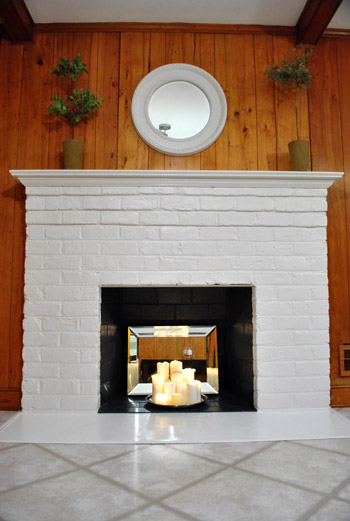
Oh and it’s really fun to go back and look at our fireplace, which originally looked like this:
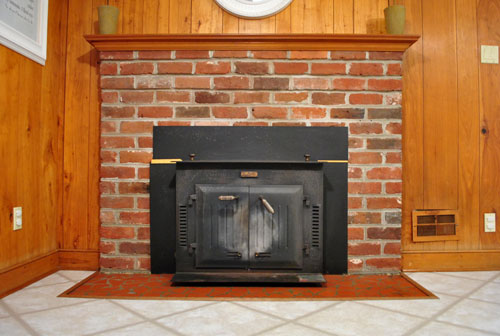

Then we removed the old unused wood stove and painted the brick, and it looked like this:
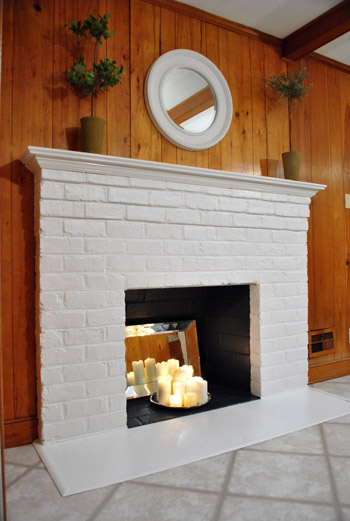
It’s amazing how much painted paneling can freshen things up even more:
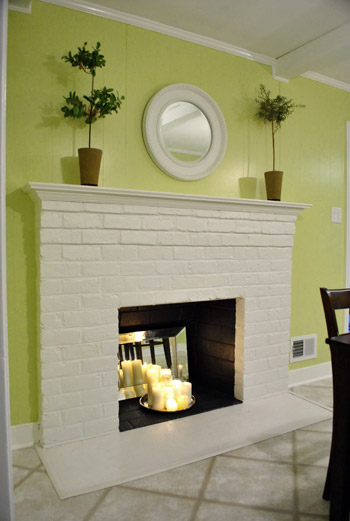
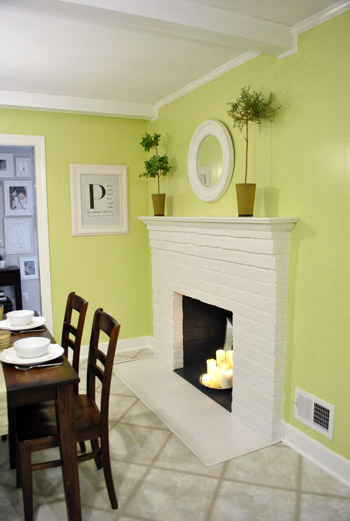
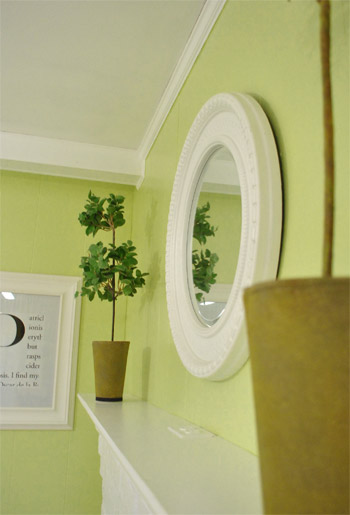
And we love how things like the white frames and the round mirror above the fireplace layer right in with the glossy white trim and beams:
Burger likey (he knows how to work that runway):
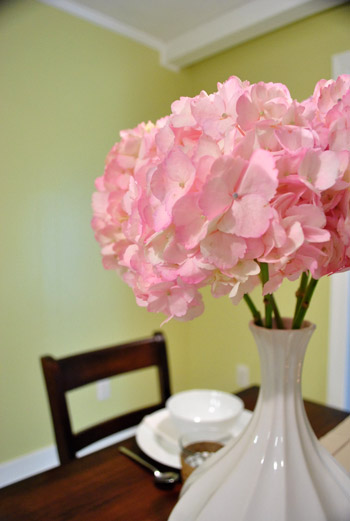
Oh yeah and see those pink hydrangeas? I wish I could say that we grew those, but they’re from the store. We figured to celebrate all that priming and painting we could spring for something soft and sweet, so these little pink snowball-looking-guys had me at hello (that’s an old vase from Target btw):
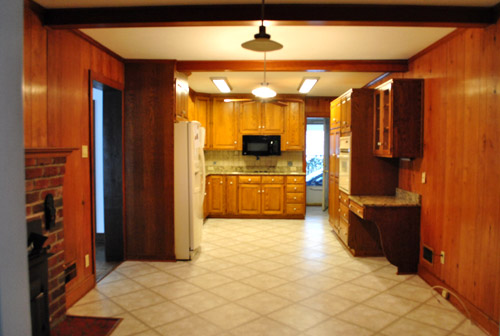
As for the opening to the dining room, here’s where it’ll be (it will line up exactly with the dining room window on the other side for balance):
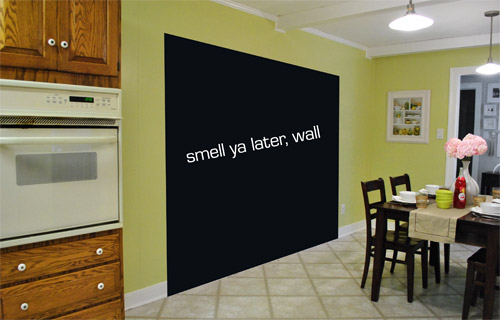
We learned that we’ll need a permit to knock out so much of that load bearing wall, so it sadly won’t be anything we can do very quickly (and we’ll definitely be leaning on some pros for help). But we can’t wait to tackle it as soon as we can get through all the permit business and hunt down the right expert for the job.
Now for some before & after bid-ness. Just because that’s my favorite part. Here’s the kitchen as it looked on moving day about six months ago:
And here it is now (still can’t wait to add that island, paint those cabinets, and upgrade the floor & appliances someday though):
Moving day again (yes, one of those lights was out):
And now:
The crazy thing is that these photos were taken around the same time of day so it definitely demonstrates how much lighter and more cheerful the space feels now that the dark paneling is a thing of the past. Oh and here’s the budget breakdown:
- Olympic Premium No-VOC primer from Lowe’s: $12
- Behr 2-in-1 Primer + Paint (in semi-gloss white): already owned
- Kilz Clean Start No-VOC Primer from Home Depot: $20
- Olympic No-VOC paint (in Sesame by Benjamin Moore) from Lowe’s: $22
- New vent and outlet covers from Lowe’s: $43
- Brushes/rollers/tape/paint tray: already owned
- Total: $97
So there you have it. The kitchen madness has officially begun. As we mentioned here, we’re definitely going to do this in phases (gotta save our pennies and just take things on as we can afford them). But it should be a whole lot of fun. As in, more fun than a barrel of monkeys. And definitely more fun than priming that paneling five hundred times. Do any of you guys have long term kitchen plans like painting the cabinets or adding an island or upgrading the flooring or making some overhead lighting switches (we’re definitely in need of some of that too)? Oh the possibilities…
Psst- We announced this week’s giveaway winner. Click here to see if it’s you.

jenn says
Then kitchen looks wonderful! Always amazed by what paint can do, can’t wait to see the rest of it come together. Oh yeah, snaps for the painting time lapse video, I enjoyed it!
Katie says
I’m sorry, I can’t even form a coherent comment because my jaw is on the floor with amazement.
Katie says
Whew, okay. Even though there’s still a lot you want to do, to me, this is the most impressive before/after you’ve done. Your den was a big one, too, but the not-so-safe color choice here is SO happy and cheerful it’s impossible not to love. I would just sit at that table and grin all day.
Kathryn says
i can’t wait to see the finished product. the color you are picking looks really warm and welcoming. the room is transforming already!
Amanda says
Love it! It’s always so amazing what paint can do! Are new appliances on your list as well? I didn’t realize they were bisque (almond?) colored until I saw the new white trim!
YoungHouseLove says
Yeah- someday. That might be phase 2 depending on how many pennies we can save (replacing a fridge and a wall oven is super expensive- boo!).
xo,
s
Stephanie says
It looks lovely! I am always so amazed by what paint swatches look like over a whole room. I would have thought your room was painted the 3rd color on the paint swatch, not the 1st!!
YoungHouseLove says
Isn’t that funny? We’ve learned with most colors that if you like one on the swatch you should probably slide one or two (even three sometimes) tones lighter since once it goes on the walls and surrounds you it’s a lot more potent than a tiny swatch!
xo,
s
Vonda says
This transformation blew my mind. It’s awesome! Another great job. I really really like the color and I usually stay away from yellowish colors.
On another note, I have friends who just bought in Bon Air and will be moving mid-August. They have 2 little girls, both under the age of 2.
YoungHouseLove says
Wahoo! Do you know where they bought? I wonder if they’ll be in our neighborhood. Hooray for more little gals in Bon Air!
xo,
s
Julia @ Chris loves Julia says
That’s incredible. I would say you matched your inspiration photo very well! The paneling doesn’t even read grooved in these pictures, but I am sure in real life there is nice texture going on. And even without the light, beachy sand walls of your old house–this room screams Petersiks to me. Like I am pretty sure I could pick it out of a lineup as yours.
Chris Loves Julia
YoungHouseLove says
Aw that’s sweet. It’s funny because it’s definitely a brighter choice than the last house but we still feel right at home.
xo,
s
Emma says
In the words (and voice) of my new and absurd idol Martyn Lawrence Bullard (a Million Dollar Decorator): It’s dee-licious!
YoungHouseLove says
Hahaha, 500 points for making me spit out water while snort-laughing.
xo,
s
Emma says
I can’t tell if his ridiculous accent is fake or genuine but I really don’t care. I heart him.
YoungHouseLove says
I vote fake but delicious. Haha.
xo,
s
liz says
it looks amazing… amazing.
Drea says
looks amazing. we painted our paneling not to long ago too. Actually your OLD kitchen was our inspiration :)
http://dreawood.com/2010/08/shirt-2-reveal-oo-and-kitchen-reveal/
Thats my post showing before/afters.
Our paneling was KNOTTING PINE, so it had these dark knots along with the dark wood, nightmare… was orange-ish wood too. I had to live with it for years before our church agree’d to let us remodel.
What we used tho was some sorta chemical to STRIP the paneling 1st.. then did the primer, then the paint. Worked great, we have yet to have any issues. So far… :)
Love your kitchen! looks so much more open.
Blessings!
Drea
http://www.dreawood.com
YoungHouseLove says
Wow- that came out really well! Congrats!
xo,
s
Heather says
Oh. My. God.
It looks absolutely beautiful!!! It’s hard to believe that it’s even the same area. Wow.
Our kitchen doesn’t have paneling, but it has ugly, dark cabinets from the 70’s and a hunter green counter top. When my husband gets home from his deployment we’re putting in a new counter top (I have my heart set on a butcher block one), replacing the cabinets with pretty white ones and painting the walls pale green. I like a color similar to yours, only without as much yellow.
I absolutely can not wait to get started!
Pammy says
Incredible transformation guys! I love this color so much, I want to paint our guest room a similar shade. I actually really like the texture of the painted paneling, so i’m glad you kept it. Your hard work really paid off! We have so much to do in our kitchen. We have some atrocious beige sheet linoleum that will be replaced with black and white checkerboard tile, and some orange oak cabinets similar to yours that are dying for some paint as well. A few months ago we picked up a stainless steel prep table from Costco that we are using as an island. We love it. We’ve got big plans, but not much free time with full time jobs… how do people find time to tackle all of these projects??
YoungHouseLove says
I love the idea of a stainless steel prep table as an island. Definitely something for us to mull over! As for finding time, we started out doing things on the weekends and sometimes even in the evenings- just try to tackle one thing at a time so you don’t get overwhelmed. And try to have fun! The key might be enjoying the journey (almost) as much as the outcome!
xo,
s
Radhika Paruchuri says
Looks so wonderful. I have been checking since morning for you update anticipating that you would post something with the lime green. Looks really really good! We need to do major upgrades for our kitchen too. Your kitchen will be an inspiration.
Lindsey says
INCREDIBLE! It looks fabulous! I’m going to go paint something Sesame now :)
DJ says
Wow! It’s like whole new house! Me likey.
Lady Goats (Gina) says
I cannot believe you guys did that! I mean, I CAN, and I LOVE it, but WOW! haha. I got goosebumps and my heart sped up when I saw the first picture! NO. WAY!
*eye gasm*
I was thrilled to have painted ONE wall turquoise, and you’re whole kitchen is BOLD. Can I move in…? I’ll sleep under the table. You’ll never know I’m there! Unless you leave red vines out, and they “mysteriously” disappear…. mysteriously….
Kate says
I’m curious what the picture on the left side of the wall with the opening to the gallery hallway is? Whatever it is it looks really good with the new paint color!
YoungHouseLove says
Aw thanks! It’s just a $29 poster from allposters.com from a while back (a photograph of shelves with fruit and olive oil on it). It felt kitchen-y so I stuck it there (it used to hang in our dining area of the first house).
xo,
s
Michelle says
This makes me want to start all over when it comes to decorating/painting our house. This looks amazing!!! Great job!
Carmen says
It looks amazing! Great job! Any plans to put color on the ceiling?
YoungHouseLove says
Hmm, not yet. But we’re never opposed to that approach. We’ll have to see where we end up as the room evolves.
xo,
s
lynn says
Love the color! What a difference it makes in the space. It’s odd to me that one wall of cupboards extends to the ceiling and the other does not. Have you considered raising the top of the shorter cabinets to match the others? Even if you don’t need the space you could always leave it open with baskets. This is going to be a fun remodel to watch and once again, a great transformation. Thanks.
YoungHouseLove says
Yes! That bugs the heck out of me. We plan to build up the cabinets on that side for more balance so they both extend to the ceiling. Might be Phase 2 though- not sure.
xo,
s
threadbndr says
I think if you’d put some removable storage up there (maybe canvas boxes or covered baskets) it would visually fill in that space. That’s what I’ve done above my cabinets instead of the expense of rebuilding them. I use that space for the ‘needed but not often’ appliances (breadmaker, slicer, canning gear). I took big heavy ‘bankers’ boxes and covered them in fabric, taping it inside so that I can remove and wash the fabric occasionally (kitchen grease, you know).
YoungHouseLove says
Yeah- that could definitely work too. We’ll have to see where we end up!
xo,
s
Stacy says
Wowsers – it make the room look so much bigger!! I love your color choice too. You make me want to repaint my house (& cabinets) every time I read your painting posts!! :)
Amber Wallace says
What a difference! It brightens up the space so much! Looking forward to the rest as time ticks by. You are putting us to shame, we moved about a month after you did. Time to get some more projects started!
Valerie says
This is seriously great guys! I love the video montage! =)
Have you guys every run into the problem of loving the paint chip, but hating the colour once you painted a bit on the wall? I am in the midst of selecting paint colours for 5 rooms in my house and I feel like every time I fall in love with a paint-chip colour, I buy a sample pot and hate what it actually looks like on the wall! It always looks darker, muddier and less sophisticated then what I was hoping for.
Please share your wisdom! Soon my whole house will be covered in reject paint samples and I still haven’t found a winner!
YoungHouseLove says
I would just keep up with the small pots of test paint until you love what you see! Some companies also sell large swatches (like 11 x16″ ones) that you can bring home and tape up to see if you like them. Good luck!
xo,
s
Julia @ Chris loves Julia says
Valerie,
I am no expert, but from my own personal experience, I have learned to go at least one step lighter from what we think we want. Even with our dark violet wall in our living room, one shade lighter was perfect and our original choice would have been TOO dark. And I think it would have been easy for this kitchen to pick an obvious middle-ground chartreuse on the strip, but they chose the lightest and look at the results! Again, I am no expert, just have loads of experience as we are in the process of painting our whole house.
Chris Loves Julia
Laura@JourneyChic says
Wow! What a HUGE difference. And I think you’re just playing us – I bet those cabinets will be painted glossy white within the month. :)
YoungHouseLove says
Oh man we can’t even think about that yet. Our arms need some recovery time. Haha.
xo,
s
Elizabeth says
That is the best transformation yet!!!!
Jessica says
Aaaahhhh…..I love it!! I can’t WAIT til you paint those cabinets and knock out that wall…the white and the light (from the dining room) are going to make this my most favorite room ever.
My hubby is obsessed with natural wood trim, and I love how you guys have all white trim, so I plan to use all of your photos to inspire him to change his mind about painting natural wood trim….it’s just SO much happier when everything isn’t so dark! :-) Great job guys! I truly love this transformation….
keri says
AMAZING! I am blown away. This officially made my day, I’m so happy for you guys.
And to believe I didn’t buy a house when we were looking because it was 100% paneled…(oh, and ok, all the copper was ripped out of the walls too)
This will definitely be changing some people’s minds about painting paneling :)
Can’t wait to see the cabinets…I’m still not brave enough to paint mine!!
Lauren M says
Loves iiiiit, gorgeouuuuuus, just like your personalitieeeees.
Erin says
I CANNOT BELIEVE how you guys transform terrible paneled rooms just with paint! A jaw-dropping moment when I saw the before & after of the den in your first house, and this is even more amazing. So many un-updated houses around here (New England) are plagued with dark paneling–would have been a deal-breaker for me in any future house hunting, but thanks to you, not any more!
Way to go for hanging in there for the no/low-VOC project. I’ve been refinishing a stand-alone cabinet (w/ a cool piano-hinge top) using less-chemically products and really appreciate the lack of fumes. I was also inspired by you guys–and your dining room built-ins–to add some surprise color to the cabinet’s inside shelves. Almost done and it’s looking fantastic! I thought the breezy neutrals of your first place were my style, but I’ve been completely won over by all the color & fun brought into your new place. Awesome.
Ok, long comment! But had to sneak in a hometown shout-out–I love that you’re in central VA, as I’m a Charlottesville native, myself.
Lauren H. says
Looks great! Congrats. I stay amazed by all the work you have done.
Tara says
You just made my day…here I am stuck at home with about a zillion things to do at the office, while the plumber who BROKE OUR BATHROOM SINK DRAIN the other day while fixing a blockage (don’t ask…teenagers) saws away at our bathroom walls. The reason you made my day? Aside from my desperation to rip apart the rest of our old, bad DIY (previous owners!) bathroom, I have been pondering paint in our living room. We have one paneled wall. The paneling is thick, good-quality stuff (which means the previous owners didn’t hang it!) and I have been hesitating to paint over it. Now, I am 97% committed. And my sweet husband says he doesn’t care either way. So…once I summon up 3% more courage/commitment, I’m there. If we weren’t stuck with our salsa-colored sofa for a few more years, I might even follow you down the grellow path.
Anyway, thanks for the great photos, the awesome prime/paint advice, and the distraction from the destruction of my bathroom wall!
Katie says
It is BEAUTIFUL! I am so jealous. I love it. Such a great look for the room. You always inspire me to want to make changes to my own home.
Jamie says
WOW! Love it! Great job you guys!
Jennifer says
Looks fantastic! Can’t believe how much a bit of hard work and paint can change a room. Great job!
I’m really looking forward to when you tackle those cabinets. I’m wanting to paint mine and I’m looking forward to getting some tips from you all. I’m hoping you are able to do those soon!
Kristi says
So great!!! I love the color! And that photoshopped picture of where the wall will get knocked out was great! It definitely helps to give a vision of the future space. It’s gonna look awesome!
Gavin S. says
Hooray! It’s so much more…you! And did I notice a plug on the top of your fireplace mantel? That’s so handy–especially for Christmas decorations. Congratulations on successfully completing step 1!
YoungHouseLove says
Yes, isn’t that handy? There are about ten million outlets in this house. Not kidding. Sometimes there’s one every foot along a wall.
xo,
s
Jill says
SMASHING!!!!! Looks just like my closet wall color. So pretty and bright. Really transformed that space… now hurry up and paint those hideous cabinets :) please?
Sara says
Do you have a draft that comes through the fireplace now that the wood stove is gone? My MIL has a fireplace and even though it is closed and she never uses it, you still feel a draft. Her solution was to shove a TV box in the hole…very unattractive :) So I’m trying to help her figure out a solution so we can paint the inside and give her something pretty!
YoungHouseLove says
Oooh, very smart. We have a damper at the top and bottom of the fireplace that we could close so thankfully there aren’t any drafts.
xo,
s
Deidre says
As always…..nicely done! I envy your ability to pick colors and tie everything together.
Katie says
Looks gorgeous!! I’m so inspired. Maybe we’ll stop rejecting all the “aaack! paneled kitchen!!” listings in our home search after all.
jennifer says
looks great! it’s amazing what a little paing can do. we had a ton of panneling in our house and we painted all of it and it looks so much better. we also remodeled our “cave” of a kitchen and opened it up to the rest of the house.
Robyn says
what a transformation
Kristin in OR says
Wow! What a difference it made! Great job!
My fiance and I are looking at homes right now to buy and so many of them have the dark paneling. I wondered how difficult and how much of a difference it would make to paint paneling if we purchased a house with all that paneling and you answered it for me! Thanks so much for being an inspiration and being the guinea pig (so to speak) for many of us!
Jessica says
Love it! I used that same kitchen as our remodel inspiration too. We ended up choosing a blue-greenish paint (blue shamrock)and we love it. good luck on the cabinets! ours took 4 coats to make them white, but well worth it. Question – how do you accomplish all of this with your baby? I feel like some days I can barely cook dinner while watching our 9 month-old!
YoungHouseLove says
We take full advantage of nap time (we usually get 1-2 hours in the morning and 30-45 mins in the afternoon) and after Clara goes to bed at 7:15 we do a lot of projects then as well. But when she’s awake one of us is with her and one of us is most likely parked at a desk (responding to comments, writing posts, editing pics, etc). We’ve learned that she’s not a very good project-partner when it comes to paint and hammers just yet, haha. Oh but occasionally we woo John’s parents into helping us with some babysitting (which is the only thing that made this priming and painting process possible).
xo,
s
Heather D says
I LOVE IT MUCH!!! I have been waiting to see what you guys were going to do with the kitchen and you totally made my week. Great job!!!!
Elise says
I have to admit that when you first said grellow, I was a little skepticle, but I should have known better because you folks are geniuses. It looks amazing!
Are you going to hang anything on the wall that will eventually be knocked out in the meantime? I think if I left it blank it would really get me moving on that whole permit thing cuz it would bug the heck out of me!
YoungHouseLove says
I think once our arms recover we’re going to start researching just how long it’ll take to get that doorway done (and then hang something if it’ll be on the longer side).
xo,
s
Krysta @ Domestic for Dummies says
It looks so freakin’ awesome! Love the color and it will look even better when the cabinets are painted white. love love love.
Heidi says
oh my god i love it!!! i’m loving all the chartreuse pops in this new house of yours! can’t WAIT to see those cabinets become a fresh white. :-D
Barb says
OMG Sherry!!! I wanted to cry with JOY when I saw your post today. It is beyond wonderful and so worth the efforts of the “priming from hell”. It looks so wonderful…..I almost cried. No, I am not crazy or a nut….just love the results.
Bravo to the YHL team.
Can’t say enough good things about it. Yahoo!!!
B.
YoungHouseLove says
Oh Barb, you’re so sweet! So glad you like it.
xo,
s
Lindsey says
This looks great! Glad you went with the grellow!