We’re back with the fireplace update that we mentioned in yesterday’s post about removing our old not-baby-safe wood stove.
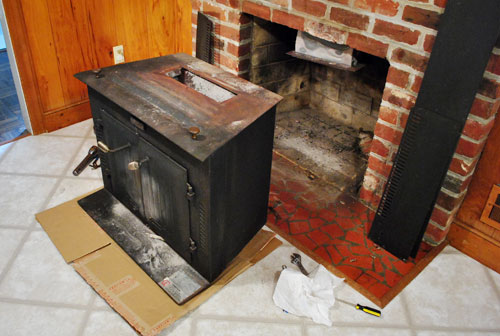
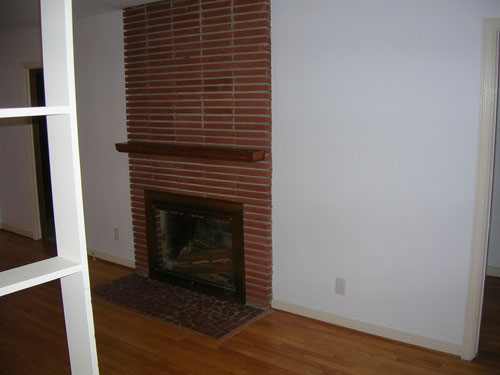
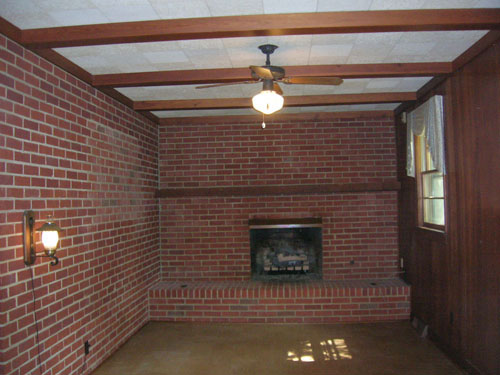
This next step is definitely just the beginning of our fireplace makeover (as in step two of probably fifteen). We figure we’ll tackle this baby in stages (just like we do pretty much everything else around here) so the first step was to spend as little as possible to get it looking better for the short-term (since it might be a while until Phase Two kicks in). So here’s what it looked like yesterday morning:
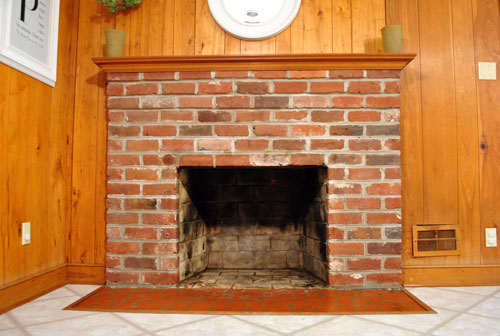
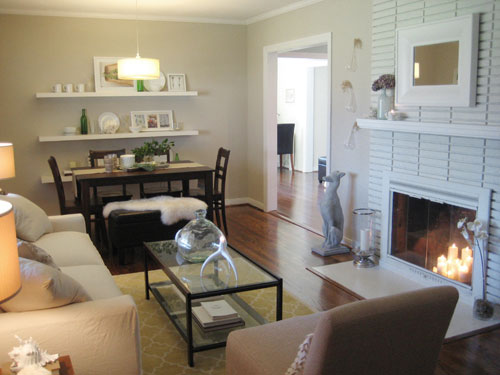
And here’s what it looked like yesterday evening:
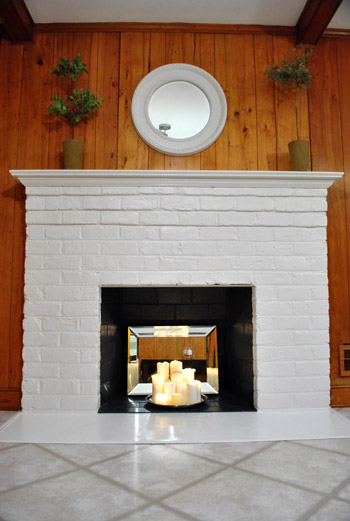
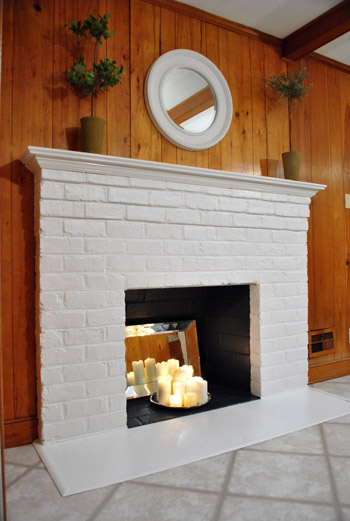
I know, I know – the orange paneling makes it look craZy with a capital Z. But just scroll down a bit to the dark den from our first house (which also had paneling and brick) to see just how transformative paint can be (we didn’t remove the paneling in there, just primed and painted it). So try to envision some fresh paint in a soft color on the paneled walls with glossy white beams and trim to match the same semi-gloss paint on the fireplace. Can you see it?
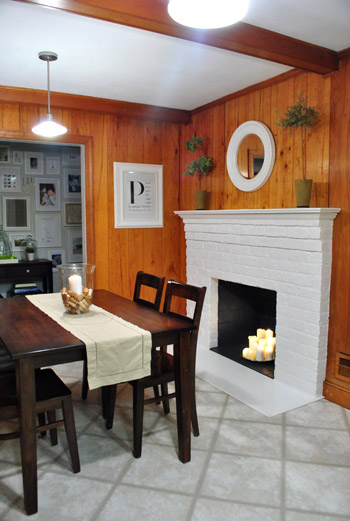
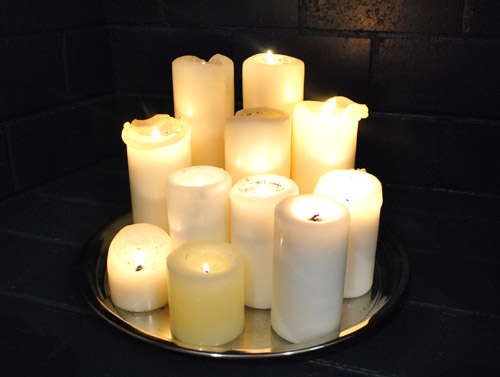
And now for a word about the candles and the mirror that I tossed into the firebox. Those are definitely not Clara-friendly. That was just mommy psychosis (I wanted something cute in there for the pics, even if there won’t be a thing in there for a while during Clara’s waking hours). It was such a quick little addition that it gave me some baby’s-in-bed-let’s-have-date-night ideas (you know as opposed to baby’s-in-bed-let’s-upload-fireplace-photos-and-write-the-post-for-the-morning ideas). The latter won out, so maybe I’ll break out this look for anniversaries. Me-ow.
But when it comes to the day to day stuff, l fully expect to find pillows, stuffed animals, books, and whatever else Clara decides to put in there awaiting me when I walk into the kitchen. The girl loves hiding stuff around the house, so I’m guessing that she’ll appreciate this new little nook. Maybe we’ll even be able to sneak a picture of her chilling in her not-hot-and-not-sharp-anymore zone reading a book or snuggling with Gee (her stuffed giraffe that she named herself).
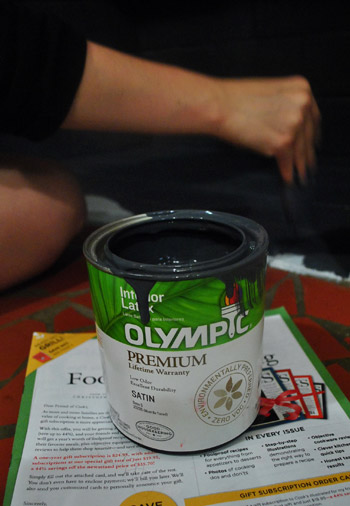
The best thing about this little fireplace facelift is that it took us about five hours (on and off with drying time in between coats) and it only cost eight dollars (and three cents, to be exact). We just used primer that we had leftover from painting the guest room (Olympic Premium No-VOC primer), some white semi-gloss paint that we always have around for trim touch ups (Olympic Premium No-VOC paint) and a quart of Benjamin Moore’s Temptation in satin that we picked up from Lowe’s (color matched to, you guessed it, Olympic Premium No-VOC paint). Primer isn’t always necessary (we’ve gone without it while painting brick before) but we had it on hand so we figured we might as well use it.
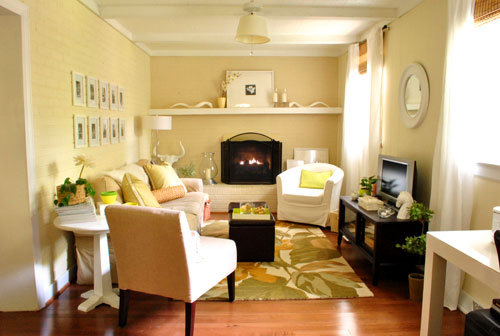
You guys know we’re no strangers to painting brick fireplaces since we tackled not one but two in our first house. Remember this guy who went from this…
… to this:

And this one that went from this…
… to this:
You can check out our original fireplace-painting tutorial here, but since we’re nothing if not even chattier these days, we thought we’d recap the steps we took when it came to prepping our current fireplace for paint. First we:
- Closed the damper and declared the fireplace inoperable (we never used the woodburning fireplace in our last house and plan to either install a double-sided gas or electric insert down the road).
- Scrubbed the heck out of the firebox, exterior brick, mantel, and hearth with soap and water to cut the grease/ash (we used Dr. Bronners + water).
- Let everything dry.
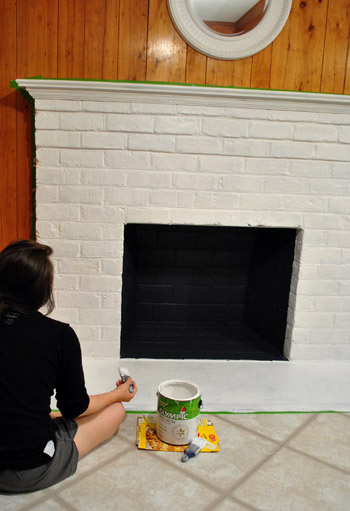
Then it was time to prime and paint. Here’s what we did:
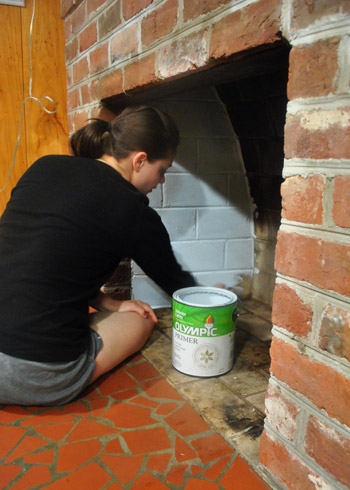
- Primed the firebox with Olympic Premium No-VOC Primer (remember, we’re not going to use this fireplace for wood burning, so if you’ll be using your fireplace either leave the firebox unpainted or hunt down high-heat options that are meant for the job).
- Painted the firebox with Ben Moore’s Temptation in satin (color matched to Olympic Premium No-VOC paint).
- Taped off the wall around the fireplace (since you have to smash a paint brush into craggy brick, it’s hard to stay in the lines).
- Caulked the big crack between the tile hearth and the firebox so it would look seamless when painted.
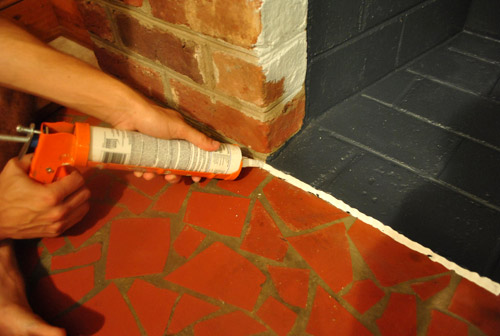
- Caulked other especially cavernous holes in the craggy brick so it looked less shadow-y and chipped when painted.
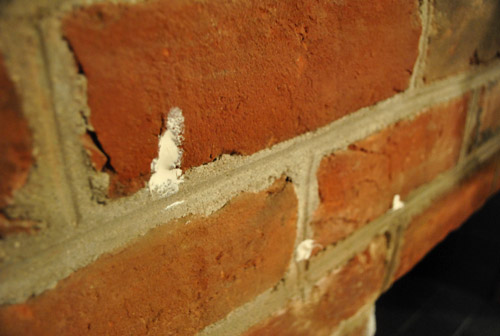
- Primed the brick fireplace surround, wood mantel, and even the tiled hearth (yup, the tiled hearth… more on that in a minute).
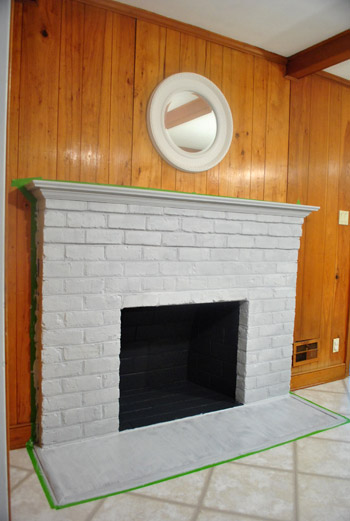
- Painted the brick fireplace surround, wood mantel, and tiled hearth with two coats of Olympic Premium No-VOC semi-gloss paint in off-the-shelf white (some folks like more contrast when it comes to mantel and hearth color, but we’ve always loved the all white look – although later when we build out or even tile the fireplace & surround we might add more varied colors and materials for fun).
- Applied three thin and even coats of Safecoat Acrylacq (a low-VOC non-toxic alternative to polyurethane) to just the tiled hearth on the floor. Be warned that certain polyurethane types will leave a nasty yellow tint so the only two that we trust are the Safecoat I mentioned above and Minwax Water-Based Polycrylic Protective Finish in “Clear Gloss.”
You think we’re crazy for painting the tile on the floor huh? Check this out. We did the exact same thing to the exact same heart floor in our first house. See the same little smashed up tile?
The whole prime, paint, and poly technique was meant as a very very temporary solution (we planned to replace the tile pretty soon thereafter). But it stuck. Literally. It still looked mint four and a half years later when we sold the house! Even with foot traffic (in shoes) and small nephews of ours ramming it with metal matchbox cars. Here’s where I’d add a close up shot, but sniffle, we don’t live there anymore. So here’s the last wide shot we took of the room (you can see that it still looks glossy and white):
So although painting ceramic tile, especially tile that gets walked on, is nothing the pros recommend, we’re totally cool with doing it as a temporary fix (although doing it in a bathroom is probably a terrible idea because it can get slick when walked on with sopping wet feet). I should mention that in both cases the tile was terra cotta which is really matte and porous (and not slick and shiny), which might be why it grabbed the paint and held the heck on for such a long time. Who knows, it could inexplicably show a lot more wear and tear than it did in the last house (you know we’ll tell ya if things quickly go south). But either way we’re pretty sure we’ll bring in some awesome new tile for the hearth and maybe the entire fireplace when we get down the road a bit (read: save enough loot to tackle the kitchen in a more major way).
Have you guys painted any brick lately? Or ever primed, painted, and poly’d tile- just to see what would happen? Has your husband ever taken terribly unflattering photos of you painting something to get you back for sharing pics of him scrubbing brick in his high school gym shorts?

Kristen @ Popcorn on the Stove says
LOVE the fireplace! It’s so pretty that I don’t even mind the orange paneling behind it.
PS- When I first looked at the picture, I thought you guys knocked out the wall behind it but then I realized it was a mirror. Oops!
Brittany says
I thought the same thing about the mirror!! I was like Wow, they have been busy! ; )
Micha says
Phew, glad I wasn’t the only one *L* I thought exactly the same! And yes, the paneling doesn’t look half as bad anymore now that the fireplace is white!
jamie says
I thought the very same thing!
Cathy says
Great job! I am trying to make my red brick fireplace look sort of like stone (white and biege). I have about six different looks on the fireplace now, waiting for paint to dry. I think I may have accomplished (or close to it) the look I want with White primer, gloss and biege latex paint. Will let you know how it goes also will be putting mosiac stone and glass tile on too. I will try and post photos. If this works it is going to look fabulous!
YoungHouseLove says
Good luck!
xo,
s
Adriane@fortheloveofpainting says
oh man I love it…I want a fireplace like thst! Great job you guys!
Brittany says
WOW! Great change :)
DanielleR says
You guys never cease to amaze me, already looks a million times better. Can’t wait to see more updates!
Sandy says
Great improvement! The paint color looks like a grayish. Is it?
YoungHouseLove says
The primer is grayish. The paint is semi-gloss white!
xo,
s
Amy says
Looks great!
I am actually planning to tackle my fireplace in a few weeks while I’m vacation, although I’ll be painting porcelain tile, not brick. I am also contemplating painting the firebox white as well. Is that crazy? It’s a non-working fireplace (there’s actually an electrical outlet inside!). The current black just seems like a gaping hole in our not-very-large living room.
YoungHouseLove says
No- check out this awesome white on white fireplace I pinned: http://pinterest.com/pin/40969769/
I love it!
xo,
s
Amy says
Ooooo. I just repinned it.
I’m thinking of doing something I just saw at a hotel in Charlottesville: Getting some pretty birch logs and wrapping them with white Christmas lights (since we have the outlet in there!).
YoungHouseLove says
That’s suuuuch a cute idea! I saw that in Domino a million years ago and have always LOVED it. You’re so lucky to have an outlet in there!
xo,
s
Amanda @ Our Humble A{Bowe}d says
Of course you guys are over achievers and couldn’t leave it as is for several months. ;) I love the crisp white. I was going to say yesterday that you could fill the inside with small logs with the ends showing, just to fill space and give something to look at other than a gaping hole. And it would be cheap/free.
We have a small section of brick on the front of our house I would love to paint: http://ourhumbleabowed.wordpress.com/2011/06/14/outdoor-bench-refinishing/ Unfortunately, I can’t convince Ben, so it probably won’t happen.
annabelvita says
Oooh what about burger and clara friendly log cushions in there? http://www.google.co.uk/search?q=log+cushions&hl=en&client=firefox-a&hs=Xjr&rls=org.mozilla:en-GB:official&prmd=ivns&tbm=isch&tbo=u&source=univ&sa=X&ei=ir34TeH_Lo61hAfL2Zj5Cw&ved=0CGUQsAQ&biw=1920&bih=979
OR burger’s crate?!
annabelvita says
(just remembered the whole point of dog crates is somewhere to go when they want to be quiet and alone… ie not a family kitchen! ignore me).
YoungHouseLove says
Oh my gosh the stuffed logs are adorable!!!
xo,
s
Elizabeth says
HELLLOOO IKEA FABRIC SECTION!
I say you and Oh Brother get together with this fabric…
http://www.ikea.com/us/en/catalog/products/50175083
and make some log pillows of your own!
I actually have some of that fabric, but haven’t decided what to make out of it, yet.
YoungHouseLove says
So much fun!
xo,
s
Megan@HomeSweetLilacDrive says
omgoodness what a transformation! nothing says fresh and clean like a little white paint :)
Devon @ Green House, Good Life says
Fantastic! Makes me want an old house….
Jordan@the2seasons says
LOVE IT!!!!
Mariel says
Looks great! Just curious why you picked semi-gloss paint over flat? I am thinking of doing the same thing with my fireplace, but am worried the glossier paint will show off all the cracks and crevices…
thanks!
YoungHouseLove says
In this house our mantra is easy and kid-friendly. So all of our rooms are painted in eggshell or satin instead of flat. And all of our trim and other architectural features (like beams and fireplaces) will go semi-gloss. But flat works too! We used that on both of our fireplace in the old house.
xo,
s
Rebekka says
it looks amazing! the white fireplace actually makes the paneling look much better, i think. and although my parents always thought painting brick was a big no-no, you guys are definitely convincing me that it is sometimes the way to go!
AT says
Holy room makeover! From the photos, your kitchen already looks brighter and airier (is that a word?). 5 hours….you make me feel SO inferior :-) I was proud of myself for just managing to scrub up my kitchen last night before falling into a heap on the sofa to watch The Voice. (go Javier)
YoungHouseLove says
We got pretty lucky with naps yesterday. And there are two of us. And we did all the prep (cleaning) the day before. Don’t feel bad! We’re just crazy enough to wake up and work on this on and off all day long until finishing around dinnertime. Other people have boundaries. Haha.
xo,
s
Laura says
Shut the front door. That looks AMAZING! WAY TO KNOCK IT OUT. OH MY GOD AMAZEBALLS. Lol sorry just so excited, and proof that any fireplace I get my hands on will be painted white, no matter what my fiance says ;)
Tamisha says
I painted the brick in the old place (http://nestingpair.blogspot.com/2009/02/living-and-dining-rooms.html) and put some slate tile on the hearth (we had that same crazy paving hearth). I ended up not loving the slate on the vertical, but loved it on the heart.
I’ve also painted the tile in the new place as well:
http://domusaurearichmond.blogspot.com/2010/08/before-and-after.html
I still want to paint the firebox and tile, but wasn’t sure chalkboard black was the way to go (which is what I did on the grey tile).
Danielle C says
I’m so happy to see the red stone collage thing on the floor in front of the fireplace painted. For some reason it reminded me of The Flinstones.
Bonnie says
WOW! What a difference a day makes. Nice work! And you can always put out your candles and pretty mirror when Clara is sleeping ;-)
Kellie says
Yea! looks awesome… Your link back to your old house made me remember a question for you. I painted my fireplace a while back but the door in front looks exactly like your old one in the living room/dining room in the old house. I see you painted that white as well… how did you do it on that material?? Also, there are some nasty soot stains on the glass.. any advice on how to clean up & make that thing shine?? And lastly, if I have not already asked too many questions, if you paint the inside of the fireplace, will it be okay down teh road for a gas/electric insert?
YoungHouseLove says
I just used a paint brush and then scraped the paint that got on the glass (and soot stains) carefully with a straight razor. You can also tape off the glass and use high heat spray paint (and then scrape the glass to get off stains and paint afterwards). As for painting the interior and then adding a gas or electric insert, yup that should be all good. We spoke to a chimney guy and he said it could cause some “wear” on the paint due to heat but you won’t see it anyway. So it’s not dangerous, it just might not hold up like high heat paint would, but it’ll be covered. Hope it helps!
xo,
s
JoAnne says
I was wondering the same thing too!
JoAnne says
Oh wait, what about the vents?
YoungHouseLove says
I’m not sure what you mean. I would just scrape things off to clean them and try to paint things if it’s non-working (ex: if your glass doors have vents you can spray the whole door except for the glass, so the vents would get a coat of fresh paint). Make sure it’s high heat paint if it’s a working fireplace though. Hope it helps!
xo
s
Rachel Tatem says
Great job! The fireplace looks great! My dad just did a similar thing with his fireplace
Christie says
WOWSERS! It looks amazing! Ahh, the power of paint. Great job! L-O-V-E the mirror and candles in the fireplace idea. Flickering light bouncing off the mirror in the fireplace + romantic anniversary dinner = Little Brother or Sister for Clara. LOL :)
Brandy says
Love it! Looks wonderful! I also love the look of the wood stored in the fireplace you posted, and showed my husband one like it. We were talking about doing that, and one little word killed it for me ‘SPIDERSSSSSS’ ugh, they would love it, and here in Savannah GA, we got some ugly spiders! So I left it empty for now. Also have a 1 year old girl (Rayne), who every time you turn around gets right up in there and just sits like its her little baby cabin.
Krysta @ Domestic for Dummies says
Love it!! The mirror totally threw me off, i thought you had knocked out the other side of the fireplace. Good work!
Shannon Collins says
Ay yay yay, you guys are so inspiring! My boyfriend and I just moved into our house after settling a month ago and we are trying our hardest to emulate your house fixer upper super powers, but alas, we are falling short! We did tackle painting our fireplace white, which took a lot more coats of primer/paint than I anticipated, but overall I think it makes such a big difference in classy-ing up the room. Feel free to check out our latest progress shots (yay, we are almost entirely wallpaper-less downstairs!) on the ol’ blog: http://youwannatalkjive.com/
We heart you big time.
Unicorn kisses and puppy dog stares,
Shannon
YoungHouseLove says
Oh my gosh it looks amaaaaaazing!
xo,
s
Amy says
You have bunnies! I love bunnies!
Elizabeth says
LOVE that your dog is named Betty White! LOL!
Angela says
Looks great! I just painted my fireplace a stoney grey colour. It looks great and made such a huge difference. It takes a lot of time and patience to get the paint in all the nooks and craneys. Do you use a brush to get the paint right in there or do you have any tricks to make it a little easier?
I can’t wait to see what you do to the kitchen!
YoungHouseLove says
We tried a nappy roller but a brush was more efficient so we went that route. Just smashing it into the crags seemed to be the most effective way. Of course we both have sore wrists today.
xo,
s
annabelvita says
I cannot believe how great this looks! For such a (relatively) minor upgrade it’s really made a world of difference.
I’m totally giving you the slow tennis clap over here. Bravo.
I understand Bart was a baby unfriendly beast, but I do love a good wood burning stove when there’s no babies around. Here’s my mum’s : http://annabelvita.com/my-days-were-merry-and-bright – you can see the flames through the glass and it makes the warm so cosy and inviting in winter.
(She’s in the process of cleaning the brick behind the stove, that’s actually from the hundreds of years of open fires that have taken place in the fireplace (the house is 18th century!)
YoungHouseLove says
So cozy! That one is a lot more charming than Bart I think. Haha.
xo,
s
Adrienne says
If you decide you want a real fire in their without having to install a real wood-burning insert again, I am a HUGE fan of the gel fire places! I wanted a fireplace but don’t like the idea of the fake flame of an electric fireplace and a gas hook-up wasn’t possible. So without a chimney our only other option for a real flame was a gel burning one. It looks amazing!! We can use 1 to 3 cans at a time of Sun Gel (or any other kind of gel) and it even crackles! It sits behind a ceramic log that looks so real that visitors just assumed it was a real fireplace! I’d be happy to share pics and a link to where we ordered ours if you like :)
(All this ’cause I wanted a place to hang stockings at X-mas that wasn’t a sham!! LOL)
Julie says
Please share! We have a non-working fireplace and though we’ll get gas at some point I’d love to look into gel for now!
Polka says
Love it :) it looks amazing and the mirror inside is a brilliant idea :)
best
polka
Adrien says
Thank you so much for this! I have a nearly identical fireplace in my living room (including ugly woodstove insert and the broken tile hearth.) I’ve been wanting to fix it up but still be able to have a fire. I love the idea of painting the brick and the hearth, but what happens when you pull out the insert? Does a professional have to come and fix the liner so it can still be used?
YoungHouseLove says
Yup, if you remove any insert yourself you should consider the fireplace non-functional until you have an expert out to evaluate things for ya! Just to be safe.
xo,
s
betty in munich says
Well done! It looks really good, you don’t even notice the paneling.
Cait @ Hernando House says
That looks great! Are you planning to tackle the paneling soon, too? I know you want to paint it, just wasn’t sure how soon you were planning to tackle that. (Sorry if I missed that part somewhere in today’s or yesterday’s post.)
YoungHouseLove says
I’m dying to do it soon! Maybe within the next month (it’ll be a big job, so we need to arrange for some serious babysitting- haha).
xo,
s
Cait @ Hernando House says
Babysitting you say? You know, with John’s parents closer now and all… ;) haha
Looking forward to reading about it when the time comes!
YoungHouseLove says
Haha- here’s hoping we can “book” them soon. They watch Clara’s cousin Emanuel a lot (he’s also here in Richmond) so we might have to fight for some grammy and tomtom time!
xo,
s
rhonda says
Wow amazing change!!! You guys rock!
D'vine Living says
Thanks so much for this post. Our new house’s fireplace has this awefull tile floor, and I was wondering whether I can paint it.
Carolyn says
That looks amazing!!! So much better already! I love the candles and mirror with the dark color on the inside!
Kylie Harbin says
What color yellow did you paint your old living room pictured above? I love yellow rooms, but I’ve had 12,000 different yellow squares painted on my walls for months!
YoungHouseLove says
That was Wishes by Glidden (they don’t have swatches for it anymore but can look up the formula in the computer).
xo,
s
Karena says
An astounding transformation, the before and then the after just takes my breath away!
xoxo
Karena
Art by Karena
I have an amazing Giveaway from the Artisans at Novica. You will love it!
Blair says
I love the addition of paint. It can change something completely. I just painted a trunk that was BRIGHT BRIGHT pink and it looks fabulous now. http://thefirstapartment.blogspot.com/2011/06/50-dollar-fix-trunk-love.html It is amazing what a little paint can do! Good luck with the rest of the remodel!
~Blair
Jamie says
Oh my goodness, it is gorgeous! I wish my fireplace was brick so that I could shamelessly copy yours.
Crystal says
WOW! What a difference the white paint makes. I can’t wait to see what it looks like when you paint the paneling. Are you keeping the floor the same or thinking about something different?
I painted a brick wall in my laundry room. Wish I had thought about caulking the deep crevices. hmmm…
YoungHouseLove says
Eventually we need to replace the floor (it’s not in the best shape) but we’ve learned that our floor beams can’t support tile in there so we have to go with something lighter. Should be interesting to see where we end up.
xo,
s
becca says
we just put vinyl peel and stick tile in our kitchen, but with a twist….you put grout in it, so it looks just like the real stuff. if you like the look of tile but not the weight (or in our case, the added cost and effort), its something to consider. its called traffic master ceramica, at HD.
YoungHouseLove says
Thanks so much! Never heard of it!
xo,
s
Erin says
My mom used a product called duraceramic in her kitchen. It lays really easy and doesn’t need grout. It cleans really well and she is thrilled with it.
YoungHouseLove says
Thanks for the suggestions guys!
xo,
s
Cindy says
Gorgeous! Wow, what a transformation in such a short time.
When reading your posts starts making me feel like a lazy loser for taking soooo long to get something started and completed around my house, I remind myself that I have to work full time outside the home, while this *is* your full-time job. Then I choose to let your posts be motivating instead of guilt-inducing. :)
And for the record, I don’t think either photo of you was unflattering. Keep up the good work! xo
tinajo says
Wow – that´s some difference, amazing! :-)
Katie @ J&KHomestead says
Sherry!!! I’m so happy to see this. My hubby and I are planning to paint our brick fireplace sometime this summer. I’m scared to death to paint the brick for the ulimate fear of not liking it afterward (and you can’t really un-do painted brick without a TON of work). But I need to be brave and just do it. Because every time I see a brick fireplace painted I just love it! So, I’m gonna say “John and Sherry did it” to myself over and over until mine is done! ;)
Jessica says
Pleeeeeeeeease say you’re going to paint that paneling soon?? The fireplace is way too gorgeous now to live amongst that orange-ness…..lol!
YoungHouseLove says
Yes, hopefully within the next month! We have to arrange some serious babysitting since it’ll be a big job to do trim, beams, lots of priming, etc.
xo,
s
Barb says
OMG!!!!! It is wonderful! I am going to do mine this weekend…even though my husband says NO!!! I don’t care….I have to paint it white. I will show him your pictures tonight and we will see. I AM ON BOARD!!!
Sherry……Once again, PRIMO JOB GIRL!!!
So proud of you again!!!
B.
Torrie @ a place to share... says
Love the candle effect… good idea, & I’d definitely bring that out again on “kid-free” occasions :).
Wow… and entire *brick room??? Never seen a room like that before!
Megan says
Looks great! I was kind of laughing when I saw this post because we’re in the process of painting the exterior of our brick house. We’ve been painting the trim and are going to use a paint sprayer on the brick this weekend. I’m anxious for it to be done and to see the finished look. Its a little daunting but I know it’ll be worth it!
Donita says
OH MY that looks fabulous!!! I CAN picture the paneling painted *have painted many a paneled wall in this rental we live in. ;-) It covers a multitude of sin. LOL* I HAVE painted brick before, in this house. The walls behind our wood stove were Z BRICK, yup you know that kind. It was hideous. I painted it with primer, then two coats of semi gloss white paint. The shine wasn’t enough for me…..so I painted it twice with glossy white paint. WE LOVE IT!!!!
Lesley says
Where is Clara during all of your work?? I have found time to paint one single chair in the past 4 months from my dining room set (3 to go) because of my crazy kids. Does she just sleep a lot? Have you invested in Benadryl? Or is this when you let her wander the streets?
Seriously, I’m loving the fireplace already.
YoungHouseLove says
She thankfully still takes two naps a day (we get about two hours in the morning and 45 mins in the afternoon) and she goes to bed at 7:15. Generally we try to squeeze as much as can into naptime and after-bedtime territory). And if it’s a bigger job (like this one) one of us will be on Clara duty while the other person works. Yesterday John did lots of reading and playing while I was priming and painting.
xo,
s
Stephanie says
I can envision the finished product, and this looks much better than before! My neighbors turned their faux mantel/fireplace nook into a fancy dog bed…clever idea, but I don’t have a photo. Not sure if Burger would be into that, but Clara would probably love it.
JennyB says
Seriously–wow! That looks terrific!
I mentioned before that it was your before and after fireplace that led me to your blog last fall. Our dining/kitchen fireplace was very, very red and the paneling was very, very dark. So we painted the fireplace a chocolate brown and the paneling is a light beige (the color is called tightrope). I love the contrast but the mantel is still this block of wood stuck to the brick. I’m still trying to figure out what color to paint it. Should it all blend? The fireplace bricks goe to the ceiling, which I love. I just can’t wrap my brain around that mantel!
YoungHouseLove says
Hmm, I’m not sure. I would bring home a ton of swatches (from bright white to soft white and all types of brown and beige tones) and tape them up on the mantel to see what you like. You could also stain the mantel a really rich deep dark color the complements the painted brick. Good luck!
xo,
s
Megan says
Hey guys! Love your fireplace…it’s so beautiful. We just finished making over our fireplace and I had never thought about just painting over the tile but it looks really good. Here are the pics from our recent job if you want to check them out. Love your blog!
http://postsfromthepotters.blogspot.com/2011/06/memorial-day-makeover.html
YoungHouseLove says
Wow- what a gorgeous makeover!
xo,
s