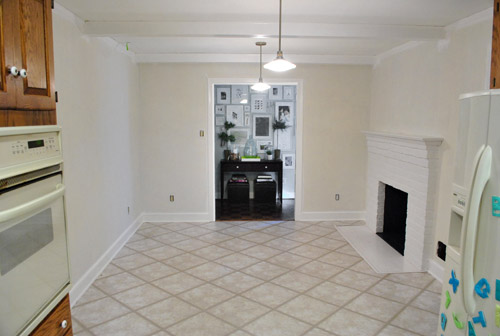
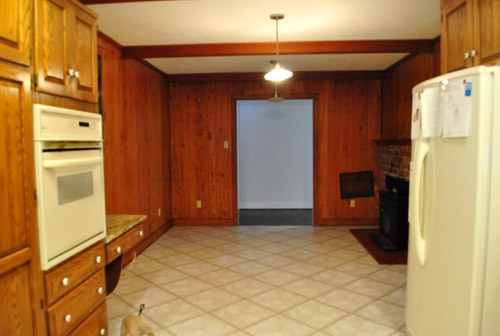
About a week ago (after we painted our brick fireplace) our kitchen looked like this:
Then we removed the desk and upper cabinet (that will be in the way of our big future doorway to the dining room) and after one coat of not-covering-at-all primer it looked like this:

Then we finally got the primer thing right after dealing with maddening bleed-through issues thanks to two days of applying coat after coat and three different types of primer (more on that here):
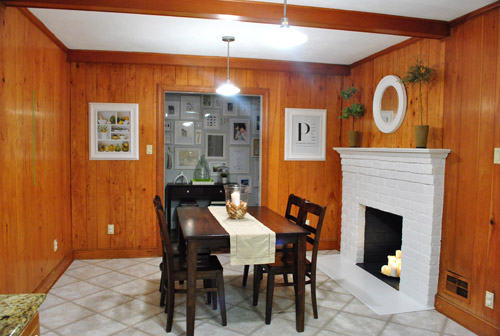
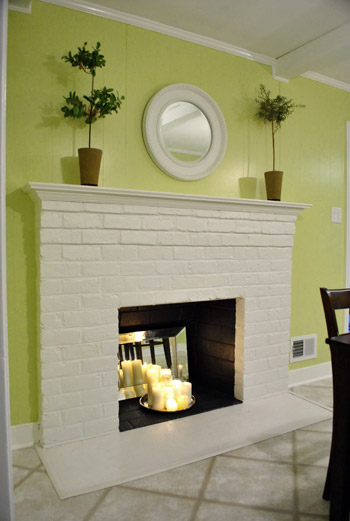
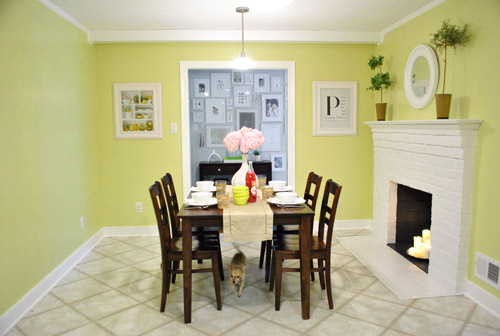
And now it looks like this, although it reads a bit more yellow in these photos than in person (it’s a smidge greener in real life).
It’s definitely a warm golden green tone (aka: grellow). Sort of like the color of an artichoke heart.
There’s definitely a lot more to do in there, but we’re so glad to have the whole prime-and-paint-the-paneling thing checked off. Here’s a fun little video that encapsulates the entire process in three short minutes. Which is more than a little ironic because it took us just a wee bit longer in real life (you know, just a smidge). Just convert those minutes to days. See it below or here on YouTube.
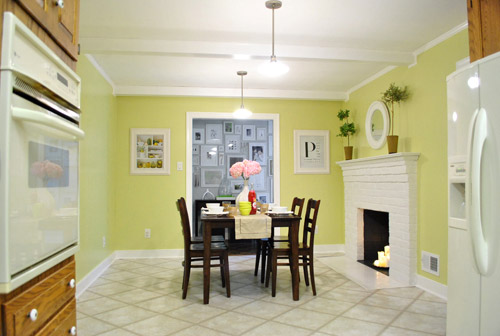
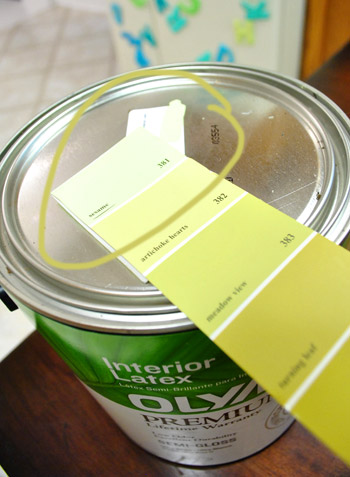
As for the paint color, after a decent amount of debate (and some pretty thorough consideration of the adjoining rooms that will be seen along with the kitchen) we opted for our new favorite color, which turned out to be Sesame 381 by Benjamin Moore (color matched to Olympic No-VOC paint in semi-gloss).
We were inspired by this kitchen (found here via Pinterest) since our cabinets will eventually go white, possibly along with our backsplash.
We chose this warm yellow-green color because we want the kitchen to be bright and happy (there aren’t any windows to the outside world – just one that looks into our sunroom) and it was suuuuuuper dark before we painted that paneling. We also knew the room could take a decent amount of color because:
- it won’t have any big long walls remaining when we add the extra-wide doorway to the dining room across from the fireplace (just slivers of wall here or there will remain, so the color won’t be overwhelming)
- we’ll be painting the cabinets glossy white later in this phase of our little kitchen makeover along with un-busying the backsplash (which will further temper the color on the walls)
- we’ll be adding an island in the place of our too-small table someday (with a different countertop and most likely a non-white base color to keep things interesting and layered)
- this room is surrounded by the dining room, the hallway, and the living room, which all have soft gray walls (so we wanted this space in the middle of them all to have some cheerful color going on)
When it came to our swatch-selecting technique we just hung up a ton of them and looked at them at all times of day to see which one we preferred. As for why we chose this swatch specifically, we decided:
- this golden-green tone will tie into the chartreuse curtain tones in the dining room and the cheerful green tone in our shaggy living room rug without being too matchy-matchy across the board (we didn’t want the exact same tone of green everywhere for fear that it would look a bit too “orchestrated”)
- a warm yellow kitchen is always a classic choice, but this color feels modern and crisp with the green undertones (and it’s not completely terrible with the oak cabinetry, which will stay for a little while)
- this tone is in Sue the Napkin – albeit a bit darker (a sure sign it’ll work with our whole house palette really well)
- unlike some of the other softer greens and greeny-gold tones that we considered, it really makes the white trim pop (lighter swatches didn’t have the same crisp effect next to the fireplace or the trim)
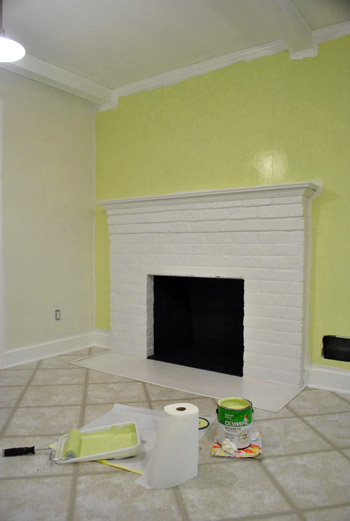
Here’s how it looked with the first coat going up around the fireplace (thanks to all that primer prep– we had really awesome coverage). Again, it’s looking more yellow and less green than it does in person in these photos, but you can really see how the white pops and how it turned a dark and brown-everywhere space into a sunny and bright room in the middle of the house.
We also decided that it was high time we switched out all of the “bisque” colored vents, outlets, and light switches.

So we grabbed a bunch of crisp white ones from Lowe’s, turned off the power, removed the old ones, connected the new wires the same way they were connected to the previous switches, added the outer switchplates, and turned the power back on. The whole switch swap took about twenty minutes. So much better:
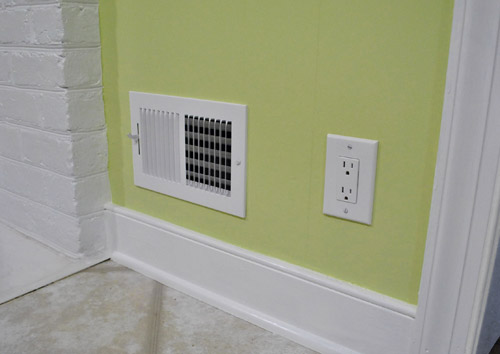
Some people opt to paint their vent covers so they blend in more, but for now we’re happy to leave ours crisp and new since we’re so used to old drippy painted-over covers (clean paint-free ones kind of feel like a luxury). Who knows if we’ll decide to add a few thin and not-drippy coats of paint to blend those vents in later though. We’ll keep you posted.
Oh and it’s really fun to go back and look at our fireplace, which originally looked like this:
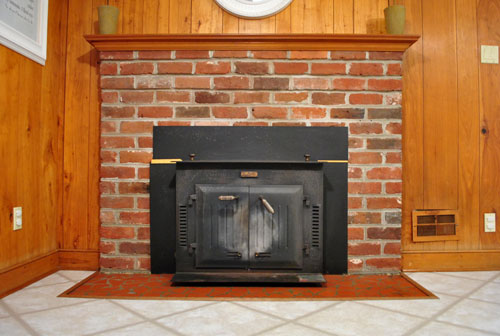

Then we removed the old unused wood stove and painted the brick, and it looked like this:
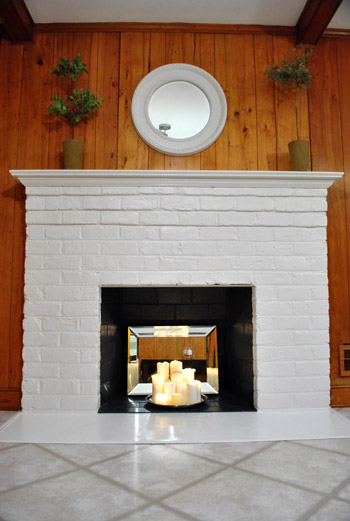
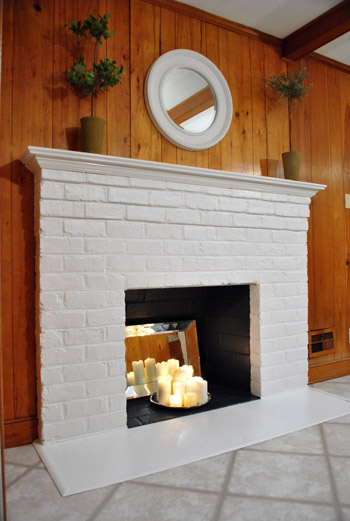
It’s amazing how much painted paneling can freshen things up even more:
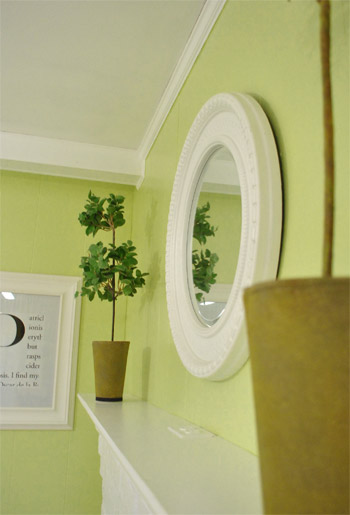
And we love how things like the white frames and the round mirror above the fireplace layer right in with the glossy white trim and beams:
Burger likey (he knows how to work that runway):
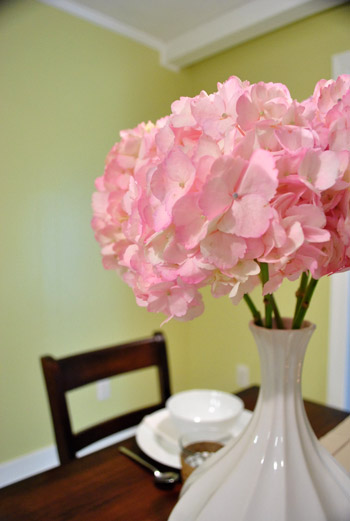
Oh yeah and see those pink hydrangeas? I wish I could say that we grew those, but they’re from the store. We figured to celebrate all that priming and painting we could spring for something soft and sweet, so these little pink snowball-looking-guys had me at hello (that’s an old vase from Target btw):
As for the opening to the dining room, here’s where it’ll be (it will line up exactly with the dining room window on the other side for balance):
We learned that we’ll need a permit to knock out so much of that load bearing wall, so it sadly won’t be anything we can do very quickly (and we’ll definitely be leaning on some pros for help). But we can’t wait to tackle it as soon as we can get through all the permit business and hunt down the right expert for the job.
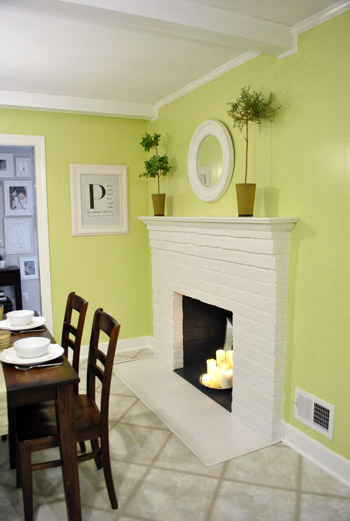
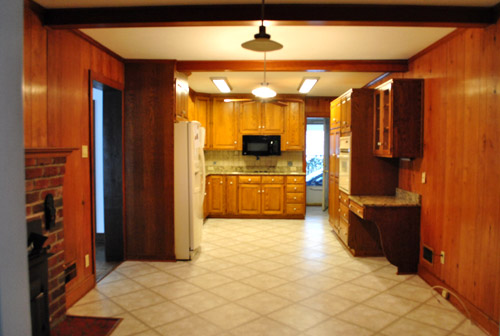
Now for some before & after bid-ness. Just because that’s my favorite part. Here’s the kitchen as it looked on moving day about six months ago:
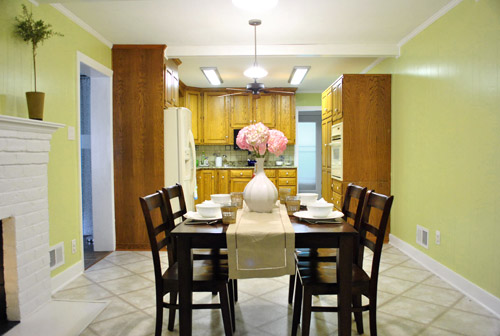
And here it is now (still can’t wait to add that island, paint those cabinets, and upgrade the floor & appliances someday though):
Moving day again (yes, one of those lights was out):
And now:
The crazy thing is that these photos were taken around the same time of day so it definitely demonstrates how much lighter and more cheerful the space feels now that the dark paneling is a thing of the past. Oh and here’s the budget breakdown:
- Olympic Premium No-VOC primer from Lowe’s: $12
- Behr 2-in-1 Primer + Paint (in semi-gloss white): already owned
- Kilz Clean Start No-VOC Primer from Home Depot: $20
- Olympic No-VOC paint (in Sesame by Benjamin Moore) from Lowe’s: $22
- New vent and outlet covers from Lowe’s: $43
- Brushes/rollers/tape/paint tray: already owned
- Total: $97
So there you have it. The kitchen madness has officially begun. As we mentioned here, we’re definitely going to do this in phases (gotta save our pennies and just take things on as we can afford them). But it should be a whole lot of fun. As in, more fun than a barrel of monkeys. And definitely more fun than priming that paneling five hundred times. Do any of you guys have long term kitchen plans like painting the cabinets or adding an island or upgrading the flooring or making some overhead lighting switches (we’re definitely in need of some of that too)? Oh the possibilities…
Psst- We announced this week’s giveaway winner. Click here to see if it’s you.

holly@LoveofLifeblog says
Wow, crazy how a paint job can open up a room so much! And once that wall is knocked out it will look even better and help with the flow of the room. Nice work!
Angie @ The Country Chic Cottage says
Yippee!! Panelling no more!! Don’t you feel like Rocky?? You could totally do a victory dance in that kitchen!! Okay I can’t wait to see those cabinets white. Pins and needles…
YoungHouseLove says
Haha- somebody cue the Rocky music!
xo,
s
Jess says
Love the paint color and love your inspiration room! The painted backs on the glass front cabinets are exactly what I need to make my brand-spanking-new-wedding-gift white china really pop!
Jessica says
wow – it looks great! The lighter, brighter color totally transforms that space. Amazing what some paint and a little (or maybe a lot :) of hard work can do.
April says
It looks so good!! Love the color…total transformation of the mood of the room. It is so happy and cheery! I hope you are relshing in your hard work’s payoff now!
Sarah @ The Strength of Faith says
You two are amazing. Amen.
Jamie says
absolutely beautiful!! I completely love it. What an amazing transformation!!
MaryGene says
what a crazy difference!!! I can’t wait until the new doorway is punched out. It will feel so much bigger, methinks. Way to push through the primer nightmare, y’all. Job well done. :)
Lauryn says
it looks so great YHL!!! :-) Can’t wait to see the rest of the to-do list happenings! all in due time!
Mel says
I LOVE IT! Can you imagine all the natural light you’ll get in that room once the wall is knocked out? How fun!
victoria says
Hey, how do you know how to swap outlets? I was going to try that at my house, but I got confused as there are so many different options 15V/20V, all these numbers. Is there a guide or someplace that I should look to find out which ones I should use to replace mine?
YoungHouseLove says
Maybe try watching a few videos on youtube? Or checking out a book in the library? The pros at the home improvement store have awesome insight sometimes too. Good luck!
xo,
s
Katherine says
HUH GUH BUH. I was about to say this is madness. Then remembered that no–this is the Petersik house, where anything is possible.
LOVE. IT.
Carrie B says
Lovely!!!
Joanna says
WOW! This looks amazing! All that hard work really paid off. You did a wonderful job and I adore your color choice. Great job!
Cori @WhereYouHangYourHeart.com says
Way to go guys! It is really bright and cheery, and I can totally envision the end result!
Jessica says
I know the feeling of all of that work, and it’s not fun, but the final result and feeling you get when you walk in the room is SO worth it. Such a small change and it totally makes the gallery wall behind it so much more modern. What a fun post to read- And you totally have inspired me to paint my fireplace someday.
Mariela says
Woah! Looks awesome!!! Love it!!! I really like that color, so pretty!
Miranda says
I’ve got to admit, at first I was concerned when I saw your inspiration photo, and then when I saw your original photo of the new color, but once I saw the video, I was sold! I think the video (at least to me) depicts your color in a more greener hue than the lemon-lime going on in your photos. It looks so much better!
Just think of how bright this room is going to pop when you’ve finally got that doorway installed and you’ve got natural light pouring in from the bay window!!!
Kelly Anne says
This looks fabulous! And out of curiosity, what did/will you do with that countertop you ripped out? I know you mentioned repurposing the cabinet in another room, but the countertop looks nice, though not really your house’s style. Craigslist?
YoungHouseLove says
We still have it (just wondering if we’ll repurpose it somehow in another project) but we do plan to donate or Craigslist it if we can’t come up with something soon.
xo,
s
stephanie says
AMAZING! You guys make my day:)
Robin @ our semi organic life says
I love that that much amazing-ness came from just $97 little dollars. So great! Love the color. What sort of color would look good with it for an island? A dark color maybe if not white?
YoungHouseLove says
Yeah- we’re thinking charcoal or something like the beams and sofa in the adjoining living room.
xo,
s
Rose says
Question – Do you think the bisque appliances will look strange with white cabinets? Asking because I love the idea of white cabinets but have bisque appliances and I’m worried they might look dingy next to glossy white cabinets.
YoungHouseLove says
Yes! We definitely plan to replace those with energy star rated models in the future (since they don’t match and are a bit worse for wear). I would either paint your cabinets an off-white color or replace your bisque appliances for the whole dingy thing (it definitely would be noticeable). Hope it helps!
xo,
s
Alisa says
We have a bisque range that I was worried about when we painted all our cabinets white. It’s actually not as bad as I thought! I guess all the white sort of bounces off it and it looks less dingy than before.
Leeann says
I love it!!!! I think it’s the perfect color for a kitchen. I can’t wait to see it with part of that wall knocked down. I guess I never noticed before that there’s no window in your kitchen, but something always seemed “not quite right” about the lighting in there. Now I know! :)
alg says
http://www.youtube.com/watch?v=CQvNu8LoTo0
MONTAGE!!!!!!!!!!
YoungHouseLove says
LOL – love that song!
-John
Julia H. says
O – M – G…looks amazing! I have a question though, did you use a specific thickness of roller to get in the gooves in the paneling? I noticed in the video you didn’t have to go in the creases by brush. Love love love the color! Well done!
YoungHouseLove says
John used a standard smooth surface roller and applied some serious pressure to get into those grooves. It helped that ours were pretty shallow since it’s that fake not-thick paneling stuff.
xo,
s
Petra says
Love it!!! Looking forward to paint my kitchen walls, even though I’m not sure what colors would look great with light blonde wood cabinets and granite counters with cream tiled floor.
Cheri says
Love it! It looks so lovely and fresh and crisp and welcoming…and the pink hydrangeas are gorgeous!
Monica says
Ahh mazing! Love it.
Steph @ BirdHouse Family says
It looks amazing!!! I love the cheerful color! It’s so hard to believe that $97 can make such a difference (plus a lot of sweat, and maybe some tears). I think it will be really neat to see how the green color contrasts with the soft gray in the dining room once you open up that wall. I also can’t wait to see it with white painted cabinets.
I’ve been mulling over the island a bit. Do you know what kind of island you would like to build/buy yet? Because the island will essentially be separated from the rest of the kitchen with a pass through area, I’m thinking that maybe a more traditional chunky “closed” island might not be the best idea. Maybe a more open style would be better. Not sure though. Will the purpose of the island be a food prep area (where counter height is important) or more of a casual eating/sitting area? I’d love to see some inspiration photos once you start thinking about that project down the road.
YoungHouseLove says
As for the island, the reason we’re going that route is because once we open the doorway to the dining room there’s a big round table in there (so another smaller table right next to seems redundant). We can pack it with storage on the side that faces the other cabinets and use the island top for workspace and casual dining and bring in some fun stools. So it’ll in effect be an eating area with some bonus storage for lesser used stuff (and plates and servingware since it’s right off the dining room). As for if it’ll be an open light-looking island or something chunky, we’re not sure at all, but we might tape things off and even use Photoshop to envision different options. Can’t wait!
xo,
s
Steph @ BirdHouse Family says
Yeah – I saw that Amy W asked a similar question after I submitted my comment. I think that an island with storage makes total sense since there will be a big table visible in the adjoining dining room. You guys are way ahead of me!
YoungHouseLove says
Let’s hope it all works out! Someone else mentioned something about a stainless steel prep table used as an island, which is intriguing to us. Should be interesting to see where we end up!
xo,
s
Steph @ BirdHouse Family says
I love the idea of a stainless steel prep table! You would need one with an overhang on at least one side so that people could still sit there and tuck their legs under the table if the space will also be used for sitting/eating.
YoungHouseLove says
Yeah- we thought we could remove the top too and build a smaller base to create an overhang if it didn’t come ready-made like that. Could be fun!
xo,
s
Ellen says
That’s like a 1000x better than that old dark paneling! Amazing! It makes me want to start to tackle my kitchen in phases… (if I didn’t have about a dozen projects lined up before it also waiting for some pennies to be saved…)
Holli C says
Do you have any close up pictures of the paneling after being painted? I’m curious to see what the grooves/textures look like with paint on them. From the far away pictures it looks like plain drywall! The kitchen looks UH-MAZING. I bet you smile every time you walk in that room now!
YoungHouseLove says
This pic and this pic were taken pretty close to the paneling, so maybe that helps? It definitely has subtle grooves for that texture that we love, but it’s not hit-you-over-the-head-with-planks or anything. Hope it helps!
xo,
s
Cate says
Love it!!! Looks absolutely fabulous! Can’t wait to see it with the cabinets painted (so get on it)! Kidding, I know you need rest after all that and in my opinion painting cabinets is no fun. I am actually trying to get motivated to give the ones at my house a fresh coat – trims been painted in every other room, i just keep putting off the kitchen :)
Caroline @ Between Your Ears says
Looks great — what a difference a fresh coat of paint makes. Very fresh, clean kitchen inspiration! FYI, that kitchen comes from Southern Living, I believe it was Summer 2009.
Erin says
This is BEAUTIFUL! Much improved! I would love to see your beam in a glossy espresso, too :)
Short, Sweet Season says
I am so excited to see the rest of the transformation. I love how you can take a wood paneled kitchen and turn it into something that should be featured in House Beautiful. The kitchen is so bright and FUN. Lurve it.
Lindsey d. says
Oh, lovely. Love that color…
For my outdated and not as functional as it should be kitchen, it will be a gut job. I plan to rip out the vinyl floors and replace with wood, put in all new cabinets, doubling my cabinet space, add a dishwasher and a garbage disposal and actually take away a little bit of my kitchen (which is rather larger for a 1930s house) to double the closet space in my bedroom!
my honest answer says
I absolutely love it. Great colour choice which I never would have thought of.
Beth says
LOVE it! You guys are so inspirational. I am covered in paint (a Goodwill tv console) and the fireplace is next, and it’s all y’all’s fault! :) In a very happy way, of course.
Jen @ Bungalov says
OMG. Are you serious? This room is completely different. A-M-A-Z-I-N-G! You really showed how paint makes a difference. I love how you switched out all the old outlets and things. We did that in all our rooms after first painting. So cheap and easy and makes a huge difference. Great job! Can’t wait to see that wall go buh bye!
April says
Oooh man, I wish I could convince my husband to let me paint our dark wood paneled kitchen! He “loves the wood” though, so he would pitch a FIT if I did it while he was away. Maybe these pictures will help change his mind..?
Bree says
These transformations are so fun to see b/c they make such an impact!! I LOVE the grellow. That has to make you more cheery to walk in there in the morning!
AmiDawn says
that’s almost exactly the color i’m planning on putting in my front room and dining room (kind of all one big room), with some chocolate brown stripes under the chair rail in the dining room. it makes a huge difference in your kitchen, and now i’m excited to get my rooms painted!
Rosie says
Looks wonderful!!
Sam says
Wow, you two never cease to amaze me!! The kitchen looks so much lighter and larger! I am totally in love with the whole house color scheme, it’s making me itch to do something similar in our house. As much as I dread painting, my husband and I undoubtedly have some sort of little mishap that has us cracking up which makes those hours spent with rollers some of my favorite memories! I hope you were able to enjoy at least the first couple hours of painting ;) And now you have a beautiful kitchen that makes it all worth it!
Pipsqueak says
Yeah!! looks so much brighter and chirpier! Congrats & well done! Any hints for getting paint splatter out of your hair?
Cher@NewburghRestoration says
GRRRREEAAATTTT Job! I wasn’t following you guys to see the transformation of your other house, but very excited to see the progress at the new one!!
Amber says
Amazing!! Your kitchen looks 1000 times better now! Can’t wait to see even more changes!
Chantelle says
WOW! It looks great. I can’t wait to see the finished product but I’m sure you’re looking forward to that more than me. You guys are so inspiring!
Shunta says
WOW!!! I am speechless. Looks so great guys!!! I tell you, you are an inspiration for home owners!! Giving us all the DIY spirit!! SO NICE!! and under $100 for a million dollar change! Hope you get to rest those arms this weekend!
Haley Connor says
Looks great! That’s the color I have in my baby’s room. : )